
1. A Primer on Shooting Video
The capability to record motion pictures has been around for about a century, and the current state of the art—high-definition video that average consumers can afford—is really just a blip in that timeline. One thing has remained constant, however, whether you’re shooting with a feature-film camera or an iPhone:
Get the best source video you can.
No amount of postprocessing can resurrect poor-quality footage, unless maybe you have millions of dollars at your disposal or your initials are I.L.M. So, before we jump into how iMovie works and the projects you can undertake, let’s look at the equipment needed to capture video and learn some basic shooting principles that will improve the original—and often irreplaceable—footage.
Gear Up
If you haven’t followed the camcorder market for a couple of years, you’ll be forgiven if suddenly everything looks different. Fairly recently, most every digital camcorder stored its footage on magnetic DV tape cassettes. Now, go to an electronics store and you’ll discover that the market is dominated by tapeless cameras that record directly to memory—built-in memory, storage cards, or small internal hard disks. Or, don’t go: You may have a perfectly acceptable video recorder in your pocket right now—your cell phone.
This section is an overview of what’s out there now and is by no means exhaustive. The video-recording field is vast, catering to high-end professionals shooting feature films and television shows on expensive HD cameras, as well as everyday folks who want to be able to capture birthday parties, weekend vacations, and school projects.
Types of cameras
The definition of a “camcorder” has broadened dramatically. Nearly every digital still camera can shoot decent video these days, and the latest digital SLR cameras are being used to replace much costlier video gear in professional productions. At the other end of the spectrum, portable Flip cameras make recording a one-button operation, and the iPhone 4 captures HD video, so you no longer need to carry a separate device dedicated solely to shooting video.
Since iMovie is a consumer application, I’ll assume that if you’re considering a camera such as the Red One ($25,000 for the body, without lenses), you already know the field and don’t need a briefing from me.
Camcorders
Most digital camcorders (Figure 1.1) record to solid-state memory, usually SDHC cards or built-in memory chips, with a few that record to an internal hard disk. (See “Understand video formats,” just ahead, for more on the files that are stored.) They’re also geared toward video capture by offering features such as good telephoto zoom ranges, optical image stabilization, and large LCD screens.
Figure 1.1. Most camcorders are small enough to hold in your hand, but packed with video features.

If you want more control over the video you shoot (and are willing to pay for it), look for the following features:
• Manual focus ring. Most camcorders offer a manual focus mode, but you must press buttons or manipulate onscreen sliders to set the focus. A real focus ring around the lens is much easier to use.
• Three CCDs. For better color fidelity, look for a camera that has three CCDs (charge-coupled devices), the sensors that record incoming light from the lens. Most cameras include just one CCD to capture light, whereas a three-CCD camera independently records red, green, and blue colors.
• Hot shoe. A connector at the top of the camcorder delivers power and data between accessories such as video lights and microphones.
• Audio terminals. Connect microphones and headphones that can be placed anywhere.
Note
It’s possible to buy a camcorder that records to DV tape, but these are the last days for the format. iMovie will import footage from tape but doesn’t offer a way to write a finished movie back to it (a feature in old versions of iMovie, when making a tape of your movie and then connecting the camcorder to a television was one of the few ways to play the movie for others).
Flip cameras
The popular Flip cameras are the size of a large cell phone, yet they can shoot decent HD video. The appeal of a Flip is simplicity: Forget about manual focus, white balance settings, or any other fluff. Just point the camera at your subject, press the large red Record button, and...well, that’s it. You can review your footage and delete clips, but it’s hard to get a sense of quality from the tiny LCD screen. When it’s time to offload the video, a USB plug flips out of the top to connect to your computer. Similar cameras are also offered by Kodak, Panasonic, Samsung, and others.
DSLR and still cameras
Until a few years ago, there was a large gap between camcorders and DSLRs (digital single-lens reflex, or still cameras with removable lenses)—they performed completely different tasks: video and still imagery. Now, Hollywood cinematographers and special-effects houses are using top-of-the-line Canon and Nikon DSLRs (Figure 1.2) to shoot video because they’re vastly less expensive than high-end professional gear and the quality is often just as good.
Figure 1.2. Consumer DSLRs have turned into formidable video cameras.

DSLRs have the advantage of shooting with the full range of lenses that photographers have been using for years, and which can produce smooth and shallow depth of field that is more difficult to achieve in most camcorders. On the other hand, they’re still primarily still cameras, so getting them to function like camcorders takes extra gear and persistence. For example, many DSLRs lack manual exposure controls for video and have slow (or non-existent) autofocus.
Tip
If you’re taking the DSLR route, I highly recommend the book From Still to Motion: A photographer’s guide to creating video with your DSLR, by James Ball, Robbie Carman, Matt Gottshalk, and Richard Harrington.
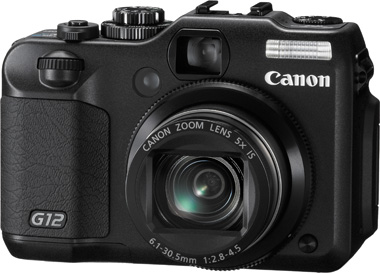
Surprisingly, you may not need the power and expense of a DSLR to get good video. Pretty much every consumer digital camera can shoot video, and now there are models that produce great HD video, too (Figure 1.3). Even fewer controls are available, but if you’re more likely to shoot video if the camera is already at hand, a still camera will get the shot.
Figure 1.3. The PowerShot G12 is an excellent little still camera and captures high-quality HD video.
Cell phones
If I had mentioned cellular phones as a video source just a couple of years ago, you’d have laughed in my face. Sure, the phone and its camera are handy, but only if you enjoy watching shapeless blobs of pixels march across the screen. As technology has advanced and components have shrunk, however, we now have cameras like the iPhone 4 that capture surprisingly good HD video. And soon, I’m sure, I won’t feel the need to add “surprisingly” when I mention it.
Understand video formats
I’ve thrown around terms like “HD” and “DV” loosely thus far, so what am I talking about when discussing video formats? Unfortunately, there isn’t one universal video format; instead, iMovie supports output from cameras that offer combinations of image sizes, format types, and image compression.
Image size
Usually when someone is talking about “HD,” they’re referring to the number of pixels in each frame of video. The more pixels that are available, the higher the resolution of the image, which produces a picture that’s a better quality than SD, or standard definition, video. Figure 1.4 compares the most common sizes.
Figure 1.4. HD uses much more image information than standard-definition video. Also note that HD features a 16:9 widescreen aspect ratio, while SD uses the television standard 4:3 ratio.

Note
You’ll notice that the width for DV is 720 pixels, which should make the frame wider than it is. The DV format actually uses tall rectangular pixels, not square ones. Other standard-definition (SD) formats, such as those captured by digital still cameras, record video with square pixels at 640 by 480 pixels.
HD cameras record footage in two varieties, progressive and interlaced, which are represented by the “p” and “i” notations in the figure. So, “1080p” indicates that the video image is 1080 pixels high, and every frame of video is captured in its entirety, the way each frame of film is recorded.
By contrast, “1080i” footage is also 1080 pixels high, but the frames are interlaced. Interlacing is a technique where every other horizontal line of a frame is recorded. For example, the even-numbered lines are recorded in one pass, and then the odd-numbered lines are recorded in the next pass. When you play back the footage, it speeds past your eyes fast enough to convince your brain that you’re looking at a single frame (Figure 1.5).
Figure 1.5. Interlacing actually stores about half of the image information for each frame. (Interlacing is also the way most televisions operate.)

Formats and compression
Many HD camcorders encode video as AVCHD (Advanced Video Codec High Definition), which uses MPEG-4 compression to reduce the size of the captured data so it will easily fit onto a memory card. AVCHD is quite impressive considering that the camera is literally throwing away image information to reduce the file sizes.
You’ll probably also see camcorders that record video as HDV (High Definition Video—really, who comes up with these boring names?), which uses MPEG-2 compression and interlacing to keep file sizes under control.
When you get into the realm of Flip cameras, DSLRs, and digital still cameras, the formats are more varied. Some cameras save native QuickTime files with H.264 encoding; some record to a new format called iFrame; some use just MPEG-4 encoding.
Note
Apple maintains an ongoing list of cameras it has tested for compatibility with iMovie at help.apple.com/imovie/cameras/. If you’re thinking of buying a new camera, it’s worth checking out the list for options. Also check out Apple’s list of formats supported by QuickTime (support.apple.com/kb/HT3775); if QuickTime supports it, iMovie does, too.
Go Shooting
You’d think that capturing video is just a matter of turning the camera on and pointing it in the right direction. In many situations, I’m sure that’s fine, but a little forethought and preparation can help you get good footage, not just acceptable footage.
Capture good video
The techniques I discuss here are suggestions, not hard and fast rules. What’s important is to be aware of these types of situations when you’re shooting, so you have the presence of mind to think, “This shot might be more dramatic if I focus close on this foreground object and make the background blurry.” I say this because it’s one of the things I struggle with most when shooting video. I get so focused on “getting the shot” that I don’t immediately consider composition or how stable the camera is. It requires practice to take a deep breath, check your surroundings, and then compose your shot.
Hold steady
Shaky footage is the hallmark of amateur video. Even when you see handheld shots in a feature film, the camera motion is different than what most people produce when holding a camcorder. Mostly this is due to the size of the camera: Smaller, lighter cameras are more difficult to hold steady and are more susceptible to minor bumps and jostles (especially when you’re shooting at the camera’s maximum zoom setting). iMovie’s image stabilization feature can help correct for bumpy video, but the results depend on how much motion there is, and even what type of camera was used (see “Stabilize Shaky Footage Project” in Chapter 4).
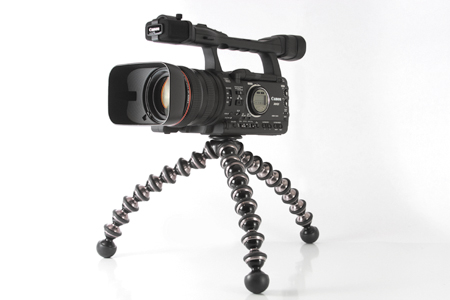
So, as much as possible, keep the camera steady. One way to do this is to set the camera on a tripod or monopod (a single leg with a screw on which the camera is attached). I also like the flexible Gorillapod tripods (Figure 1.6) made by Joby (www.joby.com).
Figure 1.6. The Gorillapod not only acts as a tripod, it can be wrapped around objects for greater stability.
If you still want to shoot handheld, do this: Tuck your elbows into your sides for more support under the camera, and swivel your torso when you need to pan left or right. You can also lean against solid structures like door frames or walls for extra stability while shooting.
Compose shots using the rule of thirds
Is everyone in your video planted squarely in the center of the frame? You were probably taught to center your subject when taking pictures, but adjusting the composition slightly makes for much more interesting shots. An easy way to accomplish this is to use the “rule of thirds”: Imagine your view is split into three sections wide and three sections tall, and balance the subjects into one of the outer areas (Figure 1.7). Some cameras offer an overlay onto the viewfinder or LCD screen that helps you compose the shot. This isn’t to say nothing should appear in the middle of the screen; only that a variety of compositions will yield better footage.
Figure 1.7. The bridge appears in the left third portion of the frame, balancing the open sky and marina on the right.

When people or objects are moving in the frame, position them so the viewer sees where they’re going (Figure 1.8) instead of heading out of the frame.
Figure 1.8. As someone is walking across the frame, give them space to move toward.

Tip
Be aware of everything in the camera’s field of view. It’s easy to focus your attention on the main subject, but if something distracting or disturbing is happening elsewhere in the frame, your viewer is likely to pay more attention to the distraction.
Depth of field
Most camcorders are great about automatically focusing on the objects in your scene, but they tend to focus as much as possible. “Depth of field” refers to the distance between the camera and the object furthest from the lens. One technique for drawing attention to something in a shot is to use selective focus, making an object in the foreground tack-sharp while the background is blurry—also known as having a shallow depth of field. This task is made easier by shooting with a DSLR through a lens with a large aperture (Figure 1.9).
Figure 1.9. This video was shot with a Nikon D90 DSLR using a 50mm f/1.8 lens to take advantage of a shallow depth of field.

You can achieve a similar effect with a camcorder by doing the following:
- Position the camera as far away from your subject as possible.
- Use the camcorder’s zooming controls to zoom in close to the subject.
- Set the manual focus so that the subject is clear.
Tip
Speaking of focus, if you’re performing an interview or other situation where the camera is fixed in one position and the focus is on one person or stationary object, switch to manual focus. Camcorders in autofocus mode are constantly checking focus, so the smallest movement from your subject could cause the camera to adjust focus, causing an effect where the screen seems to be “bouncing.”
Capture good audio
Don’t forget about audio! Video shooting and editing is primarily a visual activity, but if the audio portion of your footage is muddy, the work you put into making great images is diminished.
That said, in many situations you may not have much of a choice. Camcorder microphones vary in quality and are all confined to the camera itself. That doesn’t help much if you’re shooting something a moderate distance away. If you want to improve the quality of the audio you capture, there are a few things you can do.
Use an external microphone
On a movie set, the primary microphone is suspended from a boom over the actors’ heads, held aloft by an impressively strong man or woman who keeps their arms up most of the day. The idea is to get a microphone as close as possible to the dialogue, and away from the noisy camera (or camera operator).
For regular shooting, consider purchasing a directional microphone (provided your camera will accept it). Companies such as Røde (www.rodemic.com) sell shotgun microphones that pick up audio from only what they’re pointed at, not from noise behind or to the side.
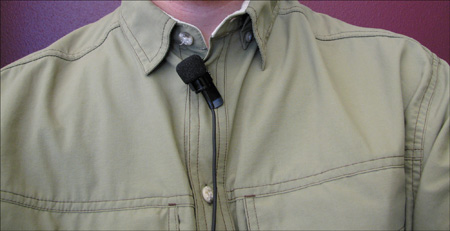
If you do a lot of interviews, or you do podcasts where you’re the main subject, consider buying a lavalier microphone that clips onto a shirt or tie (Figure 1.10). Wireless variants are also available.
Figure 1.10. A simple clip-on lavalier microphone can greatly increase the quality of your recorded audio.
Record with a set of headphones
You won’t know for certain what your camera’s microphone is picking up without hearing it through a set of headphones (Figure 1.11). Your ears pick out some sounds and ignore others, a feature most camcorders do not have. Using any inexpensive headphones will work fine—what’s important is that you hear what the camera hears while recording, not in iMovie later when there’s little that can be done about the quality.
Figure 1.11. Monitor the audio your camcorder is recording.

Tip
Take a few minutes to record...nothing. Or rather, make a point of capturing a few minutes’ worth of ambient noise, what an environment sounds like when nothing else is going on. This is important even in “silent” rooms, because although your ears may register quiet, there’s still quite a lot of sound occurring. You can use that neutral audio later, in the event you need to minimize an unexpected loud sound (like a sneeze off-camera).
Get plenty of coverage
You’re going to shoot more video than you’ll ever use in iMovie, and that’s fantastic. It’s much better to have a surplus of footage to work with than to scramble to find a shot that doesn’t exist. Linger on scenes, don’t just stop recording once the “action” has ended. You can always omit the footage when you build your movie project.
In fact, get into the habit of shooting things that catch your eye that may have nothing to do with the main focus of your movie. A few artistic shots of the flower gardens outside a ceremony can make for a nice cutaway or maybe a great background on which you hang the movie’s title (Figure 1.12).
Figure 1.12. I shot this leaf against the sky and framed it specifically to use it as a title.

Types of coverage
When shooting a feature-length motion picture, a director will use multiple camera setups to shoot as much coverage as possible. So in one scene, the camera may shoot both actors in the frame, each actor from one or more different positions, and various combinations of points of view. The goal is to present a scene in the edited movie where the camera position is integral to the scene’s mood or content.
• Establishing shot. This is usually an overview shot that’s wide enough to let the viewer know the setting and which characters inhabit the scene. It can be a sign reading “Welcome to Twin Falls,” a shot of someone’s house, or a shot of a room. The important thing is that the establishing shot provides a physical geography of where objects appear.
(This technique is used to great effect in dozens of movies and television shows: you see an establishing shot of the Chicago skyline and assume that the action takes place there, even though the actual filming took place in Vancouver.)
• Medium shot. Most shots end up as variations of medium shots. Generally, this shot is large enough to frame the torsos of two or three people, although it could range from a shot of a single person to half of a room (Figure 1.13).
Figure 1.13. A medium shot is typically close enough to include two or three people.

• Close-up. The screen is filled with part of a person or object. Close-ups usually show a person’s head and shoulders, but they can also push in closer (known as an extreme close-up) so you see only the person’s eyes. Other examples of close-ups include shots of a person’s hands, or of any object that occupies the entire frame.
• Cut-away shot. Sometimes referred to as B-roll footage, cut-aways are shots of associated objects or scenes that aren’t necessarily part of the central action in a scene. An example would be the view from a ship traveling through a passage, which cuts away to a shot of the darkening sky, but then returns to the ship safely emerging from the passage. Cut-aways often prove invaluable when you need to cover up a few frames of a glitch or when cutting and shortening interviews.
• In points and out points. If possible, give yourself some shots that can be used to enter or exit a scene, sometimes known as in points and out points. For example, if you’re shooting an interview and your subject has just declared his intention to walk on Mars, don’t immediately stop recording. Hold the camera on him as he finishes speaking, then perhaps pan down to his desk where a model of his rocket ship is mounted.
Tip
Don’t forget to take visual notes; after all, your camera is an ideal record-keeper. If you’re traveling, make a point of getting shots of important signs, markers, or waypoints so you have a geographic idea of where the scenes took place when you’re far away, hunkered down editing in front of your computer.
Tip
Remember, shooting video isn’t like shooting still photos—you can’t turn the camera 90 degrees to get a portrait-oriented shot, because video always appears horizontal. I’ve seen people turn the camera to get an entire waterfall into a shot, only to realize at home that the water is falling from left to right. It is possible to rotate the footage in iMovie, but it’s much better to keep the camera horizontal when you’re shooting.