
Chapter 4: Building Your Hunting Lab – Part 1
Now that we've gotten a lot of the theory and introductions out of the way, let's roll up our sleeves and build our hunting lab. The lab is where we'll be generating, collecting, ingesting, and analyzing events with the Elastic Stack.
Keeping with the same process that we have used in previous chapters, we'll use this chapter to build the host components, and in Chapter 6, Data Collection with Beats and Elastic Agent, we will install and configure them on the victim machine. While we could build and configure at the same time, in my opinion, when building and learning from the ground up, it's best to do things in stages.
In this chapter, we'll go through the following topics:
- Your lab architecture
- Building an Elastic machine
Technical requirements
In this chapter, you will need access to the following:
- VirtualBox (or any hypervisor) with at least 12 GB of RAM, 6 CPU cores, and a 70 GB HDD available to Virtual Machine (VM) guests.
- A Unix-like operating system (such as macOS or Linux) is strongly recommended.
- A text editor that will not add formatting (for example, Sublime Text, Notepad++, Atom, vi/vim, Emacs, or nano).
- Access to a command-line interface.
- The archive program, Tar.
- A modern web browser with a user interface.
- A package manager is recommended, but it is not required.
- macOS Homebrew: https://brew.sh.
- Ubuntu APT: This is included in Ubuntu-like systems.
- RHEL/CentOS/Fedora yum or DNF: This is included in RHEL-like systems.
- Windows Chocolatey: https://chocolatey.org/install.
Important note
We'll be building a sandbox to eventually detonate malware for dynamic analysis. It is essential to remember that while we're taking steps to ensure our host is staying secure, we are going to be detonating malicious software that, although extremely rare, could have the potential to escape a hypervisor. Treat the malware and packet captures carefully to ensure there is not an accidental infection, using a segmented infrastructure if possible.
Check out the following video to see the Code in Action:
Your lab architecture
If you're going to build a threat hunting lab, it's best to plan out all of the moving pieces, how they will interact, and what you're going to do with the data.
While there are hardware costs, the software for the lab that we're going to be building costs only one thing: your time.
For this lab, we'll utilize a few main components, as follows:
- A hypervisor
- Victim machines
- The Elastic Stack
As mentioned in the Technical requirements section, you will need a total of 12 GB of RAM, 6 CPU cores, and a 70 GB HDD that can be dedicated to the lab. Some cuts can be made, but I would consider this to be the minimum for a functional lab.
Before we continue, having built several hundred (maybe thousand) VMs and various other interconnected systems and environments, I've learned to embrace simplicity where applicable. For every lab I build, all of my usernames, service accounts, API accounts, and passwords are the same – every one of them. I do this so that when I'm troubleshooting why something isn't working, juggling between which 24-character passphrase I used for what account isn't a hurdle. I believe in functionality in a learning lab, based on the goal. If the goal is to learn how to engineer and deploy a secure platform, then yes, secure engineering is part of the learning. If the goal is to learn how to use the platform to accomplish a capability provided by the platform, then I focus on how to enable that capability.
Elastic has a lot of great training courses and articles on how to build, configure, and deploy robust and secure systems. If you are going to be deploying the Elastic Stack in production, I strongly encourage you to take advantage of those services. That said, the goal of this lab is to learn how to use Elastic to accomplish threat hunting. Here, we'll focus on making that capability accessible and leave the production and deployment of the Elastic Stack to other engineers.
In the next section, we will discuss, install, and configure the hypervisor. The hypervisor is the platform on which we will build all of our VMs.
Hypervisor
The hypervisor is either software or hardware that allows you to create and control various VMs. The hypervisor is referred to as the host, and the VMs are referred to as the guests.
There are many options to choose from when selecting a hypervisor. These options include varying levels of customization, features, and complexity. That said, we're going to use Oracle's VirtualBox because it is available on all platforms and has no cost.
Important note
Although we're going to be using VirtualBox, if you're more comfortable with another hypervisor, please feel free to use that. The instructions will be for VirtualBox, but all of this is easily accomplished using the litany of open source and commercial hypervisor solutions on the market.
In the next section, we'll be collecting and installing the binary packages for the hypervisor we'll be using, VirtualBox.
Collecting and installing VirtualBox
First, we need to collect the VirtualBox binary:
- Download VirtualBox (select your architecture): https://www.virtualbox.org/wiki/Downloads.
Depending on your setup, you can download and run the installation package from VirtualBox's website.
If you are using a package manager, which I recommend but is certainly not required, you can download and install VirtualBox in one step.
Homebrew
Homebrew is a package manager for macOS. Please refer to the Technical requirements section at the beginning of the chapter to install it. From the Terminal, run the following:
brew install --cask virtualbox
APT
apt is a package manager for Debian-like systems. Please refer to the Technical requirements section at the beginning of the chapter to install it. From the Terminal, run the following:
sudo apt-get install virtualbox
yum (or DNF)
yum and DNF are package managers for RHEL-like systems. Please refer to the Technical requirements section at the beginning of the chapter to install it. Before you get started, find the major and minor version numbers of VirtualBox by visiting https://www.virtualbox.org/wiki/Linux_Downloads. For example, version 6.1.18 would be 6.1. From the Terminal, run the following:
sudo curl -o /etc/yum.repos.d/virtualbox.repo http://download.virtualbox.org/virtualbox/rpm/el/virtualbox.repo
# sudo yum install VirtualBox-major.minor
sudo yum install VirtualBox-6.1
Chocolatey
Chocolatey is a package manager for Windows 7, 8, and 10. Please refer to the Technical requirements section at the beginning of the chapter to install it. From Command Prompt or PowerShell, run the following:
choco install virtualbox
Once we have finished installing the required packages, our next step will be to start VirtualBox.
Starting VirtualBox
Let's start VirtualBox and make sure that the installation went as planned. You should be able to view the Oracle VM VirtualBox Manager window, as shown in the following screenshot:
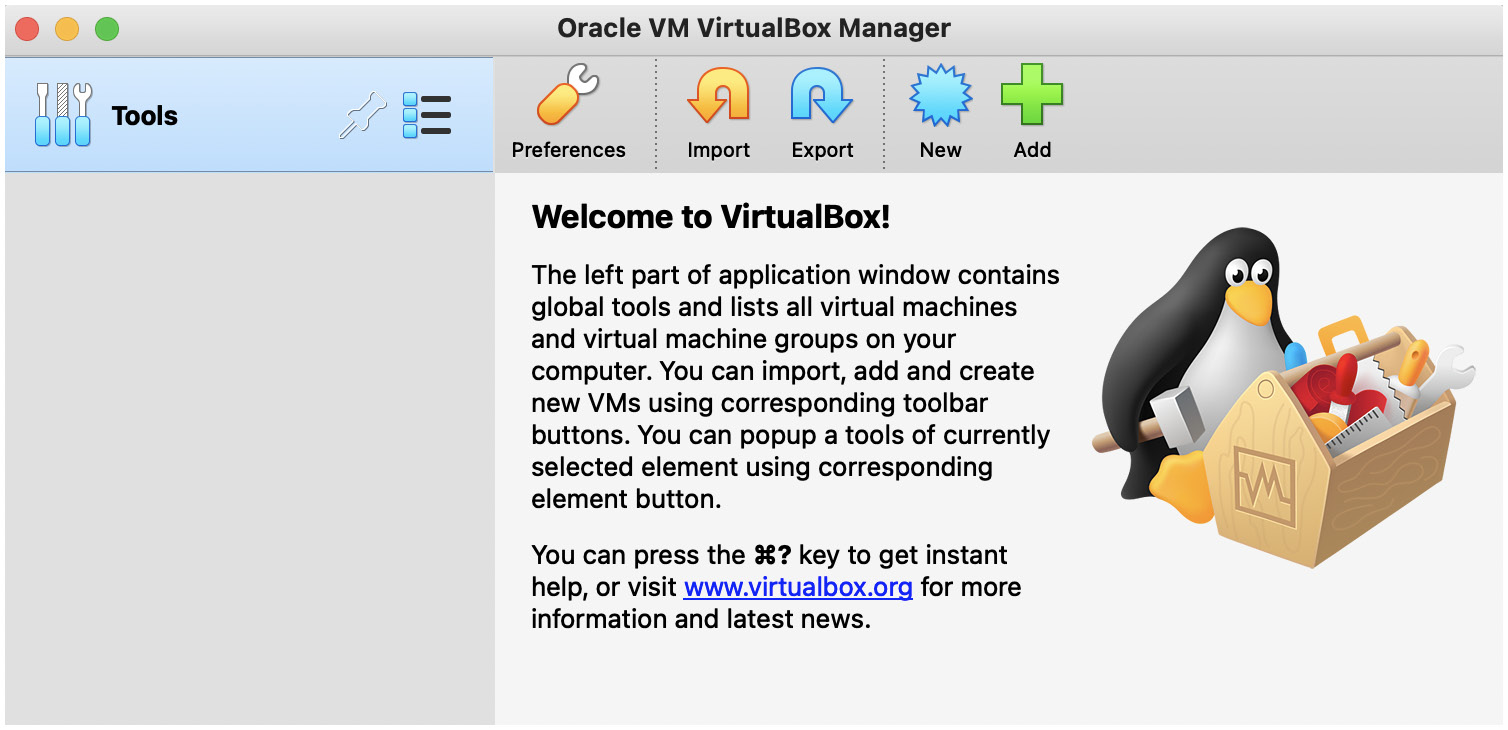
Figure 4.1 – The VirtualBox Manager window
VirtualBox Manager is the app that you'll interact with when starting, stopping, and performing any required maintenance on your VMs.
Important note
If you're having issues installing VirtualBox, please refer to the official project documentation for assistance. While this is a free project, Oracle does a good job of providing a fairly straightforward approach to installing the software. Additionally, VirtualBox is extremely popular. So, using your favorite search engine, you can find many guides that can help if you're experiencing issues. You can access the Oracle VirtualBox download and installation instructions at https://www.virtualbox.org/wiki/Downloads.
Now that we've successfully installed our hypervisor, let's start building some VMs.
Building an Elastic machine
In this section, we'll be building Elasticsearch and preparing it to index events from our victim machines.
We'll build Elasticsearch on CentOS. Elasticsearch can be built on Windows or macOS. However, for the lab, we're going to have everything running inside a VM.
Creating the Elastic VM
First, we need to install CentOS. Browse to the CentOS mirrors list (http://isoredirect.centos.org/centos/8/isos/x86_64/), select the mirror that is closest to you, and then select either the Boot or DVD ISO file. CentOS will offer you a list of mirrors that should provide the fastest download. Note that the DVD file is much larger than the Boot ISO. You can select whichever you want – the configuration steps will be the same. However, the Boot ISO requires an internet connection during configuration, while the DVD ISO does not.
Building the CentOS box follows the same steps that we used for Windows with the exception of less hard disk space being required. Perform the following steps:
- Let's open VirtualBox (which was installed in the previous section) and click on the New icon. Input the following:
Name: Elastic (note that this can be anything you want).
Machine Folder: This should be pre-populated, but you can adjust it if needed.
Type: Linux.
Version: Red Hat (64 bit).
You can view the preceding options in the following screenshot:
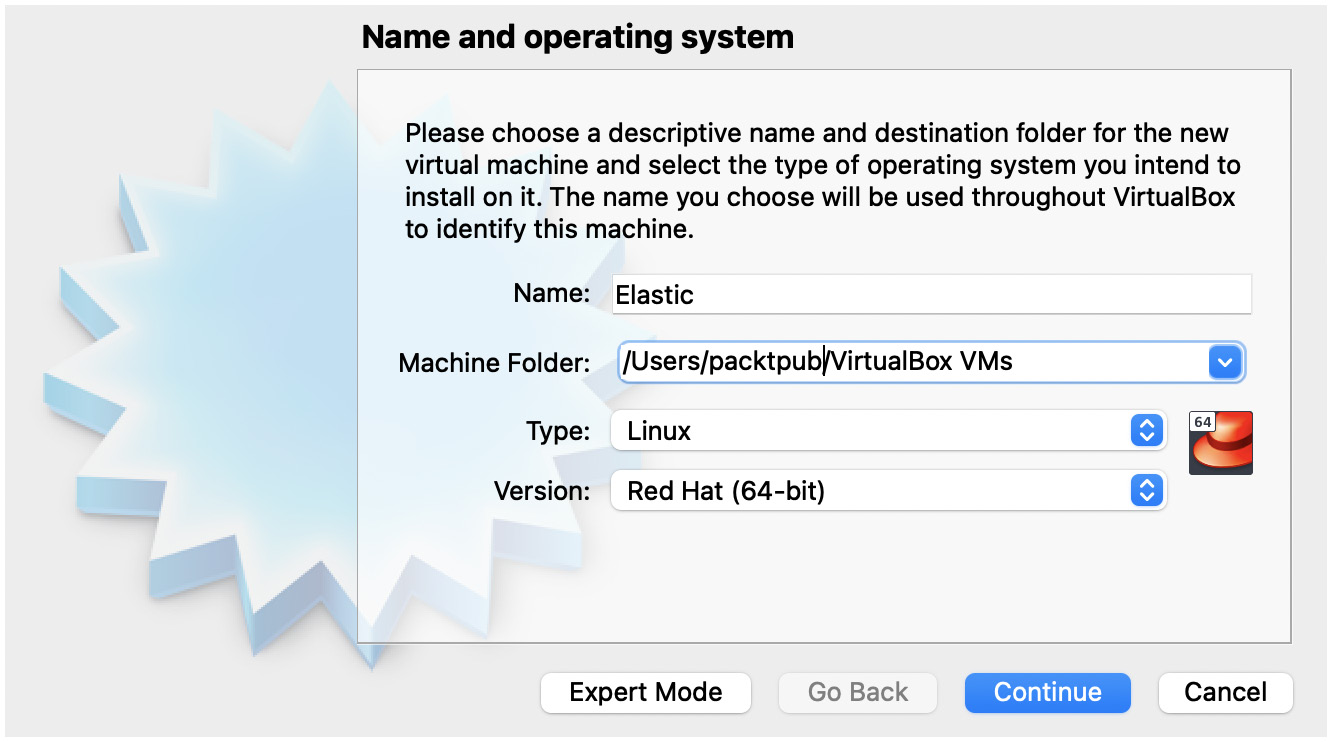
Figure 4.2 – A new Elastic VM
- Next, we'll define the amount of memory we want to provide. I would recommend at least 8 GB (or 8,192 MB) of RAM:
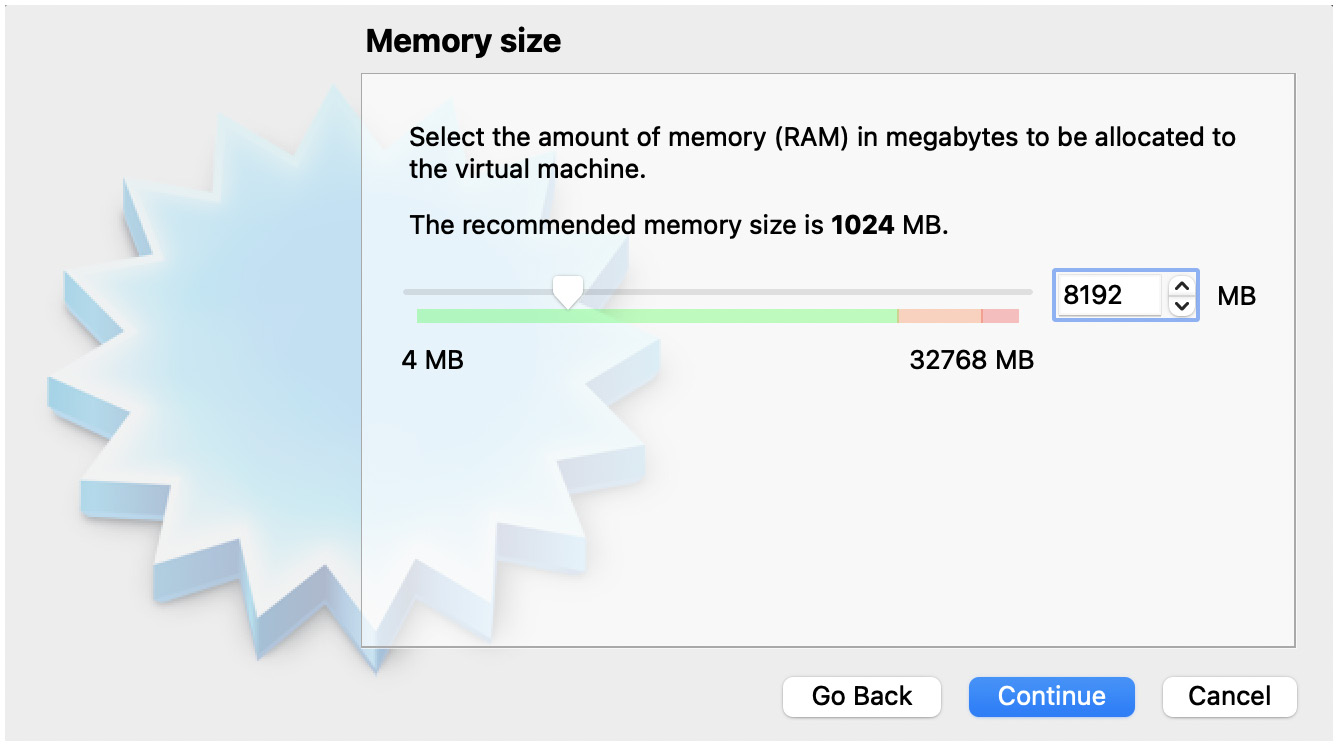
Figure 4.3 – Elastic VM memory size
- The next several windows will be to set up your hard disk. You can select the first several default settings as follows:
Create a virtual hard disk.
Use a VirtualBox Disk Image (VDI).
- When you get to the File location and size window, you're going to use the slider to go from 8 GB up to 40 GB as a minimum. Then, click on Create:
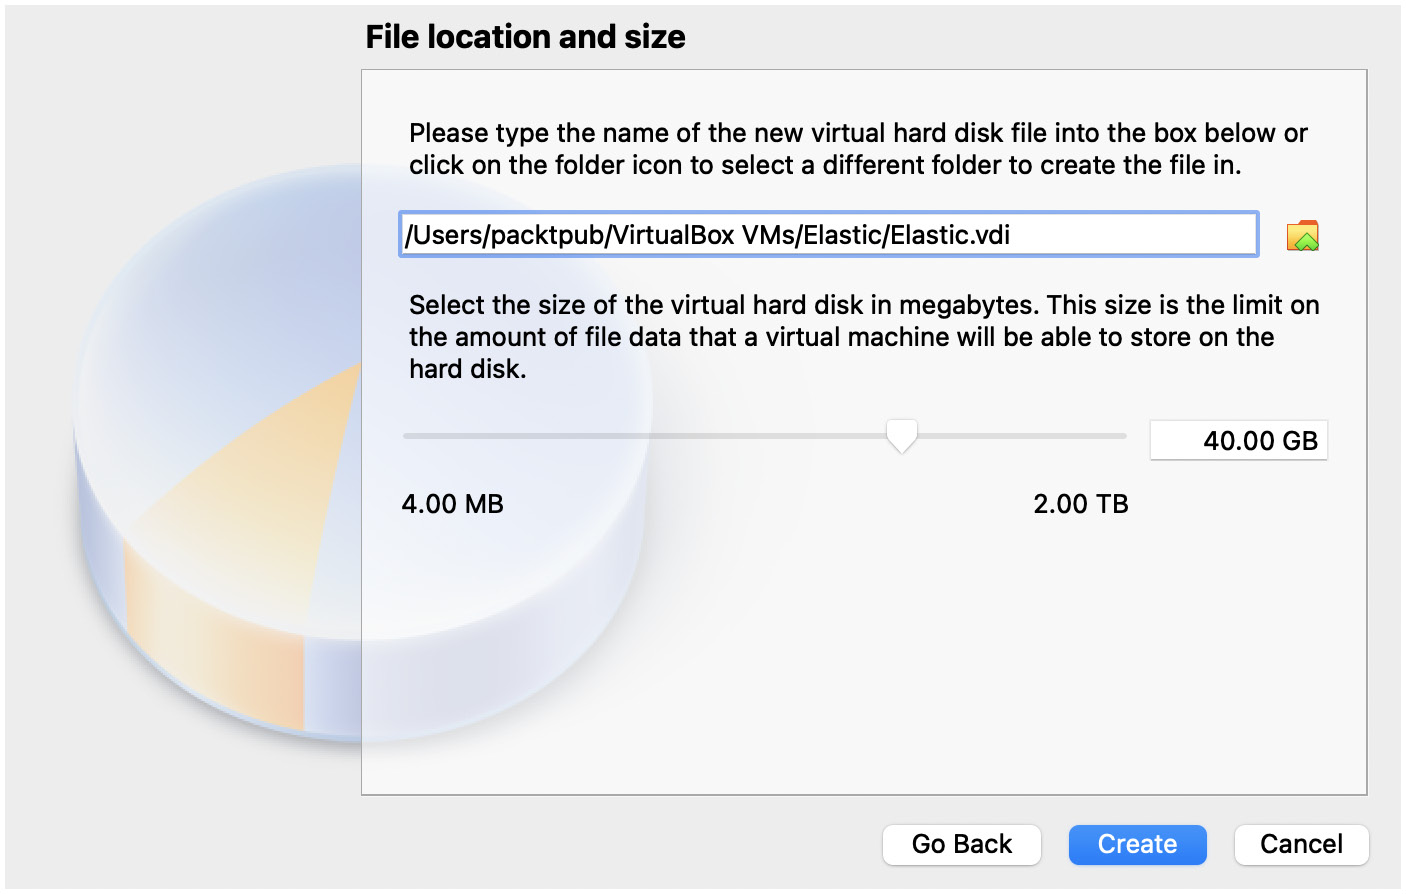
Figure 4.4 – Elastic VM hard disk size
Now that we've built the VM, let's click on the VM and select the yellow Settings button:

Figure 4.5 – The Elastic VM Settings button
First, let's adjust the boot order. We want the hard disk to appear first. So, click on the System tab, uncheck Floppy, and then click on Hard Disk. Finally, click on the up arrow. The order should be Floppy (unchecked), Hard Disk, Optical Drive, and then Network (unchecked):

Figure 4.6 – Configuring the Elastic VM system
To install CentOS, let's attach the ISO that we downloaded previously:
- Click on the Storage tab.
- Click on the Empty storage device.
- Click on the CD icon on the right-hand side.
- Select Choose a disk file….
- Select CentOS ISO.
- Click on OK:
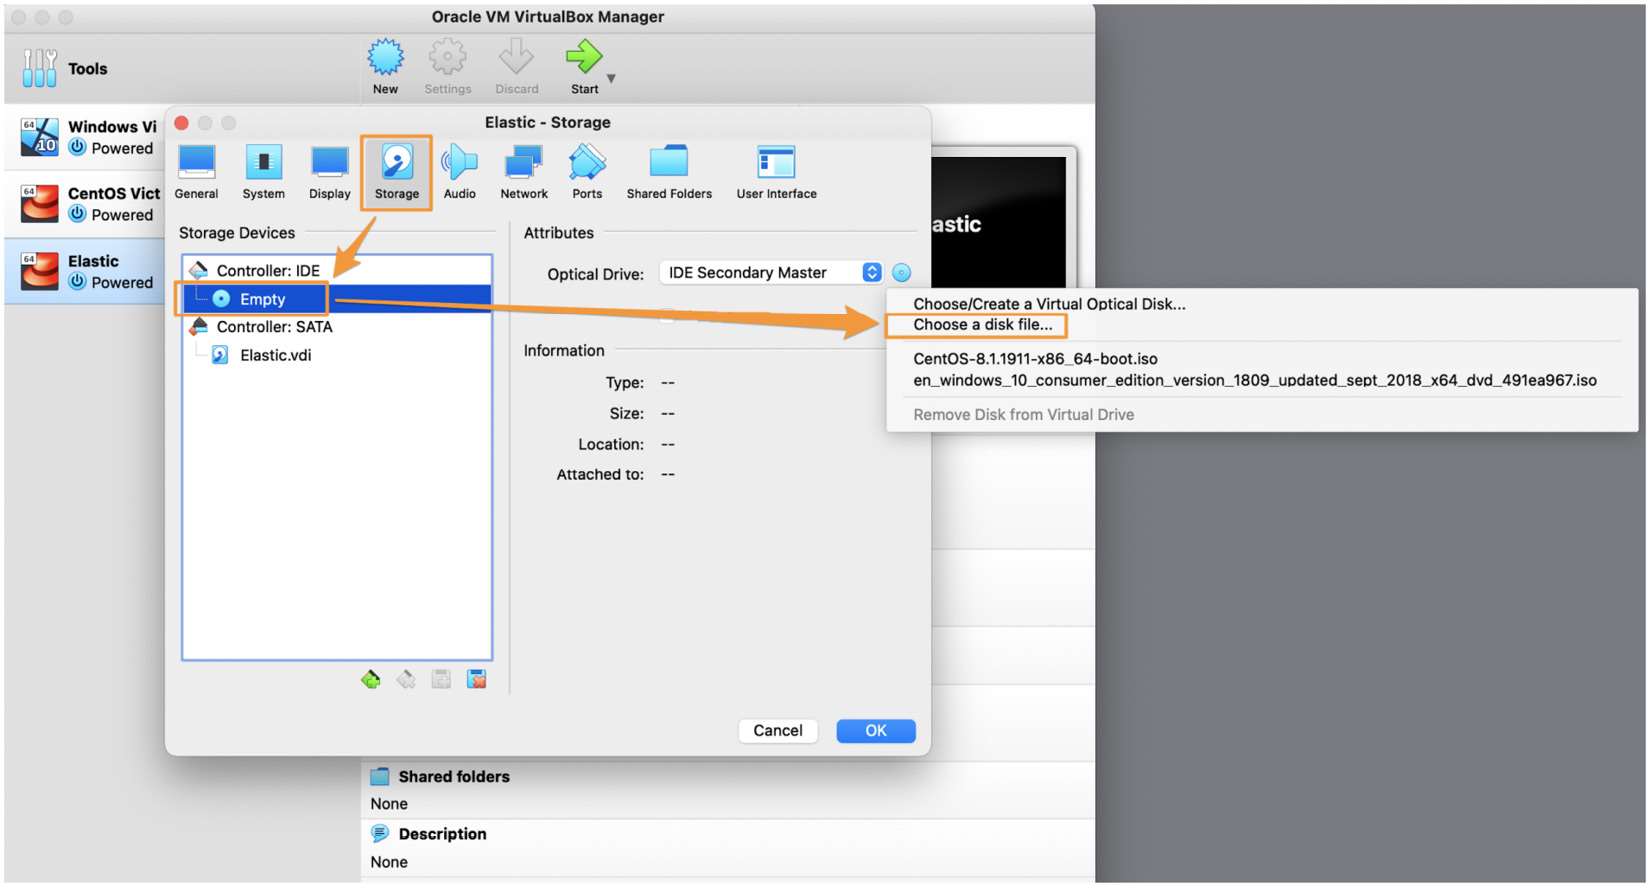
Figure 4.7 – Elastic VM storage settings
Before exiting the Settings, we need to forward some ports so that we can remotely connect to the VM, send data to Elasticsearch, and access Kibana.
First, click on the Network tab, ensure the Enable Network Adapter box has been checked, and then set Attached to to Internet Network:

Figure 4.8 – The Elastic VM Adapter 1 Network settings
After that, click on Adapter 2. Then, perform the following steps:
- Set it to NAT.
- Click on Advanced.
- Click on Port Forwarding.
- Click on the green + icon and add the following four ports:
a) Name: SSH
Protocol: TCP
Host IP: 127.0.0.1
Host Port: 2222
Guest IP: 10.0.3.15
Guest Port: 22
b) Name: Elasticsearch
Protocol: TCP
Host IP: 127.0.0.1
Host Port: 9200
Guest IP: 10.0.3.15
Guest Port: 9200
c) Name: Kibana
Protocol: TCP
Host IP: 127.0.0.1
Host Port: 5601
Guest IP: 10.0.3.15
Guest Port: 5601
d) Name: Fleet
Protocol: TCP
Host IP: 127.0.0.1
Host Port: 8220
Guest IP: 10.0.3.15
Guest Port: 8220
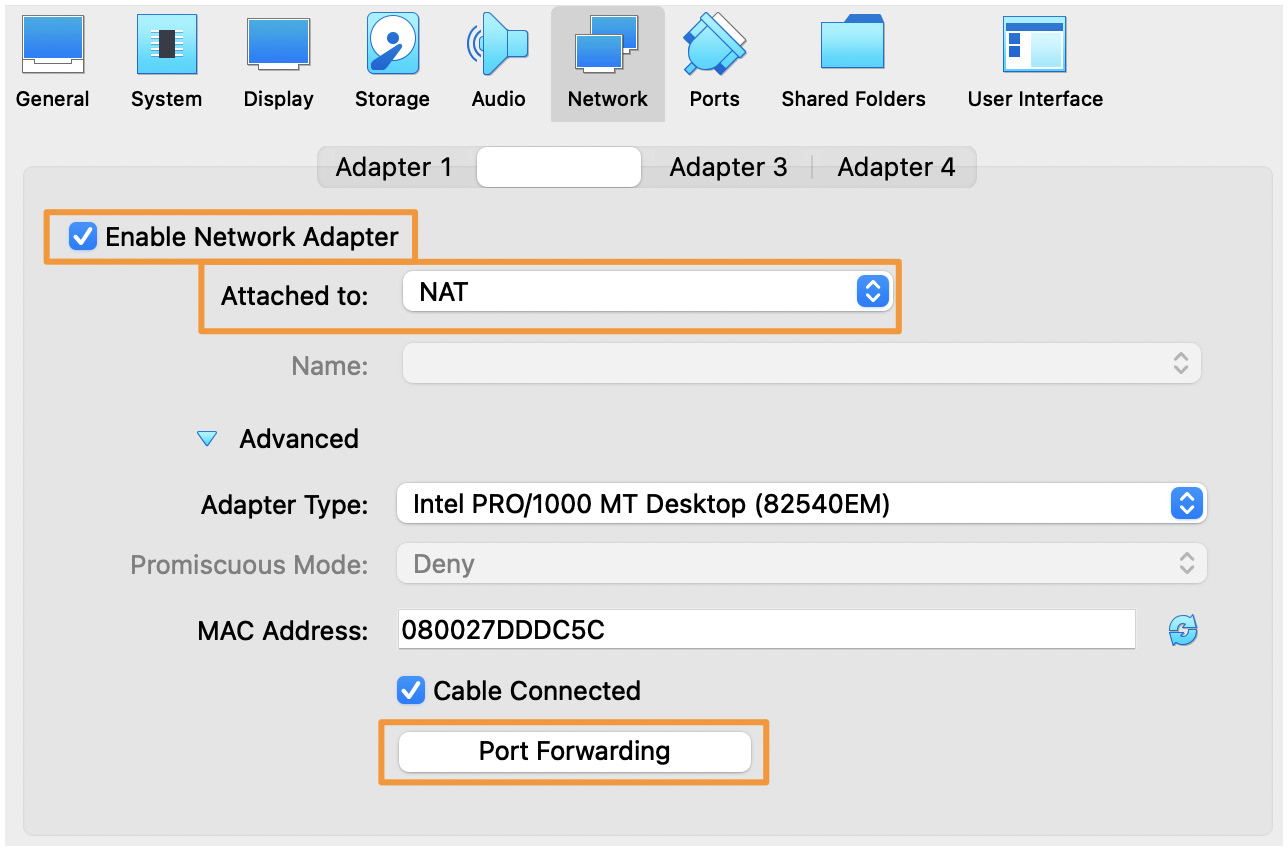
Figure 4.9 – The Elastic VM Adapter 2 Network settings
In the following screenshot, you can view the completed forwarded port configurations:

Figure 4.10 – Elastic VM port forwarding
Finally, we need to configure and enable DHCP for the internal network we configured for Adapter 1.
For the Internet Network setting to behave as expected, we need to issue IP addresses that the VMs can use to communicate with each other.
In some situations, your internal network might conflict with the VirtualBox DHCP server. This will prevent access to the internet with the VMs.
To avoid this, use one of the following examples for an IP range that does not conflict with your network settings. Here are some examples that you can use. Select one that does not share your internal network schema:
VBoxManage dhcpserver add --network=intnet --server-ip=10.0.0.100 --netmask=255.255.255.0 --lower-ip=10.0.0.101 --upper-ip=10.0.0.254 --enable
VBoxManage dhcpserver add --network=intnet --server-ip=172.16.0.100 --netmask=255.255.255.0 --lower-ip=172.16.0.101 --upper-ip=172.16.0.254 --enable
VBoxManage dhcpserver add --network=intnet --server-ip=192.168.1.100 --netmask=255.255.255.0 --lower-ip=192.168.1.101 --upper-ip=192.168.1.254 --enable
Once you have selected an IP range to use from the preceding options, on the Terminal of your host, type in the following (remember to substitute your selected IP range):
VBoxManage dhcpserver add --network=intnet --server-ip=172.16.0.100 --netmask=255.255.255.0 --lower-ip=172.16.0.101 --upper-ip=172.16.0.254 --enable
Now that the Elastic VM has been built, we can preview all of the settings to make sure that everything has been set up properly. To view the details, you can click on the hamburger menu next to the VM name and select Details:

Figure 4.11 – Details of the Elastic VM
As a review of the settings, we configured the following:
- Name: Elastic (note that this can be anything you want).
- Machine Folder: This should be pre-populated, but you can adjust it if needed.
- Type: Linux.
- Version: Red Hat (64-bit).
- 8192 RAM.
- 40 GB hard disk (feel free to increase this if you have the resources).
- Network: Adapter 1 – Internal Network, Adapter 2 – NAT (forwarded SSH, Elasticsearch, and Kibana).
- Set the boot order to Hard Disk, then Optical.
- Enable DHCP for the internal network.
- Remember to attach your CentOS ISO.
Next, let's configure the CentOS operating system that we'll use to install the Elastic Stack.
Installing CentOS
Now that we've built the Elastic VM, let's get the operating system installed and configured. Perform the following steps:
- With VirtualBox open, click on the Elastic VM and then click on the Start button.
- Another window will open with the installation process. Click on the window and use your arrow keys to highlight Install CentOS Linux 8. Then, press Enter:
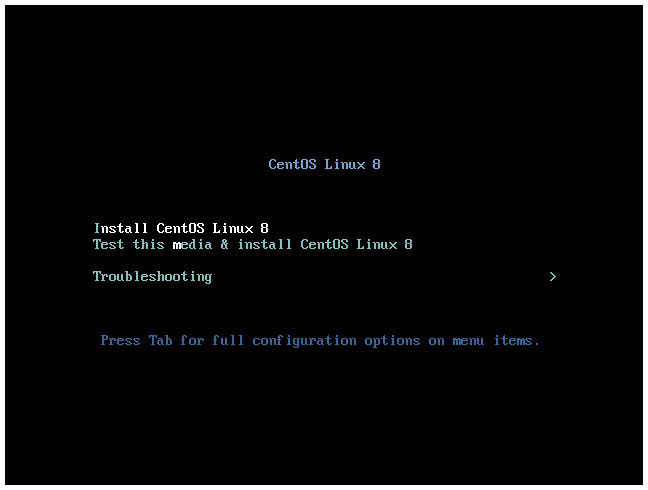
Figure 4.12 – The CentOS installation window
- Next, you'll be asked to select your language. You can use your mouse here to select your language (and dialect, if necessary). Then, click on Continue:
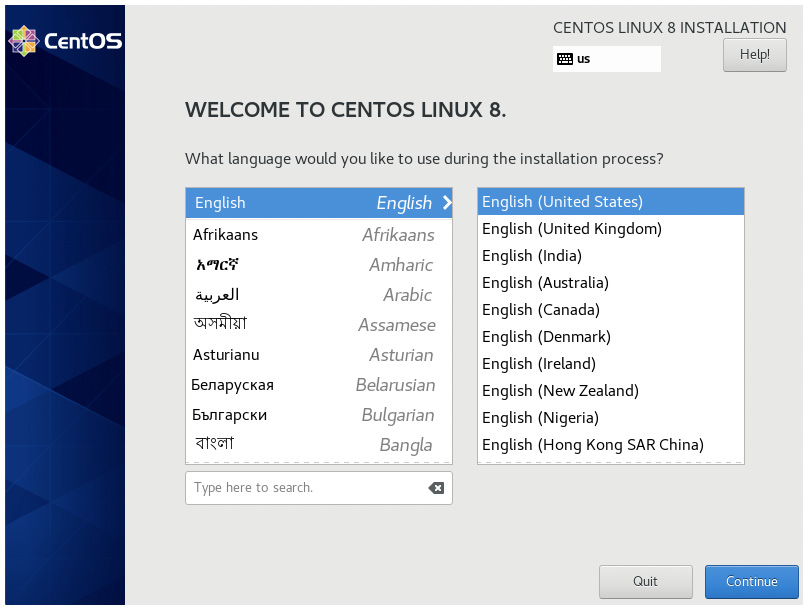
Figure 4.13 – The CentOS language selection window
- Next, we'll move on to the actual installation. For this, we're going to start with the SYSTEM column and work our way to the left-hand side.
First, select Installation Destination:
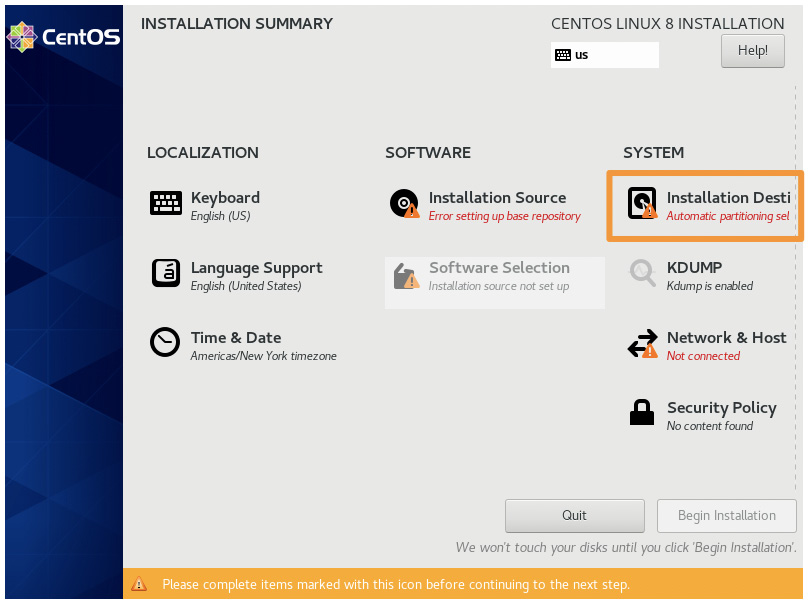
Figure 4.14 – Selecting the CentOS Installation Destination
And then, simply click on the blue Done button:

Figure 4.15 – The CentOS INSTALLATION DESTINATION window
- Back on the INSTALLATION SUMMARY page, click on KDUMP:
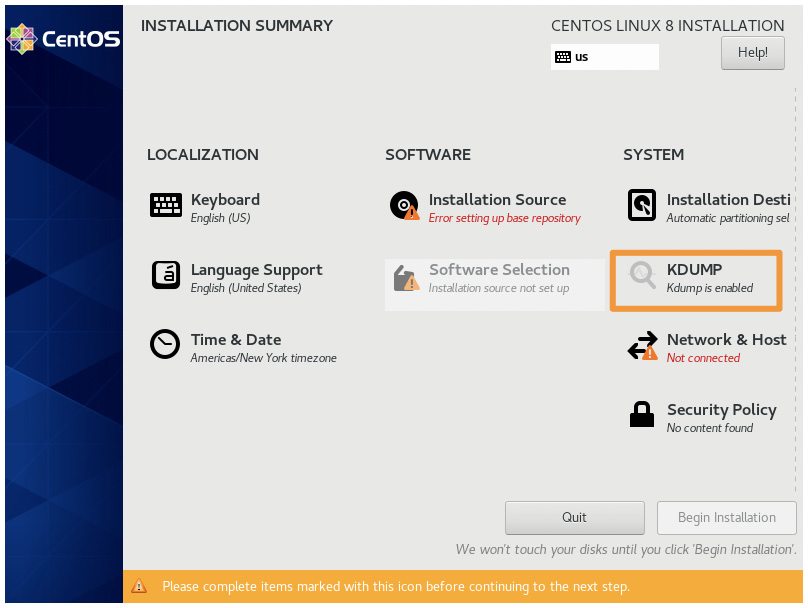
Figure 4.16 – The CentOS KDUMP selection window
- Uncheck Enable kdump, and click on the blue Done button:

Figure 4.17 – Disabling CentOS kdump
- Next, we'll configure the hostname and the network settings. Click on Network & Host:

Figure 4.18 – The CentOS Network & Host selection window
Give your VM a name and click on Apply. Click on On/Off to enable both network interfaces. Then, click on the blue Done button:

Figure 4.19 – Configuring CentOS NETWORK & HOST NAME
- Now that there is an internet connection, the installer will reach out to the upstream repositories to collect information about the available packages. If you are using the DVD ISO, this step isn't performed because everything is local.
After a moment, the Software column and Installation Source should be set to Closest Mirror (whereas earlier, it said Error setting up base repository). You don't need to change this.
Click on Software Selection and then click on Minimal Install. Finally, click on the blue Done button:

Figure 4.20 – CentOS SOFTWARE SELECTION
- Under the Localization column, select Time & Date:
Important note
The time should always be set to UTC. The last thing you want during an incident is to be trying to figure out what time an event happened when a server in London sent its logs to Los Angeles, but you're in Mumbai. Having everything, globally, at the same time is crucial.
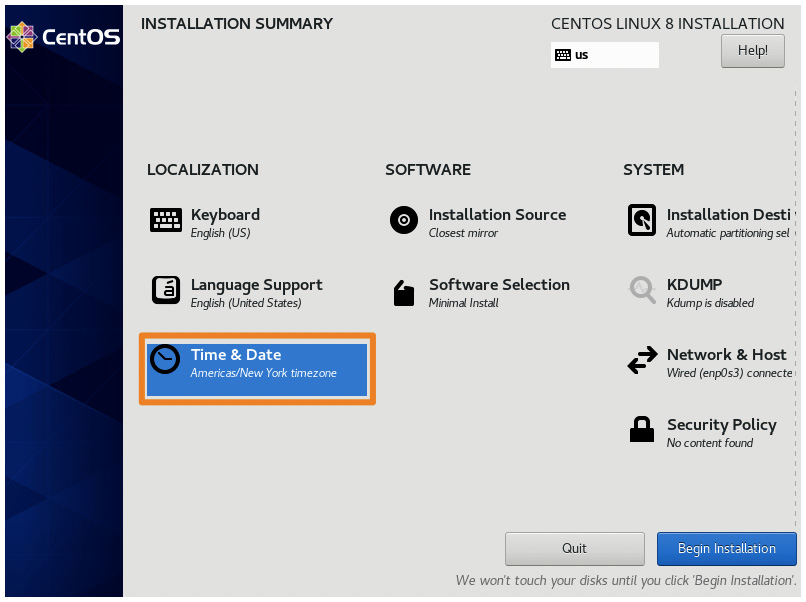
Figure 4.21 – The CentOS Time & Date configuration
Change the region to Etc, change the city to Coordinated Universal Time, and then click on the blue Done button:

Figure 4.22 – The CentOS TIME & DATE configuration
- Back on the INSTALLATION SUMMARY page, we're finally ready to begin the installation (and create the local user account):
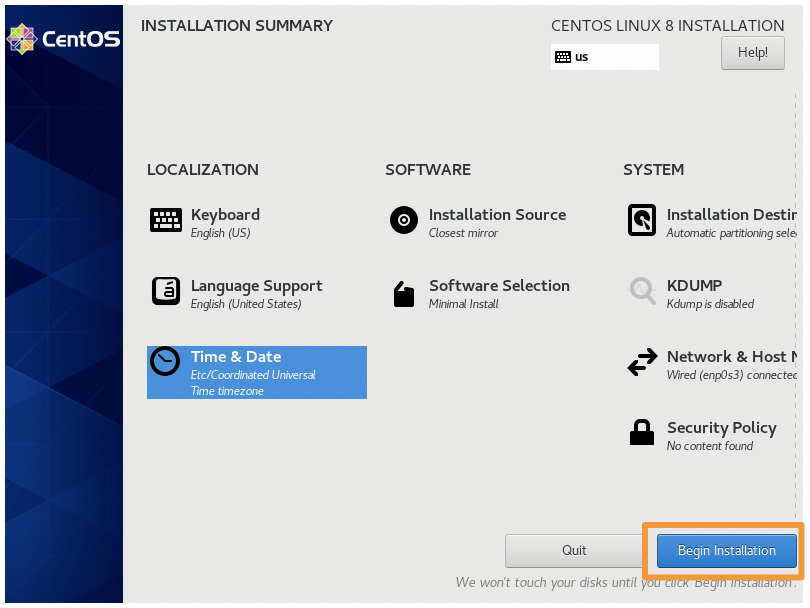
Figure 4.23 – CentOS Begin Installation
Once you click on Begin Installation, you'll move on to the installation and will be able to create a user account. We are going to create a local user account, but we are not going to create the root account. The root account is not needed at all, and it is best to remain disabled.
Feel free to make your user account and passphrase whatever you want, but ensure you check the Make this user administrator checkbox. As I mentioned at the beginning of this chapter, I prefer to use simplicity for non-production labs. There are few things more fun than realizing your complex password was mistyped (twice), and you're now trying to boot into single-user mode to reset your only account. While this is a fun exercise and has several learning points, it isn't the focus of our lab:

Figure 4.24 – CentOS CREATE USER
Allow the installation of CentOS to proceed once you have created your administrative user account:

Figure 4.25 – CentOS installation
In the preceding example, I am using the Boot ISO, so my installation is downloading all of the packages needed for my installation. If you are using the DVD ISO, this will use local packages and be much quicker.
Finally, the installation is complete, and we can click on Reboot to proceed:

Figure 4.26 – CentOS installation is complete
Once your VM reboots, you'll be presented with a login screen so that you can log in for the first time:

Figure 4.27 – The CentOS login screen
Now that we have a fully functional CentOS VM, we should install the Guest Additions to make the VM experience a bit smoother.
Enabling the internal network interface
By default, CentOS does not enable the internal interface. This is necessary so that we can connect our VMs together.
Fortunately, this is a simple fix. Perform the following steps:
- Log in to your Elastic VM and open the Network Manager by typing in sudo nmtui.
- Once you are in the NetworkManager TUI (Text User Interface), select the Activate a connection menu:
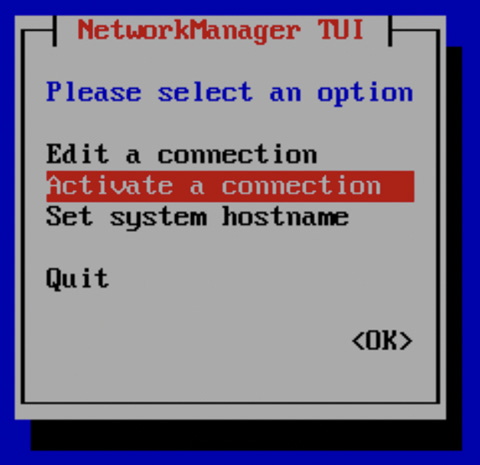
Figure 4.28 – The Activate a connection menu for the NetworkManager TUI
- Once you are in the Activate a connection section, using your arrow keys, select the network interface that does not have an * next to it (in the following screenshot, the interface name is enp0s3). Press the Tab key to move to the Activate option, and then press Enter:

Figure 4.29 – Activating the enp0s3 interface
- Once the interface is active, you can use your arrow keys to select Back and then Quit. This will take you back to Command Prompt:
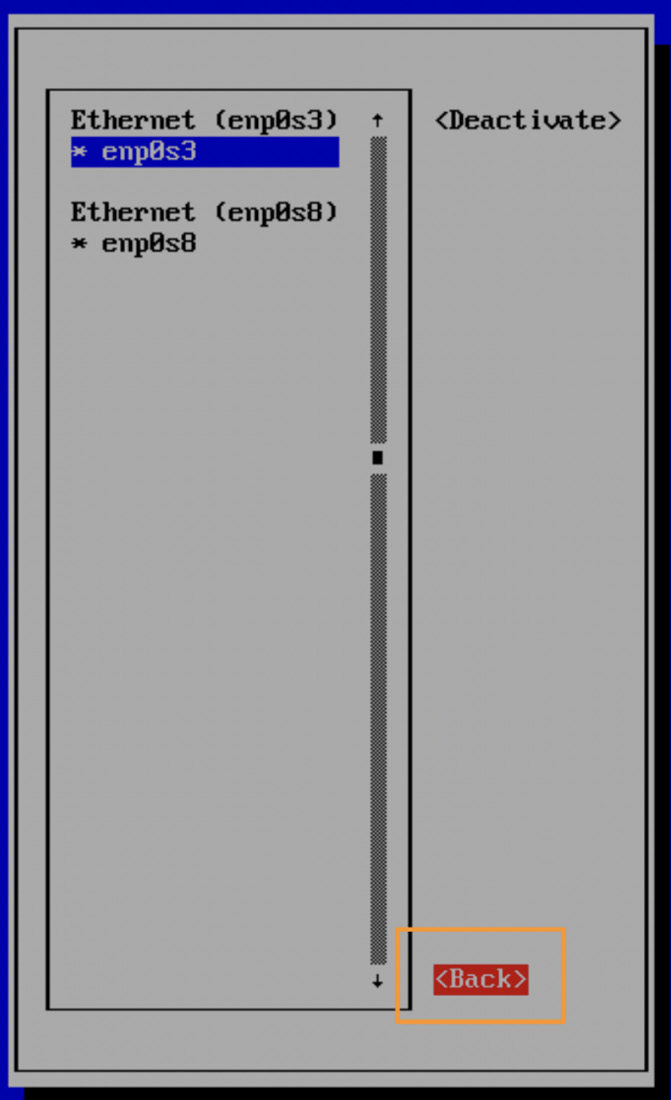
Figure 4.30 – Exiting the NMTUI
- To validate that your interface is now active, you can type in ip a, and you should see an IP address for all of the interfaces. One interface will be your loopback (127.0.0.1), one will be the intnet interface we just activated, which will have an IP address that is within the DHCP range you selected earlier, and the final interface will be 10.0.3.15:

Figure 4.31 – Validating that all of the interfaces have IP addresses
Once we have activated the interface, we need to set it to start on boot. In my example, the intnet interface is enp0s3. Yours might be something different, but it will be interface 2.
Let's install a simple text editor, called nano, by typing in sudo dnf install nano -y.
Using nano, modify the configuration for the interface to start on boot by typing in the following (remember, your interface name might be different):
sudo nano /etc/sysconfig/network-scripts/ifcfg-enp0s3
Then, set the ONBOOT parameter to yes from no:
TYPE=Ethernet
PROXY_METHOD=none
BROWSER_ONLY=no
BOOTPROTO=dhcp
DEFROUTE=yes
IPV4_FAILURE_FATAL=no
IPV6INIT=yes
IPV6_AUTOCONF=yes
IPV6_DEFROUTE=yes
IPV6_FAILURE_FATAL=no
IPV6_ADDR_GEN_MODE=stable-privacy
NAME=enp0s3
UUID=dd71d668-0c7e-45f0-ac1b-d6e441c29365
DEVICE=enp0s3
ONBOOT=yes
Save the file and exit. The interface has now been activated and will remain so.
Important note
To save and close in nano, simply press Ctrl + X, then Y to confirm you want to save and exit, and, finally, Enter to confirm the name of the file.
In the preceding steps, we activated all the interfaces on the Elastic VM that will be needed to communicate between the VMs.
Installing VirtualBox Guest Additions
The VirtualBox Guest Additions are a series of drivers and applications that allow the VMs to align more closely with the host. This is especially helpful when you're copying and pasting between guests and hosts, want to have better screen resolutions, and even share directories. In our case, we want to ensure that the guest has an accurate time that is provided by the host. Guest Additions provide that integration for us.
Before we get started, instead of trying to type directly into the VM, let's take advantage of the screen real estate, copy/paste functionality, and other features that we have on our host. If you recall in the Creating the Elastic VM section, we forwarded some ports during the VM build process. One of those was Secure Shell (SSH). We had to forward port 2222 because SSH's default port of 22 is registered, so we need to use a port above 1024. We'll direct our SSH session back to our host system over port 2222, which will be forwarded to the guest on port 22 (in this case, it is the Elastic VM).
If you're using a Linux-like system, you already have an SSH client. If you're using Windows, depending on your version, you might have an SSH client installed. If you find that you don't have SSH installed, you can use PuTTY (https://www.putty.org/).
Now that we've checked to make sure the proper ports are validated and that you have the proper software installed (if any), we can proceed with remotely accessing the VM.
Remotely accessing the Elastic VM
Let's remotely access the Elastic VM using SSH. On your host system, open up a shell (such as Bash-like, Command Prompt, or PowerShell) and type in the following:
$ ssh -p 2222 [email protected]
Here, ssh is the SSH client binary:
- -p 2222: This tells ssh to use the custom port that we configured instead of the default port of 22.
- packtpub: This is the username I made for my Elastic VM. Use whatever account you created for your Elastic VM during the installation process.
- @: This tells the SSH client where to use the username and port.
- 127.0.0.1: This is the loopback address of our localhost and what is forwarding our SSH session onto our Elastic VM guest.
You'll get a message to validate the authenticity of the host via its digital signature. To do this, you can just type in yes and then enter the password for the packtpub user. This should drop you on a shell of the Elastic VM. To verify this, you can check the hostname with the hostname command and the logged-on user with whoami:
$ ssh -p 2222 [email protected]
The authenticity of host '[127.0.0.1]:2222 ([127.0.0.1]:2222)' can't be established.
ECDSA key fingerprint is SHA256:qOASGgNPsrCtbd7pfi5aiWWtllETaHBJPNrLxgDiRl0.
Are you sure you want to continue connecting (yes/no/[fingerprint])? Yes
Warning: Permanently added '[127.0.0.1]:2222' (ECDSA) to the list of known hosts.
[email protected]'s password:
[packtpub@elastic-packetpub ~]$ hostname
elastic-packetpub.local
[packtpub@elastic-packetpub ~]$ whoami
packtpub
Now that we've accessed our VM, let's update the system and then install the VirtualBox Guest Additions.
Updating the Elastic VM and preparing for additions
To quickly ensure that we're working off the most current system packages, let's update the Elastic VM. This can be done using either yum or DNF. If you recall, I built from the Boot ISO, so I downloaded the most updated packages during the installation. If you use DVD, then you might have updates. If you do, press y when asked to proceed:
$ sudo dnf update
We trust you have received the usual lecture from the local System
Administrator. It usually boils down to these three things:
#1) Respect the privacy of others.
#2) Think before you type.
#3) With great power comes great responsibility.
[sudo] password for packtpub:
CentOS Linux 8 - AppStream 1.1 MB/s | 6.3 MB 00:05
CentOS Linux 8 - BaseOS 1.6 MB/s | 2.3 MB 00:01
CentOS Linux 8 - Extras 14 kB/s | 8.6 kB 00:00
Dependencies resolved.
Nothing to do.
Complete!
Next, we need to prepare for the Guest Additions. Again, using yum or DNF, we need to install some dependencies. From the Terminal on the Elastic VM, run the following:
$ sudo dnf install epel-release
$ sudo dnf install make gcc kernel-headers kernel-devel perl dkms bzip2
Then, set the KERN_DIR environment variable to the kernel source code directory:
$ export KERN_DIR=/usr/src/kernels/$(uname -r)
Next, we'll actually install Guest Additions.
Installing Guest Additions
First, we need to remove the CentOS ISO from the "disk tray." To do this, in VirtualBox Manager, click on the Elastic VM, and then click on Settings. From there, click on Storage, select the CentOS ISO, and then click on the Optical Drive. Finally, select Remove Disk from Virtual Drive:
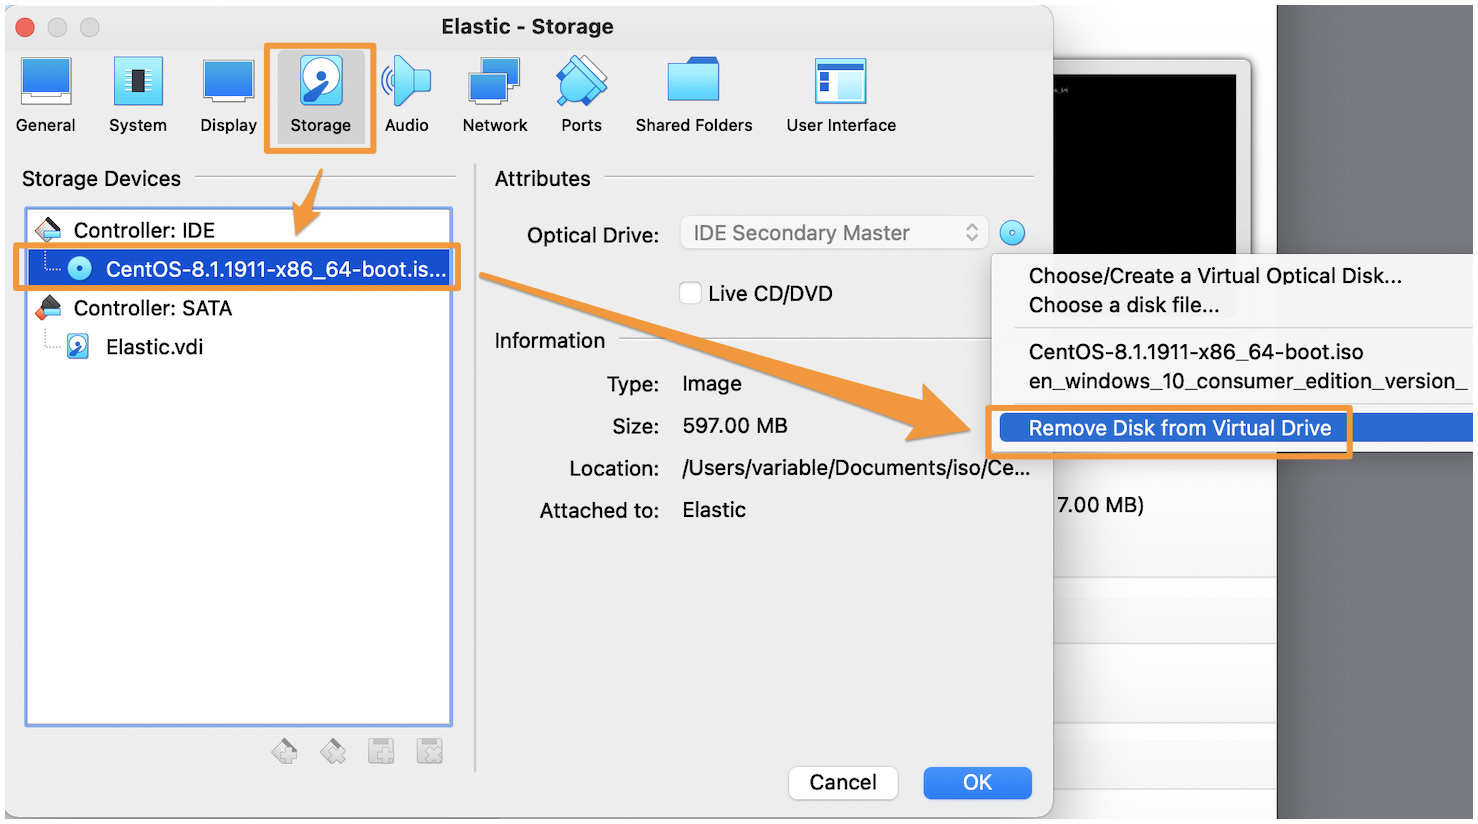
Figure 4.32 – Removing CentOS from the virtual drive
Next, we need to virtually insert the Guest Additions CD into the VM. To do this, click on Devices and then select Insert Guest Additions CD image…:
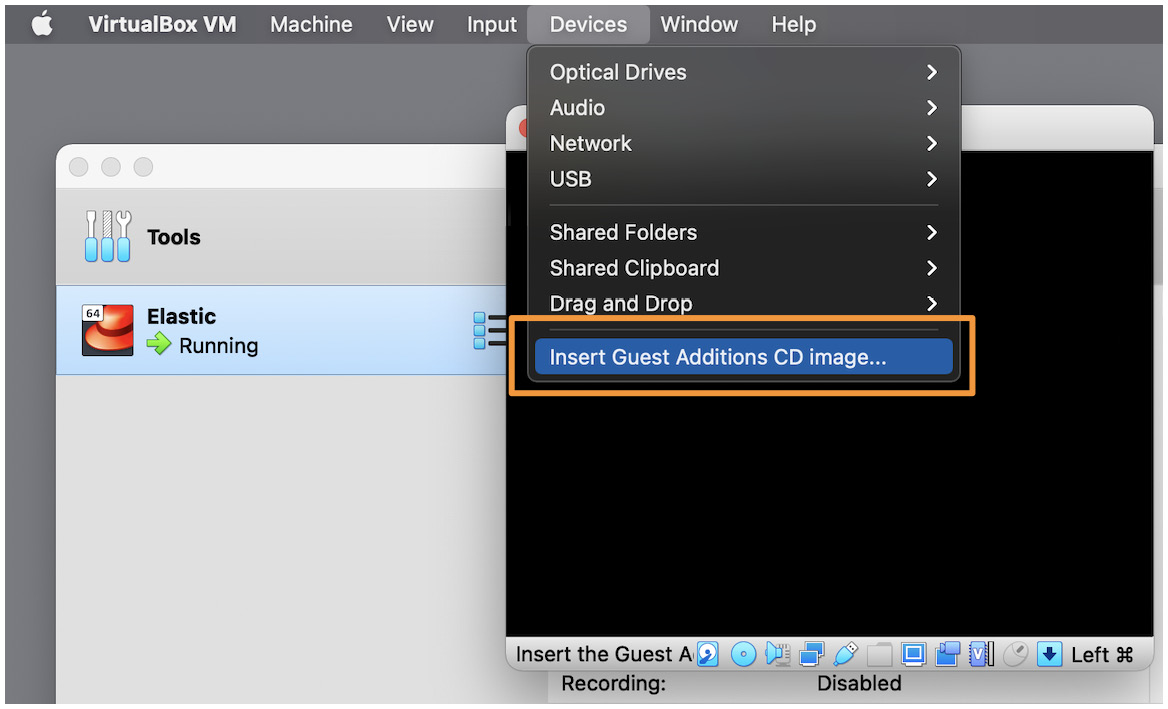
Figure 4.33 – Insert Guest Additions CD image…
Finally, we can mount the Guest Additions and run the installer. To do that, we need to mount the virtual CD drive to a directory and then run the installer.
SSH into the Elastic VM (or use the console), and type in the following:
$ sudo mount -r /dev/cdrom /media
$ cd /media/
$ sudo ./VBoxLinuxAdditions.run
Verifying archive integrity... All good.
Uncompressing VirtualBox 6.1.16 Guest Additions for Linux........
VirtualBox Guest Additions installer
Copying additional installer modules ...
Installing additional modules ...
VirtualBox Guest Additions: Starting.
...
You might notice an output asking you to look at a log file to identify what went wrong. This is because you might not be using a Graphical User Interface (GUI) for Linux. The error is simply stating that there was no GUI identified and that it was skipped. The output should appear as follows – in which case it can be safely ignored:
VirtualBox Guest Additions: Look at /var/log/vboxadd-setup.log to find out what went wrong
Once we have completed that (it takes a few minutes), let's reboot the Elastic VM:
$ sudo reboot
Now that we've fully prepared the Elastic VM, we can proceed with installing Elasticsearch.
Summary
In this chapter, we explored the architecture that you'll use for your lab environment. Additionally, we built the Elastic VM and performed the basic preparatory steps needed to install the Elastic Stack.
In the next chapter, we will install the various components of the Elastic Stack, the victim VM, and ingest threat data into the Elastic Stack.
Questions
As we conclude, here is a list of questions for you to test your knowledge regarding this chapter's material. You will find the answers in the Assessments section of the Appendix:
- What is the name of the machine that the VMs reside on?
a. Guest
b. Host
c. Virtual machine
d. Container
- What does VirtualBox function as?
a. A hypervisor
b. A guest
c. An operating system
d. The Elastic Stack
- What is the DNF program used for?
a. Starting services
b. Configuring network interfaces
c. Installing software on Linux
d. Controlling user accounts
- Prior to installing VirtualBox Guest Additions, what must you do?
a. Remove the Linux ISO from VirtualBox.
b. Reboot the system.
c. Install a web browser.
d. Disable the network interface.
- Which command updates the Linux system?
a. sudo dnf upgrade
b. sudo dnf patch
c. sudo apt-get patch
d. sudo dnf update