
Chapter 11: Enriching Data to Make Intelligence
In Chapter 1, Introduction to Cyber Threat Intelligence, Analytical Models, and Frameworks, we discussed the intelligence pipeline and the process of making data into intelligence through analysis, production, context, and enrichment. Enrichment is one of the final steps in transitioning collected data into something that can be actioned for further hunting or defensive considerations by the incident response teams.
In this chapter, you will learn how to use various tools to enrich both local observations and threat information to add contextually relevant information to events in their journey to actionable intelligence.
In this chapter, we're going to cover the following main topics:
- Enhancing analysis with open source tools
- Enriching events with third-party tools
- Enrichments within Elastic
Technical requirements
In this chapter, you will need to have access to the following:
- The Elastic and Windows virtual machines built in Chapter 4, Building Your Hunting Lab – Part 1
- A modern web browser with a UI
Check out the following video to see the Code in Action:
Enhancing analysis with open source tools
Throughout this book, we've leaned heavily, if not exclusively, on open source software to achieve our analytical goals. From building our sandbox to analyzing malicious files and network traffic, almost everything we as analysts and hunters do can be derived from the open source community.
When I first started exploring IT security, I was suspicious of open source software. My thought, like many who were new to this discipline, was that if it's open and available, anyone can see how to exploit it. If you had a closed system, those security holes could never be known, and thus never exploited.
If I fast-forward 25 years, I know that was a naïve understanding of the open source community and now realize it as the cornerstone of so many popular and almost required tools for performing analysis.
In the next section, we'll talk about the MITRE ATT&CK Navigator to view and analyze focused TTPs.
MITRE ATT&CK Navigator
We've talked about the MITRE ATT&CK framework multiple times throughout this book, but we're not quite done yet. MITRE has made an open source web application that we can use to view and analyze tactics, techniques, sub-techniques, software, and groups. Not only is this tool helpful for raw research, but we can also use it to identify collections or analysis gaps. This tool is called the ATT&CK Navigator.
Important note
The ATT&CK Navigator provides tremendous value to enhance your analysis by understanding where an observed tactic, technique, or sub-technique may be in the intrusion life cycle. When analyzing events, the Navigator is a visual aid that not only allows you to see where your event may be in a campaign but can also be used as a way of identifying other unknown techniques and sub-techniques that could be related. This is about enhancing your analysis of a campaign instead of enriching an event with contextual metadata.
The Navigator web app, which can be run locally or through MITRE's infrastructure, allows you to add information on top of the ATT&CK matrices in a process called layering.
We can begin by browsing to the Navigator web page, https://mitre-attack.github.io/attack-navigator, where we can start by selecting a blank layer by clicking on Create New Layer:
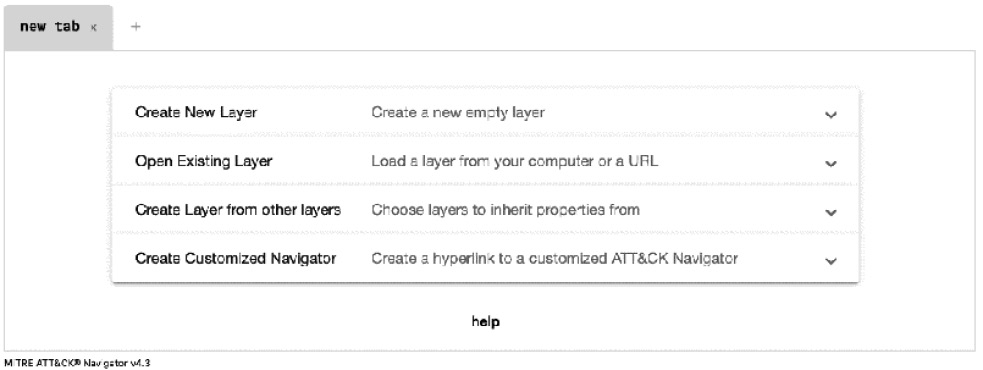
Figure 11.1 – The ATT&CK Navigator opening page
Click on More Options and then select ATT&CK v9 for the version and Enterprise for the domain, as we can see in the following screenshot:

Figure 11.2 – ATT&CK Navigator creating a new layer
Now we can see a few of the different tactics and techniques in the Enterprise domain of (in our case) version 9 of the ATT&CK matrix:

Figure 11.3 – The ATT&CK Navigator's default layer
From here, we can expand the techniques and sub-techniques by clicking on || to review them, as we're doing with this example of the techniques and sub-techniques for the Scheduled Task/Job technique within the Execution tactic:
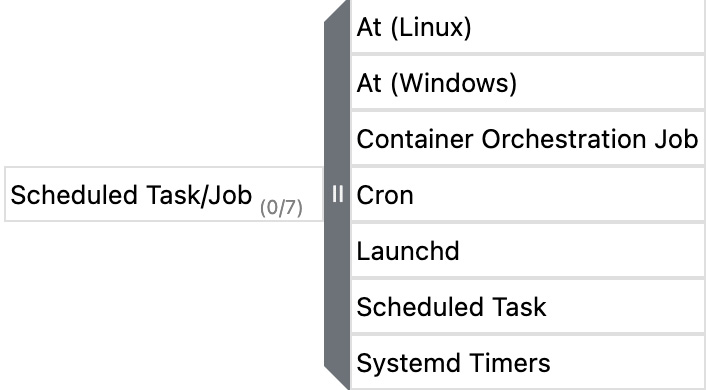
Figure 11.4 – The ATT&CK Navigator's expanded technique menu
While this is a different view than what is available on the main ATT&CK website, this isn't terribly novel.
So, what MITRE did was allow us to apply filters to the data to identify things that are associated that may be of particular interest. As an example, if our organization stored its most critical intellectual property on a set of Linux systems, we could apply filters here in the Navigator to only show techniques and sub-techniques that have been observed as targeting Linux systems:
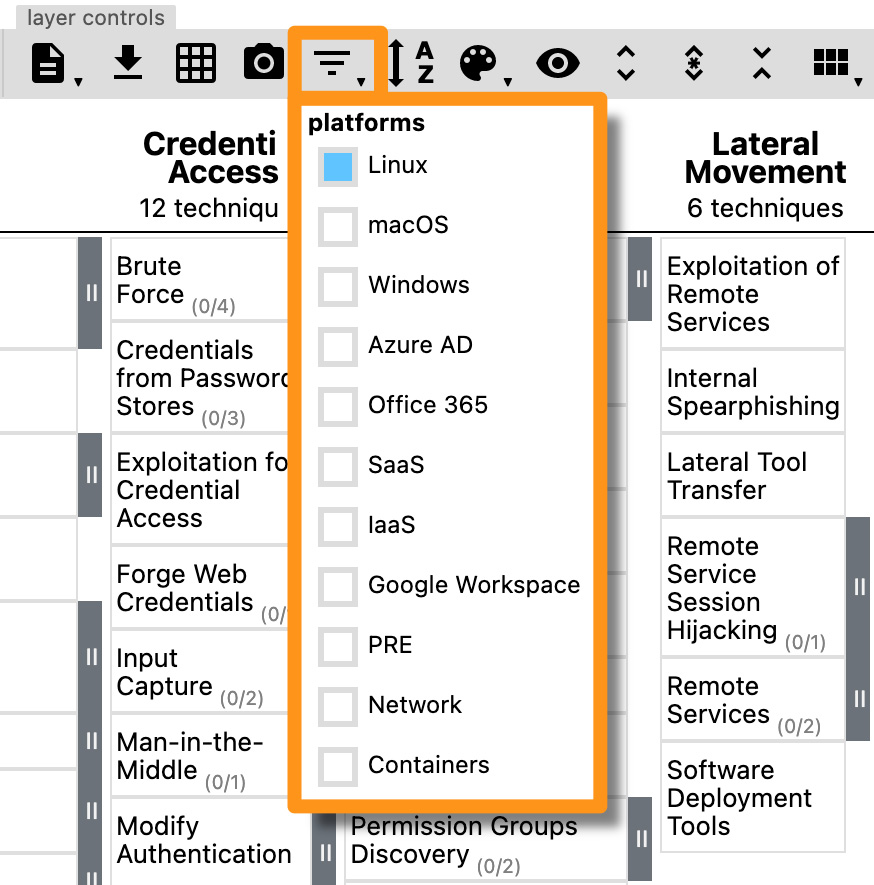
Figure 11.5 – The ATT&CK Navigator's filtering capabilities
Furthermore, if we were considering implementing three new enhancements to the security posture of an organization, we could use the Navigator to find out what tactics, techniques, and sub-techniques would be impacted by those changes. In the following example, I selected Antivirus/Antimalware as a mitigation and the Navigator highlighted the tactics, techniques, and sub-techniques that would be impacted by those mitigating steps:

Figure 11.6 – The ATT&CK Navigator selecting Antivirus/Antimalware mitigations
This is even more helpful when you have three possible changes to the security program, but only enough resources for one. As we discussed in Chapter 10, Leveraging Hunting to Inform Operations, this can help prioritize resources to make the biggest impact on an adversary campaign.
Expanding on the mitigating steps, you can apply selections for specific groups to highlight the known TTPs or software titles to identify observed capabilities and behaviors.
In this section, we introduced the ATT&CK Navigator, an extremely powerful tool to theorycraft your existing and future security posture, as well as assisting you in hunting, defensive prioritization, or incident response. Unfortunately, this was just an introduction, but there are resources in the Further reading section of this chapter that provide information on additional capabilities of the tool.
In the next section, we'll use third-party tools to enrich events and observations.
Enriching events with third-party tools
In the previous section, we worked a bit with MITRE's ATT&CK Navigator, a powerful tool that will allow you to shape and prioritize defensive considerations. Next, we're going to look at tools that can be used to enrich technical data observed during a hunt or incident response.
IPinfo
IPinfo is a website that can be used for free to gain insights into IP addresses, such as where they are located geographically, who owns them, and the hostname assigned to the IP.
This information can be collected from their website or using their exposed API endpoint, which is faster and can be done anywhere you have a command prompt.
To start, you can browse to https://ipinfo.io and either create an account or see basic information without registering. While that can be helpful, let's query the API to get information about IP addresses we may identify during a hunt. To do that, open a command prompt and use the cURL program (this is built into all modern OSes) to run the following command:
$ curl ipinfo.io
This will return your public IP address and some basic information about it. Now, if we want to use this to get additional information from an IP address during a hunt, we can simply add that to the curl command. I'm going to use an IP address from a public threat feed:
$ curl ipinfo.io/64.225.18.241
{
"ip": "64.225.18.241",
"city": "Clifton",
"region": "New Jersey",
"country": "US",
"loc": "40.8344,-74.1377",
"org": "AS14061 DigitalOcean, LLC",
"postal": "07014",
"timezone": "America/New_York",
"readme": "https://ipinfo.io/missingauth"
}
The preceding code shows the output from the API endpoint of the IPinfo service.
Note
The missingauth output is because we're not registered for an account. If you register for a free account, you'll get an authentication token (I recommend this method):
$ curl ipinfo.io/64.225.18.241?token=1234567
In this section, we discussed using IPinfo as a way to gain additional information about IP addresses.
In the next section, we'll use an open source tool to get additional information about files.
Abuse.ch's ThreatFox
Abuse.ch is a platform that publishes threat information based on their own research as well as samples submitted by the information security community. ThreatFox was released in March 2021 as a way to research and share indicators.
As with most tools, it leverages a powerful API. There is a lot that can be done with their API; we'll look at an example of querying a malware sample and then you can continue to explore all the facets on your own as an exercise left to you.
Again, using cURL, we'll query the API for ThreatFox to get some information on a credential stealer called ArkeiStealer.
As this command is a bit more complex than what we've done previously, let me walk through what we're doing:
- curl: This is the binary that we're running to make a web request.
- -X POST: This changes the default HTTP request from GET to POST, because we're going to be making a query.
- https://threatfox-api...: This is the URL that we're going to be querying.
- -d: This is telling cURL the data that we're going to send as a JSON object.
- { "query": "search_hash": This is the JSON object that we're sending; for ThreatFox, it means that we're making a query, we're going to search a hash, and the hash is as follows.
- "hash": "5b7e82e051ade4b14d163eea2a17bf8b": This is the hash that we're going to be searching for.
When we put that all together, it looks like this:
$ curl -X POST https://threatfox-api.abuse.ch/api/v1/ -d '{ "query": "search_hash", "hash": "5b7e82e051ade4b14d163eea2a17bf8b" }'
This will return the following information, which gives us a lot of useful data that can show us what other researchers have observed:
{
"query_status": "ok",
"data": [
{
"id": "4594",
"ioc": "http://choohchooh.com/",
"threat_type": "botnet_cc",
"threat_type_desc": "Indicator that identifies a botnet command&control server (C&C)",
"ioc_type": "url",
"ioc_type_desc": "URL that is used for botnet Command&control (C&C)",
"malware": "win.arkei_stealer",
"malware_printable": "Arkei Stealer",
"malware_alias": "ArkeiStealer",
"malware_malpedia": "https://malpedia.caad.fkie.fraunhofer.de/details/win.arkei_stealer",
"confidence_level": 100,
"first_seen": "2021-03-23 08:18:05 UTC",
"last_seen": null,
"reference": null,
"reporter": "abuse_ch",
"tags": [
"ArkeiStealer"
]
}
]
}
As we can see, there is a tremendous amount of information that we're provided on this malware sample. Some elements of note that are useful are when it was first observed and additional resources to check out to learn more (malpedia, in this case – which is a great resource).
In this section, we learned how to query the ThreatFox API to learn information about a suspicious file.
In the next section, we'll use VirusTotal as a one-stop shop for research.
VirusTotal
VirusTotal is often, and rightfully so, referred to as a one-stop shop for research. If you want to search IP addresses, you can do it here; if you want to search domains and URLs, you can do it here; if you want to search files, you guessed it, you can do it here.
VirusTotal has an API, but this is one of those rare cases where the website has so much great information and a very impressive user experience, so it makes sense to use the website.
Like ThreatFox, VirusTotal has a huge amount of information that I encourage you to explore on your own, but as an example, we'll search for the same file hash we used previously.
To start, browse to https://virustotal.com and enter an IP address, domain, or file hash (MD5, SHA1, SHA256) into the search bar:

Figure 11.7 – VirusTotal file hash search
When you perform this search, you'll receive information about the file, which security vendors detect the file as malicious, what they call it, relationships between other malware samples, basic metadata about the file, and even contributions from the community:

Figure 11.8 – VirusTotal file search results
Beyond querying, you can also submit malware to VirusTotal to analyze. This should be used with caution as when you submit a sample, it becomes public. Anything that is in the malware is now public, and if your organization was specifically targeted, you could be exposing sensitive information:

Figure 11.9 – Information on VirusTotal with company-specific information
Additionally, if the adversary is watching VirusTotal (and I guarantee they are), when you upload their malware for analysis, they will know you're onto them and they need to change tactics. Uploading files to VirusTotal is not bad, it is very common, but it should be something you are doing intentionally and with a purpose rather than just uploading everything that looks suspicious before performing any analysis. More specifically, querying a hash value is important and can certainly provide value; however, if a hash value returns no results, a sample may be uploaded as a last resort. Queries on VirusTotal are not publicly trackable:

Figure 11.10 – VirusTotal malware submission tracking
As we can see, VirusTotal certainly can be used as a one-stop shop for indicator research and enrichment.
In this section, we introduced enriching indicators with third-party tools such as IPinfo for IP addresses, ThreatFox for files, and VirusTotal for indicators of all sizes and shapes. Enriching indicators is paramount to a hunter's success, and these are some tools to get you down the right path.
Enrichments within Elastic
The Elastic Security app currently has IP reputation links that can be used to gain additional information about threat detections. To use these, simply click on an IP address of interest from within a timeline to be sent to either VirusTotal or Talos Intelligence and automatically perform a search for the IP address. Additional indicator types will hopefully be added in the future:

Figure 11.11 – IP reputation checking from within Elastic
In the preceding screenshot, you can see the IP address 64.225.18.241 has been identified in a timeline. From here we can click on the IP address and the network details flyout pane has hyperlinks that we can click on for VirusTotal and Talos Intelligence that will provide us with additional enrichments on this IP address.
In this section, we saw how we can use the timeline feature of the Elastic Security app to perform enrichments for IP addresses.
Summary
In this chapter, we explored a powerful tool by MITRE, the ATT&CK Navigator, to research adversary tactics, techniques, and sub-techniques. We also used tools and platforms to gain additional information about indicators that we've collected during a hunt.
If you're interested in malware reverse engineering, there is a tremendous book on the topic referenced in the Further reading section, Practical Malware Analysis.
In the next chapter, we'll discuss information sharing and analysis. Additionally, we'll explore how to get standardized data into and out of the Elastic Stack for sharing.
Questions
As we conclude, here is a list of questions for you to test your knowledge regarding this chapter's material. You will find the answers in the Assessments section of the Appendix:
- MITRE's ATT&CK Navigator allows you to research what?
a. File hashes
b. IP addresses
c. Tactics, techniques, and sub-techniques
d. Domains
- A command-line tool used to interact with APIs is called what?
a. cURL
b. Vi
c. Nano
d. Chrome
- What allows you to authenticate to IPinfo's API?
a. Key
b. Username and password
c. Cookie
d. Token
- Currently, you can perform enrichments from within an Elastic timeline for which indicator types?
a. Domains
b. IP addresses
c. Registry keys
d. File hashes
- When uploading a file to VirusTotal, what is a risk?
a. The adversary could know they've been detected.
b. You could infect yourself.
c. The results may not be accurate.
d. You cannot upload malware to VirusTotal.
Further reading
To learn more about the subject, check out the following:
- Comparing Layers in Navigator, MITRE: https://attack.mitre.org/docs/Comparing_Layers_in_Navigator.pdf
- Introduction to ATT&CK Navigator, MITRE: https://www.youtube.com/watch?v=pcclNdwG8Vs
- IPinfo documentation, IPinfo.io: https://ipinfo.io/developers
- ThreatFox API, Abuse.ch: https://threatfox.abuse.ch/api
- Malpedia, Fraunhofer FKIE: https://malpedia.caad.fkie.fraunhofer.de
- Practical Malware Analysis, No Starch Press: https://nostarch.com/malware