
6. Crisp High-Speed Photography
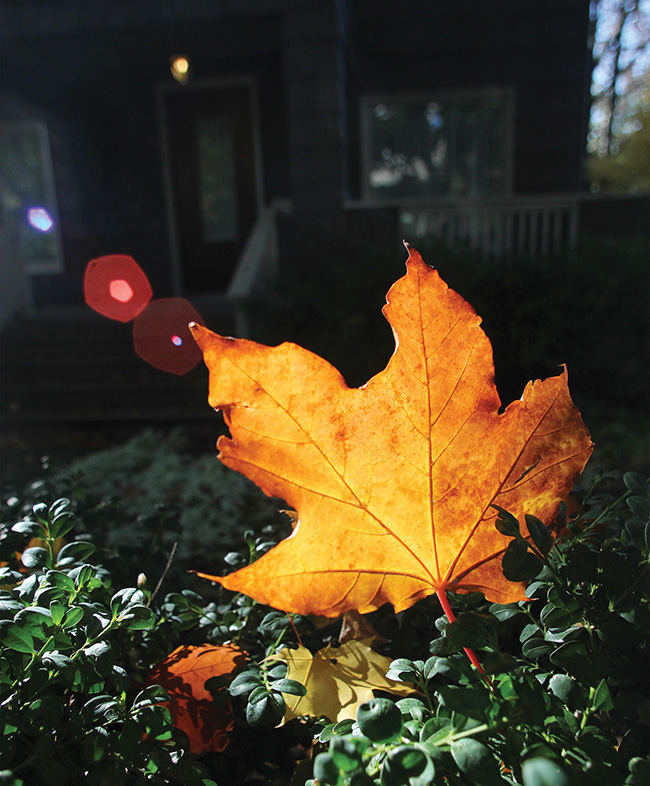
Canon T2i • ISO 400 • 1/1000 sec. • f/4.5 • Sigma 14mm lens (equivalent to 22mm)
Exposing for the Moment
Magic can happen when you venture higher on the shutter dial. Unlike collecting time in a single image or creating a sense of motion in successive frames, a high shutter speed controls duration in a different way than long exposure and time lapse photography by freezing the moment. Just because a high shutter speed captures the subject quicker than a blink of an eye, it’s not always about stopping action. In this chapter you’ll learn some practical techniques to use when you’re shooting with consumer or prosumer cameras at 1/500 of a second or higher.
Poring Over the Picture
Stopping action with a GoPro is fairly simple. You can easily attach the camera to just about anything, including a skateboard, and capture the scene as a still image, time lapse, or movie.
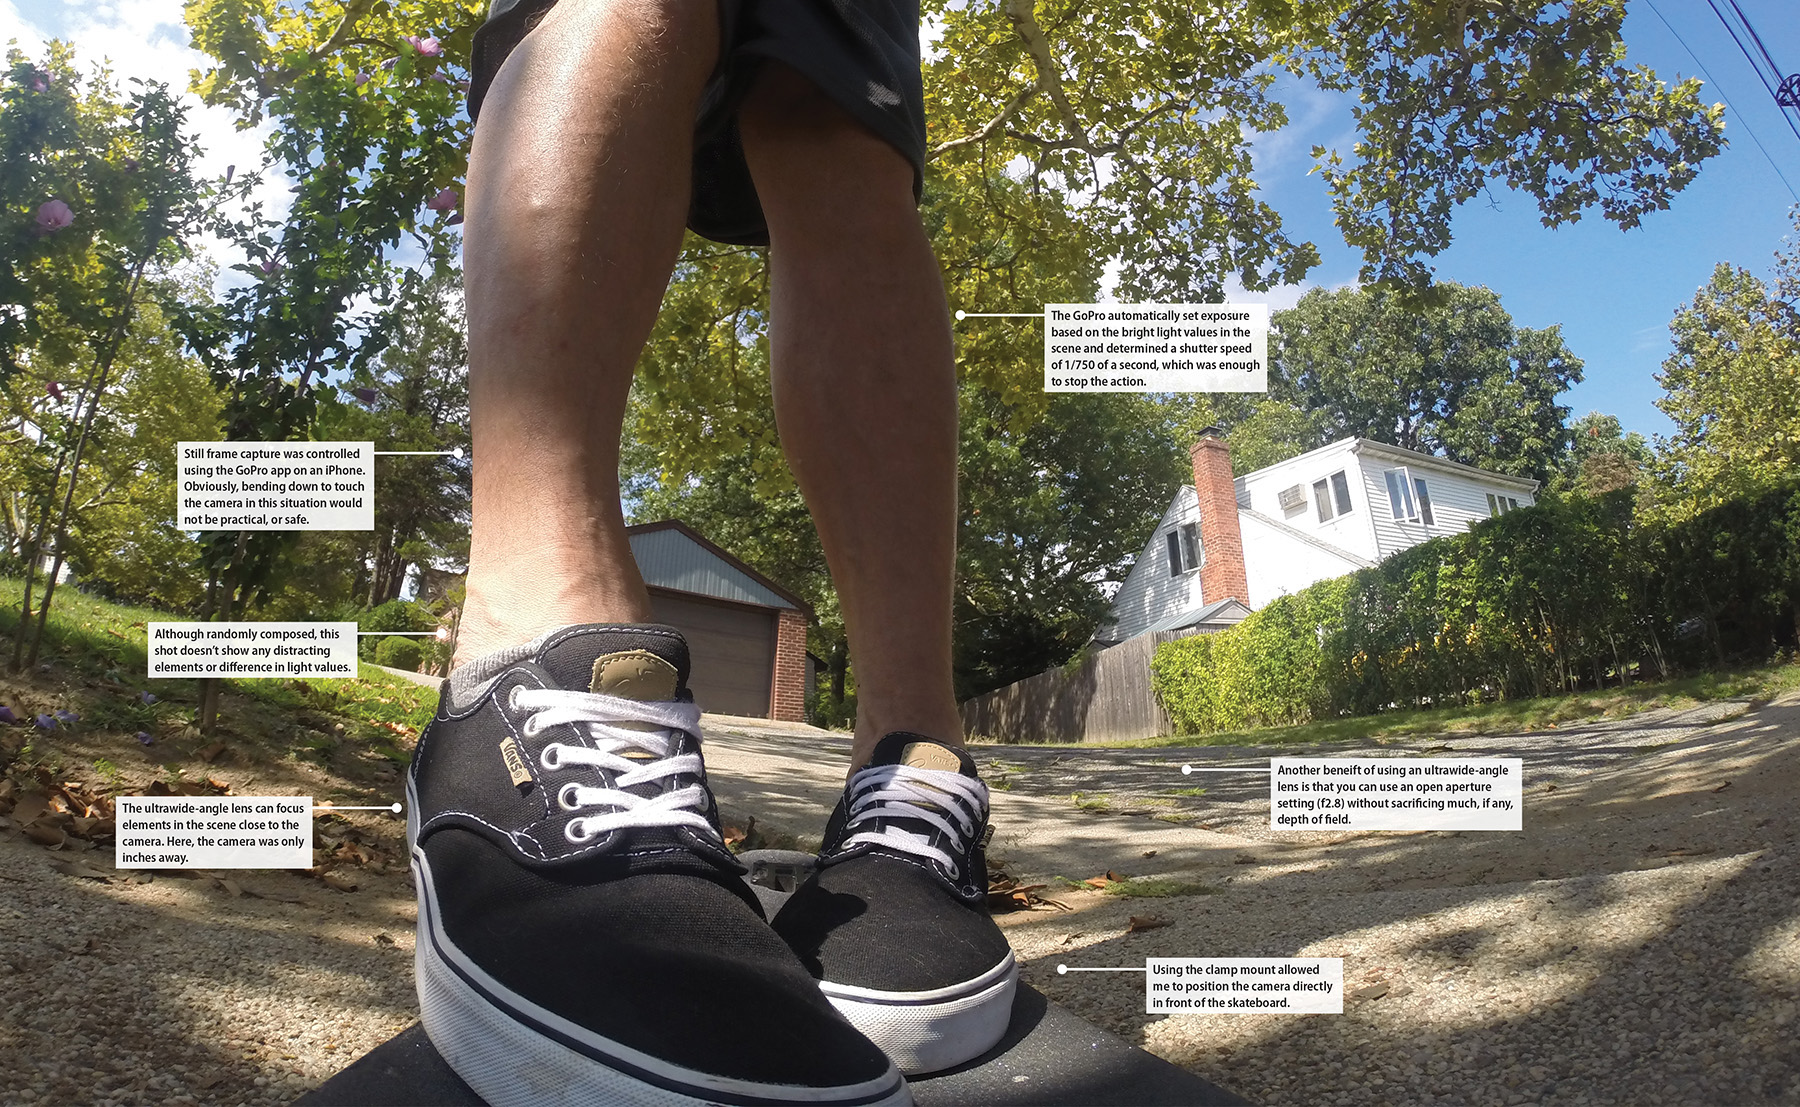
GoPro HERO3+ Black • ISO 100 • 1/750 sec. • f/2.8 • Wide view (equivalent to 14mm lens)
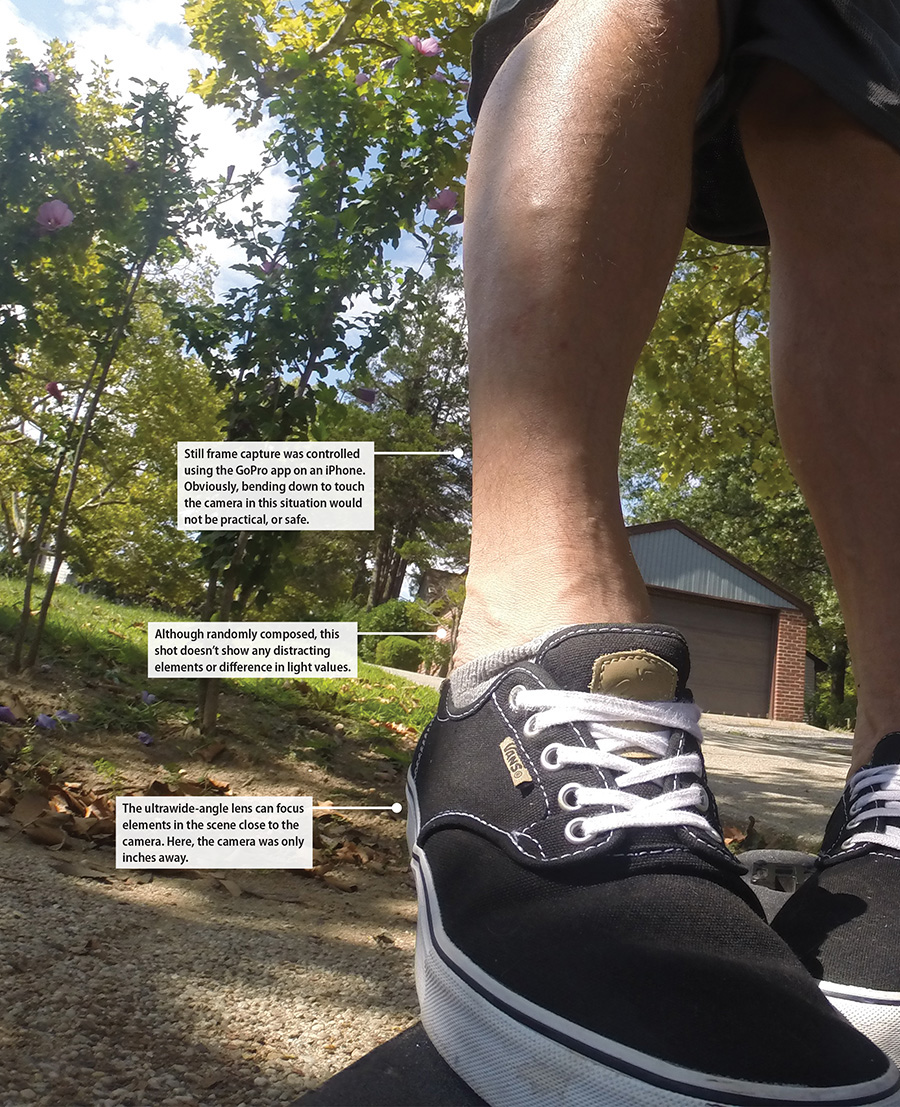

Poring Over the Picture
A high shutter speed does more than stop action: it also enables you to effectively shoot the scene in bright situations while handholding the camera, allowing you to control sharpness and depth of field.

Canon T2i • ISO 100 • 1/500 • f/11 • Sigma14mm lens (equivalent to 22mm lens)


A Fast Shutter Speed
Some situations merit the use of a long exposure, whereas others thrive on very brief ones. Circumstances benefitting from fast exposure times include freezing action, dealing with brightly lit situations, and minimizing shake while handholding the camera. Then there’s the ongoing need to control depth of field, or more specifically, lack thereof, by selecting a shutter speed high enough to balance exposure to use a wide aperture. Every situation worthy of a high shutter speed depends on one or another of these factors; often, more than one reason is evident in the same picture (Figure 6.1).

Canon T2i • ISO 100 • 1/500 • f/11 • Canon 24–105mm lens at 92mm (equivalent to 147mm lens)
Figure 6.1 This pilot boat off the coast of Bermuda was captured from a high position using a high shutter speed.
Using a High Shutter Speed for Bright Situations
Let’s take a refresher course in exposure for a moment. The relationship between aperture setting, ISO, and shutter speed determines the foundation for correctly exposing a scene. Every photographic situation can use a different balance of the three because they are reciprocal, meaning if you change one, you must change the other to maintain equal exposure. Using this logic, a high shutter speed lets less light into the lens. That’s not to say it always affects exposure, but it certainly comes in handy when you want to avoid overexposure while photographing subjects in brightly lit situations.
Capturing scenes in the snow or shooting at a beach, as shown in Figure 6.2, share similarities beyond their climatic differences because they’re both very bright due to their highly reflective nature. It’s not uncommon in either situation to require a high aperture and shutter speed to avoid overexposure.

Sony Cybershot 750 • ISO 100 • 1/500 sec. • f/8 • 35mm lens
Figure 6.2 Jillian burying her brother in the sand—or a visual rendition of I Ain’t Got Nobody—was captured using a high shutter speed on a sunny day at the beach.
When you’re shooting in either condition, in snow or at the beach, consider the follow-ing advice:
• Don’t get fooled: The brightness in either situation can possibly fool the matrix metering on your camera and underexpose the scene. If the preview looks too dark, increase exposure compensation by two stops (it’s simple to do, but operation differs from camera to camera so check your manual) or just shoot on manual exposure.
• Expose for the highlights: When the highlights are exposed normally, the rest of the scene renders darker, which can add a dramatic effect.
• Keep the camera safe: Regardless of the element, sand or water, both wreak havoc on electronics, so keep the camera covered when you’re not using it.
• Use the light to your advantage: Try shooting with the light at your back unless you want lens flare to enter the lens.
High-Speed Control Differs with Each Camera
Not all cameras provide the same level of control. Some allow you to manage every aspect of a shoot, whereas others offer limited functions. Some cameras can handle high exposure but leave you few, if any, options to do anything else but hope for the best.
The Digital SLR
Besides the ability to select the focal length, use a variety of accessories, and benefit from a basic design that’s existed for decades, using a DSLR provides the most control over exposure, allowing you to set the shutter speed fairly high (Figure 6.3), completely control the aperture, and set ISO into the stratosphere. The downside is that a DSLR is more expansive than other types of cameras; it requires some understanding to use effectively and is prone to mishaps from the elements.

Canon T2i • ISO 100 • 1/800 • f/13 • Canon 24–70mm lens at 40mm (equivalent to 62mm lens)
Figure 6.3 The hansom cab was frozen at a high shutter speed as it slowly moved down a street in Old Montreal.
Point-and-Shoot Cameras
Current point-and-shoot cameras are not your father’s point-and-shoot models; many now offer features comparable to a DSLR although not as robust. Basic models can still capture a subject at speeds up to 1/2000 of a second. But the downside is that you cannot change the lens so the angle of view is not always very wide.
GoPro Cameras
The GoPro is capable of recording an image at a very high shutter speed, and thanks to a diverse and relatively inexpensive set of mounts, you can use the camera in places you would never go and use an app to control it from a safe distance. But the downside is that you have limited control over exposure. The camera offers several ISO and exposure value settings but uses a fixed aperture and automatically chooses the shutter speed (Figure 6.4).

GoPro HERO3+ Black • ISO 100 • 1/2400 sec. • f/2.8 • Wide view (equivalent to 14mm lens)
Figure 6.4 The GoPro was placed in a fountain and captured the bursts of water at a very high shutter speed.
Smartphone Cameras
Although most smartphone cameras have the capability to stop action at fairly high shutter speeds, they offer very few functions to fine-tune your exposure. But their functionality is based on how you look at it. If you consider a smartphone a camera, it’s not a very good one. Yet, when you think of it as your phone taking pictures, the results are a bit more awesome (Figure 6.5).

iPhone 6 • ISO 50 • 1/3200 sec. • f/2.4
Figure 6.5 This panoramic on a Bora Bora motu was captured with an iPhone 6.
Determining the Correct Shutter Speed
Many cameras capture action at speeds well into the thousandths of a second, but you don’t necessarily have to go that high. Each situation has its own effective shutter speed for properly capturing a subject; it depends on several factors, including the brightness of the scene and how quickly the action moves through the frame. For example, freezing a person jumping in the air requires a slightly higher shutter speed than capturing a performer on stage. Other factors include the direction of motion, focal length of the lens, and your intention for the picture.
Table 6.1 contains some minimum shutter speeds for stopping action in various situations.

Use an Effective ISO Setting
Prepare to set ISO high enough to support the shutter speed and aperture combination that works best for the scene. The ISO setting determines sensor sensitivity and can vary from 100 to 50,000 or more. Low ISO settings yield more detail and minimal image noise (see the sidebar “What Is Digital Noise?”), whereas higher settings increase digital noise. During the day, it’s possible to shoot at a low ISO setting, but nighttime and indoor events require a lot more sensitivity, so it’s not unusual to use a setting of 1600 or higher. The good news is that today’s sensors are able to capture maximum quality with minimal noise (Figure 6.6).

Canon 6D • ISO 3200 • 1/320 • f/5.6 • 14mm lens
Figure 6.6 With the ISO set on automatic, this twilight scene was shot with a fast shutter speed and medium aperture.
Shooting Continuous Frames
Capturing action is not always a one-shot deal. Often, it’s a matter of selecting the best of a number of successive frames you captured of the action. DSLR models allow you to shoot at a fast rate per second (even faster with an optional motor drive). GoPro lets you shoot a burst of frames, offering the possibility that one frame will show the decisive moment of action (Figure 6.7) or expression on the subject’s face.

Canon T2i • ISO 100 • 1/800 • f/5.0 • 24–105 at 88mm (equivalent to 140mm lens)
Figure 6.7 A quick burst of frames captured these children diving in the harbor on the French Polynesian island of Ta’a Oha.
When you’re shooting continuous frames, consider the following:
• Be conservative with your finger on the button: The latest sensors provide high quality, but each file can take up a lot of space on a media card and your hard drive. Unless you have unlimited virtual real estate, use the bursts sparingly.
• Use a fast media card: Besides having a card with substantial capacity, a faster one can records files without lag. If you’re not sure which card is right for you, check out “Having the Right Media Card” in Chapter 1.
• Shoot in RAW: Files are bigger in the RAW format and take longer to process. But the ability to process an image after it’s captured—and do it on your computer—ensures the best quality image, especially when you’re “gunning” through the scene.
Handholding During a Long Exposure
Sure, you can handhold your camera to capture action, but it takes more than a steady hand to reduce camera shake. With gravity working against you, a little bit of movement while pressing the shutter can rob the picture of sharpness, which is why sports photographers use monopods. But they’re not always practical, and you may not have one when you need it, so you have no choice other than holding the camera. In a handheld situation, it’s important to understand the minimum shutter speed you can use and how it relates to focal length.
Since the dawn of the SLR, the rule has been that the shutter speed can never be lower than the focal length of the lens. That means if you’re shooting with a 200mm lens, you must shoot at 1/200 of a second or higher. That rule has changed somewhat during the digital era because the different sized sensors have impacted the effective focal length of a lens. So although 1/200 of a second is fine to use with a full-frame DSLR (Figure 6.8), it’s not enough when you’re using a DSLR with a crop sensor, or more specifically, one in the APS-C format.

Canon T2i • ISO 200 • 1/640 • f/8 • 24–105 at 95mm (equivalent to 152mm lens)
Figure 6.8 While handholding the camera and using a fast shutter speed, I was able to freeze the action of this cliff diver off the Kona coast of Hawaii.
Minimum Shutter Speed
Table 6.2 breaks down the minimum shutter speeds for each focal length in both full-frame and APS-C cameras. But remember that these are the lowest shutter speeds you should use to eliminate shake and may not be high enough to freeze the action, so take that into consideration as well.

Shooting at the Decisive Moment
Great photography often comes down to precisely pressing the shutter at a pinnacle moment in the scene. In the blink of an eye, you either get the shot or you don’t, making it imperative to capture the decisive moment.
Attributed to the renowned street photographer Henri Cartier-Bresson, the term “decisive moment” refers to his belief that every situation has a special moment of activity that defines it. Whether it is a man and his reflection captured in mid-air jumping over a puddle, the expression on a young boy’s face as he turns a corner, or a kissing couple who catch their dog’s attention, all situations have a defining moment.
That same intention can make your photographs stronger. Whether it’s action, an expression (Figure 6.9), or just the right alignment of objects in the frame, the right moment plays a huge role in the success of your photo.

Canon EOS-1 • ISO 200 • 1/500 • f/5.6 • 20–35mm at 24mm
Figure 6.9 An ice-cold beach shower led to this magical expression captured at the decisive moment.
Mastering Motion Blur
Somewhere between stopping the action with a high shutter speed and showing it in the picture with a slower shutter duration lies the motion blur. This cool technique provides viewers with a strong sense of activity happening in the photograph. Whether it’s those classic examples of a race car set against streaks of blur in the background or a BMX bicyclist doing a 360-degree turn (Figure 6.10), the subject is relatively frozen, yet the background shows motion.

GoPro HERO3+ Black • ISO 100 • 1/60 sec. • f/2.8 • Wide view (equivalent to 14mm lens)
Figure 6.10 A GoPro was placed on the handlebars of a BMX bike to capture a motion blur.
A motion blur is fairly easy to do and often leads to a dramatic effect. The streaking or motion occurs as you move the camera with the subject. Depending on the speed of the action, you can even use a slightly slower shutter speed because you’re following the subject as you pan. The movement keeps the subject in focus but blurs the background into a kinetic image.
Freezing Action with Flash
Electronic flash can stop action without using a high shutter speed, which comes in handy in dimly lit scenes or those without any light at all, as shown in Figure 6.11. As mentioned in Chapter 5, a flash unit uses a very fast burst of light that freezes action, provides illumination, and keeps the color balance predictable. But flash doesn’t work in every situation. For example, you can’t use it at sporting events because it’s distracting to the players. Flash units cover a limited distance, which makes it necessary to be closer to the subject, and that’s not always possible. And in some situations, flash units can produce harsh illumination. But the pros outweigh the cons most of the time, making electronic flash a viable option for stopping action.

Canon 6D • ISO 1250 • .4 sec. • f/11 • 24–105mm at 28mm
Figure 6.11 In near darkness, this diver was frozen using a slow shutter speed with a flash unit. Because the flash was the only illumination in the scene (besides the pool’s interior light), no motion blur is seen on the subject.
Fun with People
Stopping action can also have a whimsical side as you capture enjoyable moments with your friends and family. Whether it’s a kid wakeboarding at the edge of the shoreline (Figure 6.12) or a young woman caught in a mid-air pose, you can have a lot of fun creating action moments with those closest to you (Figure 6.13).

Canon 6D • ISO 800 • 1/800 sec. • f/5.0 • 200mm lens
Figure 6.12 Playing on the shoreline led to a fun picture.

Canon 20D • ISO 800 • 1/250 sec. • f/14 • Canon 20–35mm lens at 29mm (equivalent to 46mm)
Figure 6.13 Sometimes you can have fun capturing everyday action at unusual angles, like this diver doing a flip caught before hitting the water. Thanks to a wide-angle lens and small aperture setting, the entire scene is in focus.
But stopping action or capturing that perfect expression is often easier said than done, so consider the following:
• Shoot a lot of frames: The perfect image rarely comes on the first try, so keep shooting and make adjustments to get the image just right.
• Use a high enough shutter speed: There’s nothing worse than almost stopping the action, especially when it’s compelling.
• Take a few test shots: Make sure exposure and composition work for the scene by shooting a few frames and making adjustments before the action begins.
Look for a situation that consists of continuous activity (pedestrians walking, a busy intersection, or an amusement park ride) and shoot the same scene multiple times using different shutter speeds. Start at 1/30 of a second and increase by one full stop until you get to 1/1000 of a second. You can make this experiment easier by setting the camera on Shutter Priority and letting the camera select aperture. Then, check out the images and look for the shutter speed that stops the action as well as those that blur it.
Try Different ISO Settings
Shoot the same scene using different ISO settings to observe the effect each setting has on your images. Depending on the camera model and generation of sensor, the results will vary. Nonetheless, it’s important to learn how much noise (or lack thereof) you will get at each setting to understand the limitations of how far you can go to capture a perfectly exposed image in limited light. Keep in mind that a higher ISO allows you to use a relatively high shutter speed in dark conditions.
Capture Action with a GoPro
Because you can easily mount a GoPro on anything and control it from afar, you can experiment with capturing action scenes up close. The camera uses a wide-open aperture setting, so the reciprocal exposure balance produces a very high shutter speed. Also, try setting the camera in Burst mode (you can access it directly from the GoPro app): The camera will shoot a bunch of frames in succession so you don’t miss the perfect frame. Finally, change the ISO setting to gain higher shutter speeds.
Create a Moment with a Friend
Set up a situation with a friend who is involved in an activity. Ask the subject to jump in the air as you take photographs from different angles. Spice things up by suggesting different facial expressions as your friend moves. Also, experiment by freezing the action with flash. When you’re done, check out the images and see which situations worked and which ones didn’t.
Share your results with the book’s Flickr group!
Join the group here: flickr.com/groups/timelapse_longexposure_fromsnapshotstogreatshots/