
Appendix

Canon T2i • ISO 800 • 1/3 sec. • f/4 • Canon 24–70mm lens at 24mm (equivalent to 38mm)
Enhancing Your Time Images with Adobe Photoshop
Whether you’ve captured a long exposure, a very brief one, or a time lapse sequence, frequently, the image will render less than perfect. Sometimes a disparity will exist between the highlight and shadow details, and because you can choose only one, the other suffers. Other times the image might have a color issue, either because of a dominant cast or a white balance problem. Some other factors impede composition, such as extraneous objects or a tilted horizon. Regardless of your best efforts while capturing the subject, it’s likely that one or more of these factors will influence your image, and not for the better. Fortunately, you can correct many of these issues, as well as many others, using Adobe Photoshop.
Dealing with Shadow and Highlight Issues
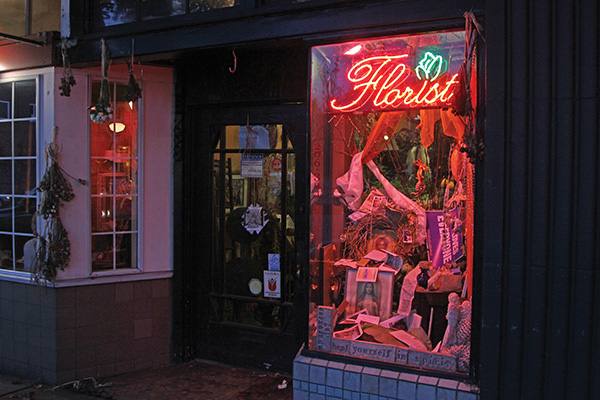
More often than not, problems with night images occur due to factors beyond your control. For example, exposure for the image in Figure A.1 was based on the unique storefront display, so the rest of the scene was rendered darker, with little evidence of details in the shadow areas. Simply lightening the scene wouldn’t help because it would deplete the detail in the window display, leading to a trade-off between improving shadow or highlight detail. But by using the Shadows/Highlights control in Photoshop, we can have both.

Canon T2i • ISO 800 • 1/3 sec. • f/4 • Canon 24–70mm lens at 24mm (equivalent to 38mm)
Figure A.1 Because illumination comes primarily from the neon-lit store window, the rest of this street scene is pretty dark.
Let’s use this image to walk through how to use the Shadows/Highlights control in Photoshop:
1. Open Adobe Bridge, navigate to the desired image, and open it in Photoshop. You can open the image in a number of ways, but here I’ll suggest two: Control-click (Mac) or right-click (Windows), as shown in Figure A.2, and choose File > Open With. Or just double-click the image to open it if Photoshop is the default software you use to open an image.

2. Choose Image > Adjustments > Shadows/Highlights to bring up the dialog (Figure A.3).
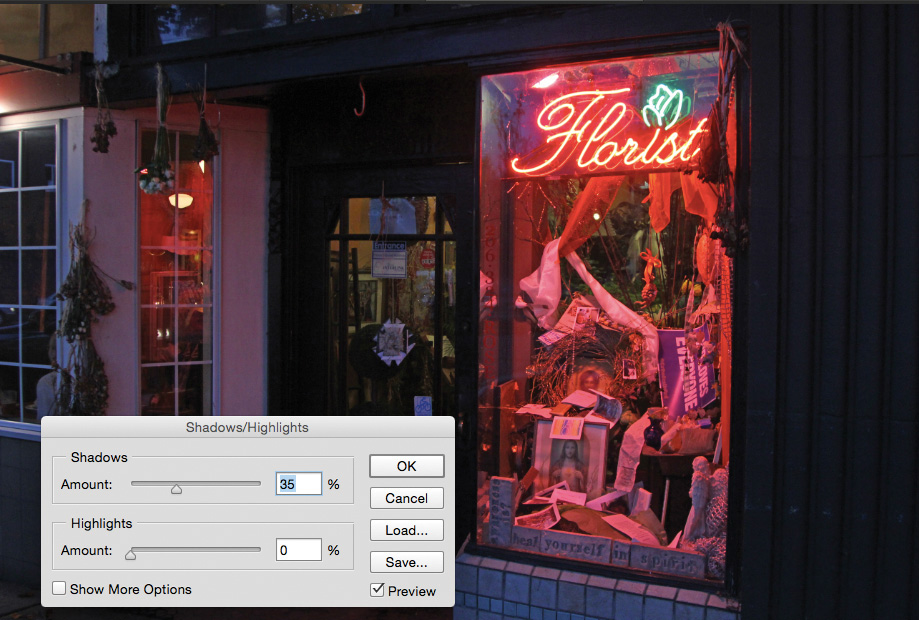
We’ll make adjustments to the shadow area first. As you can see, the Shadows Amount defaults to 35% when you open the dialog.
3. Increase the Shadows Amount to 40% to open up the scene and add detail to the shadow areas (Figure A.4). This will not affect the highlight areas.

Figure A.4 After adjusting the Shadows slider, you can immediately see the details in the shadow area, providing the Preview box is checked.
4. Let’s adjust the highlight area. Although the window display was properly exposed, we’ll add a little more detail to the scene, as shown in Figure A.5. Slide the Highlights control to 10% to provide just the right amount of adjustment for this scene, and click OK (Figure A.6).

Figure A.5 Because the highlight area was properly exposed, a slight adjustment is all that’s needed to bring out some additional nuances.

5. We’ll add some sharpness to the picture now. Although the image is fairly sharp, it can still use a little punch. Choose Filter > Sharpen > Unsharp Mask, as shown in Figure A.7. The dialog that appears contains several control sliders that allow you to adjust how much you sharpen the image. You can also preview the effect and see the result in the Mask Window. You can click in the window to see the original sharpness. For this image, we’ll set the following: Amount: 125%, Radius: 1.5, and Threshold: 10 (Figure A.8). Click OK.


You’ll see a much-improved image. The shadow and highlight areas as well as image sharpness are now more balanced (Figure A.9).
Enhancing Time Lapse Images En Masse
Time lapse images are subjected to the same issues as any other image but with one major difference: Instead of enhancing a single picture, you need to apply the changes to every image in the sequence, or at least a set of them. You can apply changes individually, but that is time-consuming. You also need to ensure that each image is altered in exactly the same way so they all conform. But there is no need to worry, because you can make uniform changes quickly and easily using the Batch function in both Photoshop and Adobe Bridge.
You start by recording an action, and then apply it to a folder full of images. You can replace them, or better yet, save them to another folder. But before you can batch correct color or exposure, or add an effect to a series of images, you must first create a specific action to carry out the desired effect.
Here’s how you record an action:
1. Open an image from the folder containing all the images you want to change (Figure A.10). We’ll prepare to record the action to tweak the density and transform it to black and white.

Canon T2i • ISO 400 • 1/320 sec. • f/11 • Canon 24–105mm lens at 75mm (equivalent to 120mm)
Figure A.10 This white seal and his buddies were frolicking on a rock at La Jolla.
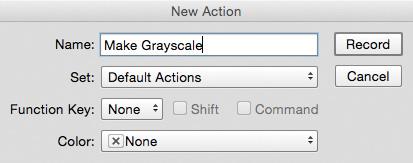
2. Choose Windows > Actions. The Actions panel appears, which allows you to record all the changes you want to make to an image, and then apply them to an entire folder of images. In the Actions panel, click the small page icon (circled in Figure A.11) to begin recording every step you take while enhancing the image.

3. Name the action in the Actions dialog that pops up (I chose: Make Grayscale) and click Record (Figure A.12).
4. Enhance the image by choosing Image > Adjustments > Levels (Figure A.13). Photoshop records every step you take. Move the slider on the left inward to the right (to create a deeper black), and then slide the pointer on the right to the area where the histogram begins to lighten highlights. Next, slide the center pointer a little to the left to lighten the middle tones. Click OK (Figure A.14).


5. Convert the image to black and white by choosing Image > Mode > Grayscale to remove color from the image (Figure A.15).

Figure A.15 Because the subject was a neutral color, it’s more effective to show in black and white.
6. Save the image. This is an important step because if you don’t add this step to the action, Photoshop will prompt you to click OK to save each image. And because that will defeat the purpose of the Batch function, it’s important to build it into the action.
7. Stop recording the action by clicking the stop button icon on the Actions panel (Figure A.16) to save the action. The action is saved and can then be applied to any image by opening the Actions panel and selecting it.

Batch Processing Your Images
After you’ve created the desired action, you can apply it to the entire folder of images. Make sure you include all the images you want to alter, and create a destination folder so you don’t overwrite the original files or confuse the altered images with the others.
Here’s how you batch process your images:
1. Choose > Automate > Batch. The Batch dialog (Figure A.17) appears.

2. Make sure you select the correct action. In the Play section in the upper-left corner of the dialog, select the Make Grayscale action (Figure A.18) if it’s not already selected.

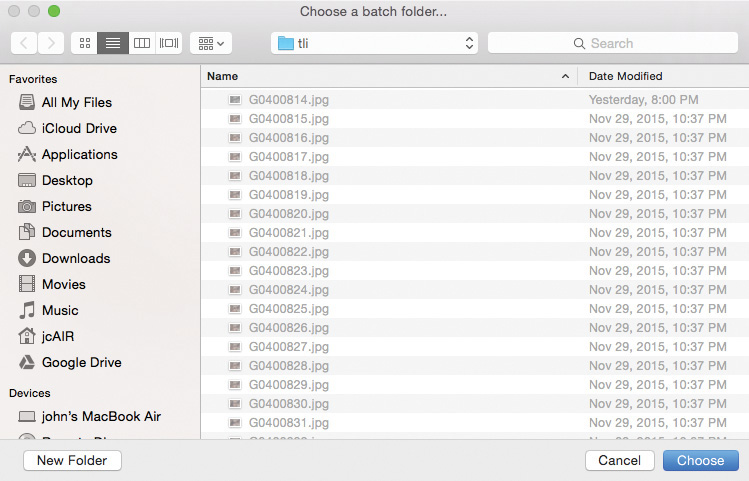
3. To select the folder of images for the Source option, click Choose and navigate to the desired folder. When you locate it, click Choose on the batch folder dialog (Figure A.19).
4. To select a folder for the converted images, select Folder as the Destination option on the right side of the Batch dialog, and navigate to the folder. If you didn’t already create a folder, make a new one, name it, and click OK. The images will process and then after a few minutes will populate the destination folder.
Image Correction Using Camera RAW
Regardless of how much care you put into your photography, not every picture downloaded from the camera ends up being technically perfect. Almost every image requires some form of tweaking, whether it’s fixing exposure, adjusting color, or cropping for a stronger composition. It’s just normal operating procedure when you’re dealing with digital photography, especially night photography. That’s why it’s a good idea to shoot your images in the RAW format.
A good example is the rendering in Figure A.20, which was shot from the top of the hill outside the Seattle Public Market at twilight. Although the picture is colorful and interesting, it does need a few adjustments, and most of those can be made in the Camera Raw plug-in included with Adobe Photoshop CC.

Canon T2i • ISO 100 • 1 sec. • f/8 • Canon 24–105mm lens at 28mm (equivalent to 45mm)
Figure A.20 The rich, colorful tones of this image taken at twilight were slightly underexposed, and its slightly tilted perspective may or may not have been intentional.
Follow along to make some adjustments to this image using the Camera Raw plug-in:
1. To open an image in the Camera Raw plug-in, just double-click on an image captured in the RAW format. In the dialog that appears, you’ll see many areas for making adjustments (Figure A.21).

Because this image is slightly underexposed, the first order of business is to correct it by adjusting the exposure.
2. We’ll increase the exposure by one stop by sliding the Exposure slider to the right until it reaches the +1.00 position (Figure A.22).

Figure A.22 Although this section of the dialog contains a variety of sliders that affect exposure and color in the image, it’s important to get exposure right before changing any others.
3. Now we need to fix color temperature. Although the color balance looks pretty good, it’s still a tad on the warm side. As you can see in the White Balance section, the camera recorded it at 3800 K (Figure A.21). Bringing it down to 3200 K, as shown in Figure A.23, will “cool down” some of the neutrals without affecting the brightly colored areas (Figure A.24).


4. We need to apply sharpening to the image next. Below the histogram on the right side of the dialog is a series of buttons. Click the one that looks like a triangle to access the sharpening tools (Figure A.25). These functions are quite sophisticated, but we’ll just make a simple adjustment to the Amount slider, increasing Sharpening to 100%.

Camera Raw allows you to perform many adjustments to an image, including cropping it.
5. Click the Crop tool icon in the upper-left corner of the dialog (Figure A.26). You can also access the Crop tool by pressing the C key.

6. To crop the image, just click on the image to draw a crop box. The cropped area appears (Figure A.27). You can adjust it using the anchors on the corners and edges. The composition appears slightly tilted, but instead of straightening it, let’s exaggerate it. To do so, we click outside the crop area on the right side of the image and move upward to twist it counterclockwise (Figure A.28).


Figure A.28 By tilting the crop box and pushing the anchors inward, we changed the image’s aspect ratio.
When you’re satisfied with the changes you’ve made, you’re done with the plug-in.
7. To open the image, click Open Image on the bottom right of the dialog. After a moment, the image will open in Photoshop, allowing you to make additional changes if you choose (Figure A.29).
