
2. Exposures Longer Than a Snapshot
Canon T2i • ISO 800 • 10 sec. • f/16 • Canon 24–70 f/2.8L at 24mm (equivalent to 38mm)
Got the Time, Get the Picture
Once upon a time, taking a long exposure was a normal part of photography—much like using a public payphone to make a phone call was normal. Or perhaps it’s more appropriate to say, as normal as loading film into your conventional camera during the modern era of photography.
The performance of film technology improved over the years, but film emulsions (the sensitive part) in the early days of photography were incredibly slow at accumulating enough exposure to make a photograph. Back when photography was in its infancy, some photographs took several hours to record, even under relatively bright conditions, and that included portraits as well. The prolonged stillness of a living subject no doubt contributed to that zombie-like appearance evident in those nineteenth-century tin plate portraits. Of course, at that time the extended exposure—and obligatory zombie look—wasn’t as much a creative device as it was simply a necessary device.
Poring Over the Picture
Twilight was the perfect time to capture Pike Place Market in Seattle. The short interval between the sun going down and the sky turning black provided an optimal period for a stunning photograph. The cool rich tones of the twilight sky nicely complement the warm, colorful lighting in the scene.

Canon T2i • ISO 100 • 1 sec. • f/8 • Canon 24–105 f/4L at 28mm (equivalent to 44mm)


Poring Over the Picture
Not all exposure times need long durations to show a universe within the picture. This picture of a cigar-smoking man sitting in a wheelchair shows the stillness of the subject and the kinetic action of people walking through Times Square. The exposure time was less than one second, but you can see all that happened in that short period of time.

Canon 20D • ISO 100 • 0.8 sec. • f/7.1 • Canon 20–35mm f/2.8L at 20mm (equivalent to 32mm)


But times certainly have changed. Many photographs are captured in a fraction of a second, making them a slice of time. But when exposure time increases, so does the photograph’s creative potential because more elements are introduced into the single image. But long exposure seems like an arbitrary term. After all, how do we qualify long? Clearly, an hour-long exposure fits the description, and perhaps so does a 30-second exposure. Sometimes even the fractional exposure is not fast enough to render the subject without blurring it. But although the term long exposure seems “loose,” the possibility of interesting photography is not.
Regardless of the exposure’s duration, when the shutter stays open for a prolonged period, it can break the monotony of capturing the world with your camera. Long exposures can detail a normally unseen world, render moving light into beautifully saturated streaks of color, and provide randomness to the image that can make each one of a kind.
Collect Light in a Single Image
When the exposure duration for a single image is several seconds to several minutes, you’re no longer capturing a slice of time, as you would in a snapshot. Now you’re collecting a big chunk of time: Everything that happens between the time exposure begins and ends accumulates as a single image. During this magical window, there’s great potential for something amazing to happen in the frame. For example, when you’re capturing a street scene, the taillights from passing traffic transform into streaks of colored light. Or, darker areas of a scene normally not seen by your eyes are “opened up,” making the scene viewable (Figure 2.1).

Canon T2i • ISO 800 • 30 sec. • f/5.6 • Canon 50mm f/2.8L (equivalent to 80mm)
Figure 2.1 Shot in the middle of the night on a south Florida canal during pitch-black conditions with my camera mounted on a sturdy tripod, this scene required a long shutter speed, a wide-open aperture, and a high ISO setting to open up a world unseen by the naked eye.

Canon 6D • ISO set on automatic (12,800) • 1/30 sec. • f/10 • Canon 14mm lens
Figure 2.2 With the ISO set on automatic for this scene of a tree shot against a twilight sky, the camera chose an incredibly high ISO 12,800 setting and retained a fair amount of detail. The 1/30 of a second exposure would require a 4-second exposure at ISO 100 using the same aperture.
Randomness of Long Exposure
No two fingerprints are alike; neither are snowflakes or human ears. That makes them all distinct and one of a kind. Well, the same can be said for long exposures thanks to all the moving parts in a scene, whether that includes light trails from traffic, painting the scene with a handheld light source (more on that in Chapter 4), or a brightly lit Ferris wheel set against a twilight sky, as shown in Figure 2.3.

Canon EOS-1 • ISO 100 • 2 sec. • f/11 • Canon 24mm lens
Figure 2.3 Captured from the front, this brightly lit Ferris wheel is complemented by the rich colors of the setting sky. Subsequent exposures take on a different appearance due to the arbitrary nature of the light source in motion and the rapidly changing colors of the background sky.
Many moving parts in a scene can ensure randomness with all that happens in the frame to make every image distinctly original.
Random situations include:
• Traffic patterns: Photograph the same street a dozen times, and the traffic pattern from passing cars renders the scene originally each time.
• Blurred motion: Blurring in a photograph is often a nuisance. Other times it’s a cool creative device that shows life in the picture. But each time you do it, the results will be different.
• Painting with light: Keeping the shutter open for an extended duration and using a penlight to outline the subject or as a brush to paint light in front of the camera makes the image a pen-and-ink drawing.
Subject Matters as Much as When You Shoot
It’s no secret that keeping the shutter open for longer than a fraction of a second changes the way a scene is rendered. Many situations lend themselves perfectly to long exposure photography, making the mundane more interesting. Common subjects shot using long exposure times take on a new life.
But that doesn’t mean anything you shoot for a long duration will always be a winner. Some subjects are perfect for extended duration, whereas others make very little impact. For example, static scenes can sometimes be difficult for the viewer to notice anything unique about the picture or how long it took to capture it; however, capturing a scene against a twilight sky or capturing a colorful light source can make a powerful impact.
Stationary subjects can make a significant impression when you use a strong perspective. Placing the camera on the ground to capture a simple backyard scene and using a 30-second exposure (Figure 2.4) reveals a new perspective normally unseen by the human eye.

Canon 6D • ISO 800 • 30 sec. • f/14 • Canon 24–70 f/4L at 24mm
Figure 2.4 Sometimes the blandest image during the day can be the most dazzling when captured in relative darkness using an incredibly long exposure. With the camera on the ground pointing upward at the umbrella and the timer on (to eliminate vibration during exposure), I was able to produce this rich color combination.
Practical Reasons for Long Exposure
Not all long exposures are shot for creative purposes, at least in the visual sense. Some are quite practical. For example, studio photographers who specialize in product photography require maximum sharpness and detail in their photography. That requires using a low ISO setting along with the smallest possible aperture to maximize depth of field (Figure 2.5). Despite the brightness of the lighting, excluding flash, of course, it’s necessary to take a long exposure from a very sturdy tripod. Shooting the same scene with a wide aperture, as shown in Figure 2.6, yields very different results.

Canon 6D • ISO 100 • 30 sec. • f/32 • Canon 200 f/2.8L
Figure 2.5 Although the cans are far apart, shooting this mock product shot shows the effectiveness of long exposure on a stationary object. The long exposure allows you to stop the lens all the way down to ensure maximum depth of field.

Canon 6D • ISO 100 • 1/4 sec. • f/2.8 • Canon 200 f/2.8L
Figure 2.6 This version of the vintage baking powder cans was shot with the lens wide open, so only the can in the foreground is in focus.
Architectural photographers often shoot exceptionally long exposures. By attaching a neutral density filter over the lens, they can use the smallest aperture setting. Because |the neutral density filter lets less light into the lens, the image requires more exposure. As a result, architectural photographers can photograph a building on a bustling street full of pedestrians, yet render the scene as if the pedestrians were never present. To produce this effect, it’s not unusual to use a several minute exposure taken during the day. Instead of freezing the peoples’ movement as a high shutter speed can do or blurring it from a slower speed, the filter affects density to such a degree that a moving subject will not register.
Understanding the Reciprocal Nature of Exposure
Proper exposure depends on the balance between intensity and time. The aperture lets light into the lens, and the shutter determines its duration. Once proper exposure is determined, changing one without the other will affect exposure balance and either over-expose or underexpose the scene. If you increase shutter speed, you must decrease the aperture setting to maintain the same exposure value. This balance is known as reciprocity.
There are good reasons for altering the reciprocal balance between the shutter and aperture setting. You can control depth of field to maximize the level of focus in a scene (Figure 2.7) or minimize it (better known as selective focus), as shown in Figure 2.8, having everything but the main subject blurred in the image. As you can see in Figure 2.8, when it comes to portraits, it’s an effective technique.

Canon 6D • ISO 3200 • 1.6 sec. • f/22 • Canon 85mm
Figure 2.7 A higher aperture setting, like f/22, lets less light into the lens, causing a longer shutter duration. It also provides the widest depth of field, which works when you need the entire scene to be clear and in focus. But complete sharpness doesn’t work for every situation, namely portraits.

Canon 6D • ISO 3200 • 1/80 sec. • f/1.8 • Canon 85mm
Figure 2.8 A lower aperture setting (wider), like f/1.8 in this case, lets more light into the lens. But using a lower setting limits the depth of field, which is ideal for a portrait because you blur the background so the subject stands out.
But there are other reasons for altering reciprocity as well. For example, you might prefer to use a specific shutter speed high enough for action photography, such as 1/500 of a second. Or, you might need to produce maximum sharpness. Based on their physical design, optical lenses are sharpest in the middle apertures. Why? When stopped down, they use the smallest piece of lens real estate, and when opened up, they are subjected to vignetting or a difference in edge sharpness. That makes using an aperture setting of f11 or f8 optimal.
Fractional Exposures
Most snapshots are captured at a fractional duration, generally between 1/60 and 1/250 of a second. During that split-second exposure, the action of everything happening is frozen as part of the photograph. But what about exposures that are fractional in time, yet are still not acceptable for handholding the camera? Those count as a long exposure too, although the results are not usually as striking as the long exposures. Figure 2.9 provides an exception to the rule.

Apple iPhone • ISO 250 (set by camera) • 1/20 sec. • f/2.4 • 4.1mm lens (equivalent to 33mm)
Figure 2.9 Taken while handholding an iPhone at a concert, the camera decided most of the settings for this photo, other than my tapping the screen for focus and exposure. Consistency during exposure also helped produce the sharp silhouette, as did the video screens not showing motion at the time of exposure.
Factors That Make Great Photographs
Successful nighttime photography depends on more than mounting your camera on a tripod, crossing your fingers, and hoping for the best. Unlike fractional situations, additional variables will affect the final image. The outcome will depend on how those variables are mixed and matched, as well as the capture conditions. Keep in mind that a universe of activity is happening within the frame that comes together as a single image.
Time of night, artificial lighting, length of exposure, and weather conditions will influence the look of an image.
Let’s examine these factors.
Time of Night
When it comes to mastering a night image, the time of night you capture the scene is sometimes as important as what you choose to capture. Consider the following example: If you photograph a scene after the sun goes down, your image will contain a pretty blue sky with some ambient light still present. If you shoot that same scene two hours later, the results will be remarkably different. So time of night is one of the most prominent factors that will affect your results.
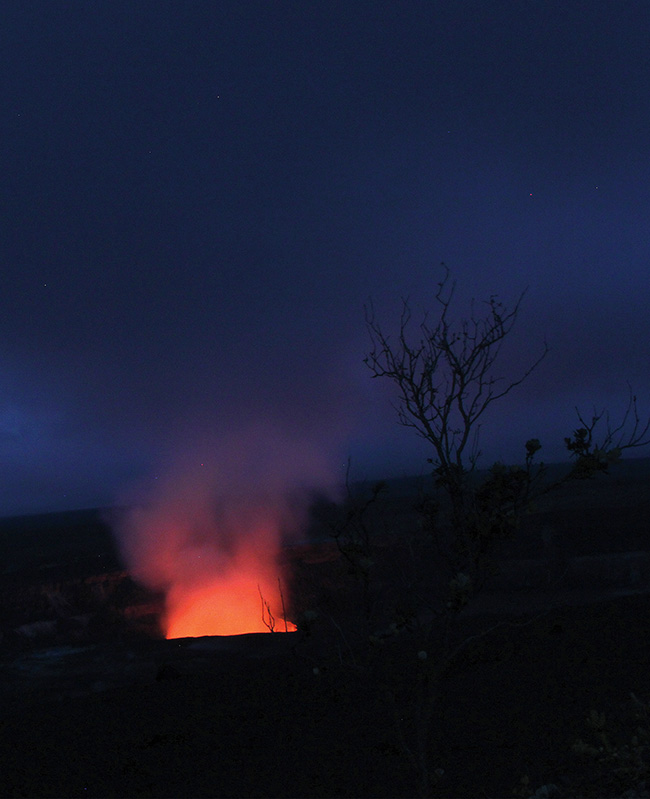
Twilight
The “sweet spot” for night photography happens at twilight (Figure 2.10). That transitional period between day and night provides a short window for optimal photography because of its rich, blue sky and lingering bits of ambient light. Twilight is when the sun dips below the horizon but continues to skim light from below for a little while longer. During this period, the remaining ambient light helps to “open up” the shadow areas and helps show separation between the subject and background.

Canon 20D • ISO 100 • 5 sec. • f/8 • Canon 20–35mm (equivalent to 32mm)
Figure 2.10 Shot during the early period of twilight, plenty of ambient light provided detail and color to this scene, including the bicycles in front of this beach cantina.
The twilight sky differs slightly each night, but often it changes from a purplish tone to a deep blue. This provides an intense background and is especially effective when a warmly lit subject is juxtaposed in front of it (Figure 2.11). But twilight doesn’t last that long, and once it dissipates, the sky transforms to black, which creates a new set of circumstances and dilemmas.
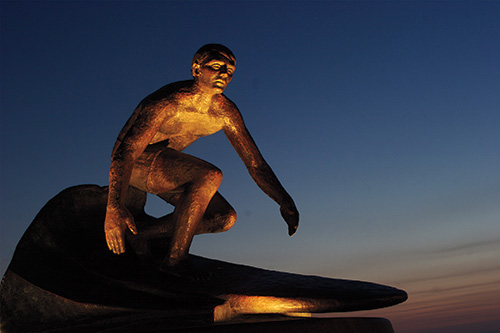
Canon 20D • ISO 100 • 5 sec. • f/9 • Canon 20–35mm (equivalent to 32mm)
Figure 2.11 The statue of surfer Tim Kelly at Hermosa Beach was captured at twilight. The warm light of artificial illumination contrasts beautifully with the vivid blue sky.
Dark Sky
You would think a black sky would make a great background, but unfortunately, looks are often deceiving. Any time illumination comes from an artificial light source, which is rarely meant for making photography look good, the results more often than not end up problematic. It’s not that anything is wrong with these light sources, per se, but their contribution leans more toward helping you see in the dark rather than making your photographs look good. High contrast, dominant colorcasts, and lack of ambient light all work against you, producing less than impressive results. However, not every black sky situation is a total fail, as shown in Figure 2.12, but it’s definitely a trickier time to shoot
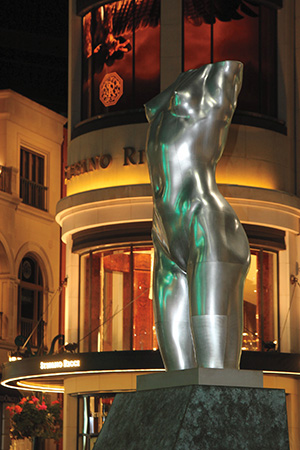
Canon T2i • ISO 800 • 1/10 sec. • f/5.6 • Canon 24–105mm at 73mm (equivalent to 117mm)
Figure 2.12 Even though the sun was down for hours before capturing the Torso sculpture in Beverly Hills, the conditions provided an “even” exposure balance throughout the scene. The variety of artificial light types also helped create a colorful background.
The Effects of Artificial Lighting
It’s a paradox that one of the great contributions seeing in the dark offers shares little regard for the outcome of your photograph. Don’t get me wrong; it gets us through our fear of the dark, but high contrast, dominant color, and inconvenient placement of a light source can make it a photographer’s nightmare.
But a dominant colorcast is not the main culprit. After all, the camera’s white balance can adjust to the situation or you can correct color in postproduction, but that’s only when the artificial light source produces a full spectrum of color. Unfortunately, many artificial lights found in public places are designed for efficiency and can only produce a single color. When you correct the colorcast, the result is a monochromatic image, but there are ways around that. Before we explore the remedies, let’s look at two different types of lighting.
Passive vs. Active Light
Many long exposure situations—particularly those shot after dark—offer limited control over the image, especially when it comes to lighting. You’re at the mercy of conditions outside your influence. If the subject you choose to capture isn’t properly lit, you can’t move a streetlamp to provide the right angle of illumination, nor can you turn off a spotlight shining into your lens to avoid lens flare. Besides making adjustments on the camera, you have passive control over capturing the scene. In addition, long exposures introduce other elements into the scene (Figure 2.13), increasing the passive nature of capturing the scene.

Canon 6D • ISO 400 • 1/2 sec. • f/11 • Sigma 14mm f/2.8
Figure 2.13 This busy scene shot at twilight illustrates the passive nature of some night scenes. Some ambient illumination is still present, so the scene isn’t completely dominated by artificial light. But you can still see how these passive elements affect the image: spectral hotspots from streetlamps, motion blur from a pedestrian walking in front of the camera, and lens flare from direct lighting.
Conversely, active control allows you make lighting adjustments. When you’re shooting a dimly lit situation—or to simply override the existing light sources—using electronic flash (Figure 2.14) is the most common way to bring light to the scene. But even more advanced techniques (discussed in Chapter 4), such as “painting” the scene with flash over a long exposure or placing colored gels over the flash unit or lens, can make the shot more impressive.

Canon T2i • ISO 200 • 1/10 sec. • f/11 • Canon 50mm (equivalent to 80mm)
Figure 2.14 Not enough light was available to capture this perfectly made spiderweb, making it necessary to activate the on-camera flash. Not only did flash provide sufficient illumination, but it also helped to define details in the web. Because the camera-to-subject distance was relatively close, it was necessary to stop down the lens so the flash didn’t overexpose the scene.
Length of Exposure
Because we’ve been examining long exposure in this chapter, you already know the possibilities of what happens when you keep the shutter open. Everything that happens during exposure collects as a single image (Figure 2.15), making a direct correlation between the length of exposure and the randomness of the image. For example, a 1-second exposure can expose a dark scene as a detailed photograph; a 10-second exposure can record an amusement park ride as a concentrated swirl of light. A 30-second (or less) exposure lets you saturate trails of beautiful light from passing traffic at a low ISO and small aperture setting. And if you want an even longer exposure, point the camera toward the sky for a few hours and render stars as streaks of light contouring to the earth’s curve.

Canon 20D • ISO 100 • 20 sec. • f/22 • Canon 80mm (equivalent to 128mm)
Figure 2.15 With some subjects, the length of exposure is not apparent; with others, it’s obvious. This picture showing the three positions of a traffic light gives the viewer an idea how long the shutter was open.
Going beyond the fractional exposure times also allows you to introduce additional elements into the scene, including both subject matter and illumination. You can regain active control of a scene by firing off a few flash pops during a long exposure time. Or you can jazz up a scene by using colored gels. You can even keep the shutter open for minutes or hours and use a penlight or flashlight. Other creative ideas include positioning a person in the scene for part of the exposure to create a ghost image or using your hand to dodge exposure from a bright part of the scene (more about that later in the book). The possibilities are endless for the active control you have while the shutter remains open.
Weather Conditions
Sometimes when the weather is bad, it makes the potential for taking compelling photos ideal. Inclement weather conditions can offer some very creative possibilities, because changes in atmospheric conditions introduce a variety of elements that include cloud cover (Figure 2.16), fog, and reflections from wet pavement. Another benefit of inclement weather is that you won’t be subjected to the limitation of dark sky conditions (and its issues), as mentioned earlier. As long as cloud cover is present in the sky, you won’t have to deal with high-contrast lighting or unfavorable colorcasts.

Canon T2i • ISO 400 • 10 sec. • f/22 • Canon 200mm (equivalent to 320mm)
Figure 2.16 Although the sun had set hours before, the heavily overcast sky provided a lighter background that the camera’s white balance recorded with a warm colorcast. The lighter sky also produced a natural reflector effect that “opened up” the dark parts of the building. Stopping down the lens to f/22 allowed for maximum focus throughout the scene.
However, poor weather conditions can also wreak havoc on your equipment. Rain, snow, or any kind of moisture is as deadly to electronics as Kryptonite is to Superman. Just a tiny bit of water can severely damage your digital camera. Make sure you keep it dry.
Let’s examine some of the conditions you can expect in foul weather.
Overcast
There’s quite a difference between photographing a scene on an overcast day at the beach and under the clouds at night. Not many of us want to go to the beach on an overcast day, opting instead for direct sunshine. But taking photos at night under overcast skies provides a different thrill. The cumulus cover provides a lighter background than the night sky, which often produces a dramatic effect. As long as your equipment is safe and dry, it’s a great opportunity to make some captivating photographs.
Fog
Throughout the history of cinema, scenes shot in the fog created a mood. Well, the same can happen when you’re shooting photographs in the fog. Misty conditions provide the scene with a diffused, sometimes ominous, look, which can also add to the randomness discussed earlier. But fog imposes some limitations as well. One of the main restrictions is that it can render the subject a little soft. How much? That depends on the camera-to-subject distance to some degree. Some objects farther away from the camera are sometimes rendered as partially visible or completely obscured. Regardless, shooting in foggy conditions often creates a dreamlike appearance in the picture.
Rain
Shooting in the rain is not much different than shooting under overcast conditions except you get something extra: the actual rain. Of course, you have to be vigilant not to get your camera wet or water on the lens to avoid damaging your equipment. As long as you’re careful, shooting in the rain presents a few more opportunities. Besides the subject standing out from the background—due to the overcast sky—the wet pavement lets you add a reflection to balance the scene. Often, these areas of saturated color can fill a void in the composition that would otherwise be unbalanced.
When you’re shooting in the rain, it’s best to use an umbrella to protect your camera and take many exposures to capture variations in the scene. Then there’s the lightning that occurs during thunderstorms, but more on that in Chapter 3.
Snow
Maybe the first image that comes to mind when you think about a snow scene is that bucolic holiday card photo of a house covered in snow with smoke billowing from the chimney, perhaps shot in late afternoon light. Although shooting that same scene after dark creates its own special moment, other situations shot in the evening in snowy conditions can also be enchanting, and sometimes surreal. You can create some very intriguing images when shooting in the snow because the environment combines several other elements that occur during inclement weather conditions (Figure 2.17). These elements include overcast skies, which make for a lighter background and provide natural diffusion, as well as the possibility of capturing reflections, especially on pavement as the snow melts. However, there is one caveat: It’s nearly impossible to render the actual white stuff without a colorcast, but that shouldn’t matter.

Canon T2i • ISO 400 • 10 sec. • f/22 • Canon 200mm (equivalent to 320mm)
Figure 2.17 This scene of a courtyard in Montreal was captured during a heavy snowstorm and includes many of the benefits of shooting during inclement weather: a lighter background, natural diffusion (from falling snow), and a lower overall contrast.
The Risk and Reward of Blurring
Keeping the shutter open for longer than normal introduces blurring by moving subjects. It’s a natural by-product of a long exposure because of the movement of objects in the frame. Sometimes blurring diminishes the quality of an image, making the viewer think the scene was improperly captured (Figure 2.18). But when done effectively, blurring can add a sense of motion and liveliness to an image (Figure 2.19).

Canon 6D • ISO 2000 • 1/10 sec. • f/16 • Canon 24–70mm at 55mm
Figure 2.18 Although not a bad image, and perhaps even one that can illustrate a specific point, this photo might look like it was captured at the wrong shutter speed. With my camera placed on a tripod, this scene was captured using a slow enough shutter speed to blur the jogger, which is effectively juxtaposed with the stillness of the scene.

Canon 6D • ISO 100 • 13 sec. • f/22 • Canon 85mm f/1.8
Figure 2.19 The street fountain’s continuous flow is technically a blurred subject—albeit a very controlled one—so it makes for a great blurred motion subject. By keeping the shutter open for 13 seconds, the water was rendered as a fine stream.
Seeing Ghosts
Although people moving through a scene during a long exposure can produce a blur that provides the photo with a sense of motion, the subject can also move more deliberately by staying still in one part of the photograph and then move to another part, rendering a transparent appearance—much like the illusion of a ghost. This effect is relatively easy to produce and can create very unique portraits. All it takes is the use of a tripod, your camera set for a long exposure, and a subject willing to transform into a photo ghost. This technique works well with static or boring scenes, adding some pizazz to the image or a bit of eeriness (Figure 2.20).

Canon EOS-1 • ISO 100 • 30 sec. • f/11 • Canon 28–85mm f/2 .8
Figure 2.20 Captured in a New Orleans French Quarter hotel room, for this 30-second exposure the subject sat on the right side for part of the exposure before moving to the left side.
Set up your tripod and shoot a subject in a lowly lit scene using a long exposure time. Often, the camera can catch what our eyes can’t see. If you can’t measure the light accurately, use the trial-and-error method by observing the picture on the camera’s preview window. Don’t be afraid to “open up” the lens, use a remote for a several minute exposure, or increase the ISO setting to increase the sensor’s sensitivity. This is a great way to understand the potential of shooting in the dark.
Practice Reciprocity
Exposure value is based on the variation of shutter speed and aperture setting. There’s a counter-balance to altering it, much like a scale. If you increase the shutter speed, you must decrease the aperture setting to maintain the same level of exposure. As previously mentioned, there are significant reasons for finding the right combination. It’s best to measure exposure, and then practice shooting at different shutter/aperture combinations. It will help you understand how to control the look of the image by manipulating depth of field, use motion creatively, or strike the perfect balance for your intentions. For example, when capturing the light trails of passing traffic, a 1-second exposure will record a short burst in the frame, whereas at 10 seconds the trail might pass through the scene. Conversely, in a portrait, using the widest possible aperture is often the goal.
Experiment During Inclement Weather
Dreary weather conditions can often lead to impressive photographs, so get out there and see what happens when you shoot under an overcast sky, surface reflections in the rain, and fresh falling snow. Just make sure your camera stays dry and you stay safe.
Compare the Same Subject at Twilight and Under a Dark Sky
A twilight sky can make almost any subject look good, but wait a bit later and you lose its benefit. Still, it’s important to understand the difference between shooting under a twilight sky and a night sky. And the only way to do that is to stick around and see what it’s like to shoot under a dark sky. Sometimes you’ll end up with a problematic picture; other times the outcome will be an image with a dramatic appearance.
Share your results with the book’s Flickr group!
Join the group here: flickr.com/groups/timelapse_longexposure_fromsnapshotstogreatshots/