
6 Tinkering Logistics
You don’t really have to make much of a plan to tinker; you can just dump the stuff out, let the students in, and start tinkering. But to optimize results and minimize crises and waste, it may be good to think about the overall logistics of how things will come together (or fall apart) as you tinker with your kids. In this chapter, I’ll talk about the tinkering space and materials, the projects themselves, and then some loose ends.1
Tinkering Space
The essence of teaching with tinkering is to get tools and materials into the hungry hands of your students. Most educational institutions are not set up for this, so you may face a challenge to pull it off. The key is to see this as one of those magnificent, exhilarating challenges, such as learning to fly or summiting a tall mountain (as opposed to one of those miserable challenges like fixing your toilet when it’s overflowing or salvaging a burned dinner for guests). I can assure you from vast personal experience that it can be a toe-tingling joy to present students an array of materials and basic tools in such a way that they feel freedom to use them safely toward a broad diversity of products.
To drive this point home, visualize a group of girls, say fourth grade girls who’ve more or less concluded that the essence of life is tied primarily to what clothes they’re wearing and what their hair looks like. You have other plans for them. You outline to them the tinkering possibilities that will be available in your program, and one of them involves learning to use a drill press with a hole saw. They’ll need this instrument to make a hole in their jewelry cabinet with music box, regardless of what form theirs will take, and you expect them to line up and learn to do it when the time comes.
You can see the girls catch their breath and look at one another with wild anticipation. This anticipation builds until they are moving steadily forward in the line at the drill press clutching their pieces of wood ready to be hole-sawed. Each one in turn reaches the front, dons the safety glasses, and receives your safety pointers, then grasps the handle of the powerful machine. They realize either from your pointers or from the feel of their own muscles that a large machine may not require a large force; gentle finesse on the handle is all that’s necessary. Faces of focused concentration transition to sheer elation as the whirling bit bites into the securely clamped wood piece and slowly chews a perfectly round hole for their ballerina. As they walk with ear-to-ear smiles, you have no doubt that you have changed their lives and changed the world.
Let there be no ambiguity: it is 100 percent worth the trouble to make this experience happen for your students, especially the girls. At the very least, every kid deserves a chance to learn to use a hand power drill or some other power tool.
Now, on to the details. It is best to have a real workshop to tinker in. Sports are a good case to compare to: no one would expect kids to learn and excel in sports without a proper facility. There is little debate or philosophical justification necessary when building a new sports facility because everyone knows the value of sports in the lives of kids, and everyone knows a proper space is necessary to convey that value to the kids. The world has not yet come to the conclusion that the same is true for tinkering, but I trust that we will soon come to our senses and conclude this, indeed. The fact is that the price tag for a reasonably well-equipped tinkering workshop is cheap compared to a sports facility of the same caliber. It is also quite possible to argue that the benefits are still greater.
The Community Science Workshops (CSWs) we have in California are ideal for any sort of tinkering. Check www.cswnetwork.org for more information and photos on how we set ourselves up for maximum-option tinkering. Essentially, we blend clever staff, tools, materials, work stations, project models, and inspirational hands-on exhibits all in the same room. When groups come to us, or individuals drop in during our open-door hours, everything is all set up and ready to go in dozens of different directions.
You can make one of these yourself in your school or home (the original one began in Dan Sudran’s garage).2 An old wood shop or auto body shop is often perfect for transforming into a tinker studio. But a big, empty drywalled room works as well—that’s what we started with in Watsonville. Ideally there is a rough floor, not too nice, not carpeted, and the space is not too near other studious occupations, since tinkering can be quite noisy. Good ventilation is a must too, since there will be dust. In fact we haul our dustiest machine—a disk sander—out the back door for use. Any tables will do, but big, thick, strong ones are best. Plywood and two-by-four construction has served us well for years.
Ideally you let your clients in to help you set up your space. They may do more hindering than helping, but you’ll immediately begin your relationship with them, and you’ll be able to form the program precisely around their needs and behavior. Sometimes timing doesn’t work out for that though, and you have to cram a bunch of stuff together and run with it. That’s fine, too, as long as you can remain flexible and keep a firm eye on the prize of serving the kids on their own terms.3
In recent years, hackerspaces and Young Makers workshops have sprung up like mushrooms after a rain. Many use common or semi-common spaces such as industrial garages, warehouses, or unused institutional space. Many are focused on technology, but others do some sort of craft or art or food creation. Some are primarily for youth, and others for all ages. I hope it’s clear: there is nothing—not one thing—standing in the way of you and your buddies creating a community tinkering space for yourselves and your students.
If you’re a teacher and can’t find or create such a space, don’t worry: you can do good tinkering in a classroom, too. It will take some rearranging, but it can start small and grow. You can’t be afraid of stuff. Piles and piles of stuff. If you have an aversion to stuff, I suggest you go into English or history, where you can tinker with less stuff. To tinker with science, engineering, design, construction, electronics, crafts, or food, you’ll need stuff and lots of it.
Let me show you around the Watsonville Environmental Science Workshop 16 years after its founding.
The first things you see
Just inside the door, among other things, you can see a sewing machine beside sewing books in front of sewing project models, a three-level rack, a shell and fossil display, a porpoise skeleton we found and cleaned off ourselves, the refrigerated salt-water aquarium holding local specimens under the counter, a microscope viewing table, and the cat pelt we tanned ourselves from a euthanized cat now tacked to the ceiling:

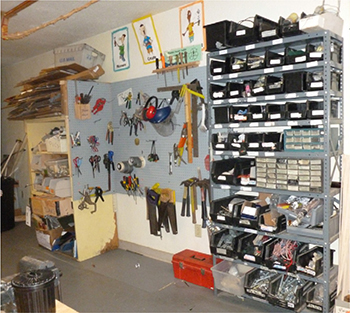
Storage racks and bins
Here. left to right, you can see some of our storage racks, for a variety of materials, our limited hand tool rack, and our small parts bins:
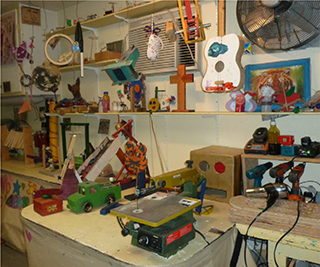
Project models and hand tools
Here is a good section of our project models on display, around the central scroll saw and beside the hand power drill charging station behind the drill platform. Note the enormous exhaust fan for use when we’re sweeping up:
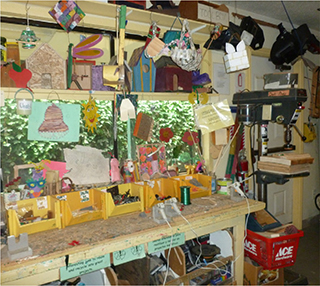
Project models and more tools
Surrounded by more project models, you can see the mandatory hot-glue station in front of more small parts bins, now mostly for bits of decorative detritus. The drill press stands just inside the back door, and welding shields hang above:
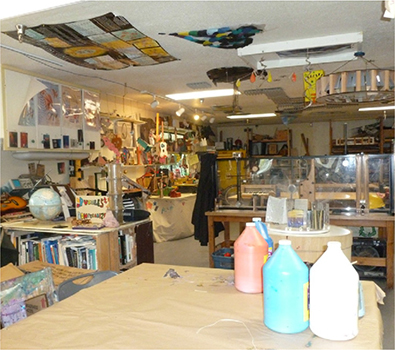
The library, music, and electronics
Our knee-level library is visible to the left beneath the music section under electronics cabinets, all behind the central paint, glitter, and gak table alongside assorted exhibit tables:
Stocking Your Space
Having a modest supply of dozens of possibly useful materials on hand is integral to tinkering. I can’t begin to count the number of discoveries and breakthroughs we’ve made in our Workshop due entirely to the fact that the perfect item just happened to be sitting around next to where we were tinkering. You’re not going to realize that bobby pins work perfectly for the spring mount on the woodpecker project unless they’re hanging around. You won’t think to use a toaster heating element as a motor speed control unless that junk toaster is hanging around. Corks, clothes-pins, marbles, balloons, sugar, CD cases, bamboo skewers, string and wire of all sizes, marker and bottle caps, broken DVD players, pennies, vinegar, tiny lightbulbs, lenses, and key rings all take their places organically in your ongoing projects if they are readily accessible.
Scrounging and dumpster diving are good skills to have. I notice that even when I’m on vacation, I view a pile of refuse with an optimistic eye for possible tinkering materials. We also buy a lot of stuff from cheap household supply shops and from hardware or home improvement stores. We frequent the lumber yard, irrigation supply shop, and electrical supply shop. We’ve got a relationship with a local metalvworker as well as a number of cabinet shops. We do order some stuff online, mostly for convenience when we need a bunch (we buy hot glue by the 300 pounds). Each of the directors at the Community Science Workshops has cultivated relationships with industry and retail/wholesale suppliers. We’ve all got a line we use to get in good with them. Usually we’ll bring a project some kid made to show them what we’re going to use their donation for. No reason to get nervous about this: they’ll either say yes or no, and it is all for the kids. You can tell within a few seconds whether or not you’re wasting your time.
Manuel, director of the Fresno Science Workshop, and I often swap stories of chiseling for donations. He makes a point never to buy anything from any new source without introducing his programs and mentioning that he’ll be able to serve a lot more kids on a meager budget if they can offer a donation or discount. He has even succeeded in getting two places to compete for who donates the most to him. To my knowledge, he’s never been run out of a store by security guards, and he has brought in many thousands of dollars’ worth of good, good tinkering treasures. One of his biggest coups was the local hospital, which tosses out hundreds of pretty good batteries each week, I guess since it is embarrassing to find a dead battery on a life-support system.
Getting steady donors makes life easy because they’ll always have more stuff for us; waste is part of their system. The mediocre ones let us stop by and pick up their waste. We thank them, but in many cases we’re actually saving them from paying to take it to the dump.4 The best ones bring it to us when they have a load. In Watsonville, we even have a parent who takes requests and then hauls them to us in his pickup, with two preteen daughters helping him to load and unload it. It’s good to have connections in institutions of learning, such as the local college or school district, which may be able to pass on outdated science kits or old lab apparatuses.
If you have a local museum in your area, by all means let them know you’re ready to take whatever they’re tossing.
There is so much waste in modern industrial society that it makes sense that you should think of your work as environmental in every respect. You’re reusing stuff that would be taking up space in a landfill, and by doing so you’re leaving other stuff on the shelf, which avoids the further extraction of raw materials from Mother Earth. You’ll always have to buy certain items, but there will also be plenty of quality tinkering done entirely with found or donated junk. This reduces your dependence on a big budget, too.

In terms of financial support, the existing Community Science Workshops have all employed a strategy of diversifying funding and support across three arms, more or less as follows: public agency (city government or school), grant funding (public or private), and contracts (gigs for pay). With this model, one of the legs may collapse completely, and the program can still maintain some forward momentum.
Materials and Tools
Here’s a list of some of the stuff we have hanging around.
Materials:
• Kitchen and household stuff: disposable utensils, bottles, cans, cups and plates (all different types have their calling), bamboo skewers, toothpicks, clothespins, straws, paper, and aluminum foil.
• Office stuff: binder clips, paper clips (large and small), a stapler, rubber bands of all sizes, tacks, push pins, brass fasteners, etc.
• Small structural vessels: corks, film cans, salsa cups, and medicine bottles.
• Wheels: bottle lids, film can lids, checkers, poker chips, large beads, or wood circles cut with a hole saw.
• Structural wire: baling wire is useful, as are clothes hangers, picture hanging wire, wire twisty ties, pipe cleaners, and even bicycle spokes.
• Fasteners: nails of various sizes are used, and to make something stronger, you can use drywall screws driven with a hand drill.
• Wood: three standard sizes for light construction, paint paddles (for stirring a gallon of paint; these are free at the paint shop, so grab a handful!), tongue depressors, and craft, or “Popsicle,” sticks. For beefier projects, 1x2 furring strips are quite useful, and a small pile of scrap wood from 1/4” to 3/4” thick is always in demand for base boards and other parts.
• Other materials: plastic of various types (Plexiglas, bubble wrap, Styrofoam, CD cases, plastic bags, and random scraps), sheet metal, cardboard thick and thin, cardboard tubes, funky metal hardware, pipes of steel and copper, PVC, rope and twine, old restaurant menus, and anything we find that’s not particularly dangerous.
• Motors: buy one or two from RadioShack or order a dozen from Kelvin Educational (http://www.kelvin.com/). Rip them from old toys.
• Batteries: cheap batteries at 99-cent stores don’t last long, but that’s mostly what we use. If you screw up and leave a project connected, it will drain a high quality battery just as completely as a cheap one. The best is to invest in a charger and use nickel-metal hydride (NiMH) rechargeable batteries. They’ll last for years if you take care of them and so are cheaper than any other type in the long run.
• Electrical wire: thin copper wire from phone or Internet connection is what is used on most of our projects. You could also use bare copper wire, but if it contacts another wire, you’ll have a short circuit. For electromagnets, you’ll want magnet wire of 24 to 30 gauge. If you just get one size, get 26 gauge. You can get it at Kelvin Educational, a motor repair shop, or by ripping apart an old transformer or motor. For the speed control, you can find an old toaster and rip the heating element wire out of it; connect one end solid, and run an alligator clip along its length to control the current to the motor.
• Decorations: paint, markers, glitter, ribbons, colored paper, stickers, puff balls, pipe cleaners, etc.
Tools:
• Drill with bits
• Files
• Hammers
• Hot glue guns with plenty of glue sticks (low temperature works fine and is safer, but high temperature bonds a bit better)
• Knives: box cutter, hobby knife, razor blade
• Needle-nose pliers
• Pliers
• Rulers
• Saws, wood and metal
• Scissors
• Screwdrivers: flat and Philips, large and small
• Side cutters
• Tape: masking, black (electrical), duct, or gaffer’s
• Vise or C-clamps or the long ratchet-spreader type sometimes used for wood gluing
This basic element of procuring a wide array of materials is important on many levels. Tinkering is inevitably linked to understanding the properties of various materials. Kids need to fiddle around building things from various materials in order to understand why certain things are always made of metal (saws, nails) and others always of plastic (straws, wire insulation), while still others can be made of either (pens, bottle caps, and cups). Thus you need to put those materials in front of the kids.
In addition to materials, you’ll need to procure tools. Each project in this book has a list of tools, and you’ll likely find yourself wanting others.
Avoid buying them all new. That’s more expensive and also cheating—did you remember this is an adventure? Start with garage/tag/yard sales, thrift shops, and pawn shops. Ask all your friends and relatives for tools they undoubtedly have rusting away in the garage. Go to hardware stores and look for the discount or reject bin, then ask for donations and special deals (for the kids!). Go to cheap household supply stores. Don’t buy something that’s so cheap it’s dysfunctional—for example, an astonishing number of side cutters out there don’t actually cut—but don’t spend any more than you have to in order to get basic stuff.
Immediately after procuring tools, you have to worry about kids stealing or breaking them. Quality tools tend to disappear more rapidly than cheap ones, and we’ve generally seen that students break quality tools just as fast as cheap ones. There will always be attrition; just try to keep it to a minimum. (And anyway, it’s always nice to imagine the kid who lifted the side cutters using them to build and fix more great projects at home.)
As you amass these tools, begin using them yourself at once. You have to be sure both that they work and that you know, more or less, how to use them. They must be safe, that is, they must function in the intended manner without hazardous breaking or slipping.
Begin thinking now about your storage spaces. You’ll want a bunch of boxes for supplies both random and regular, and at least one tool box for the tools. Label things as well as you can, and try to keep it organized. The minute you can’t find something, it’s just as if you don’t have it at all. Certain items will be used frequently, and it can be worth buying some of those little plastic sets of drawers to have it all accessible. Go to www.instructables.com and search “workspace” to find many clever ideas on how to organize and stash a lot of stuff in a small space. For us teacher types, it is one step more complicated, since we want our students to have full access, but at the same time put reasonable limits on how much stuff they can snag. In our mobile Workshop van, one set of plastic drawers is labeled, “Adults only.” Therein lies minor contraband (balloons, rubber bands, and razors) and our high-end, highly sought after items (magnets, motors, fancy tools, etc.). We still lose stuff from there from time to time, but it’s a reasonable compromise.
Figure 6-1 shows supplies for the mobile program all jammed in the back of the van.
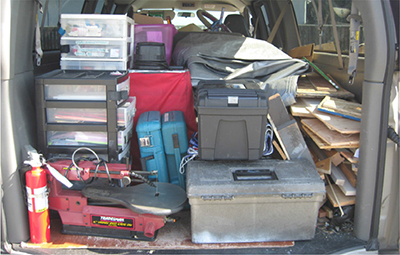
Figure 6-2 shows our good assistant Nestor lugging the stuff in and out of the spaces we use. We tried various wheeled mechanisms, but in the end it turned out to be easiest just to grab and lift.
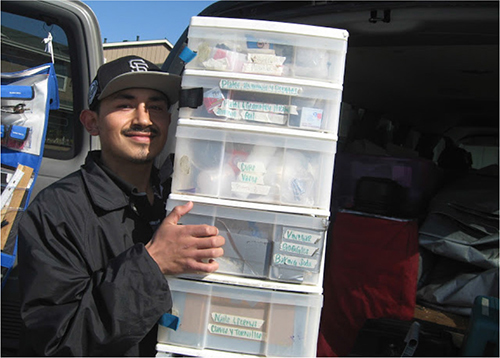
Figure 6-3 shows one of our three sets of plastic drawers (all of which we salvaged from the dump). This one holds the contraband—rubber bands, batteries, motors, and magnets; anything the kids are likely to want vast quantities of—thus the red cover cloth. We place it off to the side for easy teacher access but more difficult raiding by kids.
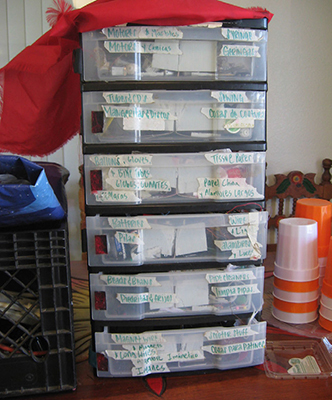
Figure 6-3. A drawer full of consumables
Figure 6-4 shows Emilyn’s famous drawer-keepers, installed with hot glue on the plastic sets of drawers. These have saved us hundreds of hours of picking up spilled supplies in the process of hauling, unloading, and loading.
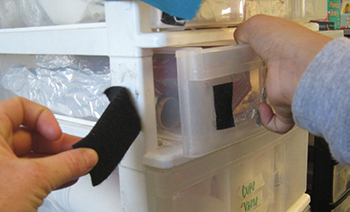
Figure 6-4. Emilyn’s drawer-keepers
You can see the entire suite of supplies for our mobile program in Figure 6-5. Still in the van are a drill press, more scrap wood, a few other boxes with project supplies (gak, papier-mâché, electronics/circuits) that we’ll haul out if necessary, as well as six empty seats to carry students around if necessary.
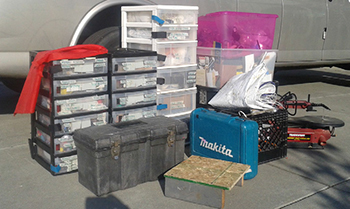
Figure 6-5. Mobile program supplies in the upgraded van, which we got after the city saw that the program was working great
Tinkering Projects
A project is something you focus your tinkering on for a while, and often something you can take with you when it’s done. You can do a lot of tinkering without ever having a finished product, but often you will have one. I’ve laid out some characteristics about our projects earlier, and I include directions to some of our best projects in this book. Here are a few additional pointers about the projects our kids tinker with.
A collection of books outlining projects that are doable with the supplies you have on hand is a good thing to have. Also, a collection of photos of previously created projects is inspirational. But the most valuable of all is a great number of finished projects, in working order (more or less), hanging from the ceiling or on small shelves on the wall. Kids can take them down, find out what they are all about, and then use them as models for their own version.
(Kids often break the models again and again, and sometimes steal them, always the best ones. Some of this is inevitable and not such a big deal, but it takes a lot of staff time to fix and remake them. Some loss can be avoided by putting the projects on higher shelves and hung from the ceiling.)
Once a functioning model is on the table, the work of the staff is reduced greatly. No one needs to give step-by-step directions. Kids can copy the model directly or develop the project in different directions. We often encourage our better tinkerers to improve on the model, as opposed to just copying it. Teach us something!
Here are some popular projects that we always have on display in our Workshop and that we are continually fixing and refixing. If you’re not familiar with one, look for it on our website (http://cswnetwork.org/activities/):
• Tornado in a bottle
• Electric cars
• Birdhouse
• Magnet hanging up
• Two-by-four scooter
• Saxophone/membranophone
• Hydraulic car or butterfly
• Catapults, onagers, trebuchets
• Toilet demo model
• Jewelry box
• Air and water rockets
• Gak—the amazing polymer toy, also known as slime
• Bean bags and handbags (near the sewing machine)
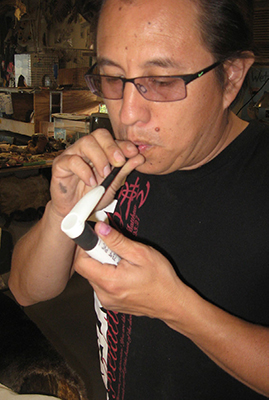
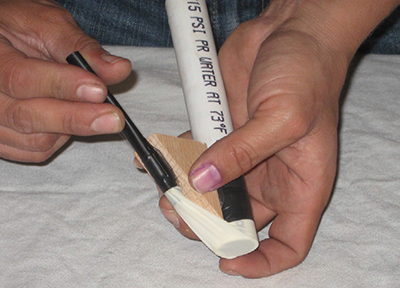
Figure 6-7. The wooden triangle secures the straw
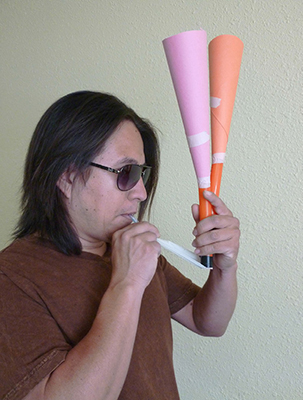
Figure 6-8. The double-tube Moose Call
We are often asked where we got the ideas for all these projects. All of the staff at the Watsonville Environmental Science Workshop have come up with great projects from various sources of inspiration, but my assistant Gustavo and I are somewhat obsessed. We’ve got so many ideas waiting to be tried that we’re often found sneaking to the Workshop early Sunday morning or late Saturday night, just to get time to try one out. New ideas are the least of our problems. He and I have been hatching ideas like this since before we were potty trained. Asking us where we get ideas is like asking a peacock where it got such nice colors on the tail feathers: beats me!
However, Gustavo and I both understand that just like in music and fashion, nothing, but nothing, is really an original idea. We’re all just stealing and trading around the same themes and trends and sometimes—BLAM!—something wonderful pops up. We get a lot of ideas from watching students and seeing their successes and failures. We surf the Web. I flick through project books at libraries and book stores like a goat looking for blades of grass amongst the rocks. ‘Tavo watches how-to and MacGyverlike shows on TV, gleaning what may actually be workable.
We focus less on finding new project ideas than on making the ideas we have come to fruition. No sooner do we catch wind of an idea than we’re methodically thinking through the materials and parts at our disposal, deciding what to try first, what possible scale and structure to give the project, and how to assemble it in a doable way. We’ve both lost sleep thanks to pregnant project ideas. We were smiling wide though, as we lay there staring at the dark, minds churning with magical images of fantastic projects.
What is it about our best projects that makes them so good? Somewhat hopeless to nail down, the question is still worth thinking about. Here is a short list of factors I think play a role:
• Project is exciting to interact with. We find projects that throw or shoot something (stopping just short of being a weapon) and projects that make lots of noise are two of the most popular categories.
• Project works even though you do a shoddy job putting it together.
• Project is not too easy, and not too hard. Challenging but doable.
• Project is doable in a single visit. In the earlier project list, only the scooter is a multiday project. We continually encourage kids to do more complex projects, but in the end, the most popular ones are immediately gratifying.6
• Project is done with mostly recycled stuff. Kids are in awe that something cool can be made from junk.
• Project core is easy to duplicate, but finishing touches can lead to much variety between projects.
• Project is appealing to both younger and older kids, as well as adults.
• Project demonstrates some phenomenon that can be clearly and compactly articulated.

Figure 6-9. Tornado in a bottle
When building with junk and cheap stuff, we often find that certain parts fit together well. We call them low-tech elements, and make wide use of them from project to project. Here are some examples:
• 1/2” PVC tubing fits snugly into the mouth of a standard plastic drink bottle.
• A C battery fits nicely into a film canister. Not that you can find many film canisters anymore, but hey, it was good while it lasted. The next generation of this one will have something to do with a USB cord, I think.
• A segment of hot-glue stick with a nail hole fits tightly onto the shaft of a motor, thus making a connection with impellors, propellers, and rubber-band belts.
• The same hot-glue stick segment also skewers onto the point of a pushpin, enabling a tiny but very secure pivoting system.
• A paper clip makes a good electrical connection when clipped onto aluminum foil in the way it was designed to be clipped onto paper.
• A cheap hobby motor runs with one 1.5 V battery and even better with two.
• The motor, battery, and some sort of switch can all be mounted on a tongue depressor and used interchangeably. We call this the Roach.7
There are dozens more, but you get the point: being familiar with a broad set of low-tech elements made from supplies you have on hand will get you farther when you have a new idea.
Facilitating Projects
As I mention elsewhere, we take as our (at times overwhelming) challenge to make each kid’s project dream come true. The first few minutes can be the most important. We often find ourselves twisting or tempering, honing down without snuffing out, offering alternatives we’ve seen to work without coercion to follow them. In the end, the kid will be most satisfied if the outcome is successful, but we want the kid’s heart and soul and creative essence all over it, too.
Over the years, I’ve increased my ability to predict the chances of success on a new project idea. We do our darndest, but sometimes the universe, with its laws of physics, does not support a given idea at all. As a facilitator, you have to make a call sometimes as to whether you think a given project is ever going to work, and you have to communicate with kids about this issue from the beginning.
I’ll often be frank but gentle, saying something like, “I think you’re going to have to change something fundamental in this idea if you want it to work with the tools and materials we have here.” Most kids can handle that, especially if it comes together with suggestions on what could be changed. Other times I’m not entirely sure it won’t work, but I’m out of ideas and I’ve got other kids to help. Then I’ll say, “I’m doubting that this thing will fly with your current plan. Don’t let me stop you if you want to keep trying, but I’m going to go help those kids over there.”
Certainly if there is some part of the project that you’re unsure about, have the kid do that part first. This may seem counterintuitive, but makes sense upon inspection: “It won’t help to have the rest of the project done if you can’t get that hard part to work, so try it first!” Finally, I sometimes just give out a friendly warning: “Brace yourself for that thing not working: I think there is a good chance it won’t, but let’s give it our best shot.”
In other circumstances, you may have a kid who can’t think of exactly what she wants to do, or has a few ideas but can’t envision the whole thing. In this case, the best plan is to start something: get a few of the materials she thinks she may use and start mucking around with them. Incidentally, I’m wary of any engineering, tinkering, or “invention” program that starts out with kids in their seats drawing plans with pencil and paper. As mentioned above, many kids these days lack experience mucking around with much of anything, so the first step is to offer an opportunity for that. Often the vision of the project comes quickly once hands are exploring materials.
Let me interject here the importance of art in the world of tinkering. Of course you can tinker with just art alone, but generally, science is the background in which tinkering is visualized, and engineering or technical skills of some sort are often what students walk away with. But art is also a brilliant part of tinkering for various reasons. First, it is a fact well known to all our staff members that kids choose project models based on how good they look. If you put up a crappy looking model, nobody wants to build it. We do our best to make sure the project model is full of art and make sure there are decoration supplies in each box that goes out to our satellite sites.
Furthermore, kids may never have the opportunity to tinker with tools and construction in their formal school experience, but there is almost always some thread of visual arts in school. Often it is amateurish, often the activities are random and only surface level, but art is present nonetheless, and the important thing is that most kids have had a happy, fun experience with it. Thus, if you embed art in your tinkering, you’ll make the kids feel at home; they’ll see a fun thing they’ve seen before.
Finally, when the project is “finished,” that is, it’s doing what it was created to do, the art of decoration can give an opportunity for the student to continue interacting with it. In this way, they’ll have more chances to observe it and understand it, as well as to make it their own unique masterpiece.
It’s worth noting that art and science are not at all opposite ends of some sort of intellectual spectrum. Both artists and scientists need to have keen skills of observation. Both want to understand and describe the world. Both seek extensive information and diverse perspectives on the subject they are studying. In the end, many of the skills of an artist are quite valuable to the scientist as well. In short, kids needn’t choose; they can be great at both art and science.
Whether in the free-form or class group arrangement often you’ll end up giving directions on how to do a project. It’s best to give vague directions. Every day kids are taught to read or listen to and follow directions, so why make them do it again when tinkering? Another great mentor of mine, Modesto Tamez at the Exploratorium Teacher Institute, has developed this to an art. He points out that giving less-than-specific directions has the wonderful result of a variety of product, which in turn offers superior learning opportunities. Which do you want: a class full of kids all with identical projects, or a class full of kids each with their own fabulous creation, all learning from the uniqueness of the others? If you want the former, tell them all—step by tiny baby step—exactly how the project is to be done, and stand over them with a stick to make sure they do it. If you’d rather the latter, give vague directions.
Often there are two or three key points about a project that kids should be shown in order to have a decent chance at success. The rest they’ll be able to figure out from the model, or make up on their own. This opportunity is what they’re not getting in school, so be sure and give it to them through tinkering.
A related point to never forget is that probably no more than half of the kids are ever listening to what you’re saying. Sorry, teacher types, but I think maybe you’ve long suspected as much. If you’re counting on the lecture format to transfer information, you’re sunk. If, on the other hand, you’re counting on the kids learning from the process of tinkering with the stuff in front of them, with you facilitating from behind, it may not make a lick of difference whether or not anyone is listening.
After directions are given and kids are tinkering away, the two most common comments we hear from the kids are these:
• “What do I do now?”
• “It doesn’t work.”
You can address the first by following the advice I give further on in the chapter on questions and answers. A fine answer is, “Yeah, what do you do now?” as you take the kid back to the model to check out what is done already and what is left to do. This process is absolutely critical. By asking what to do now, the kid is making a plea, saying in essence, “All my life I’ve been given step-by-step directions, and now I’m unable to move forward without them.” Resist giving them more directions; now is the time for them to start learning from the model and weaning themselves from directions. There is nothing wrong with being a foot soldier or a factory worker, but kids should also be able to figure out things for themselves.
The second comment has a snappy answer I never hesitate to give if the kid looks like he’s stable enough to take it: “Of course it doesn’t work! Not working is the natural state of affairs in the universe. Working, on the other hand, is something precious and extraordinary, something that takes skill and persistence to achieve. Now how can we get this thing to work?” I also point out that troubleshooting is an everyday job for many, many occupations, from computer programmers to plumbers. We did our best, but it’s still not working. Yet. Now the new task is to figure out what went wrong. Finally, I don’t usually point it out, but never forget that this kid is set up for an enhanced opportunity to learn, since he’ll end up looking more closely at how the gizmo functions. Read why mistakes are critically important in the next section.
When a kid is finished, you can always commend him for a project well done, but it is also nice to offer the kernel of a suggestion that perhaps he could do even better, be more creative, get better results, and achieve better quality if he were to keep working on it, or do it again from the start. This is, once again, something familiar to all artists and artisans: practice makes perfect and hones skills. You have to be the judge when deciding to put out that kernel or keep it for next time; take into account the kid’s frustration and patience levels, the time available, and whether or not he’ll be returning or has resources to keep going at home.
A Few More Tinkering Considerations
By the way, lists are basic to any tinkering operation. When we come up with a new tinkering activity at the Workshop, the first thing we’ll do after taking a few photos is to make a materials list and a list of the various things we noticed. I feel it’s more than appropriate then to make this final smattering of suggestions a bullet point list.
• Safety is first. Sounds like a cliché, but it’s really a statement of reality. Little learning will happen and little fun will be had if someone gets hurt, so take your time and make sure your space and your program are safe. Here are some key safety precautions we take at our program:
• No kids under 6 are allowed to participate without an accompanying adult. (This is due to the potential danger of random materials and tools available to all at the Workshop. In a more controlled space, you can tinker with kids much younger.)
• All electric tools are locked except the scroll saw and the hand drills. We’ve seen it nigh impossible to sustain more than minor scratches from these two devices. (Don’t tell anyone, but you can actually put your finger on the scroll saw blade without getting cut; it’s just going up and down. Rotary saws are a much, much different story.)
• Safety glasses are required for all electrical tools except the hand drills. A few hand tools should also be used with safety glasses: cutters that send tiny bits flying and hammers on metal, stone, or other brittle materials.
• Only one kid at a time can use the electrical tools. We’ve had two minor injuries resulting from two kids “helping” each other on the scroll saw.
• No horseplay, running, biking, rollerblading, scootering, or skateboarding in the Workshop. (You’d think that’d be obvious, but then you’re probably over 12 years old.)
• Small injuries will happen as your kids tinker, but with good planning and structure, big ones never will. We’ve had Community Science Workshops running in five Californian cities for over 20 years now and never had worse than a few deep cuts and stitches. We never hesitate to compare our Workshop to sports programs, especially for the liability watchdogs. Everyone knows that if you play sports hard, once in a while you get hurt. As long as all due precautions are taken, it’s part of the game, and it’s worth it. The same goes for using tools and fiddling with all sorts of materials. Only we’ve never had a broken leg, never a torn tendon, and never a concussion. (Heck, at my old high school, they used to park an ambulance at the end of the football field during a game, and my buddy still limps from an injury sustained during one of those “school spirit” events. Yeesh.)
On the bright side, don’t forget that one can learn a lot from an injury: how the skin works and heals, how burn pain is different than cut pain, how blood pumps, how fingerprints can come back, how a blister functions, etc. Also, a good group debriefing after an injury can help raise awareness and avoid more.
• Engage parents and families. Some of the best golden memories we have at the Workshop have been families tinkering together. Sometimes they’ll work on the same project, sometimes several different ones. It’s lovely when the members of a family all feel comfortable tinkering and can pass an afternoon together that way. Even if only one adult and one kid can get it going together, I get the feeling the world is a better place. I’ve seen research that specific parenting techniques are less important than that one-toone relationship between parent and child, and there’s nothing like tinkering toward a shared goal to cement a relationship. Parents can also bring resources to a tinkering space: tools, materials, ideas, snacks, and extra sets of watchful eyes and helping hands.
Some parents are a pain in the butt, though, and you’ll need strategies to keep them out of the mix. But here again, other supportive parents may be just what you need in this situation.
• Process is more important than product. Sometimes kids will finish tinkering on a project, realize they are dissatisfied with it, chuck it in the trash and walk away. Don’t worry: they still gained from the experience. While we’d all love to see completed tinkering projects proudly hung on the wall, it’s just not going to happen all the time. Most finished products will be mediocre (by definition), and I can say from vast personal experience that only a few will be worth keeping long term. But my experience with all the duds was just as valuable as that with the keepers. Which leads us to the undeniable fact that...
• Mistakes are critically important. You want your kids to achieve success, but you also want them to reap the benefits of failure and repeated trials before that success. The kid who fails a time or two before getting it right will walk away with more knowledge, more skills, and more confidence than the kid who nails it the first time. Everyone in the room must be aware that mistakes are part and parcel of the tinkering process. Indeed, a mistake is an opportunity for the student to advance developmentally. You as the facilitator hold the key to making sure they make that advance, and don’t just walk away all bummed out. It’s primarily a matter of communication and encouraging a broad vision.
• Know when to step aside. Now hear this: everything I lay out elsewhere about supporting kids tinkering, dealing with questions, dishing out answers, working with difficult kids, scaffolding, etc. can be put on hold if everyone is tinkering along fine. Remember, one of your goals was to get the kids to tinker independently of you, and if they’ve got it, you can move away. Not too far: you can start up a side project related to the one they’re doing, do a bit of organizing, fix a model; anything you want so long as you stay active near their tinkering. (It is a bad idea to sit down and read a book—you’re the leader, and they’ll follow.) You can keep up a conversation with them to monitor how they’re doing, but don’t think you have to be in their face all the time. You are important, but your role is facilitator; they’ll learn mostly from the stuff.
• Don’t be preoccupied by this, but take a stab at connecting students’ observations to theory in the canon if you can. In high-school and college lab courses, you often progress down a narrow experimental path toward a specific result that illustrates a theory you’ve learned in the textbook. This is good and indispensable in the process of coming to accept the theories as correct. When you tinker, you often don’t have as well controlled an environment, but you can often make and agree on observations that lead to conclusions that align well with a given theory.
An example is the magnet activity in this book: play with magnets then read magnetic field theory; your observations will tidily match the theory. Another is the common “gak” activity with white glue and borax mentioned in the chemistry activities: you can’t really prove that those molecules are polymers, but with a big enough lab you could, so why not tell the kids and get them to start thinking about it?
Many education groups have the explicit goal of turning kids on to science and engineering. This is only a peripheral goal for the Community Science Workshops, our primary goal being to facilitate kids discovering their world through direct contact with it. But still, while they are blissfully tinkering away, we don’t miss a chance to say, hey, this outrageously fun thing you’re doing now is essentially science and engineering. Basically, we’re cheating them if we don’t.
• Whenever possible, make connections to careers. I wanted to be a physicist since I was in sixth grade. Problem was, I was unclear about what a physicist did on a day-today basis. I was enamored by various biographies I’d read, some unrepresentative (to the point of downright deceptive), and I was in college before I got the full picture. Now I do all I can to let kids know that what they’re doing while they tinker is what some people do professionally all day long and they get paid for it, too. We often say something like, “As you design and build your gadget, you’re being engineers!” or, “Working to understand this phenomena is exactly what scientists do, so today we’re being scientists.” I believe this has a big impact on the way kids look to the future and sort out what they want to do with their lives.
• When it’s time to scale up, think spawning, not growth. Small is beautiful in the world of tinkering. If you’ve got a dozen kids or more tinkering each day after school or each weekend, and you want to reach even more kids, you don’t necessarily need them in the same place. What you may want instead are parallel tinkering spaces close to the other kids you want to reach.
• Finally, don’t forget that what you want to see happen is thoughtful tinkering. You want to see kids thinking about what they’re tinkering with. I assume that eventually, every kid will do this thinking, but it’s good to make a conscious effort to get them to make a conscious effort to learn as they tinker. “Conscientization” was Paulo Freire’s word for a different but related process. Here, what you want is for kids to become conscious of how they are learning, what there is to learn, and what they know already. Once they’ve got this ability, there is no stopping their self-education. Conversely, if they are not thinking, they are essentially back in preschool, led by the nose through a pleasant arts-and-crafts session, but not gaining nearly as much as they could from it.