In this chapter, we continue building out our base troubleshooting knowledge by learning about key settings of a good build. For the same reasons that a solid understanding of a least-privileged build helps you understand where to look at permissions when certain things are going wrong, a firm foundation on how the farm is constructed and being able to standardize that process helps you troubleshoot and remove inconsistencies. By standardizing the build process, we are setting the farm up for expected conditions and this makes it easier to identify unexpected behaviors and helps in troubleshooting those behaviors by being able to insure least privileging and key settings. This way, we can be certain that if something isn’t the way it is supposed to be, that it wasn’t due to an improper build.
Before we dive too deep into the PowerShell scripts used to standardize a farm build, we’ll do a cursory review of some PowerShell concepts, at a high level. And, we’ll see how PowerShell in and of itself can be a troubleshooting tool. When we start to discuss the PowerShell scripts, we’ll try to point out the deficiencies of that vs. the more automated AutoSPInstaller method.
As we already mentioned, a good build starts with least privilege. You’ve learned about how important it is to know what the standard permission levels are in SharePoint and how least privilege plays into these permissions for the file system, in Chapter 1. So, you know that it is important to standardize and that deviations from the standards lead to unexpected behaviors. Along with least privileging, a good build includes key settings that help improve performance and reduce extraneous entries in the logs. Any time we can reduce events in the logging system, it is a good day; since that means there is less work for SharePoint to perform. A good build is rolled-out in such a manner as to become repeatable. The best ways to standardize builds is through PowerShell scripting and automation.
Let’s chat a bit about using PowerShell to automate and standardize your builds in a least-privileged fashion. Then after we have that fairly nailed down, let’s talk about an awesome scripting solution available on Codeplex’s website named AutoSPInstaller. Codeplex is in the process of shutting down, with a target shutdown date of December 15, 2017. The AutoSPInstaller website is located at https://autospinstaller.com and this site has download links, as well.
Let’s get our arms around some basic PowerShell concepts, look at the PowerShell Object model, and finish up our PowerShell discussion by analyzing a couple of scripts used to build Central Administration and the Service Applications. Then we’ll do fairly high-level review of some of the things to be aware of when it comes to using the AutoSPInstaller vs. when using PowerShell. We’ll talk about the timesaver of installing the prerequisites in offline-mode.
Finally, let’s talk about key settings that neither the AutoSPInstaller nor the PowerShell scripting samples address.
PowerShell Aliases
Aliases in PowerShell are used to save time and to make it easier to perform actions. In a lot of cases, the Aliases shorten the learning curve by allowing administrators to use commands that they already know in place of learning new PowerShell cmdlets, (pronounced “command litz”). Aliases sometimes begin with a dollar sign and sometimes they are native to PowerShell. Any alias that is native to PowerShell is not preceded by a dollar sign ($); for example, the alias for the Add-PSSnapin cmdlet is asnp, which is easy to remember if you think of “Add snap.” The PowerShell one-liner that turns a regular PowerShell session into a SharePoint Management Shell is as easy as asnp *SharePoint *—provided that the PowerShell session was open administratively.
Aliases that are not native to PowerShell have a dollar sign preceding them. For example, $devdash, $webApp, and $ssa are all manually created aliases and only persistent in the current session; whereas native aliases are part of PowerShell and they persist from session to session. When creating an alias to be used only in the session or in scripts, I try to keep the aliases as short as possible and as descriptive as possible, with descriptiveness being most important; but not the ruler of all things. Following this logic, a good alias for SharePoint Search Service application is $ssa.
To create an alias all you need to do is type something like this:
$x = 1$x = a$x = a1
After you typed each of these lines with $x and then pressed Enter, you would’ve seen that the alias changes. You may already know all of this and it is old hat to you; but to someone who has not had much exposure to PowerShell, this is hopefully good stuff. This leads me to my next point: you may already know that you can put PowerShell cmdlets in variables. When you start analyzing SharePoint scripts and writing your own scripts, you’ll put PowerShell cmdlets in variables.
Verb-Noun
PowerShell cmdlets are always in verb-noun format. When IT pros talk about PowerShell cmdlets, they usually do not pronounce they hyphen. So if a SharePoint professional was asking you to run Clear-SPLoglevel to reset the logging level across the entire farm back to the default settings, she would probably say, “Run clear sploglevel,” and you would type Clear-SpLoglevel . This action would set the trace severity property back to its default values.
You would need to return logging to normal after you had previously set it to “VerboseEx” using Set-SPLogLevel –traceseverity VerboseEx . VerboseEx is used in troubleshooting issues within SharePoint and it turns the logging up as high as it will possibly go. This causes the ULS logs to grow, exponentially in size, so you don’t want to leave your farm at this level.
All PowerShell cmdlets Are Objects
An object is something that has methods and properties . The methods allow you to administer the object and the properties tell you things about the object. Sometimes you can set the properties and other times you cannot set the properties; but rather can only read or get the property. No matter what, you can query information from the objects using PowerShell that isn’t readily available or apparent using the GUI.
Some PowerShell objects have more properties than others do. Often, the properties in one object easily relate to the properties in other cmdlets. The main thing is to understand that PowerShell objects have information inside them in the form of properties and these objects have methods that can be used to update these properties.
Running Administratively and the SharePoint Management Console
When working with the SharePoint management console on a SharePoint server, you should always make sure that you’re in a console that is open administratively. That is, if you look at the title of the window, it says: Administrator: SharePoint 2013 Management Shell and not SharePoint 2013 Management Shell. The reason you want to be open administratively is so that you never run into any blocking issues, err things that keep your code from running, due to not being open administratively, after all, you’re using this SharePoint Management Shell to administer SharePoint.
In order to ensure that the PowerShell is open administratively, take a look at its advanced properties and double check the shortcut opens administratively. If it doesn’t, then check the box to run as an administrator . In Figure 2-1, the SharePoint admin has already right-clicked on the shortcut and changed the advanced properties to “Run as administrator”.
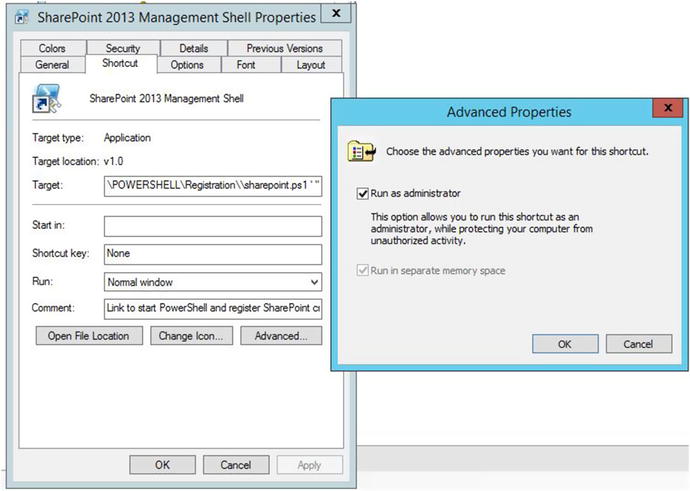
Figure 2-1. Run as administrator
Variable Instantiation
When you begin administrating SharePoint using PowerShell, you have to get objects into variables so that you can manipulate the property, or possibly add a property. Publishing Infrastructure is one of those areas where you must create a value inside the property of the web application named properties. This is required in whichever web application where you’ll be enabling publishing. The Properties property is a hashtable type of property, so it can hold more than one value. When you use the AutoSPInstaller to install SharePoint, it automatically set’s the super user and super reader accounts that are used by the publishing infrastructure. Before the days of AutoSPInstaller, this used to be done using the stsadm command and it is still possible to use that command; but it is easier to set the properties using PowerShell. It is also a lot easier to verify the properties of the web app have been set using PowerShell.
The manual code used to set the super user and super reader accounts is as follows:
$wa = Get-SPWebApplication -Identity "<WebApplication>"$wa.Properties["portalsuperuseraccount"] = "<SuperUser>"$wa.Properties["portalsuperreaderaccount"] = "<SuperReader>"$wa.Update()
You can query the web application by first instantiating the web application object, with all of its properties into a variable named $wa, by running get-spwebapplication to get the URL of one of the web apps to query and instantiate. Figure 2-2 shows the web application being instantiated into a variable named $wa, and then we used a thing called dot sourcing to drive into the properties of the web application.
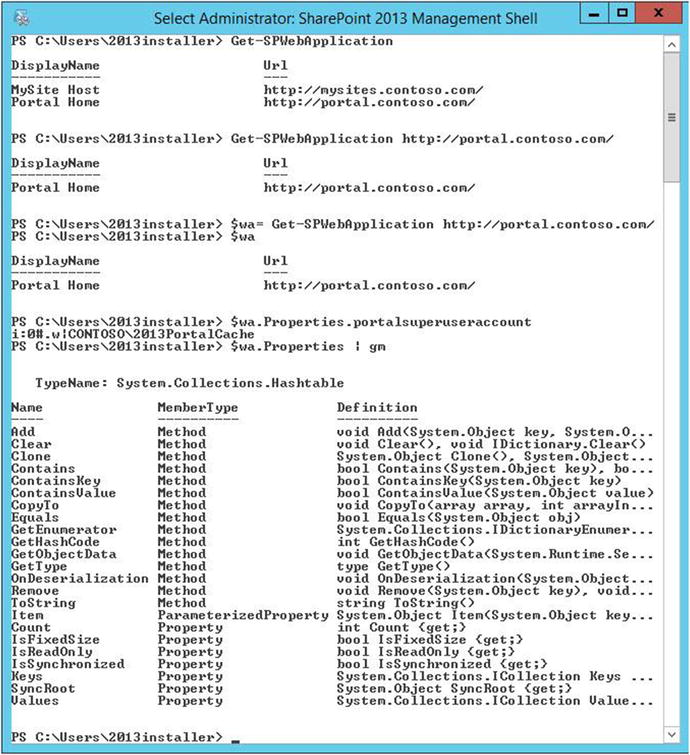
Figure 2-2. Properties exist because they are returned
When we ran the dot source $wa.Properties.portalsuperuseraccount it returned the value that we had replaced <SuperUser> with in the preceding code example. If we hadn’t used the AutoSPInstaller to install our SharePoint farm and create a web application, this process would need to be performed manually. And, if you build a farm with AutoSPInstaller and then create additional web applications, you’ll need to create the portalsuperuseraccount and portalsuperreaderaccount in order for the publishing cache to perform correctly.
In Figure 2-2, we asked PowerShell to show us the Members of the Properties property, which is one of the places that we noticed that what is returned is a hashtable. We can see that in the .NET typename of System.Collection.Hashtable. In Figure 2-3, we used dot sourcing to expand the members of the Properties hashtable by typing:
$wa.Properties
Figure 2-3. Dot sourcing the properties parameter
The web application object returned by Get-SPWebApplication is instantiated into the variable $wa. Then once we have the web application instantiated into the variable, we can query the properties. This would be the same as running (Get-SPWebApplication http://portal.contoso.com).Properties, as shown in Figure 2-4.

Figure 2-4. Values of the web application properties
Once, we have the property portalsuperuseraccount and portalsuperreaderaccount returning the values that we need, we have to burn them in. We have to update the property. This is where the methods of the PowerShell object come into play. Since we are updating the object itself, we’ll use the method named Update. We determined that this method existed by instantiating the web application to a variable and then we piped (|) that to Get-Member using the alias for Get-Member , which is gm. This is the code:
$wa | gmFigure 2-5 shows partial output of running that code. You can see the update method second from the bottom in the partial screenshot of Figure 2-5.

Figure 2-5. Get-SPWebApplication http://portal.contoso.com | gm
Objects as a Form of Troubleshooting
When you’re experiencing issues in SharePoint, PowerShell is your friend. Modifying the file system directly without the use of a wsp file is your enemy. There are numerous things that you can do with PowerShell that you cannot do within the GUI, in the newer versions of SharePoint. For example, starting with SharePoint 2013, you can only change your search topology via PowerShell. In an upcoming chapter, we’ll look at how this is done.
PowerShell is a troubleshooting tool that is often overlooked. It is through PowerShell that most of the higher-level administration tasks are performed; so, it is through PowerShell that the admin troubleshoots whether these changes were made or where certain settings are configured. For Example, Search Performance levels are set using PowerShell in SharePoint 2013 and 2016 and you use Get-SPEnterpriseSearchService to find the PerformanceLevel. By default, the performance level is set at Reduced, as you can see in Figure 2-6.
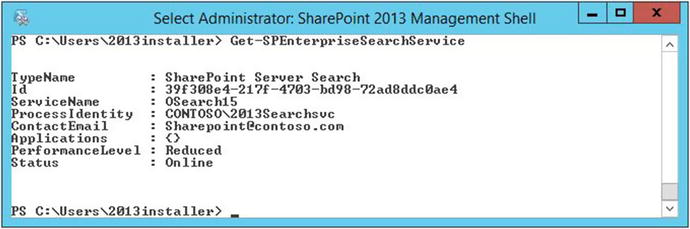
Figure 2-6. Using PowerShell to query search settings
When looking at the properties and methods of PowerShell objects in the SharePoint Management Shell, the point that I’m trying to make is that they can tell you things at a glance that you may have to open several different GUI-based windows to see, assuming that all the information could be seen in the GUI. For example, in the case of the Enterprise Search Service cmdlet that we just ran, it showed us information that we would need to open Central Administration outgoing mail settings, services on server, and the Windows operating system services console. With PowerShell, we could see the email alias shows that it is sending mail aliased as [email protected]. The Windows service named SharePoint Server Search 15 (OSearch15 ) is running under Contoso2013SearchSvc, the service is online, so there is no need to open the services console (services.msc ) or the services on server page in Central Administration. We also see that the service is showing online.
Now, this might be old hat for you, and maybe the next part of this is just the same. But what if you’re wondering about the timer jobs that are associated with search and were wondering when they last run, how would you go about getting them? Well, one way is to run a cool Get-SPTimerJob cmdlet that looks for the word search maybe. But would you get them all? The answer is “it depends.” It depends on how you structured that get-sptimerjob one-liner. Here’s a one-liner that will give you all the timer jobs associated with search and when they last ran.
(Get-SPEnterpriseSearchService).jobdefinitions | ft name, lastruntimeAs you can see in Figure 2-7, for some reason the Software Quality Metrics reporting for Search has not yet ran. This might be because it might be disabled, or perhaps there is something else at play. It also looks like the Spelling Customizations Upgrade for…. hasn’t run in a while. Using the get-member command, we can pipe (Get-SPEnterpriseSearchService).jobdefinitions to Get-Member like this:
(Get-SPEnterpriseSearchService).jobdefinitions |Get-Member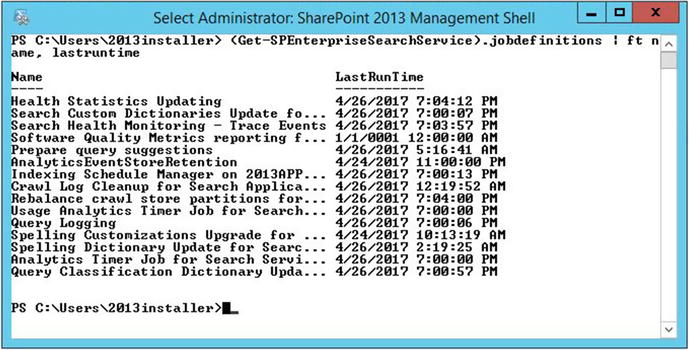
Figure 2-7. Last run time of 01/01/0001 midnight means never
This returns all the methods and properties for each job. This causes your screen to scroll and you can stop that scrolling by pressing Ctrl+C at the same time, so control key and C key together. We then notice that one of the properties is IsDisabled. Running this PowerShell, we can see the results:
(Get-SPEnterpriseSearchService).jobdefinitions | ft name, isdisabledIn Figure 2-8, it’s obvious that the Spelling Customizations Upgrade for Search Application<GUID> is disabled and there must be another reason that the other job named Software Quality something or other has not ran. Perhaps it is weekly or monthly, as this is a new farm and a brand-new search service application. Are you starting to see the way that PowerShell can help you troubleshoot? I hope you said yes, or at least a half-hearted “sorta.”

Figure 2-8. Spelling customization is disabled but why hasn’t software…ran
There are operators in PowerShell that let us sort and query streams of objects in the pipeline. When we run a cmdlet like (Get-SPEnterpriseSearchService).jobdefinitions , it returns a stream of objects in the pipeline. We can use the where-object cmdlet which is aliased with a ? mark, to query the name field, as follows:
(Get-SPEnterpriseSearchService).jobdefinitions | ? {$_.Name -like "Software quality metrics*"}In Figure 2-9, we see this code in action and that the reason the date shows as if the job never ran is because the job is weekly and isn’t set to run until Saturday. So, with this farm being just built, a “never ran” date makes sense. Whenever you see 1/1/0001 12:00:00 AM, this means the job has not ran.
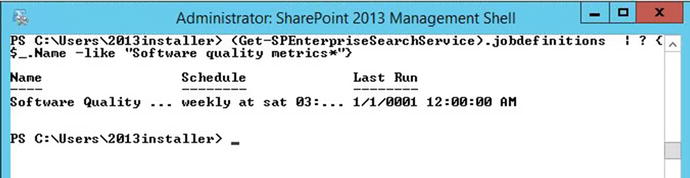
Figure 2-9. Weekly job yet to run
The key takeaway here is that PowerShell is a really great troubleshooting tool and to understand that we didn’t cover everything there is to learn about PowerShell. There are some really good resources online and some great books on PowerShell. Don Jones’s PowerShell in a month of lunches is a great series of YouTube videos that you can watch in order. Granted, while they do not cover anything within the SharePoint arena, they do cover a lot of things that we didn’t go over.
Another key takeaway here, is that there are usually a lot more properties that are waiting for you inside of any given object. Take the Get- SPEnterpriseSearchService cmdlet; for example, it has way more than six properties. If you piped it to get-member, you already know that there are more than the default six properties.
In fact, Get-member is your best friend, when it comes to using PowerShell as a troubleshooting tool. You can take any cmdlet and pipe it to the Get-Member cmdlet to find out all sorts of things. Make sure to include any required parameters, unless you would like to be prompted for them, the way I was prompted in Figure 2-10.
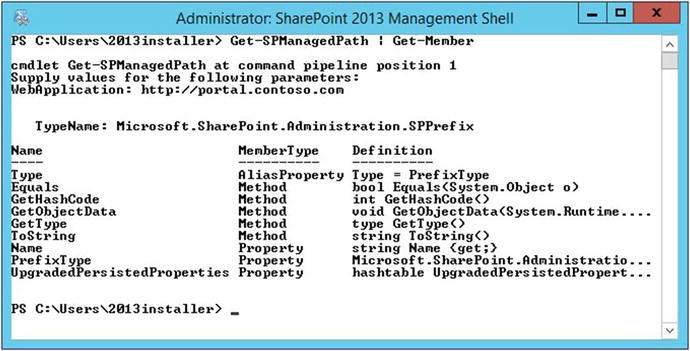
Figure 2-10. Sometimes parameters are required
Often, cmdlets have required parameters. Lucky for us, PowerShell has a built in help system. And just like the Get-Member cmdlet, the Get-Help cmdlet works with any cmdlet. The only difference is that you do not pipe the cmdlet you’re seeking help for to the Get-Help cmdlet. Instead, you just run the get-help cmdlet with whichever cmdlet you want. For example, if you wanted to get help on the cmdlet Get-SPWebApplication , you would only need to type:
Get-Help Get-SPWebApplicationWhat happens next is that PowerShell kicks out the basic help information for Get-SPWebApplication. Figure 2-11 shows the outcome of the Get-Help Get-SPWebApplication one-liner.
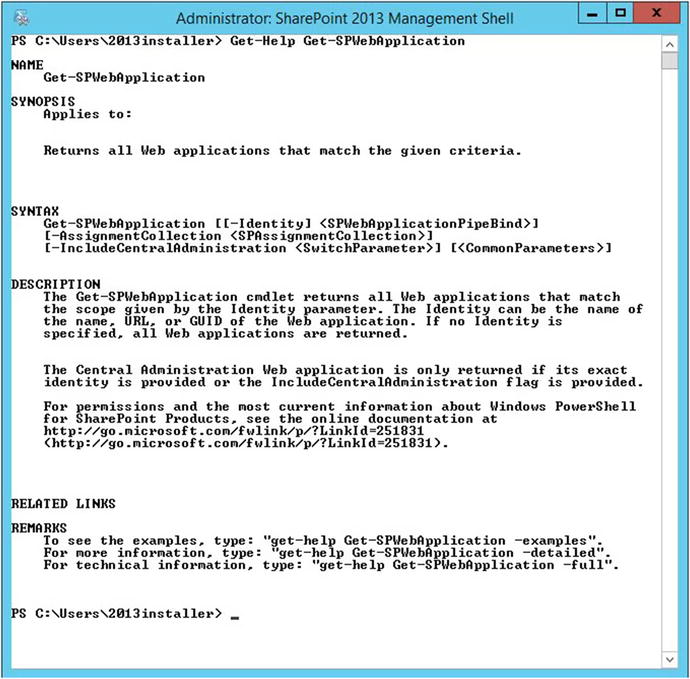
Figure 2-11. Getting help on a cmdlet
Looking at the syntax , we can tell right away that the data required for the –Identity parameter is not required and that even the –Identity parameter itself is not required. We can also see that the rest of the parameters are not required but are optional. We can also tell that if either of the optional parameters are used that they have a mandatory value that must follow. For example, notice that the –Identity parameter has brackets surrounding it, like this: [-Identity]. That means that this parameter is optional, the next set of brackets around the datatype and the parameter name tells us that the value of the datatype is also optional. The value for the type of data that the Identity parameter takes is called SPWebApplicationPipeBind . This tells you that you can pass this value into other cmdlets via the pipe method.
At the bottom of Figure 2-11, we can use some of the common parameters, such as –examples, –detailed, and –full. When we ran Get-Help Get-SPWebApplication –full, we opted to leave out any of the parameters and just go with one of the common parameters of Get-Help command, -full. The resulting screen revealed a lot more information.
Avoiding Scrolling Truncation
Scrolling truncation is not the formal term for loosing information that scrolled into the SharePoint Management Shell. Sometimes, the results of a PowerShell one-liner generate more than the default 300 lines that the Management Shell window allows in its buffer. This is why it is a good idea to modify that value. In Figure 2-12, you can see that we’ve right-clicked the title bar of the PowerShell window, scrolled down to defaults, and navigated to the Console Window Properties’ Layout tab. The buffer is defaulted to 300 lines.
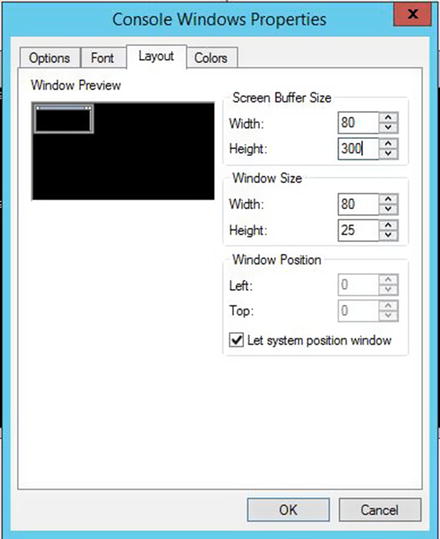
Figure 2-12. 300 lines
After we modify the buffer to a higher number—let’s say 3000 to 5000 lines, the problem with not being able to avoid scrolling truncation should mostly disappear. I say “mostly” because even with 5000 lines, there are still many PowerShell one-liners that scroll outside of this buffer range. For example, if you ran Get-ChildItem –recurse from the root of your C: drive, this would still be subject to the buffer limit. In Figure 2-13, we can see the modification for the increase in buffer size.
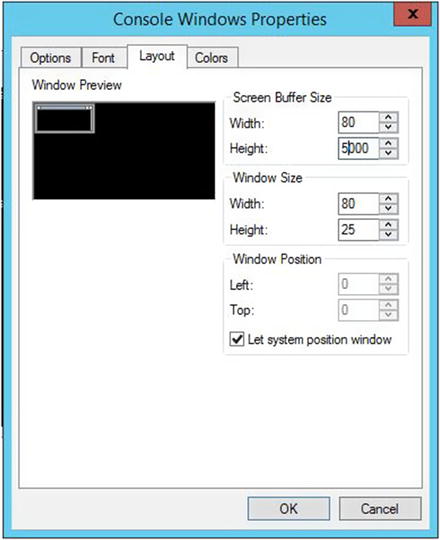
Figure 2-13. 5000 lines
Now that we’ve pretty much stopped the issue of cmdlet output scrolling off the screen, let’s make it easy to copy and paste information out of our command line. Have you ever wondered why on some servers you can just click down, drag across, and select the sections you’d like to copy, without having to go through the menu system? The reason that was possible is due to a thing called quick edit mode. If you right-click the title bar again, select the default; you can then check the Quick Edit box. After you’ve done it for the Default setting or the Properties setting, do it for the other setting. Just right-click the title bar, click Defaults, then in the Options tab, click Quick Edit, as shown in Figure 2-14.

Figure 2-14. Quick Edit Mode
With quick edit mode enabled and the buffer at 5000 lines, you should be good to go for most tasks. There may be situations where 5000 lines are not enough. I wouldn’t recommend increasing it too much higher because this buffer exists in memory, unless you have all sorts of memory available. Instead what you could do is push the output to a file, using the out-file cmdlet .
Enumerating Sites
There will be times when you are auditing a new environment, or maybe your boss asks you how many sites there are in your SharePoint farm. This is where you’ll more than likely be glad that you increased the buffer and you’ll appreciate the ability to easily copy the results. It might be a great candidate for the out-file cmdlet, too.
You can use PowerShell to get all the sites and subsites from all of the various site collections in all of the web applications in your farm. If you notice, I said that backwards, on purpose. As your boss, probably doesn’t know the difference between his page and a site collection. Another way to think of this is that a site collection and a subsite or subweb are probably synonymous in your bosses mind, and no different from a web application. Nothing could be further from the truth. When troubleshooting SharePoint, it is important to understand the stacking order of site topologies.
Web applications house numerous databases . Site collections can only span one database and they are housed inside of databases. Databases can house numerous site collections. Site collections can have hundreds of thousands of sites and subsites. That being the case, here is a one-liner that allows you to enumerate all the sites in your farm:
Get-SPWebApplication | Get-SPSite –Limit All | Get-SPWeb –Limit All | FT URL –auto –wrap | Out-File c:TroubleShootingAllSites.txtThe reason for the –auto and –wrap is to tell PowerShell not to truncate anything and just wrap to the next line if need be. The reason for the Out-File cmdlet is to take a precaution in the event that there are more than 5000 lines of site URL’s.
We’ve cruised through some PowerShell concepts and looked at how to utilize PowerShell to query the object model and interrogate it for information that is not available in the GUI. Let’s take a gander at some scripting to build a farm, as well as a method for speeding up the build time by eliminating the need to download the binaries on each server.
If you use an offline install method, you can decrease the amount of time that is required for the prerequisite installer. You can either manually download the prerequisite files to a network share or use a PowerShell script to download the files.
Craig Lussier has written an awesome set of scripts that make performing an offline install of the 2013 prerequisites much easier. You can get a copy of the SharePoint 2013 offline prerequisite install script at https://gallery.technet.microsoft.com/DownloadInstall-SharePoint-e6df9eb8 . There are instructions on how to use Craig’s script at that site. Essentially the process boils down to running three different scripts. One of the scripts performs the step of getting the Windows features on the server and another script downloads the prerequisites to the folder you specify. Finally, there is a script that kicks off the prerequisiteinstaller.exe. These scripts assume you’re working with a server running Windows Server 2012 R2. The key is to make sure you give the scripts the correct locations. Make sure to give the prerequisites download script the location shown in Figure 2-16 and make sure to give the installer script the location shown in Figure 2-15.
If you want to perform the offline install in a more manual fashion than using a download script, you can download each of the prerequisites from the Internet on a machine that has Internet connectivity. The 2013 prerequisites are available for download at the following locations:
Microsoft SQL Server 2008 R2 SP1 Native Client: http://download.microsoft.com/download/9/1/3/9138773A-505D-43E2-AC08-9A77E1E0490B/1033/x64/sqlncli.msi
Microsoft Sync Framework Runtime v1.0 SP1 (x64): http://download.microsoft.com/download/E/0/0/E0060D8F-2354-4871-9596-DC78538799CC/Synchronization.msi
Windows Server App Fabric: http://download.microsoft.com/download/A/6/7/A678AB47-496B-4907-B3D4-0A2D280A13C0/WindowsServerAppFabricSetup_x64.exe
Cumulative Update Package 1 for Microsoft AppFabric 1.1 for Windows Server (KB2671763): http://download.microsoft.com/download/7/B/5/7B51D8D1-20FD-4BF0-87C7-4714F5A1C313/AppFabric1.1-RTM-KB2671763-x64-ENU.exe
Windows Identity Foundation (KB974405): http://download.microsoft.com/download/D/7/2/D72FD747-69B6-40B7-875B-C2B40A6B2BDD/Windows6.1-KB974405-x64.msu
Microsoft Identity Extensions: http://download.microsoft.com/download/0/1/D/01D06854-CA0C-46F1-ADBA-EBF86010DCC6/rtm/MicrosoftIdentityExtensions-64.msi
Microsoft Information Protection and Control Client: http://download.microsoft.com/download/9/1/D/91DA8796-BE1D-46AF-8489-663AB7811517/setup_msipc_x64.msi
Microsoft WCF Data Services 5.0: http://download.microsoft.com/download/8/F/9/8F93DBBD-896B-4760-AC81-646F61363A6D/WcfDataServices.exe
Microsoft WCF Data Services 5.6 (rename this download to WcfDataServices56.exe): http://download.microsoft.com/download/1/C/A/1CAA41C7-88B9-42D6-9E11-3C655656DAB1/WcfDataServices.exe
If you’re not using Craig Lussier’s scripts, then after you’ve downloaded all of the prerequisites, you can use the SharePoint media and these steps to install them on SharePoint 2013:
Step 1
First, make sure the Windows Server Media is in the location specified by the -Source parameter and that the source location parameter is pointing to the correct folder on your system, else update this parameter in your script for the location relative to your environment. For example, on my server, the Windows CD was mounted to the E: drive, so this meant that the side-by-side folder was located inside the sources folder at E:sourcessxs.
Then, once you’re good to go with the path for step 1, execute the following two lines of code:
Import-Module ServerManagerAdd-WindowsFeature Net-Framework-Features,Web-Server,Web-WebServer,Web-Common-Http,Web-Static-Content,Web-Default-Doc,Web-Dir-Browsing,Web-Http-Errors,Web-App-Dev,Web-Asp-Net,Web-Net-Ext,Web-ISAPI-Ext,Web-ISAPI-Filter,Web-Health,Web-Http-Logging,Web-Log-Libraries,Web-Request-Monitor,Web-Http-Tracing,Web-Security,Web-Basic-Auth,Web-Windows-Auth,Web-Filtering,Web-Digest-Auth,Web-Performance,Web-Stat-Compression,Web-Dyn-Compression,Web-Mgmt-Tools,Web-Mgmt-Console,Web-Mgmt-Compat,Web-Metabase,Application-Server,AS-Web-Support,AS-TCP-Port-Sharing,AS-WAS-Support, AS-HTTP-Activation,AS-TCP-Activation,AS-Named-Pipes,AS-Net-Framework,WAS,WAS-Process-Model,WAS-NET-Environment,WAS-Config-APIs,Web-Lgcy-Scripting,Windows-Identity-Foundation,Server-Media-Foundation,Xps-Viewer -Source E:sourcessxs
Depending on the state of your server before your ran step 1, you may or may not be prompted to restart. Please restart even if you are not prompted to restart. After your server comes back online, repeat step 1 on any of the remaining servers in your farm not including your SQL server.
Step 2
Make sure that the $SharePoint2013Path variable points to the correct location on your server. The location is shown in Figure 2-15.

Figure 2-15. Location of SharePoint binaries
Before running step 2, make sure all the prerequisites are downloaded saved in the PrerequisiteInstallerFiles folder that is located inside of the folder that hold the SharePoint binaries. Figure 2-16 shows the location within the file system in which to store the prerequisites.

Figure 2-16. SharePoint prerequisites have their own folder
After you’ve verified that you’re pointing to the directory that holds your SharePoint binaries ; and, that the prerequisites folder has all of the prerequisite installer files stored inside, you are ready to run step 2. To run step 2, just copy and paste the following two lines of code into a SharePoint Management Shell.
$SharePoint2013Path = "C:AutoSPInstallerSP2013SharePoint"Start-Process "$SharePoint2013PathPrerequisiteInstaller.exe" –ArgumentList "/SQLNCli:$SharePoint2013PathPrerequisiteInstallerFilessqlncli.msi /IDFX:$SharePoint2013PathPrerequisiteInstallerFilesWindows6.1-KB974405-x64.msu /IDFX11:$SharePoint2013PathPrerequisiteInstallerFilesMicrosoftIdentityExtensions-64.msi /Sync:$SharePoint2013PathPrerequisiteInstallerFilesSynchronization.msi /AppFabric:$SharePoint2013PathPrerequisiteInstallerFilesWindowsServerAppFabricSetup_x64.exe /KB2671763:$SharePoint2013PathPrerequisiteInstallerFilesAppFabric1.1-RTM-KB2671763-x64-ENU.exe /MSIPCClient:$SharePoint2013PathPrerequisiteInstallerFilessetup_msipc_x64.msi /WCFDataServices:$SharePoint2013PathPrerequisiteInstallerFilesWcfDataServices.exe /WCFDataServices56:$SharePoint2013PathPrerequisiteInstallerFilesWcfDataServices56.exe"
After you have completed step 2, the prerequisites are installed, and you’re ready to run the setup.exe file, if you’re building a farm with PowerShell. If you’re using AutoSPInstaller, you are ready to run the setup.exe file on each server, just to save time. AutoSPInstaller runs setup automatically if you forget one of the servers.
Running setup is as simple as right-clicking the file, clicking Run As Administrator, and then supplying the SharePoint license key, when prompted along with a few more selections, such as the type of farm your building and file locations. You can see why an automated process such as AutoSPInstaller provides a more standardized build and gives a firmer foundation with less room for manual deviations from the standard build.
PowerShell Script to Create Central Administration
The lines used to create the configuration database and the database to house the Central Administration site and its content are fairly straightforward. Read through each line of code and then after you’re done, we’ll talk about what’s happening in each section. The code you see here would be put into a ps1 file and run from the SharePoint Management Shell, as follows.
Set-ExecutionPolicy UnrestrictedAdd-PSSnapin microsoft.sharepoint.powershell -ErrorAction SilentlyContinueWrite-Host "When prompted for credentials, give SharePoint the farm account, not the install account that you are signed in with, then provide the passphrase, note: you will not be prompted for passPhrase if it is baked into the script" -ForegroundColor greenNew-SPConfigurationDatabase -DatabaseName 2013_SharePoint_Config -DatabaseServer SharePointAlias -Passphrase (ConvertTo-SecureString "1Qaz2Wsx3Edc4Rfv"-AsPlainText -Force) -FarmCredentials (Get-Credential) -AdministrationContentDatabaseName 2013_SharePoint_CentralAdmin_Content -SkipRegisterAsDistributedCacheHost$CAPort = 5000$CAAuth = "NTLM"Install-SPHelpCollection -AllInitialize-SPResourceSecurityInstall-SPServiceInstall-SPFeature -AllExistingFeaturesNew-SPCentralAdministration -Port $CAPort -WindowsAuthProvider $CAAuthInstall-SPApplicationContentNew-ItemProperty HKLM:SystemCurrentControlSetControlLsa -Name "DisableLoopbackCheck" -value "1" -PropertyType dword## Note you might not have an SCP in your domain, so you may want to exclude the next two lines ##$ServiceConnectionPoint = get-SPTopologyServiceApplication | select URISet-SPFarmConfig -ServiceConnectionPointBindingInformation $ServiceConnectionPoint -Confirm: $FalseWrite-Host "Make sure to register the managed accounts for Service Apps and for Web Content before continuing with the 2013Install script" –ForegroundColor Green -BackgroundColor Yellow
This code sample, created a 2013 farm using an alias of SharePoint SQL; and if the alias was not in place, the code failed with all sorts of red lines. If you were creating a SharePoint 2010 farm, you would just need to remove the –SkipRegisterAsDistributedCacheHost parameter.
One of the key settings in a good build is the SQL Alias . The reason for this best practice is very simple. It is so that the entire farm is portable. For example, if the SQL server had a “virtual heart attack” and became a “smoking hole in the ground,” creating the farm using an alias would allow you to transfer the SQL database logins to a new SQL server, move the database files to the new SQL server, and begin SharePoint operations. Whereas, if you hadn’t used a SQL Alias, you would only be able to reattach the content databases and a few of the SharePoint Service applications. In other words, without an alias, you’d be staring down the barrel of the proverbial “Time to Rebuild” Shotgun.
There are a basically two different ways to create the SQL Alias. When you create a farm using the AutoSPInstaller, the script creates the SQL alias for you automatically via PowerShell. If you are going to create a farm using manual PowerShell scripts, you’ll have to create this alias before running the scripts that create the configuration database and Central Administration. Or, you have to include scripting to create the alias within your scripts before the databases get created. The only data you need to create the Alias is the Alias name, the name of the Database server, and if using a named instance, then the name of the named instance and any non-standard port.
You can add this bit of PowerShell to create the SQL Alias, or you can create it manually. We’ll look at creating the alias manually in one of the exercises at the end of the chapter. This script creates a 64-bit and a 32-bit SQL Alias on the server. Run this script on all servers in your SharePoint farm before running the psconfig to create the configuration database or create the Alias manually with the clicong.exe utility.
$SQLAlias = "SQLALIASNAME"$sqlserver = "SQLservernameinstancename,1433"Write-Host “Creating x64 SQL Alias”New-Item -path HKLM:SOFTWAREMicrosoftMSSQLServerClientConnectToNew-ItemProperty HKLM:SOFTWAREMicrosoftMSSQLServerClientConnectTo -name $SQLAlias -propertytype String -value "DBMSSOCN,$sqlserver"Write-Host “Creating 32bit SQL Alias”New-Item -path HKLM:SOFTWAREWow6432NodeMicrosoftMSSQLServerClientConnectToWrite-Host "Configured SQL Alias on the Server"New-ItemProperty HKLM:SOFTWAREWow6432NodeMicrosoftMSSQLServerClientConnectTo -name $SQLAlias -propertytype String -value "DBMSSOCN,$sqlserver"
The script to create the SQL alias, in its raw form, assumes you’re using a named instance on a specific port. The example code assumes the default SQL port 1433 is being utilized. You can update this, as required for your environment, by changing the port number, if using a static custom port, or removing the named instance. If you are using a dynamic custom port, remove the comma and port number - ,1433. If using the default instance than leave off the instance name and only include the SQLServerName.
When you run the script, you may get a little “red puke” in the output, if the registry location already exists on your server, and you can safely ignore that message. The message looks similar to the following:
New-Item : A key at this path already existsAt line:1 char:9+ New-Item <<<< -path HKLM:SOFTWAREMicrosoftMSSQLServerClientConnectTo+ CategoryInfo : ResourceExists: (Microsoft.Power...RegistryWrapper:RegistryWrapper) [New-Item], IOException + FullyQualifiedErrorId : System.IO.IOException,Microsoft.PowerShell.Commands.NewItemCommand
This is due to the script does not have any try catch logic built into it and since this isn’t a book on PowerShell scripting, but rather a book on troubleshooting, we won’t talk about developing the try catch logic. The error message is just PowerShell’s way of saying, “I didn’t create the registry location because it already existed.” When using PowerShell to troubleshoot, it is important to learn to understand what it is trying to say when it pukes in red.
OK, so now that we’ve got the SQL aliases in place, let’s briefly talk about what we see this Central Administration script doing to the system. The idea behind this discussion is to further your knowledge of PowerShell and of creating a farm with PowerShell. This knowledge aids in troubleshooting; since you have something to compare against when things go wrong and because your build is standardized, it’s even easier to see where things have deviated. The hard part is determining why they’ve deviated.
If you’re already a master or mistress at creating farms using PowerShell, and/or AutoSPInstaller, then you should skip ahead to the section entitled Component Services.
The first line tells PowerShell set the execution policy on the server to unrestricted. This is required due to this script not being signed with a trusted certificate. You can always set the execution policy back to remote signed when you have finished, if you need too. This is a pain, though, since you might find yourself having to set the policy unrestricted to run other scripts too.
Set-ExecutionPolicy Unrestricted The next line brings the SharePoint binaries into the game by converting the plain administrative PowerShell session into an administrative SharePoint Management Shell Session .
Add-PSSnapin microsoft.sharepoint.powershell -ErrorAction SilentlyContinueWhen you run this command, you do so by putting all of the code into a text file and then renaming the text file with a ps1 extension. Then you call the code by navigating to the directory that you stored it inside and calling the ps1 file. For example you might type something like this to navigate to the directory:
Cd "C:directory"Then to run the command you’d just call the PowerShell file. Assuming you named it, centralAdmin.ps1, you would call it like this:
C:directory> .centralAdmin.ps1The purpose of the next line is simply to give some feedback text in the SharePoint Management Shell window and to give that feedback using green text with the normal window background color.
Write-Host “When prompted for credentials, give SharePoint the farm account, not the install account that you are signed in with, then provide the passphrase, note: you will not be prompted for passPhrase if it is baked into the script” -ForegroundColor green
The New-SPConfigurationDatabase creates a new configuration database for a new farm with a specific name. It sets the farm passphrase to 1Qaz2Wsx3Edc4Rfv and then it prompts the admin to enter in the credentials for the farm account, so this method is not as automated as the AutoSPInstaller. The AutoSPInstaller will not prompt you for the farm account password, as you’ve already input the pw into the XML file that the AutoSPInstaller utilizes. When the parameter for the Administration Content Database Name is specified, this cmdlet causes the Central Administration content database to generate.
New-SPConfigurationDatabase -DatabaseName 2013_SharePoint_Config -DatabaseServer SharePointAlias -Passphrase (ConvertTo-SecureString "1Qaz2Wsx3Edc4Rfv"-AsPlainText -Force) -FarmCredentials (Get-Credential) -AdministrationContentDatabaseName 2013_SharePoint_CentralAdmin_Content –SkipRegisterAsDistributedCacheHost
In the next two lines, we’re setting the port number that the Central Administration site runs under and we are setting the authentication provider.
$CAPort = 5000$CAAuth = "NTLM"
Like all PowerShell cmdlets, the get-help cmdlet reveals detailed information about each of the following lines. The Install-SPHelpCollection cmdlet installs the Help site collection files in your farm.
Install-SPHelpCollection -AllWe already know that the next line enforces security for all resources, including files, folders, and registry keys
Initialize-SPResourceSecurity The get-help cmdlet had this to say about the next line: “The Install-SPService cmdlet installs and optionally provisions service on a farm. This cmdlet installs all services, service instances, and service proxies specified in the registry on the local server computer. Use this cmdlet in a script that you build to install and deploy a SharePoint farm or to install a custom developed service.” – PowerShell get-help Install-SPService
Install-SPService The Install-SPFeature –AllExistingFeatures tells the SharePoint farm to install all the features that are present on the file system for the 14, 15, or 16 Hive, depending on which version of SharePoint you are installing. You should definitely run get-help Install-SPFeature if you are a developer, so that you can learn about the developmental power of this cmdlet. During the initial build, this line installs all the features that are present.
Install-SPFeature –AllExistingFeatures The new Central Administration cmdlet creates the Central Administration Web application and it knows to store it in the previously created Central Administration content database, because the configuration database knows where the web application should store its site. This cmdlet runs the Central Administration site on the port we chose and uses NTLM as the authentication protocol.
New-SPCentralAdministration -Port $CAPort -WindowsAuthProvider $CAAuthThis next line copies shared application data into the web application folders.
Install-SPApplicationContent The following line attempts to create the DisableLoopbackCheck registry value. I’ll talk more about this later. If you’re running the script a second time, this line generates a “red line,” or what I like to call “red puke,” because it doesn’t check to see if the registry item exists; if the item does exist, the red puke just says that the property could not be created as it existed, or something to that affect.
New-ItemProperty HKLM:SystemCurrentControlSetControlLsa -Name "DisableLoopbackCheck" -value "1" -PropertyType dwordThe following line is just a PowerShell comment that is not really needed.
## Note you might not have an SCP in your domain, so you may want to exclude the next two lines ##These next two lines attempt to set the Service Connection Point data if you have created a SCP for SharePoint. If you have not created a SCP the line tells you that it couldn’t be created.
$ServiceConnectionPoint = get-SPTopologyServiceApplication | select URISet-SPFarmConfig -ServiceConnectionPointBindingInformation $ServiceConnectionPoint -Confirm: $False
This final line reminds the admin performing the semi-automated install that she needs to register the managed accounts for the SharePoint Service Application App pool and for the service account that is used for the content application app pool, before running the script to install.
Write-Host “Make sure to register the managed accounts for Service Apps and for Web Content before continuing with the 2013Install script” –ForegroundColor Green -BackgroundColor Yellow The above PowerShell is used to display a message about creating managed accounts.
If you had opted to use AutoSPInstaller, there is far less room for non-standardization. That is, when you run the installs with these semi-manual PowerShell scripts that require some configuration, it is not as easy to standardize as it is when you use the AutoSPInstaller. You’ll really see what I mean, as we discuss the PowerShell to install all the various SharePoint Service application inside the Shared Hosted Services app pool.
PowerShell Script to Create Service Applications
The PowerShell script that is used to create the SharePoint Service applications is the base of our least privileging. It creates an application pool in IIS to house the non-search service applications and it creates an application pool for search. Each application pool runs under a non-administrative user account that is not a member of any local administrative groups. The process of creating the service applications adds these accounts to the IIS_IUSRS, Performance Monitor Users, and WSS_WPG local security groups .
The script used to create the service applications is much longer than the script used for creating the configuration database and the Central Administration content database. Since the configuration database controls all sorts of things in SharePoint and is the very first database in any SharePoint farm on the planet, it’s no wonder that this script to create the service applications will not work if the configuration database and the Central Administration site are not provisioned and online.
Read through each line of this script that is used in SharePoint 2010 and don’t worry if some of it doesn’t make sense, or if you’re not sure what each part is doing, as we’ll discuss each section in further detail, next.
###################################################### This script replicates most of the functionality found in the SharePoint Products Configuration Wizard with the EXCEPTION of the USER PROFILE SERVICE#####################################################Add-PSSnapin Microsoft.SharePoint.PowerShell -erroraction SilentlyContinue## Settings you may want to change ##$databaseServerName = "SharePointSQL" #assumes you're using a SQL Alias configured with cliconfg.exe$searchServerName = "2010APP" #Front end Server that will run central admin, the server you’re on right now$saAppPoolName = "SharePoint Hosted Services"$appPoolUserName = "Contoso2010svcapps" #This is the service application pool account it is not the farm admin account for Timer and Central admin, sometimes calle#d the farm account, it is not the setup account, or install account$ssaAppPoolName = "SharePoint Search Service Application Pool"$SearchappPoolUserName = "Contoso2010Search"## Service Application Service Names ##$accesssSAName = "Access Services"$bcsSAName = "Business Data Connectivity Service"$excelSAName = "Excel Services Application"$metadataSAName = "Managed Metadata Web Service"$performancePointSAName = "PerformancePoint Service"$searchSAName = "SharePoint Server Search"$stateSAName = "State Service"$secureStoreSAName = "Secure Store Service"$usageSAName = "Usage and Health Data Collection Service"$visioSAName = "Visio Graphics Service"$WebAnalyticsSAName = "Web Analytics Service"$WordAutomationSAName = "Word Automation Services"$saAppPool = Get-SPServiceApplicationPool -Identity $saAppPoolName -EA 0if($saAppPool -eq $null){Write-Host "Creating Service Application Pool..."$appPoolAccount = Get-SPManagedAccount -Identity $appPoolUserName -EA 0if($appPoolAccount -eq $null){Write-Host "Please supply the password for the Service Account..."$appPoolCred = Get-Credential $appPoolUserName$appPoolAccount = New-SPManagedAccount -Credential $appPoolCred -EA 0}$appPoolAccount = Get-SPManagedAccount -Identity $appPoolUserName -EA 0if($appPoolAccount -eq $null){Write-Host "Cannot create or find the managed account $appPoolUserName, please ensure the account exists."Exit -1}New-SPServiceApplicationPool -Name $saAppPoolName -Account $appPoolAccount -EA 0 > $null}Write-Host "Creating Usage Service and Proxy..."$serviceInstance = Get-SPUsageServiceNew-SPUsageApplication -Name $usageSAName -DatabaseServer $databaseServerName -DatabaseName "Usage" -UsageService $serviceInstance > $nullWrite-Host "Creating Access Services and Proxy..."New-SPAccessServiceApplication -Name $accesssSAName -ApplicationPool $saAppPoolName > $nullGet-SPServiceInstance | where-object {$_.TypeName -eq "Access Database Service"} | Start-SPServiceInstance > $nullWrite-Host "Creating BCS Service and Proxy..."New-SPBusinessDataCatalogServiceApplication -Name $bcsSAName -ApplicationPool $saAppPoolName -DatabaseServer $databaseServerName -DatabaseName "BusinessDataCatalog" > $nullGet-SPServiceInstance | where-object {$_.TypeName -eq "Business Data Connectivity Service"} | Start-SPServiceInstance > $nullWrite-Host "Creating Excel Service..."New-SPExcelServiceApplication -name $excelSAName –ApplicationPool $saAppPoolName > $nullSet-SPExcelFileLocation -Identity "http://" -ExcelServiceApplication $excelSAName -ExternalDataAllowed 2 -WorkbookSizeMax 10 -WarnOnDataRefresh:$trueGet-SPServiceInstance | where-object {$_.TypeName -eq "Excel Calculation Services"} | Start-SPServiceInstance > $nullWrite-Host "Creating Metadata Service and Proxy..."New-SPMetadataServiceApplication -Name $metadataSAName -ApplicationPool $saAppPoolName -DatabaseServer $databaseServerName -DatabaseName "Metadata" > $nullNew-SPMetadataServiceApplicationProxy -Name "$metadataSAName Proxy" -DefaultProxyGroup -ServiceApplication $metadataSAName > $nullGet-SPServiceInstance | where-object {$_.TypeName -eq "Managed Metadata Web Service"} | Start-SPServiceInstance > $nullWrite-Host "Creating Performance Point Service and Proxy..."New-SPPerformancePointServiceApplication -Name $performancePointSAName -ApplicationPool $saAppPoolName -DatabaseServer $databaseServerName -DatabaseName "PerformancePoint" > $nullNew-SPPerformancePointServiceApplicationProxy -Default -Name "$performancePointSAName Proxy" -ServiceApplication $performancePointSAName > $nullGet-SPServiceInstance | where-object {$_.TypeName -eq "PerformancePoint Service"} | Start-SPServiceInstance > $null##START SEARCH$ssaAppPool = Get-SPServiceApplicationPool -Identity $ssaAppPoolName -EA 0if($ssaAppPool -eq $null){Write-Host "Creating Search Service Application Pool..."$SearchappPoolAccount = Get-SPManagedAccount -Identity $SearchappPoolUserName -EA 0if($SearchappPoolAccount -eq $null){Write-Host "Please supply the password for the Service Account..."$ssappPoolCred = Get-Credential $SearchappPoolUserName$SearchappPoolAccount = New-SPManagedAccount -Credential $ssappPoolCred -EA 0}$SearchappPoolAccount = Get-SPManagedAccount -Identity $SearchappPoolUserName -EA 0if($appPoolAccount -eq $null){Write-Host "Cannot create or find the managed account $SearchappPoolUserName, please ensure the account exists."Exit -1}New-SPServiceApplicationPool -Name $ssaAppPoolName -Account $SearchappPoolAccount -EA 0 > $null}## Search Specifics, we are single server farm ##$searchServerName = (Get-ChildItem env:computername).value$serviceAppName = "Enterprise Search Services"$searchDBName = "Search"Write-Host "Creating Search Service and Proxy..."Write-Host " Starting Services..."Start-SPEnterpriseSearchServiceInstance $searchServerNameStart-SPEnterpriseSearchQueryAndSiteSettingsServiceInstance $searchServerNameWrite-Host " Creating Search Application..."$searchApp = New-SPEnterpriseSearchServiceApplication -Name $searchSAName -ApplicationPool $ssaAppPoolName -DatabaseServer $databaseServerName -DatabaseName $searchDBName$searchInstance = Get-SPEnterpriseSearchServiceInstance $searchServerNameWrite-Host " Creating Administration Component..."$searchApp | Get-SPEnterpriseSearchAdministrationComponent | Set-SPEnterpriseSearchAdministrationComponent -SearchServiceInstance $searchInstance#CrawlWrite-Host " Creating Crawl Component..."$InitialCrawlTopology = $searchApp | Get-SPEnterpriseSearchCrawlTopology -Active$CrawlTopology = $searchApp | New-SPEnterpriseSearchCrawlTopology$CrawlDatabase = ([array]($searchApp | Get-SPEnterpriseSearchCrawlDatabase ))[0]$CrawlComponent = New-SPEnterpriseSearchCrawlComponent -CrawlTopology $CrawlTopology -CrawlDatabase $CrawlDatabase -SearchServiceInstance $searchInstance$CrawlTopology | Set-SPEnterpriseSearchCrawlTopology -ActiveWrite-Host -ForegroundColor white " Waiting for the old crawl topology to become inactive" -NoNewlinedo {write-host -NoNewline .;Start-Sleep 6;} while ($InitialCrawlTopology.State -ne "Inactive")$InitialCrawlTopology | Remove-SPEnterpriseSearchCrawlTopology -Confirm:$falseWrite-Host#QueryWrite-Host " Creating Query Component..."$InitialQueryTopology = $searchApp | Get-SPEnterpriseSearchQueryTopology -Active$QueryTopology = $searchApp | New-SPEnterpriseSearchQueryTopology -Partitions 1$IndexPartition= (Get-SPEnterpriseSearchIndexPartition -QueryTopology $QueryTopology)$QueryComponent = New-SPEnterpriseSearchQuerycomponent -QueryTopology $QueryTopology -IndexPartition $IndexPartition -SearchServiceInstance $searchInstance$PropertyDatabase = ([array]($searchApp | Get-SPEnterpriseSearchPropertyDatabase ))[0]$IndexPartition | Set-SPEnterpriseSearchIndexPartition -PropertyDatabase $PropertyDatabase$QueryTopology | Set-SPEnterpriseSearchQueryTopology -ActiveWrite-Host " Creating Proxy..."$searchAppProxy = New-SPEnterpriseSearchServiceApplicationProxy -Name "$searchSAName Proxy" -SearchApplication $searchSAName > $null#####END SEARCHWrite-Host "Creating State Service and Proxy..."New-SPStateServiceDatabase -Name "StateService" -DatabaseServer $databaseServerName | New-SPStateServiceApplication -Name $stateSAName | New-SPStateServiceApplicationProxy -Name "$stateSAName Proxy" -DefaultProxyGroup > $nullWrite-Host "Creating Secure Store Service and Proxy..."New-SPSecureStoreServiceapplication -Name $secureStoreSAName -Sharing:$false -DatabaseServer $databaseServerName -DatabaseName "SecureStoreServiceApp" -ApplicationPool $saAppPoolName -auditingEnabled:$true -auditlogmaxsize 30 | New-SPSecureStoreServiceApplicationProxy -name "$secureStoreSAName Proxy" -DefaultProxygroup > $nullGet-SPServiceInstance | where-object {$_.TypeName -eq "Secure Store Service"} | Start-SPServiceInstance > $nullWrite-Host "Creating Visio Graphics Service and Proxy..."New-SPVisioServiceApplication -Name $visioSAName -ApplicationPool $saAppPoolName > $nullNew-SPVisioServiceApplicationProxy -Name "$visioSAName Proxy" -ServiceApplication $visioSAName > $nullGet-SPServiceInstance | where-object {$_.TypeName -eq "Visio Graphics Service"} | Start-SPServiceInstance > $nullWrite-Host "Creating Web Analytics Service and Proxy..."$stagerSubscription = ""$reportingSubscription = ""New-SPWebAnalyticsServiceApplication -Name $WebAnalyticsSAName -ApplicationPool $saAppPoolName -ReportingDataRetention 20 -SamplingRate 100 -ListOfReportingDatabases $reportingSubscription -ListOfStagingDatabases $stagerSubscription > $nullNew-SPWebAnalyticsServiceApplicationProxy -Name "$WebAnalyticsSAName Proxy" -ServiceApplication $WebAnalyticsSAName > $nullGet-SPServiceInstance | where-object {$_.TypeName -eq "Web Analytics Web Service"} | Start-SPServiceInstance > $nullGet-SPServiceInstance | where-object {$_.TypeName -eq "Web Analytics Data Processing Service"} | Start-SPServiceInstance > $nullWrite-Host "Creating Word Conversion Service and Proxy..."New-SPWordConversionServiceApplication -Name $WordAutomationSAName -ApplicationPool $saAppPoolName -DatabaseServer $databaseServerName -DatabaseName "WordAutomation" -Default > $nullGet-SPServiceInstance | where-object {$_.TypeName -eq "Word Automation Services"} | Start-SPServiceInstance > $null############################################## End Script#Now proceed to manually configuring your service applications (e.g. the Secure Store Service for Excel Services, Visio graphics, and performance point. The managed metadata service #for a content type hub)
I hope you’re starting to see why using AutoSPInstaller is the way to go with rolling out and standardizing a build. The troubleshooting reason for standardizing a build is so that you know that the farm should be set to your configuration each time it is built. And, this standardization gives you a comparison point for the current status of anything in your farm, provided that the initial configuration is documented.
Let’s look at this script’s initial variables with the understanding that any lines in the script that start with a pound sign (#) are just comments or notes. The first actual line in the script, that isn’t a comment, makes it so you could run this script from a regular administrative PowerShell session, as it converts any administrative PowerShell session to a SharePoint Management Shell session.
###################################################### This script replicates most of the functionality found in the SharePoint Products Configuration Wizard with the EXCEPTION of the USER PROFILE SERVICE#####################################################Add-PSSnapin Microsoft.SharePoint.PowerShell -erroraction SilentlyContinue
The next 20 lines list most of the script’s variables . You will want to modify these for your environment and then after you create a farm, you should keep a copy of the scripts somewhere to use a reference point, should the need arise. In the case of the AutoSPInstaller, you only have one XML file that you need to keep.
I hope you’re finding that these lines are fairly self-explanatory in that they ask for the name of the SQL alias not the actual name of the database server. Then the application pool names and user accounts used in least privilege are gathered, followed by the names for each of the SharePoint Service Applications. If you’re asking the question, “why didn’t he make variables for the database names ?” after noticing that they are hard-coded in the script, then you’re already ahead of the game. And, you’ve already started troubleshooting this SharePoint script.
## Settings you may want to change ##$databaseServerName = "SharePointSQL" #assumes you're using a SQL Alias configured with cliconfg.exe$searchServerName = "2010APP" #Front end Server that will run central admin, the server you’re on right now$saAppPoolName = "SharePoint Hosted Services"$appPoolUserName = "Contoso2010svcapps" #This is the service application pool account it is not the farm admin account for Timer and Central admin, sometimes called the farm account, it is not the setup account, or install account$ssaAppPoolName = "SharePoint Search Service Application Pool"$SearchappPoolUserName = "Contoso2010Search"## Service Application Service Names ##$accesssSAName = "Access Services"$bcsSAName = "Business Data Connectivity Service"$excelSAName = "Excel Services Application"$metadataSAName = "Managed Metadata Web Service"$performancePointSAName = "PerformancePoint Service"$searchSAName = "SharePoint Server Search"$stateSAName = "State Service"$secureStoreSAName = "Secure Store Service"$usageSAName = "Usage and Health Data Collection Service"$visioSAName = "Visio Graphics Service"$WebAnalyticsSAName = "Web Analytics Service"$WordAutomationSAName = "Word Automation Services"
Starting with the line that begins, $saAppPool=Get-SpServiceApplicationPool … and continuing down through the line that starts with New-SPServiceApplicationPool and ends with > $null, is a section of code that has if then else logic that gathers the managed account to be used for the Service application pool, unless the managed account already exists. It also looks to see if the app pool is created before it even checks for the existence of that managed account, then if it finds the app pool it proceeds to the line that creates the usage service. If it can find the app pool or the managed account, it prompts, “Please supply the password for the service account,” and the account field of the credential window that pops up already contains whichever account you used for this application pool, based on the value that you assigned to $appPoolUserName. If it does not find the app pool and finds the managed account that was supplied in the $appPoolUserName variable, it creates the app pool and writes to the screen that it is Creating Service Application Pool ….
$saAppPool = Get-SPServiceApplicationPool -Identity $saAppPoolName -EA 0if($saAppPool -eq $null){Write-Host "Creating Service Application Pool..."$appPoolAccount = Get-SPManagedAccount -Identity $appPoolUserName -EA 0if($appPoolAccount -eq $null){Write-Host "Please supply the password for the Service Account..."$appPoolCred = Get-Credential $appPoolUserName$appPoolAccount = New-SPManagedAccount -Credential $appPoolCred -EA 0}$appPoolAccount = Get-SPManagedAccount -Identity $appPoolUserName -EA 0if($appPoolAccount -eq $null){Write-Host "Cannot create or find the managed account $appPoolUserName, please ensure the account exists."Exit -1}New-SPServiceApplicationPool -Name $saAppPoolName -Account $appPoolAccount -EA 0 > $null}
The next three lines create the Usage Application and its database named Usage. This is one of those spots in the script where it might have been better form to use a variable vs. hard coding. The reason is for portability between environments. In other words, if we wanted to use this script for other farms and we wanted our other farm to have different database names, we would have to comb through the script looking for –DatabaseName parameters.
Had the script used variables for the databases, there would be an even longer variables section at the top of the script; but that would allow for one place to change instead of having to look through the full script.
After the script writes to the screen that it is “Creating Usage Service and Proxy …” it creates a new service application with whichever value was assigned to $usageSAName and it creates a database on the database server that is represented by the SQLAlias.
Write-Host "Creating Usage Service and Proxy..."$serviceInstance = Get-SPUsageServiceNew-SPUsageApplication -Name $usageSAName -DatabaseServer $databaseServerName -DatabaseName "Usage" -UsageService $serviceInstance > $null
Next, the script creates the Access Service application, then it starts the Access Database Service. The Access Database Service typename property should not be changed because it is a system name and is hardcoded for that reason, so as that it would not be changed from build to build or ever. I won’t keep saying that the script writes to the screen, but it does write to the screen each time you see a write-host line.
Write-Host "Creating Access Services and Proxy..."New-SPAccessServiceApplication -Name $accesssSAName -ApplicationPool $saAppPoolName > $nullGet-SPServiceInstance | where-object {$_.TypeName -eq "Access Database Service"} | Start-SPServiceInstance > $null
After the Access Service application is created, the Business Connectivity Service (BCS) application and its database is created and then the BCS service is started. Each time you see the Get-SPServiceInstance piped into a where-object cmdlet in this script you’ll notice that the exact system name of the service is used to identify which service to pipe to the start-spserviceinstance. The >$ null that follow each line tell the script to wait until the service is started.
Write-Host "Creating BCS Service and Proxy..."New-SPBusinessDataCatalogServiceApplication -Name $bcsSAName -ApplicationPool $saAppPoolName -DatabaseServer $databaseServerName -DatabaseName "BusinessDataCatalog" > $nullGet-SPServiceInstance | where-object {$_.TypeName -eq "Business Data Connectivity Service"} | Start-SPServiceInstance > $null
After the BCS is online, the script creates the Excel Service application and starts it. So why is this important in troubleshooting? Well, if you come into work Monday, and find that your Excel service is not working and then proceed to look into the issue only to find that the there is no Excel service application in your farm any longer; but now there is one called Xcel service application services. With the standardized build and the scripts documented, you know that someone has created a new service application and possibly removed or orphaned your original service application.
Write-Host "Creating Excel Service..."New-SPExcelServiceApplication -name $excelSAName –ApplicationPool $saAppPoolName > $nullSet-SPExcelFileLocation -Identity "http://" -ExcelServiceApplication $excelSAName -ExternalDataAllowed 2 -WorkbookSizeMax 10 -WarnOnDataRefresh:$trueGet-SPServiceInstance | where-object {$_.TypeName -eq "Excel Calculation Services"} | Start-SPServiceInstance > $null
After Excel Services is online and hosted inside the SharePoint Hosted services application pool in IIS, the script creates the Managed MetaData Service application. And unlike the Excel Services application, which does not have a database, the Managed MetaData Service application cmdlet that creates the service application also creates the database.
Then after the service application is created, the cmdlet to create a proxy for the service application is used to create the connection to the endpoint that lives in IIS inside the Shared Hosted Services application pool. The proxy cmdlet also connects the proxy to the default proxy group using the –DefaultProxyGroup parameter. This makes it so that SharePoint automatically connects any new web applications to be able to see the managed metadata service application.
Write-Host "Creating Metadata Service and Proxy..."New-SPMetadataServiceApplication -Name $metadataSAName -ApplicationPool $saAppPoolName -DatabaseServer $databaseServerName -DatabaseName "Metadata" > $nullNew-SPMetadataServiceApplicationProxy -Name "$metadataSAName Proxy" -DefaultProxyGroup -ServiceApplication $metadataSAName > $nullGet-SPServiceInstance | where-object {$_.TypeName -eq "Managed Metadata Web Service"} | Start-SPServiceInstance > $null
If I said, “Please see the managed metadata explanation and replace with performance point to save trees,” would that be OK? These lines are the same as the lines used for ManagedMetadata, except that they call performance point cmdlets.
Write-Host "Creating Performance Point Service and Proxy..."New-SPPerformancePointServiceApplication -Name $performancePointSAName -ApplicationPool $saAppPoolName -DatabaseServer $databaseServerName -DatabaseName "PerformancePoint" > $nullNew-SPPerformancePointServiceApplicationProxy -Default -Name "$performancePointSAName Proxy" -ServiceApplication $performancePointSAName > $nullGet-SPServiceInstance | where-object {$_.TypeName -eq "PerformancePoint Service"} | Start-SPServiceInstance > $null
The next 22 lines create the search service application app pool using a separate service account that the one used for the Shared Hosted Service Application app pool.
##START SEARCH$ssaAppPool = Get-SPServiceApplicationPool -Identity $ssaAppPoolName -EA 0if($ssaAppPool -eq $null){Write-Host "Creating Search Service Application Pool..."$SearchappPoolAccount = Get-SPManagedAccount -Identity $SearchappPoolUserName -EA 0if($SearchappPoolAccount -eq $null){Write-Host "Please supply the password for the Service Account..."$ssappPoolCred = Get-Credential $SearchappPoolUserName$SearchappPoolAccount = New-SPManagedAccount -Credential $ssappPoolCred -EA 0}$SearchappPoolAccount = Get-SPManagedAccount -Identity $SearchappPoolUserName -EA 0if($appPoolAccount -eq $null){Write-Host "Cannot create or find the managed account $SearchappPoolUserName, please ensure the account exists."Exit -1}New-SPServiceApplicationPool -Name $ssaAppPoolName -Account $SearchappPoolAccount -EA 0 > $null}
The next three lines gather the variables used in creating the Search Service application, then the Enterprise search service instance is started along with the service responsible for managing search. After the script has finished starting the services is writes to the screen that it is creating the search service application.
The New-SPEnterpriseSearchServiceApplication is called and this creates the Search database. Then after the Search Admin database which is named Search, in this example, by the $searchDBName variable has come online, the script creates the admin components.
After the admin component is online, the process creates the remaining search databases, starts the service application proxy, and brings search online.
## Search Specifics, we are single server farm ##$searchServerName = (Get-ChildItem env:computername).value$serviceAppName = "Enterprise Search Services"$searchDBName = "Search"Write-Host "Creating Search Service and Proxy..."Write-Host " Starting Services..."Start-SPEnterpriseSearchServiceInstance $searchServerNameStart-SPEnterpriseSearchQueryAndSiteSettingsServiceInstance $searchServerNameWrite-Host " Creating Search Application..."$searchApp = New-SPEnterpriseSearchServiceApplication -Name $searchSAName -ApplicationPool $ssaAppPoolName -DatabaseServer $databaseServerName -DatabaseName $searchDBName$searchInstance = Get-SPEnterpriseSearchServiceInstance $searchServerNameWrite-Host " Creating Administration Component..."$searchApp | Get-SPEnterpriseSearchAdministrationComponent | Set-SPEnterpriseSearchAdministrationComponent -SearchServiceInstance $searchInstance#CrawlWrite-Host " Creating Crawl Component..."$InitialCrawlTopology = $searchApp | Get-SPEnterpriseSearchCrawlTopology -Active$CrawlTopology = $searchApp | New-SPEnterpriseSearchCrawlTopology$CrawlDatabase = ([array]($searchApp | Get-SPEnterpriseSearchCrawlDatabase))[0]$CrawlComponent = New-SPEnterpriseSearchCrawlComponent -CrawlTopology $CrawlTopology -CrawlDatabase $CrawlDatabase -SearchServiceInstance $searchInstance$CrawlTopology | Set-SPEnterpriseSearchCrawlTopology -ActiveWrite-Host -ForegroundColor white " Waiting for the old crawl topology to become inactive" -NoNewlinedo {write-host -NoNewline .;Start-Sleep 6;} while ($InitialCrawlTopology.State -ne "Inactive")$InitialCrawlTopology | Remove-SPEnterpriseSearchCrawlTopology -Confirm:$falseWrite-Host#QueryWrite-Host " Creating Query Component..."$InitialQueryTopology = $searchApp | Get-SPEnterpriseSearchQueryTopology -Active$QueryTopology = $searchApp | New-SPEnterpriseSearchQueryTopology -Partitions 1$IndexPartition= (Get-SPEnterpriseSearchIndexPartition -QueryTopology $QueryTopology)$QueryComponent = New-SPEnterpriseSearchQuerycomponent -QueryTopology $QueryTopology -IndexPartition $IndexPartition -SearchServiceInstance $searchInstance$PropertyDatabase = ([array]($searchApp | Get-SPEnterpriseSearchPropertyDatabase))[0]$IndexPartition | Set-SPEnterpriseSearchIndexPartition -PropertyDatabase $PropertyDatabase$QueryTopology | Set-SPEnterpriseSearchQueryTopology -ActiveWrite-Host " Creating Proxy..."$searchAppProxy = New-SPEnterpriseSearchServiceApplicationProxy -Name "$searchSAName Proxy" -SearchApplication $searchSAName > $null#####END SEARCH
After the search service application is created the state service is provisioned and like so many of its fellow SharePoint service applications is given membership in the default proxy group.
Write-Host "Creating State Service and Proxy..."New-SPStateServiceDatabase -Name "StateService" -DatabaseServer $databaseServerName | New-SPStateServiceApplication -Name $stateSAName | New-SPStateServiceApplicationProxy -Name "$stateSAName Proxy" -DefaultProxyGroup > $null
The Secure Store Service application holds credentials and in a truly least-privileged environment, Microsoft says it should have its own application pool. And, in businesses where security is paramount, like the credit card processing industry and healthcare, this seems like it would be a business requirement. In order to save resources on the server, most builds run the Secure Store Service application inside Shared Hosted Services, as we have done in this build.
Write-Host "Creating Secure Store Service and Proxy..."New-SPSecureStoreServiceapplication -Name $secureStoreSAName -Sharing:$false -DatabaseServer $databaseServerName -DatabaseName "SecureStoreServiceApp" -ApplicationPool $saAppPoolName -auditingEnabled:$true -auditlogmaxsize 30 | New-SPSecureStoreServiceApplicationProxy -name "$secureStoreSAName Proxy" -DefaultProxygroup > $nullGet-SPServiceInstance | where-object {$_.TypeName -eq "Secure Store Service"} | Start-SPServiceInstance > $null
Visio graphics is created. No database is needed. Service is started using the system name for the service.
Write-Host "Creating Visio Graphics Service and Proxy..."New-SPVisioServiceApplication -Name $visioSAName -ApplicationPool $saAppPoolName > $nullNew-SPVisioServiceApplicationProxy -Name "$visioSAName Proxy" -ServiceApplication $visioSAName > $nullGet-SPServiceInstance | where-object {$_.TypeName -eq "Visio Graphics Service"} | Start-SPServiceInstance > $null
The web analytics service that is deprecated in SharePoint 2013 and 2016 because it is built into the new search component analytics, is not deprecated in SharePoint 2010 and is brought on line like all the other service applications.
Write-Host "Creating Web Analytics Service and Proxy..."$stagerSubscription = ""$reportingSubscription = ""New-SPWebAnalyticsServiceApplication -Name $WebAnalyticsSAName -ApplicationPool $saAppPoolName -ReportingDataRetention 20 -SamplingRate 100 -ListOfReportingDatabases $reportingSubscription -ListOfStagingDatabases $stagerSubscription > $nullNew-SPWebAnalyticsServiceApplicationProxy -Name "$WebAnalyticsSAName Proxy" -ServiceApplication $WebAnalyticsSAName > $nullGet-SPServiceInstance | where-object {$_.TypeName -eq "Web Analytics Web Service"} | Start-SPServiceInstance > $nullGet-SPServiceInstance | where-object {$_.TypeName -eq "Web Analytics Data Processing Service"} | Start-SPServiceInstance > $null
Finally, the Word Conversion Service application is created and brought online. At this point in the review, you already noticed that it has a database on the SQL server.
Write-Host "Creating Word Conversion Service and Proxy..."New-SPWordConversionServiceApplication -Name $WordAutomationSAName -ApplicationPool $saAppPoolName -DatabaseServer $databaseServerName -DatabaseName "WordAutomation" -Default > $nullGet-SPServiceInstance | where-object {$_.TypeName -eq "Word Automation Services"} | Start-SPServiceInstance > $null############################################## End Script#Now proceed to manually configuring your service applications (e.g. the Secure Store Service for Excel Services, Visio graphics, and performance point. The managed metadata service #for a content type hub)
The last line that begins “#Now proceed to manually…” seems like an afterthought; it is only visible when editing the script and does not emit to the screen is just more evidence of why AutoSPInstaller is the way to go with standardized builds.
I hope you enjoyed reading about the PowerShell to stand up a SharePoint farm. If you were to use the above service apps script for 2013 you would want to comment out or remove the lines for Search and web analytics and replace them with the SharePoint 2013 cmdlets. This post on my blog has the full script (not listed here to save paper): https://anothersharepointblog.com/provisioning-a-sharepoint-2013-farm-sharepoint-service-applications .
Building a Farm with AutoSPInstaller
In order to run the AutoSPInstaller, you need to have all of your service accounts created in Active Directory and know the passwords to said accounts, and have completed the online form. When completing the online form, you need to know the names of the databases and any prefix that may be required by your requirements. After you have this information, it is time to fill out the form on the AutoSPInstaller.com website that creates the XML file that is used in the installation.
Once the form is created, a great way to save time is to run the prerequisite installer on all of your servers. Then run setup.exe up to, and not including the post-setup Configuration Wizard. After that, you’re ready to execute the AutoSPInstaller; you will not have to wait for restarts since the prerequisite installation is already completed.
Tip
The prerequisite installation and setup install up to the point of the post-setup Configuration Wizard is done to save time; it is not a requirement because the AutoSPInstaller is capable of handling the install without the prerequisites being run.
Table 2-1. Accounts Used in Least Privileging , Recap
Account Name | Description |
|---|---|
SP_Farm | Farm Account |
SP_CacheSuperUser | Object Caching Account |
SP_CacheSuperReader | Object Caching Account |
SP_Services | Service Application Account |
SP_PortalAppPool | Portal Application Pool Account |
SP_ProfilesAppPool | MySites Application Pool Account |
SP_SearchService | Search Service Application Pool Account |
SP_SearchContent | Search Content Access Account |
SP_ProfileSync | User Profile Sync Account |
SP_ExcelUser | Excel Unattended ID |
SP_VisioUser | Visio Unattended ID |
SP_PerfPointUser | Performance Point Unattended ID |
SP_Install | Setup Account |
The main reason to use AutoSPInstaller to build your farm is for the standardization of the build. There are key settings that the current AutoSPInstaller does not address, such as DCOM settings , MSDTC settings, and Component Services security for the computer running User Profile services. I’ll go over those settings after discussing AutoSPInstaller. The use of AutoSPInstaller—along with an offline install of the prerequisites—is arguably the best method for installing SharePoint. The offline install of the prerequisites speeds up the installation process since there isn’t any need to download them.
Using AutoSPInstaller is as easy as filling out a form and making sure that the files are in the correct locations on the servers. Then after you’ve got everything where you need it, and your account is a member of the domain administrators group, you’re ready to begin.
To use AutoSPInstaller or PowerShell to install SharePoint, you need a license key, of which any will do, even an MSDN copy, depending on how you’re using SharePoint. For example, you wouldn’t use an MSDN copy in a development farm, unless every user who accessed the development farm had a MSDN license. You could use an MSDN copy in your home lab, however. Then after you have the non-MSDN license, you’ll need to download the AutoSPInstaller files from GitHub, and then download the SharePoint binaries and copy them to the a location inside the AutoSPInstaller file structure. You determine the location on your server where the AutoSPInstaller files are stored. Inside the AutoSPInstaller directory, there are folders for your binaries. You’ll place the binaries in the correct folder. For example, the SharePoint 2013 binaries go in the SharePoint folder inside of the folder named 2013. Figure 2-15 displays the folder structure location of where the SharePoint 2013 Binaries are loaded into the AutoSPInstaller directories.
Once the form at www.autospinstaller.com is filled out, and the XML file is downloaded, just copy it to the AutoSPInstaller folder. Then when you are ready to start your build, drag and drop the XML file on to the file named AutoSPInstaller.bat, and watch the build go to town. Figure 2-17 shows that the XML file is named 2013Install.xml.

Figure 2-17. XML file for AutoSPInstaller
After you drag the XML file onto the bat file, the AutoSPInstaller will get underway. It really is an awesome program. Figure 2-18 shows the Cumulative Update (CU) for the App Fabric; but I hadn’t put them in the update files location.

Figure 2-18. AutoSPInstaller underway
This file has all of the default build settings and should be stored away for safe keeping in the event that the farm is blown away, corrupted, or starts behaving improperly this file can be used as a reference and if needed, as a rebuild. When the build finishes there are still some key build settings that you’ll need to address.
MSDTC and DCOM Settings
One of the things that neither the PowerShell nor AutoSPInstaller addresses are settings that need to be made to the Microsoft distributed transaction coordinator (MDTC). The settings changes are made to allow SharePoint to function more fluidly and to reduce MDTC related errors in the Application and System logs of the Windows event viewer.
Since SharePoint servers communicate with each other in such a way that it is difficult for the MDTC transaction manager to determine if an incoming connection request is from a remote machine. Therefore, for security reasons, the MDTC transaction manager treats this connection request as a remote connection request. And if the Network Clients security option is not enabled, this can cause the MDTC TM to reject this connection attempt.
In order to prevent issues like the one we just explained and numerous others, we make the following changes to the MDTC service security settings :
Enable Network DTC Access
Allow Inbound Transaction Manager Communication
Allow Outbound Transaction Manager Communication
Do not require Authentication for MDTC TM communication
Enable XA Transactions
Enable SNA LU 6.2 Transactions
The steps taken in configuring the MDTC TM are all completed within the Component Services console, which is available under Administrative Tools or by calling comexp.exe from an administrative command line. Figure 2-19 shows the Component Services console opened from the command line.

Figure 2-19. One way to open Component Services
Once the Component Services manager is open, navigate to Component Services ➤ My Computer ➤ Distributed Transaction Coordinator , and select Local DTC . Right-click and select Properties (see Figure 2-20).
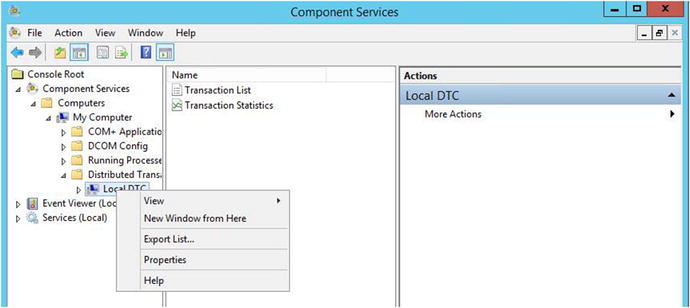
Figure 2-20. Local DTC
After the properties open, a quick look at the security tab shows why the various events listed on TechNet at https://technet.microsoft.com/en-us/library/dd337715(v=ws.10).aspx can sometimes fill the logs in your SharePoint Server and cause endpoints to become unreachable. Figure 2-21 shows the MDTC TM settings before the settings changes. You can see that Network DTC Access is not allowed, which can lead to falsely based rejections to SharePoint Service Application endpoints .
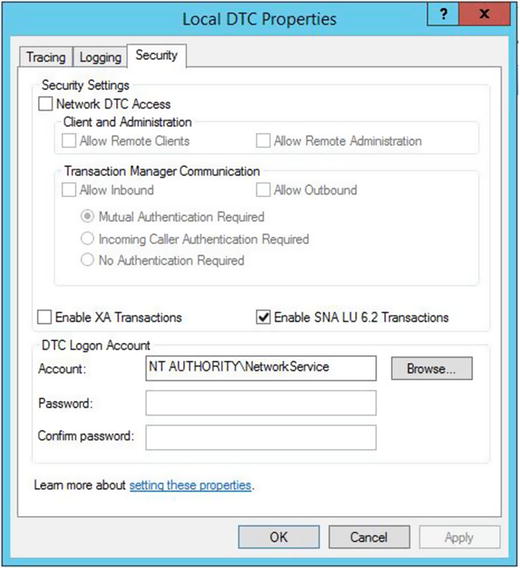
Figure 2-21. MDTC improperly configured
The only tab with settings that needs to adjustment is the security tab. After the settings adjustments are in place, the Security tab should look like Figure 2-22.

Figure 2-22. MDTC properly configured
When you make this change, the server automatically asks you to stop and start the MSDTC service, as shown in Figure 2-23.

Figure 2-23. Do you want to restart?
Go ahead and say Yes to the prompt in Figure 2-23; you should be presented with the message that the MSDTC service has been restarted, as shown in Figure 2-24
Figure 2-24. MSDTC restarted
Perform the MSDTC TM settings changes on all of the SharePoint servers in the farm and on the SQL servers. This key setting of a good build is the first place to look when messages about endpoints not listening start showing up in the logs. Having said that, this is not the end all endpoint related fix; but it fixes a lot of situations where the transaction manager may have erroneously terminated the communication.
Now that you’ve made that settings change using the Component Services management console to the Local DTC, it’s time to make another settings change to a couple more components. This time we’ll be making a few changes that have caused event ID 10016 and 10017 and Event 1015 to appear in Windows logs, since WSS 2.0 and 3.0.
Making these changes used to be as easy as just using the Component Services management console, as spelled out in the Microsoft Support article at http://support.microsoft.com/kb/920783 . However, with the new operating systems, even a domain administrator cannot make the needed changes. Let’s talk about the changes (why and where they are needed) before we talk about how to implement them.
SharePoint is heavily dependent on the numerous DLLs that it has in its file system. The accounts that run the various application pools in a least-privileged build need to have the processes that run inside these application pools allowed to locally activate and launch calls to the dll files and to IIS without having the log files fill up with errors each time that happens. The accounts already have access through the file system to run the files; but they don’t have the access they need via the Component Object Model. As a result, these errors can make our troubleshooting harder from the need to wade through more events as we hunt for root causes.
These errors that come from this setting are just unwanted noise. Nothing is getting fixed here, other than the logs not having extra entries. There is a component called the IIS WAMREG admin service that is responsible for IIS web application manager (WAM) functionality. The WAM component is used by IIS in access and interact, with processes that it doesn’t specifically host itself but with which it needs to interact (or even start). WAM is a Component Object Model application package that works with a file named DLLHOST.exe to host out-of-process ISAPI extensions and ASP files, of which SharePoint has plenty of both.
The AutoSPInstaller and the PowerShell scripts do not make the settings changes to the IIS WAMREG admin service. As I alluded to earlier, the account that runs the IIS application pools need to have local activation and local launch permissions. If you think about which accounts these are, they are basically all of the accounts that are members of the WSS_WPG group and you could add the group vs. adding each account; but I like to add the accounts directly as that rules out the possibility of any issue occurring that would prevent group members from not inheriting permissions correctly. Not that I’ve seen that before; but it is better to be safe than sorry, when it comes to stopping extra errors that have no bearing on anything.
The process to change these errors is that we need to access the components that are related to event ID 10016. There are actually two components that lead to event ID 10016: the IIS WAMREG admin service and the MSIServer DCOM Component . In Server 2008 and earlier you could modify the permissions in the Component Services management console and call it a day; but with the newer server operating systems starting with Server 2008 R2 and Server 2012, this setting is locked down and you have to take ownership of a couple of registry keys before you can modify the setting.
This is the IIS WAMREG admin service DCOM component registry key:
HKEY_CLASSES_ROOTAppID{61738644-F196-11D0-9953-00C04FD919C1} This is the MSIServer DCOM component registry key:
HKEY_CLASSES_ROOTAppID{000C101C-0000-0000-C000-000000000046} After you’ve taken ownership of the key, you can access the Launch and Activation Permissions since the customize button will not be grayed out, as it is in Figure 2-25.

Figure 2-25. MSIServer DCOM Ccmponent grayed out
You need to close and reopen the Component Services management console (comexp.exe), after you’ve taken ownership away from the trusted installer by using registry, if you have it open. Once you’ve edited the launch and activation permissions for each of these two DCOM components, and then restarted the Windows server named DCOM server process launcher, the event IDs for 10016 , 10017 , and 1015 should be few and far between.
When you research these errors online, you might see mention of changing registry permissions for the WSS_WPG group or worse yet adding the farm account to the local admins group on the SharePoint servers. Do not do this; while it would fix these errors, it violates least privilege and is strongly discouraged. Instead, just modify the Launch and Activation permissions on the two DCOM components to allow the identities that run application pools and are members of the WSS_WPG group so that they have local activation and local launch. If you’re getting a message that reads something like, “Event ID 6616 Critical Requested registry access is not allowed” you should avoid modifying registry manually and instead, run Initialize-SPresourceSecurity or psconfig –cmd secureresources. Altering any of the key registry locations or file system permissions mentioned in Chapter 1 could result in unexpected behaviors and violate least privilege.
Event ID 1015, while mostly related to the MSIServer DCOM component, can also be resolved by setting the Background Intelligent Transfer service (BITs) to automatic in the Windows Services console (services.msc). There is an exercise at the end of the chapter with a step-by-step how-to on the process related to taking ownership of the registry keys and modifying the DCOM settings is handled.
Network Service Permissions
Another key setting that is often overlooked is the permissions for the network service on the following registry key :
HKEY_LOCAL_MACHINESoftwareMicrosoftOffice Server15.0SearchSetupIt is important for search to work correctly. You shouldn’t have to manually set the permissions on that registry key, it should already be set with read permissions but you should check that the permissions are correct. The following is another registry key related to search and volume shadow copy that is important to check:
HKEY_LOCAL_MACHINESYSTEMCurrentControlSetServicesVSSVssAccessControlAt this location, you should have a Reg_Dword key for each of the accounts, as shown in Figure 2-26.
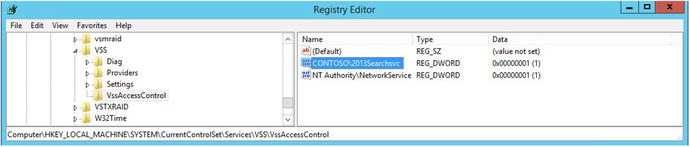
Figure 2-26. VSS access control
By creating an entry so that the Network Service account and the account used for search have a value of 1, you’ll decrease event ID 8193.
Local Security for the Farm Account
I’ve already gone into a lot of detail about the local farm account security needs. The only time it is ever elevated is during the initial build and whenever provisioning the user profile synchronization service. Other than that, the local farm account should never be a local admin. It should be members of the following local security groups:
IIS_IUSRS
Performance Log Users
Performance Monitors
WSS_Admin_WPG
WSS_RESTRICTED_WPG_V4
WSS_WPG
Due to the very sensitive access that WSS_RESTRICTED_WPG_V4 group has on the SharePoint server, the farm account should be the only member of this group.
In this chapter, we’ve taken what we learned about least-privileged builds and looked at how they come to be a reality by looking at either a PowerShell scripting option or through the use of the AutoSPInstaller, which installs SharePoint using a SharePoint Hosted Service application pool running under a non-administrative account. This application pool houses all of the service applications that are not search related because a separate app pool is created for the search applications.
Let’s look at a few exercises to put a nice wrap on this chapter.
Set MSDTC Settings
In this exercise, we’ll set the Microsoft Distributed Transaction Coordinator Transaction Manager security settings to allow network client access to create a more fluid and better-performing SharePoint farm.
Open an administrative command line. Type comexp and press Enter.
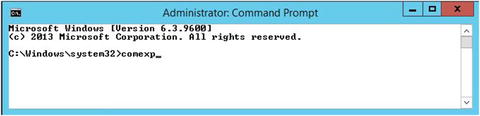
When the Component Services management console opens, navigate to the local DTC settings by clicking Component Services ➤ Computers ➤ My Computer ➤ Distributed Transaction Coordinator.
Right-click Local DTC and select Properties. Then click the Security tab and make the selections, as shown in the following screenshot.
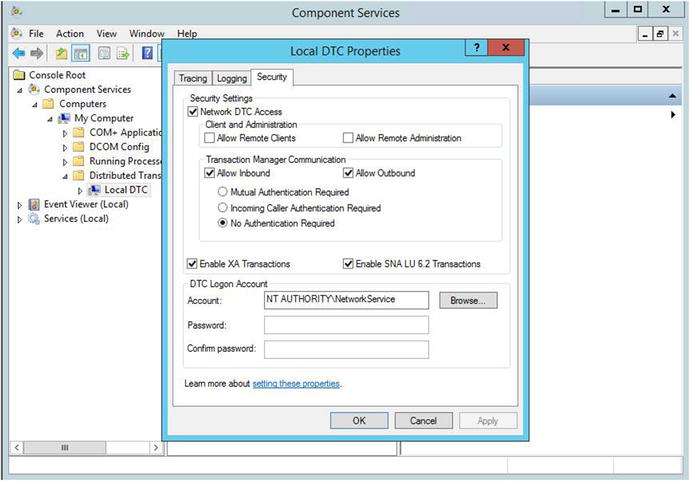
Click Apply and then Yes at the prompt to restart the service. Click OK when Windows lets you know that it has restarted.
Go to each server in your farm, including the SQL servers, and repeat these steps.
Set IIS Wamreg Admin Service and Msiserver DCOM Components
In this exercise, we’ll set the DCOM components for the IIS WAMREG admin service and MSIServer DCOM component so that the proper accounts have local activation and local launch.
Open the registry editor . You can use the same command prompt that you used in the previous session, only this time, type regedit, as shown in the following screenshot.

When the registry editor opens, navigate to the following registry location:
HKEY_CLASSES_ROOTAppID{61738644-F196-11D0-9953-00C04FD919C1}
A quick way to find this location is to search for 6173, as shown in the following screenshot. Start at the computer node. Press F3 and type 6173. Then click Find Next.

Once you’ve found the registry location, you need to take ownership of the key by using the install account. Hopefully, this is the account you are logged in to the server as. Editing registry is like doing brain surgery on your computer: one false move and the server could cease to function; so make sure that you’ve found the key as displayed in the following screenshot.

Right-click {61738644-F196-11D0-9953-00C04FD919C1} and then click Permissions, as shown in the following screenshot.

After the Permissions menu opens, click the Advanced button. Then click the Change link, as shown in the following screenshot.
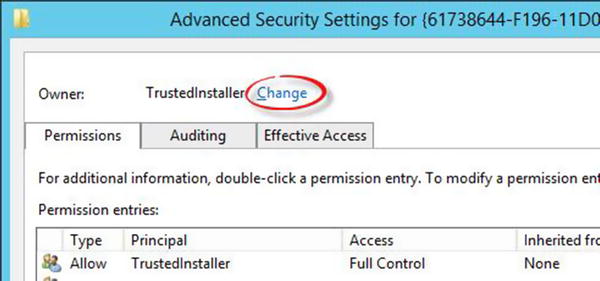
Enter your account name in the “Enter the object name to select” box and then click OK. Check the “Replace owner on subcontainers and object ” check box. Click the Apply button and then the OK button. In the following screenshot, I entered contoso2013installer because I logged in with the setup account.
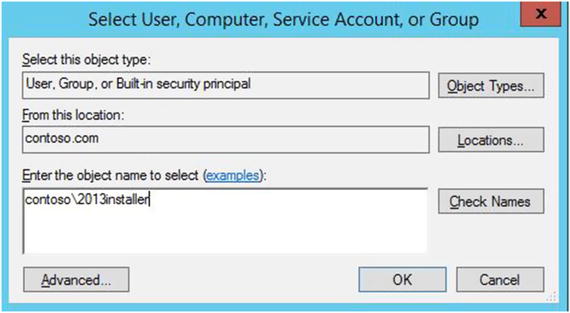
Now that you are back at the Permissions screen, add the setup account you’re using to the access control list (ACL) using the Add button. Give it full control by checking the Full Control box. Then click Apply and OK.
Navigate to the following registry location: HKEY_CLASSES_ROOTAppID{000C101C-0000-0000-C000-000000000046} . Repeat the same steps as for the MSIServer registry key. The registry key for the MSIServer is shown in the following screenshot.
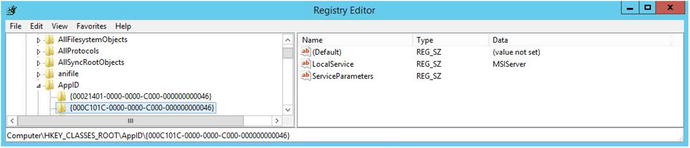
After you’ve added the setup account that you are logged in with to both registry keys, and you’ve made the changes, open the Component Services management console (comexp.exe).
Navigate to the DCOM Config section of Component Services. Scroll to IIS WAMREG Admin Service , right-click, and then click Properties. When IIS WAMREG admin Service Properties opens, the Edit button for Launch and Activation Permissions should be clickable and not grayed out, as shown in the following screenshot.

It is time to click Edit and add the domain accounts of the members of the WSS_WPG group to Launch and Activation Permissions. If you do not have these user names handy, you can obtain them from local users and groups (lusrmgr.msc) or from the WSS_WPG command-line net localgroup. Click the Edit button under Launch and Activation permissions on the Security tab, if you haven’t already, and enter the accounts in the ACL, as shown in the following screenshot. Give them local launch and local activation. Once all the accounts are entered click OK, click Apply, and then OK.
Repeat this for the MSIServer DCOM object by scrolling down to it, but this time click the Customize Radio button under Launch and Activation Permissions to make the Edit button illuminate. Then click Edit. Make the same changes that you made to the ACL of the IIS WAMREG Admin service.
Now that both DCOM components are updated, stop and start the DCOM server process launcher by restarting your server.
Manually Set SQL Alias
In this exercise, you’ll learn how to use the GUI to set the SQL alias.
Open a run bar. Type cliconfg, and then press Enter or click OK.
When the SQL Client Utility opens, click the Alias tab, as shown in the following screenshot. Note how there is already a SQL alias configured. This alias could hold all the databases in the farm, or maybe it just holds the service application databases and the Central Administration and configuration databases. Or maybe it just holds the configuration and the Central Administration databases. It isn’t possible to spin up the configuration and Central Administration content databases on separate instances.
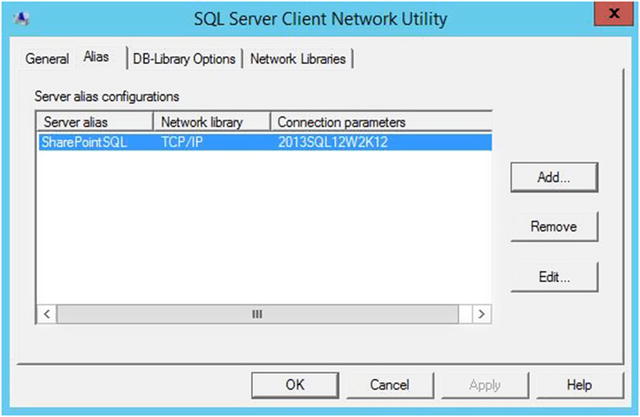
To create a new alias, click the Add button, and then click the TCP/IP radio button under the Network Libraries . Add the information for the Name of the Server Alias and the server name or servername amed instance in the appropriate boxes. You can leave the “Dynamically determine port ” selected or you can uncheck it and add a new port—something other than the default 1433, as shown in the following screenshot, we’re using the default port.

After you make your new alias , you can click OK, Apply, and OK.
And that is all there is to creating a SQL server alias manually for the x64-bit applications. To create the SQL alias for the x86-bit application, you need to navigate to C:WindowsSYSWOW64cliconfg.exe and perform the same steps, or use PowerShell.
Before we end this chapter, let’s think about how we could use PowerShell to troubleshoot or query the SharePoint object model to determine what databases were held in the SQL Alias named SharePointSQL. Well we know that there might be a command to get all the SharePoint databases (or at least we hope there is) so that we can run get-command –noun *database –verb get and see that there definitely commands that get database information. There is one command that appears to get all the database commands, as shown in Figure 2-27, since it is more general in nature. That cmdlet is Get-SPDatabase.

Figure 2-27. Get-command –noun *database –verb get
So, taking what we already know about getting information about cmdlets, we would then pipe this command to get-member or its alias gm with this command:
Get-SPDatabase | gmAfter the screen stops scrolling, notice that Get-SPDatabase has a property called Server and one called Name, so we decide to run Get-SPDatabase and pipe it to format-table for the name and the server properties using this command:
Get-SPDatabase | ft Name, ServerAnd, the results are shown in Figure 2-28. We can see that, in this case, all the databases are held in the SharePointSQL alias.

Figure 2-28. The server is the alias
Next Steps
I hope you enjoyed this chapter as you learned about PowerShell and how to use it to query the object model. You also learned about offline prerequisite installation. I talked about some key settings to a good build that affect interfarm communications. In Chapter 3, I’ll talk about more key settings and look at the SharePoint 2013 and 2016 Distributed Cache, and discuss how to fix it when it’s broken. You'll use PowerShell to determine what is configured, and then further configure it.