In this chapter, we’re going to pick up with the Component Services console for a key setting related to user profile synchronization in SharePoint 2010 and 2013 and we’ll discuss the importance of this setting. Then, we’ll switch gears by looking at the Windows operating system’s App Fabric 1.1 for Windows Server, and learn how to troubleshoot and configure SharePoint 2013 and 2016’s Distributed Cache service. We’ll look at some PowerShell used with configuring Distributed Cache in a farm that is using the minimum role technology.
After we’ve discussed Distributed Cache configuration and troubleshooting, we’ll switch back over to configuring and troubleshooting User Profile Synchronization in SharePoint 2010 and 2013. Since the Forefront identity bits have been removed from SharePoint 2016, there isn’t anything to discuss there in regards to the SharePoint User Profile synchronization service. We’re not going to discuss the Microsoft Identity Manager server, which is the 2016 on-premises answer for synching metadata from Active Directory.
Once we have User Profile Synchronization thoroughly beaten into the ground, we’ll discuss minimal download strategy and compare it with publishing infrastructure. We’ll discuss issues that can arise with the publishing infrastructure and resolutions to said issues. After we’ve looked at what publishing infrastructure introduces to a site collection and its sites and how to configure it, we will discuss rolling out host-named site collections and the steps that are part of that process.
The PowerShell to create host-named site collections will be broken down and dissected. Host-named site collections are the same thing as host header site collections and I only make a point to mention it because Microsoft has decided to abandon the HNSC naming convention and go with HHSC, so from this point forward in the book, when we talk about host-named site collections, we’ll try to refer to them as host header site collections or HHSCs. We will talk about how to roll out the HHSCs, why you might want to use them as opposed to path-based site collections (PBSCs), and key settings that are required to bring HHSCs online.
Finally, we’ll wrap up the chapter with a short discussion around account management, governance, logging locations, and logging levels. In this discussion, we'll discuss changing passwords for accounts in a section on Account management. We will look at the various logs available for troubleshooting and discuss some key things you can look for in some of the logs.
COM+ Security for User Profile Sync
On the server that runs user profile synchronization , the COM + Security settings should allow the farm account to remotely launch and remotely activate files. This is not the case by default and is one that you can easily modify. This key setting to a good build allows the farm account the local launch, remote activation, and remote launch permissions on the computer object’s COM security. This will help with issues when the User Profile Synchronization service is stuck on starting. It’s not a panacea, but it is a preventative measure in avoiding that ugly situation of the user profile sync not starting. It will also help communication.
To set this setting, open the Component Services console and right-click the My Computer object that is located inside of the computers folder inside the Component Services node within the Component Services Console. Once you’ve found it and right-clicked it, click properties and then select the COM security tab. Inside of the Launch and Activation Permissions limits, you can add the farm account to the ACL and then give the account Local Launch, Remote Launch, and Remote Activation.
App Fabric and Distributed Cache
If you’re experiencing issues with your 2013 or 2016 farm and you’ve already double-checked the permissions, and the least privileging settings are all properly in place, then one of the first places to look is the Distributed Cache—especially, if the problems are related to any of the following:
Page Load Performance Apples
Authentication
Newsfeeds
OneNote Client Access
Security Trimming
For example, if users are complaining that it is taking forever for pages to load and you are not seeing anything in performance monitor that would indicate that memory is exhausted, look at the health of the Distributed Cache by running Use-CacheCluster followed by Get-CacheClusterHealth. Hopefully, you’ll have scores in the healthy column that are 8 or higher and all zeros in the rest of the categories, as shown in Figure 3-1.

Figure 3-1. Distributed Cache is healthy
When you perform any sort of action with Distributed Cache, you always start out with the use-cachecluster command . If you’re having trouble with users being allowed into sites one minute, and then getting access denied or other weird behavior relating to permissions the next, it might have to do with the Distributed Cache not being large enough and having flushed information about authentication. If that happens, you need to change the size of the cache and possibly the number of servers that are running the Distributed Cache service. You’ll also want to make sure there aren’t any competing services on the server and we’ll talk more about that in just a few.
Since Distributed Cache is a memory hungry beast, it is a good idea to give it what you can afford, given your system and considering Microsoft’s best practice recommendations. Microsoft recommends using a dedicated Distributed Cache server, when possible, and definitely adjusting the size of the Distributed Cache if you ever add or remove memory from a server, since the cache does not automatically adjust.
When you first install SharePoint 2013 or SharePoint 2016 on a server, the Distributed Cache will appear to have configured itself at 5% of the installed memory if you look at the cache host config by running the Get-cachehostconfig command. The Distributed Cache service has actually taken 10% of the total memory though. When the cache is first configured, it uses 5% of the memory for data storage and 5% for memory management overhead. As the cached data grows, the Distributed Cache service uses the entire 10% of the allocated memory, which is why you should be cognizant of this service and now how to change the cache size and know the limits.
Speaking of limits, if your server has more than 320GB of RAM, the Distributed Cache will only be allowed 16GB of memory, automatically. And, because it is not a good idea to allocate more than 16GB of memory to Distributed Cache, you should never allocate more than that, even for servers with 34GB or more RAM. The reason that servers that have 320GB or more RAM are automatically capped at 16GB is that when the cache gets bigger than that, it becomes unstable. I’ve never had a server that big; so, I’m just going to take Microsoft’s word for it when they say that the server could stop responding, unexpectedly, for more than 10 seconds, if the Distributed Cache memory allocation is allocated more than 16GB.
When you are deciding how big to set a Distributed Cache make sure to reserve at least 2GB of memory for the other processes and services that are running on the server and then to divide the remaining memory by half to arrive at the Distributed Cache size. For example, if you had a server with 32GB of RAM, Microsoft’s guidance says to save 2GB for processes and services on the host, which would leave 30GB remaining. If you divided that in half, the Microsoft guidance would have Distributed Cache set at 15GB. This is only 1GB shy of the maximum size of 16GB.
One thing to keep in mind with Distributed Cache is that you really get the most bang out of it when you actually have more than one Distributed Cache host. Whatever you do, do not run a SharePoint 2013 or 2016 farm without a Distributed Cache host, even if it has to share the host with Excel Services, Search Services, Project Server Web application, and/or SQL services. In cases where you only have one server in your farm, as is usually the case in development, just cap the Distributed Cache out at a lower value and allocate more than the 2GB for the other services. Run search at the reduced performance level in this case.
Considering available memory, it is a best practice recommendation to keep the cache host memory resources below 95% utilization to avoid throttling. When the cache host server memory resources get up around 95%, the Distributed Cache will start throttling requests , meaning it will cause operations and things to wait. When this happens, those five areas mentioned earlier could start to exhibit issues. That’s not to say that they would not show issues until throttling begins. And, once throttling begins, it will not stop until the memory utilization drops below 70%. It is for this reason that you should not run competing services that are memory hounds like search services on the same server as Distributed Cache. This is recommended to achieve maximum performance. Microsoft also recommends not running Excel services, Project Server, or SQL server on the Distributed Cache host, as they are all memory intensive services, too.
If you’re already running Distributed Cache on a server where Excel Services, Search Services, Project Server service, and SQL service are not running and you’re experiencing issues, you should take a look at the health of the cluster and possibly changing the amount of memory allocated to Distributed Cache and/or consider adding another host to the cluster. My experience has shown that the Distributed Cache cluster is happiest when it has three or more servers and when it is properly sized.
Speaking of sizing, we already talked about how to determine the maximum size and what to avoid in terms of the maximum; but we didn’t talk about the minimum size. The minimum size for a Distributed Cache is based on Microsoft’s recommended minimum physical memory requirement of 8GB for a server that is running Distributed Cache. This means that if you were determining the size of the cache using the Microsoft formula that the minimum cache size is 3GB (Minimum recommended physical memory 8GB – 2GB for other processes and services = 6GB / 2 = 3GB).
So now that we have an idea of what size our cache should be, taking into account other things running on the server and that the cache should be at least 3GB, how do we set the cache? How do we determine how big the cache currently is? And how do we least privilege the cache?
When setting the size of your Distributed Cache memory size, you need to consider how many cache hosts are present in the cache cluster. Unlike patching Distributed Cache, when you set memory you need to shut down the Distributed Cache service on all cache hosts in the cluster; because if you fail to shut down the service on all hosts, the entire cache will become unstable and you’ll have a hard time getting all the cache hosts online. When you’re applying an App Fabric CU to a farm with one Distributed Cache host, you will shut down the Distributed Cache service on the server. The same is true when you have more than one cache host in your farm. The difference with patching is that your farm will still have the benefit of the other server or servers that are running Distributed Cache service while you patch the one of the nodes in your cluster.
For example, let’s assume you have a farm with three servers that run the Distributed Cache service and let’s also assume that CU8 for the App Fabric 1.1 for Windows Server service was just released. Currently, the most recent cumulative update for the Windows Service App Fabric 1.1 for Windows Server is CU7. What is this App Fabric 1.1 for Windows Server service, you might be asking? Why is he talking about app fabric, I thought we were talking about patching Distributed Cache. Well, the answer is we are talking about patching Distributed Cache. The App Fabric service is the Windows OS service and the SharePoint service named Distributed cache are really one in the same. In fact, you don’t patch Distributed Cache when SharePoint is patched.
Back to our example, the farm with three Distributed Cache servers and how to patch it. At a really high level, you shut down the Distributed Cache on one machine, patch it, make any post patch configurations, and then start the Distributed Cache service. After that is completed on one machine, you move onto the next. This differs from increasing the size of the memory for the cache; since when increasing the size of the cache memory allocation, which has to be the same on all machines, the first order of business is to shut down the cache-cluster, then change the size, and then start the cluster. And, actually, the act of running the PowerShell to update the cache size will cause the cluster to come online if it is completely healthy.
The PowerShell used to patch this farm with a new CU is performed in an administrative PowerShell session on one machine:
Asnp *SharePoint *Stop-SPDistributedCacheServiceInstance –Graceful
Next, you should wait a minute or two for the operations to transfer to the other hosts. After a few minutes have passed would have already downloaded the update file and would execute it and next through to finish. Then after the cumulative update is applied, you might configure garbage collection, or there might be another configuration. If you’ve never updated the Distributed Cache in a SharePoint 2013 farm, you’ll need to configure garbage collection, because it wasn’t introduced until CU3 for the App Fabric 1.1 for Windows Server service.
There are PowerShell scripts out there that you can run to configure the garbage collection, or you can do it manually without the use of scripts. In order to manually configure the garbage collection, navigate to C:Program FilesAppFabric 1.1 for Windows Server folder, as shown in Figure 3-2.
Once in the folder you would edit a file named DistributedCacheService.exe.config 
Figure 3-2. App Fabric 1.1 folder
by right-clicking it and opening it with Notepad, as shown in Figure 3-3.

Figure 3-3. Right-click and open with
Once you have the file open in Notepad, you’ll notice the section named <configuration> and that this section spans the entire file. At the very end of the file, you’ll find the end of the <configuration> section and it will look like this: </configuration>. It is right in front of this ending tag that you’ll place the following lines of code to configure the garbage collection before restarting the Distributed Cache service.
<appSettings><add key="backgroundGC" value="true"/></appSettings>
Figure 3-4 shows what the DistributedCacheService.exe.config looks like before it is configured for garbage collection.

Figure 3-4. No garbage collection
After the file is configured for garbage collection, the last few lines look like the image in Figure 3-5.
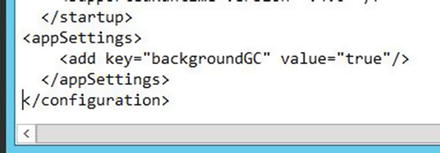
Figure 3-5. Garbage collection
After having added the garbage collection configuration to the config file, you can save it and start the service. You can start the service using PowerShell or from the services on server page in Central Administration. To start the service with PowerShell you can use the following two lines. In the first line, you grab the service instance named Distributed Cache and then you call the provision method that is part of every service instance in SharePoint.
$ServiceOnServer = Get-SPServiceInstance | ? {$_.TypeName -eq "Distributed Cache" -and $_.Server.Name -eq $env:computername}$ ServiceOnServer.Provision()
If you recall the get-member cmdlet from chapter 2, you could pipe get-spserviceinstance to get-member and after the screen stopped scrolling, you could scroll up a little and see the various methods, with provision being one of them. Provision is to start as unprovision is to stop when it comes to services on the server in SharePoint.
After you have the service started, you would complete this procedure on the other two servers in your cluster and then reset IIS and test for any of the issues you had previously been experiencing in your farm. There’s a good chance that you may have solved the issue by upgrading the cluster to the most recent tested CU and by configuring garbage collection.
If your cache memory size is too small, the cache may be constricted, and it has to flush more frequently. In order to increase the size of the cache , you need to stop the Distributed Cache service on all the hosts. You could open PowerShell on each host and use the Stop-SPDistributedCacheServiceInstance –Graceful or you could log in to Central Administration, navigate to the services on the server page, and stop all the instances that you see running. After you have stopped the Distributed Cache service, you could run the following PowerShell to verify that it is no longer provisioned:
$ServiceOnServer = Get-SPServiceInstance | ? {$_.TypeName -eq "Distributed Cache} | ft typename, status, server –auto -wrapOnce the service is no longer provisioned or started on any server in the farm, you can update the size of the cache to your desired size. Before you can update the cache size, you should use a command to get the cache host configuration into your shell and see what size the cache is currently. There are numerous ways to do this but the easiest is to just run the following command :
Use-CacheClusterGet-AFCacheHostConfiguration -ComputerName ComputerName -CachePort "22233"
You would need to substitute your computer name for ComputerName; for example, your command would look like the following if your server was named 2013Cache:
Use-CacheClusterGet-AFCacheHostConfiguration -ComputerName 2013Cache -CachePort "22233"
Once you run the preceding command, and feel that you are ready to change the size of the memory in use by the cache, you run the update-spdistributedcachesize cmdlet. To do this, you have to convert from GB to MB since the command used to increase the size of the cache is as follows:
Update-SPDistributedCacheSize -CacheSizeInMB CacheSizeThis command only has to be run on one machine in the cluster. After you run this command, it will update the cache size on all your hosts. If you were changing the cache size to 6GB, the command would read:
Update-SPDistributedCacheSize -CacheSizeInMB 6144After you ran that, the host would start up with the new memory size and then the other hosts would start up and the cache size would increase on those hosts, as well. One very important aspect of all of this to consider is that the actual physical memory on these machines should be the same size. Another key takeaway from all of this is to never stop and start the App Fabric 1.1 for Windows Server service from within the Services console (services.msc).
Up until this point, we have looked at configuring the size of the Distributed Cache memory allocation on each cache host, garbage collection, and patching the service; but we have not looked at least privileging the AppFabric Service. This is one of those situations where PowerShell is the only way to least privilege without breaking the service or corrupting the cache. When you’re going to change the identity that runs the AppFabric 1.1 for Windows Server to something other than the farm account, you must use PowerShell. As you can see from the service accounts page does not have an option for the AppFabric Service, as shown in Figure 3-6.

Figure 3-6. No options in GUI use PowerShell
You should least privilege the Distributed cache preferably before configuring the memory size and before or after patching, but not during either of those events.
The reason that I like to least privilege first is that part of the process involves removing and adding the Distributed Cache service instance from all but one Distributed Cache host in your cluster. For example, if you have three Distributed Cache hosts, before you change the identity that runs the App Fabric 1.1. For Windows Server service, you should remove the other cache hosts from the distributed cache cluster. Before you remove a cache host, make sure to stop the Distributed cache service and remove the Distributed Cache service instance from the server .
Stop-SPDistributedCacheServiceInstance –GracefulWait a couple of minutes after stopping the instance before you remove it completely. Then do the same thing on the next node, leaving only one node remaining. These are the commands used to remove the Distributed Cache Service Instance.
Remove-SPDistributedCacheServiceInstanceAdd-SPDistributedCacheServiceInstance
Once the cluster has only one host running the Distributed Cache service, you can commence with changing the alias. Do not change the alias with the Distributed Cache service stopped. The following lines of code are the one way to change the Distributed Cache service instance with PowerShell. Whatever you do, do not change the identity with the Services console (services.msc). You’ll notice in the lines of code that follow only one required change is needed and that is the change to the domainuser_account value in the first line.
$acct = Get-SPManagedAccount "domainuser_account"$farm = Get-SPFarm$svc = $farm.Services | ? {$_.TypeName -eq "Distributed Cache"}$svc.ProcessIdentity.CurrentIdentityType = "SpecificUser"$svc.ProcessIdentity.ManagedAccount = $acct$svc.ProcessIdentity.Update()$svc.ProcessIdentity.Deploy()
After you run this command, it should take at least 8 minutes for the change to take effect, and if it doesn’t, then something is wrong. You’ll know something is wrong when you go to start the cache and it quickly cycles to stopped, or hangs in an unknown status. When this happens, the best thing you can do is to set things back to square one. Clear the slate, so to speak, and get back to ground zero.
If it takes at least 8 minutes, then go ahead and add the other Distributed Cache hosts back into the farm and then update the size of the cache and configure garbage collection if not already configured.
If there is still a problem, the following paragraphs will help.
A senior SharePoint engineer named Scott Fawley shared this series of scripts with me. Scott spent over a decade with Microsoft SharePoint support before joining Rackspace. Trust me. This is the way to get your server back to ground zero in regards to Distributed Cache, if it is acting up.
If you were having trouble with multiple servers in the farm, you would need to do this on all of them. As we go over these lines, I’ll share another gem that will let you gather all the servers in your farm that have been in, or have the Distributed Cache service instance and then remove it.
You can tell you’re back at a clean slate when you’ve ran these commands and the App Fabric 1.1 for Windows Server service shows as disabled in the Windows Services Console (services.msc). Use this script to get back to ground zero and remove the Distributed Cache cluster :
Remove-SPDistributedCacheServiceInstance$SPFarm = Get-SPFarm$cacheClusterName = "SPDistributedCacheCluster_" + $SPFarm.Id.ToString()$cacheClusterManager = [Microsoft.SharePoint.DistributedCaching.Utilities.SPDistributedCacheClusterInfoManager]::Local$cacheClusterInfo = $cacheClusterManager.GetSPDistributedCacheClusterInfo($cacheClusterName);$instanceName ="SPDistributedCacheService Name=AppFabricCachingService"$serviceInstance = Get-SPServiceInstance | ? {($_.Service.Tostring()) -eq $instanceName -and ($_.Server.Name) -eq $env:computername}if([System.String]::IsNullOrEmpty($cacheClusterInfo.CacheHostsInfoCollection)){$serviceInstance.Delete()}
Don’t worry about any red vomit from this command . It will sometimes have some, but that is OK, it probably means that you’ve already partially uninstalled the instance. After running the preceding code, you want to make sure that Distributed Cache is not installed anywhere else in the farm, unless your farm is a single server farm. Here’s the script to verify if Distributed Cache is installed on any of the other vm’s in your farm, and a line to delete them:
$svc = Get-SPServiceInstance | Where {$_.TypeName -eq "Distributed Cache"}$svc.Delete()
This command should be run after the command that gets the cache cluster and removes it. Make sure that all the hosts that were previously in the cluster show the app fabric 1.1 for Windows Server with a disabled state. The previous command will remove the Distributed Cache service instance off any servers in your farm.
After all servers are back to ground zero, run the following lines on the one server on which you would like to begin your cluster:
$SPFarm = Get-SPFarm$cacheClusterName = "SPDistributedCacheCluster_" + $SPFarm.Id.ToString()$cacheClusterManager = [Microsoft.SharePoint.DistributedCaching.Utilities.SPDistributedCacheClusterInfoManager]::Local$cacheClusterInfo = $cacheClusterManager.GetSPDistributedCacheClusterInfo($cacheClusterName);$instanceName ="SPDistributedCacheService Name=AppFabricCachingService"$serviceInstance = Get-SPServiceInstance | ? {($_.Service.Tostring()) -eq $instanceName -and ($_.Server.Name) -eq $env:computername}if([System.String]::IsNullOrEmpty($cacheClusterInfo.CacheHostsInfoCollection))Add-SPDistributedCacheServiceInstance$cacheClusterInfo.CacheHostsInfoCollection
After you run these lines , close your PowerShell session, and then open a new administrative session and run the following:
Use-CacheclusterGet-CacheHost
You should be presented with the status of the cluster and it should only show one host with an UP status. Go ahead and change the identity that the service runs under using this code , which is the same as from earlier in the chapter:
$acct = Get-SPManagedAccount "domainuser_account"$farm = Get-SPFarm$svc = $farm.Services | ?{$_.TypeName -eq "Distributed Cache"}$svc.ProcessIdentity.CurrentIdentityType = "SpecificUser"$svc.ProcessIdentity.ManagedAccount = $acct$svc.ProcessIdentity.Update()$svc.ProcessIdentity.Deploy()
After 8 minutes passes, you can check the status of the cluster again by running Get-CacheHost, and if things are looking good, then add the other hosts to the cluster. Finally, update the cluster size by shutting them all off, changing the size on the first host that was in the cluster, and then running the command to update the cluster, as shown here:
Update-SPDistributedCacheSize -CacheSizeInMB 6144Ok, so that is all well and good, but what do you do if you’re still getting some sort of crazy message about no cache host info or an error reading cache info? Where is this info located? In this case you look at the C:Program FilesAppFabric 1.1 for Windows ServerDistributedCacheService.exe.config and verify if the file has the same information in the cluster config node and then you check in registry to see that the information is present. But if it ever gets to this point, you’re honestly better at ripping out the cache cluster from the farm using the previous steps. Then after the cluster is removed, you could compare the info in the config file among the different members in the farm. Every server in the farm, even the ones that are not members of the Distributed Cache cluster should all be at the same CU level and have the same information in the config file. Figure 3-7 shows a partial view of the clusterconfig line, it shows the provider and the connection string.

Figure 3-7. CacheCluster config
After you’ve copied this info, you can look in registry and compare the values for the provider and connection string in the config file with what is shown for those same values at this registry location HKLMSOFTWAREMicrosoftAppFabricV1.0Configuration . Figure 3-8 shows a farm that is either having trouble or is shows a server where the Distributed Cache service instance has not been installed and started. In this case, the server had not had Distributed Cache service instance installed.
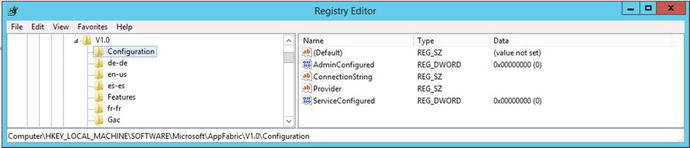
Figure 3-8. Distributed cache not installed
Once the Distributed Cache services installed and started, the registry will hold data for the connection String and Provider as the config file, as shown in Figure 3-9.

Figure 3-9. Distributed Cache installed
Notice how you can see the correlation between the config file and registry. If you’re ever in a situation where they disagree, your best bet is to remove all the Distributed Cache hosts and clear out the cluster. After doing that, you’ll want to make sure all the hosts are at the same CU level, even if they are not going to run the Distributed Cache instance.
There have been seven CUs for the App Fabric 1.1 for Windows Server service released since its inception. Garbage collection is possible starting with CU3 . Table 3-1 lists the CU levels and their associated version information.
Table 3-1. App Fabric for Windows Server Cumulative Update Versions
CU Level | Product Version |
|---|---|
CU1 | 1.0.4639.0 |
CU2 | 1.0.4644.0 |
CU3 | 1.0.4652.2 |
CU4 | 1.0.4653.2 |
CU5 | 1.0.4655.2 |
CU6 | 1.0.4656.2 |
CU 7 | 1.0.4657.2 |
You can use this one-liner to return the product version of your App Fabric.
(Get-ItemProperty "C:Program FilesAppFabric 1.1 for Windows ServerPowershellModulesDistributedCacheConfigurationMicrosoft.ApplicationServer.Caching.Configuration.dll" -Name VersionInfo).VersionInfo.ProductVersionThe output of this script, which I did not devise, is shown in Figure 3-10.

Figure 3-10. App Fabric is patched to version 1.0.4639.0, CU1
When it comes to SharePoint 2016, servers that are using the minimum role technology of Search, Application, front end, or Application with Search do not have the Distributed Cache service instance. If you want a 2016 Server to run the Distributed Cache service instance , you need to make sure that that 2016 server is running the Front-end with Distributed Cache, Custom, Single Server, or Distributed Cache minimum role.
WebFrontEnd (Front-end server role) Page Load Performance Apples
Application (Application server role)
DistributedCache (Distributed Cache server role)
Search (Search server role)
Custom (Custom server role)
SingleServerFarm (single-server farm server role)
WebFrontEndWithDistributedCache (front-end with Distributed Cache) <- - only possible if have Nov2016 CU or higher
ApplicationWithSearch (application with search) - Nov16CU required
When working with 2016 and performing any of the actions that I outlined, you should change the role to web front end if you want to remove the Distributed Cache service from the server to remove it from the cluster. You can change the role of a server directly from Central Administration in SharePoint 2016, or via PowerShell. Then after you have only one server with one of the roles that instantiate the Distributed Cache service, you could change the identity for the App Fabric 1.1 for Windows Server service. If you were looking to change the size of the cluster, the same rules apply as far as stopping all the hosts in the cluster before updating the size. You can use these lines to stop the 2016 Distributed Cache service instance.
$instanceName ="SPDistributedCacheService Name=AppFabricCachingService"$serviceInstance = Get-SPServiceInstance | ? {($_.service.tostring()) -eq $instanceName -and ($_.server.name) -eq $env:computername}$serviceInstance.Unprovision()
Run that on each server in your farm and then proceed with updating the size using the Update-SPDistributedCacheSize cmdlet. The same rules apply for sizing as did in 2013 and the same rules apply for configuring garbage collection. What’s weird is SharePoint 2016 installs with the App Fabric 1.1 for Windows Server service with CU7 applied; but the garbage collection is not automatically configured. That just seems odd to me.
In closing this Distributed Cache discussion, I have to mention that Microsoft has a really awesome resource named Plan and use Distributed Cache that is available for download in .pdf or .visio format from https://www.microsoft.com/en-us/download/details.aspx?id=35557 . I would highly recommend getting a copy of this to use a reference tool.
User Profile Synchronization
User profile synchronization is one of the most commonly misunderstood services. One of the common misunderstandings is that it has everything to do with site access and security. Another common misunderstanding is that it has nothing to do with site access and security. Both of those misunderstandings are founded in a phrase you hear thrown around a lot when people talk about SharePoint, “it depends.” In reality, User Profile synchronization only has a little bit to do with site access. User profile service is mostly used for user metadata that can be surfaced in people search.
The part of the User Profile service that has to do with permissions relates to how access is provided to your SharePoint sites, and their content relates to Active Directory groups that are synched. If you provide access directly to users and do not use Active Directory groups for access to your sites, then the User Profile service application does not have anything to do with site access. However, if you use Active Directory groups as the only means of providing site access, or you use a combination of domain groups inside SharePoint groups along with users directly added to your sites, then the user profile service has something to do with site access. Because if one of the four key settings of the user profile for a user is out of sync with the user profile info synchronized within the group information, then that could cause SharePoint to deny access to sites.
The built-in User Profile service application in SharePoint imports the following four key user attributes , which is why this service is a key setting in the farm to have correctly configured:
The Windows Security Identifier (SID)
The Active Directory Domain Services (AD DS) user principal name (UPN)
The Simple Mail Transfer Protocol (SMTP) address
The Session Initiation Protocol (SIP) address
When first provisioning the user profile service, you should make sure you are patched to at least the May 2015 CU for SharePoint 2010 and 2013, with November 2016 being the preferred CU level to spin up your farm with. Once the farm is created, you should remember an important order of operations for getting the User Profile Service created and synchronizing . There are couple of different ways to think of this process, so I’ll say them a both ways. Here goes.
The first one is don’t try to provision the service application if you haven’t already started the User Profile service and never use the farm account interactively for this provisioning. That is, do not log in with the farm account . The second rule is don’t try to start the sync service until you have created and started the User Profile service application. The third rule is create a dedicated web application for mysites and make sure that the managed path exists and that self-service site creation is on in that web app, before you create the site collection in that web application. You could also create the MySite host site collection at the root of the web application. You should perform these steps with the install account. The install account should be a local admin. The farm account should be a local admin during this provisioning; it can be removed after the sync has started and the connection to Active Directory is established.
Another way to think of this madness, is once you have the web application created and the managed path is created as a wildcard path, make sure that self-service site creation is allowed on the web application. Create a MySite host site collection at the root of the web application and then make sure the user Profile service instance is started on services on server page in central admin. After those two things are done, create the service application in manage service applications and then start the sync service on the services on server page. After the sync service starts, make sure the account that is going to create the connection to Active Directory has the correct permissions, and then create the sync connection. Perform all of this with the install account, and make sure that it and the farm account are local admins. Then establish the connection with Active Directory for the account used in the connection settings. After the sync has started, the connection is in place, and a sync has ran, remove the farm account from the local administrators.
When configuring the User Profile service application in SharePoint 2010 and 2013, you should never manually touch the related Windows services. The related Windows services are the Forefront Identity Management Service and the Forefront Identity Management Synchronization Service. The only time you’d ever touch either of these is if you had a farm that was June 2011 CU or newer and the Forefront Identity Management Service was running but the Forefront Identity Management Synchronization Service was not, in this case you would start the Forefront Identity Management Synchronization Service.
There are few things you can troubleshoot when the service will not start, one of them is to make sure the farm account has the local security policy, user rights assignment, of allow logon locally, and is a member of the Local administrators. Then log in with the farm account and then log the farm account off and log back in with the setup account to continue with getting the user profile service started. This logging in of the farm account and then logging off, helps to burn in all the farm account’s Windows settings. That is as far as you should go with the farm account. Make sure the install account is a domain admin and member of local administrators on all the machines in the farm, before trying to start the User Profile Synchronization service.
If the service still fails to start after those actions then stop the synchronization service using PowerShell , since there probably isn’t a stop action on the services on server page as the service is stuck on starting. This PowerShell will stop the sync service:
$UPS = Get-SPServiceInstance -EA "SilentlyContinue" | Where {$_.TypeName -eq "User Profile Synchronization Service" -and $_.Server -match $server}$UPS.Unprovision()
Then after the sync service stops, you’ll want to delete any timer jobs that might be hanging out and trying to sync some user profiles. These next two lines are only going to return something in a situation where the sync service is truly stuck on starting.
$timerjob = Get-SPTimerJob -EA "SilentlyContinue" | where {$_.Name -eq "ProfileSynchronizationSetupJob"}$timerjob.Delete()
When you run these lines , you might get some red puke that says, “You cannot call a method on a null-valued expression.” And do not worry about that because it is PowerShell and SharePoint’s way of telling you that the timer job didn’t exist.
After that, you need to remove the certificates that the ForeFront Identity service creates when it is trying to start the sync. You can remove them with PowerShell, but don’t try to sync just yet. To remove these manually, you open the certificate manager and look through each store for any certificates that have the words Forefront Identity Manager in their subjects. To remove these with PowerShell, make sure you have a PowerShell session open administratively and then just paste these lines of code into your window and after pasting Enter a couple of times until your prompt returns.
$allCertStores = Get-ChildItem -Path cert:LocalMachine | %{$_.name}foreach ($certstore in $allCertStores){$store = New-Object System.Security.Cryptography.x509Certificates.x509Store($certstore,"LocalMachine")$store.Open("ReadWrite")$certs = $store.Certificates | ? {$_.subject -like "*ForefrontIdentityManager*"}ForEach ($cert in $certs){if($cert){$store.Remove($cert)}}$store.Close()}
After you’re done, you should clear the SharePoint Configuration cache by stopping the timer service, navigating to the cache location, deleting out the XML files, setting the cache.ini file value back to 1, and repeating this on every server in the farm, then start the timer service and watch that all the XML files are re-created. There are many blog posts about clearing the config cache on the interwebs. I have one that is a re-blogurtation of an awesome script I didn’t write at https://anothersharepointblog.com/clearing-the-config-cache-with-powershell .
At this point, if you’re still having trouble, you can try to reset the UPS back to square one with the advice from Spencer Harbar , using the following PowerShell.
Add-PSSnapin Microsoft.SharePoint.Powershell# These will only work if there is one DB and one SA on the box.# If more than one, then use Get-SPDatabase and Get-SPServiceApplication# to grab the GUID and pass that in instead of the pipebind$syncDBType = "Microsoft.Office.Server.Administration.SynchronizationDatabase"$upaSAType = "User Profile Service Application"$syncDB = Get-SPDatabase | where-object {$_.Type -eq $syncDBType}$upa = Get-SPServiceApplication | where-object {$_.TypeName -eq $upaSAType}$syncDB.Unprovision()$syncDB.Status = "Offline"$upa.ResetSynchronizationMachine()$upa.ResetSynchronizationDatabase()$syncDB.Provision()# We MUST restart the timer service for the state to be reflected in# Services on Server and Manage UPARestart-service SPTimerV4# At this stage we MUST add the Farm account to the SyncDB (the above# steps remove the user) remember the default schema must be 'dbo'.# If we don't do this, UPS provisioning will fail.
Please pay close attention to the advice that Spencer gives, where he annotates in the script that this script is for a farm with only one User Profile service application and that after running the script that you should set the farm account privileges on the Sync db. Setting the account privileges is explained in the next paragraphs.
If things are still not working, another thing to check is that the farm account and the install account both have access to the User Profile service application databases. For example, if you’ve opened the ULSViewer, a tool we’ll talk about in depth in a later chapter, you might see the following entry occurring when the profile sync is trying to start:
05/07/2017 08:22:22.00 OWSTIMER.EXE (0x0950) 0x1880 SharePoint Portal Server User Profiles 9i1w Medium ILM Configuration: Error 'ERR_CONFIG_DB'. de5aef9d-212f-807b-4ebf-317f8875cab4 If you’re seeing this, it means that your account does not have sufficient privileges on the sync database .
Log in to your SQL server and open the SQL Server management Studio (SSMS) . Once you have SSMS open, take a look at the user mappings for each of these accounts. Make sure that the accounts have db_owner role on the Profile, Social, and Sync databases. After you’ve made any changes, you should try to start the synch once more.
At this point, you've tried many things to get this service going and you definitely have patched your farm to the May 2015 CU or higher level successfully. If that is the case, you should start the User Profile Service on the Services on Server page, and then try to start the sync once more.
As a last-ditch effort and before re-creating the User Profile service application, you might try to log in with the farm account and start the sync. This really should be avoided, however, as the farm account should never be used interactively. Use the install account to install the User Profile service. You could however; be logged in with the install account and open PowerShell as the farm account and then run your scripts to install the User Profile service, as the farm account. Spencer Harbar has a really good blog post that describes it at http://www.harbar.net/archive/2010/10/30/avoiding-the-default-schema-issue-when-creating-the-user-profile.aspx .
Another action that will sometimes get the sync to start working is to “jiggle the bits” by running the post-setup Configuration Wizard (psconfiggui.exe ). When running the psconfig wizard, make sure to keep the server in the farm and keep the Central Administration site on the server. After the psconfig wizard has ran successfully, take a look at the servers in the farm page and ensure that all the SharePoint servers have a “no action required,” and if any of them are anything but that, run the psconfig wizard on the server that does not have “no action required”. If the psconfig wizard does not complete successfully, open the log file and search for “ERR” with case sensitivity turned on. Look at the error and try to decipher what it is saying. The text from these logs and other logs is the best way to google or Bing search for any error you encounter in SharePoint.
Once, you’ve run psconfig, try to start the sync. And at this point, you’ll want to have the ULSViewer open and tracking the process. You can get a copy of the ULSViewer from the official download location at https://www.microsoft.com/en-us/download/details.aspx?id=44020 . After you download the executable to your SharePoint server and double click it, you should open from ULS and filter on Profile. Chapter 9 has more detailed steps on how to do this, in case you’re unfamiliar with ULSViewer.
If the sync is still not starting, Bjorn Roalkvam has written an awesome script that has yet to let me down when trying to get the user profile service started. If this script can't start the sync and you’ve verified that database permissions are correct, then you’ll definitely need to rebuild the User Profile Service Application.
You can download a copy of the script from Bjorn’s blog at https://sharepointbjorn.com/2014/06/25/user-profile-synchronization-autofixer/ . Bjorn’s blog also has a really straightforward explanation of how to use the script; so, I’ll let you go there and read about it. Basically, you need to run it with the correct account and know the farm password and that’s it, it does all the rest. And as I already mentioned, but will mention one more time for emphasis, if this script cannot start your user profile sync, then you need to make sure your farm is at the proper patch level and re-create the User Profile service application.
Considering all of these steps, it is best to recap all the troubleshooting steps to get the User Profile Synch Started before rebuilding. Verify the following:
The farm account is a local admin and has logged in once and then logged off
The install account is being used to start the sync
The farm account has the allow logon locally user rights assignment in local security policy
The previous Forefront Identity Manager (FIM) certs have been deleted from the local cert store
The Timer job for profile sync setup named ProfileSynchronizationSetupJob has been deleted, if it existed
The SharePoint Config Cache has been cleared
The SharePoint farm is patched to at least the May 2015 CU or higher
Verified that the install and farm accounts have db_owner role on the profile, social, and most importantly the sync database
Set the UPS back to square one
Stopped the User Profile Service, restarted it, then tried to sync
Ran PSConfigGUI.exe
Ran the script by Bjorn Roalkvam
If the farm is new, this is the first series of attempts, and you have performed all the steps, and the user profile sync still will not start, you should rebuild the User Profile service application. If the farm is not a new build, you do not want to hastily rebuild the User Profile service application since there might be a lot of custom User and Organization Properties and custom Organizational Profiles and Sub-types that a rebuild would eradicate. So, before you rebuild on an existing farm make sure to document and customizations that have been made in the User Profile service application.
If you’ve decided to remove the User Profile service application, you can do so via Central Administration ➤ Manage Service Application page by selecting the User Profile service application and then clicking the Delete icon in the operations group on the ribbon. If you opt to use this method, as opposed to PowerShell, then remember to select the “Delete Data associated with the Service Application” box, as shown in Figure 3-11.

Figure 3-11. Deleting the User Profile service application via the GUI
If you would like to remove the User Profile service application and all of its data using PowerShell , you can run these commands:
Get-SPServiceApplication | ? {$_.typename –like “user*”} | Remove-SPServiceApplication –RemoveData –confirm:$falseGet-SPServiceApplicationProxy | ? {$_.typename –like “user*”} | Remove-SPServiceApplicationProxy –RemoveData –confirm:$false
Re-creating the User Profile service application is a straightforward action that can involve the GUI or PowerShell. If you’re creating the User Profile service application with PowerShell, you have to be cognizant of the User Account Control Settings on the server, as they can cause the schema of the databases to provision incorrectly, which will cause issues.
After you get the sync started, you can create the connection in the User Profile service application to sync with Active Directory. If you encounter any errors with creating the connection, make sure that the account being used to connect to Active Directory has Replicate directory changes in Active Directory and if you’re dealing with a server running Windows Server 2008, the account should also have Replicate Directory Changes All. We’ll look at this again when we get to the chapter on logs.
Patching
Since patching the farm is a very important part of a good build, let’s talk about troubleshooting issues with patching and some methods and things to keep in mind when applying patches. The first part about patching to understand is that there isn’t any magical order of servers to patch. A lot of the interwebs will say you should patch the application server that runs Central Administration first and then follow it with the remaining servers in the farm. It’s just a preference.
When applying a patch, you can do so manually or you can use a script like the one Russ Maxwell wrote and that I have re-blogged at https://anothersharepointblog.com/applying-cus-to-sharepoint-2013-servers-with-powershell . It works great because it stops the Search service, IIS Admin service and SharePoint Timer service; which increases the rate at which patches burn-in . Then after the patch is applied to the server, the script will restart the services, provided you do not accidentally allow a patch to restart the server beforehand. So, when using the script, as I highly recommend, make sure to answer no to any prompts that want to restart the server after the patch is applied. Then, after the script restarts the search services, the IIS admin service, and the SharePoint timer service, you can restart and all will be well with the world.
After the restart happens and the server comes back online, you should run the post-setup Configuration Wizard (psconfiggui.exe) from either the GUI or using PowerShell. If you opt to use PowerShell, this is the cmdlet:
PSConfig.exe -cmd upgrade -inplace b2b -force -cmd applicationcontent -install -cmd installfeaturesSometimes the psconfig will report failures on databases where SharePoint features have not been properly removed from the database. This usually happens on content databases. You can get around this sometimes by running the upgrade-spcontentdatabase command on a database by database basis using the –skipintegritychecks parameter. If you take this approach, make sure that the database is not set to read-only, since a read-only database will not upgrade. You can check this in SQL by looking at the options page in the database properties, as shown in Figure 3-12.

Figure 3-12. Database is not read only
As long as the read-only is false, you’re good to go; but if it is true, you should change it to false, and then try to upgrade the database. The cmdlet to upgrade the database is
Upgrade-SPContentDatabase <DatabaseName> -skipintegritychecksThe skipintegritychecks parameter sounds bad and ugly, as if we are not doing something important, but all we are doing is telling SharePoint to forget about those missing features and missing setup files it was reporting in the previous attempt where psconfig failed. Missing features and missing setup files are what result when a solution is deployed to a site collection, activated inside the sites, then retracted and removed without first being deactivated in the sites. This doesn’t mean that the database is corrupt, necessarily, but it is lacking in integrity, since it will have references in it for features and setup files that are no longer present in the farm. When this happens, the psconfig will usually fail and say that it found all these features and they are not present in the farm; but they are in the database.
After you’ve ran the upgrade-spcontentdatabase, run the psconfig once more via the command line or via the GUI and you should get a successful run.
Whenever psconfig fails , it is best to troubleshoot the log it provides on the first failure. Usually the log will indicate if SharePoint couldn’t access a database or if there were issues with missing features or setup files and the database that has references to the features. This is a huge help if you’re dealing with a farm with hundreds of content databases, as maybe it is only a few that have issues. Once you’ve determined the database and have checked the database and it is not read-only, make sure that the install account has db_owner and that the farm account has db_owner as well.
Finally, in closing out this section on patching, remember that there is absolutely no shame in running the psconfiggui.exe vs. the psconfig.exe. Actually, I prefer to run the wizard via the GUI first and resort to PowerShell when I need to pull out “the big guns,” so to speak.
Publishing Infrastructure vs. Minimal Download Strategy
The publishing infrastructure brings a new feature called design manager, which allows developers to create SharePoint master pages based on html designs that they’ve created. The problem is that the master pages that get generated by design manager are not minimal download strategy aware. The minimal download strategy (MDS) master pages have this control called AjaxDelta that helps with the speed of the page load by controlling what parts of the page should be loaded on a refresh and what parts should be cached.
If you want to use a page created with the publishing infrastructure, or if you would like to take advantage of the publishing infrastructure for use in sites that use variations, you should deactivate the MDS feature. If you don’t, there is a chance that you’ll encounter two page loads, first for the start.aspx page that the MDS uses and then the full path to the publishing page behind the start.aspx.
When troubleshooting issues with page loads you should always look at how publishing is playing into the load times. If your servers have some decent RAM, let’s say 24GB or more, you can turn off MDS and use a master page that was optimized for publishing and get some really awesome page loads. On the other hand, if you don’t have a lot of RAM, MDS can give you some pretty awesome performance by only re-loading parts of the page that are wrapped by the AjaxDelta . So, if you’re experiencing a flash like where the page starts to load and then it loads really quick again, you should look at either de-activating the MDS and using publishing, using publishing pages that have master pages that address the AjaxDelta , or just using master pages that were made for MDS.
In Chapter 2, we talked about how to turn publishing on using PowerShell at the object model level and at the web application level; but we didn’t discuss the settings within the site collection that need to be set to get publishing in full force. After the SuperUser and SuperReader are set, open site settings and navigate to the top site if you’re not already there. In other words, open site settings on the site collection and then once there make sure that you do not see a “go to top level site” link.
Publishing activation has to be performed in a specific order. It is not possible to activate publishing on a sub-site of a site collection if the feature is not activated at the site collection level.
Click Manage Site Features under Site Actions, and de-activate the Minimal Download Strategy. Then go back to the top level, Site Collection Settings page, and click Site Collection Features under Site Collection Administration. After you have deactivated MDS, activate the publishing feature, from the Site Collection Features page. Then click Manage Site Features under the Site actions and activate publishing at the web level. Don’t worry. If you do this out of order, SharePoint prompts to ease your troubleshooting pain, telling you about the dependencies that publishing infrastructures require.
Click Site Collection Output Cache , and when it opens, enable the output cache so that your master pages can begin to cache in your server’s memory. Choose a profile for anonymous users and/or for authenticated users based on your usage requirements. Pick between sites that will be used primarily for collaborative purposes or for mostly information consumption, in the case of an extranet where things are just published. Then check the boxes related to how you would like to allow your designers to harness the page output cache, and click OK. You’ll be back at the Site collection settings page and have just one more setting to make to put publishing fully in force and that is the site output cache. The site output cache is to SPWeb what the site collection output cache is to SPSite. Once you’ve clicked Site Output Cache, make the settings to all sites and subsites, and then apply them to all the subsites. It’s a good idea to inherit whenever possible, so all you really need to do here is check the “Apply these setting to all sub-sites” box, and then click OK.
Once the publishing infrastructure is activated, it creates one list and five libraries named Pages, Workflow Tasks, Images, Site Collection Images, and Site Collection Documents. Sometimes users get a little crazy with SharePoint Designer or with third party tools and they delete and then try and re-create the library Pages. This happens to other libraries too, but I mention pages since it seems to happen there more than anywhere else. You can easily determine if the library was re-created manually and not by the publishing infrastructure by hovering over the ellipsis next to the app icon for the given library and you’ll see this message “This system library was created by the Publishing feature to store pages that are created in this site.” If you’re looking at the pages library on a library created manually, chances are good that it will not have the system wording on hover.
Account Management
When you think about account management, what comes to mind? I think about my bank account and how much money is in there. And then I quickly get depressed, and so on, and so forth. When it comes to SharePoint, I think of the service accounts that are used in least privileging. Of all the accounts, the farm account is the most important, followed by the accounts that run the various service application pools and the account that is used to run the application pool for web applications that house content inside site collections. The install account, while an all-powerful administrative account, would be last on this list since it does not run any services, or at least it shouldn’t.
When it comes to changing the passwords on these accounts, I’ve heard horror stories about administrators talking about thinking that to do that a new farm would be required and nothing could be further from the truth. The passwords for these accounts can be changed in Active Directory and as long as the passwords have never been manually entered into IIS, SharePoint will handle the rest. Where administrators run into problems with account management is when changes are made directly in IIS or directly inside the Windows Services console. The reason that this poses a problem is that SharePoint is not aware of these types of changes to identities. So, avoid manually changing identities in IIS and use the service accounts page in Central Administration if you want to change the account that a given Windows Service or SharePoint application pool runs underneath.
Then when the time comes to change the passwords, you can do so using Active Directory. Or you can use the command line using the net user command. We’ll have an exercise at the end of the chapter that covers changing the password via the command line.
Logging Locations and Levels
When it comes to logging in SharePoint, there are a few different logs that you’ll use when you’re troubleshooting. Here’s a list of the various logs:
Windows Event Logs , Application, System, Security, Resource Exhaustion, etc.
IIS website logs and failed requests logs
IIS Error logs and SMTP logs
SharePoint ULS logs
The Windows event logs are located at the following directory by default %SystemRoot%System32WinevtLogs. The %systemroot% path variable is C:windows in all Windows operating systems. If you ever wonder where a variable resolves to, you can look it up on the interwebs or type it in a run bar and click OK and let Windows Explorer show you the path.
The IIS website logs are located at C:inetpublogsLogFiles and the failed request logs are located at C:inetpublogsFailedReqLogFiles. Both of these logs are in UTC time by default, so that is something to keep in mind when troubleshooting so as to make sure you’re not looking forwards or backwards in time, since the server time, if not in the UTC time zone, will be different from the IIS Logs. Another thing to help make some sense of these logs is how to determine, which log is for which site and the answer to that is as follows: Open IIS Management Console (inetmgr.exe) and then click Sites, as shown in Figure 3-13.

Figure 3-13. Site IDs
Notice how each site has an ID. Now if you navigate to C:inetpublogsLogFiles, you can see that each site has its own folder. For example, the Portal Home site has logs inside of the folder named C:inetpublogsLogFilesW3SVC2043940602. When reading the IIS logs, you’ll notice four values at the end that are really helpful. Consider this diagram and then the bulleted list of explanations.
sc-status sc-substatus sc-win32status time-taken====================================================503 19 0 218
sc-status - is the major part of the HTTP status code
sc-substatus - is the sub status e.g. for a 503.19 HTTP status the sub-status would be the 19 part
sc-win32status - is a Windows system error code
time-taken - is the time taken to send the response in milliseconds
If you look through your IIS logs and see a bunch of 200s, you should have your favorite refreshing, ice-cold beverage of choice, because 200s mean, “OK. The client request has succeeded.” The TechNet article at https://support.microsoft.com/en-us/help/943891/the-http-status-code-in-iis-7.0,-iis-7.5,-and-iis-8.0 has a detailed listing of what the various sc-status codes are trying to say. This is a good page to have saved as a favorite, copied into an OneNote, and possibly even saved into a Word document or an Excel file. The only reason I didn’t copy it into this book is because I have grandkids and I want their grandkids to be able to climb trees.
If you look through your IIS logs and see something like this, you’ll notice that there was an access denied situation followed by a really long page load:
2017-05-07 21:01:19 127.0.0.1 GET /PublishingImages/Forms/Thumbnails.aspx - 80 - 127.0.0.1 Mozilla/4.0+(compatible;+MSIE+7.0;+Windows+NT+6.3;+WOW64;+Trident/7.0;+.NET4.0E;+.NET4.0C;+.NET+CLR+3.5.30729;+.NET+CLR+2.0.50727;+.NET+CLR+3.0.30729) http://portal.contoso.com/_layouts/15/viewlsts.aspx 401 1 2148074254 152017-05-07 21:03:03 127.0.0.1 GET /PublishingImages/Forms/Thumbnails.aspx - 80 0#.w|contoso2013installer 127.0.0.1 Mozilla/4.0+(compatible;+MSIE+7.0;+Windows+NT+6.3;+WOW64;+Trident/7.0;+.NET4.0E;+.NET4.0C;+.NET+CLR+3.5.30729;+.NET+CLR+2.0.50727;+.NET+CLR+3.0.30729) http://portal.contoso.com/_layouts/15/viewlsts.aspx 200 0 0 103684
When you have a sc-win32status , you can sometimes use net helpmsg <sc-win32status number>, to find out more information. But this does not work every time. Sometimes the number shown is not a valid status. A list describing all the various win32status numbers for codes 0–400 is at https://msdn.microsoft.com/en-us/library/ms681382.aspx . The error codes go from 0–15999, so the 21408074254 is definitely not an error code that relates to a win32status.
The IIS error logs are located at C:WindowsSystem32LogFilesHTTPERR. These logs are also UTC and they report any errors that might be happening in your SharePoint. If there is nothing to report, you’ll just see a hyphen, which is hopefully the case.
The IIS SMTP logs are located at C:WindowsSystem32LogFilessmtpsvc1 by default. These logs give you troubleshooting information about mail operations within SharePoint.
The SharePoint logs come in two flavors: diagnostic logs and usage logs . Both of these logs are located at the default location C:Program FilesCommon Filesmicrosoft sharedWeb Server Extensions15LOGS. It is possible and a best practice to move logging off the operating system drive over to a separate drive—in which case the logs could be anywhere.
It is not anarchy though. You can determine where the logs are located by looking at the monitoring settings within Central Administration and running a quick PowerShell, or by opening the ULSViewer and choosing to open from ULS. The ULSViewer program can detect where ULS is logging.
The way to find the logs in Central Administration is as follows: Click Monitoring ➤ Configure Diagnostic logging and scroll down. The logging location is listed under the Trace Log section in the Path box. To determine where usage data collection is taking place, click Monitoring ➤ Configure usage and health data collection and scroll down to the Usage Data collection settings and take a gander at the Log file Location box.
To find the log file locations using PowerShell, you would type (Get-SPDiagnosticConfig).LogLocation to find the tracing logs location, and you would type (Get-SPUsageService).usagelogdir to find the usage and health logs location. They do not have to be in the same directories; it is an administrative preference. From a standpoint of writing scripts to look through ULS logs, it is a lot less burdensome on the scripter if the usage and health logs are in the same directory as the trace logs.
The default logging levels are set so that the logs do not get too large yet still contain medium and higher level information about events. In any troubleshooting scenario, it is not uncommon to turn up the logging level to VerboseEx, which offers the most information you can get from the logs. When you turn this up using PowerShell, don’t forget to turn it back to normal. Clear-SPLogLevel is the quick and easy way to set the logging level back to normal. Set-SPLogLevel –TraceSeverity VerboseEx is the command used to set the logging level all the way up across the entire farm.
Path-based vs. Host-named Site collections
When SharePoint originally came out, path based site collections were really the primary focus; however, when SharePoint 2010 hit the scene, Microsoft started talking about the all glamourous Host named site collection . When 2013 made its debut, Microsoft advised that HNSCs were the recommended best practice in terms of performance to roll out site collections. That’s not to say that path based are bad, because they’re not, they just do not scale very well.
Microsoft has tested path based site collections and determined that the supported limit per web application is 20 site collections. Since a farm has supported limit of only 20 web applications per farm, this means that if you opted to go with path based site collections, the max site collections with different URL’s for your farm would be 400 (20×20). A farm of this magnitude would have a pretty decent memory footprint, as all those application pools in IIS would require additional horespower.
When it comes to Host named site collections (HNSC), which are also known as host header site collections (HHSC), the maximum limit that is supported is 750,000, of which 500,000 would be MySite site collections and 250,000 would be related to other types of sites. The HHSC is only created using PowerShell and all the HHSCs are created inside of the same web application. Far fewer resources are required to run HHSCs and you can get a lot more site collections for far less actual resources.
The nice thing about HHSCs is how they are presented to the user. In IIS, they all live inside the same site and have their own unique bindings. To the user, you could have the accounting.contoso.com inside the same IIS web that the insurance.contoso.com and the litigation.contoso.com are served from. You could use a wildcard certificate like *.contoso.com or if you wanted to use separate singularly named certs, you could do that too, by using the server name identification feature in IIS.
When HHSCs get created the get spun up inside of a web application. While it is possible to house path based site collections inside a web application that house HHSCs, I would not advise this practice; but instead would advise having a single web application for all of your HHSCs and then have however many you need for your path based site collections.
When accessing Path based or host header site collections from the server, you need to account for the loopback security feature in Internet Explorer by either creating a dword named DisableLoopbackCheck or by using Multistring value named BackConnectionHostNames. There isn’t a need for both, as either will work. The nice thing about DisableLoopbackCheck is that it covers all current and future site collections, whereas the BackConnectionHostNames needs to be updated each time a site collection is created. The site collections must be able to be opened on the server where search crawls occur; so one of the first things to troubleshoot if search is not getting results is to see if the search account can open the site collection from the server it uses to crawl.
Let’s do some exercises related to account management, logging levels, gathering logs, and creating host-named site collections.
Managing Account Passwords
In this exercise, we’ll see how to change the account password for the farm account using Active Directory and via the command line.
Using the Active Directory Users and Computers GUI
Log in to your domain controller with the setup user account or another account that is a domain admin .
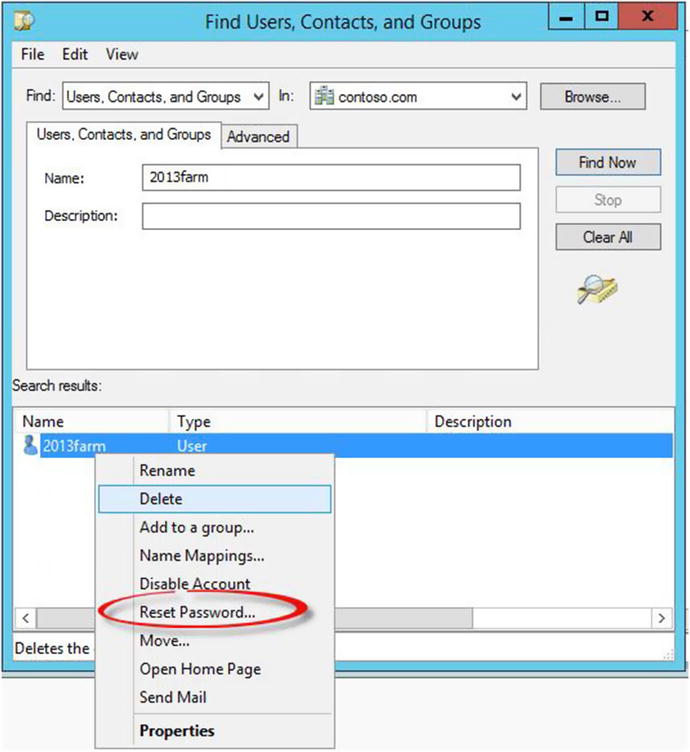
Right-click the domain and find the farm account, as shown in the following screenshot, by clicking Find and then typing the name of the farm account.
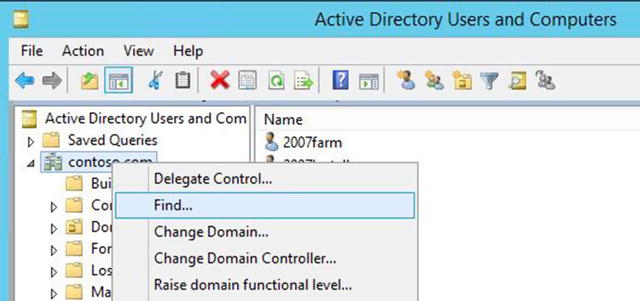
After you type the name of the farm account, click Find Now, and then right-click the account. Be very careful to click Reset Password…, as shown in the following screenshot.
After you type the password in both times and click OK, nothing should skip a beat, unless someone has manually entered a password outside of SharePoint. For example, if someone manually entered the farm account password in IIS or in the Services Console, things might hang, services might stop, app pools might cease to function, it might be a bad day. Do not fret though, there is a good chance the Sun will rise tomorrow.
After you have finished changing the password , you could open Notepad as a different user and use the password to see that the change took affect. Since you’re on the Central Administration server, you could just open the ULS Viewer and see that logging is happening. If you close and open central admin, and it fails to open, then someone has modified IIS. If this were to happen, you would run psconfig –cmd secureresources or initialize-SPResourceSecurity .
Using the Command Line
Open a command prompt administratively on your web front end or app server while logged in with the install account. Do not attempt to perform while logged in with the farm account, because you should never be logged in with the farm account.
Type the following command to change the password of the farm account, and then press Enter:
Net user 2013farm MyP@ssword0 /domain, as shown in the following screenshot.

After the command completes successfully you can test it by opening Notepad as a different user and using the new password, MyP@ssword0.
The exercise on managing account passwords demonstrated that we can change the farm password at any time. One thing that can cause an app pool to shut down, and a farm to lock, is if the wrong password is manually entered into a login window for the farm account. If this ever happens to you, you can bet that you will be modifying the logging level.
The exercise on logging levels demonstrated how we can verify our logging levels using PowerShell, but it didn’t talk about the GUI. This is because it is not possible to set the trace severity any higher than verbose in the GUI, as you can see in Figure 3-14.

Figure 3-14. No VerboseEx setting possible via GUI
VerboseEx is the absolute most information that you can gather from SharePoint’s Unified Logging System. In fact, if you know the steps to an error that you’ve received, you should first create new log files, using New-SPLogFile (another action that is not possible via the GUI) and New-SPUsageLogFile, and then turn up the logging level to VerboseEx before reproducing the error. Then after the error has been produced, wait about 15 to 30 seconds and then clear the logging level back to default.
Knowing how to increase the logging level across the farm helps a lot. Using ULSViewer to look at events preceding the error helps in troubleshooting and being able to consolidate all the events based on a time of day from all the servers in the farm is even more helpful. You can even gather logs based on the correlation ID and the time of day from all servers. In this next exercise we’ll look at how this is possible using PowerShell.
Merge-Splogfile
In this exercise, we’ll get SharePoint to give us a correlation ID that we can use in our exercise on gathering logs. When we gather the logs from all the servers, we more than likely will only see the one server due to the topology of the farm used in this exercise and how we generated the correlation ID. In a real world example that you will encounter if you support SharePoint, administer SharePoint, or develop with SharePoint, there is a good chance that you will see more than one machine in your merged log.
Open an Internet Explorer and type the URL to your SharePoint site.
Change the name of the page in the URL from “default.aspx” to “troubleshootingSharePoint.aspx” and press Enter.
SharePoint will direct you to the Page Not Found Aspx page if your site has the page not found aspx page.
Open site settings and click site permissions, under the users and permissions section.
The URL of the page you’re on should end in _layouts/15/user.aspx if you’re using SharePoint 2013, _layouts/user.aspx if you’re using SharePoint 2010, or _layouts/16/user.aspx, if using SharePoint 2016.
Change the page name from user.aspx to users.aspx and press Enter. This time you will not be redirected to a page not found error screen and instead you’ll receive a correlation ID, similar to the following screenshot.

Open a SharePoint Management Shell administratively.
Type Merge-SPLogFile, followed by the –Correlation parameter and the GUID from the error found in step 5, followed by the –Path parameter and a path to a file on your system where you can save files, similar to what’s done in the following screenshot.

After you’ve entered something like Merge-SPLogFile -Correlation 2eacef9d-110b-807b-4ebf-3d40be1bfe57 -path D: roubleshootingerr-file.txt and pressed Enter, SharePoint tells you that it is merging the diagnostic logs and that this could take a little time. After this finishes, what we’ve just done is merged through all the logs in all the servers in the farm, for a specific correlation ID. And because the error occurred on the one server, only one server is returned in the results. For example, if you look at Figure 3-15, you can see that the only server returned is 2013APPW2K12, and sorry about the eye chart, hopefully you are following along on a development farm or home lab farm.

Figure 3-15. Unexpected
If you’ll notice about five lines down in this merged log file, there is an unexpected event. It has an unexpected level. If we look for unexpected events and then look at what transpired in the farm before the unexpected event, we can often find information that may solve the issue, or give us really good google fodder (search terms for queries). In this case, we see that the system couldn’t find the file named users.aspx because it doesn’t exist, as shown in Figure 3-16. The log says “The file ‘/_layouts/15/users.aspx’ does not exist.”

Figure 3-16. Application error on line 4
This is all good that we were able to zero in on the error we created on the server we created it on; but what if we didn’t know all of that info, and all we had was a date and time range to go on? We’ll in that case we would run a command like that shown in Figure 3-17.

Figure 3-17. What happened during this time?
When typing the starting time and ending time, it is always the date and time, not the time and date. I have no idea why the PowerShell team made it this way, since time and date are easier to remember. Well, just remember that it is date and time of the accident. The syntax is
Merge-SPLogFile –Path <PathToFile> -StartTime "mm/dd/yyyy hh:mm" –EndTime "mm/dd/yyyy hh:mm"The hours and minutes are based on a 24-hour clock. So midnight is 00:00 and noon is 12:00.
If you wanted to gather logs based on the time of day and a correlation ID, you would just need to add the –Correlation parameter.
HNSC or HHSC
The creation of the host-named site collection is done using PowerShell. You can create the web application that will host the host-named site collection using the GUI if you want, or you can create it using PowerShell. Since I’m fairly sure you already know how to create a web application via the GUI, and in the interest of great-great-grandchildren, tree-climbing expeditions, and the environment, I’ve opted to save the paper and explain how to create the web app with PowerShell.
Before we can begin the exercise, we need to get some variables planned out according to Table 3-2.
Table 3-2. Host Header Site Collection Variables
Variable name | Variable Value | Variable Purpose |
|---|---|---|
$applicationPool | "HNSC01ApplicationPool" | The name of the application pool |
$ServiceAcct | "Contoso2013WebContent" | The service account that runs the app pool |
$WebApp | "SharePoint - 10001 - HNSC" | The name of the Web application in IIS |
$webAppURL | The URL to the web app | |
$contentDB | "2013_WSS_Content_HNSC01" | The content DB for the top site that is never used |
$primarySiteCollectionOwnerAcct | "ContosoSamarT" | The name of the top site primary SCA |
$PrimarySCOwnerEmail | The primary SCA’s Email | |
$webApp0URL | The full url to the web app for the new site cmdlet | |
$ HNSC3DB | "2013_WSS_Content_GetintoContoso" | The name of the content db for the first HHSC |
$primarySiteCollectionOwnerAcct | "ContosoStacyS" | The name of the primary SCA for this HHSC |
$PrimarySCOwnerEmail | The HHSC primary SCA’s email | |
$HNSC3Name | "Get Into contoso Test Site" | The name of the new site collection |
$HNSC3URL | The URL for the new site collection |
Host-Named or Host Header Site Collections
In this final exercise of the chapter, we cover one way to create Host-Named Site Collections. Microsoft has started calling them Host Header Site Collections on exams, but I’m having a hard time wrapping my mind around that name change since I’ve been calling them HNSCs for a few years.
Gather your values for the variables so that you can substitute as needed and make substitutions to the code in this exercise.
Open your hosts file and make an entry that points the local host 127.0.0.1 to hnsc.contoso.com, adjust where needed for your environment. The host file is located at C:windowssystem32driversetc and can be modified using Notepad.
Make another entry in the host file for 127.0.0.1 getinto.contoso.com.
Open a SharePoint Management Shell administratively.
Copy and paste the following variables into your management shell after you’ve updated them for your environment, as shown in the following screenshot.
$applicationPool = "HNSC01ApplicationPool"$ServiceAcct = "Contoso2013WebContent"$WebApp = "SharePoint - 10001 - HNSC"$webAppURL = "https://hnsc.Contoso.com"$contentDB = "2013_WSS_Content_HNSC01"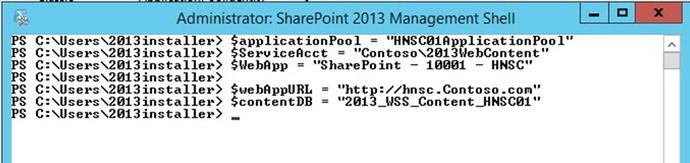
If you’re working with SharePoint 2010, copy this one-liner. Skip to step 7 if you’re working with SharePoint 2013 or 2016. After you copy it, press Enter a couple of times to make sure that it’s started its magic.
#2010New-SPWebApplication -ApplicationPool $applicationPool -ApplicationPoolAccount $serviceAcct -Name $WebApp -URL $webAppURL -Port 10001 -databaseName $contentDBIf you’re working with SharePoint 2013, copy this one-liner, and press Enter a couple of times.
#2013New-SPWebApplication -ApplicationPool $applicationPool -ApplicationPoolAccount $serviceAcct -Name $WebApp -URL $webAppURL -Port 10001 –AuthenticationProvider (New-SPAuthenticationProvider) -databaseName $contentDBNote We are running the web application up on port 10001 simply to show that the top site is not used. We could have used port 443 and the –securesocketslayer parameter if we had the proper certificates on the server.
After the web application is created, we need to create the top site, but not before we set some bindings in IIS.
Navigate into IIS Manager (inetmgr.exe) and create a couple of new bindings on the new web application by opening sites and modifying the binding for the high port and setting one on port 80 and then another for the first HHSC, as shown in the following screenshot.

Paste the following lines of code into your management shell after you’ve modified them to meet your environmental requirements, and press Enter a couple times.
$primarySiteCollectionOwnerAcct = "ContosoSamarT"$PrimarySCOwnerEmail = "[email protected]"$webApp0URL = "http://hnsc.Contoso.com:10001"New-SPSITE -URL $webApp0URL -owneralias $primarySiteCollectionOwnerAcct -owneremail $PrimarySCOwnerEmail -Template STS#1After the site is created, as shown in the following screenshot, go ahead and continue to step 10.

After you’ve updated the code for your environment, paste the following lines of code into your management shell and press Enter a couple of times.
$HNSC3DB = "2013_WSS_Content_GetintoContoso"$webApp0URL = "http://hnsc.Contoso.com:10001"New-SPContentDatabase $HNSC3DB –WebApplication $webApp0URLAfter the database is created, as shown in the following screenshot, you can proceed to step 11.

After you’ve updated the code for your environment, paste the following lines of code into your management shell and press Enter a couple of times .
$primarySiteCollectionOwnerAcct = "ContosoStacyS"$PrimarySCOwnerEmail = "[email protected]"$HNSC3Name = "Get Into Contoso Test Site"$HNSC3URL = "http://GetInto.Contoso.com"$HNSC3DB = "2013_WSS_Content_GetintoContoso"$webApp0URL = "http://hnsc.Contoso.com:10001"New-SPSite -url $HNSC3URL -Name $HNSC3Name -hostheaderwebapplication $WebApp0URL -ownerAlias $PrimarySiteCollectionOwnerAcct -owneremail $PrimarySCOwnerEmail -contentDatabase $HNSC3DB -Template STS#0Discuss parts of the scripts
Don’t be alarmed by the warning about the “port specified…” message, this is just SharePoint’s way of reminding you to create the bindings in IIS and make sure you have resolution through DNS or via a local hosts entry or both, as shown in Figure 3-18.

Figure 3-18. First host-named site collection is created
Navigate to your new site using a browser session that is running as StacyS, or your equivalent account and enter the credentials when prompted. The reason you’re being prompted is due to the site not being in trusted sites on the server, and/or the server might not have the DisableLoopbackCheck set . You can check the DisableLoopbackCheck dword for its existence and value of 1 by navigating to HKLMSYSTEMCurrentControlSetControlLsa , as shown in Figure 3-19.

Figure 3-19. DisableLoopbackCheck is disabled
If you add the getinto.contoso.com site to the local intranet sites in the security settings of your browser on the server, you will not be prompted for credentials when accessing the site on the server, assuming the DisableLoopbackCheck is set to 1.
Next Steps
Well, we’ve certainly gone over a lot in this chapter: Distributed Cache, User Profile services and synch, applying cumulative updates to SharePoint, publishing infrastructure and minimal download strategy, changing the farm password, various logs and changing the ULS logging level, and path-based vs. host header or host-named site collections.
The one thing we didn’t cover is Desired State Configuration , or DSC. DSC is still too new to this author and as such, unfortunately, I do not have enough expertise to discuss it in detail. It does require PowerShell 4.0. As Mark Watts, one of the SharePoint technical leads at Rackspace, recently proclaimed, “DSC is definitely the way the future of scripted SharePoint builds are headed.” I totally agree with him.
In the next chapter, we’ll revisit IIS mappings and talk about the file system and troubleshooting issues with site resolution.