Menus are a concept that has changed for the Joomla 1.5 release. There are essentially three steps involved in adding menus, which represent your site navigation:
Create Menu
Active the Menu by creating a module to house it
Add links to the Menu
By default, only a single menu is provided—the Main Menu (mainmenu). This may very well be the only menu you need if you have a simple site. But just in case you do not, let's step through creating a new menu.
To add a new menu, which will allow you to associate menu items to the new menu, follow these steps.
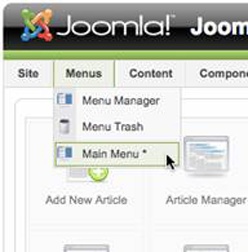
Select Menu. You should see a list of the current menus for your site, shown in Figure 30. Select Menu Manager from this menu.
On the Menu Manager page click the New button. From here, enter the following values. We are going to set up a new menu called About Us that will appear on the right side of our site.
Unique Name: rightmenu
Title: Right Menu
Description: Menu to display on the right
Module Title: About Us
Once you have entered these values, click Save.
With our menu created, now its time to enable it on the site.
To activate our menu for display purposes we must create a new Menu Module that loads the menu and specify a few parameters, such as where we want it to display (we will give you a hint...on the right).
To create a new Menu Module, follow these steps:
Open Extensions → Module Manager and click the New button.
Select the Menu radio button and click Next.
On the resulting screen, set the following options:
Title: About Us
Position: right
Menu Name (under Module Parameters): rightmenu
Click Save.
Now, if we take a look at our site, we see a new module on the right that says About Us, as shown highlighted in Figure 31. But wait a minute—there are no menu items! Correct—it's now time to take a look at how to add menu items to our new menu.

The first thing to know about a menu item is that you can link to just about anything—whether it is a link to another resource on your site or an external site. In fact, the options you have to select from, which can be seen in Figure 32, break down like this:
Internal Link: links to an internal resource, such as articles, contacts, news feeds, polls, and more.
External Link: links to a non-Joomla resource, such as those on other sites.
Separator: provides some non-linked text.
Alias: allows you to link to an existing menu item in another menu.
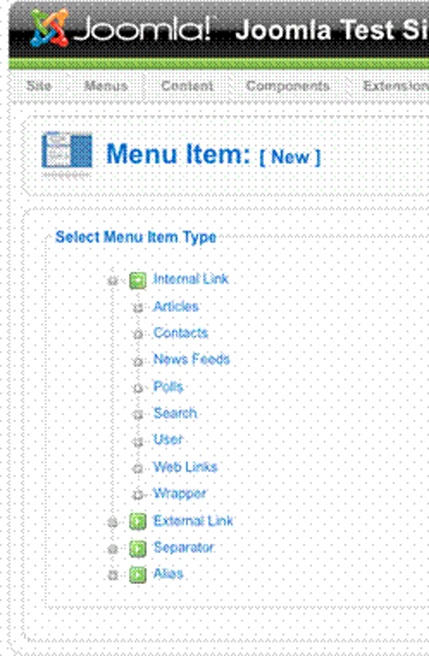
If you take a closer look at the list of Menu Item options you will also notice there are several categories of Internal Links you have at your disposal. If you click on each of these options, you will likely be presented with even more options. For instance, under Articles alone, there are further groupings of Archive, Article, Category, Front Page, and Section, with each of these groupings having one or two options themselves!
Note
If you have installed additional modules, you will see even more options to select from in the Menu Item Types.
Although you may first be inclined to just pick any Menu Item here, there is an extremely important lesson to be learned by these options—each of these have a different way of displaying content when clicked. Or to say that a different way—each of these menu item types display content differently when a user navigates to pages from them, so its important to understand what you are selecting. For instance, you will see references to Blog Layout, which is different than just the normal layout.
Having all these options sounds great, but it can also create confusion. Lucky for us, the developers of Joomla have made it really easy to change the Menu Item type from one to another if you do make a mistake. Simply click the Change Type button when creating or editing the Menu Item and you are taken back to the Menu Item Type list, where you can start all over.
The number of Menu Item Type options coupled with the various settings and other options you can specify for each type create countless combinations for controlling how your site looks. So, the best way to understand the different layout options is to create several menus and play around with the settings.
Note
Use these same steps to add menu items to any menu—including ones that already exist.
To do this, follow these steps:
Go back to Menus and select Right Menu from the list, which is the menu we just created.
Click the New button.
Select Internal Link → Articles → Category → Category Blog Layout as the type of Menu.
On the resulting page, enter in the following details:
Title: Press Releases
Display In: ensure Right Menu is selected
Category: Select News/Press Releases (Remember we created a Section called News and a Category called Press Releases earlier in the book.)
Click Save.
Note
We are sure you saw other parameters that could be controlled when creating this menu item. For now, stay the course and only change the items we mention. We cover some of these options in the next section.
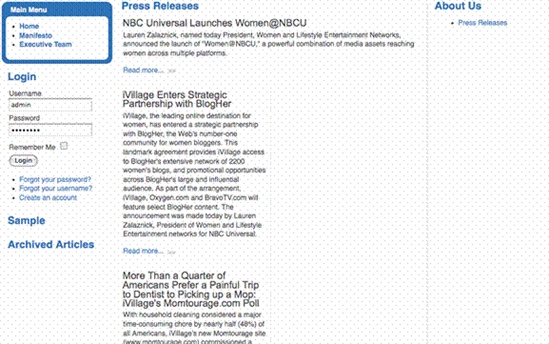
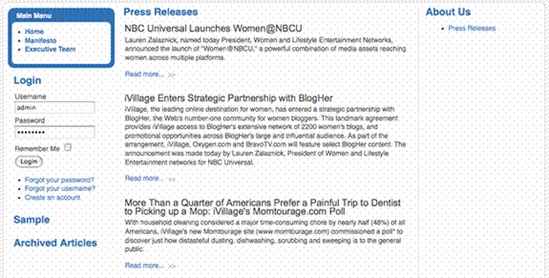
With our menus now in place, all we need to do is add some content. At this point, go back and add a new article under the Press Release Category of the News Section. After you save it, go to your site and click the Press Releases menu item we added to our About Us (a.k.a. Right) menu. Then add a second article and once again check the link and watch how it changes. Finally, add a third article and check the link. After doing so, you should see something like Figure 33.
In the last section, we created a Category Blog Layout Menu Item for our site. Once we published the menu item, we saw the content items had been automatically divided into two columns. The web developers out there would probably go straight into the CSS to change the layout, but with Joomla that is not necessary. All we need to do is set a few options within the Menu Item's parameters and we can completely change the way the page is displayed.
Note
When we say content layout, we are only speaking about the content that appears in the (usually white) content box of the site. The menu type does not affect the site template, which surrounds the content box on all sides. Subsequently, the CSS and index.php files drive the layout. For the layout in the content box however, we have to go to the Menu parameters.
To get a better understanding of the options and how they work, go back to Menus → Right Menu and click on our newly created Press Releases menu item. On the resulting screen, you will find that there are four different kinds of parameters that can be changed:
Basic Parameters: allows you to change the Category you want to link to, whether you show the Description of the Category and image, as well as how you want the layout of the page to look—such as the number of columns or how many articles you want to display before Joomla starts paginating.
Advanced Parameters: from here you can control things such as the ordering of the articles, how you want columns handled, and more specific pagination options.
Component Parameters: specific to the component itself (i.e., content), here is where you can override global settings.
System Parameters: controls some lower level aspects, but does allow you to set the
<title>of the page, which is important for SEO purposes.
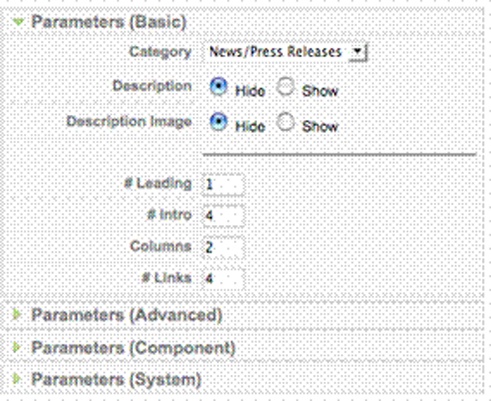
Many of the items in these parameters are self explanatory, however, when it comes to controlling the layout of a page, we do want to talk a bit more about the Basic Parameters that are available to you, which are shown in Figure 34.
At first appearance, it is not clear how you can control page layout with these parameters. If you take a look at Figure 35, however, you will get a better idea how this breaks down.
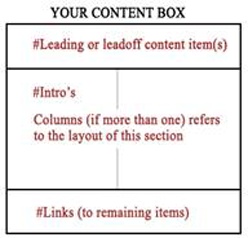
To get a better understanding of these options, specifically the last four, let's take a closer look at them:
# Leading: refers to the number of full width articles you have leading your page. Back in Figure 33 you can see the results of having one leading article.
# Intro: refers to the number of articles to display the introductory text. In short, these are the number of articles displayed that are not full width. Back in Figure 33, the setting was 4, but we only had three articles and one of them was used for leading, so only two intros were displayed.
Columns: Here is where you enter the number of columns in which the Intro's will be displayed. In Figure 33, this was set to 2. In Figure 36, you can see what happens when you change this to 1.
# Links: refers to the number of links to display at the bottom of the page after you have reached the maximum number of items on the page (e.g., Leading plus Intros). For instance, if you have Leading set to 1 and Intro and Links set to 4, but you have ten articles, then you will get five articles on the page (Leading plus Intro), four links, and then an option to continue to another page for the final link.
In addition to the Basic Parameters, there are a few noteworthy items under the Advanced Parameters section as well. They are:
Primary Order: determines the order in which your articles will be displayed. By default, the items are displayed chronologically. The most recent item created is automatically first in the order of content items. You are able to change this, however, to other values, such as alphabetically, most/least hits, or even use the ordering from the Articles Manager page.
Pagination: If you have more content items in a category than are allowed to appear on your page, as we referenced a couple of paragraphs back, Joomla provides the option for an automatic pagination, where your menu parameters divide all content items into pages. When this happens, a page navigation control will be displayed on the resulting page, such as in Figure 37.

As we mentioned, there are certainly a number of other options available for you to control. And also remember, each type of link presents different types of parameters. But just stepping through this one, which is the toughest, should give you a general idea how the parameters work and how they can be used to control content.