Chapter 2
Migrating Your Solution
In Chapter 1, you looked through all the considerations that need to be taken into account before upgrading your solutions to BizTalk 2016. You also worked through the installation and configuration of a new BizTalk 2016 server environment. With the 2016 environment set up, and those considerations taken into account, you are now ready to work through a deployment of your solutions. This chapter will walk you through various deployment techniques that you can use to deploy your code.
Working through a deployment of your code as an early step in your migration is good practice. It will allow you to get something in place to begin unit testing your components and seeing which of these components may need code updates. As noted in the first chapter, you may find that your solution will migrate exactly as-is, without making any modifications.
Jumping right into deploying your code in a BizTalk 2016 environment is the quickest way to understanding how much recoding may be necessary with your maps, orchestrations, and other components.
Planning Your Deployment
In order to most easily deploy, you need to determine the smallest unit of your solution that will be able to stand alone in the new environment. For example, let’s say that your old BizTalk 2010 environment consists of two integrations; the first is an orchestration exposed as a SOAP web service, while the second is an EDI solution that receives an EDI document from an FTP site, maps the file to an XML doc, and pushes that XML doc to a database using a stored procedure. These are very different solutions, and can be deployed separate from one another. The first could be deployed and set up to be fully functional on the new 2016 server, while the second could remain running on the old 2010 server. They are not interdependent, and therefore should be migrated separately.
The deployment options for both scenarios and virtually any other BizTalk solution are as follows:
1.You can do a manual deployment of ports, parties, compiled .NET assemblies, and other components.
2.You can export your MSI and binding files and import these into the new 2016 environment, letting these imports set up the ports, orchestrations, and configurations, while you manually deploy the .NET assemblies to the Global Assembly Cache (GAC).
3.You can deploy any non-BizTalk components, such as web service proxy services within IIS, referenced BizTalk assemblies, etc. manually.
For BizTalk 2006, 2006 R2, 2010, and 2013, you will have very similar issues to work through in your upgrade regardless of the version you are migrating from. BizTalk 2004 most likely need to be rewritten from scratch, as it is unlikely that your assemblies and applications will have any component that can be deployed “as-is.” BizTalk 2000 and 2002 are ancient technology, and your solutions must be rewritten completely – you are not looking at a migration, but rather a full rewrite.
You will most likely need to do a combination of all three of these options, depending on the complexity of your solutions. Some solutions you may want to migrate entirely by hand because of their architectural simplicity. Others, such as those that use EDI batching orchestrations and large numbers of BizTalk Parties, will require manual intervention at the batch level and the importing of bindings to create the various party settings.
We’ll now look at these various deployment methods in more detail. In each of these models, any deployment of .NET assemblies (DLLs) should be first done with the already compiled code you have deployed in your old BizTalk environment. Trying the deployment with these pre-compiled DLLs will give you a baseline for understanding what will need to be done for your final migration.
Start your migration with pre-compiled DLLs. Wait to recompile your .NET code (which includes all of the BizTalk project code as well as helper class libraries) in a newer version of Visual Studio until you see what upgrades without being touched.
Manual Deployments
When you have a live production environment, and you need to roll out a map update or some other code fix in a .NET assembly, the easiest and least risky approach is a manual deployment. You need to know how to do this for your migration as well, as no matter what level of MSI automation you may have, there will still be times that you’ll want to register things separately in the GAC.
All BizTalk artifacts within a Visual Studio solution compile into a .NET assembly. Physical copies of these assemblies are required for a manual deployment. If you do not have a physical copy of the file, you can either recompile these in either the original version of Visual Studio that was compatible with the version of BizTalk you are migrating from, or within Visual Studio 2015 for BizTalk 2016. You can also try and copy them out of the GAC. You should be able to navigate to them via some path (depending on your operating system) similar to C:WindowsMicrosoft.NETassemblyGAC_32. You can view items in the assembly at C:Windowsassembly, but you generally cannot copy directly out of this directory.
Taking the example of the orchestration exposed as a web service mentioned earlier, there are several steps to a manual deployment. In this case, you have one assembly (.NET DLL) that contains the BizTalk orchestrations, schemas, and/or maps, one referenced “Helper” assembly that is referred to from within the orchestration, and one web service proxy that must be deployed and configured within IIS. The following steps outline what is needed for the manual deployment of this example.
1.First, create an Application in BizTalk where you will deploy the components. Note that you do NOT need a special application for this. You can create one, or you can use an existing one (such as the default “BizTalk Application 1” available when you first open the Administration Console). For now, you can name this application the same as what you have in your old BizTalk environment.
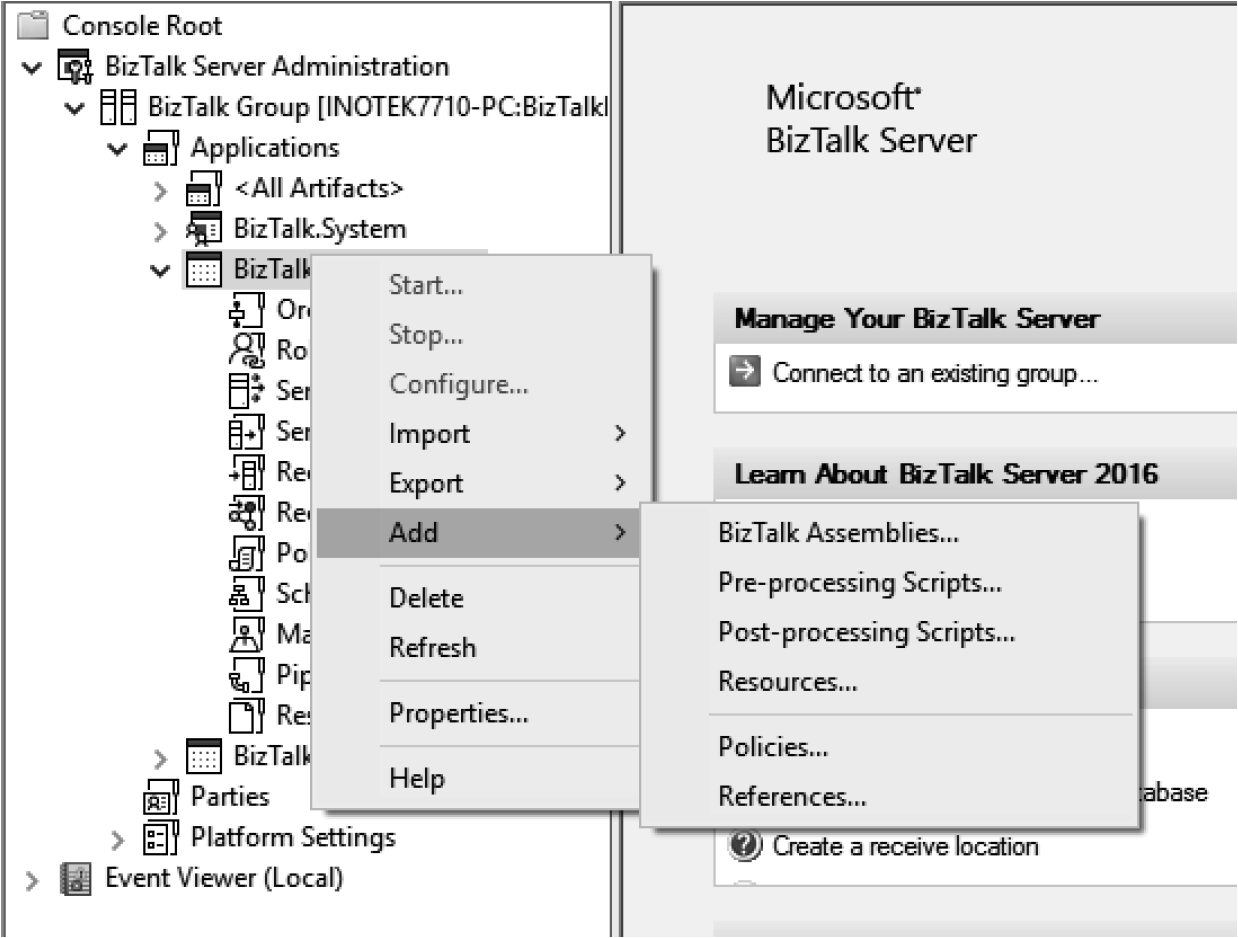
2.Next, right-click this application and select Add and then BizTalk Assemblies, as shown in Figure 2.1. This will allow you to select one or more assemblies to deploy within this application.
A good rule to follow here is to click the “Overwrite All” checkbox. This applies to every assembly and ensures that whatever you are deploying overwrites any previous deployment of the same assembly. Then, click on each individual assembly you are deploying in the list and click on the first and third checkboxes (see Figure 2.2). This will force a deployment not only to the BizTalk databases but also to the GAC. All assemblies must reside in the GAC, and this is a simple way to guarantee that they are there. Any referenced .NET assemblies (such as the “Helper” assembly used in this example) should be included in this deployment. This process will register them in the GAC, and ensure that they can be referenced by the orchestration when they run.
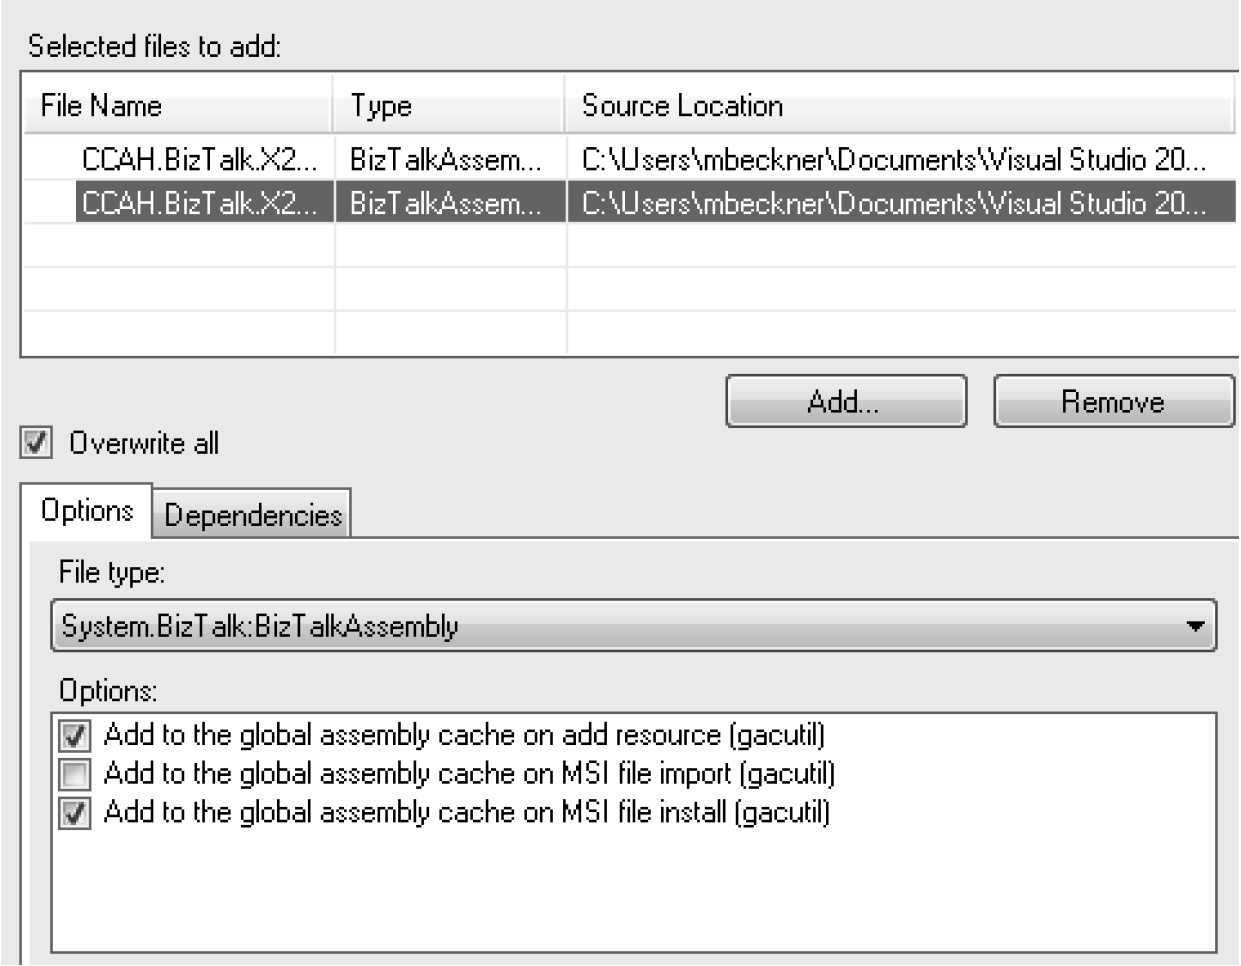
3.With the assemblies deployed to BizTalk, you now can create the ports. In the case of the orchestration deployed as a web service, you will have a two-way receive port. Setting this up manually is just a matter of transferring the port configurations in your current production BizTalk environment to your new BizTalk 2016 environment.
Copying and pasting each individual setting (as shown in Figure 2.3) is a quick-and-dirty way to get these ports set properly. On the left side of the image is a remote desktop instance where the old version of BizTalk is pulled up. On the right side, the new BizTalk 2016 Administration Console is open – values are copied from the left and pasted in the right.
While this approach is fine for a handful of ports, you can see how it would not be sustainable for large solutions. This is where the importing of bindings, outlined later in this chapter, will become vital to your upgrade.
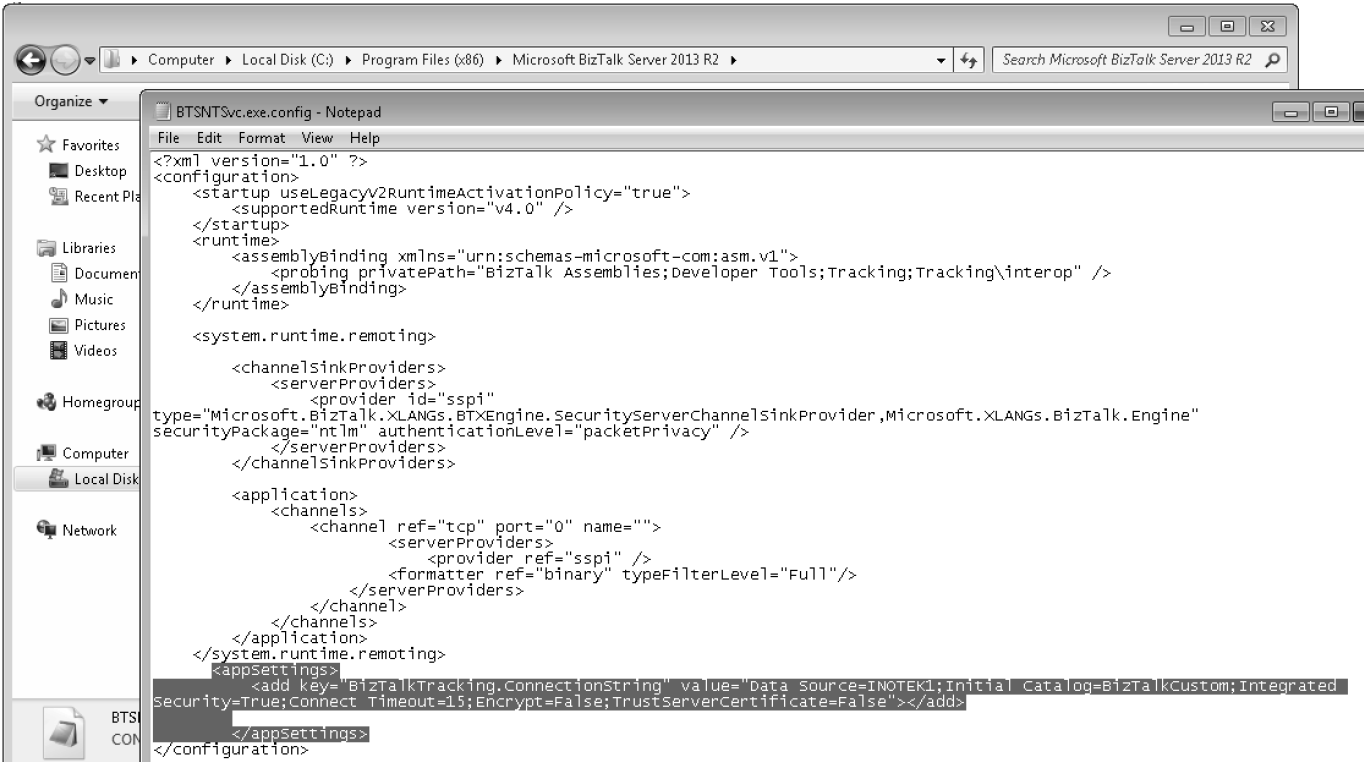
4.Next, you will need to update the BizTalk configuration file with any custom configurable keys that may have been added. This file is named BTSNTSvc.exe.config, and is found in the root BizTalk installation folder in Windows Explorer. In this scenario, the Helper assembly calls a SQL database, and this database connection string is pulled from the configuration file. An example of the configuration file with the configurable <appSettings> node is shown in Figure 2.4.
Some BizTalk solutions will use the SSO tools to store configurable data. You can continue to use this model, or you can migrate your configurable fields to the BizTalk configuration file for simplicity. You will have to manually migrate these settings from your old SSO database to your new one – most likely by using the SSO Application Configuration tool in 2016.
Remember that when you make modifications to the BizTalk configuration file, you will need to restart the BizTalk host instance. This can be done via the BizTalk Administration Console under the Platform Settings/Host Instances folder.
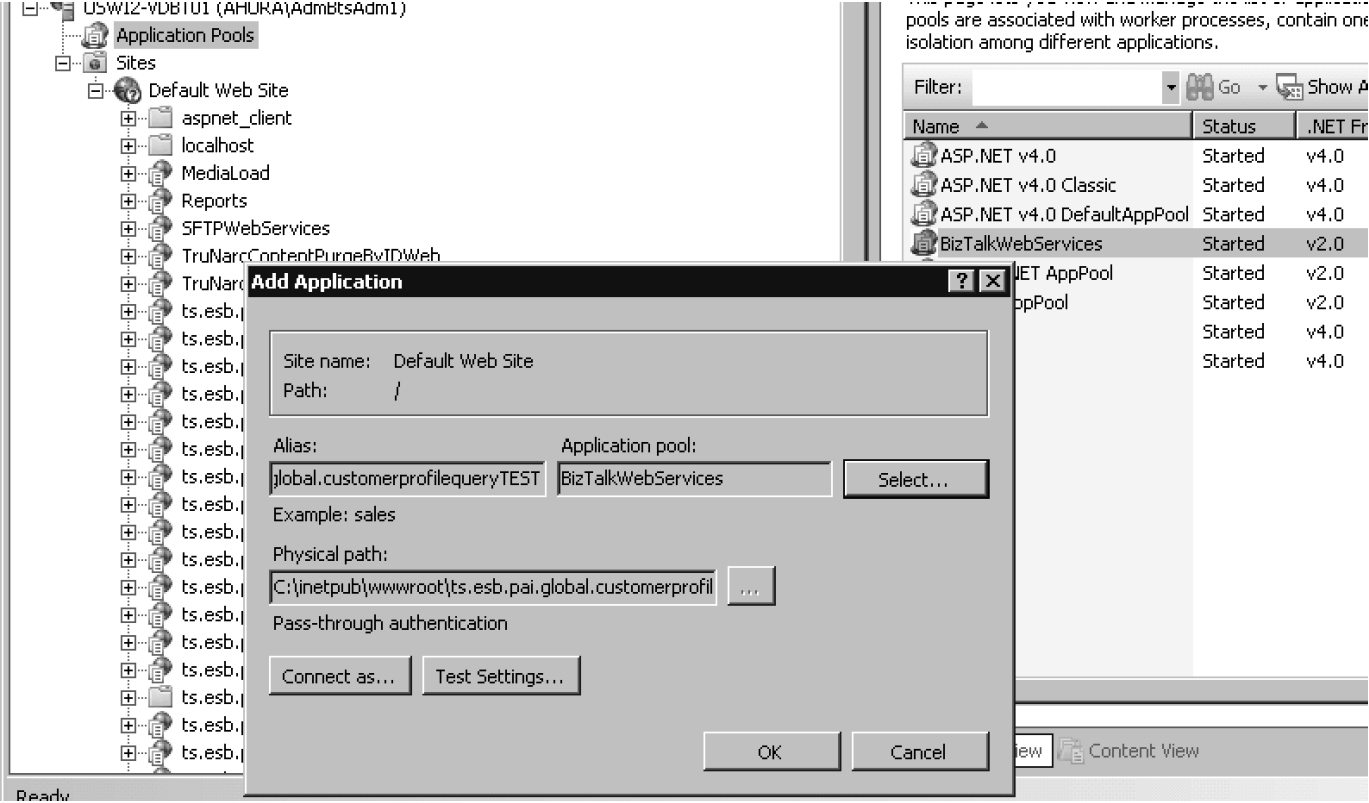
5.You can now deploy the proxy web service code to IIS. The code folder can be copied from your existing web directory (most likely under C:inetpubwwwroot) to your new BizTalk 2016 server. Once the folder is copied and pasted, open IIS and make sure you have an Application Pool created that will run under the correct .NET framework. In this case, the original web services were SOAP based, and they ran under .NET 2.0. You can continue to run them under .NET 2.0 in the new environment to ensure compatibility. At some point, you may want to publish this orchestration as a WCF service to modernize it, but at this stage in your manual migration, you don’t need to introduce new pieces of functionality outside of BizTalk when you are just working to see if your core BizTalk artifacts will work without modification.
In addition to the Application Pool, you will also need to right-click your folder and select “Convert to Application.” This will allow you to set the App Pool this proxy web service will run under and the permissions it will use when called. An example of this configuration is shown in Figure 2.5.
MSI Deployments
The previous section on manual deployments gives you full control over exactly what is happening with your deployment, but it isn’t realistic for large-scale solutions with many BizTalk artifacts. To deal with larger implementations, you will want to use MSI files. You can export an MSI for your current environment and import it into your new environment. The MSI can contain one or more applications, and each application can contain all the BizTalk artifacts. This can save substantial time and ease your migration when compared with migrating one artifact at a time manually as described in the previous section.
You do not need to run the MSI on BizTalk; you only need to import it. Many people think that the BizTalk MSI is like other installer MSI packages. In this case, it should only be used to import into BizTalk, and not double-clicked and run like an executable.
Exporting the MSI
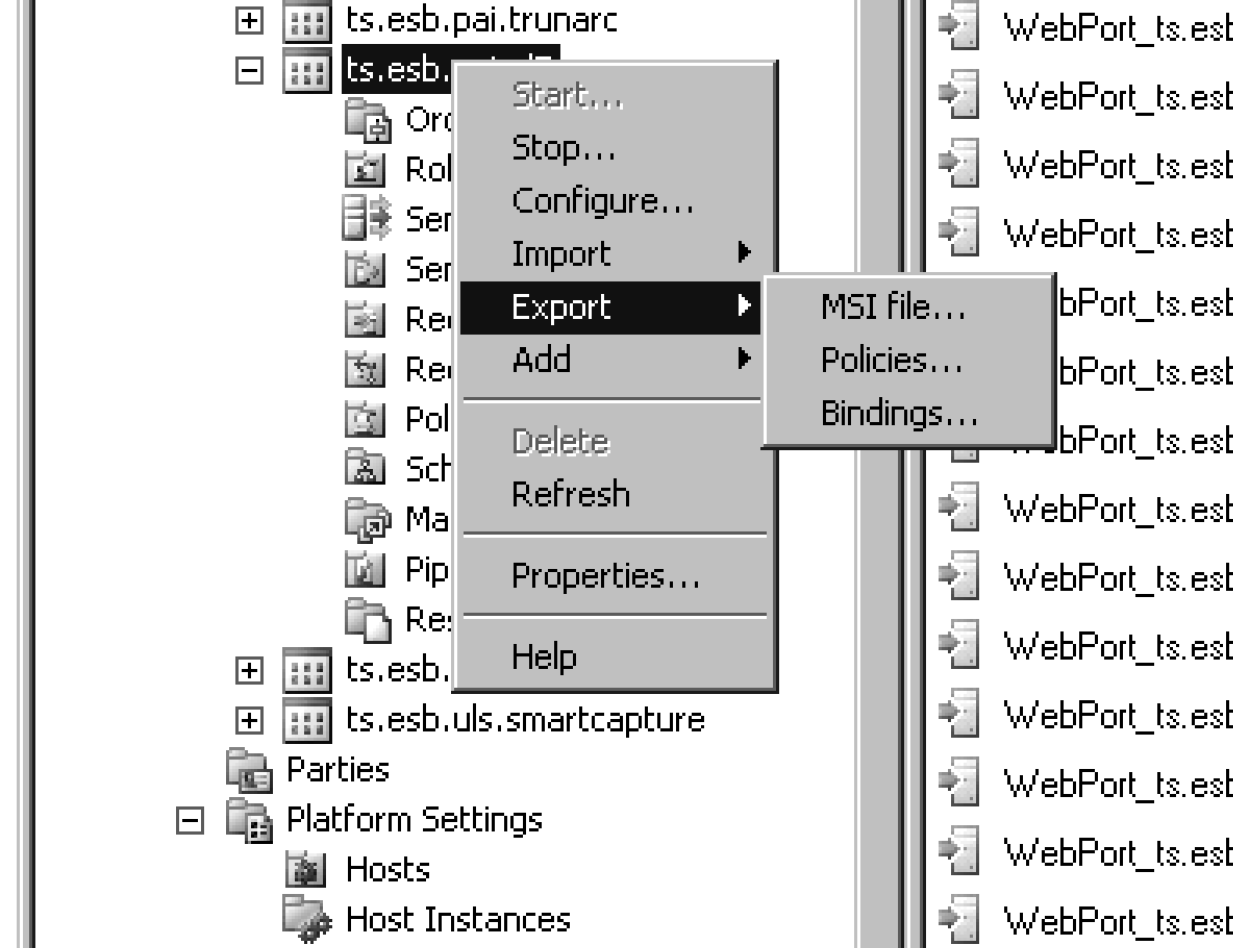
To begin with, you will need to export your MSI from your existing old BizTalk Server. This exported file, once created, will be imported into your new BizTalk 2016 environment. You can do this by right-clicking the BizTalk application you want to migrate within the BizTalk Administration Console and selecting Export and MSI file, as shown in Figure 2.6. While you can export an MSI for more than a single application, it makes it much easier to troubleshoot and pinpoint issues when you do it application by application.
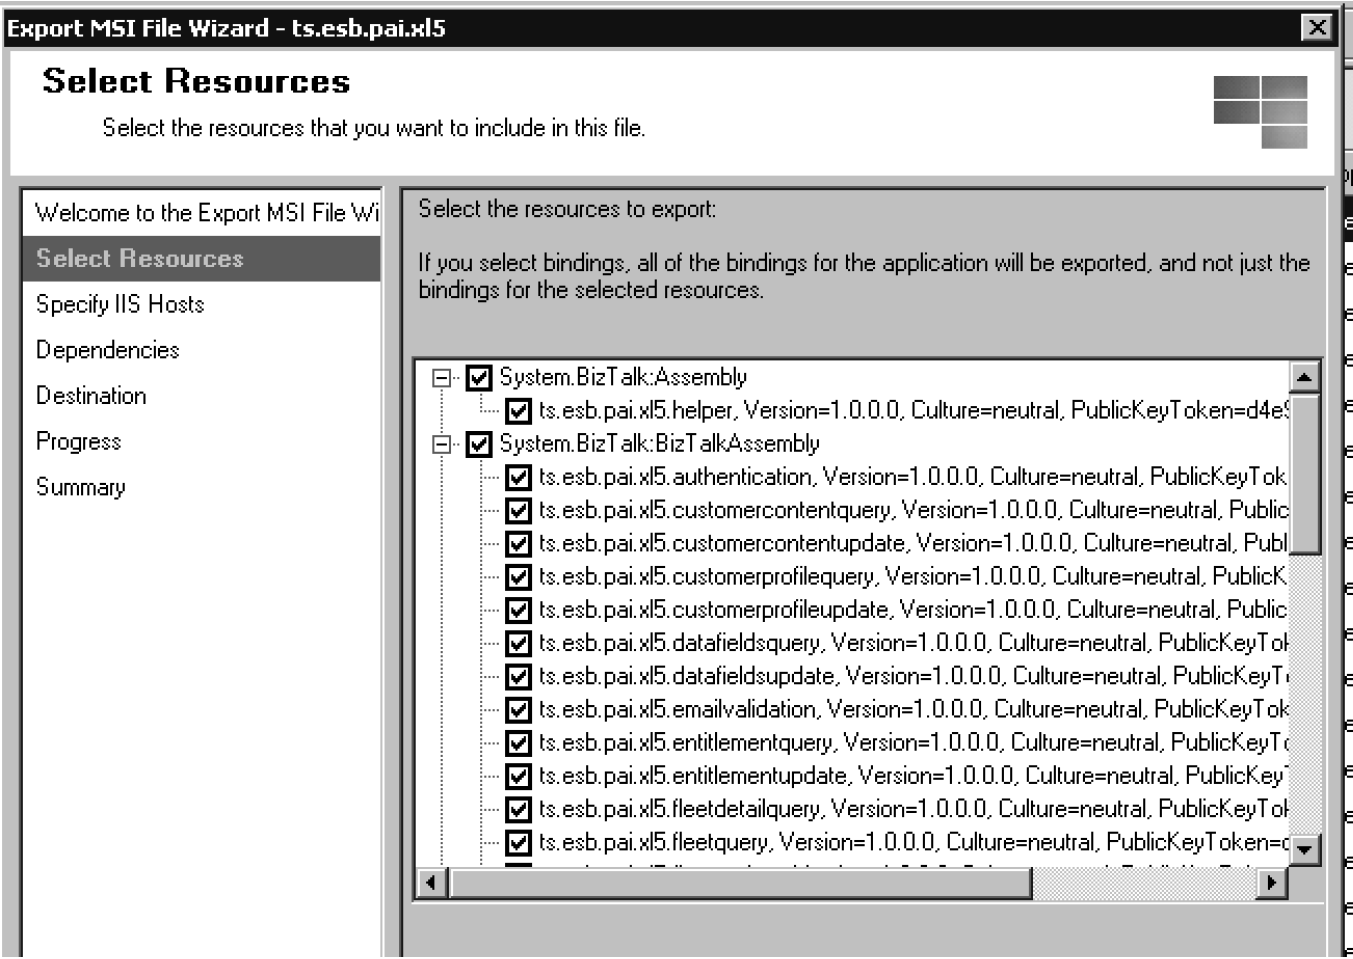
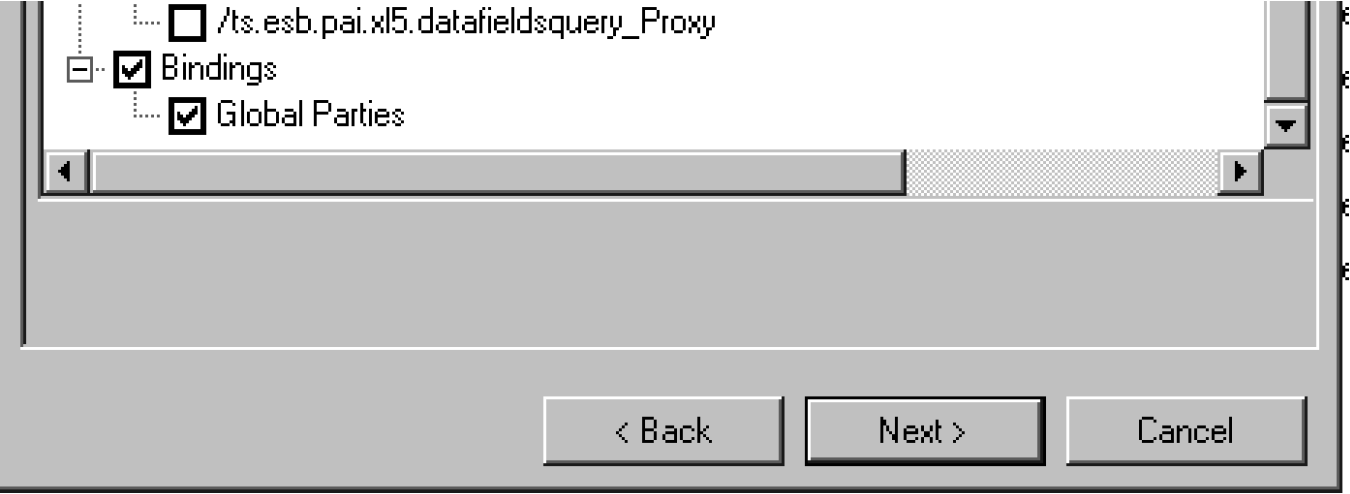
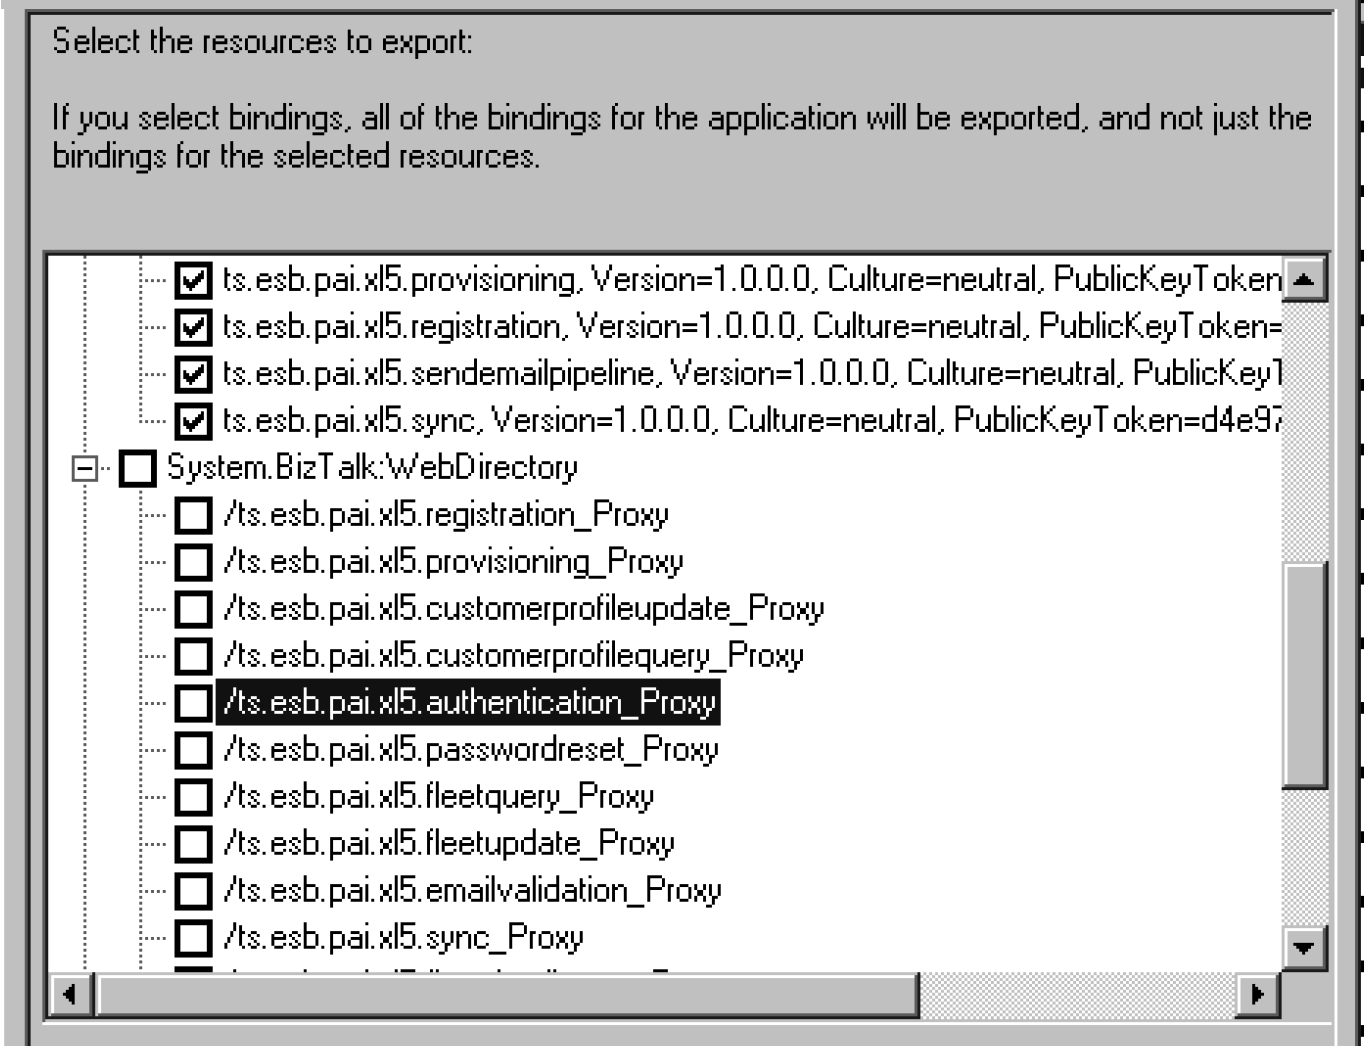
The MSI file export option will open a dialogue box that is the beginning of several pages of options within the MSI export wizard. On the Select Resources page, you will want to make sure you are selecting all the assemblies, as shown in Figure 2.7. As this image shows, both the referenced .NET helper assemblies (which do not contain BizTalk artifacts, but are referenced by those artifacts) and the core BizTalk assemblies that contain the schemas, pipelines, maps, and orchestrations. You will also want to select the Global Party Bindings (shown in Figure 2.8) if you are using EDI or BizTalk parties in any capacity.
You will still want to import your bindings file separately after you have imported the MSI. See the section later in this chapter on binding files.
You will NOT want to import any of the Web Resources. You’ll want to deploy these manually – by copying your web directories from your old server and pasting and configuring them in IIS on your new server. Look at Step 5 in the manual deployment earlier in this chapter. Importing these automatically via the MSI can be a challenge, and can be very time consuming to get the configurations right, whereas copying and pasting is quick and ensures that you are setting the right permissions in the new environment. Figure 2.9 is a reminder to not include these in your MSI export.
Make sure you do not include web resources in your MSI export. You should handle this migration manually by copying and pasting the web proxy folders from your old server to your new server and using IIS to configure permissions and access.
The next screen in the wizard – titled Specify IIS Hosts – should have no information in it, as you are not exporting your web directories in the MSI. While you can certainly try to get these to import, if you have anything other than an empty screen showing (like Figure 2.10), then you’ll have quite a bit of additional work to get them to import properly in your new environment.

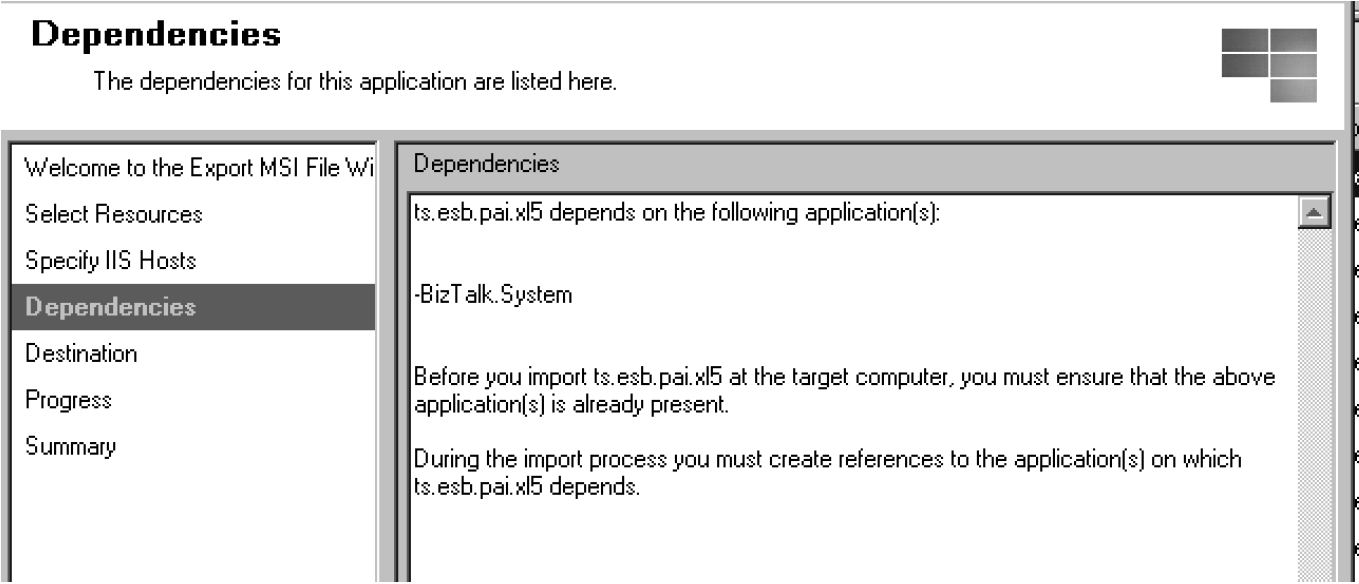
The Dependencies screen comes up next, giving a summary of what other applications are referenced by your application. Anything referenced here must already be on your target BizTalk environment before you’ll be able to import this MSI. In the case of the application shown in Figure 2.11, the only application referenced is System.BizTalk, which is the root BizTalk engine. In this case, because System.BizTalk already exists in the target environment, your application can be imported. If it were referencing another application not already in the target environment, you would need to migrate the root application first.
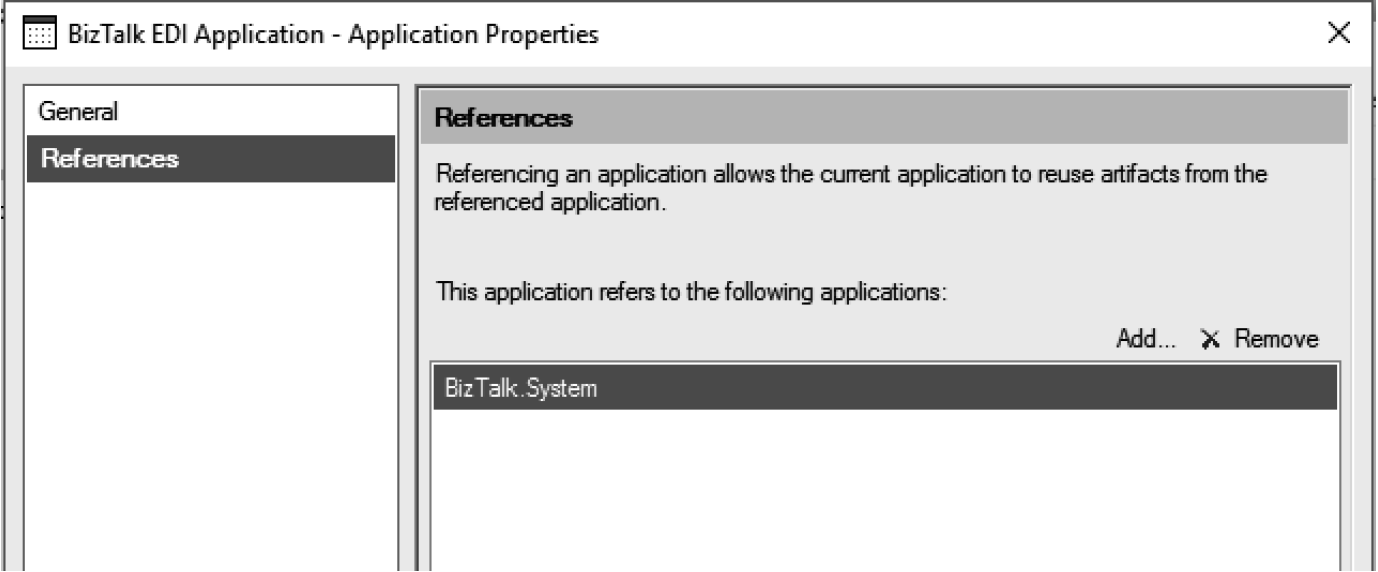
You can see what applications are referenced by right-clicking your application in the BizTalk Admin Console and clicking Properties. There is a References tab that shows referenced applications, as shown in Figure 2.12.
Back in the export wizard, the final configurable step of the MSI export is defining the application name and determining where the output MSI will go. You will want to create an application in the BizTalk 2016 environment with a name that matches what you type in here (see the “Destination application name” property in Figure 2.13). After you have this set, and the path for the exported MSI file defined, you can click through the rest of the wizard to create the MSI file.

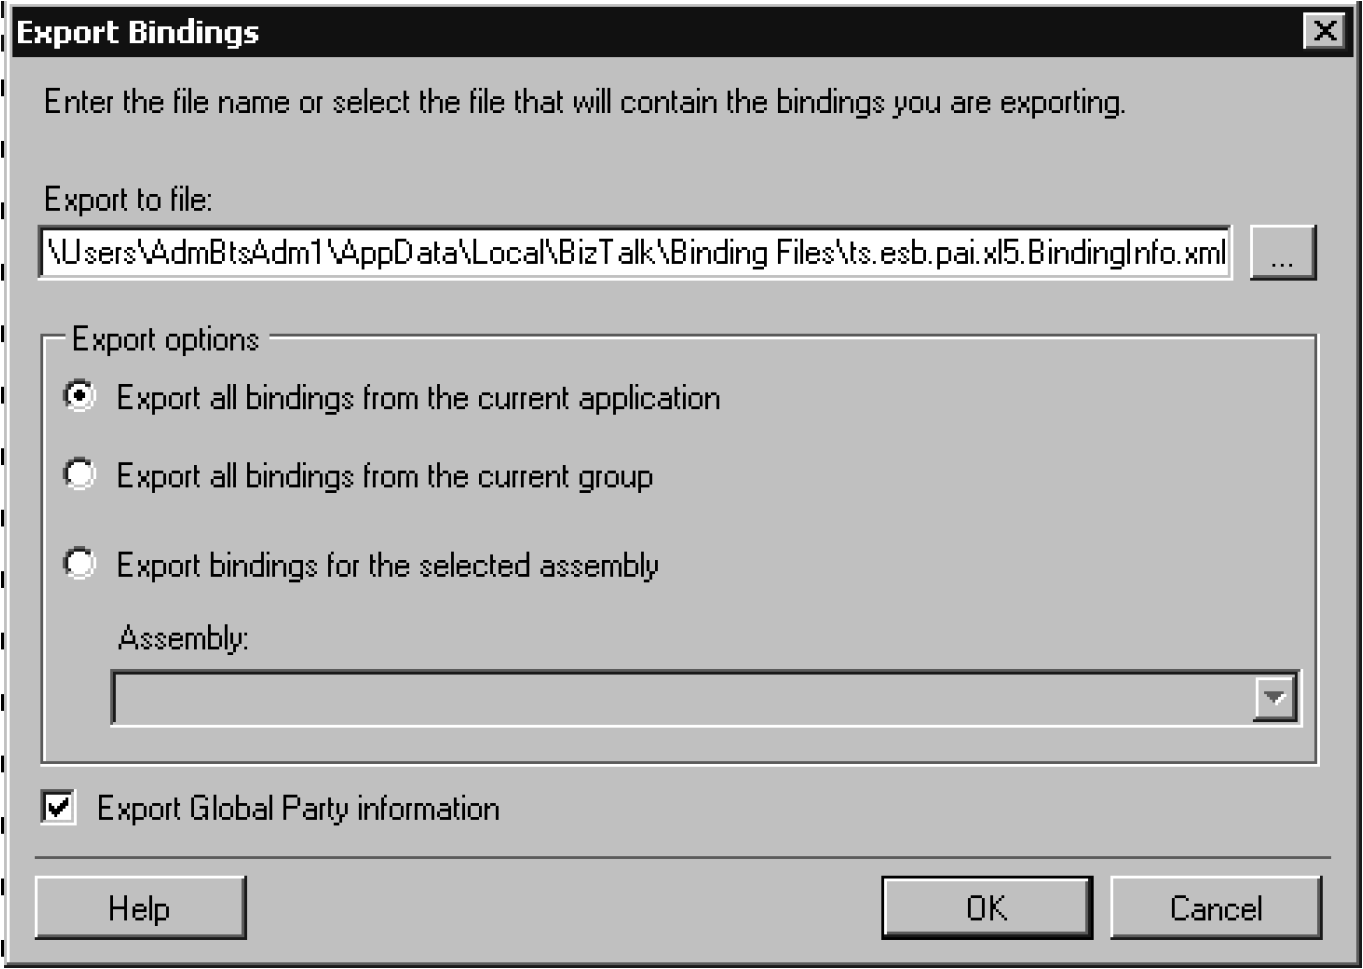
When the MSI file is completely exported, you’ll next need to export the binding file. This can be done by right-clicking the application in the BizTalk Admin Console and selecting Export and Bindings. The dialogue box shown in Figure 2.14 will appear. Your bindings represent all the port configurations related to this application. If, for example, you have a send port writing to a location on your C: drive, then this C: drive location will be output into the binding file.
Additionally, the bindings allow you to export the Global Party information, which includes all the party configurations you might have. In EDI-centric solutions, this is the core of your solution. Know that everything except the batching information is included in the bindings. The batches, if you have them configured, need to be manually validated and started in your new environment.
Importing the MSI
Take the MSI and the binding files you have exported, and copy them to the new BizTalk 2016 server. You will also need to copy the compiled assemblies used in the application, as these will need to be deployed to the GAC on the 2016 server. See Step 2 in the Manual Deployment section earlier in this chapter for information on how these will be imported. You will want to do this adding of the assemblies to the GAC after the import of the MSI and binding files has completed.
If you cannot find the original DLLs that you have deployed, and you can’t copy them out of the GAC as described earlier in this chapter, you have two choices. The first is to compile them in the original version of Visual Studio that you used for the old version of BizTalk you are exporting from. If you find that there are many errors when you try to build your solution, skip the troubleshooting and recompile them in a newer version of Visual Studio, supported by BizTalk 2016 (like VS 2015).
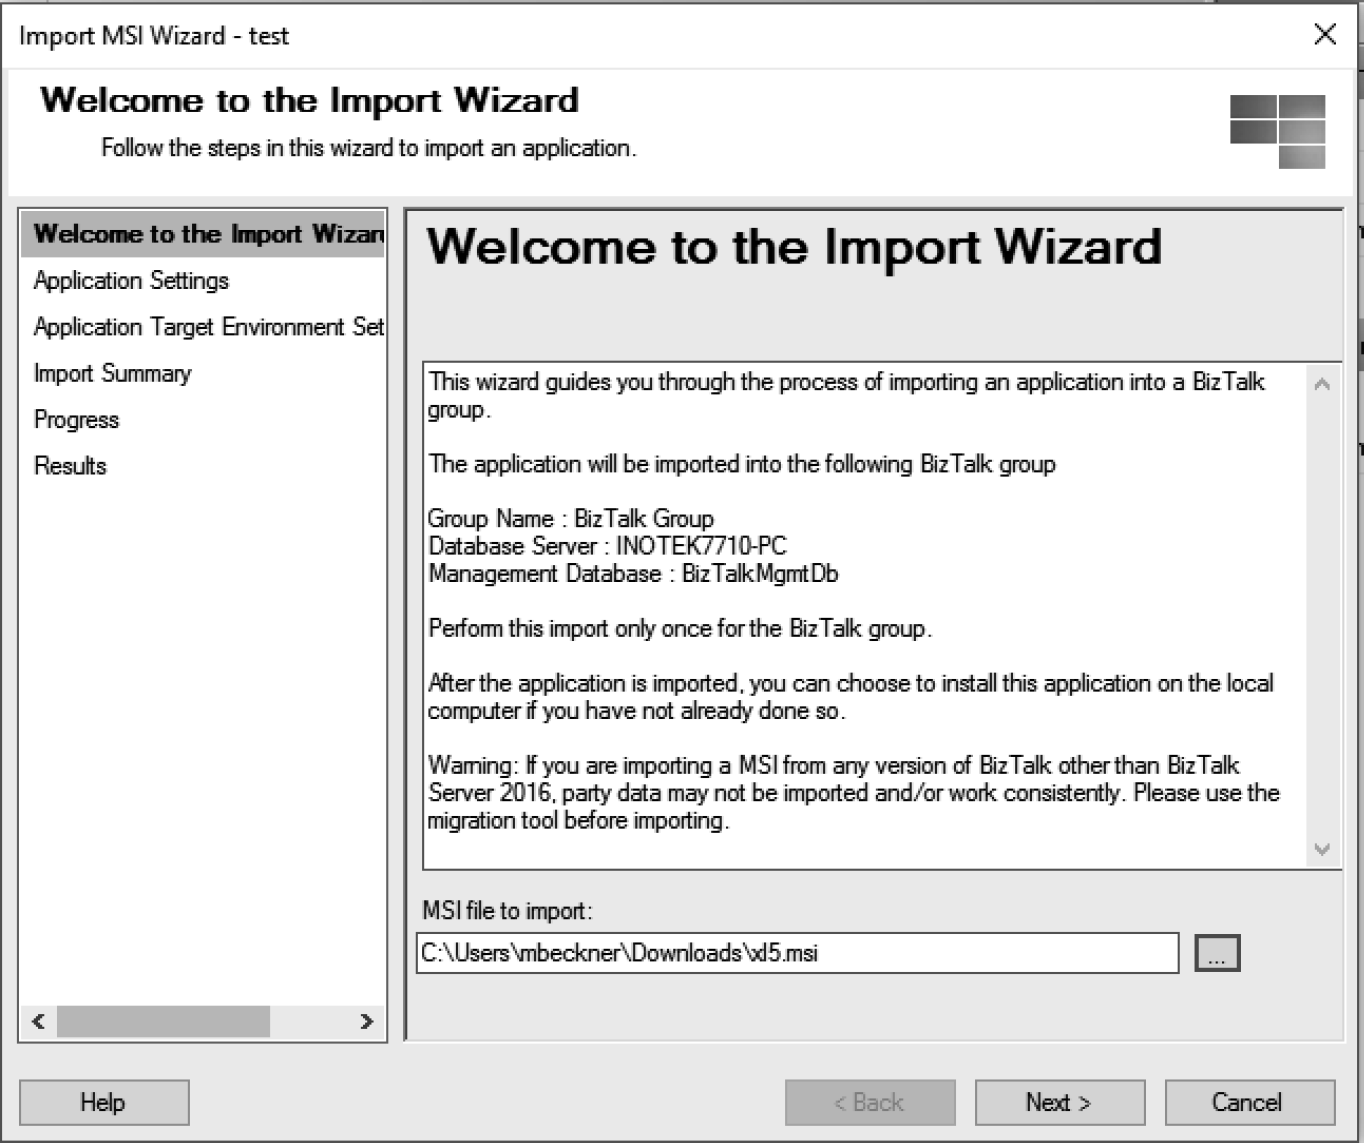
In the BizTalk 2016 Admin Console, right-click the application that you will be importing your MSI into. If you need to create a new one, do so now. On the right-click context menu, select Import and MSI. This will open an import wizard, the first page of which is shown in Figure 2.15. On this screen, you will want to browse to the MSI file that you just exported from your older version of BizTalk.
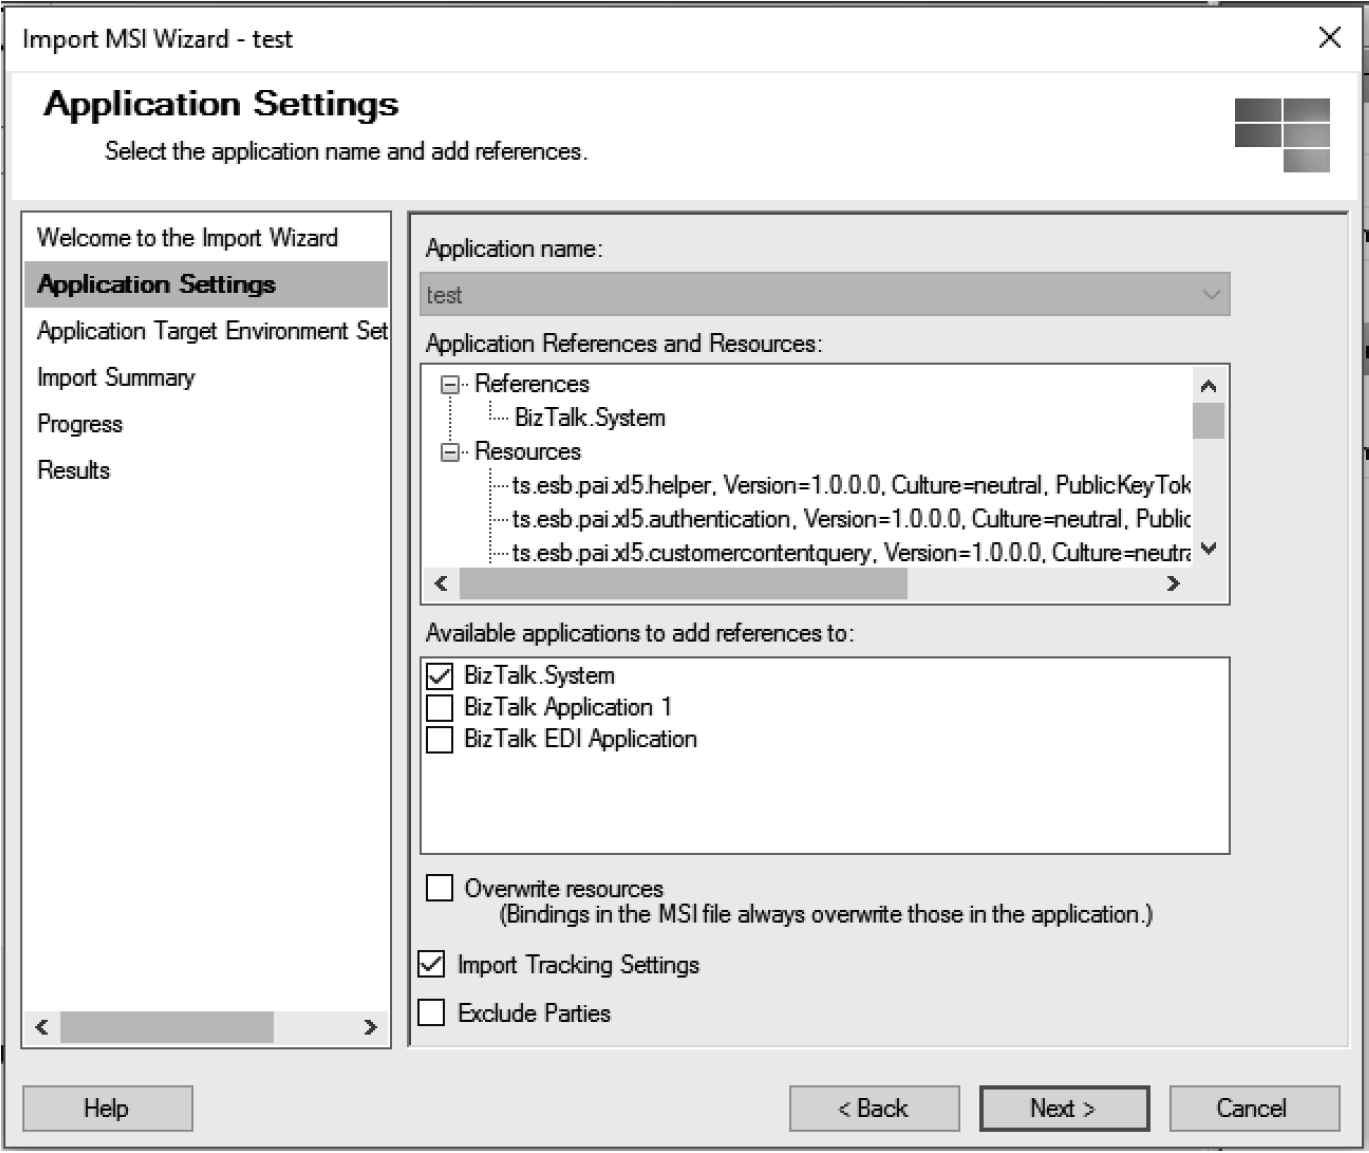
On the second screen of the import wizard, which is the Application Settings page (see Figure 2.16), you determine what applications will be referenced (you should be able to use the defaults, although if you have an application being referenced not in 2016, you won’t be able to import your MSI). You also determine if you want to overwrite resources (since you are doing a fresh install, you can leave this blank, but if you’ve already imported this MSI and are doing it for a second time, select this option). Importing the tracking settings just means you’ll keep any customizations to the default tracking that you may have had on ports, pipelines, or orchestrations.
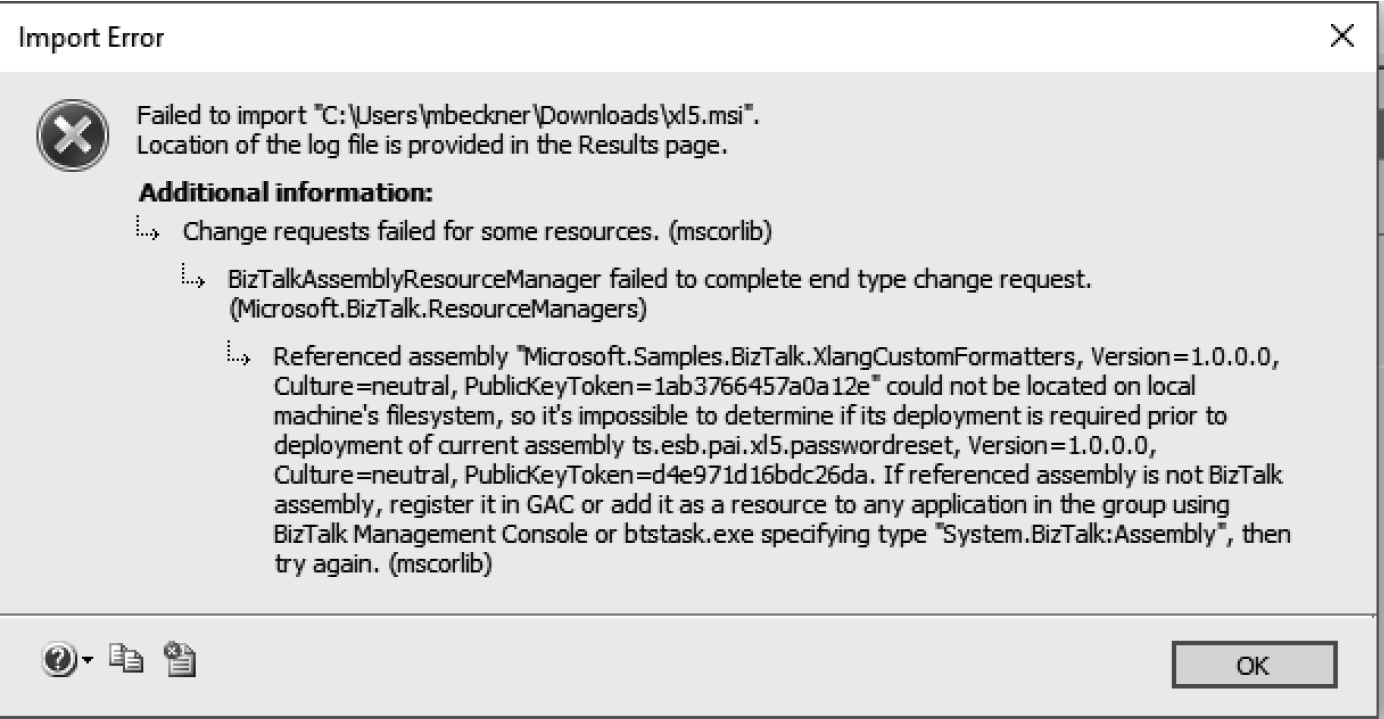
The MSI will now begin to import. If everything is in line, you will get a successful import, but it is common to get an error of some sort the first few times. Often, there are referenced DLLs that you have overlooked. For example, the error in Figure 2.17 says it is missing the Microsoft.Samples.BizTalk.XlangCustomFormatters assembly, which is a common assembly used for SMTP email formatting from orchestrations. In this case, the error can be resolved by canceling the MSI import, deploying this assembly manually (via the steps outlined earlier in this chapter on manual assembly deployment), and starting the MSI importer again.
It is not uncommon to have to try importing the MSI a number of times before it successfully imports, especially with solutions that have many artifacts. If you get errors that are difficult to address, try exporting smaller MSIs – or handling portions of the deployment manually.
When you get a successful import of the MSI, you still have two things to do. You must import the bindings in order to configure any ports or other BizTalk components, and you must register the assemblies into the GAC. You’ve looked at registering assemblies, and that is typically done after the binding import.
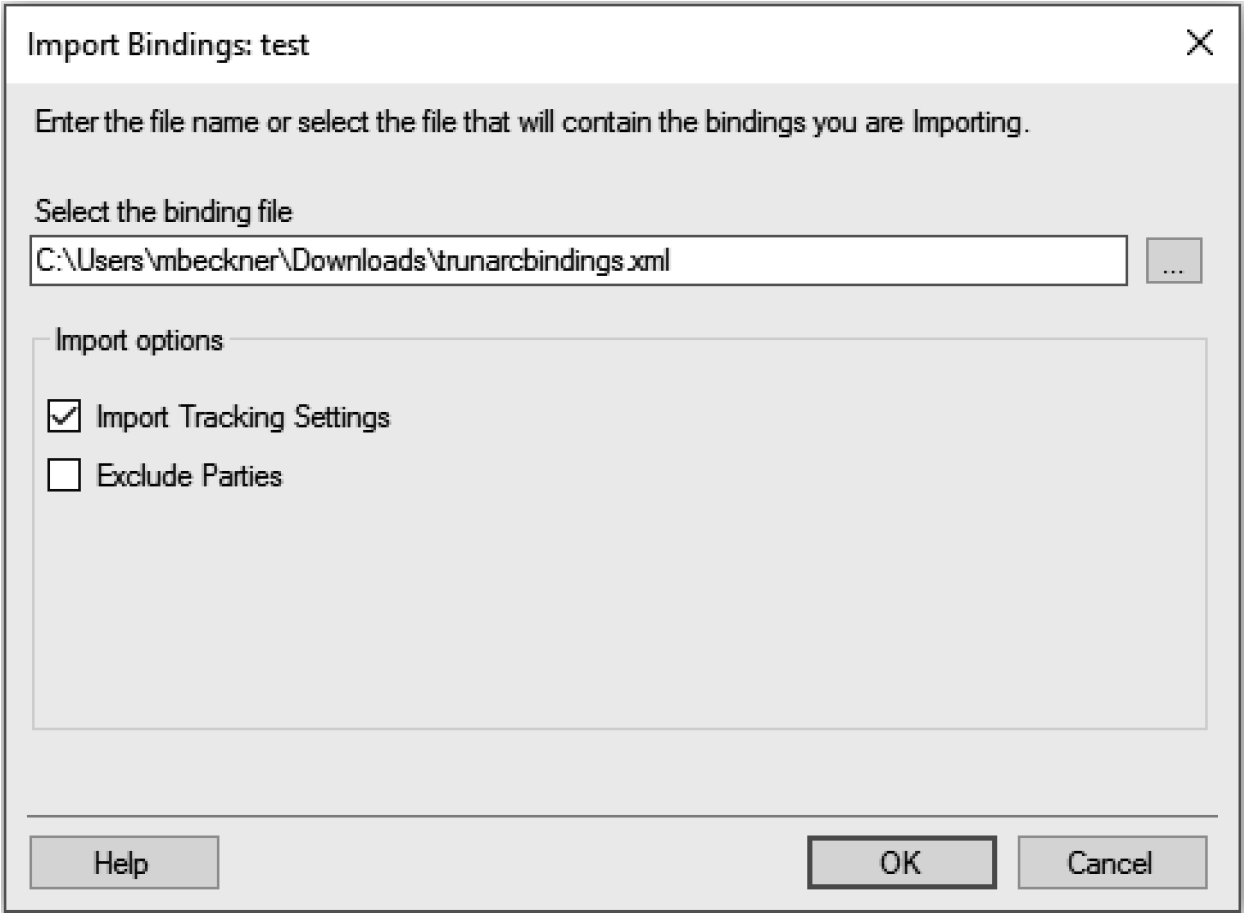
Importing the binding file can take some work. The steps are easy enough – right-click the application in the BizTalk 2016 Admin Console and select Import and then Bindings. The dialogue box shown in Figure 2.18 will be displayed. Browse to the file that you exported from your old version of BizTalk and click OK.
Upon importing the bindings file, it is very likely that you will get an error. The binding import process requires that everything match exactly in the target environment to what was in the source. For example, if you have a local path where you were archiving files on your original server, and that path was C:Archive, the binding import process will require that the same exact path exists on the new environment. If it does not, you will receive an error and must either create that directory and try importing the binding file again, or modify the binding file to alter the file path to a new path that exists on the new server.
Passwords may be converted to masked values (usually ******) when exported to binding files. If they are, you can either alter them in the binding file to their true values prior to importing, or you can change the value in the send or receive port configurations once the bindings have imported successfully. You will have passwords on ports that use FTP, SFTP, SQL, and other secure adapter types.
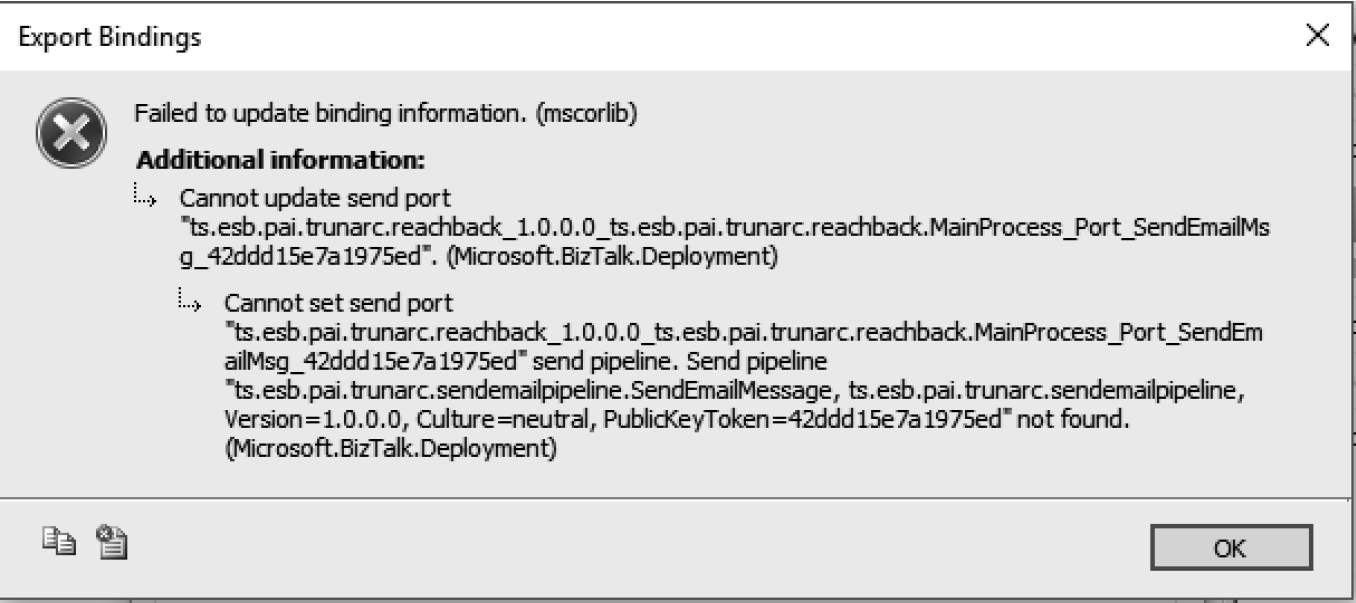
In the error shown in Figure 2.19, a pipeline assembly is missing in the target environment. The binding file is trying to set the Send Pipeline property on the Send Port, and is unable to find the missing assembly. In this case, the pipeline must first be deployed (either manually or via an MSI) before running the binding import process again.
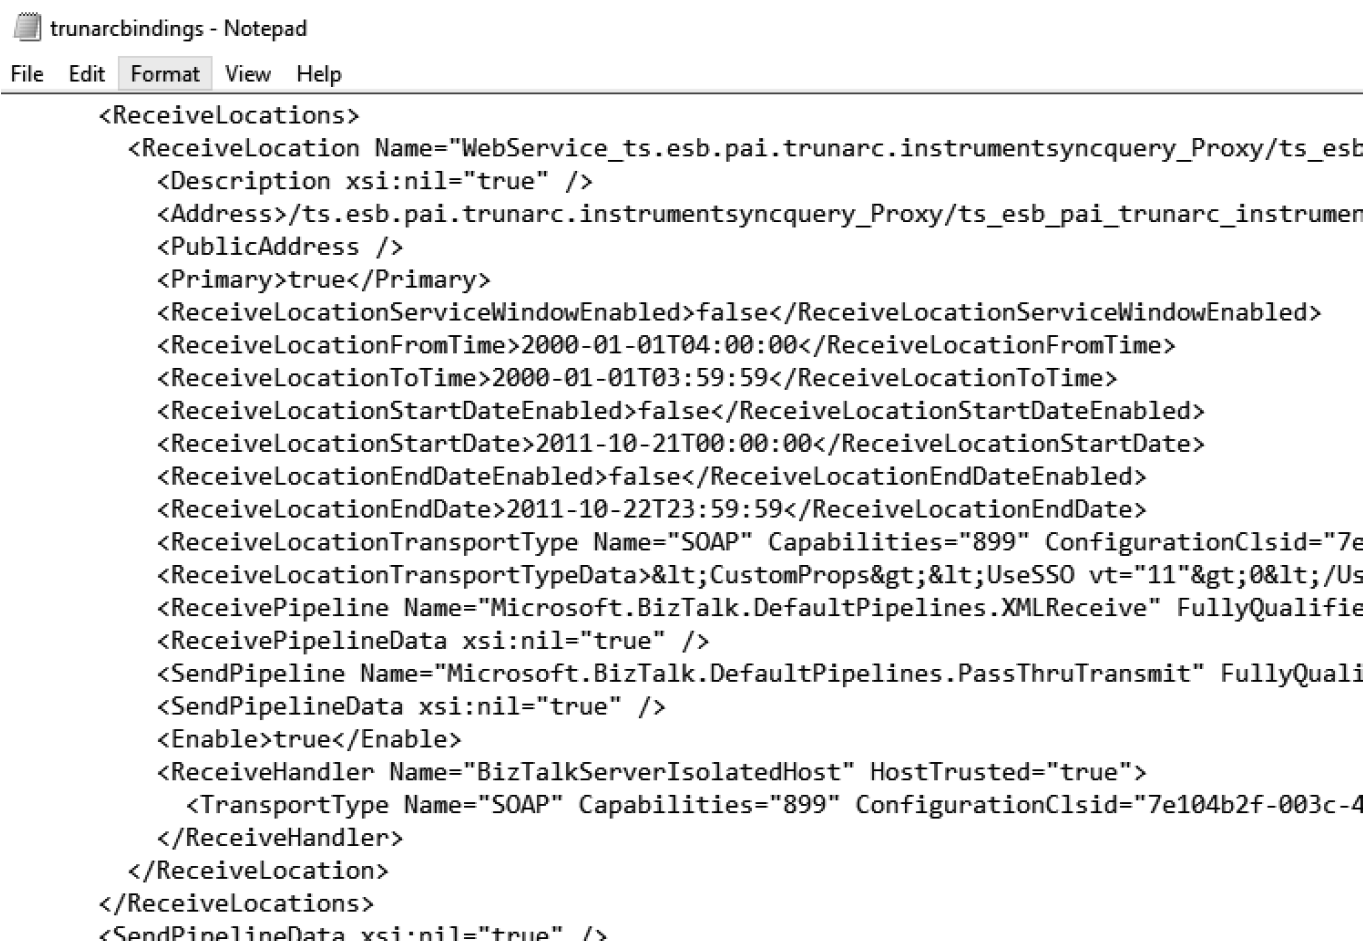
You may need to modify the binding file manually to get certain properties to point to the correct things in your new 2016 environment. The file directory example just mentioned is common; most likely you would want to change the file path from a local directory to a network share. Other common changes would be FTP server URLs, usernames, SMTP addresses, and other values that would be different between environments. Altering the bindings file can be done in a text editor (such as notepad, shown in Figure 2.20).
Validating Your Deployment
Once you have everything deployed, you can begin testing your deployment. You’ll want some sort of formal process here to make sure each component in your solution has been checked.
You’ll begin by enabling ports and starting orchestrations. In the scenario from earlier in this chapter (the orchestration exposed as a web service) the receive port listens to inbound web requests to the proxy web service hosted in IIS. You will want to create a test harness (perhaps in a C# EXE that you write, or by using a third-party testing tool like SoapUI by SmartBear) to call the web service and begin testing your solution. As you test your newly deployed solution, you will want to check for errors that would indicate that something in the code will not run as expected in 2016. The easiest way is to monitor the Windows Event log on your 2016 environment and see what exceptions may be raised.
It is very possible that your code will migrate as-is. If it doesn’t, then it will likely run but experience issues in mappings. Only by viewing the output of the full end-to-end process will you know if all your fields have mapped as you would expect. You will likely want to test each of your maps individually in Visual Studio 2015, using sample instances as the input to the maps, to make sure there are no errors. Errors and mapping inconsistencies can be masked when running in a deployed environment. See Chapter 3 for more detail on testing and upgrading maps.
Once you’ve determined if there are code changes that are required, you can decide if you want to do any of the following:
1.Do simple upgrades to the solution to make it more modern. For example, using the orchestration as a web service scenario, you may want to republish the orchestration as WCF service instead of SOAP. You can use the BizTalk WCF Service Publishing Wizard in this scenario, and immediately modernize your service without any code modifications.
2.Take steps to simplify your orchestrations or maps. This is your opportunity to make modifications that can make your code easier to work with. See Chapter 3 for ideas on how to do this.
Summary
This chapter has outlined how to deploy your solution to BizTalk Server 2016. Your goal should be to migrate the solution as-is as early in your project process as possible. From this exercise, you will quickly uncover several things:
1.The complexity of your solution. How many applications are you dealing with? How many BizTalk artifacts, individual assemblies, and manual configurations are you going to need? How much of the migration will need to be manual, versus how much can be done through MSIs and bindings?
2.How many non-BizTalk components are going to have to be migrated? There are frequently helper assemblies, custom databases, config file settings, web service proxies, and other components that are not directly part of the BizTalk engine, but that are very much part of your custom integration solution. These must be migrated separately.
3.How much of your code will you need to reorganize, update, or rewrite? If you find that your applications won’t import because you are missing assemblies, or your maps don’t work because the way they were written isn’t compatible with BizTalk 2016, then you can begin to plan for the resourcing needed to handle a successful upgrade