
Chapter 3
Visual Studio and Maps
As outlined in earlier chapters, you may have code that can be migrated without changes, or you may have to make alterations to components to get them to deploy properly. In cases where you must recompile (or want to in order to utilize the latest versions of .NET), you must upgrade your Visual Studio code base. This chapter will walk you through upgrading and recompiling your solutions, as well as testing and making modifications to your maps. You’ll look at how to migrate a map from traditional functoids to XSLT, which is a vital skill to know for advanced mapping scenarios.
Recompiling Your Code in Visual Studio 2015
You’ve worked through migrating your components as-is from an older version of BizTalk to BizTalk 2016, as outlined in Chapter 2. Now, you will look at recompiling components before deployment. While you have seen that recompiling may not be necessary to move your BizTalk solutions from an older version of BizTalk to a new 2016 environment, there are many situations where recompiling your components will be necessary. These include:
1.You have all your source code, well organized, and available. Often, with legacy solutions, the original source code has been lost, and recompiling requires piecing together code from questionable sources. If your BizTalk solutions migrate “as is” and you do not have the source code, then your solutions may still function. If you have all your original source code, then recompiling everything before deployment using Visual Studio 2015 will ensure that your compiled code is up to date and running on the latest .NET framework.
2.You have components that do not migrate “as is,” and therefore require code updates. These code updates must be done in Visual Studio 2015 and recompiled for deployment.
3.During your migration, you are adding new functionality to your processes or simplifying your architecture. Any required new component work will need to be done in Visual Studio 2015.
As a developer, you may find some of this information to be very basic. Remember that the audience to a migration will often be someone who was not part of the original development of the code and is new to BizTalk. In many of the organizations I have worked with, the people doing the upgrade not only do not know BizTalk, they frequently have not worked with .NET. Having a basic walk-through of working with Visual Studio is intended for this audience.
Let’s begin by looking at upgrading an older version of a Visual Studio BizTalk solution to Visual Studio 2015. The first step is to open Visual Studio 2015 and select the project or solution you will be upgrading. As shown in Figure 3.1, you can click on File on the toolbar and then select Open and Project/Solution. This will allow you to browse to your file.
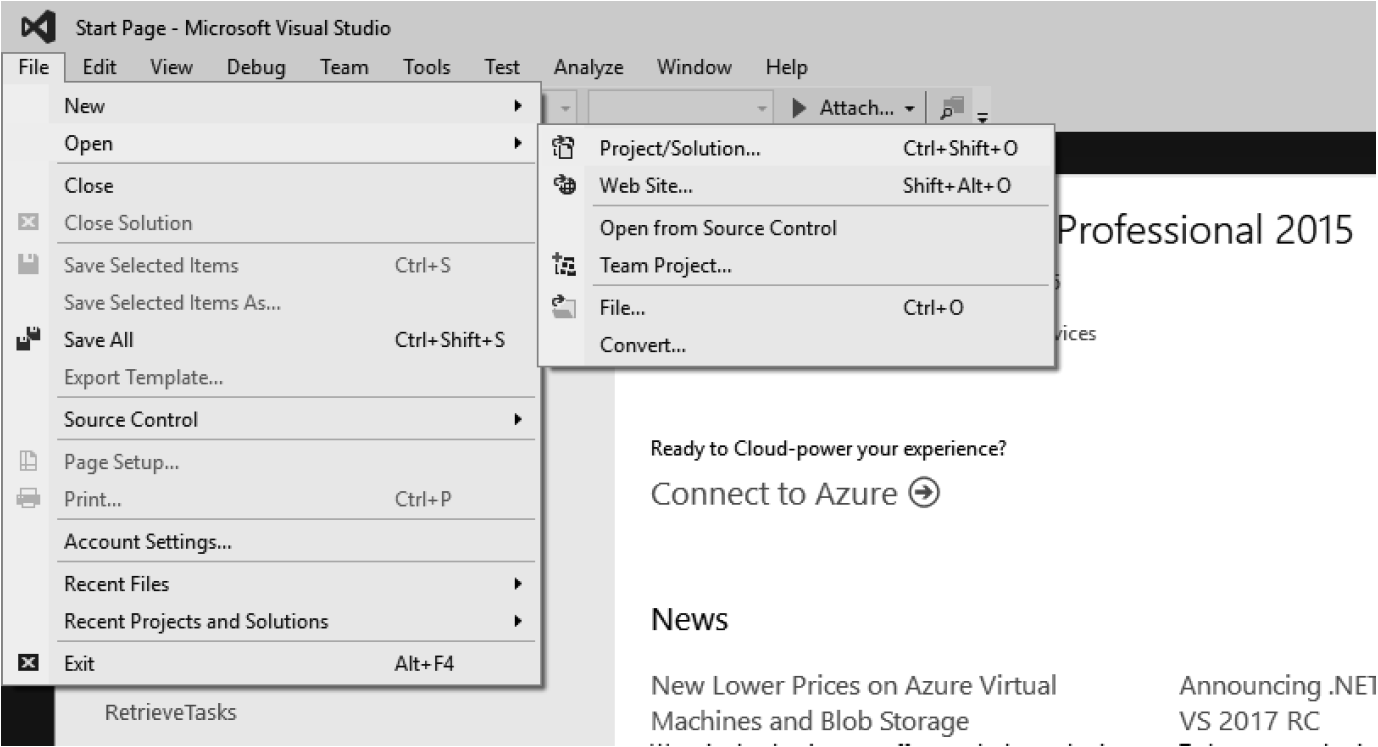
Figure 3.2 shows that the icon for the project is a Visual Studio 2010 project. You will open this older file and Visual Studio will handle the upgrade.

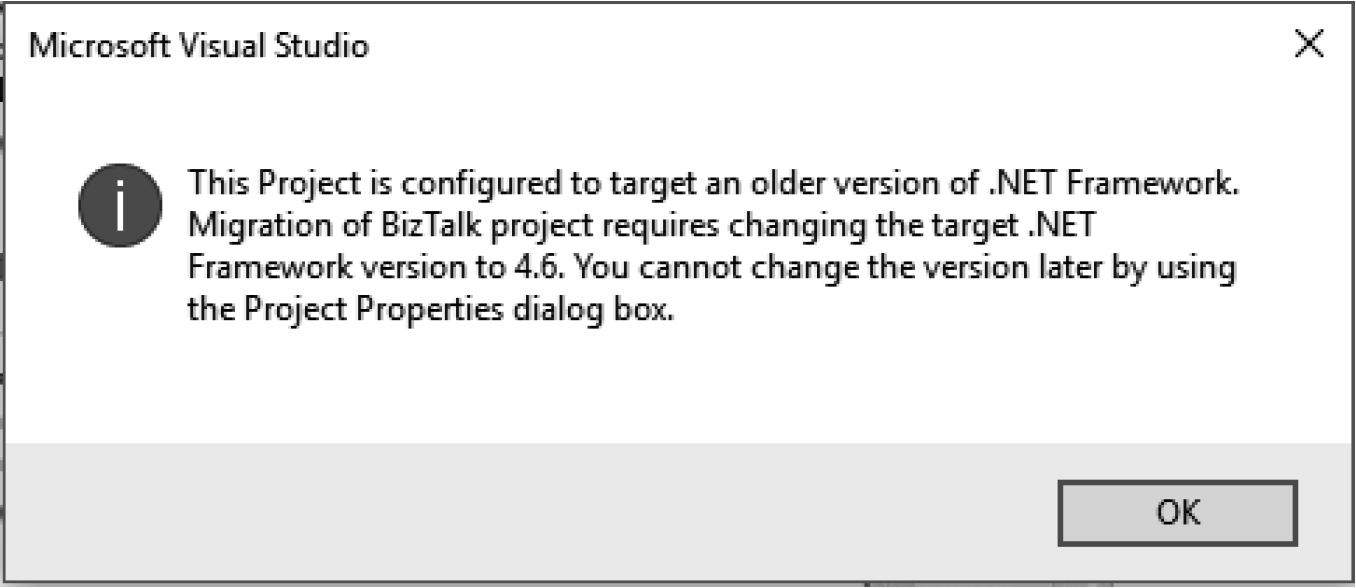
Once the solution opens, you will get a warning similar to what’s shown in Figure 3.3. You can click OK – just make sure you have a backup of your code somewhere else in case you need to refer to something in the original code.
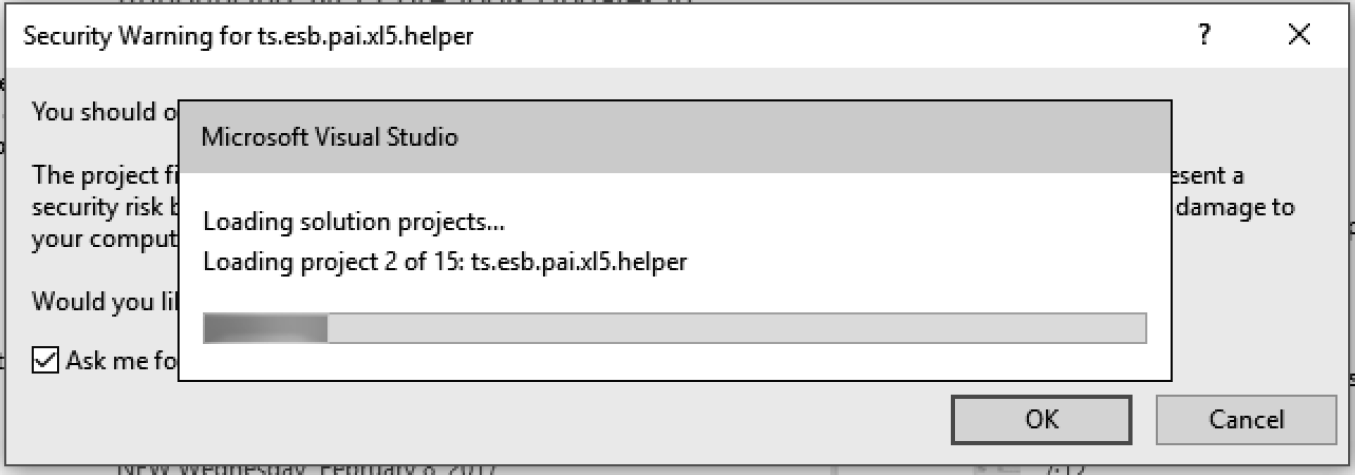
After you click OK on the warning, Visual Studio will immediately begin to load the solution (see Figure 3.4). The warning will pop up for every project in the solution, unless you uncheck the “Ask me” option in the security warning dialog box.
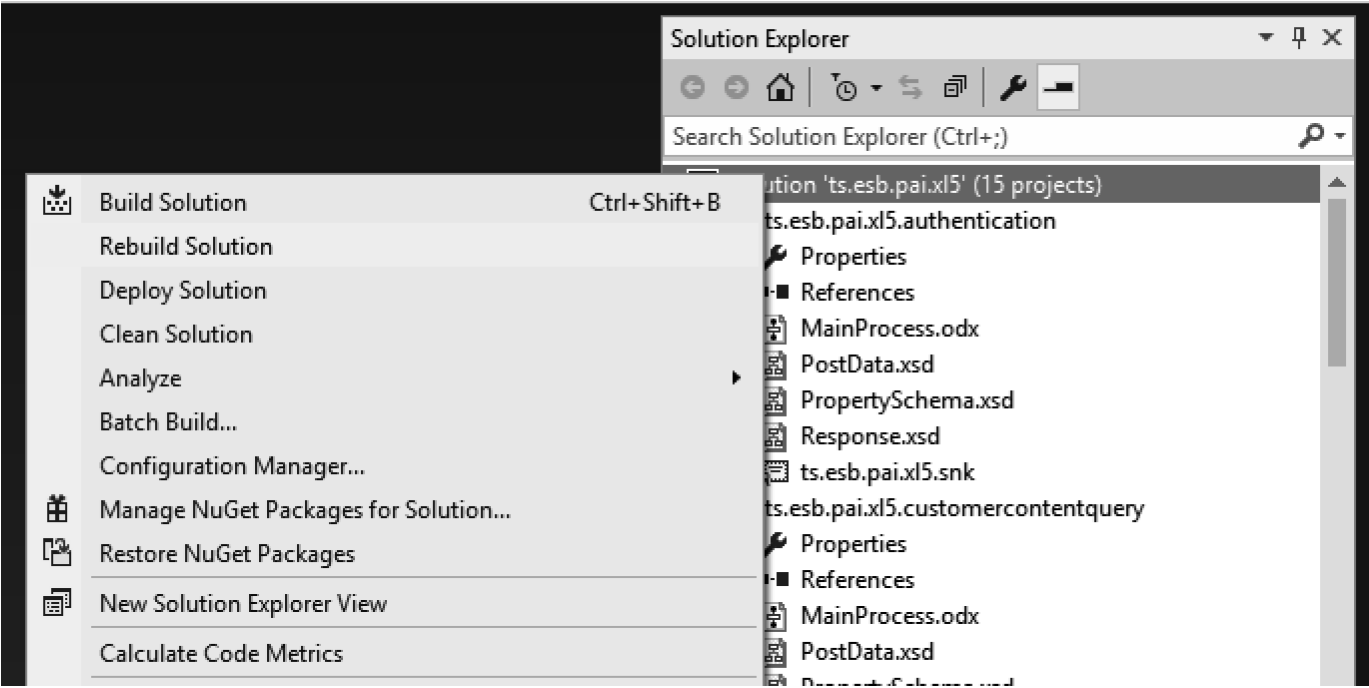
When your solution has fully loaded, you’ll want to try to build it. You should get in the habit of selecting the “Rebuild” option (as shown in Figure 3.5), as this ensures that you are forcing a recompile of all projects (or projects referenced within a single project, if you are rebuilding at the Visual Studio project level). This can be done by right-clicking the solution, or any of the individual projects, and selecting Rebuild Solution.
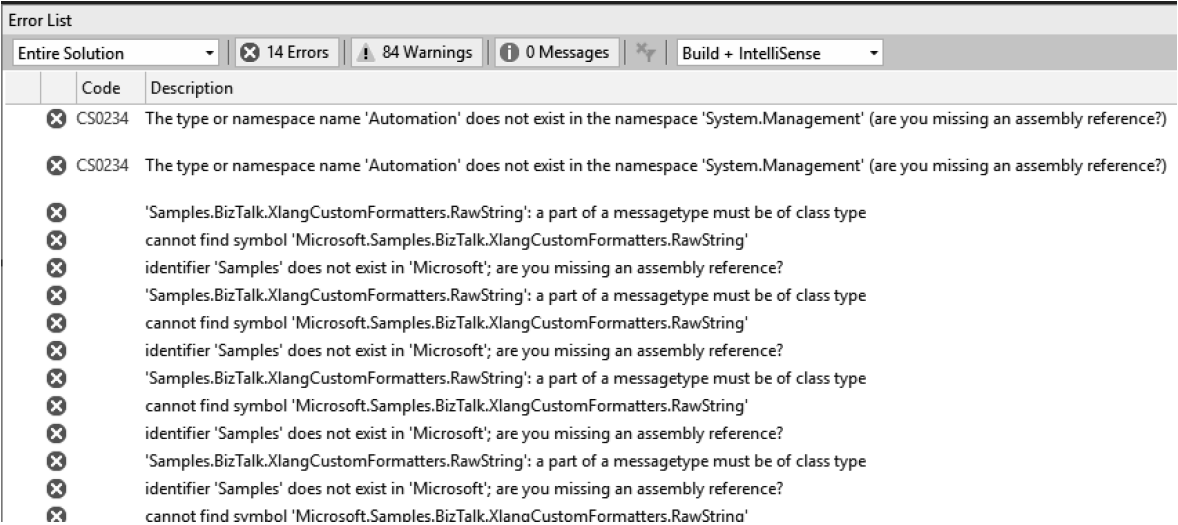
The solution used in this example and within the screenshots in this section has 15 projects associated with it. Upon rebuilding the code, we receive 14 errors, many of which are repeating (see Figure 3.6). In this case, the issue is that a referenced assembly is missing from a number of the projects. This assembly is used for email formatting in this solution, and is an assembly that was downloaded from somewhere on the internet many years ago.
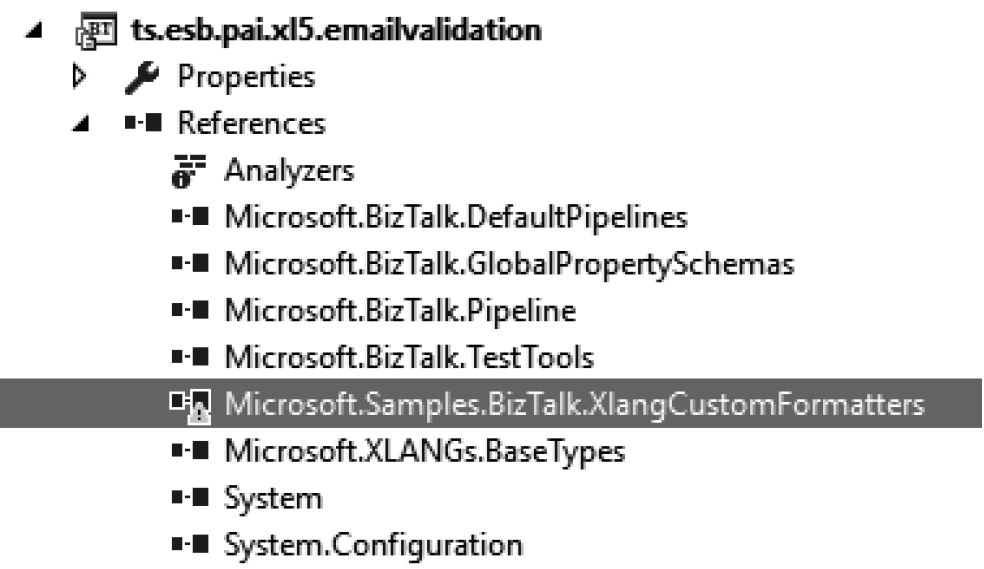
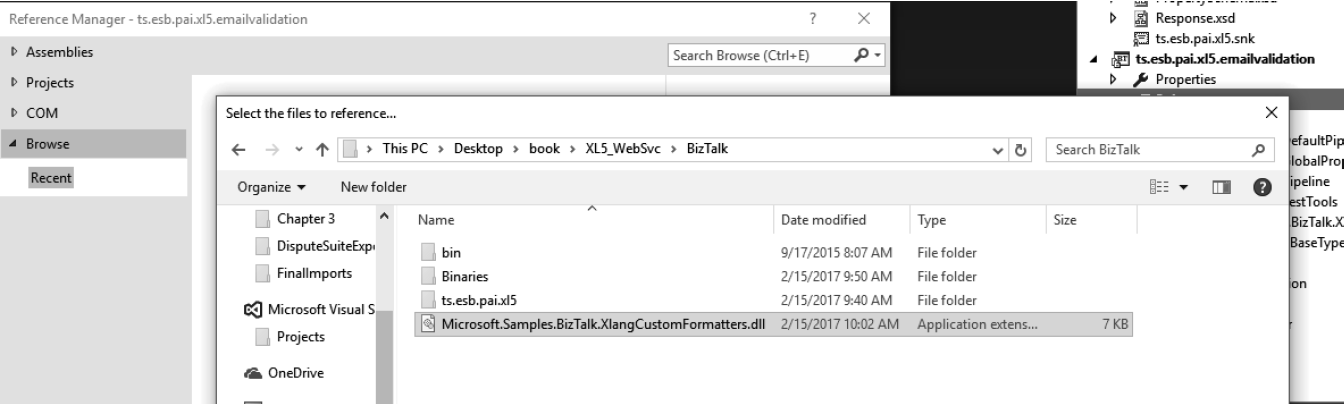
You can see in Figure 3.7 that the assembly in question still appears in the project References folder, but it can’t be found. To resolve this error, right-click on any of the projects that are missing the reference and browse to the assembly (see Figure 3.8). Updating this in one of your projects should cause it to be updated in all your projects once you build the solution again.
Thankfully, in this case, I can go to my previous 2010 BizTalk Server and grab the missing assembly. However, you may have a case where you are missing an assembly or a project, and can’t rebuild your solution. Unfortunately, your options are limited. If you can grab the assembly from the GAC on the old machine, then you may be able to migrate it “as-is.” But, if it throws errors, and you don’t have the original code, you’ll have to rewrite something!
With this assembly now referenced properly and a fresh rebuild of the solution, there are now only two errors, both coming from a C# class library assembly. This assembly is referenced within the projects from the various orchestrations, and is used to interact with a SQL server database. The code in this is pretty ancient, and there shouldn’t be anything in it that doesn’t migrate, but this error indicates that “Automation” does not exist in the System.Management reference (see Figure 3.9).

Clicking on the .cs file within the class library project and scrolling to the top of the file causes this error to convert to a warning. The warning shows that the “automation” assembly reference resulted from a change in the .NET framework. The other warnings indicate that a call used to pull configurable fields from the BizTalk configuration file has been deprecated but, in this case, is still completely functional and valid. At this point, the errors are all resolved and the solution completes the recompiling of all the assemblies (Figure 3.10).
After the Visual Studio code upgrade process, there often are temporary errors the compiler has to work with that will automatically resolve on their own. If you run into issues that make no sense, try closing out of Visual Studio and reopening the project files. This frequently will resolve issues as well.

In this example, no further code changes are required to get the code to compile. This does not mean, however, that the maps and orchestrations will work exactly as they are supposed to. All components must be deployed and tested to validate that they function as they should.
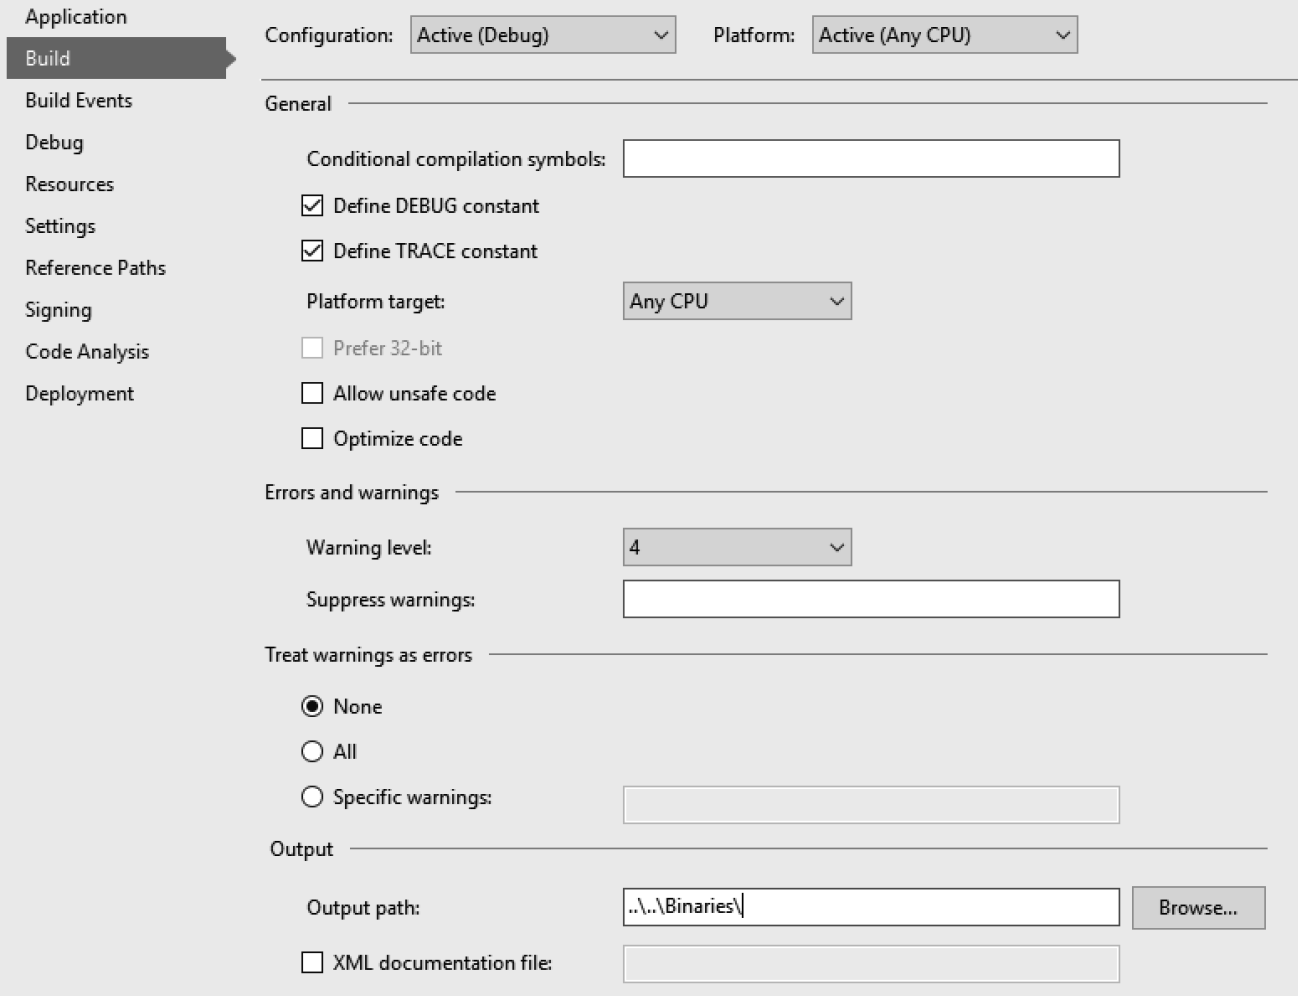
With solutions that contain multiple projects (which virtually every well-organized BizTalk solution should have), you can save time by compiling your DLLs to a single file directory. The default is to have these compile within a subfolder of each directory, which means that in order to deploy you must browse to a different directory for each assembly. Instead, you should modify the default output path on the project properties to a single top level directory where all assemblies can be written to. Figure 3.11 shows the project property settings and a relative path in the Output path. This path is defined as ...Binaries, and this can be used in every project to push to a top-level folder called Binaries.
Restructuring Your Code in Visual Studio 2015
As mentioned in Chapter 1, you need to work to always ensure you have small projects that compile down into unique aspects of work. For example, the project shown in Figure 3.12 has many maps in a single project. This compiles into a single DLL and can be both resource intensive and difficult to maintain and update.
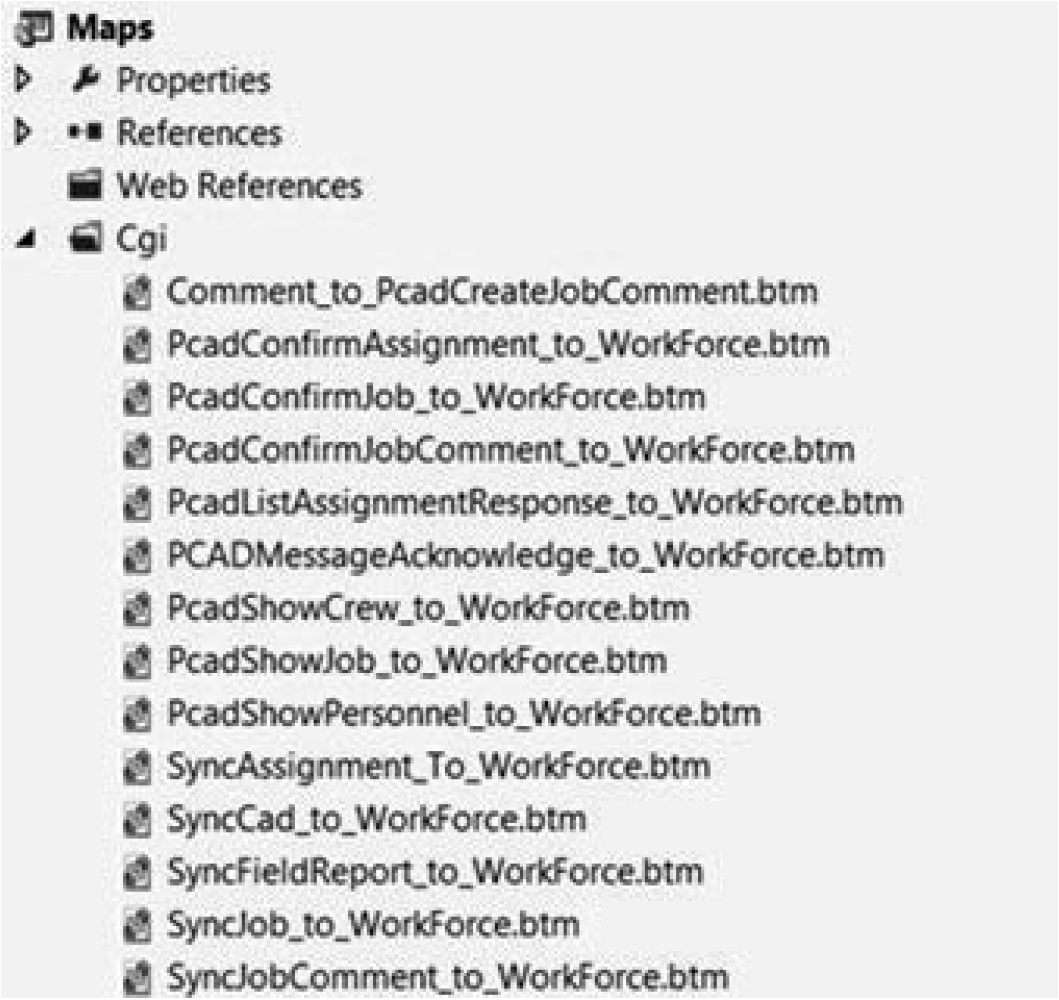
The developer who created this apparently decided to organize the BizTalk solution so that a single project had all the maps for the various pieces of work. What happens here is that all these maps compile to a single assembly. That means several things:
1.Any time one of these maps is called, the whole assembly must instantiate, requiring more system resources than if the map were compiled into its own separate assembly.
2.Any time an update to one map is needed, all the maps must be recompiled and redeployed. This makes any production deployment substantially more difficult and often means having to stop production processes while the deployment takes place. If the map was compiled into a single assembly, it could be deployed in a few seconds with only a restart of the BizTalk host required.
3.The map project is referenced by a variety of projects, which means any time a build occurs, all of these must be rebuilt.
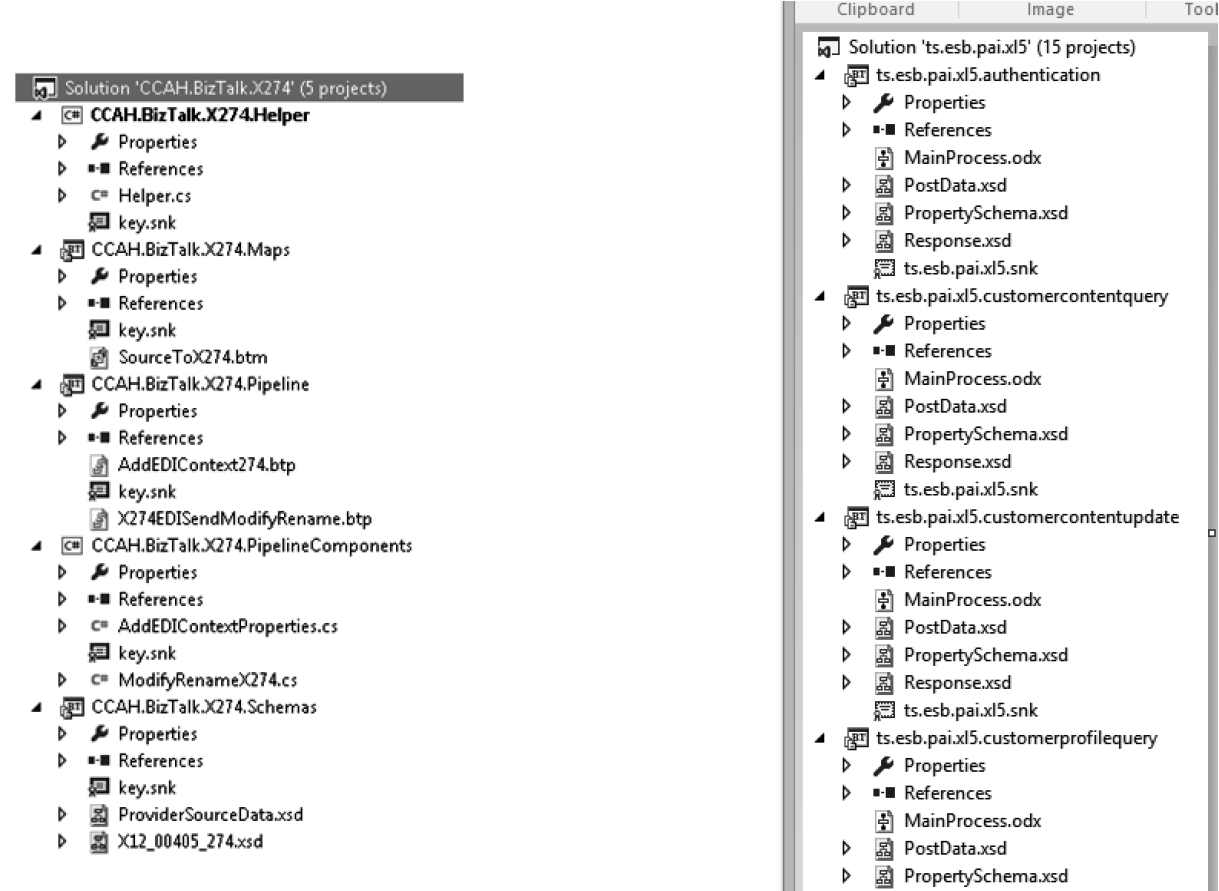
The correct architecture here is to split these maps into individual projects (and therefore assemblies, since every project builds to its own .NET assembly). In most cases, that means one map per project. In cases where multiple maps may be chained together within a single process, these maps would reside in a single project. Your goal should be to have as few artifacts in each project as possible and to split these out into as many individual project as you can.
In this restructuring, you will also want to be smart about how you name your projects. Using namespacing allows for ease of organization as well as naming. I will typically name a solution CompanyName.BizTalk, and then add projects to that solution that look like CompanyName.BizTalk.ProjectName.TypeOfProject. In practice, this looks like what is shown in Figure 3.13. On the left is a solution with projects split out by component type, while on the right the solution’s projects are split out by the type of work the project is doing. In both cases, I can keep the unique pieces of code separate from one another to ensure I have an easy way to deploy my code.
Testing Upgraded Maps
There are two ways to test maps. The first is from within Visual Studio, the second after deployment in a working scenario. To test from Visual Studio, you must have a valid instance for the source data. In some solutions, this will be easy to come by – in others, especially where multiple maps are used in succession within an orchestration – it may be more challenging. The easiest way to test is usually within Visual Studio, as it allows you to immediately see whether your code will still work in this upgraded version. In order to test your map in Visual Studio, take these steps:
1.Every map has a source and a target schema. You will need a valid XML or flat file instance for the source. Ideally, you have an archive of these documents you can pull from your old production BizTalk environment. If not, you may have to do some work to find an instance. This could include adding logging to your current production BizTalk system (that you are upgrading from) so that you can capture an XML document that matches the source schema to your map.
2.Right-click the map and select Properties.
3.For the TestMap Input property, set this to XML (or native if you are working with a flat file).
4.For the TestMap Input Instance property, browse to the XML instance you have from Step 1.
5.Set both the Validate TestMap properties to False; there is no need to validate the input or output now.
6.Right-click the map again and this time select Test Map. This will give you any errors that may have occurred. If no errors occur, this will give you the output XML file. You can view this output by holding Ctrl and clicking on it.
Look at the output that was created and compare it against a document of the same type in your current production system. This should tell you whether any discrepancies exist. Pay close attention to the output of any C# Script functoids, custom functoids, database lookups, or other complex functoids. These are prone to issues post-migration, and may have unexpected output that needs to be addressed through mapping updates.
Making Code Changes to Maps
You may find that your maps do not function as you would expect when you test them. Or you may find that the maps are so complex that they are virtually impossible to work through and make modifications to. If you are forced to make code changes to your maps, you will want to take the opportunity to rethink how your maps are programmed. Instead of using traditional functoids and relying on the mapping user interface, now is the time to look at XSLT as an option. XSLT is a powerful, versatile, and easy-to-learn language.
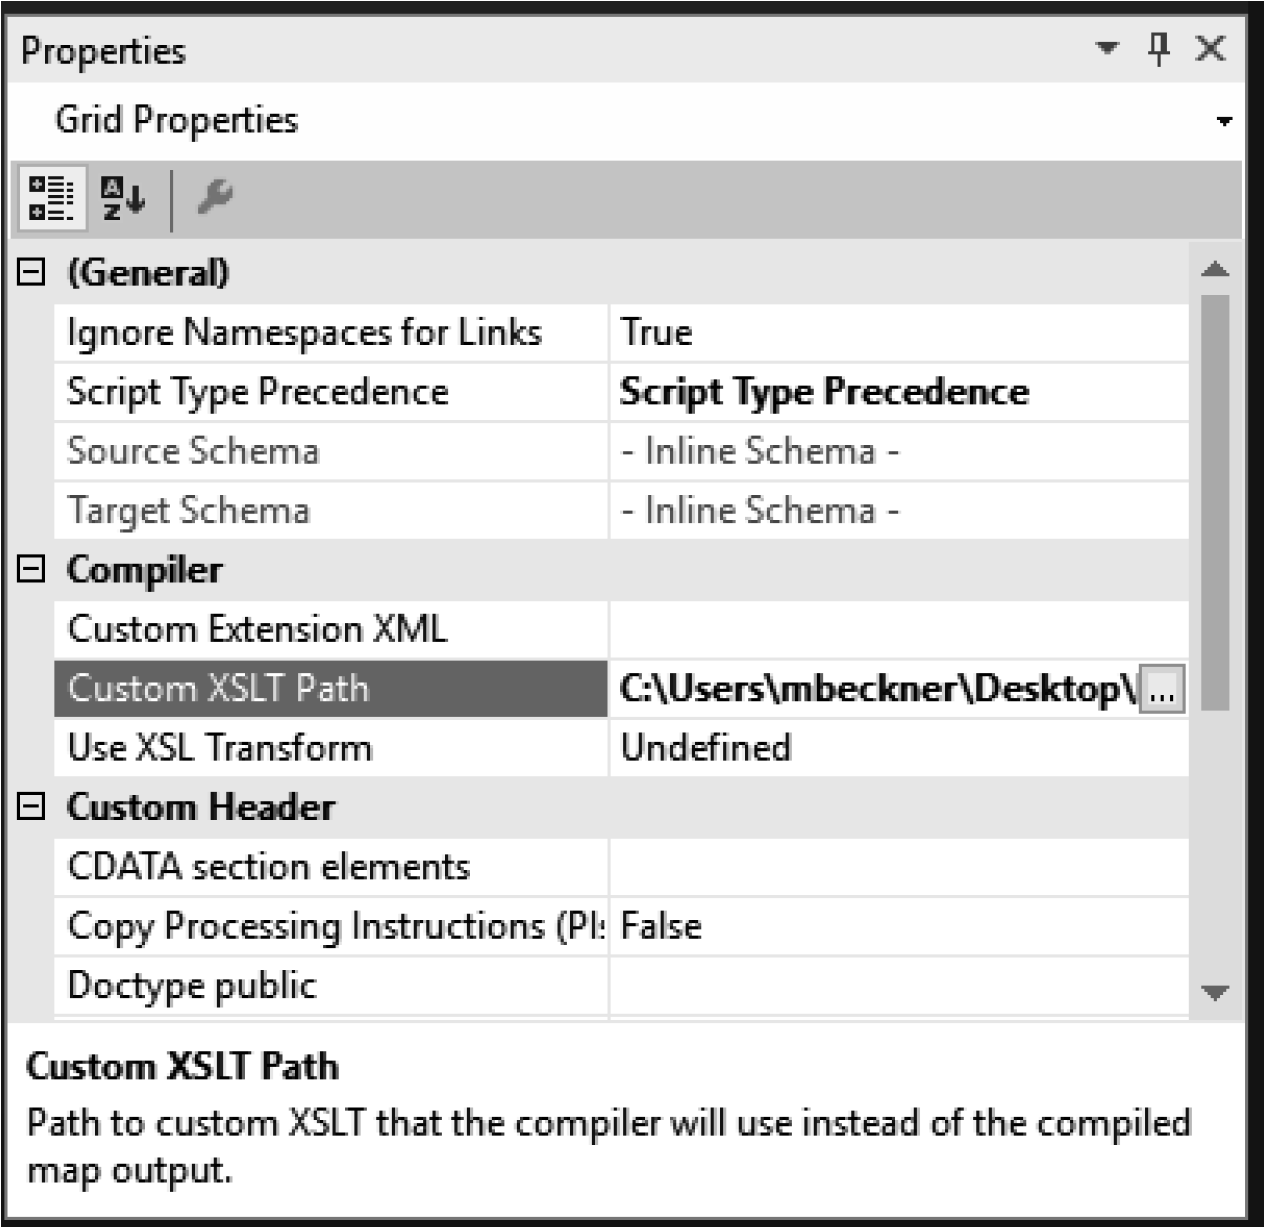
A map can consist of Inline XSLT, which allows you to combine standard functoids with XSLT script, or it can be entirely XSLT-based, and can reference an external XSLT style sheet. We’ll look at examples from the first, as it is the most versatile and the one you’ll want to incorporate into your mappings. The second can be done by setting the Custom XSLT Path property on your map – just click on the map surface, and you’ll see the property (Figure 3.14). You can browse to an XSL sheet that you have developed externally.
Note that there is a new property in BizTalk 2016 called “Use XSL Transform.” This was first released in a cumulative update for BizTalk 2013 R2. The way maps are compiled was changed in that version of BizTalk, and in doing so caused some mappings to no longer work as expected. One example was Boolean values used in Inline C# Script functoids. This property will allow you to override the new compiler and force BizTalk to compile your maps the way they were historically. If you see issues in the way Booleans are handled or other anomalies during your testing of BizTalk, you should try swapping this field to True or to False (default value is Undefined) and retesting. Doing so may save you some extensive debugging.
The way BizTalk maps are compiled by the Visual Studio compiler engine is different in BizTalk 2016 than in most previous version of BizTalk. You may need to experiment with the Use XSL Transform property in your map for certain code in functoids to work properly.
Inline XSLT Basics
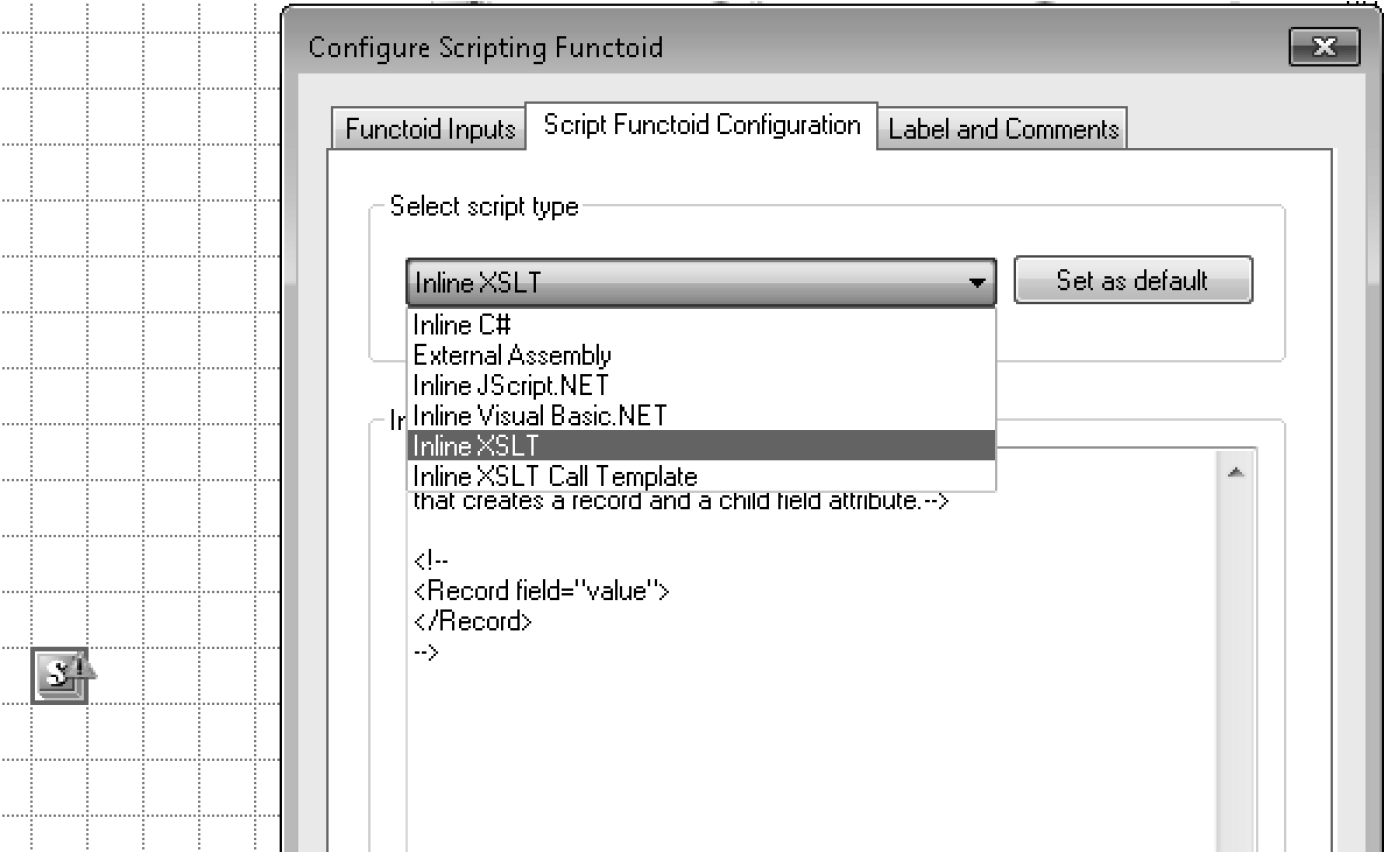
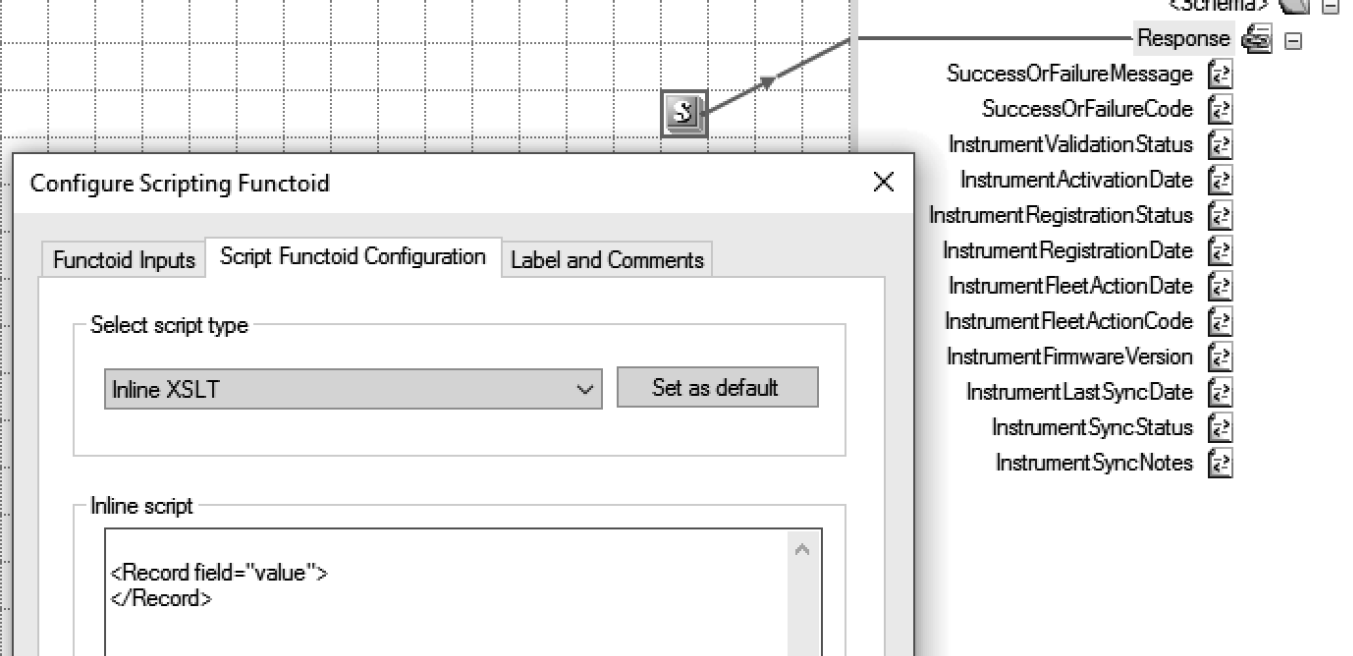
Inline XSLT is the most versatile code option you have within the mapper. Drop a Scripting functoid on the map surface, right-click it, and select Configuring Scripting Functoid. You can select either the “Inline XSLT” or the “Inline XSLT Call Template” option from the drop-down menu, as shown in Figure 3.15. The primary difference between these two is that with “Call Template” you can pass in parameters to your XSLT script, while you cannot do so with the other option. An example of passing parameters into an XSLT template is shown later in this chapter.
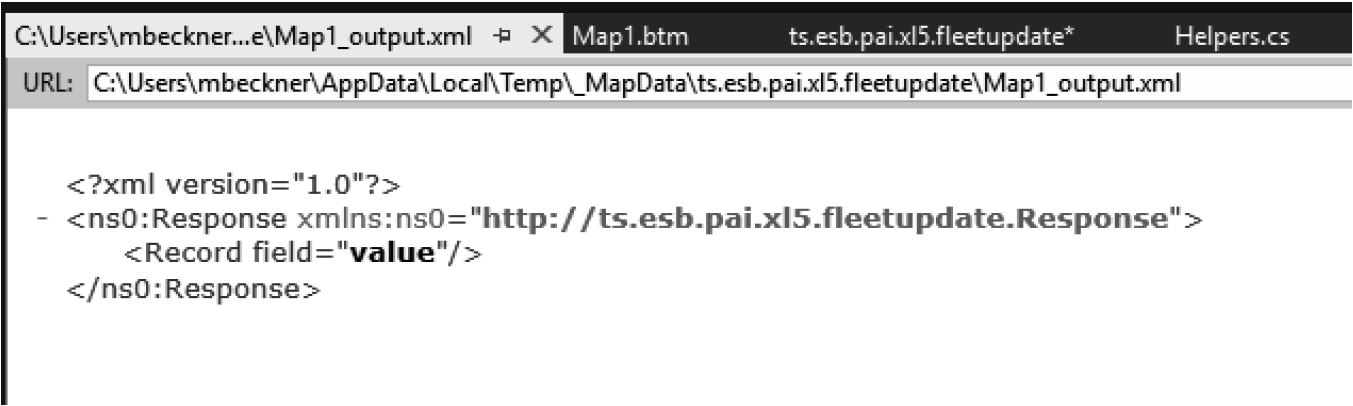
When you first select the Inline XSLT option, it will give you a simple script that has been commented out. To get your bearings, remove the comments so that your script is just the <Record field="value"></Record> statement. Then, connect the output of your Scripting functoid to the root of your target schema (see Figure 3.16).
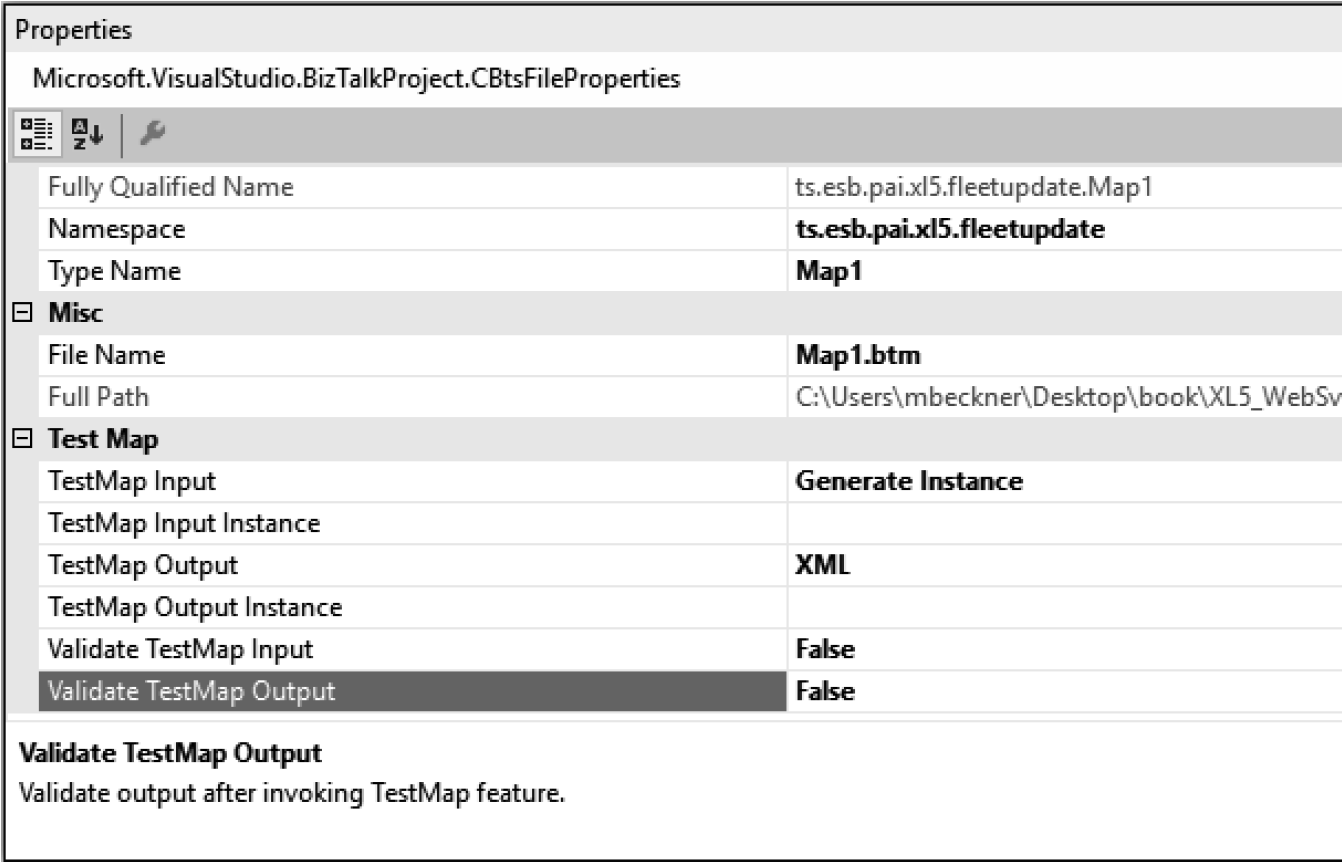
Next, you will want to test this and see what it produces. Right-click on the map and select properties. Set both the Validate TestMap Input and Validate TestMap Output properties to False. Setting these will free you up so that the Visual Studio tester isn’t concerned about the structure of your testing inputs and outputs. The TestMap Input property for now can be left to Generate Instance, but if you have a valid XML instance to use as your source, it would be great to set this property to that file now. Figure 3.17 shows all these properties for reference.
During development of your maps, you will want to set the Validate TestMap Input and Validate Test Map Output properties to False. Once your maps are complete and you are producing the output you want, you may want to re-enable these flags. You’ll then be able to fine-tune the output so that it matches what the schema is expecting.
You can now right-click your map file and select Test Map (as shown in Figure 3.18). In the Output window of Visual Studio, you will see a link next to “The output is stored in the following file.” Hold down the Ctrl key on your keyboard and click this link. It will open the output, which will look like what you see in Figure 3.19.
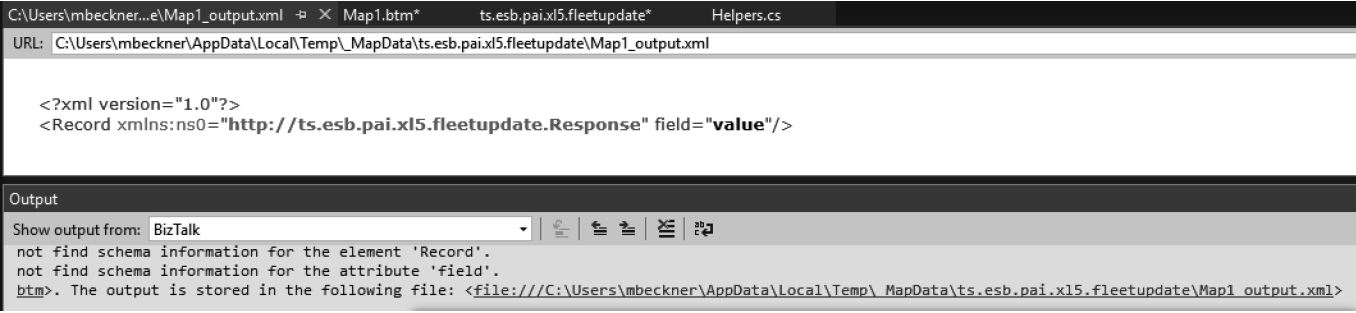
As you can see, the Record node is placed at the root level of the document. This is because the output of the XSLT Inline script is pointed to the root node. Now, move the output of the functoid to one of the child nodes in the target schema, as shown in Figure 3.20.

Testing this will place the Record node that is in the XSLT script as a child node of the Response node – even though the schema itself has no element named Record. You can force any sort of structure or standard into the target document. Figure 3.21 shows this.
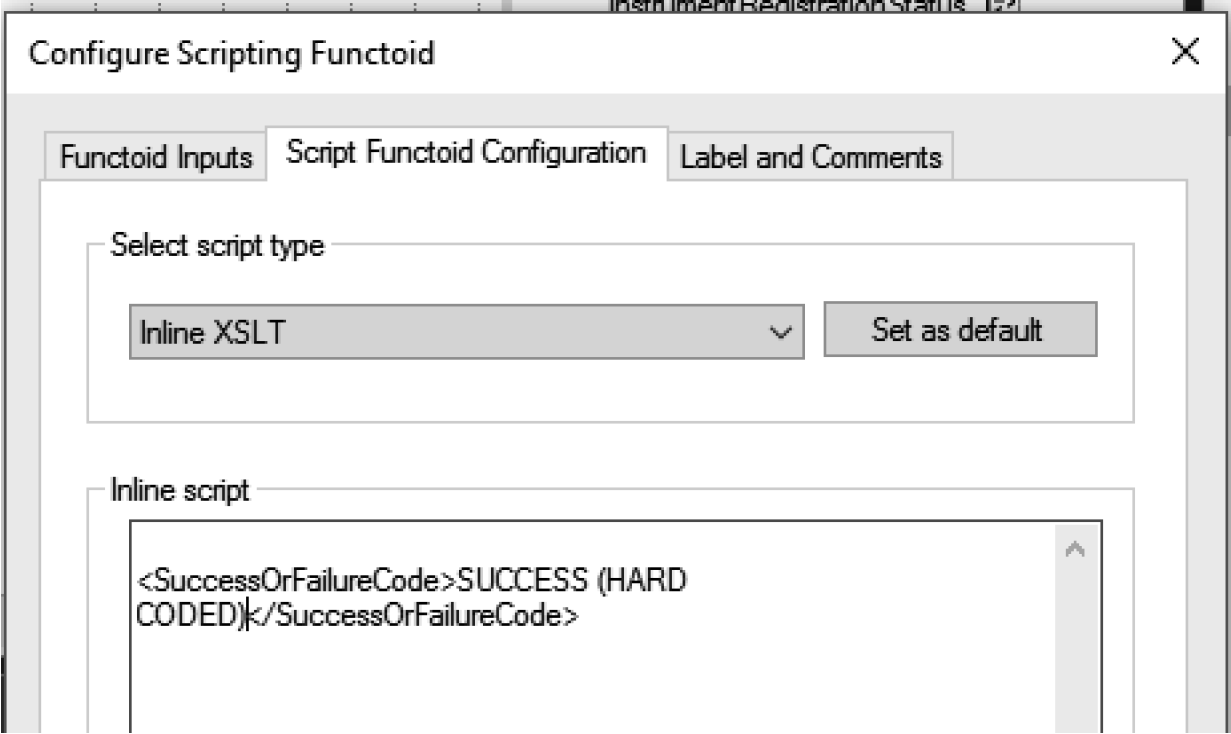
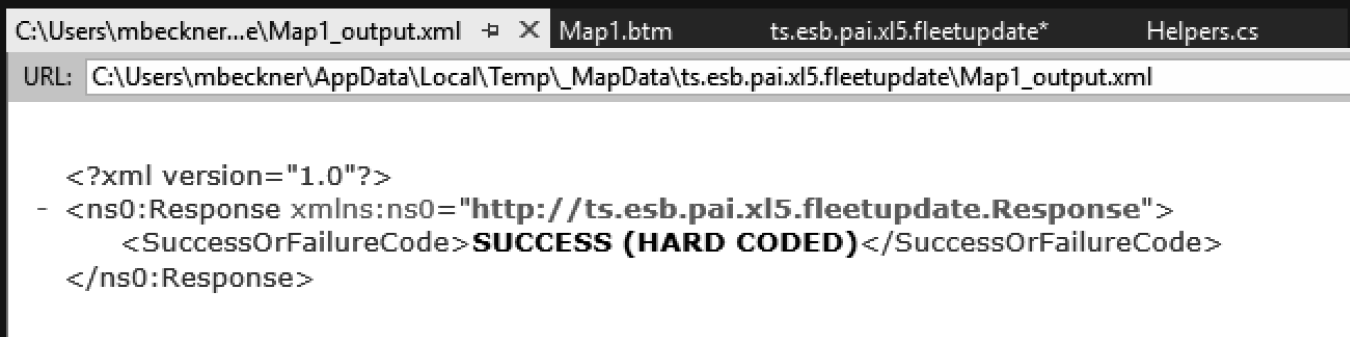
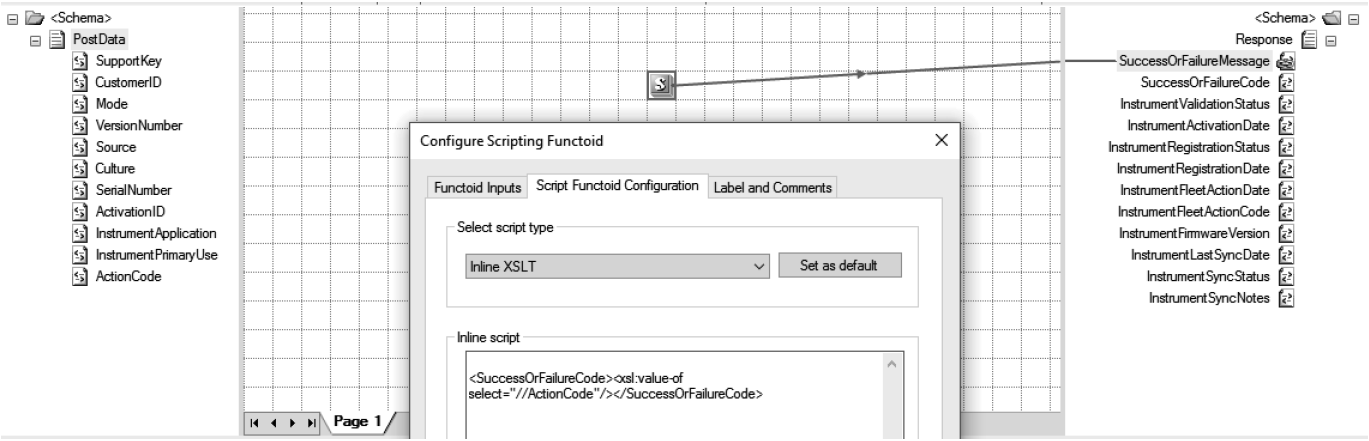
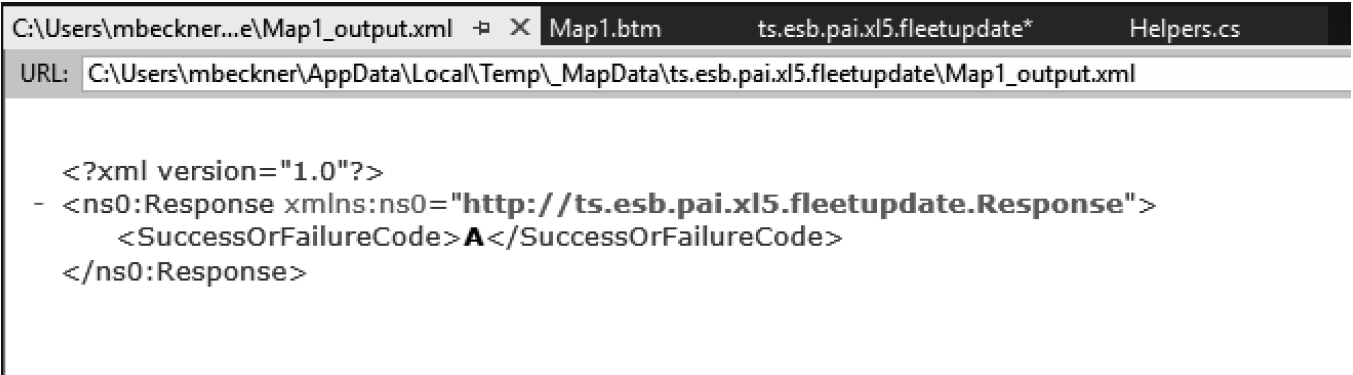
Now, looking back at the script, alter it to give the name of the target node. In this case, the target that we are mapping to is called <SuccessOrFailureCode>, so the XSLT will change accordingly (as shown in Figure 3.22). In this example, we’ve added a value of SUCCESS (HARD CODE) as a hard-coded value in the script. The output of this is shown in Figure 3.23.
In many cases, your target schema and output XML instance will contain namespace prefixes at some of the element names. To find out if your situation will require them, right-click your target schema and generate a sample output XML instance. If this shows ns0 (or similar) in front of element names, then you will need to add these prefixes into your XSLT code. This can be done by typing them directly into the node name, such as <ns0:SuccessOrFailureCode>SUCCESS</ns0:SuccessOrFailureCode>.
Finally, we’ll make the value in the output dynamic. This is done by pointing the XSLT script to a location in the source data where the data will be pulled from. There are many ways to traverse the source XML document. An example of a source schema is shown in Figure 3.24, while the XSLT updated mapping is shown in Figure 3.25. In this example, the script is going to look for the first occurrence at any location within the XML document of the ActionCode node. Using the dynamic script will cause the value in the source to be placed in the target node, as shown in Figure 3.26.
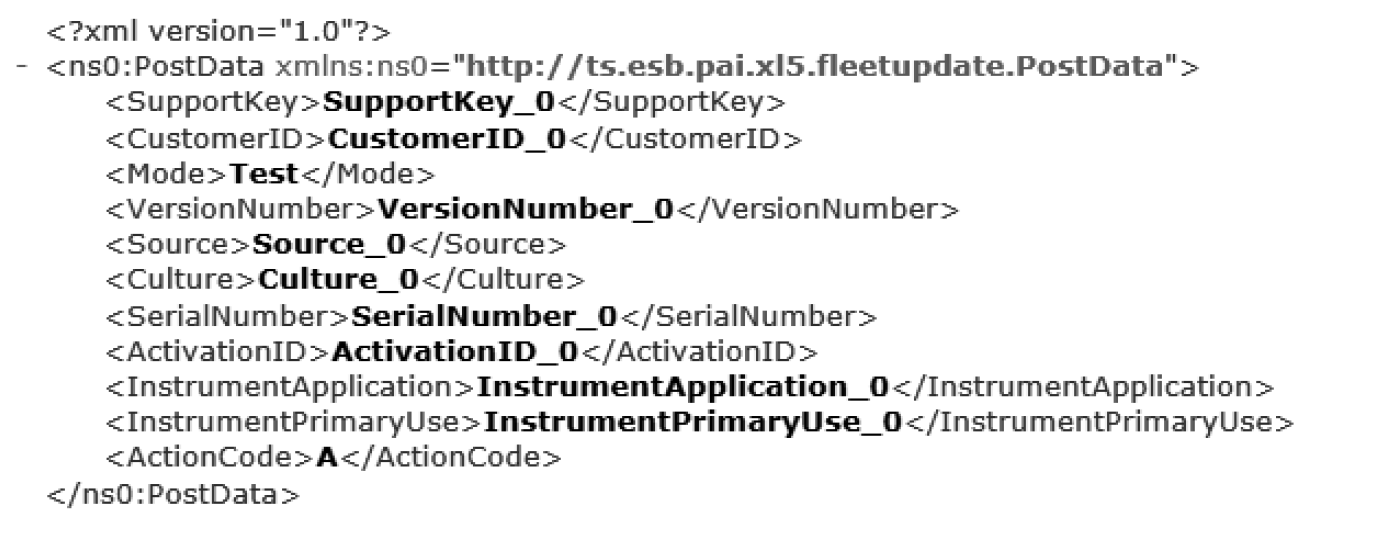
The source schema is very simple, and this node occurs only once, so there are variety of ways to get at the data, including:
1.<xsl:value-of select="//ActionCode"/>. Finds the node anywhere within the source document.
2. <xsl:value-of select="/*/ActionCode"/>. Looks for ActionCode at the second level under the first node in the document.
3.h<xsl:value-of select="//*/ActionCode"/>. Looks for ActionCode at the second level under the any node in the document.
4.<xsl:value-of select="/*[local-name()='PostData']ActionCode"/>. Looks for ActionCode under the PostData element in the source. The use of local-name() is required in this case, because the PostData node has a namespace prefix. Referring to it simply as //PostData does not work, as there is no element which matches that name exactly.
5.<xsl:value-of select="//ActionCode[1]"/>. This selects the first instance of the element that matches the XSLT. In the example we are using, there is only one ActionCode, so there is no need to declare this. In many cases, however, you will be working with more complex XML schemas, and there will be looping and recurring nodes. You may need to look at a specific instance of a value, and this allows you to access it much as you would an array in C# or other languages.
Most of the work in XSLT is experimentation. It can be tricky to get the logic correct at times, but it is a very simple language to learn, and one that you can figure out in an hour or two. Incorporating this into your maps is a must, and there is no better time than when you are forced to upgrade a map to add it in.
Passing Input Parameters to XSLT
You just looked at the basics of inline XSLT programming. The other option within the Scripting functoid is the XSLT Call Template. This acts the same as straight inline XSLT programming, except that you have the ability to pass input parameters into the code. Input parameters will work exactly as they would if you were passing them into a C# Script functoid. Figure 3.27 shows an example of passing in two input parameters from the source document you just looked at earlier.
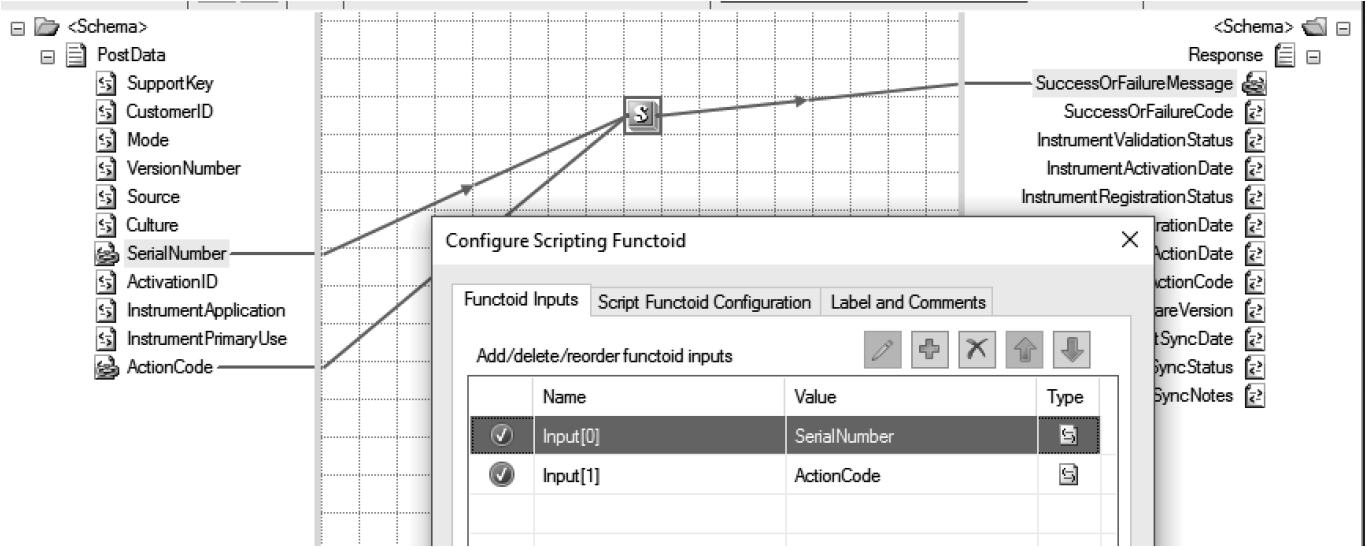
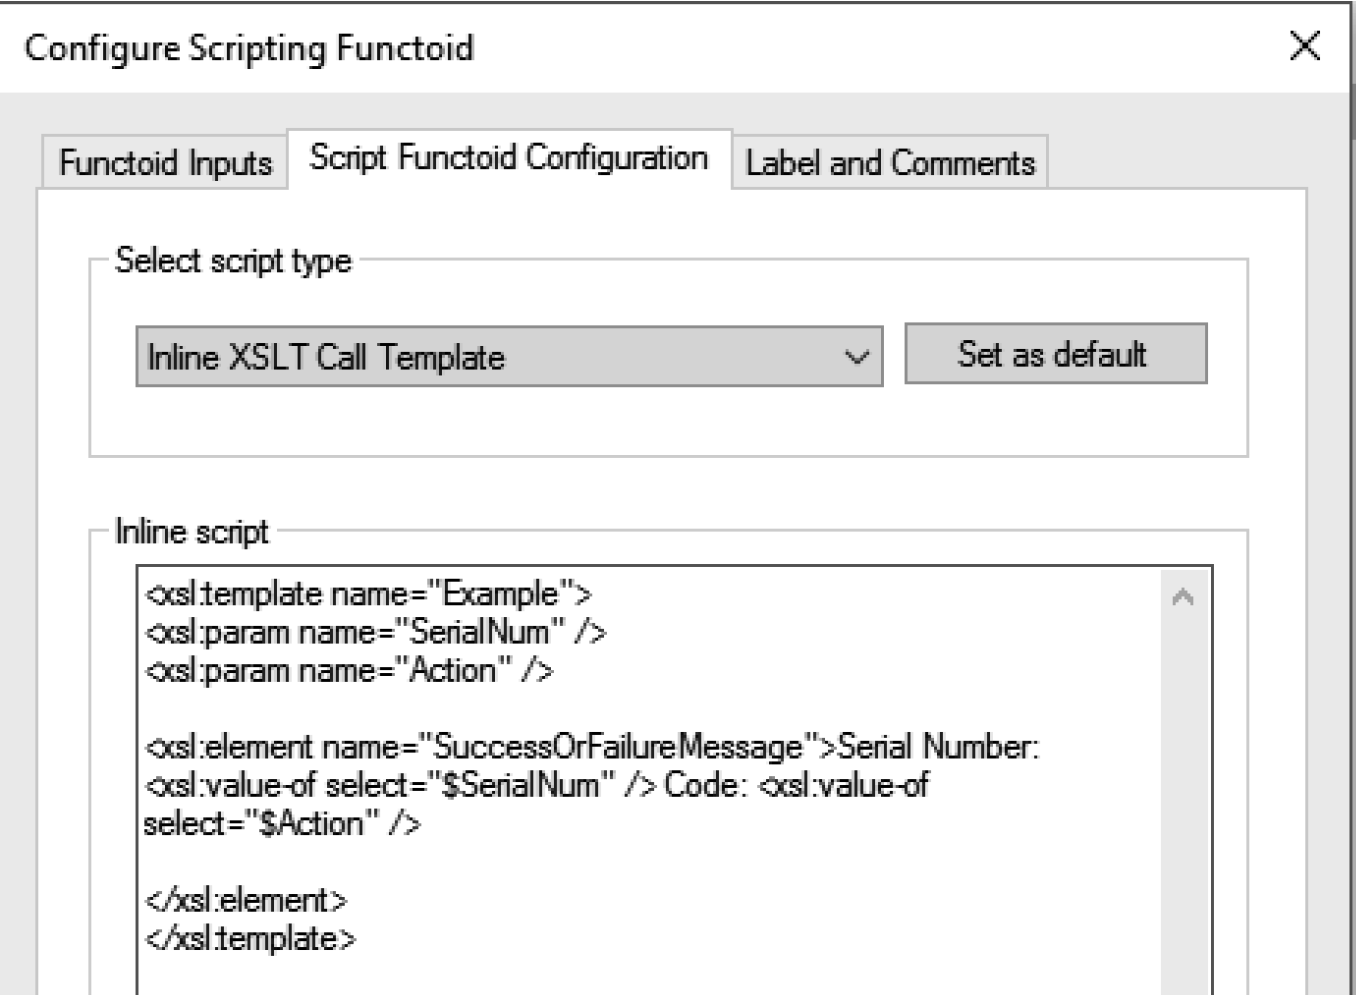
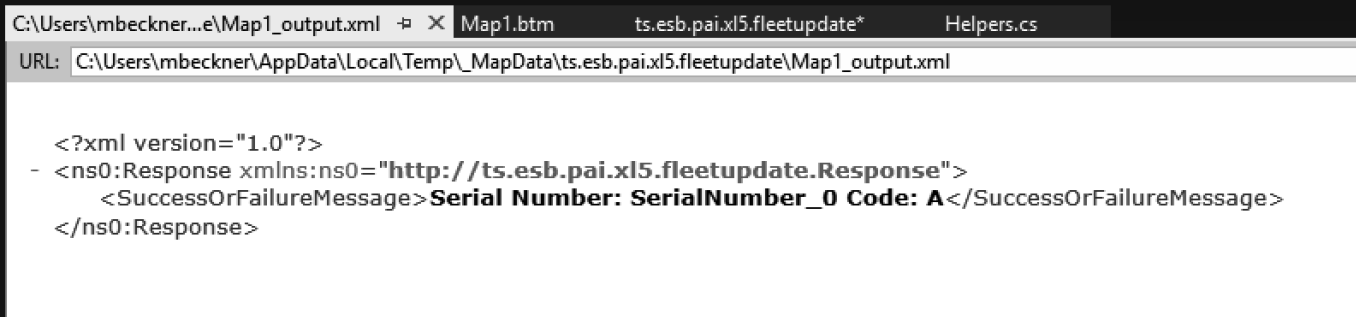
In the script (shown in Figure 3.28), there are two input parameters declared. These are declared in the same order that the inputs in the mapping interface are placed (SerialNumber is first, ActionCode is second). These parameters can be named anything you would like; they do not need to match the source node values. In this example script, these two parameters are used to create a simple output message, which will be placed inside of the SuccessOrFailureMessage node.
The output is shown in Figure 3.29.
Calling .NET Assemblies from XSLT
XSLT is a scripting language and has limitations for what can be done within it. In cases where you need to have complex logic – such as looking up data from a database or calling a web service – you will need to shell out to another component to do the work. Within the BizTalk map, you can allow your XSLT to call an external .NET assembly with relative ease.
Let’s assume you have a C# class library function ready to be called. You’ve tested this function and are able to call it from a Windows test application or other C# component. Now, you want to call it from XSLT. You must begin by creating an XML file that can be used to reference the assembly from within your map. The following XML document is an example of referencing an existing assembly. Notice that it contains both the AssemblyName (including the PublicKey) and the ClassName (this is the class where the function you will be calling is contained).
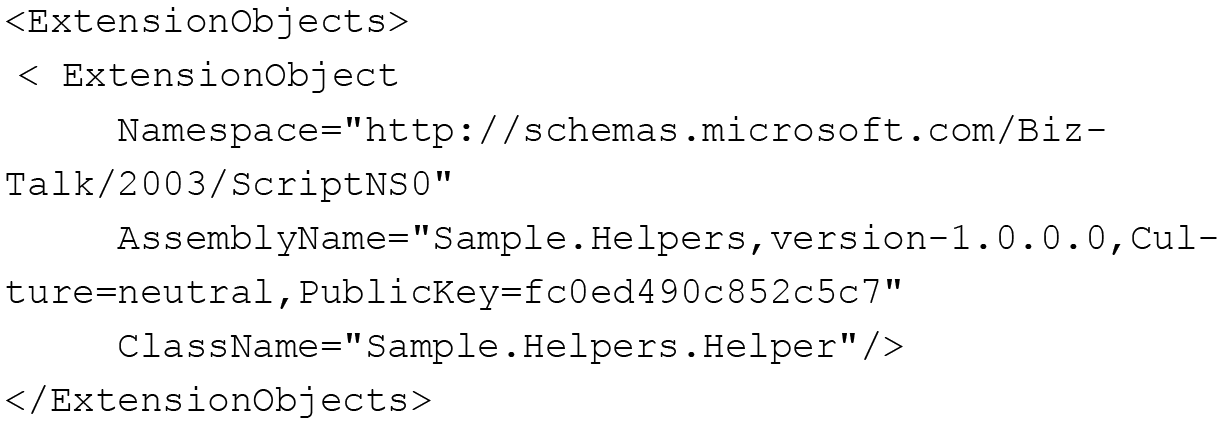
Save this XML document. It should be saved in the same place as your map file for ease of tracking. Once it is saved, reference it from the map property called Custom Extension XML, as shown in Figure 3.30.

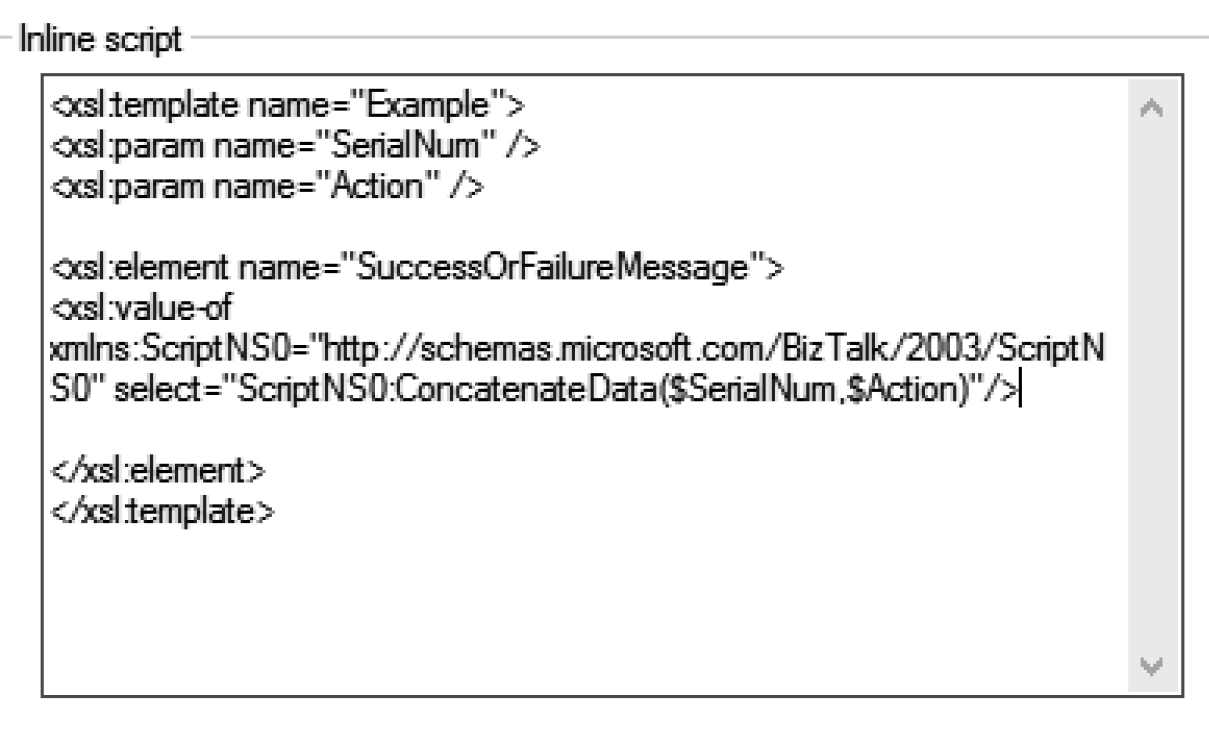
Now, from within your XSLT code, you can call this method. If you were to call it from within the Call Template code you used earlier, it would look something like what is shown in Figure 3.31. The name of the function is Concatenate Data, and it takes two input parameters.
You will need to make a manual modification to the .BTM map file. Outside of Visual Studio, from the file directory, right-click the BTM file and open it using notepad or similar text editor. Search for <TreeValues>. You will need to add a node right before this TreeValues node and right after the ScriptTypePreference node that precedes it. Your entry should look like the following:

Adding it between the two existing nodes in the BTM file looks like this:

After adding the CustomXSLT extension via the text editor to your BTM file, it may be lost if you load the file again from Visual Studio. You will want to have the map already loaded in Visual Studio, and make the save in the text editor outside of Visual Studio. Make sure and add it back in if it gets lost.
After doing this, you will be able to call the assembly from your XSLT within your map. You are also able to debug your .NET assembly from the map by taking these steps:
1.Deploy your referenced C# assembly to the GAC.
2.Have your map open in Visual Studio.
3.In a separate instance of Visual Studio, open your C# library project that you used to compile the assembly that was deployed in Step 1.
4.In this second Visual Studio instance (C#), place a breakpoint on the function that your XSLT is calling.
5.Click the Debug option from the menu in the second instance of Visual Studio and select Attach. Select the devenv.exe that maps to your first Visual Studio instance. This will cause this code in the second Visual Studio instance to kick off when the assembly that is in the GAC is called from the context of the first Visual Studio instance.
6.Test your map in your first Visual Studio instance. This should cause the breakpoint to be hit when the XSLT calls it.
Summary
You’ve looked at recompiling your code in Visual Studio 2015 and at restructuring your Visual Studio projects so that they are easier to compile. You’ve also looked at testing maps and revising your maps to use XSLT. XSLT is your most powerful tool within the BizTalk mapping environment. Take time to learn it, whether you include it in revised maps required by your migration or just in new maps that you develop in the future. Chapter 4 will look at upgrading orchestrations and external components that may be used by those orchestrations or by maps.