
![]()
Installation and Configuration
There are two primary components to a Scribe Insight installation—the client tools (the Workbench and the Console) and the Insight Server. The Workbench allows for the creation of migration and integration packages. The Console enables scheduling, administering, and monitoring deployed solutions. Both of these are client tools and can be configured on any computer that has the ability to connect to a Scribe Insight Server. The Insight Server is made up of all of the services and functionality that allow packages to be deployed and scheduled through the Console.
![]() Note This book uses Scribe Insight version 7.9. This version is supported on Windows Server 2012 Standard or Datacenter Editions (64 bit), Windows 8 Enterprise (32 or 64 bit), Windows Server 2008 R2 Enterprise or Standard (64 bit), Windows Server 2008 SP2 Enterprise or Standard (32 or 64 bit), and Windows 7 Enterprise (32 or 64 bit).
Note This book uses Scribe Insight version 7.9. This version is supported on Windows Server 2012 Standard or Datacenter Editions (64 bit), Windows 8 Enterprise (32 or 64 bit), Windows Server 2008 R2 Enterprise or Standard (64 bit), Windows Server 2008 SP2 Enterprise or Standard (32 or 64 bit), and Windows 7 Enterprise (32 or 64 bit).
This chapter walks through all the steps needed for a Scribe installation. The installer can be downloaded from Scribe’s site at the following URL.
https://openmind.scribesoft.com/html/insight_download
In addition to downloading the software, you will need to sign up for an evaluation license (or purchase a license)—see the section “Licensing.”
![]() Note There is an installation guide for Scribe Insight that can be downloaded from the same location as the installer. This installation guide should be used in conjunction with the information outlined in this chapter.
Note There is an installation guide for Scribe Insight that can be downloaded from the same location as the installer. This installation guide should be used in conjunction with the information outlined in this chapter.
Running the Scribe Installer
![]() Note Before running the installer, you will need to have access to SQL Server (version 2005 or higher) somewhere on your network. You will also want to have MSMQ installed if you plan to use queuing functionality (see later in this section for how to install Microsoft Message Queue (MSMQ).
Note Before running the installer, you will need to have access to SQL Server (version 2005 or higher) somewhere on your network. You will also want to have MSMQ installed if you plan to use queuing functionality (see later in this section for how to install Microsoft Message Queue (MSMQ).
Once you have the installer downloaded and the files extracted, you can run the setup.exe file. The first actionable screen of the installer allows you to select the components that will be installed. A number of these are required prerequisites, and they include the .NET framework and SQL Server (if it isn’t already installed on your box). Make sure to click the Insight Adapters option on this screen (it is not checked by default) so that all of the relevant adapters you will be using in your solutions are available (see Figure 1-1).

Figure 1-1. The main page of the installer
Insight Server vs. Insight Workstation
Click through the wizard and accept any license agreements needed. Soon you will get to the screen that allows you to select between Insight Server and Insight Workstation (see Figure 1-2). Insight Server is the full solution, installing the Console, Workbench, and all services required for scheduling and running packages. Insight Workstation installs the Workbench and Console as well, but these must be configured to run remotely against a computer that has the full Insight Server installation in place.
![]() Note If you already have Insight Server installed on another computer on the network, you can use the Insight Workstation option to connect other computers to this existing instance. See the section “Accessing Scribe Remotely” for more details.
Note If you already have Insight Server installed on another computer on the network, you can use the Insight Workstation option to connect other computers to this existing instance. See the section “Accessing Scribe Remotely” for more details.
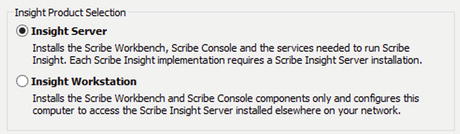
Figure 1-2. Determining whether to install Insight Server or Insight Workstation
MSMQ
During the Insight Server installation, a warning may pop up indicating that MSMQ has not been installed (see Figure 1-3).

Figure 1-3. If you need MSMQ, it must be installed prior to the Scribe install
Installing MSMQ prior to running the Scribe Installation will save you time and is a best practice. If you get this message, close the installer and install MSMQ.
MSMQ can be installed via Programs and Features in the Control Panel. Clicking “Turn Windows features on or off” will pop up a window where you can select the option Microsoft Message Queue (MSMQ) Server (as shown in Figure 1-4).
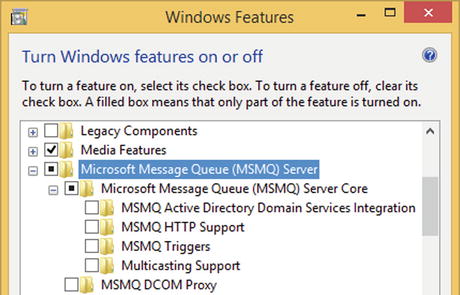
Figure 1-4. Installing MSMQ
Once MSMQ has been installed, you can restart the Scribe installer and proceed with installation.
![]() Note You may not think you need MSMQ, but if you ever want to have a multithreaded optimized Scribe integration solution, you will need MSMQ (see Chapter 7 for more details on optimized solutions).
Note You may not think you need MSMQ, but if you ever want to have a multithreaded optimized Scribe integration solution, you will need MSMQ (see Chapter 7 for more details on optimized solutions).
Next, the installer will create the SQL database that is used by Scribe processes. You will have the option to create a new database or connect to an existing one (Figure 1-5). You will be able to configure several things about the database, including whether you will connect using a domain account or a SQL account (you will want to use either a service domain account that doesn’t have password expirations or a SQL account that has DB create permissions), where the database will be installed (SQL Server 2005 or higher must be available somewhere on your network), and what the database name will be (sticking with the default SCRIBEINTERNAL is the most logical choice).
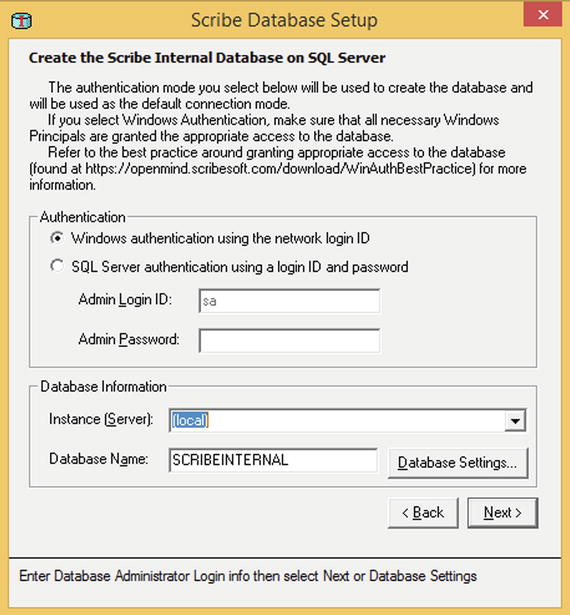
Figure 1-5. Create and configure the SCRIBEINTERNAL database
Clicking Next on the database setup screen will begin the creation of the SCRIBEINTERNAL database and all of its components.
![]() Note On some systems, it can take an extremely long time to create the database and its tables. When you are doing an installation on a network server with network credentials, don’t be surprised if it takes 30 minutes for this configuration to complete.
Note On some systems, it can take an extremely long time to create the database and its tables. When you are doing an installation on a network server with network credentials, don’t be surprised if it takes 30 minutes for this configuration to complete.
Once the creation and configuration of the database have completed, you will be prompted for whether you want to override the account used by the Scribe services. Click Cancel if you want the generic network service account, or type in the service account credentials if you wish to control the account that will be used (see Figure 1-6). Some administrators will want a specific service account to run Scribe-related processes under, while others will be fine with generic network service accounts.
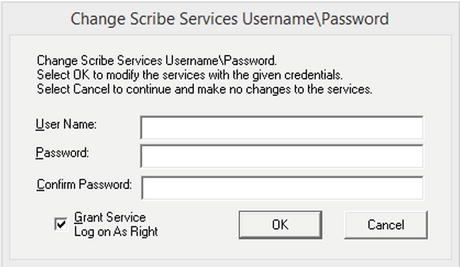
Figure 1-6. Changing the default service account
At the end of the installation process, an additional window will pop up allowing you to select which adapters you want to install (see Figure 1-7). The most common is the Scribe Adapter for Microsoft Dynamics CRM, which will be used for illustrating functionality throughout this book. Click Next to select the adapters you want installed.
![]() Note The configuration will also allow you to create a Scribe sample database. There is no need to install this for anything covered in this book.
Note The configuration will also allow you to create a Scribe sample database. There is no need to install this for anything covered in this book.
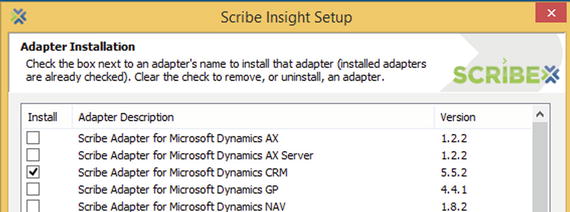
Figure 1-7. Selecting the adapters to install
![]() Note The Scribe Adapter for Microsoft Dynamics CRM, which will be used throughout this book, supports Dynamics CRM 4.0, 2011, 2013, and 2015 on-premise and online versions.
Note The Scribe Adapter for Microsoft Dynamics CRM, which will be used throughout this book, supports Dynamics CRM 4.0, 2011, 2013, and 2015 on-premise and online versions.
Once the adapters finish installing, the Scribe installer process will be complete. You will now need to add a valid license (see the section “Licensing”) and configure a new site in the Scribe Console (see the section “Configuring a Site in the Scribe Console”).
![]() Note If you run into any issues during the installation or configuration of Scribe that can’t be resolved, simply uninstall via the Windows Control Panel, delete the SCRIBEINTERNAL database from SQL, and start again.
Note If you run into any issues during the installation or configuration of Scribe that can’t be resolved, simply uninstall via the Windows Control Panel, delete the SCRIBEINTERNAL database from SQL, and start again.
Licensing
There are several licenses available for Scribe Insight. You can install and configure the product, but you will not be able to open the Console or test any DTS (Data Translation Specification) packages without a valid license. The two primary types of licenses are as follows:
- The evaluation edition. This enables nearly full functionality of the Workbench and the Console—except that only 100 records can be loaded via any given package at any given time. This ensures that you have the ability to do development and testing, but it requires that you purchase a license before doing any significant migrations or integrations. The license lasts for 30 days. You can sign up for an evaluation license on Scribe’s web site via the following URL:
http://info.scribesoft.com/trl_scribe-insight
![]() Note It can take anywhere from a couple of minutes to a number of hours to receive your license key e-mail.
Note It can take anywhere from a couple of minutes to a number of hours to receive your license key e-mail.
- The commercial license. There are several licensing options here, and you will want to contact Scribe for the pricing that is appropriate for your solution. As of 2015, a 60-day license used primarily for migration of data is approximately $1,800 while the standard perpetual license is $8000. Find out more detail at http://www.scribesoft.com/Buy-Scribe-Insight.
Once you have a license key, you can enter it into the Workbench, similar to the process shown in Figure 1-8. You can also enter it during the setup installation process.
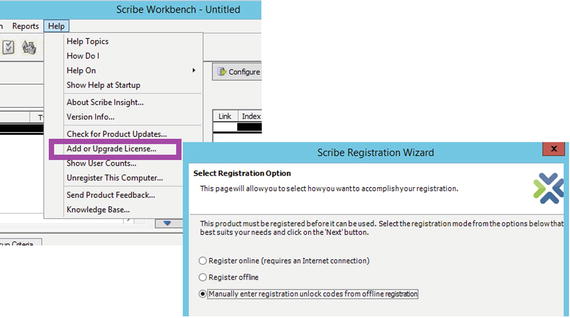
Figure 1-8. Adding a license via the Workbench
When a license is about to expire, you will be presented with a warning (this happens approximately five days before expiration). Once a license fully expires (Figure 1-9), you will no longer be able to load any data using any of the processes (although you will still be able to do development within the Workbench).
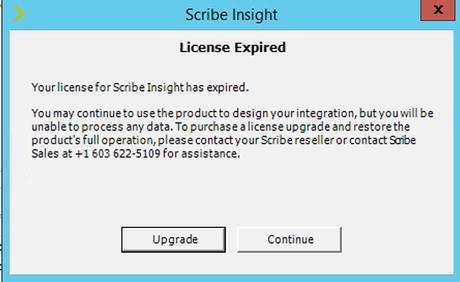
Figure 1-9. License has expired
When your installation has completed, and your license has been added, do a spot check on the health of your solution. Make sure the Workbench opens and that you have the ability to add an adapter and test a basic integration (see Chapter 2 for more details on this issue). Open SQL Server Management Studio (SSMS) and ensure that you are able to view all the database tables related to the SCRIBEINTERNAL database. Check that all the Scribe services are running; you will likely need to do this manually, unless you have restarted your computer after the installation (see Figure 1-10). Finally, open the Scribe Console and ensure that you are able to configure a new site, as outlined in the following section.
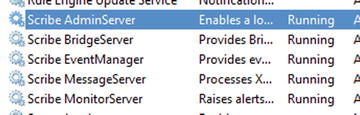
Figure 1-10. Running Scribe services
Configuring a Site in the Scribe Console
The first time you open the Scribe Console, you will be prompted to set up a new site, as shown in Figure 1-11. Give the site a descriptive name and select a Site Type of Local. If you already have a Scribe Insight Server installation, you can connect to it remotely, as outlined in the section “Accessing Scribe Remotely.”

Figure 1-11. Creating a new site in the Console
After configuring these properties and clicking Next, you will be prompted to test your connection (via the Test button). If you get an error similar to the one shown in Figure 1-12, then you must add your user to the Scribe Console Users group on your local machine (see Figure 1-13). You can get to this screen via Computer Management, accessible in Windows 7 by clicking the Start Button, right-clicking Computer, and selecting Manage.
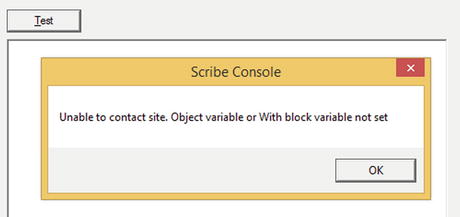
Figure 1-12. Example error within the Console
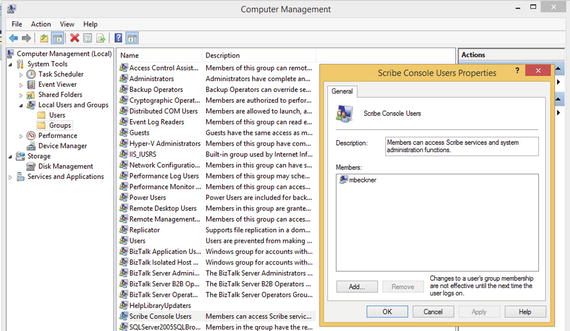
Figure 1-13. Adding account to the Scribe Console Users group
If you get a connection error like the one shown in Figure 1-14 when you test your connectivity, the most likely cause is that there is no license. To resolve this error, close the Console, add a valid license (as outlined in the section “Licensing”), and reopen the Console.
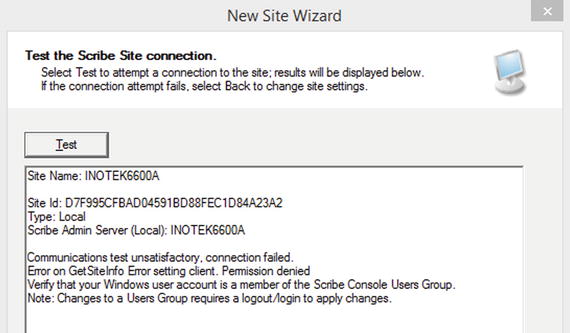
Figure 1-14. Another example of an error within the Console
Accessing Scribe Remotely
Scribe allows users to connect to the Insight Server remotely, which can be done by adding a new site in the Console and selecting the Remote option. This allows for complete administration and deployment without having to remote desktop into the Scribe server (as shown in Figure 1-15).
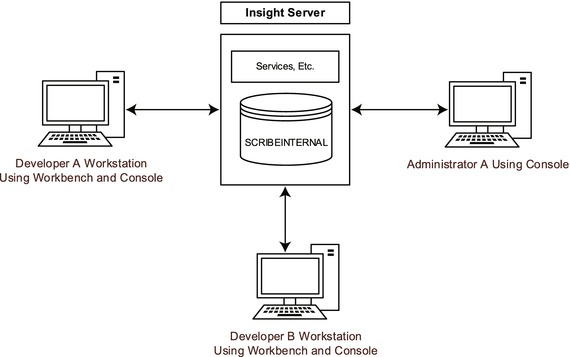
Figure 1-15. Connecting remotely to the Insight Server
There are a lot of manual configuration steps that must be taken in order for a machine to connect remotely to Scribe insight. The installation guide details these (see the installation guide section titled “Installing Scribe Workstation”), but it is easy to overlook some of the requirements. There are also cases (such as the firewall issue noted later) that are not discussed in the installation guide. The following bulleted list points out the key items that need to be addressed. Make sure you follow all these steps and reference the installation guide.
- Make sure that your Windows account has been added to the Scribe Console Users group on the Scribe Server.
- Give your Windows account the datareader and datawriter roles on the SCRIBEINTERNAL database.
- Set the access permissions in COM Security on the server as outlined in the documentation. This gives members of this group rights to access the server remotely.
- Modify the DCOM (Distributed Component Object Model) permissions in the Local Security Policy on the server as outlined in the documentation.
- Check your firewall settings (see Note that follows).
![]() Note If you have a firewall on your local computer or on the Scribe server, you may not be able to configure remote connectivity. If your remote installation has completed but you are unable to connect your console remotely even though your SQL connection through SSMS works and you’ve worked through all the steps in the installation guide, then you may have to work directly with Scribe and your network team to figure out what ports need to be opened in the firewall. Another good post to review is shown here:
Note If you have a firewall on your local computer or on the Scribe server, you may not be able to configure remote connectivity. If your remote installation has completed but you are unable to connect your console remotely even though your SQL connection through SSMS works and you’ve worked through all the steps in the installation guide, then you may have to work directly with Scribe and your network team to figure out what ports need to be opened in the firewall. Another good post to review is shown here:
https://openmind.scribesoft.com/topics/i-cant-connect-my-remote-scribe-console-to-my-scri
Conclusion
The installation of Scribe Insight is fairly straightforward, and the installer takes care of most of the work. Once you have the platform installed, you can move immediately into development using the Scribe Workbench, as outlined in Chapter 2. Unlike many mapping and integration packages, the learning curve for Scribe is low, and you’ll be able to make immediate inroads into your work.