![]()
Building and Testing Packages with the Workbench
The Scribe Workbench is where the development of your solutions will be performed. All mapping and connections to source and target data are done within Data Translation Specification (DTS) files. You will be able to define your field mappings, the types of operations your package will need to execute, and the steps, logic, and order of processing. You will also be able to test and run your package. This chapter outlines the core functionality of the Workbench.
Creating a New DTS
To create a new DTS file, open up the Scribe Workbench and begin by configuring your source and target connections.
![]() Note In order to save your DTS file, you must have a source and target configured with at least one map link. You will want to save your file as soon as you can to make sure you don’t lose any work. The moment you have a source and target connection created, map across any field with a direct link and save your file. You can update the mapping later.
Note In order to save your DTS file, you must have a source and target configured with at least one map link. You will want to save your file as soon as you can to make sure you don’t lose any work. The moment you have a source and target connection created, map across any field with a direct link and save your file. You can update the mapping later.
Connections
You can have as many connections as you want within your DTS. At a minimum, you will have a source and a target. There will always be one preconfigured connection to the SCRIBEINTERNAL database. If you are reading from or writing to this SCRIBEINTERNAL database, then this connection could be used as either a source or a target. If you are doing lookups via formulas and/or variables within your DTS, you may have additional connections defined that are neither source nor target.
Figure 2-1 shows an example of a package that has multiple connections. A source, target, and a connection to SCRIBEINTERNAL (which could also be the source and/or target) are the minimum requirements in any DTS package. In addition, there is a connection to a custom SQL lookup table.
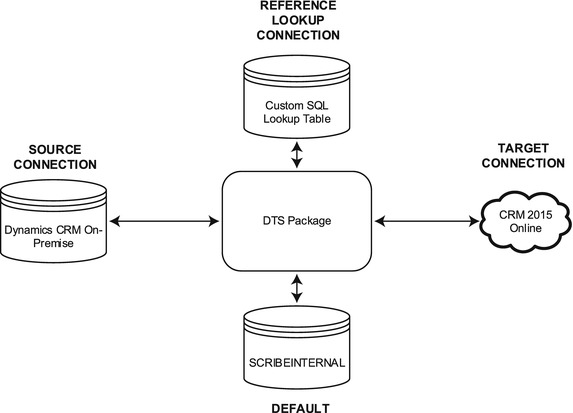
Figure 2-1. Showing multiple connections for a single DTS file
To illustrate the use of connections within the Workbench, we will create the four connections shown in Figure 2-1: one ODBC (Open Database Connectivity) connection to CRM On-Premise, which will query a filtered view, one Native Database connection to a custom SQL database, one connection that uses the CRM Adapter to connect to CRM Online, and the default SCRIBEINTERNAL connection.
You can create a connection by clicking View and then Connections within the Workbench. This will open the Connection Manager window (see Figure 2-2), which will show by default the connection to the Scribe Internal Database. DTS files log activity to tables within the SCRIBERINTERNAL database, and they must have connectivity to this to run, which is why every DTS has this connection by default.
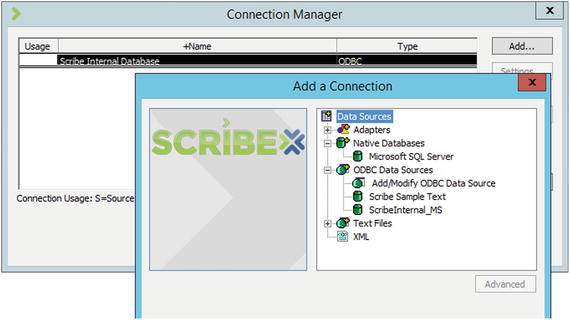
Figure 2-2. The Connection Manager window
![]() Note The exact options within your Add a Connection window will vary. For example, you may already have other ODBC connections created on your machine for other applications, in which case they may appear here.
Note The exact options within your Add a Connection window will vary. For example, you may already have other ODBC connections created on your machine for other applications, in which case they may appear here.
First, you can create the connection that will be used for the source data. In this case, it will be the Native Databases connection to the CRM On-Premise instance (which may be of value when querying filtered views directly). This can be done by clicking the Microsoft SQL Server option under the Native Databases heading in the Add a Connection window. Configure the four properties shown in Figure 2-3. Clicking OK will add the connection to the list in the Connection Manager.
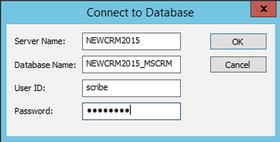
Figure 2-3. Connecting to a native SQL Server database
Next, you will create a connection to CRM Online using the CRM Adapter. Click Add, select the Microsoft Dynamics CRM option under Adapters, and enter in the appropriate login information, as shown in Figure 2-4. Clicking OK once you have the information entered will add the connection to the list in your Connection Manager.
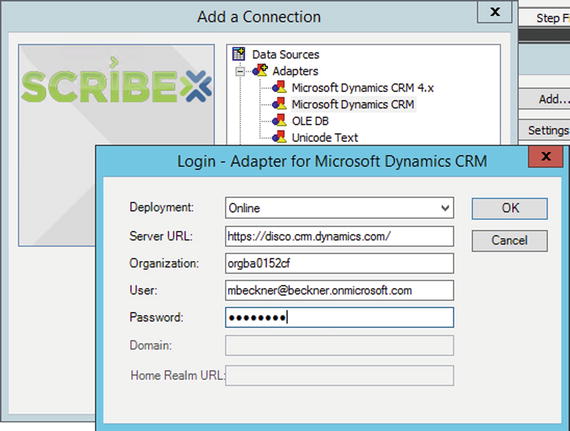
Figure 2-4. Connecting to CRM Online
![]() Note The Organization property value for the Adapter when connecting to CRM Online can be retrieved from within your online instance of CRM. Log into your instance browser to Settings->Customizations and click Developer Resources. The Organization Unique Name will have the value you will need to enter into the Organization property.
Note The Organization property value for the Adapter when connecting to CRM Online can be retrieved from within your online instance of CRM. Log into your instance browser to Settings->Customizations and click Developer Resources. The Organization Unique Name will have the value you will need to enter into the Organization property.
The final connection you will make is an ODBC reference lookup connection—this will neither be the source nor the target but will be used by a variable for doing a lookup to retrieve a value. To create this connection, click the Add/Modify ODBC Data Source option under the ODBC Data Sources heading in the Add a Connection window. This will open the ODBC window shown in Figure 2-5.
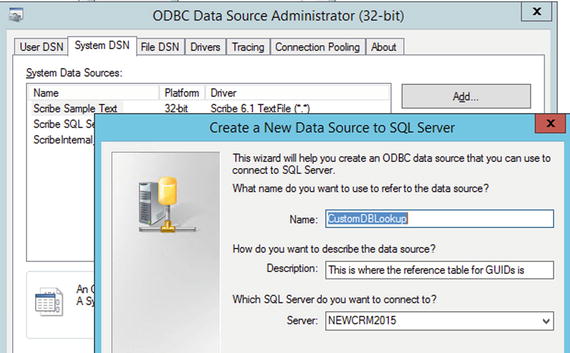
Figure 2-5. Connecting to SQL using an ODBC connection
![]() Note See Chapters 3 and 4 for details on using variables within DTS files.
Note See Chapters 3 and 4 for details on using variables within DTS files.
You will want to click Add on the System DSN tab and select SQL Server from the list of options that appear. An ODBC connection wizard will pop up; work through this wizard to connect to your database, and when you are complete, this new connection will be added to the list of connections. At this point, you should have three connections in the Connection Manager, as shown in Figure 2-6.
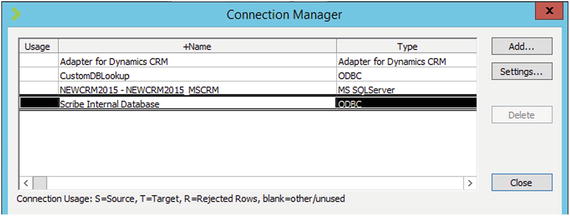
Figure 2-6. The Connection Manager with multiple connections configured
![]() Note The value of an ODBC connection is that you can connect to virtually any type of data repository. Scribe has adapters that allow you to connect to SQL Server, text files, XML, and CRM, so you don’t have to use an ODBC connection unless Scribe does not natively support your data repository.
Note The value of an ODBC connection is that you can connect to virtually any type of data repository. Scribe has adapters that allow you to connect to SQL Server, text files, XML, and CRM, so you don’t have to use an ODBC connection unless Scribe does not natively support your data repository.
Configuring Source and Targets
With connections defined, you can begin to build your integration package. You will be able to define one source and one or more targets. For purposes of illustration, you will look at one source and one target; Chapter 4 will cover multiple targets. For now, the source will be a table called Accounts on a custom SQL server database, while the target will be the account entity in Dynamics CRM Online.
![]() Note While multiple step processes are possible within Scribe, it is best practice to keep your DTS solutions as simple as possible. See Chapter 3 for creating multiple step processes, and Chapter 7 for how to keep processes optimized and easy to maintain.
Note While multiple step processes are possible within Scribe, it is best practice to keep your DTS solutions as simple as possible. See Chapter 3 for creating multiple step processes, and Chapter 7 for how to keep processes optimized and easy to maintain.
To configure the source, click the Configure Source button in the upper right corner of the Workbench window. This will open the window shown in Figure 2-7, which will show you all the objects that can be connected to on the source database. In this case, there is a single table called Accounts. Additionally, there is a radio button in the upper right corner of the window that allows you to select between Single Data Object and Custom Query.
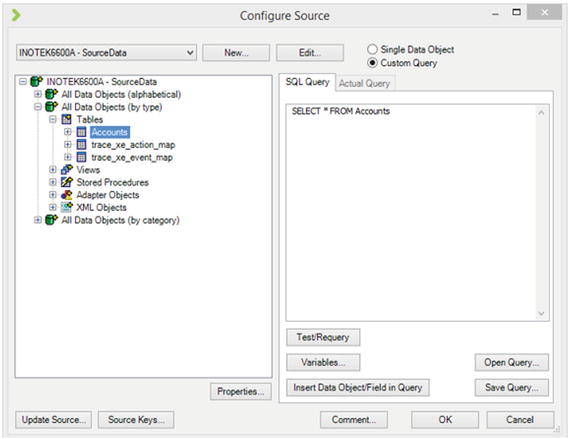
Figure 2-7. Configuring the source connection
When dealing with SQL objects (tables, views, stored procedures), the easiest thing to do is to click the Custom Query and write your own SQL (you can use the UI, but you will have limited options for filtering and other query-related activities). Other sources are not so flexible—you will not be able to write custom queries, for example, against non-SQL-based sources. In this case, the custom query is a SELECT statement with no filters (again, shown in Figure 2-7).
Clicking OK on the Configure Source screen will return you to the main window with the source fields showing in the left-hand column (in the cast of a SELECT *, the actual field names will be determined automatically by Scribe). You can now configure your target using the following steps:
- Start by clicking the Configure Steps button in the top center of the Workbench window.
- In the window that opens, click the Data Objects tab and click Add. Select the connection that will be the target. In this case, we are using the Adapter for Dynamics CRM connection.
- Once you select the connection, a list of objects for that connection will be listed. The integration being demonstrated here is for the account entity, so select Accounts from underneath the All Data Objects header (it can also be accessed elsewhere in the hierarchy; for example, you will also see an alphabetical listing of objects).
- Under the Operation label in the lower left corner of the window, select the appropriate operation from the drop-down. We are going to insert/update account records, so select the Update/Insert option. There are a number of operations here, as described in Table 2-1.
Table 2-1. Target Operations
Operation
Function
Comments
Insert
Insert the source record into the target.
This operation tries to insert the record. If the record already exists in the target, then either an error will be thrown or a duplicate will be created (this will depend on the target adapter and target system capabilities).
Update
Update the target record based on the source data.
An update requires a lookup record. For instance, a unique identifier that is common to both the source and target could be used to uniquely identify a record. Any combination of fields can be used as a unique identifier.
Update/Insert
Try first to update the record in the target. If no record exists, insert the record.
This operation consists of two distinct operations. It can be expensive to use (time consuming and resource intensive) if there are many records that must be processed, but if number of records is not a concern, using it can reduce the amount of logic in the DTS.
Insert/Update
Upsert
Seek
Delete
Try first to insert the record. If the record already exists, update it.
Same functionality as Update/Insert.
Find out whether a record exists in the target.
Delete a record in the target.
This is similar to the Update/Insert, except that the order is reversed.
This is the same functionality as the Update/Insert, but it is a single operation rather than two distinct operations. Not all target connections support this.
Use the Seek operation to do a lookup on a record (or records). While Seek is available as an option, there are more optimized ways to build DTS packages. See Chapter 7 for more details.
Records can be deleted.
- Click the Add [Operation Name] Step button next to the drop-down. This will create a new step on the right side of the window. Figure 2-8 shows the full configuration of this screen.
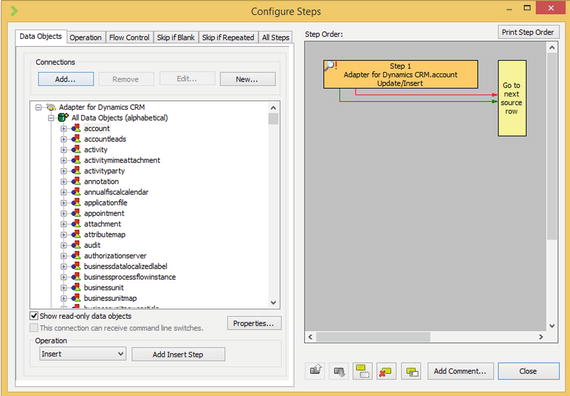
Figure 2-8. Setting up an Update/Insert step
- Click Close to return to the main mapping window. The Target fields are displayed on the right side of this window. Mapping can now begin.
Figure 2-8 shows the result of taking these steps.
Basic Mapping
There are three chapters in this book dedicated to mapping and development of DTS packages. Chapter 3 outlines standard approaches to mapping, while Chapter 4 and Chapter 7 outline advanced solutions to complex map requirements and optimized processes. For the purposes of this chapter, we will outline the most basic mapping functionality. In the case of mapping the SQL account data from the Source to the CRM Online account data in the target, we’ll assume no data transformations are necessary, and that all of the fields will map across without modification. This straight mapping can be done using the following steps:
- Click AccountNumber in the source data and accountnumber in the target data.
- Next, click the Data Link button which is between the source and target data, in the middle of the window. A check mark will appear next to the two fields, indicating that mapping has taken place.
- Now, with both fields still highlighted, click the Lookup Link. This will place a second check mark next to the target field and will allow the accountnumber to be used as a unique identifier. If the accountnumber already exists in the target, the record will be updated. If it does not exist, the record will be created.
- Use the Data Link to map Name to name, AddressLine1 to address1_line1, City to address1_city, State to address1_stateorprovince, and Zip to address1_postalcode.
- With the mappings complete, click the Data Formulas tab in the lower portion of the window in order to see all Data Link mappings (as shown in Figure 2-9).
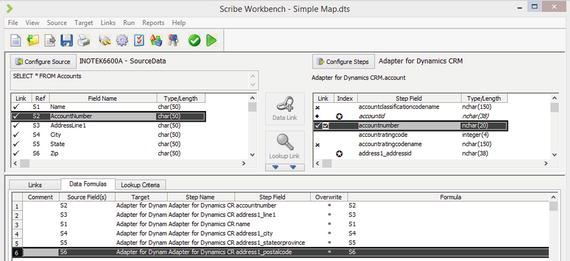
Figure 2-9. Mapping fields
- Click the Lookup Criteria tab to see all Lookup Link mappings.
- Click the Links tab to see the specific links related to individual fields that have been mapped. This can be very useful when a source field has been mapped to multiple targets.
![]() Note A field mapped using the Data Link will be inserted or updated in the target operation. A field mapped using the Lookup Link will be used as a primary key and will allow for determining whether the records exist. You can use multiple Lookup Links if more than one field is needed to look up a record.
Note A field mapped using the Data Link will be inserted or updated in the target operation. A field mapped using the Lookup Link will be used as a primary key and will allow for determining whether the records exist. You can use multiple Lookup Links if more than one field is needed to look up a record.
If you map a field to the wrong target, right-click the target field. This will present a context menu with many options. Several of the options deal with removing the link. Select the appropriate removal option here to delete the mapping (see Figure 2-10).

Figure 2-10. Removing a link via the context menu on a target field
![]() Note Save your DTS file frequently. You will often run into situations where you have linked things incorrectly and need to roll back, added complex logic that is difficult to undo, or created a package that doesn’t work even though you think it should. Making frequent saves and backing up your work at various stages of functionality will save you time.
Note Save your DTS file frequently. You will often run into situations where you have linked things incorrectly and need to roll back, added complex logic that is difficult to undo, or created a package that doesn’t work even though you think it should. Making frequent saves and backing up your work at various stages of functionality will save you time.
Testing Your DTS File
With at least one field mapped, you will be able to test and run your DTS file. Always begin by testing your mapping before trying to run it. The test functionality will show you what fields are being mapped, what the source data is before the mapping for each field, and what the target field values are after the mapping. It will also show the results of each step.
In order to test your package, click the test check box button in the Workbench toolbar (shown with the arrow over it in Figure 2-11). This will pop up a window (see Figure 2-12) showing all of the information about the execution of this package.

Figure 2-11. The test button
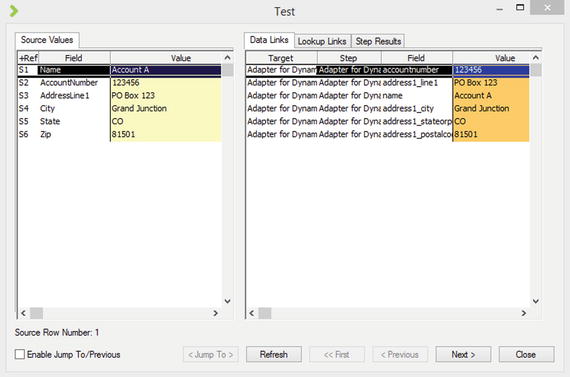
Figure 2-12. The test results window
![]() Note If you get an error when testing your solution, you will want to look at the details of the error. You can read the error report, and you can also look directly at the underlying SQL table execution log. See Chapter 8 for more details.
Note If you get an error when testing your solution, you will want to look at the details of the error. You can read the error report, and you can also look directly at the underlying SQL table execution log. See Chapter 8 for more details.
There are several things to note within the Test window, as follows:
- At the bottom of the window, you will see a number of buttons. Click the Enable Jump To/Previous check box in order to move through the source data. When you are working with large datasets, this can be helpful to see how different data combinations will map. Additionally, when you are troubleshooting a data load, and one record is throwing an error, you can use this to scroll to the specific record throwing the error to see how the data is being transformed.
- When testing your DTS, you will often need to alter the source test data. For example, if you want to test different values in a field, it is easy to go to the source record in SQL or a text file to change these values. When you make changes to your source data, Scribe does not always pick these changes up. You will want to always click the Refresh button in the test box to ensure you are working with the latest data from the source.
- Click the Data Links, Lookup Links, and Step Results tabs to see the outcome of all of your mappings.
Running Your DTS File
Once you are comfortable with the outcome of your testing, you can run the DTS package. Running the package will cause data in your target system to change, so make sure you are working against a test environment. Click the Run Job button on the toolbar (shown with the arrow over it in Figure 2-13). This will pop up a window that shows the execution status of your package, as shown in Figure 2-14. You can see the total number of operations that were performed, and the success or failure of records.

Figure 2-13. The button used to run the DTS file
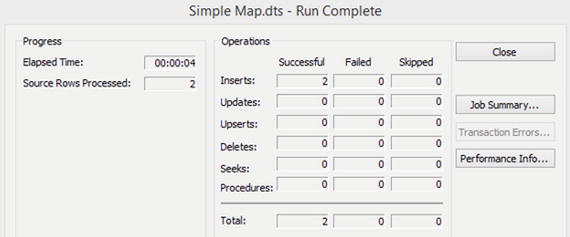
Figure 2-14. The results of running the DTS file
![]() Note If errors occur, you will need to look at the execution log in order to determine which records erred. You can click the Transaction Errors button for a report view of this, but in order to get all of the details, you will most likely want to look at the execution log table in the SCRIBEINTERNAL database. See Chapter 8 for more information on viewing this table’s data and troubleshooting in general.
Note If errors occur, you will need to look at the execution log in order to determine which records erred. You can click the Transaction Errors button for a report view of this, but in order to get all of the details, you will most likely want to look at the execution log table in the SCRIBEINTERNAL database. See Chapter 8 for more information on viewing this table’s data and troubleshooting in general.
You will see several additional buttons once a process completes. The Job Summary button will provide a high-level overview of what occurred during the run cycle. If there were errors, the Transaction Errors button will be available—see Chapter 8 for more details about troubleshooting. The Performance Info button will give metrics around runtime and related information.
Conclusion
The Scribe Workbench is a self-contained environment. You can develop, test, and run a solution end to end. In the cases of migration, you can often use the Workbench to perform all of your work. In other cases, you will need to deploy your DTS solution to the Scribe Console in order to schedule it or have it interact with queues and other components (see Chapter 5). The Workbench also has extensive development-related capabilities for mapping and integrations, which will be outlined in the next two chapters.