Chapter 9
Deploying and Customizing ESXi Hosts
2V0-21.19 EXAM OBJECTIVES COVERED IN THIS CHAPTER:
- Section 1 – VMware vSphere Architectures and Technologies
- Objective 1.1 – Identify the pre-requisites and components for vSphere implementation
- Section 4 – Installing, Configuring, and Setting Up a VMware vSphere Solution
- Objective 4.4 – Set up ESXi hosts
- Section 7 – Administrative and Operational Tasks in a VMware vSphere Solution
- Objective 7.8 – Manage resources of a vSphere environment
- Objective 7.16 - Configure and manage host profiles
This chapter addresses deploying ESXi hosts using the Auto Deploy mechanism as well as utilizing Host Profiles to manage host configuration settings. The ability to simplify the deployment and configuration of hosts reduces the time to provision new hosts and apply changes. With a mechanism to compare host configurations, configuration drift can be managed, and the host settings can remain consistent between hosts, clusters, and datacenters.
A rapid and automatic method of standing up hosts with little or no manual intervention can improve the flexibility of an environment and eliminate the requirement to be physically at a server to deploy it—no more USB drive or inserted CDs. Hosts can also quickly be updated or reverted to previous versions as quickly as they can be rebooted.
Configuring Auto Deploy
With Auto Deploy configured, new hosts can be configured automatically as they boot, reducing the time to deploy and eliminating manual steps. Custom boot images and updates can be applied by simply rebooting the hosts, and troubleshooting some host problems can be skipped when rebooting the host rebuilds it from a known good image.
However, there are several steps required to properly configure Auto Deploy, and third-party resources (specifically a DHCP server and TFTP server) are required. We'll walk through the steps over the following pages.
Auto Deploy Steps
- The new host server powers on and its PXE-enabled network card makes a DHCP request.
- DHCP server responds with IP configuration and two options: a file server IP address and PXE boot loader filename.
- The host server's PXE card sets the IP configuration received and queries the file server for the PXE boot loader file.
- The file server sends the PXE boot loader file to the host server.
- The PXE card uses the PXE boot loader file to start booting the host and queries the Auto Deploy server for an image file (a PXE boot file).
- The Auto Deploy server uses the properties of the host to determine which image is appropriate and sends the host image file to the host server along with host profile settings.
- The PXE process on the host server chainloads the ESXi boot process using the supplied image file and configuration settings.
The components needed for Auto Deploy include a host with a PXE-capable network card, a DHCP server, a TFTP server, and a vCenter server. Optionally, you can install PowerCLI if you would like to manage Auto Deploy rules and images using cmdlets. The ability to manage all settings from the GUI is new to vSphere 6.5, but if you used PowerCLI scripts in the past. they will still work with 6.5.
Enabling PXE Boot
The first step is to configure your host to boot from the network card. You may need to refer to your host server or network card documentation to enable PXE booting; however, many systems with PXE-enabled network cards will attempt to boot using PXE, either initially or if no other boot source is found. To speed up boot times, you may want to ensure that the PXE card is the first boot option in the host BIOS (Figure 9.1).

FIGURE 9.1 BIOS boot order
If your network requires VLAN tagging on the ESXi host management subnet, you will need to ensure that your host's network card supports tagging and is configured to supply the proper VLAN ID. If you can configure your network to use the native (or default) VLAN for the management network, you can avoid manually configuring each host.
Configuring DHCP
Once your host is set to boot from the network, a DHCP server is needed to supply the proper IP settings (address, subnet mask, default gateway) and the PXE boot parameters. If your DHCP server is not on the same network as your ESXi management NIC, you will need a DHCP helper server configured to forward the request to the DHCP server.
The DHCP server needs to be configured to supply the IP address of the TFTP server along with the filename of the PXE boot loader. While many DHCP servers use option 066 Boot Server Host Name and option 067 Bootfile Name to supply the values during a boot request, you may need to check your DHCP server's documentation on setting these values. VMware offers a Knowledge Base article (KB 2005071) that covers Windows, Infoblox, and Cisco DHCP server configuration.
A Windows 2008 R2 server uses options 66 and 67 (Figure 9.2). These should be configured as options for the management network (as opposed to DHCP server options) to prevent PXE boots from other networks from being directed to the Auto Deploy server. The boot file name will be undionly.kpxe.vmw-hardwired for normal Auto Deploy–linked boot but the TFTP server or boot server value will change for your environment.

FIGURE 9.2 Windows DHCP server with Auto Deploy options
Configuring TFTP
A TFTP server accessible from the management network is needed to supply the boot loader file during the iPXE boot process. We are using SolarWinds's free TFTP server for our lab, but you may want something more robust. Once the TFTP service is installed and running, make sure to create firewall rules on the TFTP server permitting access. You can use a TFTP client (there is one built into Windows) to test access to the TFTP server to verify connectivity.
After you configure Auto Deploy on your vCenter server, you will need to download the TFTP files and place them into the TFTP root directory (Figure 9.3).
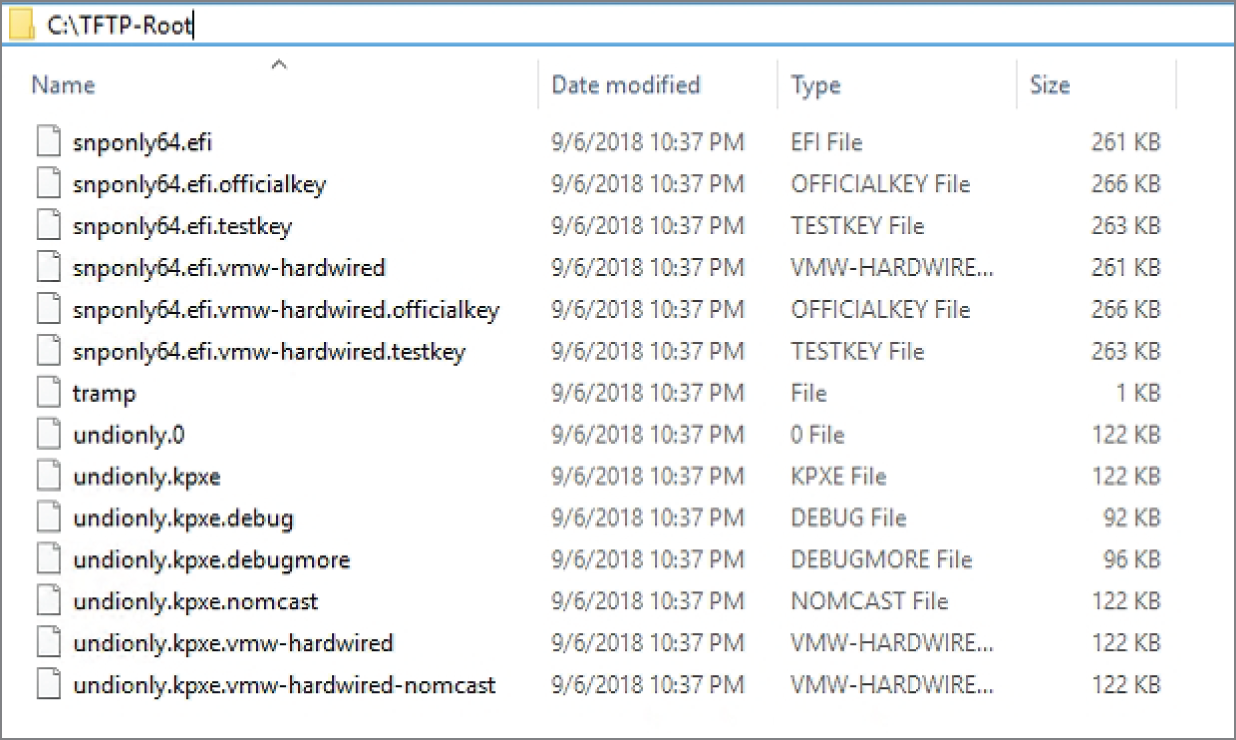
FIGURE 9.3 TFTP root directory with Auto Deploy boot files
These files include the undionly.kpxe.vmw-hardwired boot loader and the tramp file, which includes the information needed for the iPXE boot process to find the Auto Deploy service. If your vCenter server IP address changes, you can edit the tramp file to direct hosts to the new IP.
Enabling Auto Deploy
One of the new changes with vSphere 6.5 is that Auto Deploy is bundled with vSphere and cannot be separated. After you install the Windows-based vCenter or deploy the VCSA, you can enable Auto Deploy by starting the services and configuring them to start with vCenter.
- Go to the System Configuration section of the Administration menu in the web client (Figure 9.4).
- Select your vCenter server, and under the Services section, open the Related Objects tab.
- Start Auto Deploy and the ImageBuilder Service, and set them to start with vCenter by editing the startup type (Figure 9.5).
- Once the two services are started, the Auto Deploy option will be available in the Operations and Policies menu (Figure 9.6). Log out and back into the web client if the icon is not available.
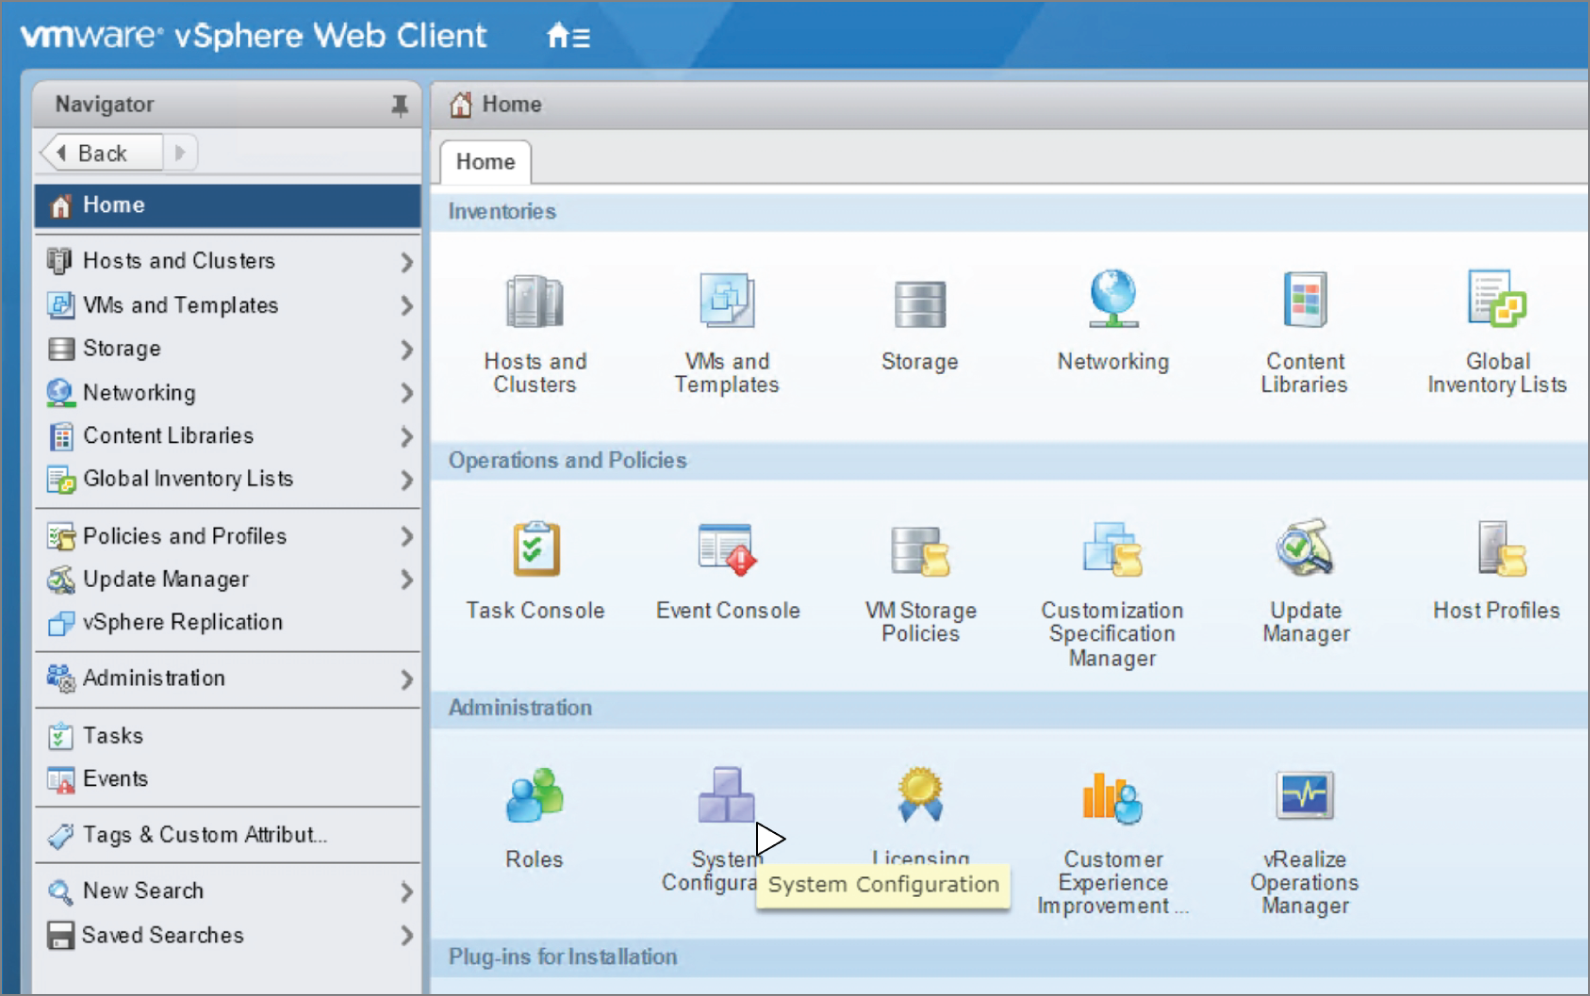
FIGURE 9.4 System Configuration

FIGURE 9.5 Edit the startup type.

FIGURE 9.6 Auto Deploy in the Operations and Policies section
- There are three tasks to accomplish after Auto Deploy is started:
- Add a software depot to pull images from.
- Create Auto Deploy rules to associate images with hosts.
- Copy the TFTP files to the TFTP server.
- Use the Configure menu of the vCenter object to locate the TFTP boot file zip link (Figure 9.7). Extract the files from the zip archive to the TFTP root directory.
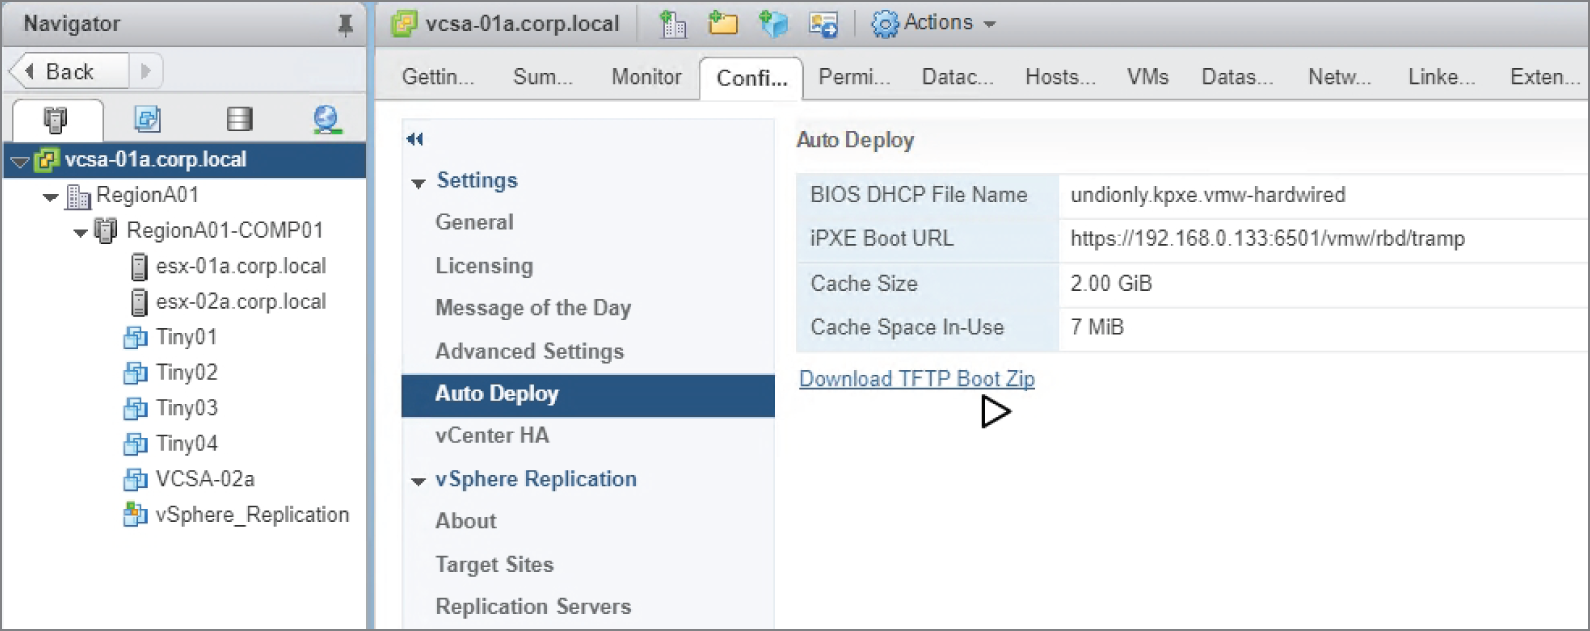
FIGURE 9.7 Download the TFTP boot files from vCenter.
- The Auto Deploy server needs a repository of images to associate with hosts. You can use a public repository such as the official VMware one, or you can create your own repository to hold custom images and software packages.
To use the VMware public repository, create an Online depot referencing
hostupdate.vmware.com/software/VUM/PRODUCTION/main/vmw-depot-index.xml(Figure 9.8).

FIGURE 9.8 Creating an online depot for the VMware public repository
Once you have a depot available with images, you can create Auto Deploy rules to assign images to hosts, which we'll cover next.
Adding Deploy Rules
You can use the New Deploy Rule wizard from the Deploy Rules tab to create a new rule to associate images with hosts. Rules are required to automatically assign images; however, you can link a host to an image manually.
A host will continue to use an associated image until it encounters a new rule that assigns a different image. If you delete a rule, any host that used that rule for deployment will still use the assigned image until a new rule is created or the host is removed from inventory.
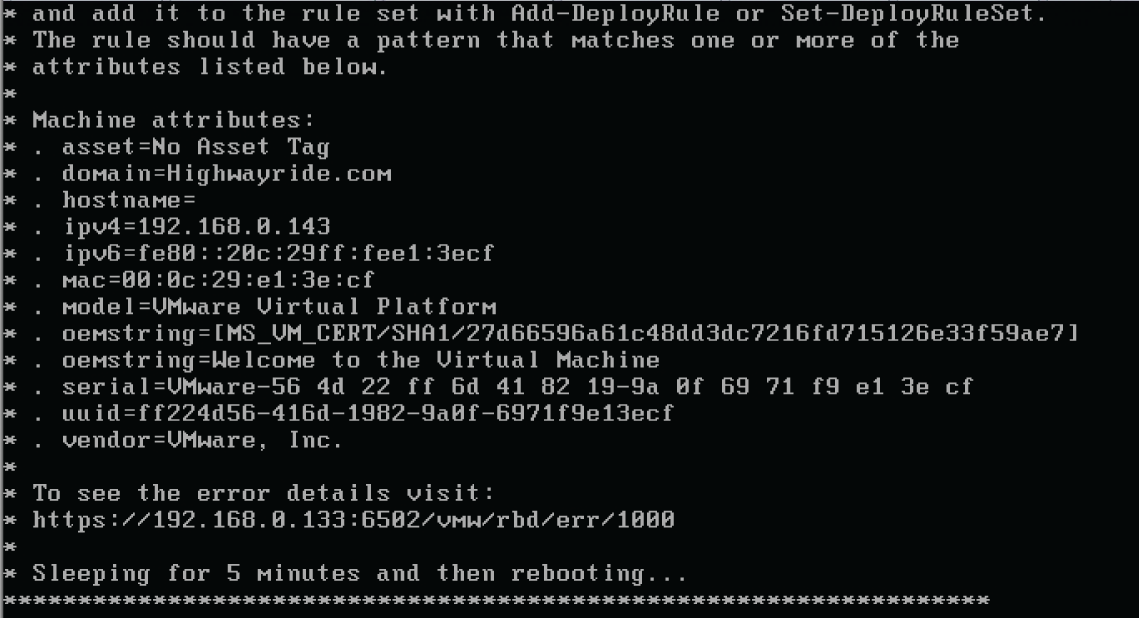
When you create a new rule, you must specify that it applies to all hosts or add a pattern for the host to meet. To see the properties supplied by your hosts, look at the error screen when one boots when there is no rule.
Machine attributes:. asset=No Asset Tag. domain=corp.local. hostname=. .ipv4=192.168.0.143. mac=00:0c:29:e1:3e:cf. model=VMware Virtual Platform. oemstring=[MS_VM_CERT/SHA1/27d66596a61c48dd]. oemstring=Welcome to the Virtual Machine. serial=VMware-56 4d 22 ff 6d 41 82 19-9a 0f. uuid=ff224d56-416d-1982-9a0f. vendor-VMware, Inc.
Once the hosts are selected, you need to select the image to use, an (optional) host profile to assign, and the location in the datacenter the hosts should be assigned to.
After creating the rule, make sure you activate it using the Activate/Deactivate Rules wizard (Figure 9.9).

FIGURE 9.9 Activate the deploy rule.
The Discovered Hosts tab (as shown in Figure 9.10) will display hosts that have contacted the Auto Deploy server and not been assigned an image. You can select a host from the list and use the Add to Inventory wizard to manually assign an image, host profile, and location.
Adding a Custom Image and Profile
Your server vendor may offer custom images for your server hardware that could include specific drivers, vendor-supplied VIBs, or patches specific to the server. They often are smaller than VMware-supplied images as they do not need to include drivers for other vendors or hardware.
You can import the ZIP file containing the image as a separate repository (Figure 9.10 and Figure 9.11).

FIGURE 9.10 Importing a custom image ZIP file
You can also create your own profiles to use, pulling software packages from the any of the depots, including the public VMware depot and uploaded vendor-specific ZIP packages. See Figure 9.12 for a sample image profile created using packages from public and vendor-specific depots.
Stateless Caching and Stateful Installs
There are two other methods of using Auto Deploy beyond reading an image from the Auto Deploy server at boot: Stateless Caching and Stateful Install. Either of these options requires changes to the boot order of the host and a host profile with the proper settings.

FIGURE 9.11 Listing available image profiles
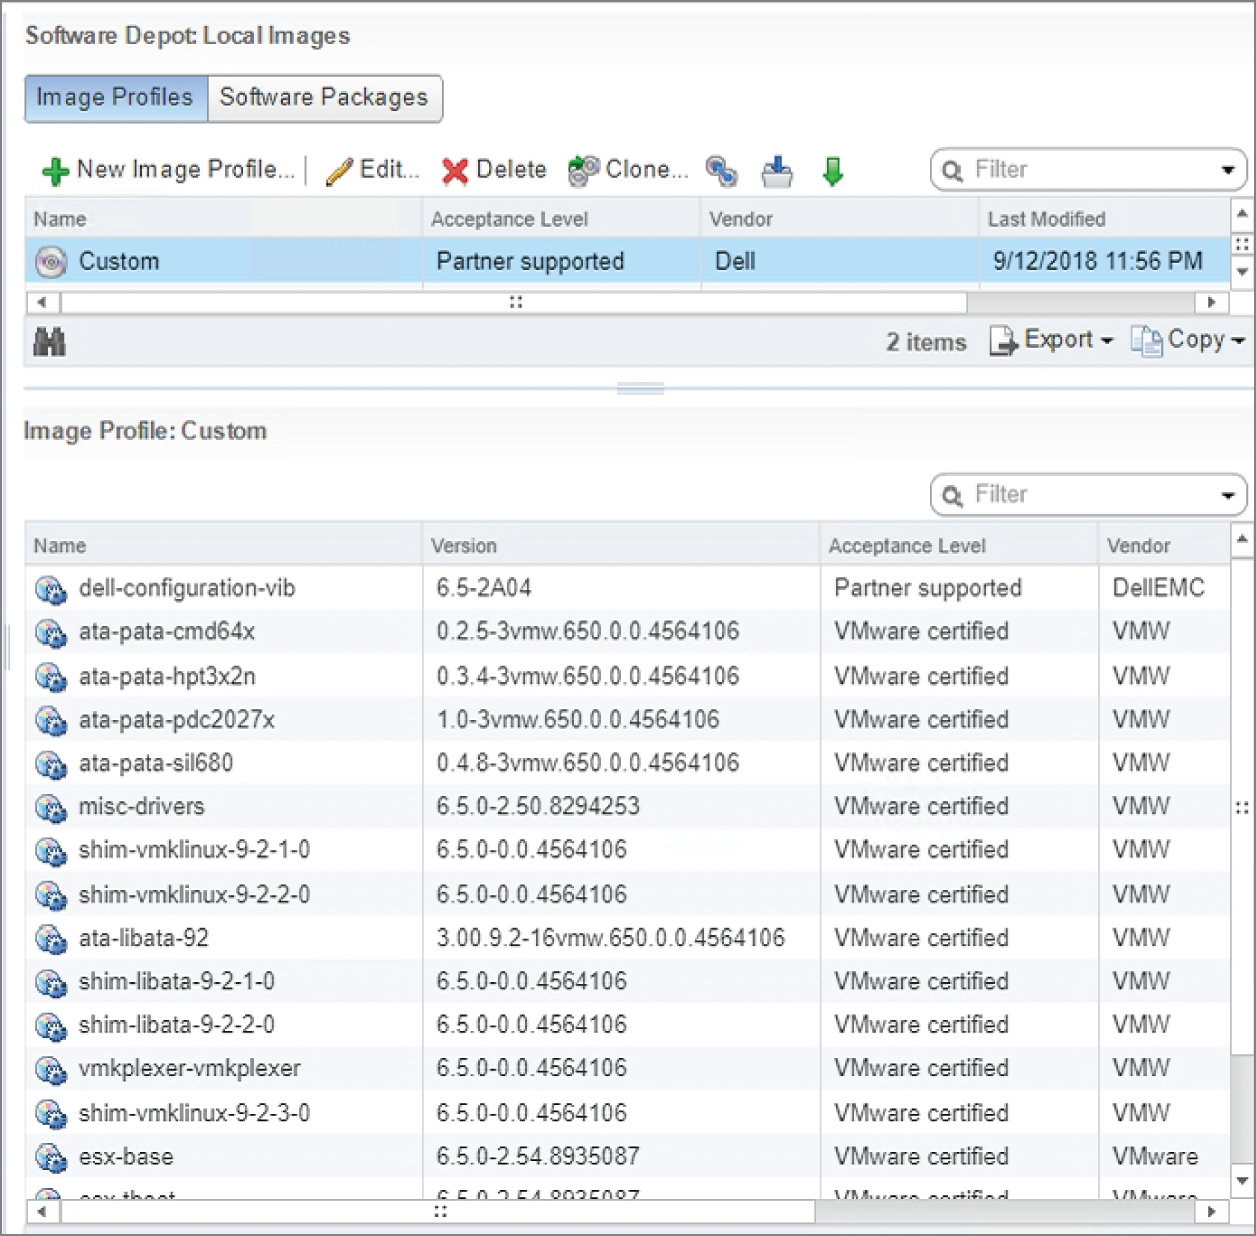
FIGURE 9.12 Custom image profile
Stateless Caching enables the host to cache the software image obtained from Auto Deploy on a local or remote disk or a USB drive. This has the primary advantage of allowing the host to boot even if the Auto Deploy server is not available during startup.
Note that if the vCenter server is available but the Auto Deploy service is not available when a Stateless Cache host boots, it will not join the vCenter server automatically, but the hosts can be manually joined. If the vCenter server is unavailable, you will need to use the host client to manage the hosts.
Stateful Install will install the Auto Deploy–sourced image to a local, remote, or USB drive on the host. The host will not contact Auto Deploy again after the install.
Make sure you set the boot order of the host properly:
- Stateless Cache: Attempt to boot from network, then boot from disk.
- Stateful Install: Attempt to boot from disk, then boot from network.
For Stateless Cache, it will always attempt to contact the Auto Deploy server and if that fails will boot from the cached image. For Stateful Install, once the image is installed it will boot from there and not contact Auto Deploy.
You will also need to set the proper system image cache profile settings on the Host Profile assigned to the hosts. See Figure 9.13 for the possible options.

FIGURE 9.13 System image cache profile settings
If you choose either of the options that do not use a USB disk, you will also need to specify the disk to use and choose to overwrite VMFS and/or ignore local SSD drives (Figure 9.14).

FIGURE 9.14 Configuring stateful installs
Employing Host Profiles
VMware vSphere Host Profiles offers a solution to manage and compare host settings. While host profiles are a key component of Auto Deploy, they have significant usage even if Auto Deploy is not used in the environment. Host profiles can be used to ensure that all of your hosts are configured identically across datacenters, to ensure that any new change is applied uniformly, to speed deployment of hosts, or to troubleshoot why hosts do not behave the same.
The standard host profiles workflow is as follows:
- Build a “gold” host with all the appropriate settings.
- Extract a host profile from the gold host.
- Apply the profile to a new host.
- Check for any differences between the new host and the profile.
- Apply the changes from the profile to the new host.
However, not all steps have to be followed. Instead of applying the profile to hosts, you can export it to keep as a backup or use with a separate vCenter installation. You can also choose to only compare settings and not remediate.
Host profiles are managed using the Host Profiles menu option from the Operations and Policies section of the Home menu (Figure 9.15). You can also start Host Profiles management from Policies and Profiles, accessed from the Home drop-down menu.

FIGURE 9.15 Managing host profiles
Creating and Using Host Profiles
To create a new host profile, you use the Extract Profile wizard (Figure 9.16).
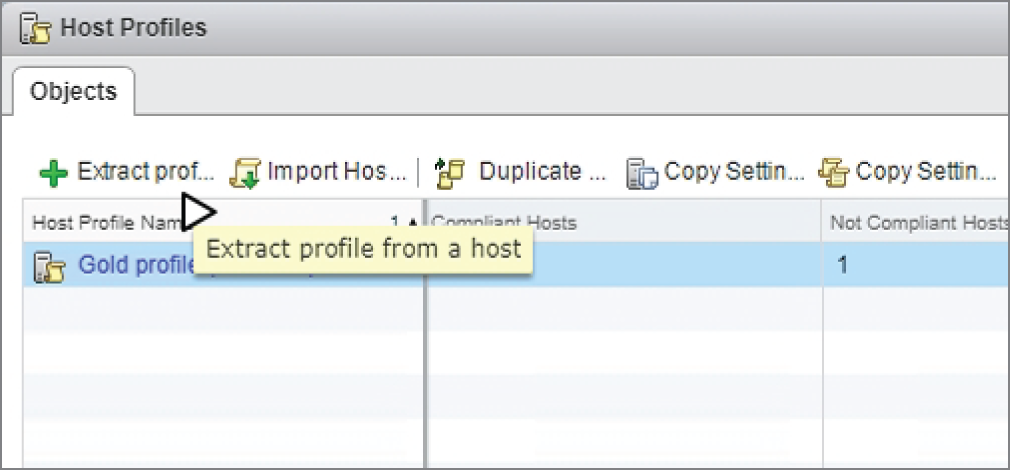
FIGURE 9.16 Extracting a host profile
Once the profile is extracted you can review the settings captured and edit them by clicking the profile name (Figure 9.17).
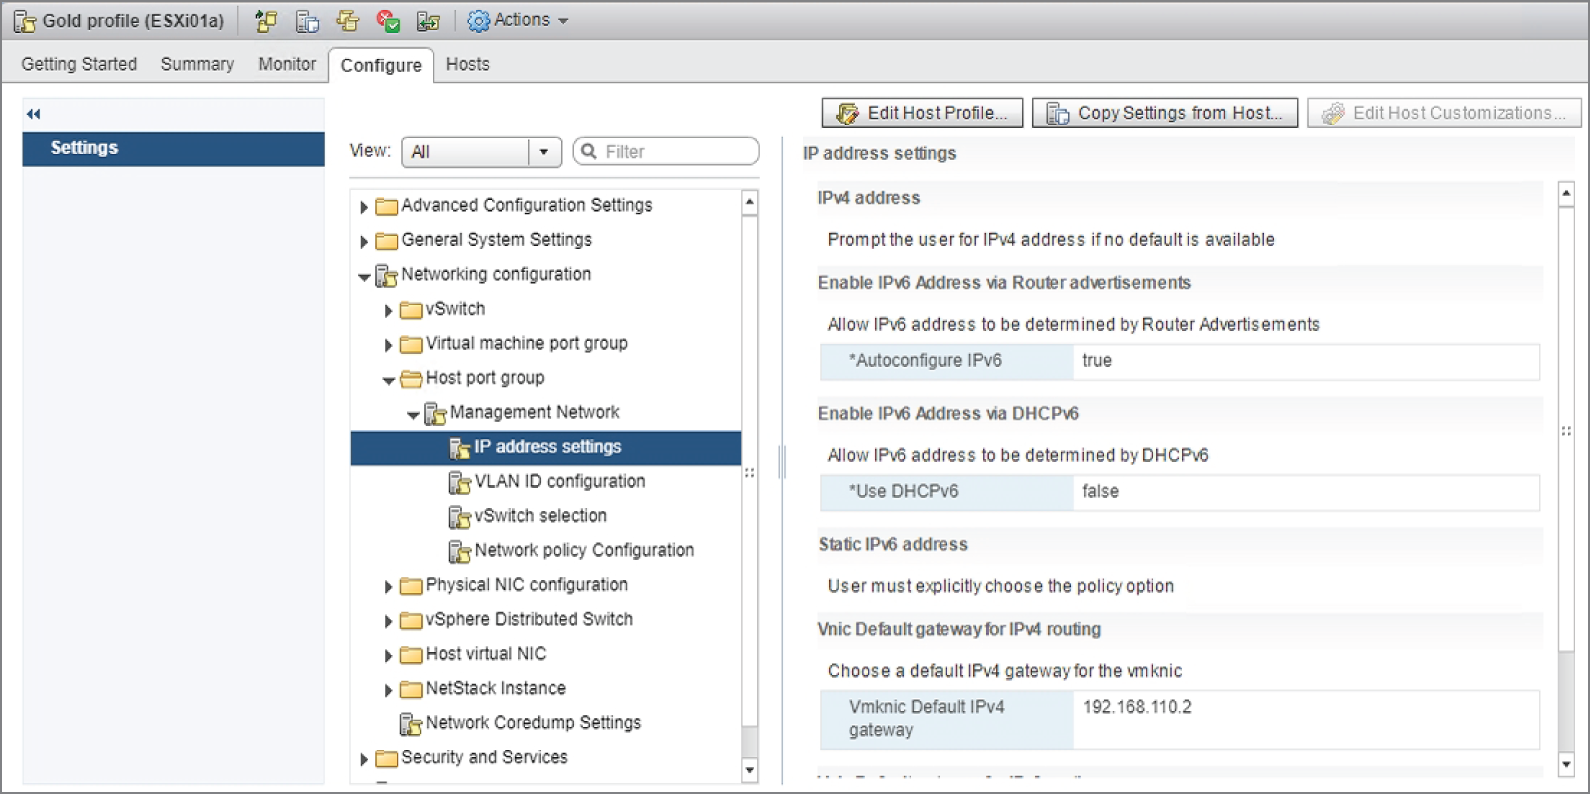
FIGURE 9.17 Viewing host profile settings
In addition to changing captured settings, you can also disable sections of the host profile (see Figure 9.18) so they will not be used for compliance checks or remediation. This can be useful when storage or networking parameters vary or you only want to remediate some settings.

FIGURE 9.18 Disabling host profile settings
Once the profile contains the settings desired you can attach it to individual hosts or all hosts in a cluster by using the Attach/Detach wizard in Host Profiles or the Host Profiles actions menu available from a cluster or host object (Figure 9.19). Be advised that you can only attach one profile to a host at a time.
When a profile is applied to a host, it may require customization—fields that typically have unique values for each host, such as IP address, MAC address, IQN name, and so on. When the profile is attached, the values will be read from the attached host and you will be prompted to validate those values (Figure 9.20).

FIGURE 9.19 Host Profiles menu on a cluster object

FIGURE 9.20 Customize hosts.
After a profile has been attached to a host, you can check host compliance and view the results from within the profile (Figure 9.21) from the host or from the cluster (Figure 9.22).

FIGURE 9.21 Checking host compliance from the profile
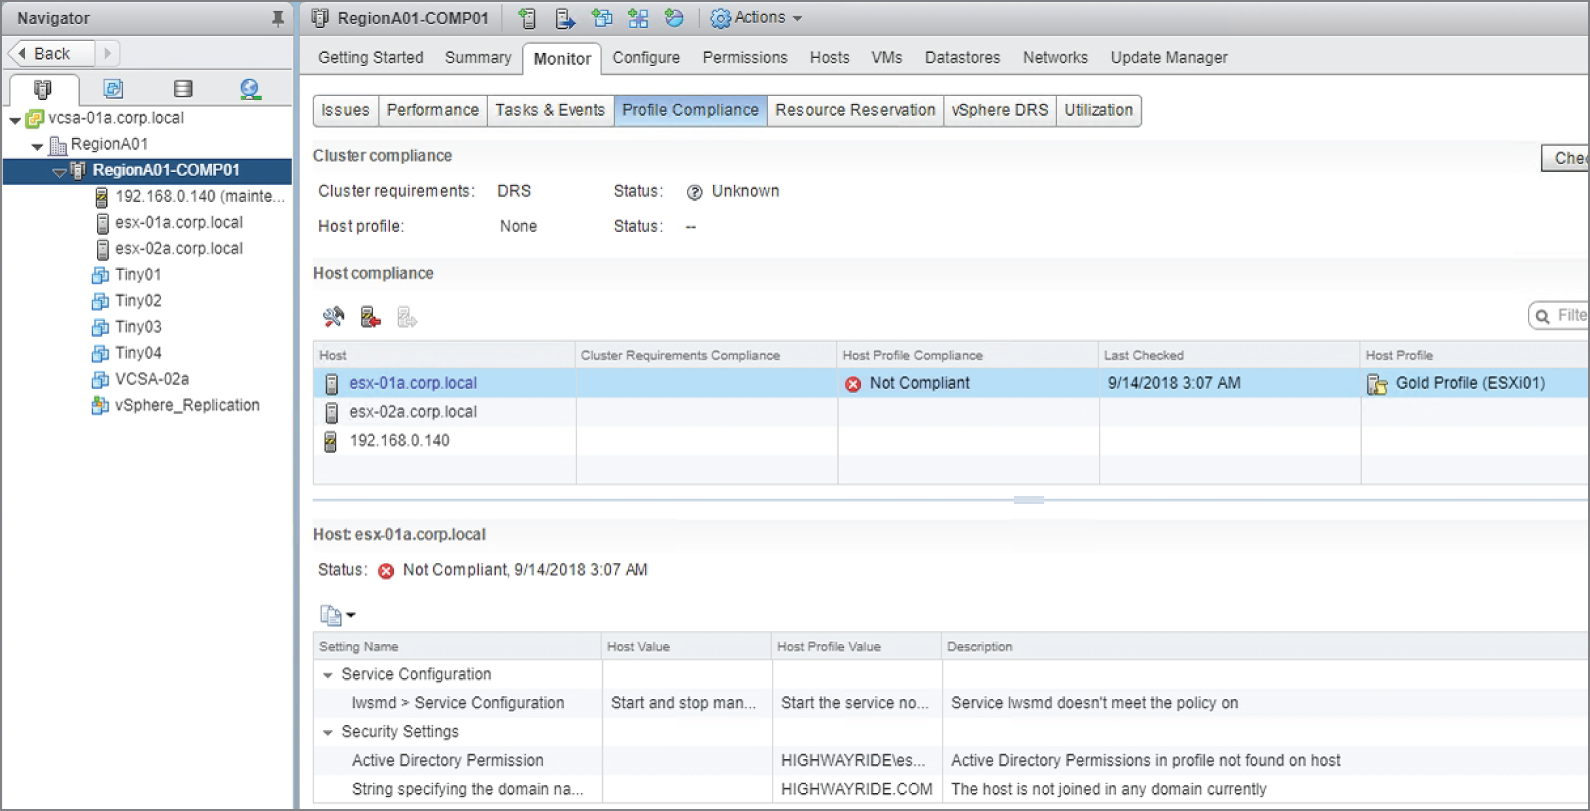
FIGURE 9.22 Checking host compliance from the cluster view
Whether or not you have checked the host's compliance with the profile, you can remediate the host to correct any differences (Figure 9.23).

FIGURE 9.23 Remediate a host from the cluster view.
If you no longer wish to associate a host profile with a particular host or all the hosts in a cluster, you can detach the profile using the Action menu on the host or cluster object (Figure 9.24) or from within the host profile.
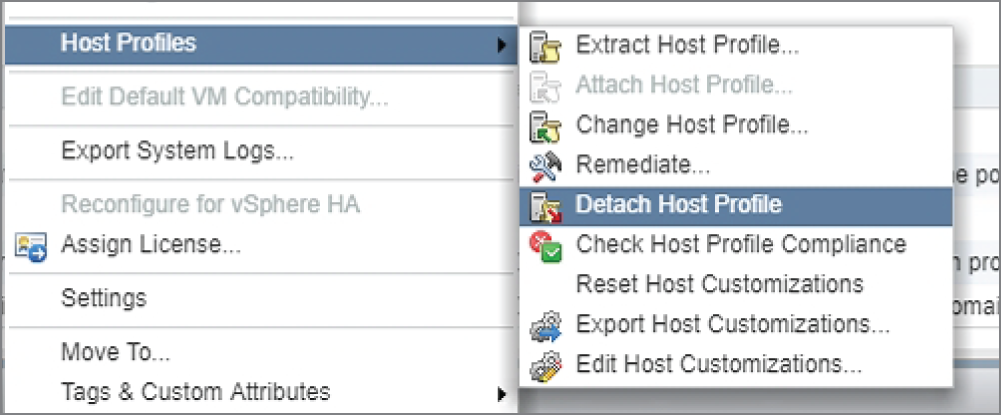
FIGURE 9.24 Detaching a host profile
Note that if you want to switch profiles, there is a Change Profile wizard also available from the Action menu on the host or cluster object or from within the host profile.
Importing and Exporting Host Profiles
You can keep host settings in separate datacenters in sync by importing and exporting host profiles between them. By keeping a set master to compare against, you can ensure consistency between environments.
While you might be able to use one profile between all of your hosts with no changes, you will likely need to strip out a number of settings to avoid considerable overhead. Properties such as syslog and NTP servers, not to mention network and storage, would have to be either removed or adjusted for each environment.
However, you could use one “universal master” profile with settings that are consistent across the environments, such as security profiles, and use the Copy Settings to Host Profiles wizard to copy the settings from the master profile to the local “gold” profile (Figure 9.25).

FIGURE 9.25 Copy settings from one profile to another.
You can then export the profile with the security settings to use across all datacenters (Figure 9.26) and import it into the other vCenter environments (Figure 9.27). Host profiles use XML with a .vpf filename extension.
You will note that administrator passwords are not exported with the profile (Figure 9.28). They will need to be set when the policy is imported and applied.
Advanced Profile Modifications
One of the more advanced uses for host profiles is to change storage paths and network switch configuration.
For example, you can change the path section plug-in for a particular storage device using the PSP configuration branch of the storage configuration (Figure 9.29).
Edit the PSP Name field to the desired plug-in and then apply the profile.
You can also quickly update switch changes, including security policies and traffic shaping (Figure 9.30).

FIGURE 9.26 Exporting a host profile

FIGURE 9.27 Importing a host profile

FIGURE 9.28 Passwords are not exported with the host profile.

FIGURE 9.29 Changing a storage device's PSP using a host profile

FIGURE 9.30 Changing security settings on a network switch using a host profile
Using Answer Files
When applying host profiles across many hosts, it may be easier to supply the required customization settings using customization files instead of entering the values in the GUI. The file was referred to as an answer file in previous version of vSphere.
You can generate a customization file from a profile that has been attached to a host (Figure 9.31).
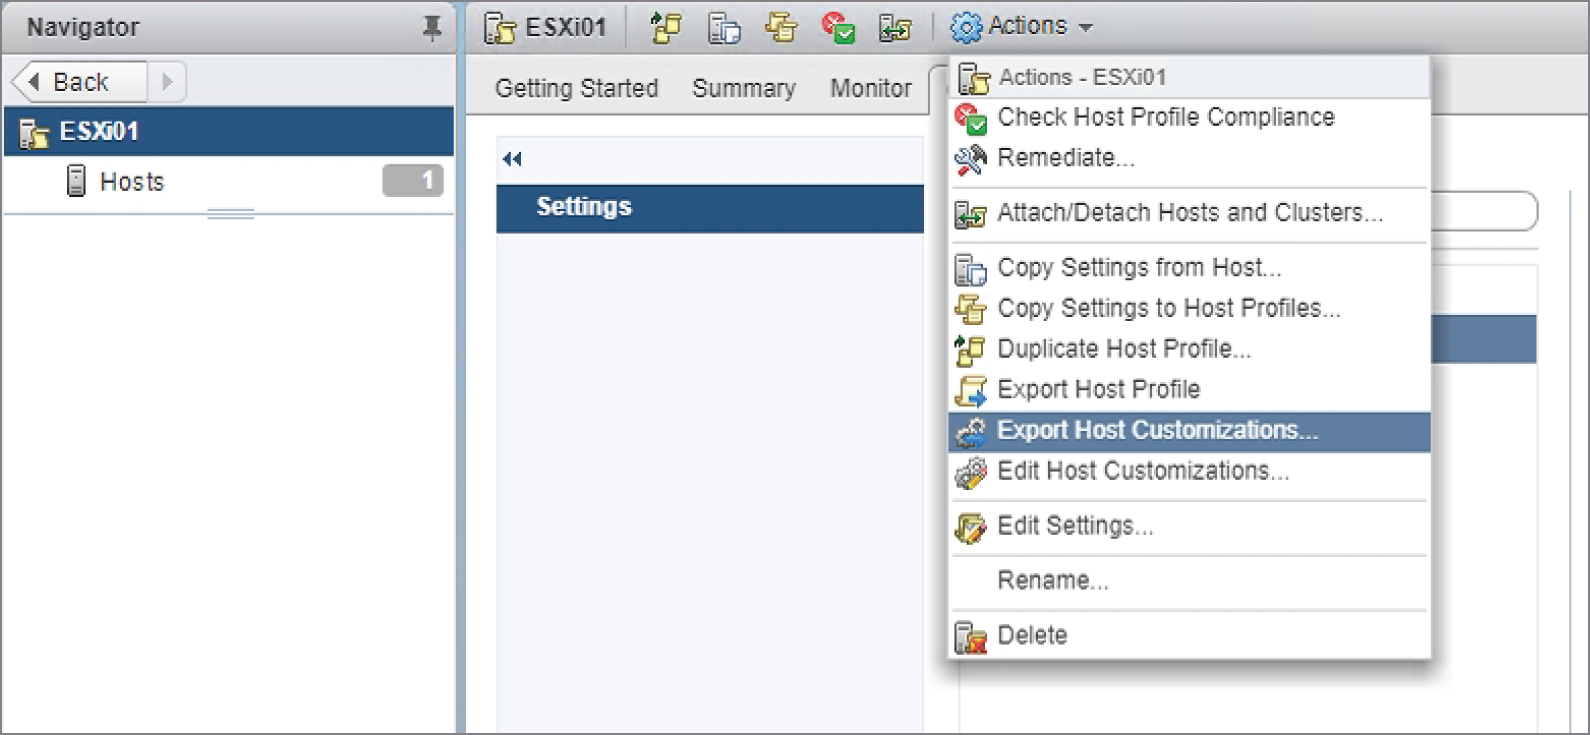
FIGURE 9.31 Changing security settings on a network switch using a host profile
The customization file is a CSV (.csv) text file (Figure 9.32) that can be copied and edited for other hosts.

FIGURE 9.32 Sample customization file
You can use the Edit Host Customizations tool from inside the profile (Figure 9.33) to make changes to host customizations and upload customization files for specific hosts.

FIGURE 9.33 Launch the Edit Host Customizations wizard.
Summary
This chapter has covered Auto Deploy and Host Profiles. These two features provide methods for automatically deploying ESXi hosts and comparing and applying host settings between different hosts.
With Auto Deploy, ESXi hosts can be deployed without physical intervention. Those hosts can be stateless, cached stateless, or installed. With a stateless deployment, an ESXi image is pulled from the Auto Deploy server each time a host boots. With a stateless cached configuration, the image will be stored where the host can access it after the initial boot in case Auto Deploy isn't available during subsequent boots. Using the install settings, Auto Deploy is contacted only during the initial boot and ESXi is installed to the host.
With each of those Auto Deploy configurations, you can provide all of the settings required by the host using Host Profiles. These profiles can also be used to compare and remediate settings between hosts or exported to be used to ensure consistent settings in other vCenter installations.
Exam Essentials
Understand the Auto Deploy sequence. The host queries DHCP for IP settings, a TFTP server, and a boot loader file. Then the server pulls the boot loader file and tramp file from the TFTP server. The PXE process on the host starts to boot with the bootloader and uses the tramp file settings to query the Auto Deploy server. The Auto Deploy server matches the host to an image and a profile and supplies those to the host.
Know the specifics of the Auto Deploy boot. The DHCP options are 66 (boot server) and 67 (boot file). The default bootfile name is undionly.kpxe.vmw-hardwired. The third-party servers needed are DHCP and TFTP.
Know that a host will wait if no image is matched when using Auto Deploy. These hosts can be found in the Discovered Hosts tab and can be matched to an image using the Add to Inventory wizard.
Understand how host profiles work. Only one host profile can be attached to a host. You have to extract a profile from a host or import a profile to get started. You can copy settings between profiles using the Copy Settings wizard. Not all settings are universal; some require customization for each host.
Know how customization and customization files work. When you attach a host, you must supply the customization settings that are unique to each host. You can export and import customization files in CSV format.
Review Questions
- How many host profiles can be attached to a host?
- One on either the host or the cluster
- Two: One on the host and one on the cluster
- Three: One on the host, one on the cluster, and one on the datacenter
- Four: One on the host, one on the cluster, one on the datacenter, one on vCenter
- You have settings in two host profiles that you would like applied to all hosts. What is the simplest method to do this?
- Create customization files for each server with the settings.
- Extract a new profile and edit the settings.
- Use the Copy Settings to Host Profiles wizard.
- Use the Copy Settings from Host wizard.
- Where can profile compliance for all hosts in a cluster be checked?
- The datacenter object under Host Profiles
- The cluster object under Host Profiles
- The datacenter object under Profile Compliance
- The cluster object under Profile Compliance
- Where can profile compliance for a specific host in a cluster be checked?
- The host object under Host Profiles
- The cluster object under Host Profiles
- The host object under Profile Compliance
- The cluster object under Profile Compliance
- Why would you export a host's customization settings? (Choose two.)
- To enable Stateless Cache mode
- To back up before re-creating the host
- To use as a template for other hosts
- To use the host profile with a different vCenter
- What steps are always required to compare settings between hosts? (Choose three.)
- Extract
- Remediate
- Attach
- Export
- Check
- What file format do exported host customizations use?
- CSV
- VPF
- ZIP
- ISO
- What file type does an exported host profile use?
- CSV
- VPF
- ZIP
- ISO
- What file type does an imported software depot use?
- CSV
- VPF
- ZIP
- ISO
- What is a custom depot?
- A URL-accessible image repository
- An uploaded software bundle
- A place to add image profiles
- A collection of deploy rules
- A host console display is shown in the accompanying image. Where can this host be found in the web client?
- It cannot be found using the web client.
- Discovered Hosts.
- Deployed Hosts.
- The cluster it was assigned.
- Where should you look to resolve the error in the screenshot? (Choose two.)

- Network configuration
- DHCP server
- TFTP server
- Auto Deploy server
- Deploy rules
- Where should you look to resolve the error in the following screen shot? (Choose two.)

- Network configuration
- DHCP server
- TFTP server
- Auto Deploy server
- Deploy rules
- Where should you look to resolve the error in the following screen shot? (Choose two.)
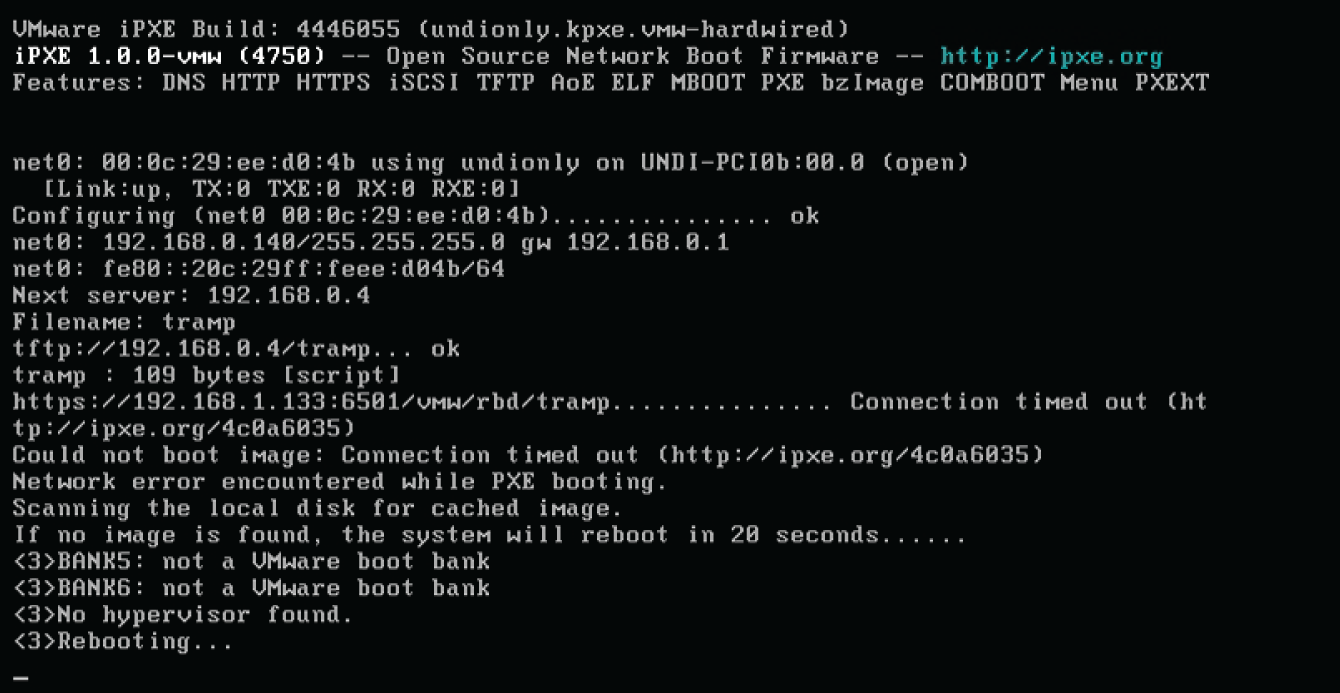
- Network configuration
- DHCP server
- TFTP server
- Auto Deploy server
- Deploy rules
- Where should you look to resolve the error in the following screen shot? (Choose two.)

- Network configuration
- DHCP server
- TFTP server
- Auto Deploy server
- Deploy rules
- What rules options are available to match a rule to multiple hosts? (Choose three.)
- All hosts
- Asset tag
- Serial number
- Network
- VLAN
- A rule was created to provide an image for all hosts. (See the following screen shot.) However, no hosts are completing the boot process after powering on. What can resolve this issue?

- Set a host profile.
- Assign a compatible image.
- Activate the rule.
- Set a host location.
- What will happen to a host in inventory if all deploy rules are deleted and the host is restarted?
- The host will boot properly.
- The host will boot but need to be added to vCenter manually.
- The host will not complete the boot process.
- You cannot delete all deploy rules.
- What Auto Deploy method will always boot to ESXi regardless of access to the Auto Deploy server? (Choose two.)
- Stateless Caching
- Stateful Install
- Stateless Deploy
- Stateful Caching
- What steps will prevent an existing host from receiving an image during bootup? (Choose two.)
- Remote the host from inventory.
- Create a new rule that only includes the host's vendor value.
- Create a new rule that doesn't include any of the host's values.
- Delete any existing rules that applied to the host.
