Chapter 7
Planning Your Virtual Reality Project
IN THIS CHAPTER
![]() Thinking through your project
Thinking through your project
![]() Learning about virtual reality design principles
Learning about virtual reality design principles
![]() Understanding best practices for virtual reality projects
Understanding best practices for virtual reality projects
Congratulations! You’ve decided to take the plunge and create content for virtual reality (VR) consumption. Now, you may find yourself wondering where to start. It can be daunting to jump into a new technology without understanding everything that may go into planning that project.
This chapter explains the “getting started” phase of VR project development. Here, you find out what goes into planning a VR project, including defining the scope, target audience, hardware support, and timeline.
I also explain some VR design principles and best practices that have emerged from trial and error over thousands of applications of VR technology. Incorporating these principles and best practices will save you time, money, and countless headaches down the road.
Defining Your Virtual Reality Project
If you’re at this point in your project planning, I assume you’re confident that VR is appropriate for your project. I you aren’t sure, turn back to Chapter 6 and work through the steps to determine whether your project is a good fit for VR in the first place. This may be the most important decision of all.
There are a number of standard project practices applicable to any project. These include steps such as clarifying goals, creating project specification documents, defining project budget, and defining project scope. I don’t cover most of these subjects in depth in this chapter because their usage in a VR project is nothing out of the ordinary. However, there are some topics that, while applicable to both standard projects and VR, have unique ramifications with VR projects. Defining your timeline is one example — it’s a general requirement for any project, but there are special considerations for VR projects.
Planning can be tricky. Each of these choices can affect and influence the others. Deciding how you envision your VR execution can determine the hardware you’ll have to use. Determining the hardware to support can force your hand in defining your audience. And so on and so on.
 Prioritize what’s most important for your project and work from there. For example, if the level of user immersion is the most important component of your project, that likely means building to the best possible VR hardware specifications, which may end up limiting your market. If reaching the largest possible market is more important to you than final project execution, you may want to start with finding the hardware with the largest market share, and then work backward from there to determine how being limited to that hardware’s capabilities will influence your project’s level of immersion.
Determining your project execution
For VR, determining your project execution — how you’ll complete the work to best meet your project’s requirements — will require answering a number of questions. These questions will cover the goals of your project; your users; and the design and development of your application. Answering these questions is an important step. You often may find yourself with conflicting answers. Try to address all the following points; then prioritize which ones are most important to you. (Is it market penetration of headsets? Level of immersion in the headset? Support for a particular platform?)
 If you’ve reached this point in the book, I assume you’ve already worked through the steps in Chapter 6 to evaluate your project needs at a general level. If you have yet to do so, I encourage you to review those steps before proceeding.
Ask yourself the following questions to help determine your project execution:
- What is your vision for a successful project? Your users’ wants and needs should be the ultimate decision driver, of course, but establishing your own baseline can also be useful. What will it take for you to consider this a successful project? Hitting certain sales numbers? Reaching installed user base numbers? Execution on a new or untested platform?
- What level of immersion and realism does your project require? The level of immersion you require for your project can drive the type of headset you build for, the amount of development time, the development tools you may choose to utilize, and so on. A multi-user open-world real-time VR game with a high level of immersion and realism would likely require a large team of highly specialized designers and developers, a long project timeline, and the graphics processing capabilities of a high-end tethered VR headset. On the other hand, a business looking for a way to distribute 3D videos of their interiors for marketing purposes may set its timeline and requirements much lower.
Defining your audience
In order to define your audience, you need to consider a number of factors. Some of the factors are quite broad, such as who this application will help, how it will help them, and what other applications they may be using currently that accomplish a similar task. Other items to consider will be more targeted, such as whether you’re developing for a tech-savvy audience that’s comfortable exploring or a novice audience that will need a lot of guidance. You should also decide whether your experience will be targeted at the broadest audience possible who might be using a variety of hardware devices, or a small subset of known users using a specific device type.
The more targeted audience-based questions may help start to drive other application decisions. If, for example, you want to reach the largest number of users, you’ll consult the latest sales numbers to define that market. Using current sales numbers would likely find you targeting the mobile VR marketplace (Samsung Gear VR, Google Daydream, and so forth), which in turn would drive you to create content for those platforms. If, instead, your target market were high-end gamers, you’d likely find yourself putting mobile VR aside and developing for desktop/gaming system devices such as Windows Mixed Reality, HTC Vive, and Oculus Rift.
Determining hardware support
There are plenty of VR options to choose from — from simple mobile-based VR viewers to full-scale VR gaming rigs with the highest resolution and realism available. You need to decide what VR hardware you want your application to support. This decision is intertwined with the others in this chapter. Here’s an overview of your options:
-
Low-powered mobile experiences: If you target the lowest-powered mobile experiences, such as Google Cardboard, you’ll be very restricted when it comes to the type of experience you can create. Most Cardboard experiences are little more than viewing experiences. You won’t be able to offer users much interactivity, because you’ll be hamstrung by the device’s capabilities. Targeting the lowest-powered mobile experiences may also mean that your test matrix (the devices you need to check to make sure your application works on) could be very broad, because a user could be on any number of devices that support Google Cardboard.
On the upside, developing an experience targeting the lowest common denominator of headset often means that porting this same experience to higher-powered headsets will be a relatively easy task.
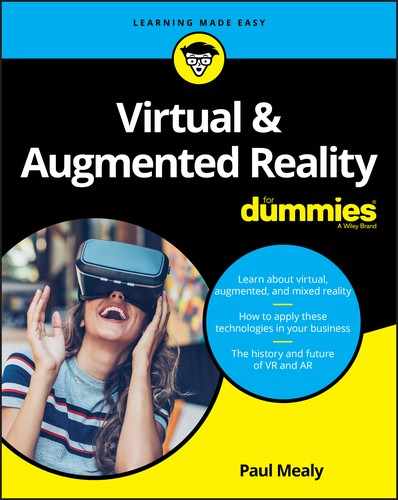
Good candidates for this level of hardware support are simple applications that are little more than 360 viewers with limited interactivity, or businesses looking to market themselves by supplying branded devices to an unknown hardware user base. For example, McDonald’s in Sweden created what it dubbed “Happy Googles,” Happy Meal boxes that could be turned into VR viewers similar to a Google Cardboard (see Figure 7-1). The experience ran off of the consumer’s device, allowing McDonald’s to create an engaging experience while providing little more than a standard Happy Meal box.
Google Cardboard headsets are generally fragile, but they’re also relatively low cost, making them a good choice for situations where damage concerns may exist. For example, middle schools and high schools looking to provide a VR experience to students at a low cost may opt for inexpensive Google Cardboard headsets.
-
Mid-level mobile headsets: Targeting a mid-level mobile headset (such as Google Daydream or Gear VR) offers decent market penetration, though only a smaller subset of Android devices can run on Google Daydream or Gear VR. This limits your potential audience, but unlike Google Cardboard, you have a baseline for the minimum level of performance. Only certain higher-powered mobile devices are compatible with Daydream and Gear VR. This smaller subset of devices also means that when testing your application, you’ll likely have a smaller subset of devices to test against. Plus, experiences that run well on Daydream often can fairly easily be ported to Gear VR, and vice versa.
However, remember that mobile experiences still come at a performance cost. They don’t come close to the level of immersion that can be offered by the higher-end externally powered devices. Current mobile executions don’t offer physical movement (or room-scale movement) within VR (though the next generation of mobile VR devices seeks to cross that barrier). They also typically have lower refresh rates of the display, as well as a lower resolution than the high-end headsets.
-
High-level VR experiences: The highest-level (“desktop”) VR experiences can offer a far more immersive experience than the mobile-based VR headsets. Most of these high-level devices allow some sort of room-scale experience — that is, physical movement within the virtual environment. The level of realism offered can engage the user far more than less-expensive hardware options are capable of. The hardware you need to test against when creating your VR application is strictly defined, and that can help make testing and debugging simpler.
On the downside, the size of the high-end market is currently smaller than the mobile VR market, and development for these devices can be more complicated. The higher-end headsets can have more friction for users — meaning that, unlike mobile VR apps, they may require a user to set aside time and space to use. Porting a higher-level experience to lower-level ones can be much more difficult. A number of features that work for high-level experiences don’t work at all on lower-level devices. Your entire app concept may need to be rethought, or it may literally be impossible to execute on lower-level devices.
Good use cases for this type of experience are high-end games, premium entertainment applications, and technical learning applications with a well-defined user base. Any applications that are looking at targeting the highest level of immersion for mass consumer devices belong here. Many games, entertainment applications, location-based solutions, or industry-specific executions where the hardware will be a known commodity build toward these high-end experiences.
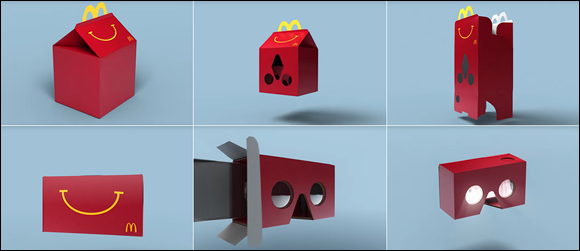
FIGURE 7-1: McDonald’s Sweden instructional video for creating “Happy Googles.”
Don’t get too caught up in thinking that the best experiences have to be as high-powered as possible. The better performance offered by “desktop” VR is always a plus, but performance doesn’t necessarily make for a great experience. There are millions of mobile apps in the Apple App Store and Google Play Store that are far more popular than they ever would have been if they were built to run only on more powerful desktop PCs. What’s more, a number of mobile VR apps perform fairly processor-intensive work (such as live video streaming) without issue.
All that is to say you can create engaging experiences in both mobile and desktop VR. Make sure to evaluate your project based on project needs and feature requirements, and not by processor speed alone.
Defining your timeline
Defining a timeline is vital for any project, but VR development time can be difficult to estimate at this stage. With VR still in its infancy, a project with a long timeline will run parallel to advances in the VR industry. Consequently, the cutting-edge project you began developing nine months ago may no longer be so cutting-edge when it finally comes to market, thanks to the rapid advances taking place in the industry. Maybe a new headset has been released, making the older headsets you had been targeting appear dated. Maybe a new piece of haptic hardware has been released. Or maybe it’s a piece of software that changes the way content in VR is being created.
Thankfully, this frenetic pace of development is becoming a bit more predictable for VR. Plenty of advances are happening almost daily, but many of them don’t directly affect consumers or won’t directly affect them for some time. Mass consumer devices take time to create, evaluate, and release to the public.
When estimating your project’s timeline, consider how it will align with any upcoming hardware devices or software applications. You may need to support new devices that launch between project inception and completion, especially if the devices directly intersect your target market. For example, any VR project planning on launching in late 2018 should consider when the Oculus Santa Cruz (or any other HMDs) may be launching around the same time and how that should affect your project launch.
Fortunately, you’ll likely have some advance notice before a major new product appears on the market. Companies developing hardware for large consumer bases typically announce a timeline of what they expect to launch in the near future. Many of the large headset manufacturers such as Oculus and HTC have announced what consumers can expect in the next 6 to 12 months. That doesn’t tell the entirety of those companies’ plans for VR in the future, but it can at least provide a general road map and timeline of where things are headed.
 VR is still a fledgling industry. Out-of-the-blue releases still occasionally happen. If you plan on becoming part of an emerging industry such as VR, you may find a good deal of your job is simply keeping up with all the changes. It can be one of the most enjoyable parts of the job, but also one of the most frustrating. If you’re hoping for an industry with more stability that requires less time exploring future trends, VR may not be for you — at least not until the dust settles a bit.
Exploring Design Principles in Virtual Reality
The term design principles refers to a set of ideas or beliefs that are held to be true across all projects of that type. Some examples of design principles within two-dimensional design include designing on a grid or creating a visual hierarchy of information to direct users to the most important information first. These principles, or agreed-upon standards, are created over many years, after much experimentation and trial and error. And although these principles can be broken, they should be broken only for good reason.
Because VR is such a new field, we’re still in the process of discovering what its design principles are. Often, in order to find out what design principles work well, you have to find out what does not work well. Best practices and standards will emerge over time as the VR community grows and more mass consumer VR applications are produced. In the meantime, there are a number of generally agreed upon standards for VR, regardless of the platform for which you may be designing. I review them in the following sections.
Starting up
Upon initially entering an experience, users often need a moment to adjust to their new virtual surroundings. A simple opening scene where users can adjust to the environment and controls can be a good way to help them acclimate to your experience. Allow the user to acclimate themselves to your application and move into your main application experience only when they’re ready.
Figure 7-2 shows how the game Job Simulator handles startup. Job Simulator’s entry screen establishes a clean environment and asks the user to complete a simple task similar to the controls used within the game in order to start the game. This gives the user time to adjust to the game environment and get accustomed to the controls that she’ll use in the game.
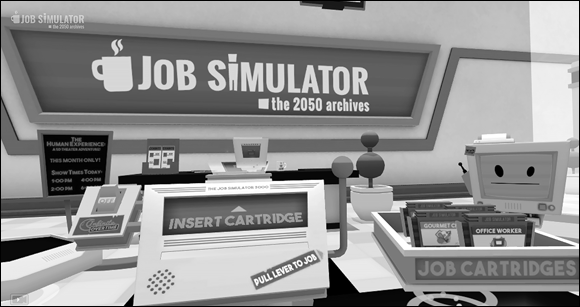
FIGURE 7-2: The intro screen for Job Simulator game.
Focusing the user’s attention
VR is much less linear than experiences within a traditional 2D screen. In VR, you must allow the user the freedom to look around and explore the environment. This freedom of exploration can make it difficult when you need to attract the user’s attention to certain portions of your application. A director in a 2D movie can frame the user’s vision exactly where he wants it. As the director within a 3D space, however, you have no idea if the user might want to face your main content or be focused on some other part of the scene. You cannot force a user to look a certain direction — forcing a users’ view in VR is one of the quickest ways to trigger simulator sickness.
However, there are a number of ways to focus the user’s attention where you want it. Subtle 3D audio cues can guide a user to the area where action is occurring. Lighting cues can be used as well. For example, you can draw the user’s attention by brightening the parts that you want them to look at and darkening parts that you want to deemphasize. Another way is to reorient the content itself within the app to match the direction the user is facing.
In what is perhaps the easiest solution, some applications simply put messaging within their 3D environment instructing the user to turn around and face wherever they want the user’s attention to be focused. This technique is also used in room-scale games in which a user may only have a limited number of sensors available to track his motion in the real world. It can be easy to get turned around in room-scale VR, and putting up a message can help a user re-orient himself in relation to the real-world sensors. Figure 7-3 shows this method in use in the game Robo Recall. The messaging is blunt, but it gets the point across for where the user should focus.

FIGURE 7-3: Robo Recall instructing a user to re-orient himself.
Whichever way you choose to handle focusing the user’s attention, realize that in VR, users must have freedom of choice. That freedom of choice can conflict with what you may want them to do. Finding ways to allow that freedom of choice while also focusing the user where you want him is a vital part of a well-designed VR experience.
Understanding the comfort zone
With traditional 2D design, user interface (UI) has been restricted to certain canvas sizes. Whether it’s the size of the browser or the size of the monitor, something has always placed a limit on the dimensions in which your user interface could exist. VR removes those restrictions. Suddenly a 360-degree canvas is at your disposal to design with! UI can be anywhere and everywhere!
Before you start throwing interface elements 360 degrees around your users, there are a number of best practices to keep in mind for making your experience comfortable. If a user must rotate her head too much, strain to read interface text, or flail her arms about in an attempt to use your UI, it will most likely lead to a poor experience and cost you users.
Alex Chu of Samsung Research, in his presentation “VR Design: Transitioning from a 2D to a 3D Design Paradigm” (https://youtu.be/XjnHr_6WSqo), provides a number of measurements for the minimal, optimal, and maximum distance objects should appear away from a user. In the presentation, Chu discusses optimal distances for 3D object presentation. As objects get closer to your face, your eyes will begin to strain to focus on them. Around 0.5 meter away from the user and closer is typically the distance where this strain begins to occur; Oculus recommends a minimum distance of at least 0.75 meter in order to prevent this strain from occurring. Between that minimum distance and about 10 meters is where the strongest sense of stereoscopic depth perception occurs. This effect begins to fade between 10 and 20 meters, and after 20 meters, the effect basically disappears.
These limitations give you an area between 0.75 and 10 meters in which you should display your main content to the user. Content any closer will cause eye strain to your users, and any farther out will lose the 3D effect you’re trying to achieve. These guidelines are illustrated in Figure 7-4, which is a top-down view of the user. Circle A represents the minimum comfortable viewing distance for users, 0.5 meter. You should avoid placing content within this space. Circle B represents the sweet spot where content should be placed: between 0.75 and 10 meters. At 20 meters, a user’s stereoscopic depth perception disappears (circle C).

FIGURE 7-4: Comfortable viewing distances in VR.
As the resolution of VR headsets improves, the stereoscopic effect may be retained the farther you get from the user, past the 20 meters or so in which the effect disappears today. For now however, the 20-meter mark is still a good rule of thumb for content design.
Google VR Designer Mike Alger, in his “VR Interface Design Pre-Visualization Methods” presentation (https://youtu.be/id86HeV-Vb8), also discusses the range of motion users can comfortably rotate their heads horizontally and vertically. Chu and Alger both mention that the range users can comfortably rotate their heads horizontally is 30 degrees, with a maximum rotation of 55 degrees. Combined with the field of view (FOV) of the higher-end, tethered headsets (averaging around 100 degrees), this gives a user a range of around 80 degrees to each side for comfortable viewing of the main content, and around 105 degrees to each side for peripheral content. When displaying content to your users, focus on keeping your main content within the user’s horizontal comfort zone of viewing.
Figure 7-5 displays these values in a top-down view. Circle A is an average horizontal FOV for a VR headset. Circle B represents the area a user can comfortably see when rotating his head (the FOV of the headset plus a comfortable rotation of 30 degrees to each side). Circle C represents the maximum rotation of a user’s head (55 degrees to each side) combined with the FOV of a headset. For your applications, you should likely focus on keeping content within the comfortable viewing area as represented by circle B. As FOV of headsets improve, these values will change to allow further visibility to the side. However, it is worth noting that most headsets (with a few exceptions such as Pimax) seem to be unconcerned with greatly improving FOV in the upcoming second generation of devices. Regardless, you’ll be able to use the same calculations to determine the comfortable viewing area yourself in the future.

FIGURE 7-5: Horizontal comfort zone for head movement.
Similarly, there is a comfortable range of motion for users to rotate their heads vertically. The comfort zone here is around 20 degrees comfortably upward, with a maximum of 60 degrees upward, and downwards around 12 degrees comfortably and 40 degrees maximum.
Figure 7-6 displays the comfortable range of motion for vertical FOV. Most headsets don’t publish their vertical FOV, only horizontal. We use 100 degrees as an average vertical FOV, as represented by circle A. The comfortable viewing zone is represented by circle B with the rotation combined with the headset FOV. A user can comfortably rotate her head upward 20 degrees and downward 12 degrees. Circle C represents the extremes, with a maximum vertical rotation upward of 60 degrees and a maximum rotation downward of 40 degrees.

FIGURE 7-6: Vertical comfort zone for head movement.
Although horizontal head movements are a small annoyance, vertical head rotation can be extremely taxing to a user to hold for long periods of time. Vertical FOV of headsets is also not typically published, so it’s approximated here. On some headsets, it may be even smaller. As a best practice, try to keep the user’s vertical head rotation to a minimum for the most comfortable user experience.
Using the preceding information, you can establish a set of guidelines for placing content relative to the user. You can place content wherever you like of course, but important content should stay within the areas where the horizontal, vertical, and viewing distance comfort zones converge. Content in areas outside of these zones is less likely to be seen. If you’re creating content that is meant to be hidden, or only discoverable through deep exploration, areas outside of the comfort zone can be good areas to place that content. However, avoid keeping your content there once discovered. If a user has to strain for your content, he won’t stick around in your app for long.
Giving the user control
A basic tenet of VR is giving users control over their surroundings. In real life, users are fully in control of how they move and perceive the world around them. When users “lose control” in real life is when their movements and perception of the world around them seem to no longer align. This feeling can be equated to the feeling of being inebriated, or what’s commonly referred to as simulator sickness (discussed later in this chapter).
Simulator sickness should be avoided at all costs — users hate it and it will drive them away from your product. You want to ensure your users always feels in control. Their movements should always be mirrored by movement within the virtual environment. Additionally, you should never wrest control away from the user. You don’t want to move the user around without her actions triggering that movement. Also, don’t rotate or reposition a user’s view of the virtual environment. If a repositioning is needed, it is advisable to fading to black for a moment, then fade back up to your repositioned environment. Although it’s not optimal, fading to black (triggered by a user’s action of course) and back in can be a way to reposition the users environment without your user feeling as if she has relinquished control.
Understanding locomotion
Locomotion in VR has yet to be gracefully solved. One of the strengths of VR is the ability to create compelling environments that a user wants to explore. But it doesn’t matter how compelling an environment is if a user can’t move about to explore it.
If your experience is more than a static, seated experience, you need to enable users to move about your space. You can create a method for a user to move forward using a standard, non-VR method, such as a joystick, but this kind of motion is apt to produce nausea. It tends to trigger a feeling of acceleration, which in turn triggers simulator sickness, discussed later in this chapter.
When adding movement to your VR app, ask yourself how movement is enhancing the user’s VR experience. Unnecessary movement can be disorienting to users. Focusing on what value movement adds to the experience can help strengthen your VR app.
Many applications find ways for users to be grounded on some sort of machine or platform, and then move the platform itself rather than the user. This can help alleviate some of the potential issues of simulator sickness, especially if the user remains seated.
For room-scale VR experiences, “teleportation” is one of the current standards for smoothly moving users large distances in virtual worlds. The user aims at the place they would like to move to, some sort of graphic appears to define the target destination, and then the user triggers the teleportation.
Figure 7-7 shows how a user in Vive’s headset can teleport around the Vive home scene. Holding down the touchpad displays a graphic to the user defining where she’ll teleport to if teleportation is triggered. A user can then choose to trigger the teleportation event, moving her to the new location, or cancel the teleportation event.

FIGURE 7-7: HTC Vive’s home scene teleportation visual.
Locomotion is very much an evolving best practice for VR, and one that is going to require plenty of exploration for what works best for your application. Application developers are implementing and improving upon this mechanic in a number of ways. Robo Recall, a game for Oculus Rift, enables the user to determine the direction he’ll be facing when he arrives at his teleportation location, instead of just teleporting him straight to the location in whatever direction he’s currently looking. Budget Cuts, a game by publisher Neat Corp, gives the user the ability to peek at his destination and how he’ll be facing before he teleports, removing the confusion that can often occur when a user teleports to a new location.
And teleportation is not the only method of locomotion available. Many applications offer standard “walking” locomotion to users. Smooth locomotion, or sliding through virtual environments without jerky acceleration, can help retain some immersion of a standard method of movement with some of the potential “simulator sickness” triggers minimized.
Other solutions for locomotion within a limited space are also being explored. Saccade-driven redirected walking is a method of redirecting users away from real-world obstacles that allows users to traverse large virtual scenes in a small physical space. In saccade redirection, the virtual scene is rotated slightly in a way invisible to the user, causing the user to alter his walking slightly in response to the digital scene changes. For example, utilizing this method, a user may think he’s walking in a straight line in the digital world, but in the physical world he’s guided on a much more circular path.
Large-scale movement in VR is a mechanic that has yet to be completely solved. Teleportation is often used, but it’s only one of many possible solutions for motion. If your application requires movement, review other applications and their methods of locomotion and see what you think makes sense. You may even be the one to come up with the new standard of motion for VR experiences!
Providing feedback
In the real world, a person’s actions are usually met with some sort of feedback, visual or otherwise. Even with your eyes closed, touching a hot stove provides the tactile feedback of a burning sensation. Catch a thrown ball, and you feel the smack of the ball against your palm and the weight of the ball in your hand. Even something as simple as grasping a doorknob or tapping your finger on a computer key provides tactile feedback to your nervous system.
VR doesn’t yet have a method for fully realizing tactile feedback (see Chapter 2), but you can still find ways to provide feedback to the user. If available on the VR device you’re targeting, haptic feedback (via controller vibrations or similar) can help improve the user’s immersive experience. Audio can also help notify the user of actions (when a user clicks a button, for example). Providing these audio and haptic cues alongside your visuals can help make your VR environments seem more immersive and help notify a user when actions have occurred.
Following the user’s gaze
Knowing where a user’s gaze is centered is a necessary part of VR interactions, especially in the current versions of head-mounted displays (HMDs) that don’t provide eye tracking. Many VR applications rely on a user’s gaze for selection. In order to utilize gaze, you may want to provide a visual aid, such as a reticle (see Chapter 2) to help a user target objects. Reticles are typically visually distinct from the rest of the environment in order to stand out, but small and unobtrusive enough to not draw the user’s attention away from the rest of the application. Reticles should trigger some sort of indication to the user as to what elements are interactive within the environment.
Figure 7-8 shows a reticle being used for selection in PGA’s PGA TOUR VR Live application. Without motion controllers, the reticle enables the user to see what interactive item her gaze should be triggering.

FIGURE 7-8: A reticle in use in PGA Tour VR Live.
Depending on your particular VR implementation, you may also choose to display a reticle only when a user is close to objects with which she can interact. This allows a user’s focus to be undisturbed by the extra visual information of a reticle when focused on things that she can’t interact with at the moment.
Not every VR application needs a reticle. When using motion controllers to select or interact with objects outside of a user’s reach, a reticle is typically discarded in favor of a laser pointer and cursor for selection. You could just display the cursor, but you’re better off displaying a combination of a virtual model of the controller, a laser ray, and the cursor all together. Doing so helps users notice the motion controller and cursor, helps communicate the angle of the laser ray, and provides real-time feedback and an intuitive feel to the user about how the orientation of the motion controller can affect the input of the ray and cursor.
Figure 7-9 displays a motion controller and laser pointer in use in Google Daydream’s home menu scene.
FIGURE 7-9: A laser pointer in Google Daydream’s home menu scene.
Avoiding simulator sickness
Discussed briefly in Chapter 2 as one of VR’s biggest issues to overcome, simulator sickness is the feeling of nausea brought on by a mismatch between the user’s physical and visual motion cues. At its simplest, your eyes may tell you that you’re moving, but your body disagrees. Nothing will make a user leave your app more quickly than the feeling of simulator sickness.
There are a number of ways to avoid simulator sickness.
- Maintain application frame rate. Sixty frames per second (fps) is generally considered the minimum frame rate in which VR applications should run in order to prevent simulator sickness in users. If your app is running at less than 60 fps, you need to find ways to get back to at least 60 fps. Maintaining this frame rate is likely the most important tip to follow, even if it means cutting other portions of your application.
- Maintain continuous head tracking.Head tracking in VR refers to the application continuously following the motion of your head, and having those movements reflect themselves within the virtual environment. Aligning your application’s virtual world positioning with a user’s real-world head movements is vital to avoiding simulator sickness. Even a slight pause while tracking a user’s movements can induce motion sickness.
-
Avoid acceleration. In the real world, our bodies notice acceleration far more than we notice movement at a constant velocity. While you’re traveling in a car going 65 mph on a highway, you may not feel any different than if you were sitting on a park bench. However, your body definitely feels the difference of the acceleration from zero to 65 mph.
Acceleration or deceleration in the real world provides a visual change as well as a sensation of motion to the end user. VR, however, provides only a visual update. This lack of sensation of motion in VR can trigger simulator sickness. Avoid accelerating or decelerating a user in VR. If movement within the space is required, try to keep users moving at a constant velocity.
- Avoid fixed-view items. Any graphic that “fixes” itself to the user’s view can trigger the feeling of nausea. In general, keep all objects in 3D while in VR instead of fixing any items to the user’s 2D screen.
More best practices to consider
Here are a few more useful best practices for colors, sounds, and text usage, all of which can affect user experiences:
-
Bright colors and environments: Imagine the feeling of leaving a darkened theater and walking out into a bright sunny day. You find yourself shielding your eyes against the glare of the sun, squinting and waiting for your eyes to adjust. In VR, the same feeling can be triggered by quickly changing from any dark scene to a bright scene.
Immediate brightness changes from dark to light can annoy and disorient users, and unlike stepping out into bright sunlight, when in a headset a user has no way of shielding her eyes from the glare. Avoid harsh or quick changes between darker scenes to lighter scenes or items.
Extremely bright colors and scenes can be difficult to look at for an extended period of time and can cause eye fatigue for your users. Be sure to keep scene and item color palettes in mind when building out your experiences.
- Background audio: VR applications should be immersive. In the real world, audio plays a huge part in helping you to determine your environment. From the bustling noises of a busy street to the white noise hum and background noises of an office environment, to the echoing silence of a dark cave, audio cues alone are often enough to describe an environment. Make sure to consider how not only event-based audio (such as audio triggers on user interaction), but also background audio will play a role in your experiences.
-
Text input and output: When in VR, users are surrounded with visual information from the environment. Adding large blocks of text to this environment can overload the user with input. Where possible, avoid using large blocks of small-font text. Short text excerpts rendered in large print are typically preferred.
Similarly, it can be difficult for a user in VR to input a large amount of text. As discussed in Chapter 2, text input in VR has yet to be completely solved. If text input is a requirement of your application, consider carefully how this can occur in the VR space.
Defining Your Social Experience
Another core issue to consider when developing for VR is how your experience may be used in social settings. The rise of personal computers and mobile devices led to unprecedented development of social experiences and ways to connect users either in the same room or across the globe. From playing games to networking for work to sharing our photos and videos, the options available for connecting with other users have spawned massive industries within the hardware and software worlds. VR has the capability to create entirely new methods of social interaction, but these interactions won’t appear on their own.
VR as a standalone experience has the potential to feel very solitary. Due to the nature of VR headsets, most experiences close the user off from those in the room with them. The user’s eyes are covered via the headset visuals, and the user often wears headphones as well, closing off external sound input. Without the ability to communicate with anyone in the physical world, most social interaction in VR needs to occur within the experience itself.
Experiences such as Altspace VR, Rec Room, or Pluto VR — social VR applications focused around meeting other users and hanging out and playing games in VR — are proving that social VR applications can be enjoyable experiences. And mixed media games such as Keep Talking and Nobody Explodes (a cooperative game wherein a single user with a headset communicates to a group of users in the same room without headsets) have shown that social interaction in VR can be thought of in outside-the-box ways.
Figure 7-10 captures gameplay of Keep Talking and Nobody Explodes VR. The user inside the headset is the only one who can see and disarm the bomb (right) but requires input from users outside the headset to do so.
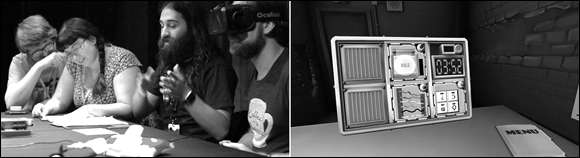
FIGURE 7-10: Keep Talking and Nobody Explodes VR gameplay.
When planning your own VR applications, put some thought into your social experience. Simply allowing multiple users in your experience often isn’t enough to make something compelling. You shouldn’t feel restrained by the norms of established social interaction. VR is a new tool that has the potential to create a whole new kind of social interaction. What could that mean to your application? What do your users gain by adding a social component to your experience? How will your application enable this social interaction?
Best practices for social experiences in VR are still being established. But much like Facebook for the web, whoever “solves” how VR may be used socially may change the norms of social interaction for years to come.