Chapter 8
Planning Your Augmented Reality Project
IN THIS CHAPTER
![]() Learning how to plan your augmented reality project
Learning how to plan your augmented reality project
![]() Discovering design principles to follow for augmented reality experiences
Discovering design principles to follow for augmented reality experiences
![]() Understanding best practices for augmented reality projects
Understanding best practices for augmented reality projects
Augmented reality (AR) has existed for some time, but the field is just now starting to be pushed forward at consumer scale. This is a great time to be entering the AR marketplace — it’s wide open and in need of innovators! Nearly everyone is starting at square one. We’re all on the learning curve together. However, it also means that there are few successful AR projects or applications to look to for best practices concerning how to approach building a successful AR app. But they are there. By analyzing some of the existing research around AR and various AR applications, a number of standards and best practices can be observed.
This chapter helps you plan your AR application and offers some best practices for developing your application. Use it as a set of guidelines, but don’t be afraid to experiment on your own to find out what you think makes a great AR application. You may stumble across a new best practice for AR, or you may find that your method doesn’t work at all, but don’t be afraid of failure! In a field as new as AR, learning what does not work can be just as valuable as learning what does.
Defining Your Augmented Reality Project
 Before you begin planning your AR project, review the material in Chapter 6 to ensure that AR is an appropriate execution for your project. After covering the steps in Chapter 6, you may find that AR is not a good fit. If so, you’ll have saved yourself a lot of wasted time and effort trying to fit a square peg into a round hole.
The steps for planning a successful AR project share many traits with traditional project planning, as well as some of the steps outlined in the Chapter 7. The following topics from Chapter 7 are also applicable to AR projects.
Determining hardware support
Determining what hardware or software to support is vital to any technology project, but AR presents some unique challenges. The field is very young, and options can be limited. Having limited options can actually be a benefit: Because only a handful of options are available, choosing what to support isn’t that difficult. Of course, your project’s execution will be limited by what the chosen platform can handle.
For AR projects intended for mass consumption, your choice will likely be limited to mobile AR solutions such as Apple’s ARKit and Google’s ARCore. Currently, AR headsets and glasses are mainly targeted for enterprise-level audiences.
Webcams
Webcam-based or video camera-based AR has been around for some time as a method of executing AR for mass consumption. As far back as 2009, Esquire released an AR-powered issue featuring AR and Robert Downey, Jr., intended for use with a reader’s webcam. Holding the cover and certain pages of the magazine up to a webcam would reveal AR content on top of the page played back on a user’s monitor, providing the consumer with additional audio and video.
Reviews of the experience were mixed. Although it was innovative at the time, the form factor of the experience was awkward. Having a properly configured webcam, downloading the specific AR software, and holding up the magazine in front of your computer while simultaneously trying to watch the results proved to be a lot of work and an awkward experience for what some viewed as minimal payoff. Esquire’s own editor-in-chief, David Granger, hand-waved their implementation of AR at that time as a bit of a “gimmick.”
Tools do exist to produce AR content via consumer desktop hardware, but, as exemplified by Esquire’s AR issue, they aren’t always the best experience for the consumer. If consumers have to configure a webcam, download files, and place markers to trigger AR holograms for a less-than-compelling experience, they quickly lose interest. So, if mass adoption is a requirement for your AR application, a mobile-device AR solution is likely appropriate.
 ARToolKit is a powerful toolset for creating certain types of experiences on both desktop and mobile devices. It was created by Hirokazu Kato of Nara Institute of Science and Technology in 1999 and was often used to power early webcam-based AR experiences. It is now run as an open-source project after being purchased by DAQRI, an industrial AR company. ARToolKit can still be used on various platforms such as Windows, OS X, Android, and iOS.
A webcam-based AR experience can be compelling if it’s an appropriate use for your audience. Figure 8-1 shows webcam-based AR at use in a LEGO store. A store customer can hold any LEGO box sets up to the LEGO Digital Box, which utilizes a webcam. A 3D model and animation of the LEGOs within the package is displayed via video screen on top of the box as if in the real world. Although it still can be a bit of an awkward experience having to hold the box up to the webcam, it’s intended to be a short experience to generate buying interest. It’s also a controlled environment where the hardware is known ahead of time, eliminating many variables that can cause problems with AR webcam experiences.

FIGURE 8-1: Webcam AR at use at the Digital Box display in the LEGO store.
Mobile
The biggest strength of mobile AR executions is the prevalence of mobile devices. They also offer less friction for the user than most headsets, and the familiarity of the form factor can mean users need very little education about how to interact with the device.
However, mobile executions do come with drawbacks. Mobile devices are often underpowered compared to their desktop and headset counterparts. The larger device base means you’re often creating an application targeting a number of different devices. You may have to test against a large number of devices to be sure of compatibility. As the AR-capable mobile device list grows, the sheer number of devices may make it necessary to test against only a sampling of devices instead of the entire list of potentially supported devices.
 The experience mobile devices offer exists as sort of a “training wheel” step to AR’s ultimate form factor. Mobile AR offers a window into an augmented world, nowhere near the imagined future of AR glasses fully augmenting the world around us. Its form factor busies the users’ hands and can force some awkward and tiring interactions with users holding devices out in front of them with one hand and awkwardly navigating with the other. The training wheels of mobile AR may sustain the mass consumer base for now, but expect a better-executed solution eventually.
Because of the awkwardness of navigation, strong use cases for mobile AR are mostly for experiences intended for brief consumption periods, or scenarios in which the user is allowed some time to rest in between interactions. Mobile AR is not yet a form factor that is suitable for using hours on end. Games such as Pokémon Go can be looked at as a good example of this. Rather than a full AR experience (requiring users to constantly hold their devices out in front of them and interact with an augmented environment), Pokémon Go uses AR to augment the main experience of the game itself only in small segments, allowing users to rest their arms in between holding the devices out in front of them for the AR experience.
Amazon’s AR View also displays this in action — the AR portion of the experience is an enhancement to the main shopping application. Users shop as they normally would on a mobile device, entering the AR portion only when they want to view an item in their environment.
Headsets
If mass consumer adoption is not a requirement for your project, your choices for AR execution open up to allow AR headsets (as well as the aforementioned webcams). Wearable AR such as AR headsets, glasses, and goggles are likely the future of AR, so evaluating and building headset-based AR applications now can give companies a significant head start over their competitors. These devices also allow a much deeper level of interaction than other AR executions, and can uphold AR’s promise of becoming the technology that helps us get things done.
However, the drawbacks of AR headsets can be significant for some projects. The mass consumer market is currently nonexistent, with no indication of when it will take off in popularity. There is also uncertainty about not only which device consumers will lean toward, but which sort of experiences as well, such as a device tethered to an external computer versus non-tethered devices. It could be that none of the currently available headsets wins out and the final form factor for consumer AR is radically different from what exists today.
That said, strong use cases for headset- or glasses-based applications do exist. These applications are typically built for enterprise consumption or with a specific market already in mind. Currently, you should find yourself designing for AR headsets only if you’ll be directly defining the hardware and software for use in the experience.
If you’re defining the hardware, you need to understand the potential drawbacks of each available type of hardware before making a selection. Cost, tethered versus non-tethered, mobility of device, field-of-view (FOV) requirements, extra hardware requirements — these are all items you need to consider when choosing to build for AR headsets.
Defining your timeline
As with VR projects (see Chapter 7), you must carefully consider the length of the project timeline when building out an AR project. If you’re planning a long-term AR project, advances in AR technology may force you to adjust your execution.
For example, if you were to decide upon a year-long AR engagement to build applications for the Microsoft HoloLens, recognize that in that year there may be significant software or hardware updates or releases that may change your project execution. Perhaps a new mixed-reality headset will be announced, or new software will change how you build your application. To help minimize such changes, I suggest shorter project timelines (if feasible) or breaking up your project into smaller sprints where industry updates can be addressed without the need to fully overhaul the project.
Advances in AR hardware and software arrive fairly often, and can sometimes feel as if they come out of the blue even for those embedded in the industry. Don’t let the possibility of these potential advances scare you away from AR projects! Advances are always welcome in the industry. Your project can take advantage of them, especially if you’re keeping an eye on the industry, making adjustments to your project as you go. If you’re creating an AR application, however, it’s vital to keep up with industry updates and align your plans with upcoming innovations. Keeping up with the changes means you can adjust on the fly and stay ahead of the curve in your development efforts.
Exploring Design Principles in Augmented Reality
Design principles are a set of ideas or beliefs that are held to be true across all projects of that particular type. Design principles are typically created through years of trial and error within a field. The older a field of study is, the more likely a strong set of design principles has arisen around that field for what works well and what doesn’t.
AR developers are still defining the design principles that will help guide the field forward. The field is still very young, so these best practices are not set in stone. That makes AR an exciting field to be working in! It’s akin to the early Internet days, where no one was quite sure what would work well and what would fall on its face. Experimenting is encouraged, and you may even find yourself designing a way of navigating in AR that could become the standard that millions of people will use every day!
Eventually a strong set of standards will emerge for AR. In the meantime, a number of patterns are beginning to emerge around AR experiences that can guide your design process.
Starting up
For many users, AR experiences are still new territory. When using a standard computer application, videogame, or mobile app, many users can get by with minimal instruction due to their familiarity with similar applications. However, that is not the case for AR experiences. You can’t simply drop users into your AR application with no context — this may be the very first AR experience they’ve ever used. Make sure to guide users with very clear and direct cues on how to use the application on initial startup. Consider holding back on opening up deeper functionality within your application until a user has exhibited some proficiency with the simpler parts of your application.
Many AR experiences evaluate the user’s surroundings in order to map digital holograms in the real world. The camera on the AR device needs to see the environment and use this input to determine where AR holograms can appear. This orientation process can take some time, especially on mobile devices, and can often be facilitated by encouraging a user to explore his surroundings with his device.
In order for users to avoid wondering whether the app is frozen while this mapping occurs, be sure to show an indication that a process is taking place, and potentially invite the user to explore her surroundings or look for a surface to place the AR experience. Consider displaying an onscreen message to the user instructing her to look around her environment. Figure 8-2 displays a screenshot from the iOS game Stack AR, instructing a user to move her device around her environment.

FIGURE 8-2: Stack AR instructing a user to move camera around the environment.
Most AR applications map the real world via a computational process called simultaneous localization and mapping (SLAM). This process refers to constructing and updating a map of an unknown environment, and tracking a user’s location within that environment.
If your application requires a user to move about in the real world, think about introducing movement gradually. Users should be given time to adapt to the AR world you’ve established before they begin to move around. If motion is required, it can be a good idea to guide the user through it on the first occurrence via arrows or text callouts instructing him to move to certain areas or explore the holograms.
Similar to VR applications, it’s important that AR applications run smoothly in order to maintain the immersion of augmented holograms existing within the real-world environment. Your application should maintain a consistent 60 frames per second (fps) frame rate. This means you need to make sure your application is optimized as much as possible. Graphics, animations, scripts, and 3D models all affect the potential frame rate of your application. For example, you should aim for the highest-quality 3D models you can create while keeping the polygon count of those models as low as possible.
3D models are made up of polygons. In general, the higher polygon count of a model, the smoother and more realistic those models will be. A lower polygon count typically means a “blockier” model that may look less realistic. Finding the balance between realistic models while keeping polygon counts low is an art form perfected by many game designers. The lower the polygon count of a model, the more performant that model will likely be.
Figure 8-3 shows an example of a 3D sphere with a high polygon count and a low polygon count. Note the difference in smoothness between the high-polygon model and the low-polygon model.
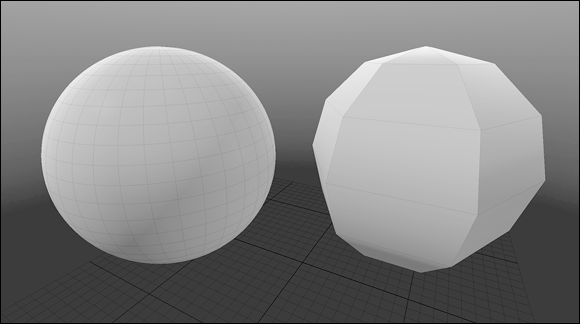
FIGURE 8-3: High-poly versus low-poly sphere models.
Similarly, ensure that the textures (or images) used in your application are optimized. Large images can cause a performance hit on your application, so do what you can to ensure that image sizes are small and the images themselves have been optimized. AR software has to perform a number of calculations that can put stress on the processor. The better you can optimize your models, graphics, scripts, and animations, the better the frame rate you’ll achieve.
Considering the environment
AR is all about merging the real world and the digital. Unfortunately, this can mean relinquishing control of the background environment in which your applications will be displayed. This is a far different experience than in VR, where you completely control every aspect of the environment. This lack of control over the environment can be a difficult problem to tackle, so it’s vital to keep in mind issues that may arise over any unpredictable environments your application may be used in.
Lighting plays an important part in the AR experience. Because a user’s environment essentially becomes the world your AR models will inhabit, it’s important that they react accordingly. For most AR experiences, a moderately lit environment will typically perform best. A very bright room such as direct sunlight can make tracking difficult and wash out the display on some AR devices. A very dark room can also make AR tracking difficult while potentially eliminating some of the contrast of headset-based AR displays. Many of the current AR headsets (for example, Meta 2 and HoloLens) use projections for display, so they won’t completely obscure physical objects; instead, the digital holograms appear as semitransparent on top of them.
AR is all about digital holograms existing in the environment with the user. As such, most AR usage is predicated on the user being able to move about their physical space. However, your applications could be used in real-world spaces where a user may not have the ability to move around. Consider how your application is intended to be used, and ensure that you’ve taken the potential mobility issues of your users into account. Think about keeping all major interactions for your application within arm’s reach of your users, and plan how to handle situations requiring interaction with a hologram out of the user’s reach.
In the real world, objects provide us with depth cues to determine just where an object is in 3D space in relation to ourselves. AR objects are little more than graphics either projected in front of the real world or being displayed on top of a video feed of the real world. As such, you need to create your own depth cues for these graphics to assist users in knowing where these holograms are meant to exist in space. Consider how to visually make your holograms appear to exist in the real-world 3D space with occlusion, lighting, and shadow.
Occlusion in computer graphics typically refers to objects that appear either partially or completely behind other graphics closer to the user in 3D space. Occlusion can help a user determine where items are in 3D space in relation to one another.
You can see an example of occlusion (foreground cubes partially blocking the visibility of the background cubes), lighting, and shadow all at play in Figure 8-4. The depth cues of occlusion, lighting, and shadow all play a part in giving the user a sense of where the holograms “exist” in space, as well as making the holographic illusion feel more real, as if the cubes actually exist in the real world, and not just the virtual.

FIGURE 8-4: 3D holographic cubes within the real world.
Understanding comfort zones
Understanding users’ interaction within their comfort zones is important, especially for AR applications that may be more focused on getting work done. You also need to understand the differences between comfort zones for interaction with a head-mounted AR device versus comfort zones for interaction with AR on a mobile device.
Head-mounted AR experiences are fairly similar to that of VR, with a few exceptions. As discussed in Chapter 7, you need to minimize how much users will be required to move their heads for any experiences longer than a few minutes. Though their work was focused on VR, Google VR Designer Mike Alger and Alex Chu of Samsung Research claim that users’ comfort level when rotating their heads horizontally is 30 degrees to each side, with a maximum rotation of 55 degrees. For vertical motion, rotation of 20 degrees upward is comfortable, with a maximum rotation upward of 60 degrees. Rotation downward is around 12 degrees comfortably with a maximum of 40 degrees.
When defining your comfort zones for head-mounted AR, it’s also important to consider how your application will be used. Will it require users’ direct interaction, such as with hand tracking and gestures, or just point and click via controller or touchpad? If it will require direct interaction, consider how that can be used comfortably, especially if the application is intended for extended use. As more and more AR applications are utility based, this consideration will become more important.
A report on office ergonomics by Dennis Ankrum (https://humanics-es.com/setting.htm) provides a good guide for seated AR experiences requiring user interaction, especially AR applications intended to be used in conjunction with (or as a replacement to) traditional computer usage. Ankrum lists the correct eye-to-screen distance for most users as 25 inches from the eyes, preferably more, and optimal placement for screens as 15 to 25 degrees below the horizontal plane of a user’s eye, resulting in a small “comfort zone” for seated AR experiences.
Meta has completed similar studies and achieved similar results with its headset for both standing and seated experiences. There is an “ideal content area” that exists between the intersection of where a user’s hands will be detected by the headset, the FOV of the headset itself, and the comfortable viewing angle for a user’s line of sight. Each headset is slightly different, but in general the ergonomics of a comfortable AR headset experience hold true across most platforms.
Figure 8-5 shows the best area for content display within the FOV of the Meta 2 headset. The tracking technology utilized for Meta 2’s hand tracking has a detection area of 68 degrees, optimized at a distance of 0.35 meter and 0.55 meter from the user. Combined with the 40 degree vertical FOV of the headset, an ideal content area can be established at the intersection of what is comfortable for the user to reach and see.

FIGURE 8-5: Ideal content areas for standing and seated Meta 2 experiences.
This comfort zone for interaction is not the same for every AR headset, but defining these zones will be similar for any current or future headsets. Carefully consider the amount of user movement and interaction that your application requires and what the comfort zones of your hardware may be. Take care to minimize the amount of neck rotation or unnecessary user motion. The first time a user has to reach up to “turn on” a virtual light bulb in your AR experience may be novel. If a user has to perform this action multiple times, it’ll quickly become tedious.
 Mobile device comfort zones are very different from that of head-mounted AR devices. In a mobile AR experience, a user is forced to hold his device a certain distance in front of his eyes and angle his arm or his head to get a view into the augmented environment within the device. Holding a device in this manner can be extremely taxing after a period of time, so try to find a way to minimize the user’s discomfort. If your application requires a large amount of user motion or long periods in which a user must hold his device out in front of him, find ways to provide rest periods to allow the user to rest his arms for a bit before continuing.
Interacting with objects
Most VR interaction takes place via a motion controller, but most headset-based AR devices utilize a combination of gaze and hand tracking for interaction. Often, AR headsets use gaze-based navigation to track where a user is looking to target items within the environment. When an item is targeted, a user will often interact with that item via hand gestures.
As such, you need to design your experience to keep the user’s hands within the headset’s area of recognition and work with each headset’s specific set of gestures. Educating the user about the area of recognition for gestures — and notifying users when their gestures are near the boundaries — can help create a more successful user experience.
Because this way of interaction is new to nearly everyone, keeping interactions as simple as possible is important. Most of your users will already be undergoing a learning curve for interacting in AR, figuring out the gestures for their specific device (because a universal AR gesture set has yet to be developed). Most AR headsets that utilize hand tracking come with a standard set of core gestures. Try to stick to these prepackaged gestures and avoid overwhelming your users by introducing new gestures specific to your application.
Figure 8-6 gives examples of the two core gestures for HoloLens, the “Air Tap” (A) and “Bloom” (B). An Air Tap is similar to a mouse click in a standard 2D screen. A user holds his finger in the ready position and presses his finger down to select or click the item targeted via user gaze. The “Bloom” gesture is a universal gesture to send a user to the Start menu. A user holds his fingertips together and then opens his hand.

FIGURE 8-6: Microsoft’s example of a user performing an “Air Tap” (A) and a “Bloom” (B).
Grabbing an object in the real world gives a user feedback such as the feel of the object, the weight of the object in his hand, and so on. Hand gestures made to select virtual holograms will provide the user with none of this standard tactile feedback. So it’s important to notify the user about the state of digital holograms in the environment in different ways.
Provide the user cues as to the state of an object or the environment, especially as the user tries to place or interact with digital holograms. For example, if your user is supposed to place a digital hologram in 3D space, providing a visual indicator can help communicate to her where the object will be placed. If the user can interact with an object in your scene, you may want to visually indicate that on the object, potentially using proximity to alert the user that she’s approaching an object she can interact with. If your user is trying to select one object among many, highlight the item she currently has selected and provide audio cues for her actions.
Figure 8-7 shows how the Meta 2 chooses to display this feedback to the user. A circle with a ring appears on the back of a user’s hand as he approaches an interactive object (A). As the user’s hand closes to a fist, the ring becomes smaller (B) and draws closer to the center circle. A ring touching the circle indicates a successful grab (C). A user’s hand moving near to the edge of the sensor is also detected and flagged via a red indicator and warning message (D).

FIGURE 8-7: A screen capture of in-headset view of a Meta 2 drag interaction.
Mobile device interaction
Many of the design principles for AR apply to both headsets and mobile experiences. However, there is a considerable difference between the interactive functionality of AR headsets and mobile AR experiences. Because of the form factor differences between AR headsets and AR mobile devices, interaction requires some different rules.
Keeping interactions simple and providing feedback when placing or interacting with an object are rules that apply to both headset and mobile AR experiences. But most interaction for users on mobile devices will take place through gestures on the touchscreen of the device instead of users directly manipulating 3D objects or using hand gestures in 3D space.
A number of libraries, such as ManoMotion (www.manomotion.com), can provide 3D gesture hand tracking and gesture recognition for controlling holograms in mobile AR experiences. These libraries may be worth exploring depending on the requirements of your app. Just remember that your user will likely be holding the device in one hand while experiencing your app, potentially making it awkward to try to also insert her other hand in front of a back-facing camera.
Your users likely already understand mobile device gestures such as single-finger taps, drags, two-finger pinching and rotating, and so on. However, most users understand these interactions in relation to the two-dimensional world of the screen instead of the three dimensions of the real world. After a hologram is placed in space, consider allowing movement of that hologram in only two dimensions, essentially allowing it to only slide across the surface upon which it was placed. Similarly, consider limiting the object rotation to a single axis. Allowing movement or rotation on all three axes can quickly become very confusing to the end user and result in unintended consequences or placement of the holograms.
In Figure 8-8, a cube has been placed on a flat surface. Instead of allowing a user to move the object up and down off the plane (along the y-axis), consider locking that movement to only the x- and z-axes. Similarly, if you’re rotating an object, consider allowing rotation only around the y-axis. Locking these movements prevents your user from inadvertently shifting objects in unpredictable ways. You may also want to create a method to “undo” any unintentional movement of your holograms, as placing these holograms in real-world space can be challenging for your users to get right.
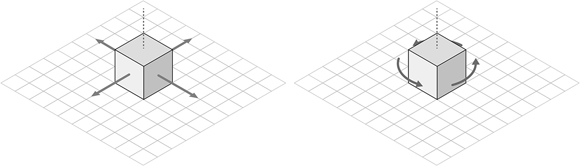
FIGURE 8-8: Locking motion and rotation of AR holograms in space.
Most mobile devices support a “pinch” interaction with the screen to either zoom in on an area or scale an object. Because a user is in a fixed point in space in both the real world and the hologram world, you probably won’t want to utilize this gesture for zooming in AR.
Similarly, consider eliminating a user’s ability to scale an object in AR. A two-fingered pinch gesture for scale is a standard interaction for mobile users. In AR, this scale gesture often doesn’t make sense. AR hologram 3D models are often a set size. The visual appearance of the size of the 3D model is influenced by the distance from the AR device. A user scaling an object in place to make the object look closer to the camera is really just making the object larger in place, often not what the user intended. Pinch-to-scale may still be used in AR, but its usage should be thoughtfully considered.
Voice interaction
Some AR devices also support voice interaction capabilities. Although the interaction for most AR headsets is primarily gaze and gestures, for those headsets with voice capabilities you need to consider how to utilize all methods of interaction and how to make them work well together. Voice controls can be a very convenient way to control your application. As processing power grows exponentially, expect voice control to be introduced and refined further on AR headsets.
Here are some things to keep in mind as you develop voice commands for AR devices that support this feature:
- Use simple commands. Keeping your commands simple will help avoid potential issues of users speaking with different dialects or accents. It also minimizes the learning curve of your application. For example, “Read more” is likely a better choice than “Provide further information about selected item.”
- Ensure that voice commands can be undone. Voice interactions can sometimes be triggered inadvertently by capturing audio of others nearby. Make sure that any voice command can be undone if an accidental interaction is triggered.
- Eliminate similar-sounding interactions. In order to prevent your user from triggering incorrect actions, eliminate any spoken commands that may sound similar but perform different actions. For example, if “Read more” performs a particular action in your application (such as revealing more text), it should always perform the same interaction throughout your application. Similar-sounding commands should also be avoided. For example, “Open reference” and “Open preferences” are far too likely to be mistaken for each other.
- Avoid system commands. Make sure your program doesn’t override voice commands already reserved by the system. If a command such as “home screen” is reserved by the AR device, don’t reprogram that command to perform different functionality within your application.
- Provide feedback. Voice interactions should provide the same level of feedback cues to a user that standard interaction methods do. If a user is utilizing voice commands, provide feedback that your application heard and understood the command. One method of doing so would be to provide onscreen text of what commands the system interpreted from the user. This will provide the user with feedback as to how the system is understanding his commands and allow him to adjust his commands if needed.
Exploring user interface patterns
Best practices for AR user interface design are still being defined. There are not many defined user experience (UX) patterns that AR designers can fall back on as best practices for what a user will expect when entering an augmented experience. Plus, AR is a totally new form factor, different from the 2D screens people have become accustomed to. AR will enable people to totally rethink the way we handle user interface (UI) design.
The 2D world of the computer consists of flat layouts with multiple 2D windows and menus. AR enables developers to utilize 3D space. When designing your AR UI, consider creating a spatial interface and arranging your UI tools and content around the user in 3D, instead of the windowed interface that computer screens currently confine us to. Consider allowing the user to use 3D space as an organizational tool for her items, as opposed to hiding or nesting content in folders or directories — a practice common in current 2D UIs. AR has ways to gracefully avoid hiding content.
Instead of hiding menus inside other objects, use the physical environment available to you to organize your setup. Hidden menus in 2D screens are usually created due to space constraints or a designer feeling that the amount of content would be overwhelming for a user to consume. For augmented experiences in cases of what you may consider an overwhelming amount of information, considering organizing items in groups in 3D space.
Instead of nesting content within menus, explore the possibility of miniaturizing content to optimize the space around your user. Content that may normally take up a large amount of space could be made small until a user has expressed a desire to interact with it.
That is not to say that you can always avoid hidden or nested structures. Both will likely always exist in UX designs for AR. If you do find the need to nest content, try to keep the levels of nesting to a minimum.
In most traditional 2D UIs, nested content is a given. On a traditional computer, users are fully accustomed to having to click into four or five different nested directories in order to locate a file. However, deep nesting of content can be very confusing to end users, especially in the 3D environment of AR. A user having to navigate in 3D space through multiple nested items will likely quickly grow frustrated with the experience. Shallow nesting and making items easily accessible within the spatial environment should enable users to retrieve content quickly.
Limit expandable and hidden menus as much as possible in the AR space. These patterns may have worked well in the 2D screens of the past, but they aren’t necessarily relevant in the 3D world that AR is trying to emulate. Expandable/hidden menus can introduce a level of complexity that you should avoid, if possible.
The windowed 2D world of current computing UIs has accustomed us to iconography and abstract 2D shapes that represent real-world tools. These icons also can often hide further functionality, such as expandable or hidden menus. However, the world of AR is full of new patterns for users to learn. Try to avoid creating a new system of 2D icons for your AR experiences. These can force users to have to guess and learn a system you’ve created that may not have relevance to them.
If a tool is intended to be used within the 3D space of the experience, replace abstract icons or buttons with 3D objects in space that give the user a sense of the tool’s purpose. Look to real-world environments such as drafting desks or art studios for inspiration. Such real-world workspaces can provide examples of how real 3D objects are organized in a physical environment, which is generally what your UI in AR will try to emulate.
Finally, enable your user to personalize and organize her own spaces in a way she finds comfortable, in the same way she may organize her physical desktops or work areas at home or work. This will increase the likelihood that she’ll be comfortable using the system you’ve created.
Understanding text
Carefully consider the legibility length of text when creating your AR application, and proofread it during testing on as many hardware platforms and as many environmental conditions as possible. You likely won’t know what type of environment your application will be running in. A very dark area at night? An overly bright room at midday? To make sure text can be seen, consider placing it on contrasting-colored background.
Figure 8-9 shows an example of potentially poor legibility on top of a sub-optimal environment (left), and how that legibility can be resolved for unknown environments via a text background (right).

Photo by Jeremy Bishop on Unsplash (https://unsplash.com/photos/MhHbkyb35kw)
FIGURE 8-9: A simple solution for text legibility over unknown environments.
The text size and typeface (font) can also affect text legibility. In general, you should opt for shorter headlines or shorter blocks of text whenever possible. However, many AR applications are utility based, and sometimes involve consuming large blocks of text, so ultimately designers will have to find a way to make long-form text documents manageable in AR. If long document consumption is required for your application, make sure that the font size is large enough that the user can read it comfortably. (Meta recommends a minimum font size of at least 1cm in height when the text is 0.5 meter from the user’s eye.) Avoid overly complicated calligraphic fonts. Instead, stick with utilizing simple serif or sans-serif fonts for these large text blocks. In addition, narrower columns of text are preferable to wider columns.
Rapid serial visual presentation (RSVP) speed reading is a method of showing a document to a user a single word at a time. This could prove to be a good way of consuming large blocks of text in AR, because it allows a single word to be larger and more recognizable, instead of forcing your application to account for displaying these large blocks of text.
For any informational or instructional text display, try to favor conversational terms that most users would understand over more technical terms that may confuse a user. “Unable to find a surface to place your object. Try moving your phone around slowly” is preferable to “Plane detection failed. Please detect plane.”
Testing, testing, 1, 2, 3
AR applications are still defining what make an interaction good or bad. So, you’ll often need to work from your own assumptions, and then test those assumptions as frequently as possible. Testing with multiple audiences will help reveal what’s working well and what you may need to go back to the drawing board with. When testing your application, give your test users only the same amount of information a standard user of your application would receive. Letting your testers try to use the app without assistance will help prevent you from inadvertently “guiding” them through your application and will result in more accurate test results.
Defining Your Social Experience
Social interaction in AR is one area where VR and AR differ fundamentally. Directly out of the box, VR has the potential to be a solitary experience. Without careful planning for how social interaction can be introduced to your VR app, you could leave your users feeling very lonely.
AR experiences are different. Unlike VR, users experiencing AR either via headset or other form factor aren’t blocked off from the rest of the physical world. They can still see, talk to, and interact with those around them. However, you still need to put the same amount of thought and care into how your AR application will be used socially. Consider what your social experience within AR means. Although the user is physically present in the room, a user with AR hardware won’t have the same experience as someone without AR hardware. Even with matching hardware, if you haven’t built social connection into your app, users won’t be able to share the experience.
Developers of the Mira Prism AR headset have come up with an interesting solution for what these new types of AR experiences can mean for users of their hardware. The Prism allows for collaboration between users within the headset, but it also allows users without a headset to join in the AR experience in real time in Spectator Mode on a mobile device.
Spectator Mode allows users without a headset to join the experience of users with headsets in real time, seeing the same things a user with a headset sees. It also allows for quickly capturing photos or videos of the AR experience for quickly sharing via social media.
Spectator Mode is a small but clever step in extending AR from an experience that may otherwise fall into the same solitary trap that VR experiences can become. As you plan out your AR applications, be sure to consider how you can introduce social interaction between users both inside and outside your application.