
Chapter 11
Copying a Virtual Machine
Virtual machines are composed of disk files that make certain maintenance operations more timely and less cumbersome than working with their physical counterparts. Creating a new virtual machine is often no more complicated than making a file copy and some configuration changes. Deploying a new virtual machine may take a matter of minutes instead of the days or weeks it takes for physical servers to be ordered, staged, provisioned, and deployed. Templates allow system administrators to create standard images of virtual machines that can be stamped out at will. Even the system administrator's long-time bane, backup and recovery, can be simpler in the virtual environment. Aside from the same back-up solutions and strategies employed with physical servers, you can back up an entire server configuration and data with a data copy. In the event of a problem, you can restore the virtual machine the same way. Snapshots allow a developer to test software or operating system updates against an existing environment, and then instantly roll back to a specific point in time, instead of needing to rebuild the server to retest.
- Cloning a virtual machine
- Working with templates
- Saving a virtual machine state
Cloning a Virtual Machine
Backing up information was a necessary process even before the advent of computers. As you have seen, the amount of data that systems handle today is immense and continues to grow. Protecting that information is a function that needs to be simple, efficient, and reliable. There have been many solutions to back up the data on a system, from the earliest days when computer disks were written out to magnetic tape. If you periodically back up your personal computer, you might use a similar method, a simple utility, or the most basic file copy to move data files to other media, like CDs, DVDs, or USB disk drives. More recent solutions, such as Mozy, Dropbox, and Carbonite, track and copy file changes from the local system to an off-site repository via the Internet. Smart phones, tablets, and other devices also are now either synced with a trusted computer or with a cloud repository, all to prevent data loss in case of a system failure.
Because a virtual machine's actual physical format is a set of data files, it is easy for us to back up that virtual machine simply by periodically copying those files to another place. Because those files contain the application programs, user data, operating system, and the configuration of the virtual machine itself, a backup is created and a fully functional virtual machine that can be instantiated on a hypervisor is created, too. The process to copy a virtual machine is so simple that administrators sometimes use this technique to quickly create a new virtual machine. They merely create a set of file copies with a few configuration adjustments to ensure that there is a unique system name and network address—and it's done! It is faster than the process you went through to create the virtual machine, and much faster than the path of obtaining, provisioning, and deploying a physical server. One other advantage that helps accelerate virtual provisioning is that the virtual hardware presented is consistent from VM to VM and from host to host, removing many possible areas where physical discrepancies, such as firmware incompatibilities, might arise. To see how simple and quick creating a new virtual machine from an existing copy is, let's build one.
- To begin, open Windows Explorer and locate the directory where the existing virtual machines reside. If you are not sure where it is, you can start VMware Workstation Player, pick any virtual machine, edit the hardware settings, and select the Options tab. The
Workingdirectory is displayed in the right panel. The default isC:Users<username>DocumentsVirtual Machines. Once there, you should see folders for each of the virtual machines that are already created. As shown in Figure 11.1, create a new directory calledVM Copy.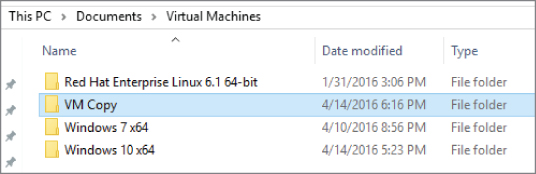
Figure 11.1 The
VM Copydirectory - Go to the directory where the Windows virtual machine resides, as shown in Figure 11.2. There are a number of files and a cache directory that represent the virtual machine. To copy a virtual machine, you need only a few of these. The others will be created anew the first time you power on the virtual machine. The critical files for this task are the configuration file (
.vmx) and the virtual disk files (.vmdk).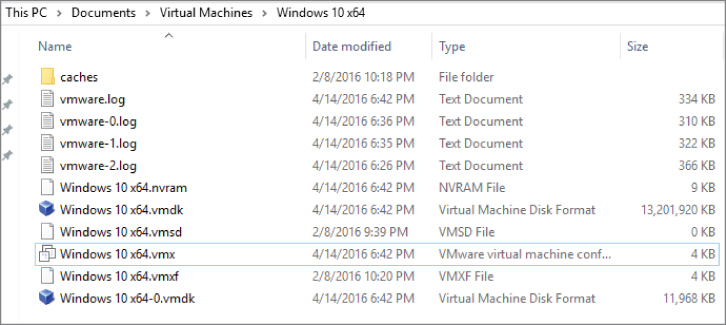
Figure 11.2 A virtual machine's files
If your file extensions are not visible, you will need to enable them. In Windows 10, you can do this by choosing View from the Windows Explorer tab and selecting Preview pane. Be sure that the File name extensions box is checked. The extensions will now be visible. Copy these files into the
VM Copydirectory. There should be two virtual disk files if you added a second drive in Chapter 9, “Managing Storage for a Virtual Machine.” The copy should take about five minutes, depending on your hardware. - In the
VM Copydirectory, highlight the configuration file and open it with the Windows Notepad utility. Windows Explorer has Notepad as an option in the Open With VMware Workstation Player pull-down menu above the file window. If Notepad is not an option in the list, right-click on the.vmxfile and select Open With &cmdarr; Choose another app. If Notepad is not an initial option, select More apps and scroll down until you can select it. Figure 11.3 shows a portion of the configuration file.
Figure 11.3 Editing the configuration file
- You want to change the name of the virtual machine, so each iteration of the current name needs to be altered. In the example shown, the entry for
Windows 10 x64will be changed toVM Copy. You can make these changes by hand, or use the Notepad Replace feature under the Edit menu. If you do this by hand, do not change theguestOSentry. - Save the configuration file and then close it.
- Back in the
VM Copydirectory, rename the three files from their existing name toVM Copyas well. Make sure the second disk drive is correctly namedVM Copy-0, as shown in Figure 11.4.
Figure 11.4 Renamed virtual machine files
- Start the virtual machine by double-clicking the configuration file. VMware Workstation Player will start up and boot the virtual machine. If it doesn't automatically boot, you can power it on manually. It will notice that something is different and, as shown in Figure 11.5, ask if you moved or copied the virtual machine. To continue, select I Copied It.
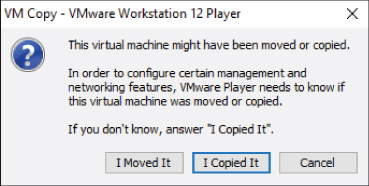
Figure 11.5 Moved or copied notice
If your virtual machine does not boot up successfully, it means that your changes to the configuration file were incorrect, or they did not match the files names of the virtual
disks.vmdkfiles. Double-check your changes, or recopy the original configuration file and try again. One possible error could be that you missed a critical step in Chapter 4, “Creating a Virtual Machine,” when specifying the Disk Capacity. If you did not choose to store your virtual disk as a single file, you now have more than two.vmdkfiles that need to be copied. In addition to copying the files, there is another configuration step. One of the.vmdkfiles is much smaller than the others and contains pointers to the multiple parts of the virtual disk. You will need to open it with Notepad and rename the pointers from the original name to VM Copy and save your work for the virtual machine to power on successfully. - Let's examine our cloned virtual machine and see if it is identical to the original.
- 1. Windows boots and prompts for the same username and password as on the original virtual machine. Enter the password to log in.
- 2. Congratulations! You have copied a virtual machine. Open a command-line window by entering
cmdinto the Search text box. Select the cmd icon to open the command-line utility. - 3. As shown in Figure 11.6, enter
ipconfigto examine the network setting of the virtual machine. It should look similar, if not identical, to the original virtual machine. There should be the same number and type of adapters and connections. There were two Ethernet adapters previously.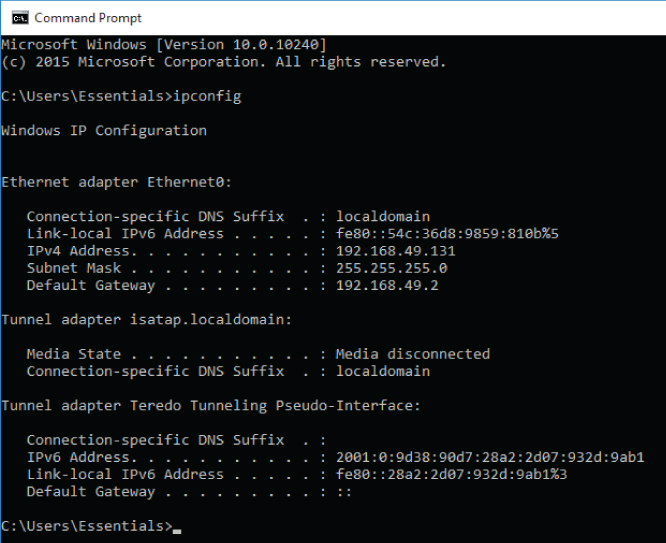
Figure 11.6 Examining the network configuration
What might not be the same are the IP addresses. You learned in Chapter 10, “Managing Networking for a Virtual Machine,” that systems can automatically get their IP addresses from a DHCP server. When you responded to VMware Workstation Player and verified that you copied the virtual machine, it created a new unique machine ID for the virtual machine. If you had answered I Moved It, the unique identifier would not have been changed. If the IP address was hard-coded into the virtual machine, you would need to change it to a new address by hand or risk network problems with two identically referenced systems.
- 4. Close the command-line window.
- 5. Enter Control into the Search text box and open the Control Panel. Select System and Security &cmdarr; System. Everything that you can see about this copied virtual machine is identical to the original. Even the computer name is the same, which in any real environment would be a problem. You could alter the system name here, but doing so is not necessary to complete the exercise.
- 6. You can explore the copied virtual machine further. When you are done, power off the virtual machine. Open the Player menu and choose Shut Down Guest. Notice that the
VM Copyhas been entered into the top of virtual machine library. - 7. You are done with this virtual machine. You can delete it by right-clicking on the virtual machine and choosing Delete VM From Disk. A warning box will appear. Select Yes, and all the files will be removed. Close VMware Workstation Player.
The simple copy scenario works here because it is dealing with a single virtual machine. Even if you were to create a dozen virtual machines over the course of a year, the process would not be a hardship because the effort would still be minimal. But what would happen if you needed to deploy a hundred virtual machines? Or five hundred? That would be a considerably larger effort from a manual-labor perspective and with more opportunities for errors to occur. Fortunately, there are many ways to automate this process. One method is scripting. System administrators build scripts that duplicate the steps you just executed and even more, making sure that the cloned virtual machine has unique system information and network addresses inside the guest operating system and outside. Another method is through the use of automation tools that provide a standard repeatable process but are all front-ended with a user-friendly interface. These tools are either part of the vendor hypervisor management set or available from third-party providers.
Now let's use the vendor tool to clone a virtual machine. We'll use Oracle VM VirtualBox since the VMware Workstation Player doesn't offer this capability.
- Open Oracle VM Virtual Box. Highlight the virtual machine you want to clone. As shown in Figure 11.7, you can right-click on the virtual machine to get the Machine menu or select Machine from the menu bar at the top.
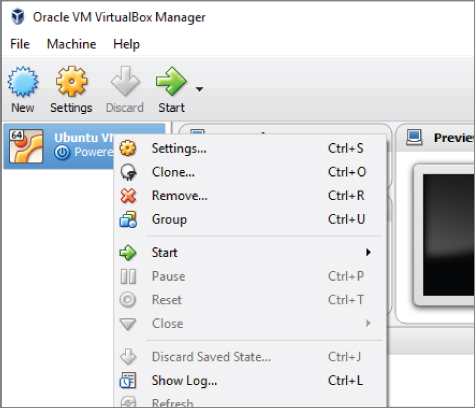
Figure 11.7 The Machine menu
- Select Clone and the New Machine Name screen appears, as illustrated in Figure 11.8. As we needed to do for the manual method of cloning, the new virtual machine will need a unique name. Enter a unique name in the text box. Also select the checkbox that will reinitialize the MAC addresses of the virtual network cards. This is another place of differentiation. Select Next to continue.
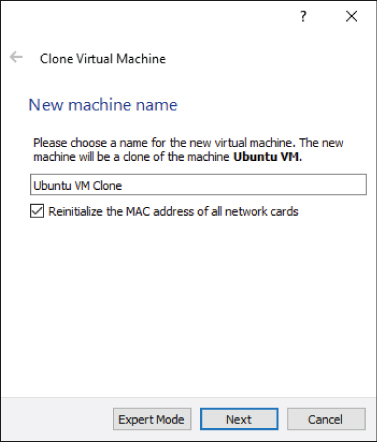
Figure 11.8 The New Machine Name screen
- The Clone Type window is shown. The two clone types are explained. Full clones are entirely separate replicas, while linked clones require being tied to the original machine, though they do require less storage space. Leave the default choice of Full clone. Select Clone to clone the virtual machine.
- A progress window appears, displaying the time remaining and Dolly the Sheep. The amount of time needed to complete the clones depends on the size of the storage. When it is done, the new virtual machine is added to the list, as shown in Figure 11.9.
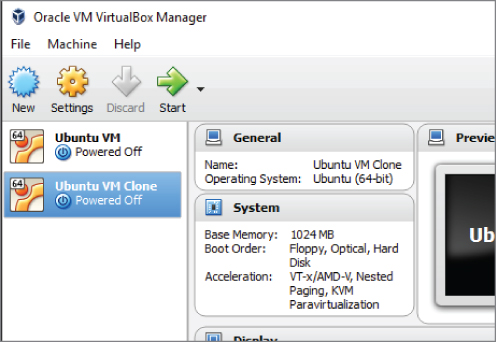
Figure 11.9 The completed virtual machine clone
- Select the virtual machine clone from the list and power it on by selecting Start at the top of the screen using the green arrow icon. When the login screen appears, enter the password that you created for the original virtual machine. Figure 11.10 shows that the virtual machine is now ready for use. You can investigate further by validating that the clone has unique properties by comparing items such as system name and MAC addresses. When you are done, you can shut down the virtual machine.
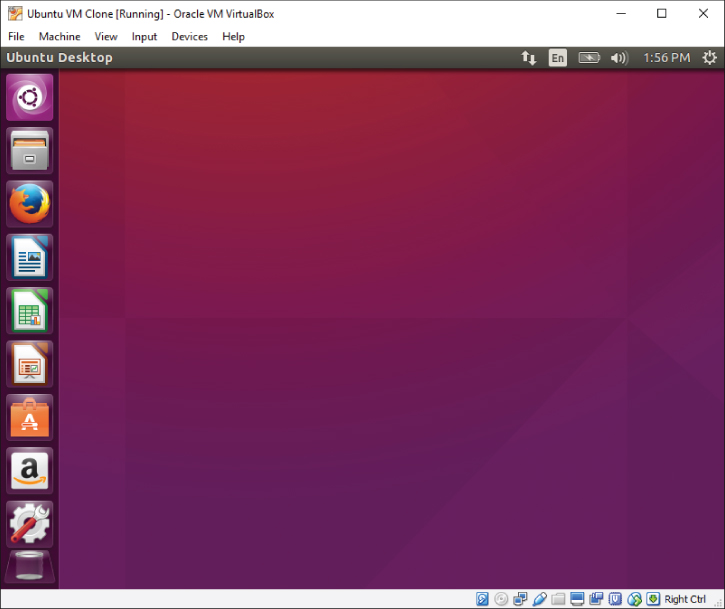
Figure 11.10 The virtual machine clone
Working with Templates
Creating new virtual machines from an existing virtual machine saves a great deal of time and effort in a virtual environment and is one of the largest reasons that system administrators enjoy the change from a physical environment. Cloning requires that you have something to clone from, a standard image that serves as a mold from which to create the new virtual machines. To do that, admins employ an idea called templates, which developed from the provisioning physical servers. A template is a golden image—a prebuilt, tested image that contains approved corporate-standard software. Administrators build an operating system deployment with some set of applications and tools. Once the most current patches are applied, the image is written to some media, such as a DVD. When new servers arrive, the image can be rapidly applied without needing to redo all of the various installations that helped define the image. Having the image in a read-only format also prevents unintended changes. Virtual environments also use this technique to great advantage.
The image from which you create new virtual machines contains not just a large bundle of software including an operating system, but the hardware configuration as well. There is also a slight difference between cloning a virtual machine and creating one from a template. In cloning, a virtual machine rather than a template is the source, although that is not necessarily a hard and fast rule. A template is usually a virtual machine image that cannot be powered on—in other words, it is nothing more than a mold for other virtual machines. Templates are created by building a clean, pristine virtual machine deployment and then having a hypervisor management feature, or other tool, do the conversion. For example, Figure 11.11 shows the menu when you highlight and select a virtual machine using VMware vCenter, the interface for managing a VMware ESX infrastructure. When you choose Clone, you can see three options, the first being to clone the selected virtual machine as we've done already, the second to convert the new clone into a template, and the third to convert the new clone into a template and place it into a designated library. If you wanted to convert the selected virtual machine into a template, selecting the Template option would offer that choice.
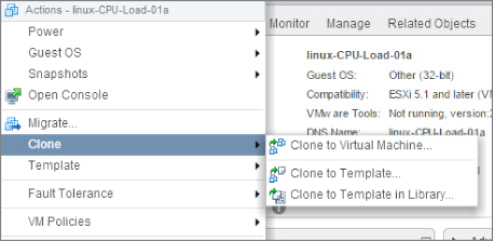
Figure 11.11 Template creation choices
The following example will show a new virtual machine cloned from a template. Because VMware Workstation Player does not allow this functionality, VMware Workstation Pro will be used instead. Two steps were made to the Windows virtual machine to create the template. The first was to check the Enable Template mode checkbox in the Advanced Options of the Virtual Machine Settings. The second was to create a snapshot of the virtual machine to be used as the template. We will cover snapshots later in this chapter. Figure 11.12 shows the menu used to clone the virtual machine.
The Clone Virtual Machine Wizard is shown in Figure 11.13. When the initial screen appears, it displays a reminder to enable the template mode in the Virtual Machine Settings.
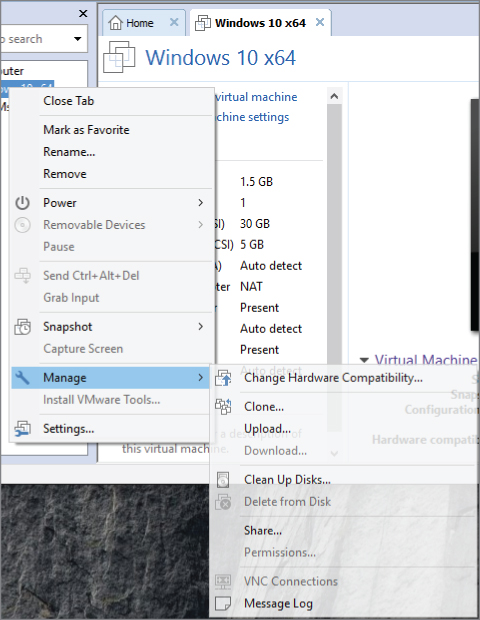
Figure 11.12 Manage a virtual machine.
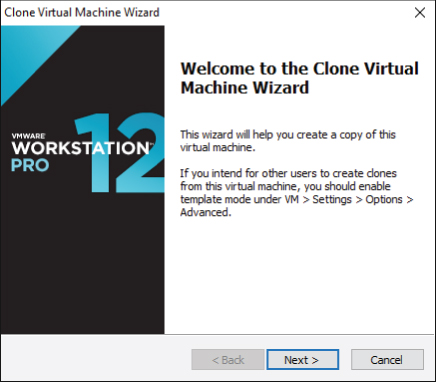
Figure 11.13 The Clone Virtual Machine Wizard
Because the virtual machine is in template mode, you need to select a snapshot to use as the clone. In this example, there is only the single snapshot, as shown in Figure 11.14.
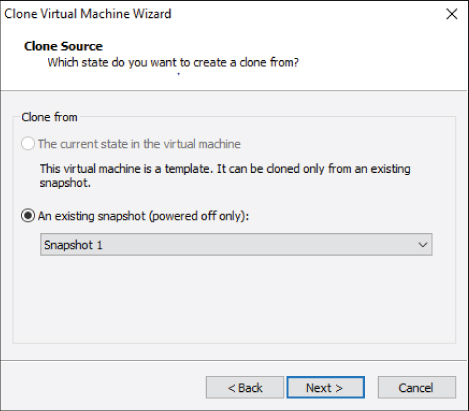
Figure 11.14 The Clone Source screen
Figure 11.15 shows that two different types of clones can be created. A full clone is a complete copy and requires the same amount of disk storage as the original to deploy successfully. A linked clone uses the original as a reference and stores any changes in a much smaller amount of disk storage. Because it is not a full copy, the linked clone needs to have the original virtual machine available. For this example, a full clone will be created.
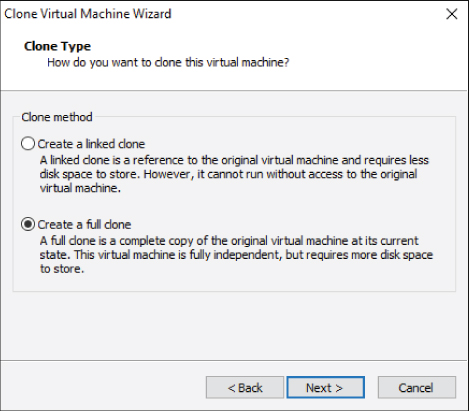
Figure 11.15 The Clone Type screen
The final step is to name the new virtual machine, as shown in Figure 11.16. The wizard provides a short list of steps and a progress bar as it performs the cloning process. When it is completed, the new virtual machine appears in the virtual machine list and can be started. A brief examination shows that it is identical in configuration to the template from which it came. By using the available tools, you can see that the process is much quicker and much less error prone than the earlier manual procedure. It is also possible to simultaneously clone a number of virtual machines, though that operation would be heavily dependent on the storage I/O bandwidth because the major portion of a cloning process involves copying data.
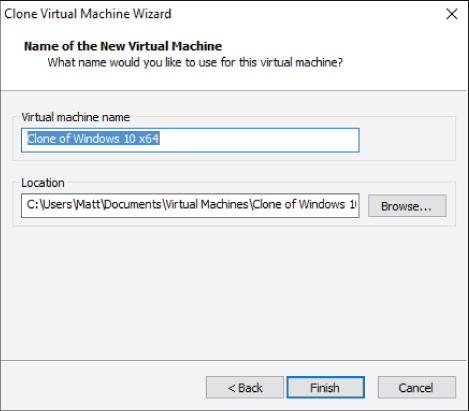
Figure 11.16 Naming the clone
Saving a Virtual Machine State
Virtual machines are backed up for many reasons; the first and foremost reason is disaster preparedness. Whether it is an actual disaster such as an unexpected violent act of nature or a man-made mistake, having accurate and validated application data available for retrieval has been a long-term practice and it is crucial for business continuance. Virtual machines, by the nature of their composition as data files, often allow simpler methods of backup than their physical counterparts. We'll cover more about this topic in Chapter 13, “Understanding Availability,” but there is one use case to look at in the context of copying virtual machines.
Many companies dedicate portions of their IT departments and application groups to the various types of application maintenance. Maintenance could entail anything from actual development and creation of new application models, to testing existing application modules as upgrades are provided by the application's vendor, to routine testing of an application in the face of new operating system patches, or even major operating system upgrades. Prior to virtualization, IT departments would need to provision a physical server with the exact operating system, patches, and application suite that was running in the production environment, so they could then apply the new changes, whether that was an application or operating system update, and then do the testing necessary to satisfy an acceptance or denial to deploy the changes into the production environment. The hardware used for the test could then be reprovisioned for the next set of tests. It was not unusual for this process to be a bottleneck in a company's ability to deploy new application modules or stay up-to-date with operating system improvements. In larger companies with hundreds of applications, the size of the test environment is often three to five times larger than the production environments, consuming valuable budget dollars as well as data center space and resources. Even as companies transition to using cloud services for some of this development work, the need in this area is still relevant and will be for quite some time.
Virtual machines bring immediate relief to this scenario. By maintaining a template of an application's server configuration, it is a matter of minutes to create a duplicate of the image deployed in production. New patches can be applied and evaluated. At the end of a test, if the results are positive, that updated virtual machine can be converted into the new template that can also be used to update the production system. If no template exists, you can clone the production virtual machine, again guaranteeing that the testing is performed on a duplicate of the production configuration from the application, to the operating system, to the (virtual) hardware configuration. Hypervisor management tools make it simple to create templates, clone virtual machines, and deploy them to a virtual environment for these types of tests. They also add another capability to an administrator's arsenal in the form of snapshots.
Just from its name, snapshot tells you most of what you need to know about this capability. It is a method to capture a virtual machine's hardware and software configuration like the copy mechanisms cloning and templating, but it also preserves the virtual machine's processing state. Snapshots allow you preserve a virtual machine at a particular point in time that you can return to again, and again, and again, if need be, making it particularly useful in test and development environments. In a sense, snapshots provide an Undo button for the virtual server. Snapshots are not designed to be a backup solution for virtual machines. In fact, by using them that way, the virtual machine can be subject to poor performance and the entire virtual environment may suffer from a storage performance and usage standpoint. All of the major hypervisors support snapshotting technology. The following description of how snapshots are deployed and managed is specific to VMware, but the overview is similar in other solutions.
When you take a snapshot of a virtual machine, a few new files are created. There is a file that contains all the relevant information about the snapshot. In VMware that file has a .vmsd file extension. One file contains the memory state of the virtual machine, and it has a .vmem file extension. The virtual machine snapshot file (.vmsn) stores the state of the virtual machine at the time of the snapshot. Also created are a number of child disks with the familiar .vmdk extension. The created child disk is what is a termed a sparse disk, a storage optimization method to prevent the need for an entire clone for a snapshot. Sparse disks use a copy-on-write strategy where the only data written to it are data blocks that have changed from the original disk. The active virtual machine snapshot reads from the child disk and the original parent disk for current data, but will only write to the child disk. Figure 11.17 shows a simple example of a snapshot. The parent disk at the bottom is locked to writing, and any data-block changes are written to the sparse child disk.
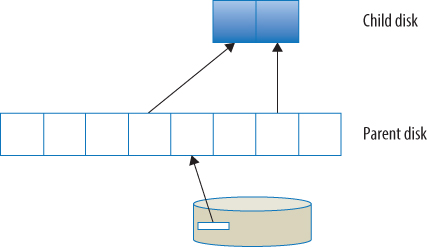
Figure 11.17 A first snapshot
Figure 11.18 illustrates what occurs when a second snapshot is taken. A second child disk is created, also in the sparse format. As data-block changes are made again, whether in the original disk or the first child disk, those data blocks are written to the second child disk. The first child disk, as the original disk, is locked to writing and is used only as a read-only reference for the current information. You can see that using too many snapshots or changing large amounts of data can consume significant quantities of disk storage. In addition, with many snapshots, the paths to find the most current data blocks can become cumbersome and impact the performance of the virtual machine.
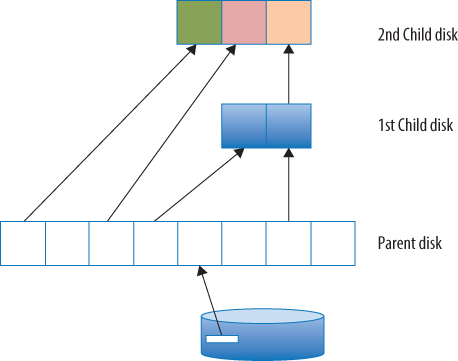
Figure 11.18 A second snapshot
Creating a Snapshot
These examples will show a snapshot being created and then rolling back to the original. Because VMware Workstation Player does not allow this functionality, VMware Workstation Pro will be used instead. Using the clone of the Windows virtual machine, it is powered on and logged into. A snapshot is taken to acquire a base state. The snapshot is taken by clicking a Workstation icon or selecting a menu item. The Snapshot Wizard asks for a name to call the snapshot. In the example, the name is Snapshot v1. A progress bar appears while the snapshot is taken and the appropriate files are created. Figure 11.19 shows the data files that now comprise the virtual machine with the snapshot. Note the memory state file (.vmem), the snapshot configuration file (.vmsd), the virtual machine state (.vmsn), and the child disks. Notice that because our original virtual machine had two disks, a child disk has been created for each. Each child disk is designated with a snapshot iteration number, in this case 000001.
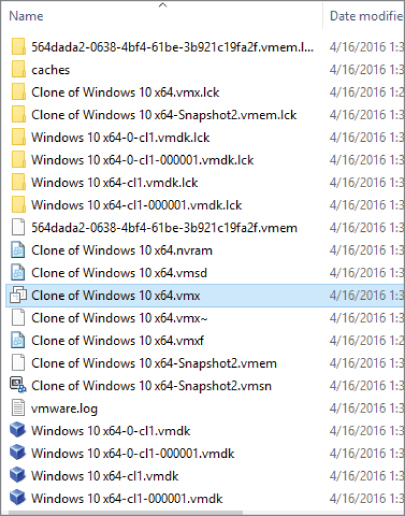
Figure 11.19 Physical files of a snapshot
In addition to the new files in the host file system, Workstation Pro has a map to use in the Snapshot Manager. Figure 11.20 shows the simple map created so far. The snapshot is merely an initial stake in the sand as you make some changes to the virtual machine.
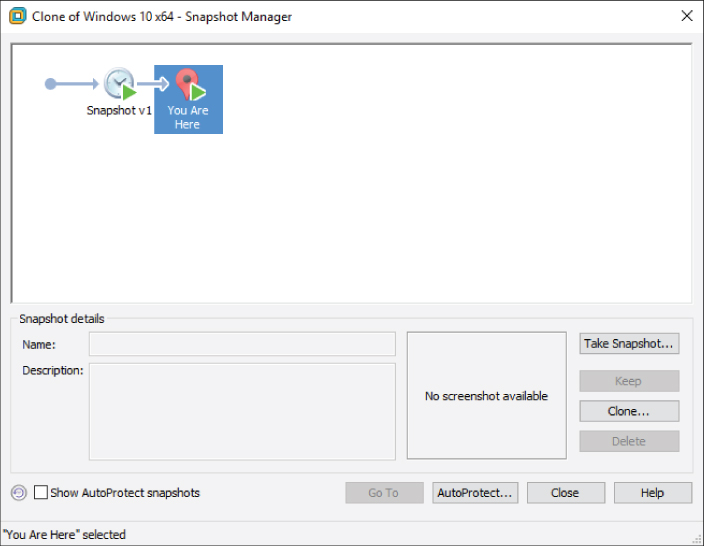
Figure 11.20 The Workstation Pro Snapshot Manager
Even if no alterations are made to the virtual machine, changes still occur. As time passes, operating system logs and monitoring tool logs are filled with time-stamped entries. These changes add data blocks to the child disks. As illustrated in Figure 11.21, creating a Notepad document and saving it to the desktop adds changes.
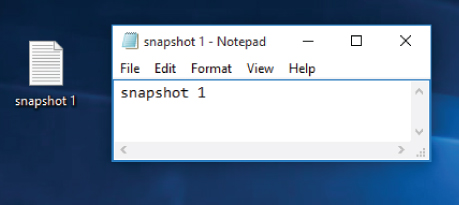
Figure 11.21 Changing the virtual machine
A second snapshot is taken at this point. As with the first, it is named in this iteration, Snapshot v2. The contents of the Notepad document are also changed and saved to the disk. The virtual machine's physical files are shown again in Figure 11.22. There is now a second set of child disks along with a second memory state and system state file.
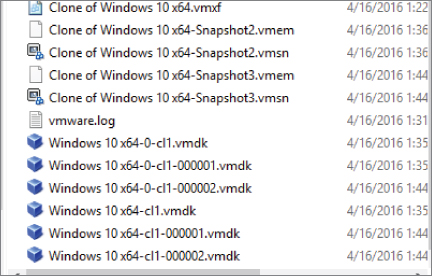
Figure 11.22 Physical files of a second snapshot
The Workstation Pro Snapshot Manager, shown in Figure 11.23, now has a second point in time in the snapshot chain to which the virtual machine can be restored. From here there are a number of choices. Adding more snapshots will create additional snapshot files and provide more places to roll back to, but eventually at the expense of performance and data storage. Not only can snapshots be added sequentially in the line that has been shown, but you can also use snapshots to construct very large branched maps to handle sophisticated testing models. By reverting back to the first snapshot, making changes, and creating a third snapshot, there would be two branches from the first snapshot. If the tests that were performed on the snapshotted virtual machine proved valuable, you could merge the snapshots into the original virtual machine, in effect, updating that original virtual machine. You will walk through that example in a moment. Finally, and probably most frequently, you will want to revert to a previous snapshot.
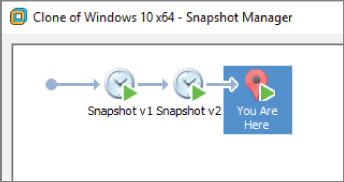
Figure 11.23 A second snapshot
As with creating a snapshot, you can revert to a previous snapshot from a Workstation icon, a menu selection, or from the Workstation Pro Snapshot Manager. Reverting to Snapshot v2 is quick, as shown in Figure 11.24. You right-click on the snapshot you want to revert to and select Go To Snapshot from the menu. Workstation Pro provides a helpful message that all work done in the virtual machine since the snapshot was taken will be lost. A progress bar is shown during the rollback. Once the rollback is complete, the Notepad file with the original data is restored to the desktop.
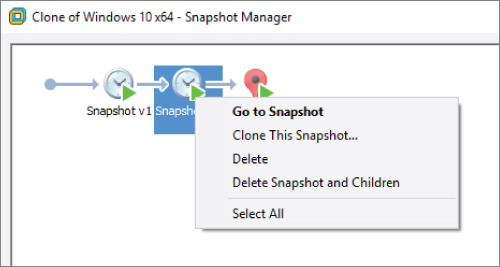
Figure 11.24 Reverting to a previous snapshot
If you reverted to the first snapshot, the same process would occur, but you would be presented with the virtual machine at the time of that snapshot. There would be no Notepad document at all. You could continue various tests and revert back to this virtual machine's point-in-time state as often as needed.
Merging Snapshots
Suppose your tests necessitate an update to your original virtual machine. You discover that the operating system patches were not detrimental to the application environment and want to include them as part of the system. The process to do that involves collapsing the snapshots back into the original virtual machine. In Workstation, by deleting the snapshots in the chain, you can apply the snapshot changes to the original virtual machine. The first step, as shown in Figure 11.25, shows that the data in the second child disk was merged with the data in the first disk. The first child disk is now unlocked for writes so that it can be updated. Data blocks unique to the second child disk are added to the first child disk. Data blocks in the first child disk that were altered and also in the second child disk can be updated with those changes in the first child disk.
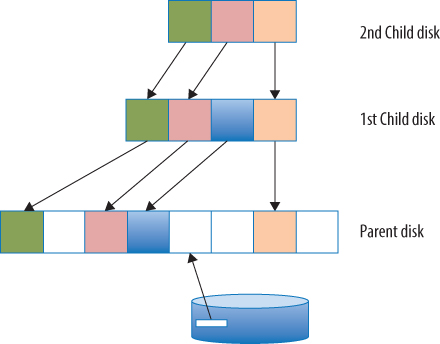
Figure 11.25 Deleting the second snapshot
The next step is to collapse the first snapshot's child disk, now including the second child disk's additions, into the unlocked parent disk. This is illustrated in Figure 11.26. Note that this process doesn't increase the size of the original disk at all. As a last step, all of the associated snapshot files are physically deleted from the disk. All of the changes have been merged into the original virtual machine. Because each child disk can potentially grow to the size of the parent disk, without periodically collapsing or deleting snapshots, large swaths of disk storage can be consumed and performance on the virtual machine can degrade. Again, snapshots are for testing, not for backup.
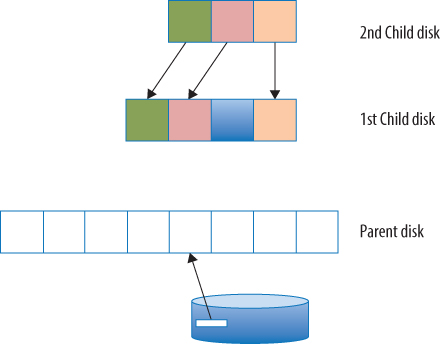
Figure 11.26 Deleting the first snapshot
Although the VMware terminology is a bit confusing regarding deleting snapshots, you can actually remove snapshots that you no longer need and don't want to merge into the original machine. When you do, the snapshot files are removed from the physical disk, the snapshot entries are cleared from the Snapshot Manager, and the parent disk is again unlocked for writes.