
Chapter 12
Managing Additional Devices in Virtual Machines
Server virtualization focuses most of the attention on the CPU, memory, disk storage, and networking—the four main resources responsible for providing a superior user experience in a virtual environment. This makes perfect sense, but these four are not the only devices that users and applications need to work with in a virtual machine. Hypervisors support a wide selection of device types and connections to allow everything from serial and parallel device connections up to the latest USB devices and advanced graphical displays. Vendors handle optimization of devices in many ways, usually with the installation of a software suite that can provide a number of enhancements to the guest.
- Using virtual machine tools
- Understanding virtual devices
- Configuring a CD/DVD drive
- Configuring a floppy drive
- Configuring a sound card
- Configuring USB devices
- Configuring graphic displays
- Configuring other devices
Using Virtual Machine Tools
In Chapter 5, “Installing Windows on a Virtual Machine,” you installed the VMware Tools as part of preparing a virtual machine for use. VMware Tools is a suite of utilities that not only improves the performance of a virtual machine, but also improves the user experience by providing capabilities that are not available without them. Without these tools installed, the guest operating system works, just not as smoothly as it does with the tools. VMware Tools is actually deployed as three separate parts: an operating system service, a set of enhanced device drivers, and a user process for a better user experience. In a Windows operating system, VMware Tools Service is deployed as the Windows service vmtoolssd.exevmtoolsd
- Cursor handling (Windows)
- Time synchronization between the guest and the host
- Heartbeat for availability
- Enhanced Hypervisor to Virtual Machine communications
- Display synchronization (Windows)
- Executing commands (Windows) or scripts (Linux) to help cleanly shut down or start a virtual machine OS
VMware Tools also provides a suite of enhanced device drivers for:
- Mice
- SCSI devices (BusLogic)
- SVGA graphical display for improved performance and higher resolutions
- Networking (
vmxnetvmxnet3 - Audio
- Shared folders
- Virtual printing (Windows)
- Automatic backups
- Memory control
The VMware Tools user process is deployed as part of the vmtoolssd.exevmware-user
- Display synchronization (Linux)
- Cursor handling (Linux)
- Text copying and pasting between a virtual machine and various other places
- Other product-specific user enhancements
VMware is not the only solution that uses this methodology to help improve virtual machine performance. In Chapter 6, “Installing Linux on a Virtual Machine,” you used Oracle VirtualBox as the hypervisor platform. As part of preparing that virtual machine, you installed the VirtualBox Guest Additions. A similar suite of functionality is provided when the Guest Additions are installed:
- Time synchronization between the guest and the host
- Improved video support
- Shared folders
- Improved mouse/pointer integration
- A shared Clipboard between the guest and the host
- Additional guest/host user experience capabilities
A similar suite is used for Citrix XenServer implementations. Citrix Tools for Virtual Machines is also installed in the operating system and replaces the native network and SCSI device drivers with an optimized version that provides enhanced throughput between the virtual machine and the hypervisor. Without these drivers, performance will be degraded and some capabilities, such as live migration, will not work. These tools also allow the XenCenter management suite to see the performance metrics in a Windows virtual machine.
Microsoft Hyper-V employs an additional package called Integration Services. The installation modifies the operating system kernel and adds new virtual device drivers to optimize virtual-machine-to-hardware communications. In addition to the device drivers, enhancements are made to improve:
- Time synchronization
- Virtual machine heartbeat
- Operating system shutdown
- Data exchange
All of these solutions help provide an optimized virtual machine, an improved user experience, and, most importantly for this context, enhanced device drivers for the best device performance.
Understanding Virtual Devices
When you created a virtual machine, it was already preconfigured with a base set of virtual resources (compute, memory, storage, and network) without additional customization. Once the VM was created, the resources could be configured further to provide more flexibility. Beyond these four main areas, additional devices are available. If you consider a personal computer, there are USB devices like keyboards or mice. Printers can be connected in a variety of ways. Other sensory interfaces, such as graphical displays and sound cards, are used as well. All of these are available.
- To examine the various virtual hardware devices, in VMware Workstation Player, open the Virtual Machine Settings on the Windows virtual machine. The Hardware tab should be selected by default, displaying the devices in the virtual machine. In the following example, the virtual machine is powered off.
- As a quick review, you can adjust the amount of virtual memory up or down. You can also add or subtract from the number of virtual processors. You can add network adapters and configure them for various uses and network connection types. You can add hard disks of various sizes and configure properties as well.
Configuring a CD/DVD Drive
The CD/DVD drive is one of the standard devices initially configured for a virtual machine, and the reason is obvious. To load many software applications and operating systems, CDs and DVDs are still the preferred transfer media. Today, if you accept electronic delivery of software, often it will be downloaded in the ISO format, which is a standard format for a CD or DVD. As you saw when you loaded both the Windows and Linux operating systems, you can boot a system from an ISO image.
Highlight the CD/DVD drive. As shown in Figure 12.1, the physical CD/DVD device is the specified connection, rather than the ISO image file that you used earlier. Under the Device Status, note that it shows the device is connected and that it will automatically connect at power on. While this is fine for the simple configuration we are using here, in a normal environment with many virtual machines on a single host, this choice would be troublesome. If each virtual machine on the system tried to connect to the device, only the first one booted would be successful and it would retain control of the device until it was either shut down or an administrator disconnected it through the Settings Panel. For that reason, this device would not normally be set to Connect at power on.
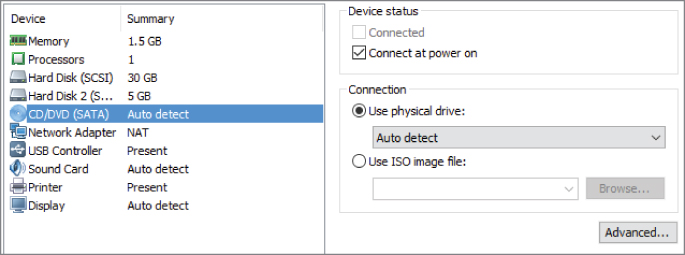
Figure 12.1 The CD/DVD device configuration
The drop-down menu in the Connection box will display all of the CD/DVD devices available on the physical server. If there is more than one, you can select a preferred device. The Advanced button allows you to select a specific address for the device, but this needs to be done with the virtual machine in a powered off state.
Configuring a Floppy Disk Drive
While CDs and DVDs are still being used for both commercial and consumer purposes, floppy disks are barely around. The original floppy disks were made of a round piece of magnetic media sealed in a thin, square, usually black plastic envelope. Both the disk and the envelope were fairly flexible and, well, floppy, hence the name. They were one of the first methods of portable storage for moving data files from one system to another. With the spread of personal computers, they were the transportable media of choice. The first floppies, developed during the 1970s, were 8-inches square and could hold 1.2 MB of data. As technology improved, they shrank to 5¼ inches square with roughly the same capacity. By the end of the 1980s, they had shrunk again to 3½ inches, could hold 1.44 MB of data, but had a harder plastic case and could no longer flop. Today, they have been replaced by smaller, denser, and faster storage devices such as USB flash drives, SD memory cards, and removable hard drives.
So why still support an almost extinct mode of storage? There are a number of good reasons. One reason that consolidation and virtual environments are attractive to companies is because of the continued support of older operating systems and the hardware devices on which they rely. A Windows NT server that uses a floppy disk image to receive information can still do so in a virtual environment. A virtual floppy disk image can still be used to transfer data from one system to another, though these days it would probably be sent by a network or hand-carried on one of the newer devices mentioned earlier—not necessarily a realistic solution, but still possible.
Notice that no floppy drive is present in the Virtual Machine Settings. Mirroring the trend in the physical world, a floppy drive is no longer included as a default device in a new virtual machine, but you can add one.
- Select Add at the bottom of the Hardware tab. If the Windows User Account Control asks for permission to make changes on the PC, respond Yes. The Add Hardware Wizard appears. Select Floppy Drive and then click Next to continue.
- On the Floppy Media Type screen, choose Create A Blank Floppy Image. The other choices require connecting to a physical floppy disk or an existing floppy disk image file. Click Next to continue.
- Enter a name for your floppy image file. Unless you explicitly place the file elsewhere with the Browse function, the file is by default in the same directory as the other files that comprise this virtual machine. Uncheck the Connect At Power On checkbox and select Finish. Notice that the file extension for the virtual floppy disk is
.flp
Highlight the Floppy drive. Figure 12.2 shows the configuration options for the virtual floppy disk drive. The Device Status and the Connection options are the same as the CD/DVD device with a few exceptions. The first is the Read-Only checkbox. Physical floppy disks had a write-protect tab that could be flipped to prevent additional changes to the data on the disk. This option serves the same function and will prevent accidental erasure or rewriting of the disk. The second option is the Create button. You can create a virtual floppy disk and copy files to it as you would a physical floppy disk. In the case of VMware Workstation Player, the floppy disk is actually a file in the host file system. After you create the virtual floppy disk, it will need to be formatted for use.
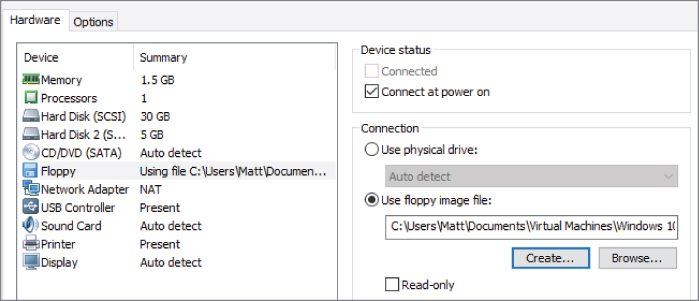
Figure 12.2 Floppy disk configuration
- If your virtual machine is powered off, close the Virtual Machine Settings window and power the virtual machine on now. Log in to it. At the top of the VMware Workstation Player window is a Device Panel that displays the virtual devices available to the virtual machine. The Floppy icon (
 ) is now present but grayed out. To connect the floppy drive, right-click on the Floppy icon and select Connect. The other choice, Settings, will open the Virtual Machine Settings.
 - Note the Floppy Drive icon (
 ) is now active and, like the other available and mounted devices, has a virtual green LED to display I/O activity.
 - In the virtual machine, open the File Explorer and select This PC. The floppy disk drive is now available and mounted, but not quite usable. Right-click on the Floppy Disk Drive, as shown in Figure 12.3. Choose Format from the menu. When the Disk Format menu appears, accept the default selections and click Start to begin the initialization of the virtual floppy disk.
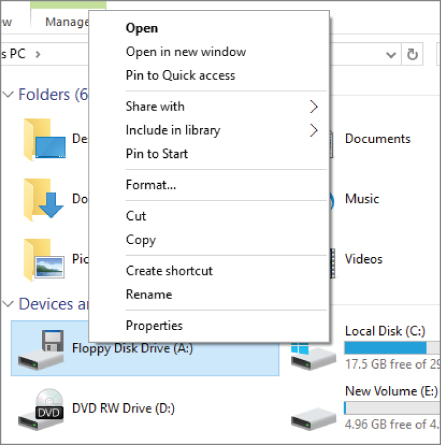
Figure 12.3 Floppy disk management options
- A warning appears that you will be erasing the new floppy disk. Click OK to continue. A moment later, the Format Complete message appears. Click OK to dismiss the message. Choose Close to exit the Format screen.
- Double-click on the Floppy Disk Drive, and it opens into a Windows directory. You can now copy a file there as you would to any other disk. When you are done, close the Computer window.
- In your host, open Windows File Explorer and navigate to the directory where the virtual machine files reside. As shown in Figure 12.4, you can see that the floppy disk image you created,
Essentials.flp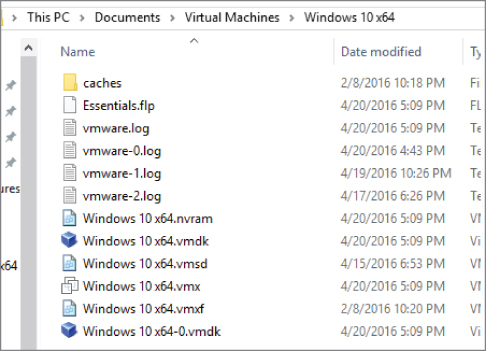
Figure 12.4 The floppy disk image file
- Close Windows Explorer and reopen the Virtual Machine Settings.
Configuring a Sound Card
Sound is not usually considered mandatory for virtual machines, because most business applications don't rely on audio to provide data to their users. However, that is rapidly changing. From the spread of virtual desktops, to social media applications, to educational and informational audio and video clips, sound is becoming an integral part of how computer services are being delivered. This change is accelerating as the line between consumer services and corporate services continues to blur, forcing each side to adopt characteristics and expectations of the other. Fortunately, hypervisors already have the ability to deliver a virtualized sound card. The virtual sound card actually passes control back to the local sound card that the virtual machine's guest operating system can then utilize. A desktop virtual machine that is running Windows 10 on a host server in the data center uses the physical sound card of the client device from which the user accesses the virtual machine. Most hypervisors have this ability and are architected similarly.
An icon (![]() ) at the top of the VMware Workstation Player window shows whether sound is available and active. Because the sound card is one of the default devices added when the virtual machine was created, the icon is not grayed out. Highlighting the Sound Card will show the device options, as illustrated in Figure 12.5. Like the floppy and CD/DVD drives shown earlier, the Device Status Settings will automatically connect the device to the virtual machine when it is powered on. The virtual sound card can be configured after the virtual machine is created. The Connection area offers two options. The first is to Use Default Host Sound Card. If you select Specify Host Sound Card, you can examine the pull-down menu that will allow you to change the default if your system has more than one sound option.
) at the top of the VMware Workstation Player window shows whether sound is available and active. Because the sound card is one of the default devices added when the virtual machine was created, the icon is not grayed out. Highlighting the Sound Card will show the device options, as illustrated in Figure 12.5. Like the floppy and CD/DVD drives shown earlier, the Device Status Settings will automatically connect the device to the virtual machine when it is powered on. The virtual sound card can be configured after the virtual machine is created. The Connection area offers two options. The first is to Use Default Host Sound Card. If you select Specify Host Sound Card, you can examine the pull-down menu that will allow you to change the default if your system has more than one sound option.

Figure 12.5 Sound card options
Configuring USB Devices
PCs and other computers in the 1980s had many ways to connect storage and interface devices. Printers were initially connected through parallel ports. Serial ports connected modems for communications. Other connectors were available for keyboards and mice. There was even a special port for a joystick to play games. None of them were compatible with each other in form or often function. In 1994, a number of PC-related companies including IBM, Microsoft, and Intel began to work on a unified way to connect these external devices. Two years later, the result was the Universal Serial Bus (USB) standard. USB created one common connection, enabled greater throughput speeds, and provided a way to supply power for the devices. Taking the place of many first-generation connections for computer peripherals, USB is now the de facto standard for device connection.
Floppy disks soon gave way to thumb drives for easy, portable storage. You probably have personal experience with USB devices and their plug-and-play ease of use. Today we connect digital cameras, MP3 players, and even speakers, in addition to mice, keyboards, and printers via the USB port. Since the standard's first release, there have been two major updates. USB 2.0 was released in 2000, with the largest change being a quadrupling of the speed to 60 MB per second. Interim enhancements provided portable-electronics consumers two of the most common capabilities they use: synchronizing and recharging mobile devices by connecting them to a computer through the USB port. Bluetooth and Wi-Fi are creeping into the synchronization space, but until broadcast power is available, recharging will still depend on the wired connection. USB 3.0 was released at the end of 2008. Capable of delivering 625 MB per second, ten times greater than USB 2.0, it provided a large improvement in throughput speed. In 2015, USB 3.1 was released providing twice the throughput of USB 3.0. Also, the first new cable changes, USB-C, are appearing to accommodate the greater data speed and power demands that the new specification offers. With additional improvements and enhancements on the roadmap, it appears that the USB standard will be around for quite a while.
- Figure 12.6 illustrates the few options that are available to manage the USB connection for a virtual machine. The Connections box has three checkbox items. The USB Compatibility pull-down menu allows you to choose which version of the USB standard the virtual machine should support.
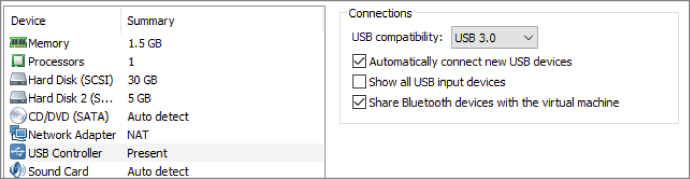
Figure 12.6 USB management options
- The Automatically Connect New USB Devices option will allow the virtual machine to access newly connected devices.
- The Show All USB Input Devices option will display the connected USB devices at the top of the VMware Workstation Player window. If the device is already connected to the host, it will appear but be grayed out. You can right-click the icon, as shown in Figure 12.7, and connect the device to the virtual machine. Because a USB device can be connected to only one computer at a time, it will be disconnected from the host system before being connected to the guest.
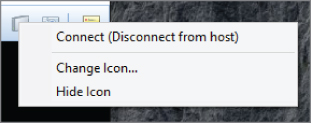
Figure 12.7 Connecting a USB device from a host
- The Share Bluetooth Devices With The Virtual Machine option does as its name suggests; it allows devices connected to the host by Bluetooth to be connected to the guest.
Type 2 hypervisors initially had superior support for USB devices because they could leverage the host operating system underneath the hypervisor. In this way, solutions like VMware Workstation Player offer certain capabilities that are not available in Type 1 hypervisors, such as the Bluetooth connectivity. This is not usually an issue with enterprise environments. Initial Type 1 hypervisor releases did not have USB support at all, one reason being the live-motion capabilities. You will learn more about moving a running virtual machine from one physical host to another in Chapter 13, “Understanding Availability.” If a USB device were connected to the first physical server, when the virtual machine was relocated, it would no longer be available on the second physical host. Newer releases, however, do support some level of this functionality.
Configuring Graphic Displays
Like a physical machine, a virtual machine supports a graphical display or monitor. In practice—much like a mouse, a keyboard, or other human interface devices (HIDs)—a virtual machine does not have its own dedicated monitor. Instead, the user connects to the virtual machine with a common set of basic peripherals for the duration of a session. Even though this is the norm, many applications and situations now require a wider set of more specialized configurations. Software developers typically use multiple screens for additional desktop space. Newer operating systems have higher visual performance requirements than the classic 640×480 screen resolution. The blending of higher quality video into many application experiences also necessitates support of this kind. Again, hypervisors handle these devices by leveraging the hardware of the display itself.
For the next few devices, you will need to have the virtual machine powered off. If it is running, shut down the VM, reopen VMware Workstation Player, and edit the Virtual Machine Settings of the Windows 10 VM. By highlighting the Display device, as shown in Figure 12.8, you can see the checkbox option for accelerated 3D graphics, specifically for Windows DirectX support. In the Monitors area, the Use Host Setting For Monitors option uses the settings of the host machine. This is for VMware Workstation Player, where there is a host operating system underneath to access.
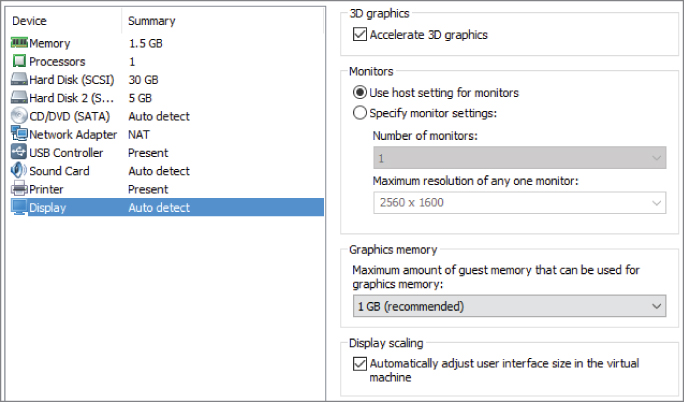
Figure 12.8 Display device options
The Specify Monitor Settings option can be used to set the number of monitors the virtual machine can access, as well as the configuration for those monitors. In this way, a virtual machine can have multiple, high-performance graphical displays.
There is a pull-down menu where the amount of guest memory can be allocated specifically for video graphics memory. A recommended value is provided based on the operating system installed in the VM.
The final checkbox automatically scales the virtual machine's display.
Configuring Other Devices
Other device connection types that are not part of the initial default virtual machine creation can be configured. Often, they are not included because the devices, which once were connected by legacy methods, are now connected by other means such as USB. Serial and parallel port devices are two of these devices.
Serial ports pass information through them serially, or one bit at a time; and in early computers, serial ports were frequently reserved for pre-Internet communications via an external modem. Today, PC modems are typically part of a PC's motherboard connected to the external world by an RJ11 phone jack, if they are there at all.
Parallel ports can pass many bits of data simultaneously, depending on the actual cable configuration. Originally designed as a high-bandwidth connection for printers, parallel connections soon found their way onto other external peripherals such as tape drives and disk drives. Today, they have been superseded by USB devices and are rarely included on most computer hardware. In both cases, parallel and serial ports, there are times when the virtual machine may need to use or emulate them.
- Normally, the virtual machine needs to be powered off for this process, but because you are not actually adding a serial port, it will not be necessary. Click the Add button at the bottom of the Virtual Machine Settings window to add a hardware device. Select the Serial Port option and click Next to continue. As shown in Figure 12.9, there are three serial port types from which to choose.

Figure 12.9 The Serial Port Type screen
- The Use Physical Serial Port On Host option is similar to the other devices discussed earlier. Click Next to continue. The default setting is Auto detect, but if you have a serial port on your system you could examine the pull-down menu to select it. There is also the familiar checkbox to automatically connect the port to the virtual machine when it is powered on. Click Back to return to serial port types.
- Select the Output To File option and then click Next. On this screen, you can browse for an existing file to connect to as a port, or you can create one to which to stream information. This capability can be used for simulations. Click Back to return to the Serial Port Type screen.
- Select the Output To Named Pipe option and then click Next. Named pipes are used for inter-process communications in a single system, or they can be used to pass data from virtual machine to virtual machine.
- Click Cancel to close the window.
Now let's examine the parallel port. As before, the virtual machine normally needs to be powered off for this process, but because you are not actually adding a parallel port, it will not be necessary.
- Click the Add button at the bottom of the Virtual Machine Settings window to add a hardware device. Select the Parallel Port option and click Next to continue. As shown in Figure 12.10, there are two parallel port types from which to choose.

Figure 12.10 The Parallel Port Type screen
- The Use Physical Parallel Port On The Host option is also similar to the other devices discussed earlier. Click Next to continue. The default setting is Auto detect, but if you have a parallel port on your system you could examine the pull-down menu to select it. Beneath the Device Status heading is the checkbox to automatically connect the port to the virtual machine when it is powered on. Click Back to return to the Serial Port Type screen.
- Select the Output To File option and then click Next. On this screen, you can browse for an existing file to connect to as a port, or you can create one to stream information. This capability can be used for simulations.
- Click Cancel to close the window.
Finally, let's examine a generic SCSI device.
- Click the Add button at the bottom of the Virtual Machine Settings window to add a hardware device. Select the Generic SCSI device and click Next to continue. Figure 12.11 illustrates the SCSI device options. The connection pull-down menu allows you to choose a CD drive or a hard disk. As with the other devices, the Connect At Power On checkbox will connect the device when the virtual machine is powered on.
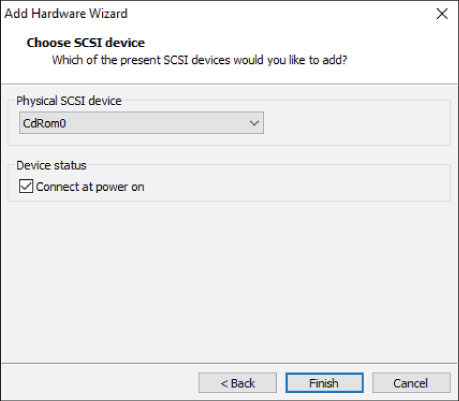
Figure 12.11 Generic SCSI device options
- Click Cancel to close the window.
Not all devices can be used in a virtual environment. Certain specialized PC boards such as fax modems have no virtual analogies. Industry-specific hardware (telephony systems, for example) cannot be virtualized. Aside from a few scattered examples, the bulk of peripherals in use today can be connected and optimized for use with a virtual machine. As technology and hypervisors continue to mature and evolve, the number of devices that cannot be virtualized should diminish to virtually zero.