
Chapter 4
Creating a Virtual Machine
Virtual machines are the building blocks for today's data centers. Once an infrastructure is in place, the process of populating the environment with workloads begins. There are two main methods of creating those virtual machines, the first being a physical-to-virtual operation (or P2V) and the second being a from-the-ground-up execution. We'll cover both of those and perform the latter to create an initial VM.
- Performing P2V conversions
- Loading your environment
- Building a new virtual machine
Performing P2V Conversions
Virtualization technology and its use by corporations did not spring up instantly out of nowhere. Even though increasing numbers of virtual machines are being deployed today, there are still many millions of physical servers running application workloads in data centers. A significant percentage of new workloads are still being deployed as physical servers as well. As data center administrators initially embraced virtualization, there were two main strategies for using virtualization in their environments.
The first of these was consolidation. Consolidation is the practice of taking existing physical servers and converting them into virtual servers that can run atop the hypervisor. As you saw in Chapter 1, “Understanding Virtualization,” there were and still are millions of physical servers running business applications. In order to achieve the substantial savings that virtualization provided, corporate IT departments needed to migrate a significant portion of their physical server workloads to the virtual infrastructure. To effect this change, they needed tools and a methodology to convert their existing physical servers into virtual machines. Today, many companies who have begun virtualizing their data centers have more than half of their servers converted into virtual machines.
The second strategy was containment. Containment is the practice of initially deploying new application workloads as virtual machines so additional physical servers will not be required, except to expand the virtual infrastructure capacity. You'll learn more about this later when you create new virtual machines.
In the last few years, a third reason for virtualizing existing workloads has appeared in the form of cloud computing. The first step for many companies to take advantage of cloud computing is to either migrate a set of virtual machines to an outside hosting provider or to convert to a subscription application service that is managed by the application company and is usually run outside of the company's physical premises. Some examples of these would be Salesforce.com, Workday, and Microsoft's Office 365 offering. These Software-as-a-Service (SaaS) applications take all of the maintenance and management of the infrastructure from the company, which is part of the vendor's value. We will focus on those infrastructures that require your attention.
Investigating the Physical-to-Virtual Process
The process of converting a physical server to virtual, often shortened to the term P2V, can take a number of paths. The creation of a brand new virtual machine is usually the preferred method. A new virtual machine provides the opportunity to load the latest operating system version and the latest patches as well as rid the existing workload of all the accumulated detritus that an older server acquires over the course of its working lifetime through application installations and upgrades, tool installations and upgrades, and operating system upgrades, not to mention additional work that may have been done and forgotten over time. Also, as part of creating a virtual machine, you will see that certain physical drivers and server processes are no longer needed in the virtual environment. When you create a new VM, part of the process needs to make these adjustments as well.
If you were to perform this process manually for multiple servers, it would be tremendously repetitive, time-consuming, and error prone. To streamline the effort, many vendors have created P2V tools that automate the conversion of existing physical servers into virtual machines. Instead of creating a clean virtual server and installing a new operating system, the tools copy everything into the VM. Older servers that run applications or environments that are no longer well understood by their administrators are at risk when the hardware becomes no longer viable. The operating system version may no longer be supported, or even be capable of running on a newer hardware platform. Here is a perfect situation for a P2V—the ability to transfer that workload in its native state to a new platform-independent environment where it can be operated and managed for the length of its usable application life without concern about aging hardware failing. The other advantage of this process is that a system administrator would not have to migrate the application to a new operating system where it might not function properly, again extending the life and usability of the application with minimal disruption.
One of the disadvantages of a P2V conversion can be an advantage as well. The P2V process is at its very core a cloning of an existing physical server into a virtual machine. There are some changes that occur during the process, translating physical drivers into their virtual counterparts and certain network reconfigurations, but ultimately a P2V copies what is in a source server into the target VM.
In addition to the various hypervisor solution providers, a number of third-party providers also have P2V tools. Here is a partial list of some of the available tools:
- VMware Converter
- Novell Platespin Migrate
- Microsoft Virtual Machine Converter
- Citrix XenConvert
- Dell vConverter
Hot and Cold Cloning
There are two ways of performing the P2V process, hot and cold, and there are advantages and disadvantages to both methods. Cold conversions are done with the source machine nonoperational and the application shut down, which ensures that it is pretty much a straight copy operation from old to new. Both types involve a similar process:
- Determine the resources being used by the existing server to correctly size the necessary resources for the virtual machine.
- Create the virtual machine with the correct configuration.
- Copy the data from the source (physical) server to the target (virtual) server.
- Run post-conversion cleanup and configuration. This could include network configuration, removal of applications and services that are not required for virtual operations, and inclusion of new drivers and tools.
- Make manual adjustments to the configuration, if needed. If an application has outgrown its physical server, the administrator could add more RAM or additional processors. If the workload was overprovisioned in the physical server, here is an opportunity to right-size the virtual machine by removing unneeded RAM or processors that can be used more efficiently elsewhere.
Hot cloning, as the name implies, performs the clone operation while the source server is booted and the application is running. One disadvantage to this is that data is constantly changing on the source machine, and it is difficult to ensure that those changes are migrated to the new VM. The advantage here is that not all applications can be suspended for the period of time that is necessary to complete a P2V. A hot clone allows the P2V to complete without disrupting the application. Depending on where the application data is being accessed from, it may be even simpler. If the data is already kept and accessed on a SAN rather than local storage in the server, the physical server could be P2Ved, and when the post-conversion work and validation is completed, the physical server would be shut down, and the disks remounted on the virtual machine. This process would be less time-consuming than migrating the data from the local storage to a SAN along with the P2V.
The length of time to complete a P2V is dependent on the amount of data to be converted, which correlates directly to the size of the disks that need to be migrated to a virtual machine. More disks and larger disks require more time. Times can vary widely from just an hour to maybe a day. Most systems, however, can comfortably be done in just a few hours, and very often P2Vs are run in parallel for efficiency. Vendors and service organizations have years of experience behind them with these conversions and have created P2V factories that allow companies to complete dozens or hundreds of migrations with minimal impact on a company's operation and with a high degree of success. At the end of the process, a data center has a lot fewer physical servers than at the start.
Loading Your Environment
In order to build and configure virtual machines, you'll need a workbench. Although you could download and install a Type-1 hypervisor on your PC, it would be outside the scope of this text as well as unnecessary for the work that you will be doing. In fact, many tools are available that will allow you to create VMs using a Type-2 hypervisor as your environment. The benefit is that you will be able to start up virtual machines when they are required, shut them down or suspend them when the work is complete, and then return to your usual PC applications. Many application developers use these tools to create virtual machines that then get migrated to the larger dedicated virtual environment. Here is a short list of some of the more popular applications:
- VMware Workstation Player
- VMware Workstation Pro
- VMware Fusion (for Macintosh)
- Parallels Desktop
- VirtualBox (open source)
- Microsoft Windows Virtual PC
The virtualization workbench tools you choose will depend on several factors, including what you are running as a desktop operating system and what, if anything, you are willing to pay for the tools. The examples in this text use VMware Workstation Player for most of the work and VMware Workstation Pro for some illustrative elements that Player does not have. Just as Adobe Acrobat Reader allows you to read PDF documents created by other people, VMware Workstation Player allows you to play virtual machines. It also allows you to create new VMs. Player is used in these examples for a number of reasons; the first and foremost is that it is available as a free download. The second is that VMware has the lion's share of the virtualization market, so it makes sense to use a solution that would be more prevalent than a lesser-used application. Also, if you are using this text as part of a university class, many schools have agreements with various software companies such as Microsoft, Red Hat, Cisco, and VMware to provide their solutions at little or no cost to students. That means that VMware Workstation Pro might be available to students at a reduced cost or free. We'll also use VirtualBox, a free, Oracle-backed, open-source offering that is very popular in development environments.
Loading VMware Workstation Player
As shown in Figure 4.1, you can download VMware Workstation Player from the VMware website from a number of different links, including www.vmware.com/downloads. Read the release notes, which are available via the link on the page, to make sure that your computer meets the requirements for the software. Usually, the resource that your computer needs most is memory. If you recall that a Type-2 hypervisor sits on top of a native operating system, you will see that you need to provide memory for the host operating system, VMware Workstation Player, as well as any VMs that you will be running. Because you will typically be running only one VM at a time, processor resources don't usually become a bottleneck. This could change if you do run multiple VMs, which is not unusual in a test or development environment.
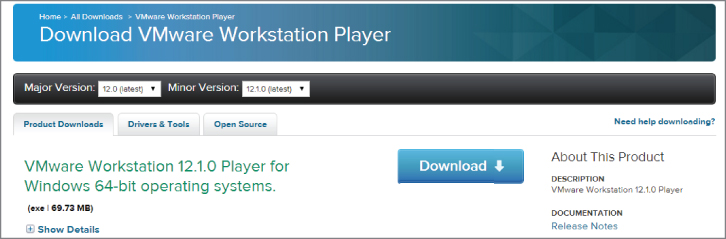
Figure 4.1 Downloading VMware Workstation Player
After downloading the Player executable, install it by double-clicking the icon shown in Figure 4.2.

Figure 4.2 The VMware Workstation Player package
The Windows User Account Control window appears. Select Yes. The Player Setup screen appears, as shown in Figure 4.3. Select Next to continue.

Figure 4.3 The Player Setup window
As Figure 4.4 illustrates, you will need to accept the End User License agreement before continuing. Click the I Accept The Terms In The License Agreement checkbox and select Next to continue.

Figure 4.4 The License Agreement window
The Custom Setup screen appears, as illustrated in Figure 4.5. Here you can select the destination folder of your choice by clicking the Change button. If you have a Windows host system, check the Enhanced Keyboard Driver checkbox. This provides some additional security, faster keyboard processing, and better handling of international keyboards and keyboards with extra function keys. Select Next to continue.
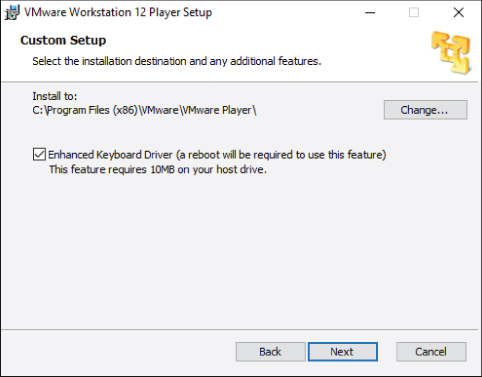
Figure 4.5 The Custom Setup window
The User Experience Settings Window appears, as shown in Figure 4.6. Uncheck the first selection box if you do not want to check for product updates on startup. Uncheck the second selection box if you do not want to provide usage statistics to VMware. Select the Learn More link to find out about the feedback process. Choose Next to continue.
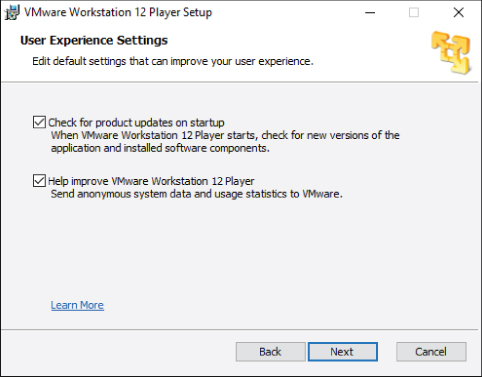
Figure 4.6 The User Experience Settings window
The Shortcuts Window appears, as shown in Figure 4.7. Uncheck the selection boxes if you do not want the offered shortcuts created. Choose Next to continue.

Figure 4.7 The Shortcuts window
As illustrated in Figure 4.8, the Ready to Install window appears. You can review your selections screen by screen using the Back button. Choose Install to install VMware Workstation Player.

Figure 4.8 The Ready to Install window
VMware Workstation Player will be installed, and a series of update screens will display the progress of the installation, as shown in Figure 4.9. This process will take a few minutes.

Figure 4.9 The installation progress screen
As illustrated in Figure 4.10, at the completion of the installation, a last screen appears saying the installation is completed. If you chose to retain the shortcut option, a shortcut appears on the desktop. Select Finish to exit the installation process.

Figure 4.10 Installation complete
Exploring VMware Workstation Player
Now that Player is installed, fire it up and take it for a short spin before you start building VMs. Double-click the icon to start VMware Workstation Player. The initial entry prompts you for an email address to use the free version. Enter a valid email address and select Continue. Acknowledge the Thank You window and click Finish.
Figure 4.11 shows the main Workstation Player window. The items along the right side of the screen are a subset of what is available from the Player menu at the top of the screen. You can select either the icons or the text along the right side to choose the action. Selecting the house icon on the left side will return to main window.

Figure 4.11 The VMware Workstation Player main window
Let's look closer at each of the selections under the Player pull-down menu under File. They are
- Create A New Virtual Machine
- Open A Virtual Machine
- Download A Virtual Appliance
- Player Preferences
As with many Windows applications, there are still keystroke commands that will execute the selected function. Create and Open are both fairly self-explanatory, and you will use both of them extensively. Download A Virtual Appliance will open your default browser to the VMware Virtual Appliance Marketplace where you can search for specific prebuilt VMs, or just browse through the thousands that are available. We'll return to virtual appliances later in Chapter 14, “Understanding Applications in a Virtual Machine.” Finally, select Preferences. As shown in Figure 4.12, there are a number of options that can affect how Player behaves as you work with the application.

Figure 4.12 Player preferences
Under the Help menu are
- Help Topics
- Online Documentation
- Support
- Online Community
- Request A Product Feature
- Upgrade To VMware Workstation Pro
- Enter License Key
- Software Updates
- Hints
- About VMware Workstation Player
The Help Topics selection opens an Internet browser and brings you to the appropriate user guides for VMware Workstation Player. Similarly, the Online Documentation selection also opens an Internet browser and brings you to the latest documentation available online for VMware Workstation Player. Under the Support submenu, the Online Community selection provides a link to the VMware Workstation Player online discussion areas. Also under the Support submenu, the Request A Product Feature choice allows you to make feature enhancement suggestions to the VMware Workstation Player product management team. Upgrade To VMware Workstation Pro links you to the VMware Workstation Pro product page for information. Choosing Enter License Key allows you to enter a purchased license key if you are using Workstation Player for a business. Selecting Software Updates will check to see if a newer release of VMware Workstation Player is available for download. The Hints option allows you to toggle the hints capability. Finally, the About VMware Workstation Player window provides information about this particular installation of VMware Workstation Player, including the version number and various bits of host information.
Loading VirtualBox
Another very popular Type-2 hypervisor is Oracle VirtualBox. Developed by Innotek GmbH in Germany, it was offered free as open source in 2007. Sun Microsystems acquired Innotek in 2008, and Oracle acquired Sun in 2010. VirtualBox continues to be open-source software and free of charge. It runs not just on Windows or Linux hosts, but on Mac OS X and Solaris hosts as well. As shown in Figure 4.13, you can download VirtualBox from http://www.virtualbox.org/. Choose the Downloads link and select the correct choice for your host machine.
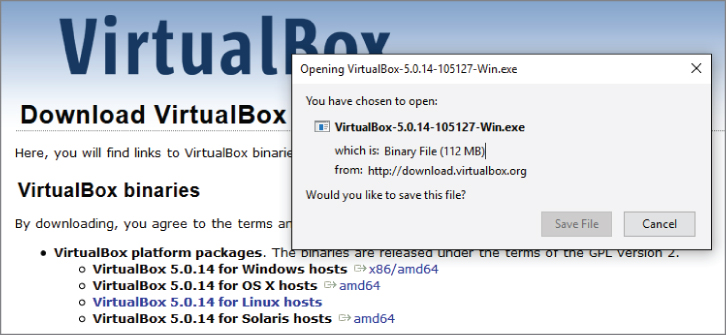
Figure 4.13 Downloading VirtualBox
After downloading the VirtualBox executable, begin the installation by double-clicking the icon shown in Figure 4.14. If you are presented with a Windows SmartScreen popup, select More and then Run to continue to the installation.
Figure 4.14 The VirtualBox installation package
As shown in Figure 4.15, the VirtualBox Setup window appears. Select Next to continue.
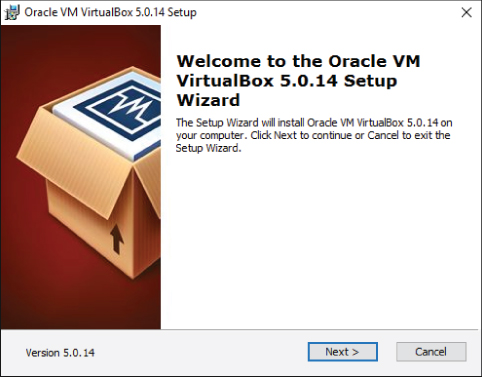
Figure 4.15 The VirtualBox Setup window
The Custom Setup screen appears, as illustrated in Figure 4.16. In the feature window, you can select or deselect which features to install. For our purposes, install the default options by making no changes.

Figure 4.16 The Custom Setup screen
You also have the option to change the installation location by choosing the Browse button. The Disk Usage button at the bottom of the screen gives you insight into how much storage will be required for the installation and what is available on your system. Choose Next to continue.
Figure 4.17 shows the second Custom Setup window. Here you can choose to keep or unselect the offered shortcuts on the Desktop and the Quick Launch bar. Leave the Register File Associations checkbox selected. This will connect specific file types that VirtualBox uses to the application, much like how Microsoft Excel is associated with .xls.xlsx
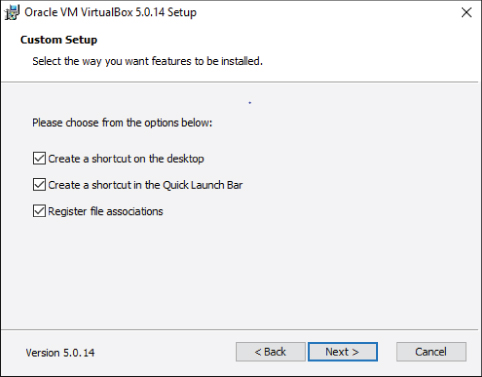
Figure 4.17 Another Custom Setup window
The Warning screen, shown in Figure 4.18, appears and explains that VirtualBox will reset the network connection and momentarily disconnect your machine from the network. To proceed with the installation, select Yes.
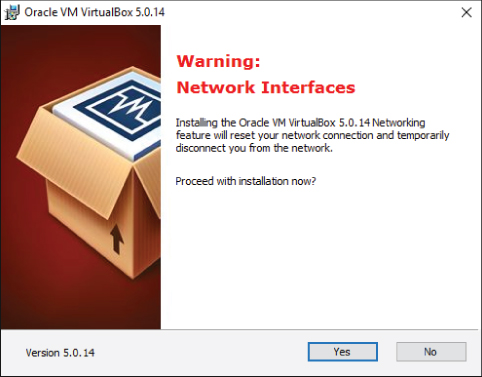
Figure 4.18 The Network Interfaces warning
The Ready to Install window appears as illustrated in Figure 4.19. Click Install to begin the installation process.

Figure 4.19 The Ready to Install window
VirtualBox will be installed, and a series of update screens will display the progress of the installation, as shown in Figure 4.20. During this stage you will be presented with a number of screens to install USB device drivers. Choose Install to allow the drivers to be loaded. This entire process will take a few minutes.
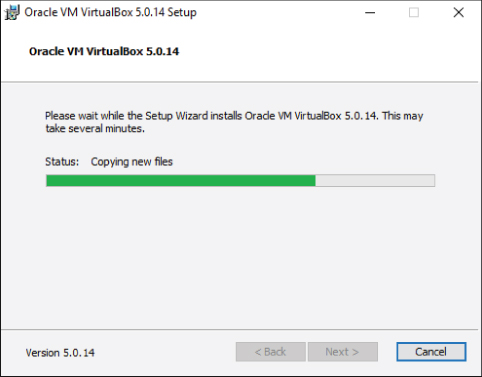
Figure 4.20 Installation progress
When the installation is finished, the final screen will display as shown in Figure 4.21. Select Finish to complete the process.

Figure 4.21 The VirtualBox installation is completed.
The Installation Wizard closes and VirtualBox is opened for the first time, as shown in Figure 4.22. We'll explore the VirtualBox in Chapter 6, “Installing Linux on a Virtual Machine.”
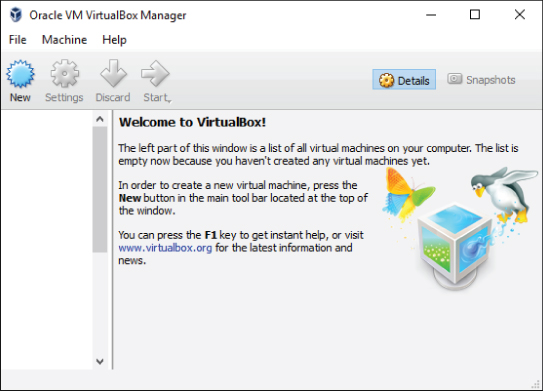
Figure 4.22 The Oracle VM VirtualBox Manager
Building a New Virtual Machine
Once they experience the benefits of consolidation in a data center, administrators quickly look to expand the use of virtualization to increase those advantages. Containment is the practice of initially deploying new application workloads as virtual machines. One large benefit of a containment strategy is a significant decrease in new hardware acquisition costs because most incoming workloads are now deployed as virtual machines. Some necessary workload-configuration education occurs during this process.
When physical servers are purchased for new applications, their configuration is based on a number of assumptions. The first assumption is how long the server will be in use. A typical server's lifespan is between three and five years, at which point they are replaced by equipment that is newer, faster, and usually less expensive to maintain. In order to configure the system to run for its useful lifespan, you have to take into account two parameters: peak performance and growth.
A server is typically sized to handle what the application owner believes the application will need to handle at the end of its life. For example, if in its initial deployment it will process a thousand transactions a second, and you expect about 10 percent growth every year, at the end of five years, the server will need to process about 1,450 transactions a second. However, from a different perspective, there might be times during that initial year when the expectation is that during peak times, the system would need to process 1,500 transactions per second. That number would grow to about 2,200 transactions per second in the final year. The bottom line is that your server should be sized from day one to handle more than double the need at that time. This is the model that has been in place for many years: the application vendor works with a customer to decide what the long-term need will be, and they configure the hardware for that projection. The company pays for that capacity and hardware, even if that projection is never reached. If that projection is reached earlier, then the existing server needs to have resources added, if that is possible, or a whole new server is needed to replace it.
Thinking about VM Configuration
Virtual machines and virtual infrastructure work differently. The platform is an aggregation of resources that are allocated to the various workloads, but the adjustment of that allocation is often very fluid and dynamic, in sharp contrast to the essentially locked-in configuration of a physical server. Two areas that application owners need to understand as they move their applications into a virtual environment are configuration and resource allocation. Though every application is different and its resource requirements are different, most workloads, when they are migrated to a virtual machine, are configured with less memory and fewer processors than they would have been configured with in the physical world.
There are a number of reasons why this is true, the first being that with the many different aspects of dynamic resource allocation in a virtual environment, they can be sized appropriately for the current need rather than an oversized future need. You'll see later that you can configure cushions of resources that are available if needed but are never used if they aren't required. Those cushions, when they aren't being used, remain as part of the larger resource pool that everyone can use. Both memory management and processor utilization are highly optimized, so the practice is to start smaller with an initial VM and add resources if necessary, rather than start with a larger VM and subtract them. It is a best practice, with few exceptions, to create every new VM with one virtual CPU (vCPU) and only add additional vCPUs if poor performance dictates the change. Most often, one is more than enough.
Creating a First VM
Taking into account best practices about proper configuration, for your first virtual machine, let's create a VM with one vCPU, 2 GB of memory, 30 GB of storage, and one network connection. Don't forget that the VM is equivalent to a hardware server, so when you are done, you will merely have a container into which you can load an operating system. Chapter 5, “Installing Windows on a Virtual Machine,” will cover installing Microsoft Windows 10 into a VM, while Chapter 6, “Installing Linux on a Virtual Machine,” will cover loading Ubuntu Linux into a VM.
Let's begin by opening VMware Workstation Player. Select the Create A New Virtual Machine option from the main screen or the File menu. Figure 4.23 shows the New Virtual Machine Wizard. There are three choices here. The first two will load an operating system from either a DVD or an ISO image, but we will defer those methods for now. Select the option “I will install the operating system later” and then select Next.

Figure 4.23 The New Virtual Machine Wizard
The Select a Guest Operating System screen, shown in Figure 4.24, allows you to choose which operating system you plan to install. You can see there are quite a few operating systems that can be installed in a virtual machine. Choose the Guest Operating System. Choose the Version. This VM will be used as the base for Chapter 5, so Windows 10 x64 is selected. Select Next to continue.
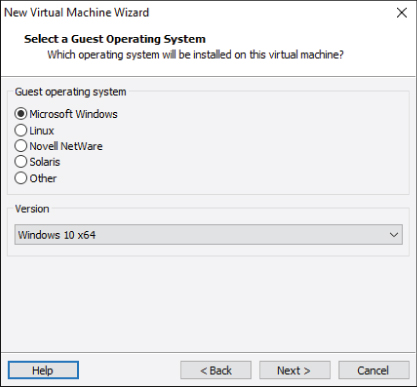
Figure 4.24 The Select a Guest Operating System screen
The Name the Virtual Machine screen in Figure 4.25 is where you choose a name for the VM and select where you want the files that comprise the VM to reside. You can choose the defaults or create your own name. Use the Browse button to choose a different place to create the files. Select Next to continue.

Figure 4.25 The Name the Virtual Machine screen
The Specify Disk Capacity screen in Figure 4.26 is where you will size the initial disk for your VM Player. It provides a recommendation, in this case 60 GB, based on the operating system type and version that you plan to install. You should set the maximum disk size to 30 GB. You can choose to create one large file or many smaller files to represent the disk out on the host file system. Because there are no plans to move this VM, store the virtual disk as a single file and choose a smaller amount of storage space for the disk. Choose Next to continue.
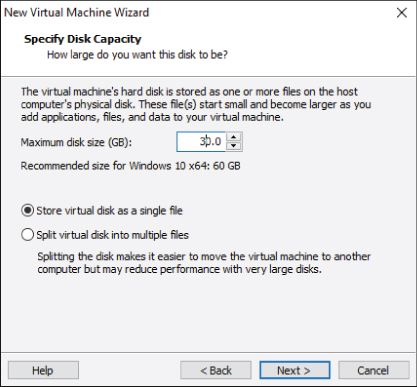
Figure 4.26 The Specify Disk Capacity screen
The VM is now ready to be created. If you look at the settings, you will see that some virtual devices included in the VM were not selected, such as a floppy drive and a printer. If you want to make additional changes to the default device selections, you can select Customize Hardware. Figure 4.27 shows a summary of the hardware devices that will be configured, as well as the memory settings. You will make adjustments as you go forward, so for the moment just Close the window.
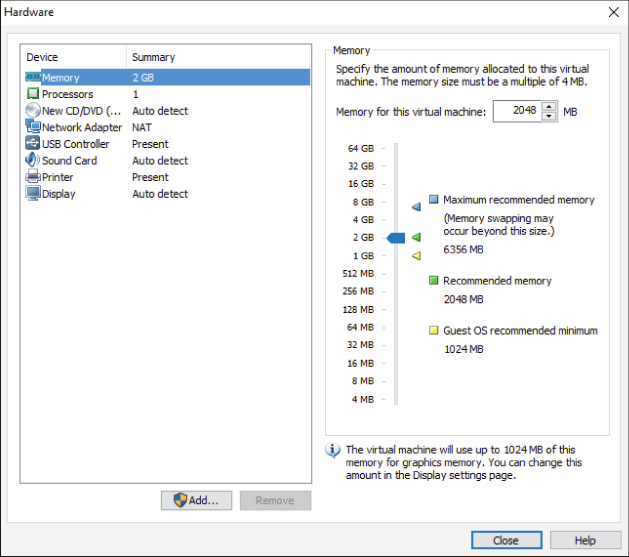
Figure 4.27 Customize the hardware.
Figure 4.28 shows the final screen. Select Finish to create the VM.

Figure 4.28 Create the virtual machine.
The Virtual Machine is now created. You can see the new VM in the left column. Because the VM is selected, additional information and operational options appear on the right. We will examine these in the next chapter.