Thanks to Chapter 6, we can draw and animate sprites on the screen. In this chapter, we will make them more lifelike by giving them the ability to bump into each other. This is done using a technique called collision detection. A collision occurs when two sprites touch or overlap each other. To demonstrate this new concept, we will create a simple ball-and-paddle game like the old Atari game, Breakout. This is a higher-level technique than previous topics you have learned so far, which have focused more on just getting something up on the screen. This is a very direct way to test for collisions. Another technique, which is ultimately used in Celtic Crusader, is to calculate the distance between two sprites. Let’s start with the simpler of the two in this chapter, and the distance approach down the road in the gameplay chapters.
Here’s what we’ll cover in this chapter:
Collision detection is an important technique that you should learn. It is a requirement for every game ever made. I can’t think of any game that does not need collision detection, because it is such an essential aspect of gameplay.
Without collisions, there is no action, goal, or purpose in a game. There is no way to interact with the game without collisions taking place. In other words, collision detection makes the sprites in a game come to life and makes the game believable. Not every situation in which collision detection occurs necessarily means that something is hit or destroyed. We can also use collision testing to prevent the player from going into certain areas (such as a lake or mountain area that is impassible).
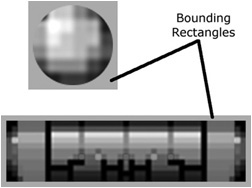
Collision detection is pretty easy to do using the System.Drawing.Rectangle class. First, you will create a rectangle based on the position and size of one object, such as a sprite. Then you will need to create a similar rectangle for a second object. Once you have two rectangles, which represent the position and size of two objects, then you can test to see whether the rectangles are intersecting. We can do this with a function in the Rectangle class called IntersectsWith(). Figure 7.1 is an illustration showing the bounding rectangles of two sprites from the example program. In most cases, the image itself is used as the bounding rectangle, which includes the transparent pixels that usually surround an image.
In Chapter 6, when we first learned about sprite programming, and when we created the Sprite class, we added a function called IsColliding—but didn’t use it right away, as it was created in advance for our needs in this chapter! Here is the IsColliding() function:
Public Function IsColliding(ByRef other As Sprite) As Boolean
    REM test for bounding rectangle collision
    Dim collision As Boolean
    collision = Me.Bounds.IntersectsWith(other.Bounds)
    Return collision
End Function
Hint
You will get better results in your game if you make sure there is very little empty space around the edges of your sprite images, since the image is used as the bounding rectangle!
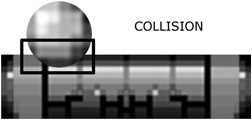
Let’s dissect this function to determine what it does. First, notice that Collided-With returns a Boolean value (true or false). Notice also that there’s only one Sprite passed by reference (ByRef). Thus, the entire sprite object in memory (with all of its properties and functions) is not copied to the function, only a reference to the sprite’s location in memory (like a pointer). This function is small thanks in part to the Sprite.Bounds property, which returns a Rectangle representing a sprite’s position and size as it appears on the screen. Thus, two rectangles are essentially created based on the position and size of each sprite, and then IntersectsWith() is used to see whether they are overlapping each other. Figure 7.2 shows an illustration of a collision taking place between two sprites.
To demonstrate sprite collision testing with our new function, I’ve put together a quick demo based on the old Atari game Breakout, and it’s shown in Figure 7.3. Let me show you how to create this project. We’ll reuse classes written previously to simplify the game and cut down on the amount of code that would otherwise be required. This game is dramatically different from the Blocks game back in Chapter 3, which was created using form controls to demonstrate how to work with a PictureBox! This new game is done entirely in graphics mode with real collision detection.

Copy the Sprite.vb file from the Sprite Drawing Demo project in the previous chapter over to the new one so we don’t have to re-list the source code over again in this chapter! Once copied, open up Sprite.vb to make some changes to it. It’s almost impossible to foresee every property and function you’ll need for a class ahead of time. Instead, these things tend to grow over time, accumulating new features as needed. Such is the case with our brand new Sprite class, christened just in the previous chapter. But, as is often the case, we already need to make some changes to it! We need to add properties to expose Velocity and CurrentFrame, and we need to add another function called KeepInBounds()! Our new project this chapter is called Collision Demo.
First, we will add a velocity value to the Sprite class. This will make it possible to set the speed for a sprite and then move it based on that speed.
Private p_velocity As System.Drawing.PointF
Public Property Velocity() As PointF
    Get
        Return p_velocity
    End Get
    Set(ByVal value As PointF)
        p_velocity = value
    End Set
End Property
Next up is the CurrentFrame property. We already have the Sprite.p_current Frame variable in the class, but need a way to access it so this property will fill that important need that was glossed over.
Public Property CurrentFrame() As Integer
    Get
        Return p_currentFrame
    End Get
    Set(ByVal value As Integer)
        p_currentFrame = value
    End Set
End Property
A new function will be added to the Sprite class: KeepInBounds(). This could easily be added to the program source rather than to the class, but it will be a helpful function in the long term and we need it for the example program.
Public Sub KeepInBounds(ByVal boundary As Rectangle)
    If p_position.X < boundary.Left Then
        p_velocity.X *= -1
        p_position.X = boundary.Left
    End If
    If p_position.X > boundary.Right Then
        p_velocity.X *= -1
        p_position.X = boundary.Right
    End If
    If p_position.Y < boundary.Top Then
        p_velocity.Y *= -1
        p_position.Y = boundary.Top
    End If
    If p_position.Y > boundary.Bottom Then
        p_velocity.Y *= -1
        p_position.Y = boundary.Bottom
    End If
End Sub
I don’t want to list the source code for Game.vb here again because it hasn’t changed since Chapter 6, so just copy the file from your last project into the new one for this chapter. Here is just a sample of the class for reference.
Public Class Game
        Private p_device As Graphics
        Public p_surface As Bitmap
        Private p_pb As PictureBox

        . . .


End Class
Both the game loop and gameplay code are found in the Form source code file Form1.vb. When you create the new project, Form1 will be added automatically, so you can open the source code for it and enter this code. Add Game.vb and Sprite.vb to the project, grab the bitmap files, and watch it run.
Public Class Form1
    Private Sub Form1_Load(ByVal sender As System.Object, _
            ByVal e As System.EventArgs) Handles MyBase.Load

        Main()
    End Sub
    Private Sub Form1_FormClosed(ByVal sender As Object, _
            ByVal e As System.Windows.Forms.FormClosedEventArgs) _
            Handles Me.FormClosed
        Shutdown()
    End Sub
    Private Sub Form1_KeyDown(ByVal sender As Object, _
            ByVal e As System.Windows.Forms.KeyEventArgs) _
            Handles Me.KeyDown
        Game_KeyPressed(e.KeyCode)
    End Sub
    Private Sub Form1_KeyUp(ByVal sender As Object, _
            ByVal e As System.Windows.Forms.KeyEventArgs) _
            Handles Me.KeyUp
        Game_KeyReleased(e.KeyCode)
    End Sub
End Class

Public Module Module1
    Public game As Game
    Public gameOver As Boolean = False
    Public startTime As Integer = 0
    REM framerate variables
    Public frameCount As Integer = 0
    Public frameTimer As Integer = 0
    Public frameRate As Integer = 0
    Public ballImage As Bitmap
    Public ball As Sprite
    Public Const PADDLE_SPEED As Integer = 6
    Public paddleImage As Bitmap
    Public paddle As Sprite
    Public blockImage As Bitmap
    Public blocks(10, 8) As Sprite
    Public score As Integer = 0

    Public Sub Main()
        game = New Game(Form1, 800, 600)
        Game_Init()
        While Not gameOver

        REM let gameplay code update
        Game_Update(0)
        REM let gameplay code draw
        Game_Draw()
        REM let the game object update
        game.Update()
        REM give the form some cycles
        Application.DoEvents()
        REM calculate framerate
        frameCount += 1
        If My.Computer.Clock.TickCount > frameTimer + 1000 Then
            frameTimer = My.Computer.Clock.TickCount
            frameRate = frameCount
            frameCount = 0
        End If
    End While
    REM free memory and shut down
    Game_End()
    End
End Sub

Public Sub Game_End()
    ballImage = Nothing
    ball = Nothing
    paddleImage = Nothing
    paddle = Nothing
    blockImage = Nothing
    For y = 1 To 8
        For x = 1 To 10
            blocks(x, y) = Nothing
        Next
    Next
End Sub

Public Function Game_Init() As Boolean
    Form1.Text = "Collision Demo"
    game.SetFont("Arial", 14, FontStyle.Regular)
    REM create ball sprite
    ballImage = Game.LoadBitmap("ball.png")
    ball = New Sprite(game)

    ball.Image = ballImage
    ball.Size = ballImage.Size
    ball.Position = New PointF(400, 300)
    ball.Velocity = New PointF(4.0, 2.5)
    REM create paddle sprite
    paddleImage = game.LoadBitmap("paddle.png")
    paddle = New Sprite(game)
    paddle.Image = paddleImage
    paddle.Size = paddleImage.Size
    paddle.Position = New PointF(350, 550)
    REM create blocks
    blockImage = Game.LoadBitmap("blocks.bmp")
    For y = 1 To 8
        For x = 1 To 10
            blocks(x, y) = New Sprite(game)
            blocks(x, y).Image = blockImage
            blocks(x, y).Alive = True
            blocks(x, y).Image = blockImage
            blocks(x, y).Columns = 4
            blocks(x, y).Width = 64
            blocks(x, y).Height = 32
            blocks(x, y).CurrentFrame = y - 1
            blocks(x, y).Position = New PointF( _
                x * (64 + 2), y * (32 + 2))
        Next
    Next
    Return True
End Function

Public Sub Game_Update(ByVal time As Integer)
    ball.KeepInBounds(New Rectangle(0, 0, 800, 600))
    If paddle.X < 10 Then
        paddle.X = 10
    ElseIf paddle.X > 700 Then
        paddle.X = 700
    End If
    CheckCollisions()
End Sub

Public Sub Game_Draw()
    game.Device.Clear(Color.Black)
    REM move & draw the ball
    ball.X += ball.Velocity.X
    ball.Y += ball.Velocity.Y
    ball.Draw()
    REM move & draw the paddle
    paddle.X += paddle.Velocity.X
    paddle.Draw()
    DrawBlocks()
    game.Print(0, 0, "Framerate: " + frameRate.ToString(), _
        Brushes.White)
End Sub

Public Sub Game_KeyPressed(ByVal key As System.Windows.Forms.Keys)
    Select Case key
        Case Keys.Escape : Shutdown()
        Case Keys.Right
            paddle.Velocity = New PointF(PADDLE_SPEED, 0)
        Case Keys.Left
            paddle.Velocity = New PointF(-PADDLE_SPEED, 0)
    End Select
End Sub

Public Sub Game_KeyReleased(ByVal key As System.Windows.Forms.Keys)
    Select Case key
        Case Keys.Right
            paddle.Velocity = New PointF(0, 0)
        Case Keys.Left
            paddle.Velocity = New PointF(0, 0)
    End Select
End Sub

Private Sub CheckCollisions()
    Dim x As Integer
    Dim y As Integer
    REM test for collision with paddle
    If paddle.IsColliding(ball) Then
        ball.Velocity = New PointF(ball.Velocity.X, _
                ball.Velocity.Y * -1)

        End If
        REM test for collision with blocks
        For y = 1 To 8
            For x = 1 To 10
                If blocks(x, y).Alive Then
                   If ball.IsColliding(blocks(x, y)) Then
                       score += 1
                       blocks(x, y).Alive = False
                       ball.Velocity = New PointF(ball.Velocity.X, _
                               ball.Velocity.Y * -1)
                   End If
                End If
            Next
        Next
    End Sub

    Private Sub DrawBlocks()
        For y As Integer = 1 To 8
            For x As Integer = 1 To 10
                If blocks(x, y).Alive Then
                   blocks(x, y).Draw()
                End If
            Next
        Next
    End Sub

    Public Sub Shutdown()
        gameOver = True
    End Sub
End Module
That’s about all there is to sprite collision detection at this point. You learned about the basic collision between two sprites—or more accurately, between two rectangles—using the Rectangle.IntersectsWith method, which simplifies the collision code that you would otherwise have to write yourself. We will be using another form of collision detection later on when we are working with the game world, made up of a tile map, in which certain areas in the world will be impassible based on the tile values.