This chapter will show how to create a sprite using the code developed in Chapter 5 for working with bitmaps. We have a lot of ground to cover here, and we’ll be going through it thoroughly because this is the foundation of the Celtic Crusader game. You will finish this chapter with a solid grasp of sprite programming knowledge, with the ability to load a sprite sheet and draw a sprite with timed animation. Because we want a sprite to draw transparently over any background image in a game, we’ll also learn how to work with an alpha channel in a bitmap image to render an image with transparency. This chapter moves along at a pretty good clip, so you don’t want to skip ahead or you might miss some important detail.
Here’s what we’ll cover in this chapter:
The first question that often arises when the discussion of sprites comes up is, “What is a sprite?” To answer this question simply, a sprite is a small, transparent, animated game object that usually moves on the screen and interacts with other sprites. You might have trees or rocks or buildings in your game that don’t move at all, but because those objects are loaded from a bitmap file when the game starts running, and drawn in the game separately from the background, it is reasonable to call them sprites. There are two basic types of sprites. One type of sprite is the “normal” sprite that I just described, which I refer to as a dynamic sprite. This type of sprite is often called an actor in game design theory. The other type of sprite might be called a static sprite; it is the sort that doesn’t move or animate. A static sprite is used for scenery or objects that the player uses (such as items that might be picked up in the game world). This type of sprite is often called a prop.
Definition
A sprite is a small, transparent, animated game object that usually moves on the screen and interacts with other sprites. There are two types of sprites: actors and props.
I’m going to treat any game entity that is loaded and drawn separately from the background as a sprite. So, I might have a whole house, which normally would be considered part of the background, as a sprite. I use that concept in the sample program later in this chapter.
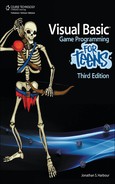
Figure 6.1 shows an example sprite of an Orc warrior. The sprite is really just the detailed pixels that you see at the center of the image, showing the Orc warrior holding a mace and shield. The sprite itself only takes up about half of the actual size of the sprite boundary because the computer only sees sprites in the shape of a rectangle. It is physically impossible to even store a sprite without the rectangular boundary because bitmap images are themselves rectangular. The real problem with a sprite is what to do about all the transparent pixels that should not be shown when the image is displayed on the screen (or rather, on the back buffer surface).
The amateur game programmer will try to draw a sprite using two loops that go through each pixel of the sprite’s bitmap image, drawing only the solid pixels. Here is the pseudocode for how one might do this:
For Y = 1 To Sprite_Height
  For X = 1 to Sprite_Width
    If Pixel At X,Y Is Solid Then
      Draw Pixel At X,Y
    End If
  Next X
Next Y
This pseudocode algorithm goes through each pixel of the sprite image, checking for solid pixels, which are then drawn while transparent pixels are ignored. This draws a transparent sprite, but it runs so slowly that the game probably won’t be playable (even on a top-of-the-line PC).
And yet, this is the only way to draw a transparent sprite! By one method or another, some process must check the pixels that are solid and render them. The key here is understanding how drawing works, because this very critical and time-consuming algorithm is quite old and has been built into the silicon of video cards for many years now. The process of copying a transparent image from one surface to another has been provided by video cards since Windows 3.1 first started supporting the concept of a “video accelerator.” The process is called bit block transfer or just blit for short. Because this important process is handled by an extremely optimized and custom video chip, you don’t need to worry about writing your own blitter for a game any longer. (Even older systems like the Nintendo Game Boy Advance have a hardware blitter.)
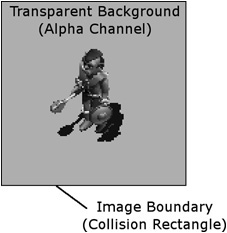
The video card uses alpha blending to draw textures with a translucent effect (which means you can see through them like a window) or with full transparency. Fifty-percent translucency means that half of the light rays are blocked and you can only see about half of the image. Zero-percent translucency is called opaque, which is completely solid. The opposite is 100-percent translucency, or fully transparent, which lets all light pass through. Figure 6.2 illustrates the difference between an opaque and transparent sprite background.
When an image needs to be drawn with transparency, we call the transparent color a color key, and the process of alpha blending causes that particular pixel color to be completely blended with the background. At the same time, no other pixels in the texture are affected by alpha blending, and the result is a transparent sprite. Color key transparency is not often used today.
Color key transparency is a pain. A better way to handle transparency is with an alpha channel and a file format that supports it (such as tga or png). (Note: bmp files do not support an alpha channel).
How Basic Handles Pathnames
A path is a complete description of a directory location. Consider a file with an absolute path, as in the following example:
C:Program FilesMicrosoft Visual Studio 8Common7IDEdevenv.exe
The filename is located at the end, “devenv.exe,” while the path to this filename is everything else in front of the filename. The complete “path” to a file can be described in this absolute format.
The problem is, Visual Basic compiles programs into a subdirectory under your project directory called bin. Inside bin, depending on whether you’re building the Debug or Release version of your program, there will be a folder called binDebug or binRelease. You need to put all of your game’s asset files (bitmaps, waves, etc.) inside this folder in order for it to run. You would not want to store your game’s files inside the main folder of the project because when it runs (inside binDebug, for instance) it will not know where the files are located, and the program will crash.
You can hard-code the path into your game (like C:Game), but this is a bad idea because then anyone who tries to play your game will have to create the exact same directory that you did when you created the game. Instead, put your artwork and other game resources inside binDebug while working on your game. When your game is finished and ready for release, then copy all of the files together into a new folder with the executable.
After you have written a few games, you most likely find that many of the sprites in your games have similar behaviors, to the point of predictability. For instance, if you have sprites that just move around within the boundaries of the screen and wrap from one edge to the other, you can create a subroutine to produce this sprite behavior on call. Simply use that subroutine when you update the sprite’s position. If you find that a lot of your sprites are doing other predictable movements, it is really helpful to create many different behavioral subroutines to control their actions.
This is just one simple example of a very primitive behavior (staying within the boundary of the screen), but you can create very complex behaviors by writing subroutines that cause sprites to react to other sprites or to the player, for instance, in different ways. You might have some behavior subroutines that cause a sprite to chase the player, or run away from the player, or attack the player. The possibilities are truly limited only by your imagination, and, generally, the most enjoyable games use movement patterns that the player can learn while playing. The Sprite Drawing Demo program in this chapter demonstrates sprite movement as well as animation, so you may refer to that program for an example of how the sprite movement code is used.
Sprite animation goes back about three decades, when the first video game systems were being built for arcades. The earliest arcade games include classics such as Asteroids that used vector-based graphics rather than bitmap-based graphics. A vector-based graphics system uses lines connecting two points as the basis for all of the graphics on the screen. Although a rotating vector-based spaceship might not be considered a sprite by today’s standards, it is basically the same thing. Any game object on the screen that uses more than one small image to represent itself might be considered a sprite. However, to be an animated sprite, the image must simulate a sequence of images that are cycled while the sprite is being displayed.
Animation is a fascinating subject because it brings life to a game and makes objects seem more realistic. An important concept to grasp at this point is that every frame of an animation sequence must be treated as a distinct image that is stored in a bitmap file; as an alternative, some animation might be created on the fly if a technique such as rotation or alpha cycling is used. (For instance, causing a sprite to fade in and out could be done at runtime.) In the past, professional game developers did not often use rotation of a sprite at runtime due to quality concerns, but we can do that today with pretty good results.
Animation is done with the use of a sprite sheet. A sprite sheet is a bitmap containing columns and rows of tiles, with each tile containing one frame of animation. It is not uncommon for a sprite with eight directions of movement to have 64 or more frames of animation just for one activity (such as walking, attacking, or dying).
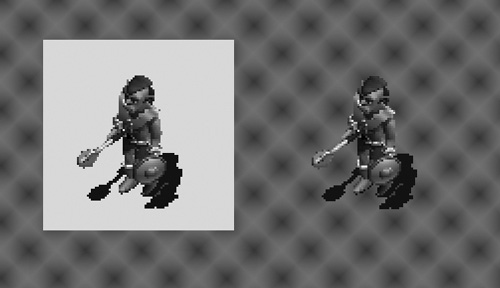
Figure 6.3 shows a dragon sprite with 64 frames of animation. The dragon can move in any of eight directions of travel, and each direction has eight frames of animation. We’ll learn to load this sprite sheet and then draw it transparently on the screen with animation later in this chapter. The source artwork (from Reiner Prokein) comes in individual bitmap files—so that 64-frame dragon sprite started out with 64 individual bitmap files.
Figure 6.3. A dragon sprite sheet with an 8 × 8 layout of animation frames, courtesy of www.reinerstileset.de.
Tip
This dragon sprite was provided courtesy of Reiner “Tiles” Prokein at www.reinerstileset.de. Most of the other sprite artwork in this book is also from Reiner’s sprite collection, all of which includes a royalty-free license for personal or commercial use.
The trick to animating a sprite is keeping track of the current frame of animation along with the total animation frames in the animation sequence.
This dragon sprite is stored in a single, large bitmap image and was actually stored in 64 individual bitmaps before I converted it to a single bitmap using Pro Motion.
Trick
Cosmigo’s Pro Motion is an excellent sprite animation editor available for download at www.cosmigo.com/promotion. All of the sprite sheets featured in this book were created using this tool.
After you have exported an animation sequence as a sprite sheet image, the trick is to get a handle on animating the sprite in source code. Storing all the frames of animation inside a single bitmap file makes it easier to use the animation in your program. However, it doesn’t necessarily make it easier to set up; you have to deal with the animation looping around at a specific point, rather than looping through all 64 frames. Now we’ll start to see where all of those odd properties and subroutines in the Sprite class will be used. I have animated the dragon sprite by passing a range to the Animate function that represents one of the four directions (up, down, left, right), which is determined by the user’s keyboard input. Although the sprite sheet has frames for all eight directions, including diagonals, the example program in this chapter sticks to the four main directions to keep the code simpler.
To get the current frame, we need to find out where that frame is located inside the sprite sheet in the least amount of code possible. To get the Y position of a frame, you take the current frame and divide by the columns to get the appropriate row (and then multiply that by the frame height, or height of each tile).
To get the X position of the frame, perform that same division as before, but get the remainder (modulus result) from the division rather than the quotient, and then multiply by the sprite’s width. At this point, the rest of the rectangle is set up using the sprite’s width and height. The destination rectangle is configured to the sprite’s current position, and then a call to the existing Draw subroutine takes care of business. Figure 6.4 shows the numbered columns and rows of a sprite sheet. Note that the numbering starts at 0 instead of 1. That is a little harder to follow when reading the code, but using a base of 0 makes the calculations much simpler. See if you can choose a frame number and calculate where it is located on the sprite sheet on your own!

We could get by with a couple of reusable functions and a Bitmap. But, that would involve a lot of duplicated code that could very easily be put into a class. So, that is what we will do. There aren’t very many classes in this book, in the interest of making source code easier to understand, but in some cases it’s more difficult to not use a class—as is the case with sprite programming. I have some goals for our new Sprite class. First, it will be self contained, with the exception that it needs the rendering device in our Game class (Game.Device) for drawing. We can pass a reference to the game object to a sprite’s constructor at runtime and that should take care of it. Second, the class should handle both drawing and animation with enough variation to support any needs we’ll have in Celtic Crusader, with numerous properties to keep the code clean and tidy. This is a pretty good start, but we will make small changes to Sprite over time to meet any new needs as the game begins to take shape.
Public Class Sprite
    Public Enum AnimateDir
        NONE = 0
        FORWARD = 1
        BACKWARD = -1
    End Enum
    Public Enum AnimateWrap
        WRAP = 0
        BOUNCE = 1
    End Enum
    Private p_game As Game

Private p_position As System.Drawing.PointF
Private p_size As System.Drawing.Size
Private p_bitmap As System.Drawing.Bitmap
Private p_alive As Boolean
Private p_columns As Integer
Private p_totalFrames As Integer
Private p_currentFrame As Integer
Private p_animationDir As AnimateDir
Private p_animationWrap As AnimateWrap
Private p_lastTime As Integer
Private p_animationRate As Integer
The constructor and destructor functions are next. The variables and references are initialized at this point. Although Basic does automatically initialize most variables to the most obvious value (Nothing or 0), it’s good programming practice to set the initial values on our own.
Public Sub New(ByRef game As Game)
    REM keep reference to Game object
    p_game = game

    REM set core properties
    p_position = New PointF(0.0, 0.0)
    p_size = New Size(0, 0)
    p_bitmap = Nothing
    p_alive = True

    REM set animation to 1 frame by default
    p_columns = 1
    p_totalFrames = 1
    p_currentFrame = 0
    p_animationDir = AnimateDir.FORWARD
    p_animationWrap = AnimateWrap.WRAP
    p_lastTime = 0
    p_animationRate = 30
End Sub

Protected Overrides Sub Finalize()
    MyBase.Finalize()
End Sub
The Sprite class includes numerous properties to give access to its private variables. In most cases this is a direct Get/Set association with no real benefit to hiding the variables internally, but in some cases (such as AnimationRate) the values are manipulated.
Public Property Alive() As Boolean
    Get
        Return p_alive
    End Get
    Set(ByVal value As Boolean)
        p_alive = value
    End Set
End Property

Public Property Image() As System.Drawing.Bitmap
    Get
        Return p_bitmap
    End Get
    Set(ByVal value As Bitmap)
        p_bitmap = value
    End Set
End Property

Public Property Position() As System.Drawing.PointF
    Get
        Return p_position
    End Get
    Set(ByVal value As PointF)
        p_position = value
    End Set
End Property

REM optional way to change X position
Public Property X() As Single
    Get
        Return p_position.X
    End Get
    Set(ByVal value As Single)
        p_position.X = value
    End Set
End Property

REM optional way to change Y position
Public Property Y() As Single
    Get
        Return p_position.Y
    End Get
    Set(ByVal value As Single)
        p_position.Y = value
    End Set
End Property

Public Property Size() As System.Drawing.Size
    Get
        Return p_size
    End Get
    Set(ByVal value As System.Drawing.Size)
        p_size = value
    End Set
End Property

REM optional way to change size
Public Property Width() As Integer
    Get
        Return p_size.Width
    End Get
    Set(ByVal value As Integer)
        p_size.Width = value
    End Set
End Property

REM optional way to change size
Public Property Height() As Integer
    Get
        Return p_size.Height
    End Get
    Set(ByVal value As Integer)
        p_size.Height = value
    End Set
End Property

Public Property Columns() As Integer
    Get
        Return p_columns
    End Get
    Set(ByVal value As Integer)
        p_columns = value
    End Set
End Property

Public Property TotalFrames() As Integer
    Get
        Return p_totalFrames
    End Get
    Set(ByVal value As Integer)
        p_totalFrames = value
    End Set
End Property

Public Property AnimateDirection() As AnimateDir
    Get
        Return p_animationDir
    End Get
    Set(ByVal value As AnimateDir)
        p_animationDir = value
    End Set
End Property

Public Property AnimateWrapMode() As AnimateWrap
    Get
        Return p_animationWrap
    End Get
    Set(ByVal value As AnimateWrap)
        p_animationWrap = value
    End Set
End Property

Public Property AnimationRate() As Integer
    Get
        Return 1000 / p_animationRate
    End Get

    Set(ByVal value As Integer)
        If value = 0 Then value = 1
        p_animationRate = 1000 / value
    End Set
End Property
Sprite animation is handled by the single Animate() function, which should be called from the gameplay functions Game_Update() or Game_Draw(). Animation timing is handled automatically in this function using a millisecond timer, so it can be called from the extremely fast-running Game_Update() without concern for animation speed being in sync with the drawing of the sprite. Without this built-in timing, the Animate() function would have to be called from Game_Draw(), which is timed at 60 Hz (or frames per second). Code such as this Animate() function really should be run from the fastest part of the game loop whenever possible, and only real drawing should take place in Game_Draw() due to timing considerations. If you were to put all of the gameplay code in Game_Draw() and hardly anything in Game_Update(), which is the fast running function, then the game would slow down quite a bit. We will also need the default Animate() function which defaults to animating the whole range of animation automatically.
Public Sub Animate()
     Animate(0, p_totalFrames - 1)
  End Sub

  REM cycle the sprite's animation frame
  Public Sub Animate(ByVal startFrame As Integer, _
                  ByVal endFrame As Integer)
     REM do we even need to animate?
     If p_totalFrames > 0 Then

         REM check animation timing
         Dim time As Integer = My.Computer.Clock.TickCount()
         If time > p_lastTime + p_animationRate Then
             p_lastTime = time

             REM go to next frame
             p_currentFrame += p_animationDir

             If p_animationWrap = AnimateWrap.WRAP Then
                 REM need to wrap animation?

                If p_currentFrame < startFrame Then
                   p_currentFrame = endFrame
                ElseIf p_currentFrame > endFrame Then
                   p_currentFrame = startFrame
                End If

            ElseIf p_animationWrap = AnimateWrap.BOUNCE Then
                REM need to bounce animation?
                If p_currentFrame < startFrame Then
                   p_currentFrame = startFrame
                   REM reverse direction
                   p_animationDir *= -1
                ElseIf p_currentFrame > endFrame Then
                   p_currentFrame = endFrame
                   REM reverse direction
                   p_animationDir *= -1
                End If
            End If
        End If
    End If
End Sub
This single Draw() function can handle all of our sprite drawing needs, including animation! However, there is an optimization that can be made for sprites that do not animate (i.e., “props”): the modulus and division calculations being done in this function make sprite sheet animation possible, but this code can slow down a game if quite a few sprites are being drawn without any animation. The Game.DrawBitmap() function can be used in those cases, because it does not take up any processor cycles to calculate animation frames.
Public Sub Draw()
    Dim frame As New Rectangle
    frame.X = (p_currentFrame Mod p_columns) * p_size.Width
    frame.Y = (p_currentFrame  p_columns) * p_size.Height
    frame.Width = p_size.Width
    frame.Height = p_size.Height
    p_game.Device.DrawImage(p_bitmap, Bounds(), frame, GraphicsUnit.Pixel)
End Sub
Oddly enough, even though we have not discussed the subject yet, this class already has collision detection included. We have a chapter dedicated to the subject: the very next chapter. So, let’s just briefly take a look at this as-yet-unused code with plans to dig into it soon. There is one very useful function here called Bounds(), which returns a Rectangle representing the bounding box of the sprite at its current position on the screen. This is used both for drawing and collision testing. When drawing in the Draw() function, Bounds () is used to return the destination rectangle, which defines where the sprite is supposed to be drawn on the screen, and it can also specify scaling of the target image. The IsColliding() function below also uses Bounds(). One very handy function in the Rectangle class is IntersectsWith(). This function will return true if a passed rectangle is intersecting with it. In other words, if two sprites are touching, then we will know by using this function that is built in to the Rectangle class. We don’t have to even write our own collision code! Nevertheless, we’ll explore advanced collision techniques in the next chapter.
    REM returns bounding rectangle around sprite
    Public ReadOnly Property Bounds() As Rectangle
        Get
            Dim rect As Rectangle
            rect = New Rectangle(p_position.X, p_position.Y, _
                                 p_size.Width, p_size.Height)
            Return rect
        End Get
    End Property

    Public Function IsColliding(ByRef other As Sprite) As Boolean
        REM test for bounding rectangle collision
        Dim collision As Boolean
        collision = Me.Bounds.IntersectsWith(other.Bounds)
        Return collision
    End Function
End Class
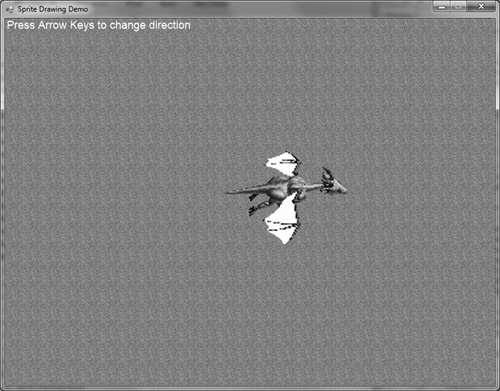
The Sprite Drawing Demo program shows how to use the new Sprite class, the improved Game class, and the new Form/Module code presented in this chapter to draw an animated sprite. The result is shown in Figure 6.5. The dragon sprite is actually comprised of animation frames that are each just 128 × 128 pixels in size, but I have enlarged the sprite sheet so the dragon is twice as large as normal. This isn’t a great idea for a game, because we can resize the sprite at runtime (with the Bitmap.DrawBitmap() function), but it was a simple solution to make it appear bigger for the sake of illustration.
It is completely possible to make a game within the source code file of the Form, without any support or helper code or external libraries. But, there will come a point where the complexity of the source code (in a single file) will exceed our ability to manage it effectively, and progress on the game will grind to a halt with new and frustrating bugs cropping up every time one is apparently fixed. Celtic Crusader is one such game. In previous editions of this book, there have been about a dozen Basic classes created for the game, such as CSprite, CBitmapFont, CDirect3D, CKeyboard, and others. This worked at the time, but in trying to make the game’s source code easier to use, these classes themselves added new complexity to what should have been an engaging exercise in gameplay programming. So, we’re taking more of a structured programming approach this time, centralizing much of the code with most of it right inside the Form and only a few outside helper modules and classes.
We have already seen the early stages of a Game class, and have now added a new Sprite class to our game programming toolbox. In the next section we will build a real-time game loop with new gameplay function calls that will enable us to write code that runs extremely fast, and that is detached from Basic’s event-driven Windows Forms architecture. The new and improved Game class still has the primary responsibility of creating the rendering device (i.e., our PictureBox/Graphics/Bitmap concoction), but added to that is support for printing text in various fonts and loading and drawing bitmaps. At one point I had considered putting the game loop in the Game class, but it proved to be too complex and we’re going for simple, fast, and practical instead of fancy—a Ford versus a Mercedes, if you will. Like Sprite, we may need to make changes to Game in the future. Don’t think of any class as 100 percent complete right away! This is my best guess at this early stage, and I’m sure changes will be made later.
Public Class Game
    Private p_device As Graphics
    Private p_surface As Bitmap
    Private p_pb As PictureBox
    Private p_frm As Form
    Private p_font As Font
    Private p_gameOver As Boolean

    Protected Overrides Sub Finalize()
        p_device.Dispose()
        p_surface.Dispose()
        p_pb.Dispose()
        p_font.Dispose()
    End Sub

    Public Sub New(ByRef form As Form, ByVal width As Integer, _
            ByVal height As Integer)
        p_device = Nothing

    p_surface = Nothing
    p_pb = Nothing
    p_frm = Nothing
    p_font = Nothing
    p_gameOver = False

    REM set form properties
    p_frm = form
    p_frm.FormBorderStyle = Windows.Forms.FormBorderStyle.FixedSingle
    p_frm.MaximizeBox = False
    REM adjust size for window border
    p_frm.Size = New Point(width + 6, height + 28)

    REM create a picturebox
    p_pb = New PictureBox()
    p_pb.Parent = p_frm
    'p_pb.Dock = DockStyle.Fill
    p_pb.Location = New Point(0, 0)
    p_pb.Size = New Size(width, height)
    p_pb.BackColor = Color.Black

    REM create graphics device
    p_surface = New Bitmap(p_frm.Size.Width, p_frm.Size.Height)
    p_pb.Image = p_surface
    p_device = Graphics.FromImage(p_surface)

    REM set the default font
    SetFont("Arial", 18, FontStyle.Regular)
End Sub

Public ReadOnly Property Device() As Graphics
    Get
        Return p_device
    End Get
End Property

Public Sub Update()
    REM refresh the drawing surface
    p_pb.Image = p_surface
End Sub
We studied rudimentary text printing back in Chapter 4, “Drawing with GDI+,” where we learned how to use the Font class to print text with any TrueType font, size, and color. Now, it’s possible to use just the Font class and Graphics. DrawString() function for our text output needs, but I propose a simpler, more convenient approach. Instead of re-creating the font object in each game, let’s add some text printing code to the Game class. This will handle most text output needs, while giving us the freedom to still create a custom font in the game if we want. Below is the new printing support in the Game class. You can now change the font using the SetFont() function and then use Print() to print text anywhere on the screen. A word of warning, though: changing the font several times per frame will slow down a game, so if you need more than one font, I recommend creating another one in your gameplay code and leave the built-in one at a fixed type and size.
REM ********************************************
REM font support with several Print variations
REM ********************************************
Public Sub SetFont(ByVal name As String, ByVal size As Integer, _
        ByVal style As FontStyle)
    p_font = New Font(name, size, style, GraphicsUnit.Pixel)
End Sub

Public Sub Print(ByVal x As Integer, ByVal y As Integer, _
        ByVal text As String, ByVal color As Brush)
    p_device.DrawString(text, p_font, color, x, y)
End Sub

Public Sub Print(ByVal x As Integer, ByVal y As Integer, _
        ByVal text As String)
    Print(x, y, text, Brushes.White)
End Sub

Public Sub Print(ByVal pos As Point, ByVal text As String, _
        ByVal color As Brush)
    Print(pos.X, pos.Y, text, color)
End Sub

Public Sub Print(ByVal pos As Point, ByVal text As String)
    Print(pos.X, pos.Y, text)
End Sub
Here is the new Bitmap support code with the old LoadBitmap() function and several versions of the DrawBitmap() function. When a function name is repeated, but has different parameters, we call that an overloaded function. Note: we are still inside the source code for the Game.vb file.
    REM ***********************************************
    REM Bitmap support functions
    REM ***********************************************
    Public Function LoadBitmap(ByVal filename As String)
        Dim bmp As Bitmap
        Try
            bmp = New Bitmap(filename)
        Catch ex As Exception
            bmp = Nothing
        End Try
        Return bmp
    End Function


    Public Sub DrawBitmap(ByRef bmp As Bitmap, ByVal x As Single, _
            ByVal y As Single)
        p_device.DrawImageUnscaled(bmp, x, y)
    End Sub


    Public Sub DrawBitmap(ByRef bmp As Bitmap, _
            ByVal x As Single, ByVal y As Single, _
            ByVal width As Integer, ByVal height As Integer)
        p_device.DrawImageUnscaled(bmp, x, y, width, height)
    End Sub


    Public Sub DrawBitmap(ByRef bmp As Bitmap, ByVal pos As Point)
        p_device.DrawImageUnscaled(bmp, pos)
    End Sub


    Public Sub DrawBitmap(ByRef bmp As Bitmap, ByVal pos As Point, _
            ByVal size As Size)
        p_device.DrawImageUnscaled(bmp, pos.X, pos.Y, size.Width, size.Height)
    End Sub
End Class
In order to make the architecture for this game framework work effectively, the different parts need to be able to talk to each other. One way is to pass references to the Form and Game object around to every function used in a game, but that becomes tedious very quickly. A much more elegant way is to use a module within the Form’s source code file. A module is a programming construct, similar to a namespace, that allows for grouping of variables, classes, and structures together under one common, shared name. Think of a module like this: everything inside the module is treated as if it’s found inside one long source code file.
Are you getting tired of all this talk about architectures, frameworks, and classes? I know how you feel, if that is the case. But, we have to set a solid framework for Celtic Crusader now or otherwise we’ll have to make all kinds of changes later and that will slow down progress on the game. Our new Form source code will be quite short, because its job is now only to pass control to the Game class and to the main module. This code is found in the Form1.vb file in the project. Note that each of the events call only one function, and we haven’t seen them before.
Public Class Form1
    Private Sub Form1_KeyDown(ByVal sender As Object, _
            ByVal e As System.Windows.Forms.KeyEventArgs) _
            Handles Me.KeyDown
        Game_KeyPressed(e.KeyCode)
    End Sub

    Private Sub Form1_Load(ByVal sender As System.Object, _
            ByVal e As System.EventArgs) Handles MyBase.Load
        Main()
    End Sub

    Private Sub Form1_FormClosed(ByVal sender As Object, _
            ByVal e As System.Windows.Forms.FormClosedEventArgs) _
            Handles Me.FormClosed
        Shutdown()
    End Sub
End Class
There is now a Module section of code in the Form1.vb source code file (right below the Form1 class). Yes, it’s okay to combine different modules and classes inside a single source code file! Although you can separate them, it’s often easier to keep them together in cases like this. This is just an experiment to show you one way to go about creating a game loop. We could also just use a loop inside Form1_Load in the form’s source code. Take your pick!
Public Module Module1
    Private p_gameOver As Boolean = False
    Private p_startTime As Integer = 0
    Private p_currentTime As Integer = 0

    Public game As Game
    Public dragonImage As Bitmap
    Public dragonSprite As Sprite
    Public grass As Bitmap

    Public frameCount As Integer = 0
    Public frameTimer As Integer = 0
    Public frameRate As Single = 0
    Public direction As Integer = 2
    Public velocity As PointF
As you’ll recall, in past chapters we used a Timer control to make things happen. In those cases, the Timer was sort of the engine for the program, causing something to happen automatically. Otherwise, the only thing we can do in our code is respond to events from the controls on a Form. The Timer control works pretty well for this, but we need to dig a bit deeper to get more performance out of our Basic code, and to do that we have to use our own timed loop. The function below is called Main(), which makes it somewhat resemble the main() function of a C++ program, or the WinMain() function of a Windows program. Before the While loop gets started, we create the game object and call Game_Init (), which is sort of the gameplay loading function where you can load game assets before the timed loop begins. After the loop exits, then the gameplay function Game_End() is called, followed by End.
REM *******************************************
REM real time game loop

REM *******************************************
Public Sub Main()
    game = New Game(Form1, 800, 600)
    REM load and initialize game assets
    Game_Init()
    While Not p_gameOver
        REM update timer
        p_currentTime = My.Computer.Clock.TickCount()

        REM let gameplay code update
        Game_Update(p_currentTime - p_startTime)

        REM refresh at 60 FPS
        If p_currentTime > p_startTime + 16 Then
            REM update timing
            p_startTime = p_currentTime
            REM let gameplay code draw
            Game_Draw()
            REM give the form some cycles
            Application.DoEvents()
            REM let the game object update
            game.Update()
        End If

        frameCount += 1
        If p_currentTime > frameTimer + 1000 Then
            frameTimer = p_currentTime
            frameRate = frameCount
            frameCount = 0
        End If
    End While
    REM free memory and shut down
    Game_End()
    End
End Sub
Calling the Shutdown() function from anywhere in the program causes it to end. No other code is needed besides setting p_gameOver to True, because that variable controls the real-time game loop, and when that ends, then two things will happen: 1) Game_End() is called, allowing the gameplay code to clean up; 2) End is called, which closes the program.
Public Sub Shutdown()
    p_gameOver = True
End Sub
We’re still in the source code module called Module1 in the Form1.vb file at this point, continuing on into the gameplay functions. I call them by that name because the Main() function and everything else might be thought of as the game engine code, and now we’re dealing with just gameplay. While the engine code seldom changes, the gameplay code changes frequently and certainly will be different from one game to the next. There is no rule that we must use these particular function names. XNA Game Studio gameplay functions are called LoadContent(), Update(), and Draw(). You are welcome to change them if you wish.
The first function called is
Game_Init(), and this is where you can load game assets.The
Game_Update()function is called repeatedly in the untimed portion of the game loop, so it will be running code as fast as the processor can handle it.The
Game_Draw()function is called from the timed portion of the game loop, running at 60 FPS.The
Game_End()function is called after the game loop exits, allowing for cleanup code such as removing gameplay assets from memory.The
Game_KeyPressed()function is called fromForm1_KeyDown(), and receives the code of any key being pressed. This is a bit of a workaround, when we could have just responded to the key press directly inForm1_KeyDown(), but we want the gameplay code to be kept together in one module. Eventually we’ll have mouse input as well.
Public Sub Game_End()
    dragonImage = Nothing
    dragonSprite = Nothing
    grass = Nothing
End Sub

Public Function Game_Init() As Boolean
    Form1.Text = "Sprite Drawing Demo"
    grass = game.LoadBitmap("grass.bmp")
    dragonImage = game.LoadBitmap("dragon.png")
    dragonSprite = New Sprite(game)
    dragonSprite.Image = dragonImage
    dragonSprite.Width = 256
    dragonSprite.Height = 256
    dragonSprite.Columns = 8
    dragonSprite.TotalFrames = 64
    dragonSprite.AnimationRate = 20
    dragonSprite.X = 250
    dragonSprite.Y = 150
    Return True
End Function

REM not currently used
Public Sub Game_Update(ByVal time As Integer)
End Sub

Public Sub Game_Draw()
    REM draw background
    game.DrawBitmap(grass, 0, 0, 800, 600)

    REM move the dragon sprite
    Select Case direction
        Case 0 : velocity = New Point(0, -1)
        Case 2 : velocity = New Point(1, 0)
        Case 4 : velocity = New Point(0, 1)
        Case 6 : velocity = New Point(-1, 0)
    End Select
    dragonSprite.X += velocity.X
    dragonSprite.Y += velocity.Y

    REM animate and draw dragon sprite
    dragonSprite.Animate(direction * 8 + 1, direction * 8 + 7)
    dragonSprite.Draw()

    game.Print(0, 0, "Press Arrow Keys to change direction")
End Sub

     Public Sub Game_KeyPressed(ByVal key As System.Windows.Forms.Keys)
         Select Case key
            Case Keys.Escape : Shutdown()
            Case Keys.Up : direction = 0
            Case Keys.Right : direction = 2
            Case Keys.Down : direction = 4
            Case Keys.Left : direction = 6
         End Select
     End Sub
End Module
The most remarkable accomplishment in this chapter is the creation of a robust Sprite class. Any time we need to give our sprites some new feature or behavior, it will be possible with this class. But no less significant is the start of a reusable game engine in Basic! From the new real-time game loop to the new sprite animation code to the new gameplay functions, it’s been quite a romp in just a few pages! But we’ve set a foundation now for a truly robust engine for Celtic Crusader, and in a very short time we will begin discussing the design of the game and begin working on the editors.