This chapter explores the all-important topic of combat and how gaining experience affects the player’s character. Chapter 15 gave us some tools that will be useful again now: to figure out when the player is close enough to an enemy combatant to engage him. This applies solely to melee fights, of course, and not to attacks at range, which will require a bit of extra effort. The simplest form of melee combat occurs when the player is close enough to an enemy and hits the attack button, similar to the way in which dialogue was engaged in Chapter 15. One additional requirement for combat is that we must ensure the player is facing toward his enemy in order to deal any damage. In this chapter, we will explore these techniques and the random attack dice rolls needed to make realistic combat that an RPG purist would find acceptable.
Here’s what we’ll cover in this chapter:
In a normal game, hostile NPCs will be guarding locations or wandering around in the environment, usually following a series of waypoints or just walking back and forth between two points. For our first few examples of combat, the hostile NPCs will be positioned in the level randomly and will not move. We will give them movement behavior later, but for now I just want to show you how to engage an enemy in order to attack them.
There are several ways we could go about handling combat in the game. In a 100% real-time game, there is never a pause in the action: when the player engages one enemy, there may be other nearby enemies who charge into the battle as well. A variation is a partial real-time game where the player can move freely through the game but each round of combat causes the game to pause while it is resolved.
A second type of combat is turn-based. Although our game allows the player to roam the world freely in real-time, I have decided to use a turn-based system with rounds to resolve combat. This choice comes after much play testing of a fully real-time combat system that just seemed to happen too quickly. With the player swinging his weapon and the hostile NPC swinging his, basically as fast as the attacks were allowed to go, the HP for each would slowly go down until one fell (or until the player ran away). This form of combat works great for a game like Diablo and Baldur’s Gate, but those games are largely dungeon crawlers of the “hack-n-slash” variety rather than world-based RPGs. An example of a world-based RPG that pauses during combat is the Might & Magic series from New World Computing (Figure 16.1).

The gameplay for the Might & Magic series from the 1990s evolved with technology, with later games showing a full 3D world (software rendered at the time before GPUs were invented). Interestingly enough, the world looked a little bit like World of Warcraft (a soft/light RPG compared to Might & Magic). Hostile NPCs could be seen in the world, in dungeons, in rooms, and would only attack if you attacked them first or got too close to them. At that point, the game would go into a pseudo real-time mode where hostiles would basically stay in one place (if in range), allowing the player to attack the target of his choice. Opening a spell book or inventory would pause the combat, or the player could pause the game with a key press while choosing the appropriate attacks for each hostile. The earlier games in the Might & Magic series were entirely turn-based, while later ones were entirely real-time.
The combat system for Celtic Crusader will work with either real-time or turn-based with a few simple flags in the code. Normally, the player will walk around fighting monsters and going on quests, and the monsters should behave somewhat like they do in Might & Magic: if you attack them first or get too close, they’ll attack you.
The code to draw the monsters is the same code used in previous chapters to draw objects with a global position within the scrolling level. Before drawing objects, we must get its relative position with respect to the scroll position and then draw it at the relative position.
If monsters(n).X > level.ScrollPos.X _
    And monsters(n).X < level.ScrollPos.X + 23 * 32 _
    And monsters(n).Y > level.ScrollPos.Y _
    And monsters(n).Y < level.ScrollPos.Y + 17 * 32 Then ...
If the object is within the viewport at the current scroll position, then we can figure out its relative position on the screen and draw it.
relativePos.X = Math.Abs(level.ScrollPos.X - monsters(n).X)
relativePos.Y = Math.Abs(level.ScrollPos.Y - monsters(n).Y)
monsterCenter = relativePos
monsterCenter.X += monsters(n).GetSprite.Width / 2
monsterCenter.Y += monsters(n).GetSprite.Height / 2
Distance is calculated from the center of the NPC’s sprite to the center of the PC’s sprite.
dist = hero.CenterDistance(monsterCenter)
If dist < attackRadius Then ...
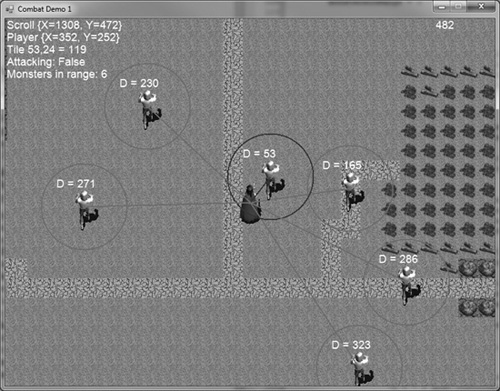
As you can see, most of this code was developed previously. We first learned how to calculate relative position back in Chapter 12, “Adding Objects to the World,” and then how to calculate distance to an NPC in Chapter 15. When the PC is within range of an NPC, its radius circle will change from red to blue, and then the Space key will trigger an attack. In this demo, nothing happens beyond printing out the attack flag status.
The first Combat Demo project shows how to calculate the attack radius around each NPC and the logic to determine when the player is in range to attack. At this point, the NPCs do not move or react to the player and combat isn’t working yet. We will build on this example while building a combat system. (See Figure 16.2.) In the truncated source code listing below, the sections related to the radius and combat are highlighted in bold.
Public Structure keyStates
    Public up, down, left, right As Boolean
End Structure

Private game As Game
Private level As Level
Private keyState As keyStates
Private gameover As Boolean = False
Private hero As Character
Private attackFlag As Boolean = False
Private attacking As Boolean = False
Private monstersInRange As Integer
Const NUM_ZOMBIES As Integer = 25
Private monsters(NUM_ZOMBIES) As Character

Private Sub Form1_Load(ByVal sender As System.Object, _
        ByVal e As System.EventArgs) Handles MyBase.Load
    Me.Text = "Combat Demo 1"
    game = New Game(Me, 800, 600)
    level = New Level(game, 25, 19, 32)
    level.loadTilemap("sample.level")
    level.loadPalette("palette.bmp", 5)

    REM load hero
    hero = New Character(game)

    hero.Load("hero axe.char")
    hero.Position = New Point(400 - 48, 300 - 48)

    REM create zombie sprites
    For n = 1 To NUM_ZOMBIES
        monsters(n) = New Character(game)
        monsters(n).Load("zombie.char")
        monsters(n).Position = New Point(game.Random(800, 2000), _
            game.Random(0, 1200))
    Next

    While Not gameover
        doUpdate()
    End While
End Sub

Private Sub doUpdate()
    Dim frameRate As Integer = game.FrameRate()
    Dim ticks As Integer = Environment.TickCount()
    Static drawLast As Integer = 0
    If ticks > drawLast + 16 Then
         drawLast = ticks
         doScrolling()
         doHero()
         doMonsters()
         game.Print(700, 0, frameRate.ToString())
         Dim y As Integer = 0
         game.Print(0, 0, "Scroll " + level.ScrollPos.ToString())
         game.Print(0, 20, "Player " + hero.Position.ToString())

         REM get position under player's feet
         Dim feet As PointF = hero.FootPos
         Dim tilex As Integer = (level.ScrollPos.X + feet.X) / 32
         Dim tiley As Integer = (level.ScrollPos.Y + feet.Y) / 32
         Dim ts As Level.tilemapStruct
         ts = level.getTile(tilex, tiley)
         game.Print(0, 40, "Tile " + tilex.ToString() + "," + _
             tiley.ToString() + " = " + ts.tilenum.ToString())
         game.Print(0, 60, "Attacking: " + attacking.ToString())
         game.Print(0, 80, "Monsters in range: " + _
             monstersInRange.ToString())

         game.Update()
        Application.DoEvents()
     Else
         Threading.Thread.Sleep(1)
     End If
End Sub

Private Sub doHero()
         REM limit player sprite to the screen boundary
         If hero.X < -32 Then
             hero.X = -32
         ElseIf hero.X > 800 - 65 Then
             hero.X = 800 - 65
         End If
         If hero.Y < -48 Then
             hero.Y = -48
         ElseIf hero.Y > 600 - 81 Then
             hero.Y = 600 - 81
         End If
         REM orient the player in the right direction
         If keyState.up And keyState.right Then
            hero.Direction = 1
         ElseIf keyState.right And keyState.down Then
            hero.Direction = 3
         ElseIf keyState.down And keyState.left Then
            hero.Direction = 5
         ElseIf keyState.left And keyState.up Then
            hero.Direction = 7
         ElseIf keyState.up Then
            hero.Direction = 0
         ElseIf keyState.right Then
            hero.Direction = 2
         ElseIf keyState.down Then
            hero.Direction = 4
         ElseIf keyState.left Then
            hero.Direction = 6
         Else
            hero.Direction = -1
         End If
         REM draw the hero

            hero.Draw()
         End Sub

         Private Sub doMonsters()
             Dim relativePos As PointF
             Const attackRadius As Integer = 70
             Dim color As Pen
             Dim heroCenter As PointF
             Dim monsterCenter As PointF
             Dim dist As Single
             Dim spriteSize As Single
             Dim center As Point
             Dim circleRect As RectangleF

             REM get center of hero sprite
             heroCenter = hero.CenterPos
             game.Device.DrawRectangle(Pens.Red, heroCenter.X - 2, _
                 heroCenter.Y - 2, 4, 4)

             monstersInRange = 0
             For n = 1 To NUM_ZOMBIES
                 REM is monster in view?
                 If monsters(n).X > level.ScrollPos.X _
                 And monsters(n).X < level.ScrollPos.X + 23 * 32 _
                 And monsters(n).Y > level.ScrollPos.Y _
                 And monsters(n).Y < level.ScrollPos.Y + 17 * 32 Then
                     monstersInRange += 1
                     relativePos.X = Math.Abs(level.ScrollPos.X - monsters(n).X)
                     relativePos.Y = Math.Abs(level.ScrollPos.Y - monsters(n).Y)
                     REM draw the monster sprite
                     monsters(n).GetSprite.Draw(relativePos.X, relativePos.Y)
                     REM get center of NPC
                     monsterCenter = relativePos
                     monsterCenter.X += monsters(n).GetSprite.Width / 2
                     monsterCenter.Y += monsters(n).GetSprite.Height / 2
                     game.Device.DrawRectangle(Pens.Red, monsterCenter.X - 2, _
                         monsterCenter.Y - 2, 4, 4)
                     REM get distance to the NPC
                     dist = hero.CenterDistance(monsterCenter)
                     REM draw line to NPCs in view

                     If dist < attackRadius Then
                         color = New Pen(Brushes.Blue, 2.0)
                     Else
                         color = New Pen(Brushes.Red, 2.0)
                     End If
                     game.Device.DrawLine(color, heroCenter, monsterCenter)
                     REM print distance
                     game.Print(relativePos.X, relativePos.Y, _
                         "D = " + dist.ToString("N0"), Brushes.White)
                     REM draw circle around monster to show attack radius
                     spriteSize = monsters(n).GetSprite.Width / 2
                     center.X = relativePos.X + spriteSize
                     center.Y = relativePos.Y + spriteSize
                     circleRect = New RectangleF( _
                         center.X - attackRadius, center.Y - attackRadius, _
                         attackRadius * 2, attackRadius * 2)
                     game.Device.DrawEllipse(color, circleRect)
                 End If

                 REM is player trying to attack to this monster?
                 If dist < attackRadius Then
                     If attackFlag Then
                         attacking = True
                     End If
                 Else
            attacking = False
        End If
    Next
End Sub

REM some code was omitted to conserve space
We have come to the point where additional artwork is needed to make any more progress with the Celtic Crusader game, so in this section we will look at most of the character art planned for the game, including sprites for the player character and NPCs. Real characters will be created out of these templates in the final chapter when the game is fully realized. So, you’ll want to look at these character descriptions and animation artwork as mere templates of actual character classes, not characters themselves. Let’s take a short break from working on the combat system to look at the artwork. As you continue into the combat system in this chapter, begin thinking about which of these sprites you plan to use in the game.
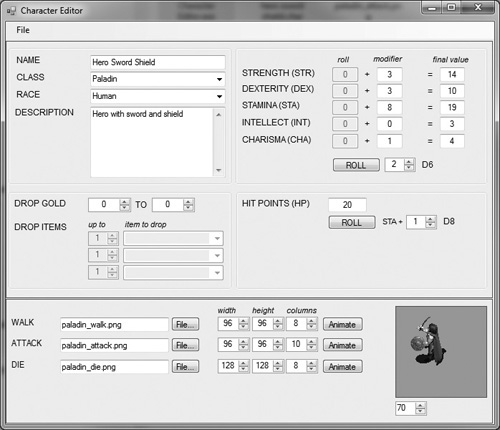
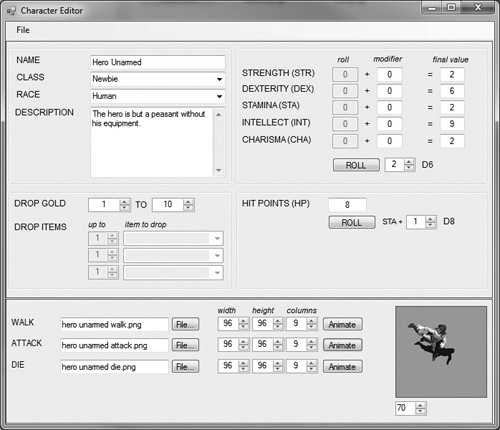
For the last two chapters, we have been using the paladin character file generated back in Chapter 14, “Creating the Character Editor.” That character has good animations and is representative of the PC for Celtic Crusader, but we have three additional sets of artwork available and need to bring them into the game world. Technically, we aren’t supposed to pre-roll a player character. Part of the fun factor of playing an RPG—one might even argue that it’s the most important part of the gameplay—is creating your own character. I don’t want to take away that joy from players by pre-rolling them with the character editor. This tool is meant to be used to create NPCs, but we use it to manage the artwork for the PC classes. In Chapter 20, we will build an in-game character generator! Let’s create random PC classes for use in this chapter. You have already seen the paladin, so we’ll roll the other three classes.
I will provide animation sets so that it is easy for you to add new characters to the game without requiring much extra work. The hostile NPCs need attack animations, while the peasantry does not, so if the player attacks a peasant or any other nonfighting NPC, then you have to add behavior that causes the character to run away or die, depending on your style. (I recommend adding a state that causes civilians to flee.)
I won’t focus on the player character classes here, but rather on what artwork is available for use in creating characters—because we have more artwork than we need for just the four classes (Warrior, Paladin, Hunter, and Priest). Feel free to use the animation sets specified in these template .char files for any unique classes of your own design. The purpose behind the .char file, at least for player characters, is to define the animation properties.
Hint
In the final game, these character templates will be used to create real game characters. The complete sets of animation and character editor data files are included for each one in this chapter’s resource files (www.courseptr.com/downloads).
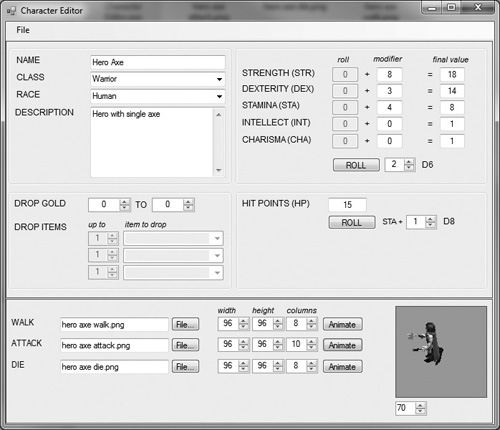
The hero sprite animations that show the character carrying an axe (Figure 16.3) are usually variations of the warrior, who may also carry a single sword, and is generally different from a paladin because he doesn’t have a shield.
This hero sprite has a single sword and is often a variation of the warrior class (along with the axe sprite) (Figure 16.4).

We have already seen the paladin character back in Chapter 13, but the actual character is not all that important prior to the player actually creating a player character at the start of a new game.
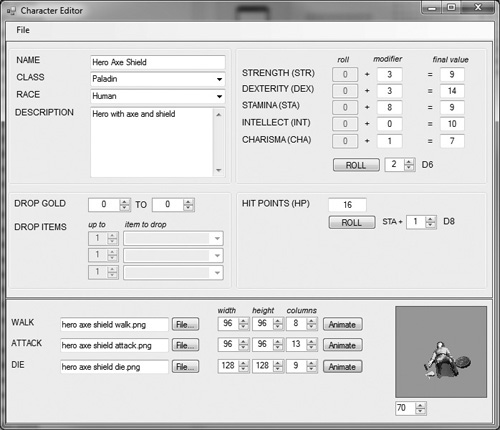
The hero sprite animation featuring both a sword and shield (Figure 16.6) is also usually associated with the paladin class, but this is a loose interpretation that you are welcome to change if you wish!
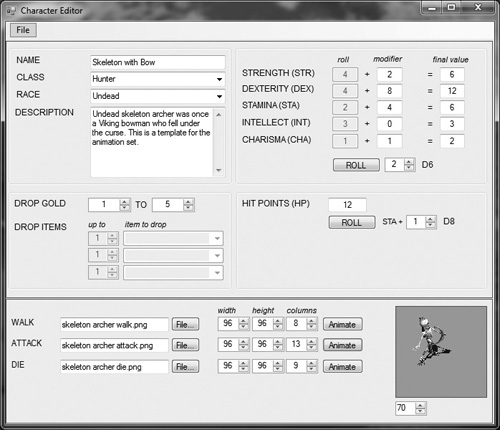
The hero sprite with bow animations (Figure 16.7) is obviously associated with a hunter, archer, or scout class, but you may invent any name for the class using these animation sets.

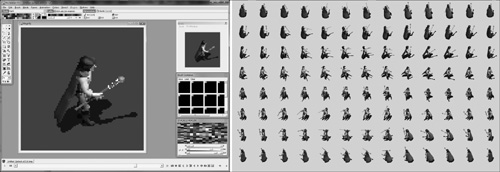
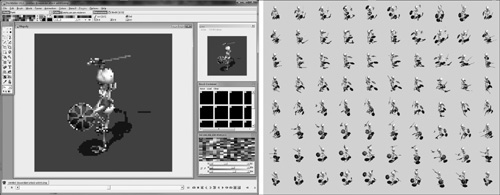
The staff-wielding hero character (Figure 16.8) usually represents a cloth wearing mage, wizard, or priest. To show how these animations are created, I’ve included a screenshot of the priest sprite as it appeared in Pro Motion (the sprite animation software—see www.cosmigo.com for a trial copy). The sprite sheet produced by Pro Motion is shown next to it. Pro Motion saves the file as a .bmp file, so it must be converted to a .png with an alpha channel, and I prefer to use GIMP for that step. It’s easy to use the Color Select tool to highlight the background color and convert it to a Layer Mask.
The hero sprite animation with no weapon or shield (Figure 16.9) still has unarmed animations, with a kick attack, which might be fun to explore in a game. How about a Kung Fu character?
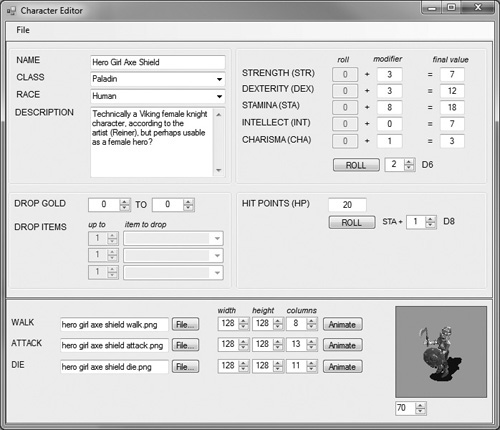
I have to cheat a bit by suggesting this animation set as a potential female hero character (Figure 16.10), because this is a female Viking according to animator Reiner Prokein (www.reinerstileset.de). She has a permanent helmet, which poses problems for inventory and equipment. Since none of the male hero sprites have a helmet we would still equip an “armor set” (be it cloth, leather, chain, or plate), but not represent the character with the given armor set, specifically. With this female sprite, that poses a problem, but she’s compelling enough to work around the gearing up problems if you want to use her! The animation is quite good and she has discernible female physical attributes even for such a low-resolution animation. If not usable as a player character (PC), I was thinking she would make an interesting companion NPC that might follow or lead the player on a quest or two. Perhaps you can think of a good story arc around this sprite and incorporate her into your own game in a creative way? She’s like Red Sonya to our Conan!
The hostile NPC character sheets show just what is possible with these animation sets, but you are encouraged to create characters of your own design with the character editor using these template files as a starting point (with the animations already in place).
The skeleton animation set with a bow (Figure 16.11) is obviously an archer or hunter class for the undead race, but these characters were once Viking bowmen who fell under the curse.
The sword & shield animation set for the undead skeleton (Figure 16.12) can be used for a typical former warrior or paladin turned undead, with any number of actual characters derived from it. Since there is no other variation of an undead melee character, this one will be reused. The image here shows the sprite animation as it appears in Pro Motion, along with the saved sprite sheet.
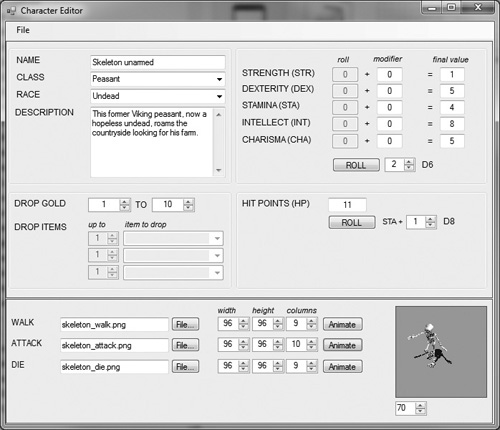
The unarmed undead skeleton sprite (Figure 16.13) is a good general-purpose template for lower-level enemy characters, which may be good for early leveling by player characters.
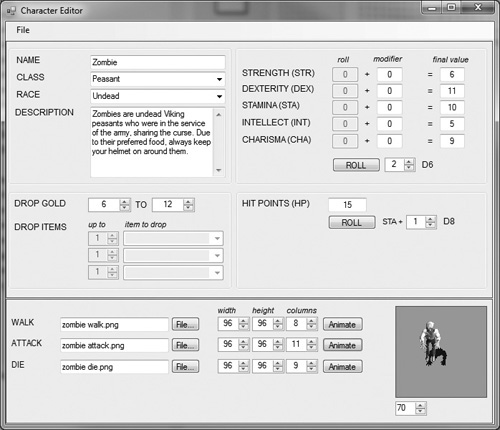
This undead zombie sprite (Figure 16.14) has no weapon, but that is traditionally accurate of zombies in popular culture (namely, zombie films). With an appetite for gray matter, the player would do well to take them out at range!
According to the game’s story first presented in Chapter 9, there were some Viking soldiers who were not in the main army that was converted into undead by the curse. The Viking sprite shown here is wielding an axe (Figure 16.15), so he may be best classified as a warrior or barbarian, but that’s up to the designer who will use this as a template for real game characters.
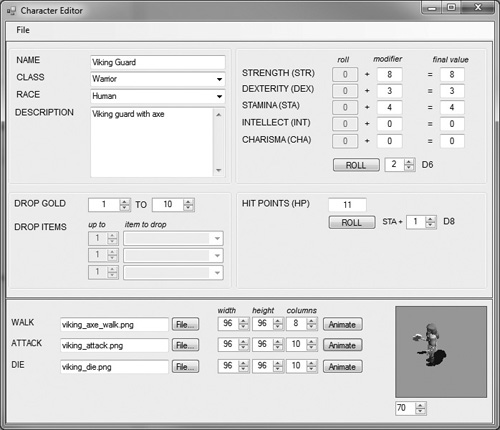
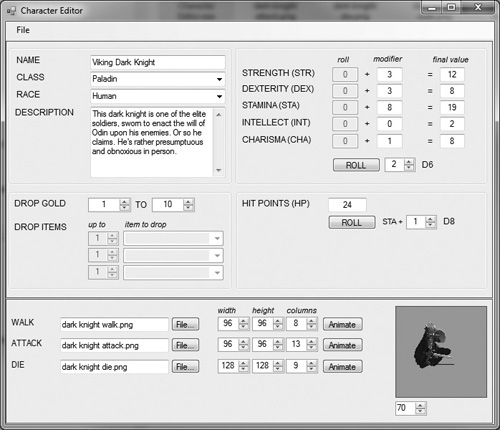
Another soldier who escaped the undead curse is a full plate knight. This Viking template character is decked out in full battle plate with sword and shield (Figure 16.16), and might be used for a “dark knight” as suggested by the description.
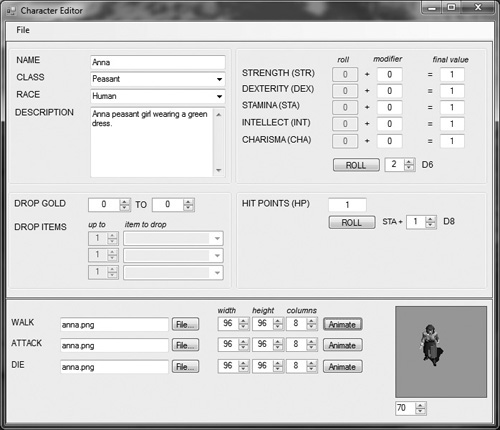
I have prepared two complete friendly NPCs for any purpose you wish. In the finished game (see Chapter 20), they will be quest givers and random filler characters to make towns look more lively, but will otherwise not be interactive (although that’s up to you—they could be given simple dialogue).
There is only one animation set for Anna—walking. She is a good general-purpose NPC sprite. This would make a good character to show walking around a town as filler, or she could be used as a quest giver or any other purpose. (Figure 16.17.)
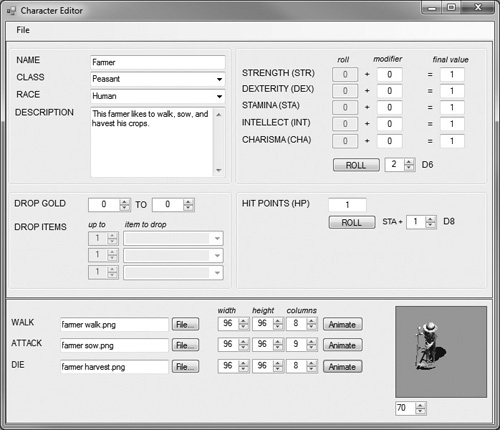
Joe the farmer (Figure 16.18) is another friendly NPC that would be good to use for filler around towns. Unlike Anna, however, Joe comes with three complete sets of animation: walking, sowing seeds, and harvesting. The sowing animation is in the attack sprite, while the harvesting animation is using the die sprite (since friendly NPCs can’t be attacked).
Melee combat occurs when opponents fight each other with hand-held weapons (while unarmed combat occurs when no weapons are used, as in a martial art). The game engine already has support for melee combat, but it is not yet implemented, so that is what we’ll do in this chapter. First, we must determine when the player is near an enemy, then cause the enemy to turn toward the player, and then allow combat to ensue. Fortunately, the sprites available from Reiner’s Tilesets (www.reinerstilesets.de) also include the attack and falling animations.
Combat requires another layer of logic added to the state engine that controls the characters. Although higher-level interaction with characters would make the game more realistic, we’ll just be treating this like an old-style hack-and-slash game where the goal is not to follow some sort of complex storyline, but rather to gain experience and explore the world. A simple state-based system will be used to cause enemies to attack the player when in close range.
There are many role-playing game systems that we can emulate for our own games, or we can just borrow ideas from many different games and come up with totally unique gameplay and rules. I am not proposing following any particular franchise for the rules in Celtic Crusader, but some common rules will be familiar to an experienced RPG player.
The Celtic Crusader project, as of Chapter 15, is basically a template game that has most of the functionality you need to actually create an RPG, but is lacking most of the finer details. There is just an enormous amount of detail that must be put into even the simplest of RPGs. Although the size and scope of this book is insufficient to completely build the game, we can create a fun hack-and-slash game where the goal is to gain experience and go up levels, with the corresponding new abilities and skills.
Chapter 15 developed the ability for the player to have encounters with NPCs, which is an important first step in the game’s NPC interaction. From this point, you can engage the NPCs in dialog or combat, and the game responds appropriately. A higher level of behavior over the NPCs is also needed to turn this skeleton game into a polished game, a system of behavior that causes NPCs to seek out and engage the player, rather than always responding to the player. At the very least, you can add the ability for NPCs to fight back.
A non-player character (NPC) can be friendly or hostile—we might refer to them as “friendly NPCs” or “hostile NPCs”—but they are still grouped together as “not the player,” for the sake of discussion. We’re going to combine the work done back in Chapter 12 and in the previous chapter, to create random hostile NPCs that will react to the player with, well, hostility.
Hint
In the final game presented in Chapter 20, we will draw on all of the techniques of every chapter into a single game, and use all of the editors to make a compelling game world with a story and quests to complete. In that chapter, you will see how to position NPCs and objects in the game world using script code. For the sake of clarity, we will not be getting into the editor data in this chapter.
When you are fighting with an NPC and kill that character, there should be a death animation. These are not always possible in every case, due to a limited number of sprites. You are limited overall by the availability of artwork, without which you have to get creative with your sprites. Rather than dealing with a whole slew of death animations for each NPC, I have seen some games use the fade effect, where a character blinks out of existence or fades away. You might use the alpha color parameter in the sprite class to cause a character to fade out of existence after dying rather than using a death animation. The important thing is that you recycle your sprites in the game, which means recycling the NPCs. You don’t want the NPCs to just respawn at the same place every time, because then the player can see the spawning taking place (which seriously ruins the realism of the game). In addition, if a player learns where some of the NPCs are respawning on the map, he or she will be able to spawn camp (which refers to hiding out near a spawn point and killing new players that appear) and rack up a ridiculous amount of experience, which also ruins the game.
Tip
The fully prepared sprite sheets (with all three animations) and the .char file for several hostile and friendly NPC characters are included in the chapter’s resources (www.courseptr.com/downloads).
What really happens when you attack another character in the game? That is the basis of the game’s combat system, and it has to do with each player’s attributes, including weapon and armor class. Usually, the defender’s defensive value is compared to the attacker’s attack value, and a simulated “roll” of dice is made to determine if the attack succeeded (before calculating damage). All of the attributes are available already from the character editor files.
If the attack value is less than the defense value, then basically you can do no damage to your opponent! So, say you are a new warrior with an axe that does + 10 damage, and you attack a level 10 zombie with 93 defense points. What happens in this situation? You can stand there and bang against this monster all day long with your pathetic little axe and do no damage to him! In a situation like this, you are helplessly outclassed by this character, who swiftly and easily kills you with a single blow.
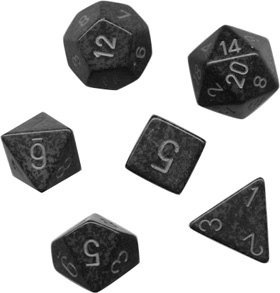
This is called the “to-hit roll” and it adds a nice layer of realism to the game (as opposed to some games where just swinging your sword kills enemies nearby). Knowing that not every swing does damage requires you to use some tactics in your fighting method, and this gives players the ability to be somewhat creative in how they fight enemies. You can swing and run or swing several times in a row, hoping to get a hit. But in general, it’s a hit-or-miss situation (sorry, bad pun). Figure 16.19 shows an example of several types of dice.
Many RPGs allow the player to equip modifiers such as rings and special weapons with bonuses for the to-hit value. These modifiers increase your chances of scoring a hit when you attack. Not only is it essential for a good RPG, but working with miscellaneous items as well as different types of swords, shields, armor, helmets, and so on, is an extremely fun part of the game! Our Character class will be modified over the next two chapters to add support for gear such as the weapon, armor, and other items that the player can equip, and you have an opportunity to use these special items to customize characters. You may even allow the player to pick up items found in the world and equip them.
A character’s armor class determines whether an attack made against him will succeed or not. If the attack fails, then no damage is applied at all. Usually, regardless of the AC, an attack to-hit roll of 1 is an epic fail and does not hit. Here’s one possible way to calculate AC:
AC = DEX + Armor Points + Shield Points
where Armor Points represent the sum total of all armor items and Shield Points represent the defense value of an equipped shield. I say possible way because this is not the only way to perform the calculation. Some game systems do not allow a DEX bonus for plate armor wearers because that represents a slow-moving character, whereas high DEX represents high agility. To keep the rules simple in Celtic Crusader, I just apply the full DEX and full AP to the calculation.
Based on the type of gear available in your game, you may want to add a modifier to the AC calculation to help balance the gameplay a bit if it seems that too many attack rolls are an instant hit. I would expect about half of all attacks to fail when rolled against a foe at the same level. If you find that significantly more than half of all attacks are succeeding, then that’s a sign you need to add a modifier to the AC (such as +5).
The mechanics of combat for any game is entirely up to the designer. The important thing is not that your game works like many other RPGs out there, only that combat is balanced within your own game system. In other words, as long as the PC and hostile NPCs attack with the same set of rules, then the game is playable. One thing you really don’t want to happen is for combat to end too quickly. It’s generally necessary to artificially raise the hit points (HP) of monsters at the lower levels so they don’t fall with one hit. You want the player to feel as if real combat is taking place, not that they’re just walking around taking out enemies with a single blow as if they’re using a lightsaber. We do want the player’s attributes to play an important role in the to-hit roll as well as the damage done in an attack.
For Celtic Crusader, I’m going to use a D20 (a 20-sided die) as the basis for the to-hit roll. In RPG lingo, a D20 roll of 1 is an epic fail while a roll of 20 is a critical hit, which usually means a definite hit (ignoring the defender’s AC).
Melee Chance To-Hit = STR + D20
Ranged attacks with bow or spell are similar to melee with a D20 roll, but with DEX instead of STR as a modifier. The character’s agility contributes to his ability to hit accurately at a distance, where his strength has little or no effect.
Ranged Chance To-Hit = DEX + D20
If the To-Hit roll results in a hit, the next step is to roll again to determine how much damage was done to the target. This is where the weapon attributes come into play. If the game features real items that you can give your character to use in combat, then it makes a big difference in the gameplay. For one thing, you can scatter treasure chests around the game world that contain unique quest items (like magical swords, shields, and armor), as well as valuable jewels and gold. (These types of items are all modeled and available in the sprites provided in the Reiner’s Tileset collection.)
The melee damage value is calculated primarily from STR and weapon damage with a 1D8 roll added to the mix. This damage factor is then reduced by the defender’s AC to come up with a total damage, which goes against the defender’s HP.
Melee Damage = D8 + STR + Weapon Damage - Defender's AC
Some games apply a different die roll based on the type of weapon, such as a 2D6 for a two-handed sword, 2D8 for a two-handed mace, and 1D10 for a bow. You may use modifiers such as this if you want, but it adds an additional bit of information to the item database. I found it easier to use a base random die roll (D8) and the weapon damage as an additional die roll. The result is very nearly the same, but it results in more reasonable weapon damage factors. For instance, we wouldn’t expect a rusty short sword to deal 12-16 damage where normally it should be 1-4. By using the D8 roll in addition to the weapon damage range, the damage factors will be more reasonable.
The ranged damage value is calculated primarily from DEX and weapon damage with a 1D8 roll added for some randomness. A range penalty is then subtracted from the total to arrive at a new attack value, which is further reduced by the defender’s AC. The final value is the total damage dealt against the defender’s HP.
Ranged Damage = D8 + DEX + weapon damage - range penalty - Defender's AC
Ranged damage differs slightly from melee due to the range penalty, but it’s a reasonable subtraction, because without it the player would be nearly invincible, able to deal out full damage at long range where no monster would ever be able to catch him before being cut down.
If the chance to-hit roll of the D20 results in a 20, then the attack is a critical hit and incurs additional damage! You may add whatever modifier you want to the attack damage factor, such as a 2x roll factor. So, if the damage was calculated with 1D8, then the critical damage will be 2D8. Optionally, you may just double the 1D8 damage roll. Remember, your system doesn’t have to mimic the combat mechanic of any other system—be creative and unique!
Let’s simulate one half of an attack round where just one player attacks and the other defends, to see how the calculations are done and what results we get. First of all, we’ll give the player these relevant attributes:
STR: 18
DEX: 12
STA: 9
Weapon: 2-8 dmg
Armor: 10
HP: 14
The monster will have these sample attributes:
STR: 15
DEX: 14
STA: 16
Weapon: 1-6 dmg
Armor: 12
HP: 16
First, we’ll calculate the AC for the monster:
AC = DEX + Armor Points + Shield Points
AC = 14 + 12 + 0
AC = 26
Now, we’ll calculate the attacker’s attack chance to-hit:
To-Hit = Attack Roll (STR + D20) - Defender's AC
Attack roll = STR + D20
Attack roll = 18 + 9 (roll)= 27
Did the attack succeed?
To-Hit = Attack Roll (27) - AC (26) = 1 (Hit!)
Since our attack succeeded, but was not a critical hit, we calculate normal damage.
Damage = D8 + STR + Weapon Damage - Defender's AC
Damage = roll (1-8) + 18 + roll (2-8) - 26
Damage = roll (3) + 18 + roll (7) - 26
Damage = 3 + 18 + 7 - 26 = 2
Had the attack been a critical hit with an attack roll of 20, then critical damage would be calculated as follows:
Damage = D8 * 2 + STR + Weapon Damage - Defender's AC

Damage = roll (1-8) * 2 + 18 + roll (2-8) - 26
Damage = roll (3) * 2 + 18 + roll (7) - 26
Damage = 6 + 18 + 7 - 26 = 5
The monster’s HP is reduced by the total damage until it reaches zero (which is death):
HP = 16 -2 = 14 (normal damage)
HP = 16 -5 = 11 (critical damage)
As you can see from these results, the die rolls are crucial! After all those many calculations, our hero only dealt 2 points of damage to the monster, and the monster then gets to strike back at the player. This continues round after round until one or the other loses all their HP or flees.
One drawback to combat is that you can die. It’s a cold, hard, truth, I realize, but it can happen. What should you do, as the game’s designer and programmer, when the player’s character (PC) dies? That is a tough decision that requires some thought and should be based on the overall design of your game. You might let the player save and load the game, but that takes away from the suspension of disbelief. You want the player to be completely immersed in the game and unaware of a file system, an operating system, or even of the computer. You want your players to be mesmerized by the content on the screen, and something as cheesy as a load/save feature takes away from that. I’ll admit, though, most players abuse the save/load game feature and complain if you don’t have one. After all, you want the player to be able to quit at a moment’s notice without going through any hassle. Let’s face it: Sometimes the real world asserts itself into the reverie you are experiencing in the game, and you have to quit playing.
But just for the sake of gameplay, what is the best way to deal with the player character’s death, aside from having a save/load feature? I recommend just re-spawning the PC at the starting point of a level file. The location of a re-spawn is up to you as the game’s designer. Do you want to make it too easy for the player to die and come back too quickly, or do you want to make them work a little bit before resuming the fight they were in previously? Re-spawning too close to the last fight might make the game too easy, so a spawn point at a central hub town or other location might be better, and then the player must walk and portal to get back to the location where they were at prior to dying.
The second Combat Demo shows how to make these calculations for an attack against an NPC (Figure 16.20). This demo uses the Dialogue class to show the results of attack rolls with each part of the calculation shown for you to study. This scene, for instance, shows a critical attack roll that dealt 14 damage to a target NPC. Most RPG purists will enjoy seeing this information, whereas casual RPG fans will prefer to just hurry up and kill the monster so they can loot its corpse for items and gold. It’s up to you to decide how much information you want to share with the player.
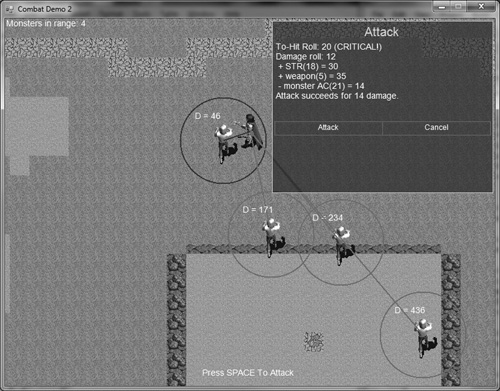
On the one hand, it might be impressive to see what all is involved in an attack with the various rolls and calculations, since the casual player might just assume your combat system uses a simple attack roll versus defense roll system. If you don’t show any information, and just show damage dealt (as in games like Baldur’s Gate), the player might assume just a random attack roll is all there is to it. Every attribute is important and affects the outcome of combat, and every player knows this intuitively, but it’s easy to forget if combat tends to happen very quickly. One advantage to turn-based combat is that it will reflect a pencil-and-paper game, which is at the root of every computer RPG. On the other hand, some players might get annoyed with the slow pace of combat and give up on your game. You have to decide on the best balance between information overload (TMI) and dumbed-down gameplay.
When a turn-based combat system is the way to go, we need to make a few minor changes to the input system. In the previous example, we used the Space key to trigger a flag called attackFlag, which was set to False when the Space key was released. That works for a real-time combat system, but not for a turn-based one. For turn-based combat, we need to wait until the user releases the attack key. Otherwise, some sort of timing mechanism must be used and that can get messy. So, here is the new keyboard code—note how attackFlag is now handled.
Private Sub Form1_KeyDown(ByVal sender As Object, _
        ByVal e As System.Windows.Forms.KeyEventArgs) Handles Me.KeyDown
    Select Case (e.KeyCode)
        Case Keys.Up, Keys.W : keyState.up = True
        Case Keys.Down, Keys.S : keyState.down = True
        Case Keys.Left, Keys.A : keyState.left = True
        Case Keys.Right, Keys.D : keyState.right = True
    End Select
End Sub

Private Sub Form1_KeyUp(ByVal sender As System.Object, _
        ByVal e As System.Windows.Forms.KeyEventArgs) Handles MyBase.KeyUp
    Select Case (e.KeyCode)
        Case Keys.Escape : End
        Case Keys.Up, Keys.W : keyState.up = False
        Case Keys.Down, Keys.S : keyState.down = False

        Case Keys.Left, Keys.A : keyState.left = False
        Case Keys.Right, Keys.D : keyState.right = False
        Case Keys.Space : attackFlag = True
    End Select
End Sub
We need the Dialogue class again to show the results of an attack. You can now see how useful Dialogue is beyond its original intended use as a way to talk with NPCs! Granted, the window is not very attractive yet. We will need to add some more configuration options to it so the buttons look better and the height is adjusted automatically to the number of buttons in use. But, the important thing is, we have a way to interact with the player. Before using it, we need to add some new features to the Dialogue class. See, I warned you in Chapter 15 that this was likely to happen! But, we can’t possibly foresee in the future what new things we’ll need to do with our code, so this is to be expected.
As you’ll recall, the Dialogue class will display the dialogue window until a button is clicked, and then set the Selection property equal to the button number. Previously, the Dialogue class did not hide itself after a selection was made or reset any of its properties. The new feature we need to add is a Visible property.
Private p_visible As Boolean
Public Property Visible() As Boolean
    Get
        Return p_visible
    End Get
    Set(ByVal value As Boolean)
        p_visible = value
    End Set
End Property
The Draw() function will check p_visible before drawing anything. Now we will have the ability to continually update the Dialogue object and have it display whatever we want to the player, and selectively show it as needed.
Public Sub Draw()
    If Not p_visible Then Return
    . . .
End Sub
Back to our main source code for Combat Demo 2. Here is the new doUpdate() function, which now handles scrolling, hero, monsters, attacking, and dialogue.
Private Sub doUpdate()
    Dim frameRate As Integer = game.FrameRate()
    Dim ticks As Integer = Environment.TickCount()
    Static drawLast As Integer = 0
    If ticks > drawLast + 16 Then
        drawLast = ticks
        doScrolling()
        doHero()
        doMonsters()
        doAttack()
        doDialogue()
        game.Print(0, 0, "Monsters in range: " + monstersInRange.ToString())
        game.Print(320, 570, "Press SPACE To Attack")
        game.Update()
        Application.DoEvents()
    Else
        Threading.Thread.Sleep(1)
    End If
End Sub
The doDialogue() function does not automatically move, but you may use that feature if you want (see Chapter 15 for details). I want the combat dialogue to stay in the same place.
Private Sub doDialogue()
    dialogue.updateMouse(game.MousePos, game.MouseButton)
    dialogue.setCorner(Dialogue.Positions.UpperRight)
    dialogue.Draw()
    If dialogue.Selection > 0 Then
        dialogue.Visible = False
        dialogue.Selection = 0
    End If
End Sub
The doDialogue() function is called continuously from the main loop, and properties determine what it should do. To trigger a dialogue to “pop up,” we can call on this new showDialogue() function, which automatically formats the dialogue with two buttons:
Private Sub showDialogue(ByVal title As String, ByVal message As String, _
        ByVal button1 As String, ByVal button2 As String)
    dialogue.Title = title
    dialogue.Message = message
    dialogue.NumButtons = 2
    dialogue.setButtonText(1, button1)
    dialogue.setButtonText(2, button2)
    dialogue.Visible = True
End Sub
The doAttack() function handles a single round of combat. Well, technically, it’s just one-half of a round since the NPC doesn’t fight back yet. Study the calculations in this function to learn more about how the armor class, attack roll, and damage roll are related.
Private Sub doAttack()
    Const DEF_ARMOR As Integer = 10
    Const DEF_SHIELD As Integer = 0
    Const WEAPON_DMG As Integer = 5
    Dim hit As Boolean = False
    Dim critical As Boolean = False
    Dim fail As Boolean = False
    Dim roll As Integer = 0
    Dim AC As Integer = 0
    Dim damage As Integer = 0
    Dim text As String

    If Not attacking Then Return

    REM calculate target's AC
    AC = monsters(target).DEX + DEF_ARMOR + DEF_SHIELD

    REM calculate chance to-hit for PC
    roll = game.Random(1, 20)
    text += "To-Hit Roll: " + roll.ToString()
    If roll = 20 Then
        REM critical hit!
        hit = True
        critical = True

        text += " (CRITICAL!)" + vbCrLf
    ElseIf roll = 1 Then
        fail = True
        text += " (EPIC FAIL!)" + vbCrLf
    Else
        REM normal hit
        roll += hero.STR
        If roll > AC Then hit = True
        text += " + STR(" + hero.STR.ToString() + ") = " + _
            roll.ToString() + vbCrLf
    End If

    REM did attack succeed?
    If hit Then
        REM calculate base damage
        damage = game.Random(1, 8)
        REM add critical
        If critical Then damage *= 2
        text += "Damage roll: " + damage.ToString() + vbCrLf
        REM add STR
        damage += hero.STR
        text += " + STR(" + hero.STR.ToString() + ") = " + _
            damage.ToString() + vbCrLf
        REM add weapon damage (usually a die roll)
        damage += WEAPON_DMG
        text += " + weapon(" + WEAPON_DMG.ToString() + ") = " + _
            damage.ToString() + vbCrLf
        REM subtract AC
        damage -= AC
        text += " - monster AC(" + AC.ToString() + ") = " + _
            damage.ToString() + vbCrLf
        REM minimal hit
        If damage < 1 Then damage = 1
        REM show result
        text += "Attack succeeds for " + damage.ToString() + " damage."
    Else
        text += "Attack failed." + vbCrLf
    End If
    showDialogue("Attack", text, "Attack", "Cancel")
End Sub
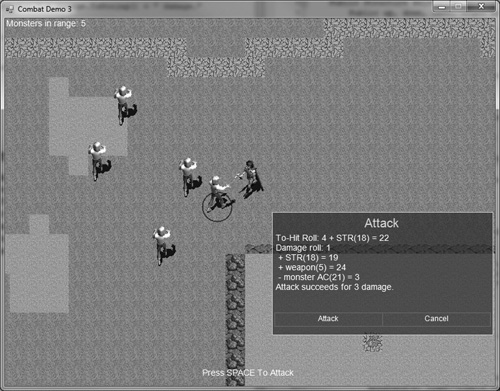
It goes without saying that attacking an enemy who is behind you is kind of silly. No, it’s ridiculous. No one can swing a sword accurately behind them, let alone shoot an arrow backwards. So, the game shouldn’t allow it either! What’s worse, we can deal damage to a monster without even swinging at it. The code that figures out the direction to a target is like the code that sets the player’s animation based on its direction. The getTargetDirection() function will “point” a character from its current angle toward a target. This is also useful for pitting NPCs against each other, or for having NPCs face the player when you talk to them. Figure 16.21 shows the Combat Demo 3 running with new code to cause sprites to face toward each other.
Hint
Note: the code presented in these examples is not meant to be typed in to modify the first example in the chapter step by step, but only to show the most relevant code for each example (which share many unchanging functions). You will want to open the complete project for each example and observe it running as you study the text. These projects do show an evolution toward a final, working combat system, but the code is not all listed due to space considerations.
The logic behind figuring out the direction from one point to another is really just about brute-force If statements. First, we look at the X position of both points to find out whether the target is left, right, or directly in line with the source. Then, it checks the Y position to figure out whether the target is above, below, or right in line with the source. Based on these conditions, we set the source in a direction that will most closely match the target’s location (within the limits of the 8-way directions for our animations).
Private Function getTargetDirection(ByVal source As PointF, _
        ByVal target As PointF)
    Dim direction As Integer = 0
    If source.X < target.X - 16 Then
        If source.Y < target.Y - 8 Then
            direction = 3 'south east
        ElseIf source.Y > target.Y + 8 Then
            direction = 1 'north east
        Else
            direction = 2 'east
        End If
    ElseIf source.X > target.X + 16 Then
        If source.Y < target.Y - 8 Then
            direction = 5 'south west
        ElseIf source.Y > target.Y + 8 Then
            direction = 7 'north west
        Else
            direction = 6 'west
        End If
    Else
        If source.Y < target.Y - 8 Then
            direction = 4 'south
        ElseIf source.Y > target.Y + 8 Then

            direction = 0 'north
        End If
    End If
    Return direction
End Function
Using this function, we can modify doMonsters() and force the PC and NPC to face each other when the player triggers an attack! The result is much improved over the previous example.
REM is player trying to attack this monster?
If dist < attackRadius Then
    game.Device.DrawEllipse(New Pen(Brushes.Blue, 2.0), _
        monsterCenter.X - 24, monsterCenter.Y, 48, 48)
    If attackFlag Then
        attacking = True
        target = n
        attackFlag = False
        REM make PC and NPC face each other
        Dim dir As Integer
        dir = getTargetDirection(monsterCenter, hero.CenterPos)
        monsters(target).Direction = dir
        monsters(target).Draw()
        dir = getTargetDirection(hero.CenterPos, monsterCenter)
        hero.Direction = dir
        hero.Draw()
        Exit For
    End If
End If
A minor change is required in the Character class to support the feature of forcing sprites to face toward each other. The original single Character.Draw() function is replaced with these three versions:
Public Sub Draw()
    Draw(p_position.X, p_position.Y)
End Sub

Public Sub Draw(ByVal pos As PointF)
    Draw(pos.X, pos.Y)
End Sub

Public Sub Draw(ByVal x As Integer, ByVal y As Integer)
    Dim startFrame As Integer
    Dim endFrame As Integer
    Select Case p_state
        Case AnimationStates.Walking
            p_walkSprite.Position = p_position
            If p_direction > -1 Then
                startFrame = p_direction * p_walkColumns
                endFrame = startFrame + p_walkColumns - 1
                p_walkSprite.AnimationRate = 30
                p_walkSprite.Animate(startFrame, endFrame)
            End If
            p_walkSprite.Draw(x, y)
        Case AnimationStates.Attacking
            p_attackSprite.Position = p_position
            If p_direction > -1 Then
                startFrame = p_direction * p_attackColumns
                endFrame = startFrame + p_attackColumns - 1
                p_attackSprite.AnimationRate = 30
                p_attackSprite.Animate(startFrame, endFrame)
            End If
            p_attackSprite.Draw(x, y)
        Case AnimationStates.Dying
            p_dieSprite.Position = p_position
            If p_direction > -1 Then
                startFrame = p_direction * p_dieColumns
                endFrame = startFrame + p_dieColumns - 1
                p_dieSprite.AnimationRate = 30
                p_dieSprite.Animate(startFrame, endFrame)
            End If
            p_dieSprite.Draw(x, y)
    End Select
End Sub
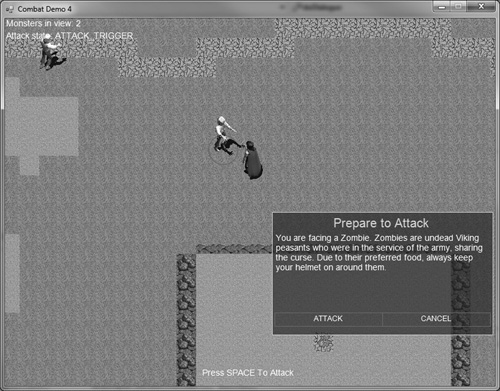
The combat system is now complex enough to require a state variable. Previously, a Boolean variable, attacking, kept track of just whether combat was supposed to happen. Now, we need to involve several steps for combat:
This enumeration will handle the four states in the combat system:
Public Enum AttackStates
    ATTACK_NONE
    ATTACK_TRIGGER
    ATTACK_ATTACK
    ATTACK_RESULT
End Enum
This is the variable we will be using to keep track of the current state of the combat system:
Private attackState As AttackStates
By the time we’re done adding state to the combat engine for this Combat Demo 4 project, shown in Figure 16.22, the game will allow you to make distinct, individual attacks against an enemy with a click of the Attack button.
Now that we’re using a state-based system for combat, we need to modify other parts of the game code to also work correctly: namely, the Dialogue class. Previously, we just looked for a mouse click to trigger a button selection event. Now, that will not work because the dialogue will be repeatedly updated so a mouse click will be seen as many clicks while the button is being held. No matter how fast you press and release the mouse button, it will pick up several events because the loop is running at 60 fps. What we need to do is look for a button release event instead. This change has been made to the Dialogue.Draw() function:
REM clicked on this button?
If p_mouseBtn = MouseButtons.None And p_oldMouseBtn = MouseButtons.Left Then
    p_selection = n
Else
    p_selection = 0
End If
I will not go over every line of the next example, but suffice it to say there were a lot of changes made to move the combat system over to a state-based system. The most important changes were made to doMonsters() and doCombat(), which mainly involved just checking the current state and acting appropriately. For instance, in doMonsters(), rather than simply setting the target to whatever monster the player is close to without regard for any previously targeted monster, the code now checks to see if the player isn’t already in a fight.
If attackState = AttackStates.ATTACK_NONE Then
    If attackFlag Then
        attackState = AttackStates.ATTACK_TRIGGER
        target = n
        attackFlag = False

        dialogue.Visible = True
        REM make PC and NPC face each other
        Dim dir As Integer
        dir = getTargetDirection(monsterCenter, hero.CenterPos)
        monsters(target).Direction = dir
        monsters(n).Draw(relativePos)
        dir = getTargetDirection(hero.CenterPos, monsterCenter)
        hero.Direction = dir
        hero.Draw()
        Exit For
    End If
End If
Also, after all of the monsters have been processed in the loop, then we need to reset combat if the player has walked away or cancelled combat.
If monstersInRange = 0 Then
    target = 0
    attackText = ""
    dialogue.Visible = False
    attackState = AttackStates.ATTACK_NONE
End If
Likewise, some serious changes have been made to doAttack() to support the new state-based combat system. Here is the new code for the function. All of the previous code in doAttack() is now contained solely inside the ATTACK_ATTACK state condition.
Private Sub doAttack()
    Const DEF_ARMOR As Integer = 10
    Const DEF_SHIELD As Integer = 0
    Const WEAPON_DMG As Integer = 5
    Dim hit As Boolean = False
    Dim critical As Boolean = False
    Dim fail As Boolean = False
    Dim roll As Integer = 0
    Dim AC As Integer = 0
    Dim damage As Integer = 0
    Dim text As String = ""

    If dialogue.Selection = 2 Then
        attackState = AttackStates.ATTACK_NONE

    Return
End If
Select Case attackState
    Case AttackStates.ATTACK_NONE
        Return
    Case AttackStates.ATTACK_TRIGGER
        If target > 0 Then
            text = "You are facing a " + monsters(target).Name + _
                ". " + monsters(target).Description
            showDialogue("Prepare to Attack", text, "ATTACK", "CANCEL")
        End If
        If dialogue.Selection = 1 Then
            attackState = AttackStates.ATTACK_ATTACK
        End If
    Case AttackStates.ATTACK_ATTACK
        REM calculate target's AC
        AC = monsters(target).DEX + DEF_ARMOR + DEF_SHIELD
        REM calculate chance to-hit for PC
        roll = game.Random(1, 20)
        text += "To-Hit Roll: " + roll.ToString()
        If roll = 20 Then
            REM critical hit!
            hit = True
            critical = True
            text += " (CRITICAL!)" + vbCrLf
        ElseIf roll = 1 Then
            fail = True
            text += " (EPIC FAIL!)" + vbCrLf
        Else
            REM normal hit
            roll += hero.STR
            If roll > AC Then hit = True
            text += " + STR(" + hero.STR.ToString() + ") = " + _
                roll.ToString() + vbCrLf
        End If
        REM did attack succeed?
        If hit Then
            REM calculate base damage
            damage = game.Random(1, 8)
            REM add critical

                If critical Then damage *= 2
                text += "Damage roll: " + damage.ToString() + vbCrLf
                REM add STR
                damage += hero.STR
                text += " + STR(" + hero.STR.ToString() + ") = " + _
                   damage.ToString() + vbCrLf
                REM add weapon damage (usually a die roll)
                damage += WEAPON_DMG
                text += " + weapon(" + WEAPON_DMG.ToString() + ") = " + _
                   damage.ToString() + vbCrLf
                REM subtract AC
                damage -= AC
                text += " - monster AC(" + AC.ToString() + ") = " + _
                   damage.ToString() + vbCrLf
                REM minimal hit
                If damage < 1 Then damage = 1
                REM show result
                text += "Attack succeeds for " + damage.ToString() + _
                   " damage."
            Else
                text += "Attack failed." + vbCrLf
            End If
            attackText = text
            attackState = AttackStates.ATTACK_RESULT
        Case AttackStates.ATTACK_RESULT
            showDialogue("Attack Roll", attackText, "ATTACK AGAIN", _
                "CANCEL")
            If dialogue.Selection = 1 Then
                attackState = AttackStates.ATTACK_ATTACK
            End If
    End Select
End Sub
The final step to complete the combat system is to give the player experience after defeating a monster. This will require some new fields in the Character class since we did not account for experience or leveling when originally designing the class. Some additional code will be required in this final example, Combat Demo 5, to allow the animation for the killed monsters to stay on the screen after they fall. Figure 16.23 shows the result. The amount of experience awarded is a random value from 50 to 100, which is just an arbitrary range that I made up as filler. How should we award experience in the real game? It should be a factor that involves the monster’s level, which is not something we’re currently using in the character editor files. What would you do with this design decision: add a level field, or a pair of fields that define how much experience the player receives? Something to ponder between now and the final chapter.
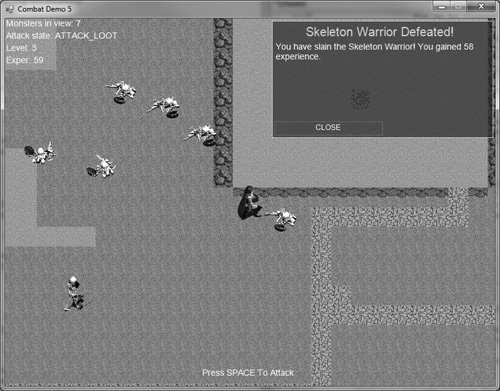
These few changes are needed in the doAttack() function to add the ability to kill monsters, gain experience, and level up. Portions of the code that have not changed that we have already recently covered are omitted. There are two states involved when a battle is concluded: ATTACK_RESULT and ATTACK_LOOT. The former tallies the experience, kills the monster, and displays the dialogue message. The latter is simply used to hold the dialogue window up until the player has acknowledged the information by clicking the “CLOSE” button.
Note: some variables in this code will be new; refer to the source code in the finished project to see the variable declarations.
Select Case attackState
        Case AttackStates.ATTACK_NONE
             hero.AnimationState = Character.AnimationStates.Walking
             dialogue.Visible = False
             Return
        Case AttackStates.ATTACK_TRIGGER
             If target > 0 Then
                 text = "You are facing a " + monsters(target).Name + ". " + _
                     monsters(target).Description
                 showDialogue("Prepare to Attack", text, "ATTACK", "CANCEL")
             End If
             If dialogue.Selection = 1 Then
                 attackState = AttackStates.ATTACK_ATTACK
             End If
        Case AttackStates.ATTACK_ATTACK
             hero.AnimationState = Character.AnimationStates.Attacking
             monsters(target).AnimationState = _
                 Character.AnimationStates.Attacking
             REM calculate target's AC
             . . .
             REM calculate chance to-hit for PC
             . . .
             REM did attack succeed?
             . . .
             attackText = text
             monsters(target).HitPoints -= attackDamage
             attackState = AttackStates.ATTACK_RESULT
        Case AttackStates.ATTACK_RESULT
             hero.AnimationState = Character.AnimationStates.Walking
             REM is monster dead?
             If monsters(target).HitPoints <= 0 Then
                 monsters(target).Alive = False
                 Dim xp As Integer = game.Random(50, 100)
                 addExperience(xp)
                 text = monsters(target).Name + " Defeated!"

            attackText = "You have slain the " + monsters(target).Name + _
                "! You gained " + xp.ToString() + " experience."
            showDialogue(text, attackText, "CLOSE")
            attackState = AttackStates.ATTACK_LOOT
        Else
            showDialogue("Attack Roll", attackText, _
                "ATTACK AGAIN", "CANCEL")
            If dialogue.Selection = 1 Then
                attackState = AttackStates.ATTACK_ATTACK
            End If
        End If
    Case AttackStates.ATTACK_LOOT
        hero.AnimationState = Character.AnimationStates.Walking
        If dialogue.Selection = 1 Then
            attackState = AttackStates.ATTACK_NONE
            target = 0
        End If
End Select
A helper function called addExperience() will take care of granting the player experience and leveling up. At this early stage of development, leveling up is a trivial affair meant only to demonstrate that it can be done. In the finished game, we will want to grant the player new attribute points (to STR, DEX, etc.) to reflect the fact that their new level makes them stronger. This function is just a stopgap for the time being to demonstrate experience and leveling, while a more permanent solution will be offered in the final chapter.
Private Sub addExperience(ByVal xp As Integer)
    hero.Experience += xp
    If hero.Experience > 200 Then
        hero.Level += 1
        hero.Experience -= 200
    End If
End Sub
The Character class needs some new features to accommodate the requirements for gaining experience and leveling up the character.
Private p_experience As Integer
Public Property Experience() As Integer

    Get
        Return p_experience
    End Get
    Set(ByVal value As Integer)
        p_experience = value
    End Set
End Property

Private p_level As Integer
Public Property Level() As Integer
    Get
        Return p_level
    End Get
    Set(ByVal value As Integer)
        p_level = value
    End Set
End Property
We will also add a new Character.Alive property to make it easier to flag monsters as they are killed and prevent the code from updating those characters.
Private p_alive As Boolean
Public Property Alive() As Boolean
    Get
        Return p_alive
    End Get
    Set(ByVal value As Boolean)
        p_alive = value
    End Set
End Property
The death animation will require a new item in the Character.AnimationStates enumeration so that when the animation finishes one cycle, the sprite will remain on the ground, showing the final frame of the death animation for good.
Public Enum AnimationStates
    Walking
    Attacking
    Dying
    Dead
End Enum
After play testing the Combat Demo 5 project a few times, I’m extremely pleased with the decision to use a turn-based combat system instead of real-time. This slows down the game, gives it more character, and allows the player to become more involved in the gameplay. Combat in a traditional pen-and-paper RPG is not a quick “hack-n-slash” affair that ends in seconds—the players must calculate the results of each attack, roll the dice for their attack roll and damage roll, while the defender often has “succeed or fail” rolls to block the attack, based on their abilities. It is this interaction that makes the game fun. Simply swinging the weapon as fast as the game will let you and mopping up the loot afterward takes away a huge amount of the fun factor. However, there most certainly is a balance to be found: you don’t want to bore your player with micro managing his character. One type of combat we did not address in this already lengthy chapter is ranged attacks (of the bow and spell variety). As it turns out, these types of attacks tend to get handled very much like melee attacks but with a little bit more range, so all we need to do is increase the attack radius around each monster to allow for ranged weapons. Perhaps that is an attribute best handled by the weapon’s stats? Ironically, that is the very subject we’re covering in the next chapter.