
Purpose-Built Rigs
Every motion control equipment supplier has a pile of one-off rigs that were built for a particular shot or to solve a particular problem. If you have an oddball shot, it is worth asking your motion control supplier if he or she has a rig that can accommodate the shot. Most motion control suppliers are quick to rise to a new technical challenge.
Motors and Sound
The two types of motors commonly used in building motion control equipment are stepper motors and servo motors. From the VFX Supervisor’s point of view, the main difference between them is that servo motors are virtually silent, while stepper motors emit a variety of harmonic sounds at different speeds. While the choice of motors is only one of the factors affecting the rig’s impact on sound, it is a significant one.
Model/Miniature/Stop-Motion Rigs
While many miniature and stop-motion jobs have been shot with live-action motion control rigs, numerous rigs are still on the market that are fully capable of motion control accuracy but not at live-action speeds.

Figure 3.67 A large motion control rig designed to work at stop-motion and go-motion speeds. (Image courtesy of New Deal Studios.)
The resurgence of stop-motion animation features has resulted in the renovation and manufacture of smaller, lighter rigs that are only capable of stop-motion and go-motion speeds.62 It is very unlikely that any rig that has not been built from the ground up to work at live-action speeds can be adapted to do so without performance compromises. When it comes to choosing a rig for shooting miniatures, models, or stop- or go-motion animation, it is best to discuss the specifics of the shots with your VFX Director of Photography, model shop supervisor, and motion control equipment vendor.
Motion Control Software
The two most prevalent motion control programs in current use are Kuper and Flair. Each has its proponents, and motion control programmers tend to specialize in using one or the other. Rigs from General Lift, Pacific Motion Control, Image G, and the companies that shoot miniatures in the United States are controlled primarily by Kuper software. Rigs that are built and supported by Mark Roberts Motion Control (a U.K. company) and their affiliates generally offer systems that use Flair software. For the most part, the ease and ability to accomplish a given shot will be determined by the physical rig and the skill of the programmer, not the choice of motion control software. On the other hand, if the data is being ported out real time to an on-set preview system, it is critical to determine that the specific preview system being used is compatible with the specific motion control software being used. As with all computer technologies, assurances over the phone are no substitute for actual tests.
Camera Types
Motion control can be used with a wide variety of camera types. Formerly used primarily with Mitchell cameras with stepper motors or Lynx Robotics motors, motion control rigs can be used with all manner of film, television, HD, and even digital still cameras.
Sync and Phase
What makes motion control “motion control” is the accurate correlation between each image frame and the matching camera position. To create this correlation, the motion control computer’s time base either needs to be driven by the camera or needs to drive the camera. This requires the synchronization and phasing of the camera to the motion control computer. When synchronized there is a one-to-one correlation between photographic frames and data frames, but when a camera has a 180-degree shutter, for instance, this frame-per-frame correlation can still have offsets of as much as half a frame. The camera and motion control computer are said to be in phase when the data frame correlates with the center of the open shutter period of the camera’s cycle.
In practical terms, the importance of being in phase from pass to pass is greatest when there is fast movement in the motion control rig relative to the frame rate. Since a phasing error amounts to a timing error, the faster the movement, the greater the distance or angle offset per frame. The result of this offset is that multiple passes will not line up. The line-up error is not necessarily as simple as a global pixel offset. In the case of multiple objects in a scene at varying distances from the camera, the resultant camera path displacement caused by the timing offset can result in parallax variances from pass to pass between foreground and background objects.
With a little advance notice and fussing, pretty much any film camera that has an accessible shutter pulse signal can be made to work with a motion control rig at a variety of camera speeds. Standard-definition and HD cameras can be synced to a motion control computer using the camera’s sync pulse (tri-level sync in the case of HD). When using HD cameras at speeds other than 23.98 or 29.97 fps, however, the likelihood of being able to obtain a once-per-frame pulse is much lower. For specific cameras and frame rates, it is imperative to research the possibilities with the motion control equipment supplier for the job. For obvious reasons, this is of particular importance when using motion control to create timescale effects, necessitating shooting the same shot at different frame rates.
Dealing with Production
The secret of a successful motion control shoot is good communication before the shoot. Part of the challenge is managing the expectations of the 1st Assistant Director and the Unit Production Manager. Many complaints about motion control arise from a lack of understanding on the part of the AD of what the shots entail and the AD’s subsequent inability to plan the day appropriately. Find the time to talk through the on-set process with the AD. Let him or her know how much setup time the crew will need to get the rig on line and how much time you expect it to take in order to program the first pass. The AD also has to know what else has to happen before you can get to the second pass, whether that involves shifting scenery, flying in green screens, or moving the rig.
Talk with your set lighting crew and your grip crew. Make sure that the set lighting best boy knows how much power you will need and what, if any, special connectors you will need in order to power up. Motion control track is not difficult for grips to deal with, but the grips should be made aware of the necessity to support the track in such a way that there is no movement from pass to pass. When working with platforms, for instance, this often requires more legs, more plywood on top, or more bracing.
The Director of Photography needs to know how the shot will be programmed: whether the operator will be encoding the shot or whether the programmer will be building the move. Discuss the options with the DP before you finalize the equipment package—make sure the DP is happy with the process. Make sure to speak with the camera assistant and that there is a clear understanding of whose equipment will be controlling the lens and which camera body you will be working with. If necessary, have production bring a body to the motion control supplier’s shop during prep. At least make sure that the body will be available to test for the sync pulse before the shot.
Conclusion
With a little research into the best ways of accomplishing the needed shots, and a little time spent communicating with production and the rest of the crew, it is possible to shoot motion control smoothly and efficiently. Every well-planned and well-executed motion control shoot helps makes for a smoother path for VFX Supervisors everywhere to use motion control when it serves the purpose of the project.
ACQUISITION OF MOTION/STILL PHOTOGRAPHIC TEXTURES FOR MAPPING ONTO CG
Mark H. Weingartner
Among the tools available for creating photorealistic panoramic backgrounds or photorealistic GC objects are elements that are created by photographing scenery, architecture, objects, and even people. While there are often considerations that suggest the use of procedurally generated textures, photographing real scenes or textures can provide a cost-effective and time-effective way to work.
Two general situations warrant the use of photographically acquired elements. One is the creation of naturalistic panoramic backgrounds onto which foreground elements are to be composited. This category includes not only static environments, but also moving background plates (for vehicles, for instance) that are built up from several overlapping images. The second application of photographic elements is in generating specific CG elements for which the skin might be more easily created using photographs than through CG synthesis—either modeling/painting or procedurally. These textures can be photographed with digital still cameras, film still cameras, motion picture film cameras of various formats, or digital cinema cameras. Additionally, many visual effects facilities have incorporated HDRI63 fish-eye images into their automated lighting systems for CG elements.
Panoramic Backgrounds
When shooting the tiles that will be blended together to form a background, a number of factors inform the decision to shoot stills or motion pictures.
Resolution is a prime consideration. One must consider the resolution and intended viewing method of the final project, as well as the degree of magnification that might be called for in a given composite. Since the background is being assembled from photographic tiles, it is not necessarily the case that the resolution of the tiling camera need match the 1st unit camera, but one must be mindful of trade-offs. Insufficient resolution might result in backgrounds that need to be heavily processed to reduce grain or noise. Shooting much higher resolutions than needed can result in very large, unwieldy image files once the backgrounds have been assembled. In a bright day exterior scene where 1st unit photography can be expected to have a relatively deep depth of field, or when composites require focus thrown deep into the scene, more resolution is likely to be needed than if the tiles will form a deep background for a night scene that will be photographed with shallow depth of field. Resolution should be considered with respect to the field of view of a given tile, not just by looking at the resolution of the camera format that covers the same field of view.64
The anticipated dynamic range in a scene can strongly influence camera choice. Even as the dynamic range and bit depth of digital motion picture cameras and digital still cameras are improving, film stocks also continue to improve. Film can still capture a greater dynamic range within a scene than digital cameras can at a given exposure setting. While the 1st unit Director of Photography can control exposure and contrast by changing the f-stop and adjusting lighting, backgrounds that encompass wide angles of view often have a great range of contrast—sunlit buildings with strongly shadowed streets, for instance. The desirability of shooting adjacent plates or tiles with the same exposure settings to facilitate stitching and blending suggests the use of film in high-contrast situations. If the 1st unit is shooting film, this approach has the collateral benefit of capturing the background material in the same color space as the foreground elements.
The advantages that film has in these respects are somewhat offset by handling costs and grain. Many projects choose to shoot their background tiles with digital still cameras, using bracketed exposures to compensate for the lesser dynamic range of CCD and CMOS sensors compared to modern film stocks. On the other hand, many backgrounds are assembled from tiles built from multiple film frames with grain averaging applied.
The choice of motion versus still capture is informed by several factors. If the backgrounds contain elements that show movement over time, such as wavy trees, rippling water, moving clouds, moving traffic, or flocks of birds, for instance, a strong argument can be made for shooting motion pictures. However, if the backgrounds are generally architectural or do not reveal movement, the lower costs, lower profile on location, and less voluminous data storage issues often suggest the use of digital stills.
Tiled Stills
In the past dozen years, the assembly of individual still photographs into a seamless image has gone from being a laborious manual process requiring sophisticated and expensive programs to something that can be done with free software available with many digital cameras. With either film or digital still cameras, a nodal head65 is preferable when shooting environments containing objects at varying distances to the camera and including foreground objects, but if shooting distant backgrounds, perfectly acceptable results can be achieved with non-nodal camera heads. A certain amount of horizontal and vertical overlap is needed, generally on the order of 10% to 20% of the image. Prime lenses (non-zoom) should be used, both for optical quality and to ensure that image magnification and distortion are consistent from tile to tile. When photographing scenes that contain a wide tonal range, it is advisable to shoot multiple bracketed exposures for each camera position. These images can be combined to express an extended dynamic range in the scene. Different facilities have different specific requirements in order to feed their pipelines, so it is important to confer with the chosen facility before shooting whenever possible.
For remote applications and to solve certain other production issues, several automated nodal tiling systems are in use. These systems remove the difficulty of figuring out the appropriate overlap when shooting night scenes with few discrete visual reference points. The Tesselator system is a camera-agnostic system that calculates angles of view based on focal length, film-back size, and percentage overlap and drives a motorized head to shoot a user-definable matrix of tiles. Some visual effects facilities have built in-house solutions for automated tiling needs as well. Another approach to building a background from stills is the Panoscan system, which uses a motorized head to scan a panoramic scene and delivers a single large file integrated from the scan.
Motion Tiling and Synchronous Plates
If the needs of a project warrant the use of motion picture tiles, whether film or digital, there are two basic approaches: single-camera tiles or multiple-camera synchronous plates.

Figure 3.68 VistaVision camera on a nodal head atop a skyscraper. (Photo courtesy of Mark H. Weingartner.)
A single-camera nodal tiling setup allows for all the tiles to be shot without any parallax66 issues arising between foreground, midground, or background objects. This lack of parallax shift simplifies assembly of the background. In addition to shooting bursts at each position in the tile matrix, it is often advisable to shoot longer takes of tiles that are specifically framed to show traffic, crowds, or other moving elements. Even if the facility paints out the existing traffic and animates traffic across the tiles, these traffic tiles can serve as useful animation references.
Background plates for scenes that take place in moving vehicles or in front of movement-filled backgrounds are frequently shot with multiple motion picture cameras filming overlapping fields of view. Richard Yuricich, ASC, is generally credited with pioneering the technique of shooting a continuous panorama using a multiple-camera array with matched lenses in order to provide for tracking a moving foreground camera shot across a digitally stitched-up background. This method is now in common use, with overlapping plates shot digitally with 35mm cameras, VistaVision cameras, and even 65mm cameras.

Figure 3.69 (A) VistaVision cameras on a helicopter. (B) Rotovision cameras on a train. (Images courtesy of Mark H. Weingartner.)
While it is possible to set up two cameras to share a nodal point using a beamsplitter, whenever there are more than two cameras working, it is not possible to have them nodal to each other. The determination as to how many cameras and what focal length lenses to use involves weighing various factors—lens distortion, format resolution, lens vignetting, physical rig size, etc.—and coming up with the best compromise.
If the background objects are all very far away, parallax becomes less of an issue and intercamera spacing becomes less critical. However, if dealing with foreground objects passing by slowly enough to be sharp, it is important to choose camera/lens/mounting combinations that create the least amount of temporal or spatial offset between an object’s appearance at one edge of the frame of one camera and its appearance at the corresponding edge of the next camera over.67
To eliminate stuttering as objects cross from one frame to the next, the cameras should be synchronized and phased so that all the shutters are open at the same time and closed at the same time. If shooting electronically, cameras must be genlocked. Because of the parallax shift caused by multiple cameras not shooting nodally, a bit of repair work can be expected in post. For this reason, if the Director and DP are willing and able to nail down specific angles for process work, there is some benefit to shooting in-one specific angle plates where possible or centering the tiled plates such that in-one plates can be extracted from single-camera shots.
Practical Considerations
Here are some rules of thumb that apply whether shooting with film or digitally and whether shooting still tiles or motion tiles:
• Maintain a consistent exposure. To fit tiles together, it is important that the exposure of each tile not need to be adjusted on ingest. Analyze the scene and set a fixed exposure that will work for the entire range of tiles to be shot. Do not vary the f-stop within a tile sequence, because this will alter depth of field and subtly change the bokeh68 of highlights or out-of-focus objects.
• Use prime (fixed focal length lenses).69
• Use a deep enough f-stop to let the lens be the best it can and for the best depth of field possible, but avoid stopping down all the way, because lens performance can be degraded by diffraction.
• Most visual effects facilities will want lens distortion grids for any lenses used to shoot tiles. These grids will allow them to automate the removal of distortion of the individual tiles prior to assembly.
Stills for Textures and Lighting
The use of physical miniatures for set extensions and to photograph physical effects has been supplanted to a large degree by the use of models built in a CG environment, whether as wireframes or otherwise, and skinned70 with the appropriate textures. Often the basis of this skin is a photograph or a series of photographs of a real object.
If called on to provide texture photos, either for direct use or as reference, it is important to find out exactly what the facility requires. Depending on the specifics of the job, the facility might want softly lit texture shots so that they can add their own drop shadows as needed, while other situations call for baked-in71 shadows. In any case, it is important to use lenses that are of good quality, have decent contrast, and exhibit minimal spherical distortion across their fields. Backing up far enough from the subject to allow the use of relatively long focal length lenses (≥50mm in full-frame 35mm still format at the widest) will help flatten the image and reduce the baked-in perspective.
Another evolution in 3D CG production is the automation (or semiautomation) of some of the lighting of 3D CG elements using fish-eye images shot on the live-action set. For years, common practice included shooting shots of chrome reflecting spheres along with 18% reflectance gray spheres in order to give CG artists lighting references, but gradually different visual effects facilities have built pipelines that incorporate fish-eye images, either of a reflecting sphere, or shot with a fish-eye lens, in their lighting systems. As with the software systems that assemble tiles into panoramic backgrounds, as the systems have become more automated, the specific shooting parameters have become more detailed and restrictive. Where these images were once visual references that allowed a 3D lighting artist to deduce what the light sources were on set that would have lit the CG element, they now drive the lighting programs directly.
The visual effects facility will generally specify how these fish-eye images are to be shot, both with regard to physical setup and with regard to exposure bracketing in order to best feed their pipeline. Several visual effects facilities and individuals have built their own proprietary hardware systems for recording the lighting impinging on a scene. The HDR-Cam Light Probe System developed by Hoyt Yeatman uses an array of multiple lenses whose images are integrated into a single HDR panorama. Others use motorized pan/tilt heads to map a scene with multiple exposures. Yet another clever approach to shooting panoramas for reference is a device that consists of a parabolic conical mirror into which a still camera is pointed. When photographed, the mirror records a 360-degree panorama.
Conclusion
With a variety of methods and uses for photographic textures, it is important to choose the most appropriate approach for a given situation. The gross distinctions between (1) film or digital acquisition, (2) motion or still capture, or (3) production use or reference use (e.g., HDRI lighting references) are further refined by the subtler choices of specific cameras and systems. Whenever possible, get a clear understanding of what the parameters are with regard to:
• visual effects facility pipeline requirements,
• contrast inherent in the material to be photographed,
• degree of resolution required for the specific use of the materials to be photographed, and
• color space matching issues.
Once format and exposure strategy have been decided on—have at it, and remember that in the digital world, data is not data until it is safely stored in two places.
STOP-MOTION
Pete Kozachik, ASC
Stop-motion is best known as a blend of animation and model photography, long the most versatile means to produce creature effects. Now it is chosen more for stylistic reasons, leaving computer graphics to produce footage that is required to be hyperrealistic.
At the heart of the process, a lone animator creates a performance by sequentially posing a flexible puppet and photographing each pose on a separate frame of film.
Without key-frame interpolation or Newtonian physics routines, stop-motion delivers a somewhat surreal take on real-world motion, further abstracted by the lack of motion blur.
For many decades, animating on film imposed a completely linear workflow; start at the beginning, and carry the shot to its end, only imagining how the work was progressing. The first opportunity to check one’s performance was in dailies, when the shot was finished and baked in to the negative.
Evolution of Stop-Motion Photography
Recent advances in technology have made stop-motion a more user-friendly technique. But for most of its run, stop-motion was at a disadvantage with other forms of animation.

Figure 3.70 Anthony Scott animates Jack Skellington, using several surface gauges mounted on a grip stand. (Image courtesy of Jim Matlosz, Tim Burton’s THE NIGHTMARE BEFORE CHRISTMAS © 1993 Touchstone Pictures. All rights reserved.)
The classic means of estimating frame-by-frame continuity in stop-motion was a machinist’s tool called a surface gauge. Basically a movable pointer on a heavy base, it was placed at a strategic point on the puppet such as the nose, before moving the puppet another increment. The gap between nose and pointer indicated how far the nose was moving between frames. Beyond that, the animator carried the entire shot in his head; the faster he could work, the better he could visualize the performance in progress.
Meanwhile, cartoon animation offered instant feedback; the animator could flip through his drawings to check motion and could shine a light through a sheaf of drawings to gauge increments of motion. Only when all was ready did the drawings go under a camera.
Beginning in the late 1980s, animators have been able to review stop-motion work in progress and service change notes midshot. Starting with surveillance video cameras and repurposed hardware frame stores, animators could scrub through their two most recent frames and a live frame. It was rudimentary and expensive but enough to gauge progress and verify that all those puppet arms and legs were moving in the right direction.
Soon after, hardware capture systems became available that could store hundreds of standard video resolution frames. Animators could review an entire shot in progress. And it was possible to cut back several frames and carry on in a different direction. The video camera image was not usable as production footage but was very helpful in gauging performance, while a film camera captured the end product.
Now such products are sold as PC or Mac applications, requiring only a video camera and a frame grabber card.
As digital photography evolved, it became possible to capture images good enough for production footage. The first stop-motion feature to shoot without film cameras was Corpse Bride (2005), using instead a fleet of digital SLRs.72 It was still necessary to feed the frame grabber animation aid from a live video camera placed at the dSLR eyepiece.
By the time the next stop-motion feature, Coraline (2009), was gearing up, it was possible to couple industrial machine vision cameras with a custom PC grabber application to handle both tasks, displaying animation in progress and capturing high-resolution production images.
As prosumer technology has evolved, the next such production will likely use the latest dSLR, now capable of live preview output, for the same purpose. This, coupled with evolving commercial frame grabber applications, will democratize stop-motion production, making high-end technology accessible to any budget.
The Time Required to Shoot in Stop-Motion
The actual shooting process takes time, but the supervisor can control some of it, not to mention the animator. Many factors affect production time; most notable are shot complexity, number of characters, accessibility to the puppet, and the work style of a given animator. Definitely include the animator and cameraman in prep to find ways of saving time.
There is a benchmark for high-end feature work. Average output from one animator on an average shot, working on Corpse Bride (2005), Coraline (2009), or The Nightmare before Christmas (1993), has been 2 or 3 seconds of screen time per day.

Figure 3.71 Buck Buckley sets up a challenging shot of multiple characters marching by torch light. (Image courtesy of Eric Swensen, Tim Burton’s THE NIGHTMARE BEFORE CHRISTMAS © 1993 Touchstone Pictures. All rights reserved.)
Simpler visual effects work, or episodic TV character work, come in at 7 to 10 seconds a day. When the machine is humming, a stop-motion feature studio can put out a minute a week.
And once the shot is in the can, it is truly done. Lighting is done, camera work is done, and there will be no significant reworking of the performance. Good news for some and a scary scenario for others.
Sometimes a director will wish for a tweak on a finished shot, but usually she has infused her vision into the animator, and the first take has a strength and honesty about it.
Now that it is possible to stretch and squeeze time in selected parts of a shot, a director can massage a performance in post with a surprising degree of finesse. The animator’s timing plays a major part in a performance, making retiming a powerful dramatic tool.
Preparation before Shooting
Preparation goes all the way back to shot design, character design, rigging, and building, before even entering the shooting stage.
Characters are designed with sketches and rough sculpts, followed by a fine sculpt. Since it is difficult to capture the exact look twice, it is a good idea to approve at the roughest acceptable stage and save the sculptor’s mojo for the final master sculpt. This would be best done by applying clay over the armature, in a neutral spread-eagle pose, for best molding and casting.
An armature serves the same purpose as does rigging in CG animation. It is typically a framework of steel joints, machined to fit inside the puppet and hold any stance the animator imposes on it. A good armature can make a great difference in getting a subtle performance and can also save shoot time by making the animator’s work easier. The armatures are usually designed to accommodate the range of motion called for in a breakdown of the character’s planned performance.
Armature building is part art and part skilled machine work; some of the best armatures are made by animators with machining skills. They know just how the joints should behave when being moved. Each animator prefers a different amount of resistance, but they all like joints to move smoothly and hold their position the instant pressure is removed. That quality is best attained by lapping the joints, working them repeatedly until they are burnished smooth.
External rigging might also be used. More often these days, puppets have flying rigs and helper rigs, both used more for top-heavy puppet stability than for actual flying. Before rig removal became a catchphrase, puppet support came from finicky tungsten wires or just plain practical character design, usually including fat ankles.
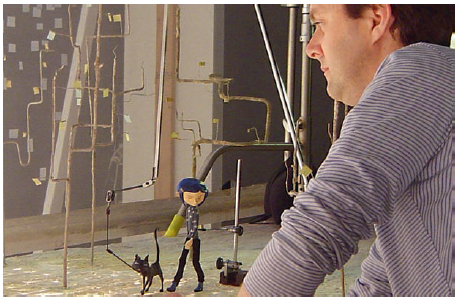
Figure 3.72 Phil Dale uses support rigs to aid in animating Coraline and Cat. (Image courtesy of Pete Kozachik, Coraline © 2009 Laika, Inc. All rights reserved.)
Today, the animator usually does not make the puppet; a machinist makes the armature, a sculptor forms oil-base clay over it, and a mold maker casts it in foam latex, often lightly skinned with silicone. Then a painter paints it, a costumer clothes it, and yet another fabricator adds hair, scales, and so forth.
It is worth noting that these puppets wear out in use from constant handling. At the very least they need careful cleaning after a long shot. Inevitably the foam wears down, and the puppet is stripped down to the armature and recast. On a long project this must be accounted for.
Most puppet fabricators are freelancers, and there are a few one-stop shopping opportunities, entire companies that make animation puppets from scratch.
The same holds for stage crew; some, but not all, visual effects cameramen have shot stop-motion and are typically versed in the use of motion control. They have practical experience with shooting miniatures and can either match lighting from first unit plates or create dramatic lighting for a given scene or plot point.
Setting Up a Shooting Space for Stop-Motion
Stage sizes for most shows have centered around 20 by 25 feet, usually side by side with other setups, all separated by black duvetyne curtains. The biggest have been 40 by 60 feet, and the smallest have been 10 by 10. The higher the ceiling, the better, for cooling.
The setups use less electricity than live action, and a typical setup could work with 60 to 100 amps. This feed usually needs to be conditioned, held within a half-volt tolerance, so the shot doesn’t flicker as line voltage varies throughout the day. Line regulators can be obtained in the form of a 60-amp variable transformer, constantly adjusted by a stepping motor and voltage sensor working in a closed loop. There are larger versions for permanent installation that can handle a whole studio.
Conditioning systems can save many hours on stage and in post; by presetting the line voltage down 5 or 10 volts, lamp life extends far beyond specifications. The difference in brightness and color is trivial, compared to dealing with a blown lamp during a shot.
Live-action-style overhead grids have disadvantages in a stop-motion studio, especially with multiple setups. While a camera crew relights one set, the grid may move over another set that is shooting. And grid heights are usually too high for table-top setups.
By populating the studio with simple floor-based individual grids, all that can be avoided, and the crew can still use the advantages of a grid. Given the scale of most setups, a grid can be no more than two parallel lengths of speed rail overhead, reachable by a 6-foot ladder.
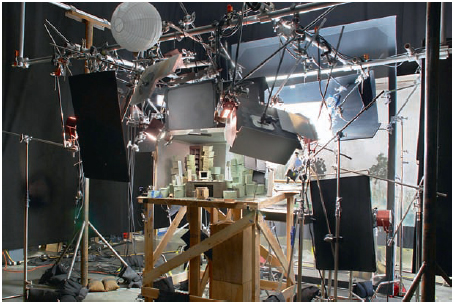
Figure 3.73 Typical interior set, with a scaled down overhead grid holding most of the lighting. (Image courtesy of Galvin Collins, Coraline © 2009 Laika, Inc. All rights reserved.)
To date, most lighting for stop-motion has used small lights, scaled down to match puppet scale as much as possible. A typical setup relies mostly on 200W Mini-Moles and Arri 300W Fresnel units, with a few 650 and 1k units. A 2k is considered a big light in most cases, but some very large exterior sets have required 5k and 10k lights.
More recently, small banks of white LEDs have found their way onto stop-motion setups. They are good for hiding within a set, and run cool, which helps prevent the damaging of latex foam in proximity.
Practical lights, such as puppet scale table lamps and candles, tend to dictate how bright the movie lights can be. Practicals are usually made up from small but robust aircraft instrument panel lamps, typically 14 volt.
In planning for a workflow, one should have more setups than animators. While a camera unit works on lighting and motion control moves on one setup, the animator can be working on another setup. One of the primary goals for a production manager is to keep animators busy, and that means always having a set waiting for them once they finish their current shot.
Such redundancy should be used anywhere a production bottleneck could delay a shot. For example, there should always be an extra puppet waiting to fill in for a damaged one. Now that cameras and motion control rigs are easily obtained, there should also be a backup on them as well. As production ramps up, elements in short supply will reveal themselves, like it or not. An experienced production manager can identify them in advance.
Use of Motion Control in Stop-Motion
Motion control has allowed stop-motion to use camera moves like live action does. The rig need not be fast, pretty, or sophisticated. It should have somewhat higher resolution than typical live-action rigs, so it can smoothly advance from frame to frame. About one-half inch per motor turn is a good rule of thumb for tracks and booms. And pan/tilt/roll axes are good around 1-degree per motor turn.
Almost anything cobbled together will deliver a usable move, as long as its mechanical slop73 is contained by bungee cords and counterweights. Plenty of motion control shots have been successfully filmed on rigs made with bicycle and car parts and hardware found in surplus stores.
The best use of one’s motion control budget is to obtain as many cheap, separate units as possible. Each will be tied up on a shot for several days, usually on simple moves, so simplicity and redundancy are the key requirements. That said, boom arms are preferred over tripod setups, because they help keep the animators’ workspace clear.

Figure 3.74 Boom arm camera rig gives Eric Leighton easy access to animate. (Image courtesy of Pete Kozachik, Coraline © 2009 Laika, Inc. All rights reserved.)
Aside from camera cranes, motion control is useful in animating simple rigs such as color wheels, motorized dimmers, and moving props. Such mechanization helps to keep the animator’s attention on character performance.
In the 1980s, ILM adapted motion control to animate creature effects, with 3 or 4 degrees of freedom on a puppet-sized rubber monster’s head, limbs, and body. This change enabled animators to preanimate and edit the puppet’s performance before committing it to film. Since it had the ability to create real motion blur, the process was named go motion.
Useful Caveats
Launching an animator is a serious commitment. Go through a checklist of shot-safety items before the animator begins. This can include securing camera and light stands, lens settings, camera and motion control cables, and props on the set. It is common practice to hot-glue grip stands to the floor and check individual lightbulbs for signs of impending burnout. Pay special attention to making a clear path for the animator to move in and out of the set. Whether shooting film or digital, make sure the media won’t run out midshot.

Figure 3.75 Jan Maas uses a trap door to gain access to his puppets, while cameraman Peter Williams finishes camera checks. (Image courtesy of Pete Kozachik, Coraline © 2009 Laika, Inc. All rights reserved.)
Camera supports and table-top sets shift over time, due to humidity and temperature variance. It only becomes a problem when shooting is interrupted for several hours, typically overnight. The effect on screen is a visible jump, usually slight, but not always. This problem is often fixable by carefully tweaking whatever shifted. Turnbuckles, jackscrews, and wedges are helpful. The frame grabber is used to compare last night’s final frame with a live image, while making the adjustment. It is a good idea to build sets with some means of adjustment built in.
2D fixes in post sometimes help, but are often thwarted by motion parallax, which makes foreground objects shift more than in the background.
Prevention is the best approach, which saves valuable shoot time in the morning. Note that rigs made of unpainted thick-wall aluminum extrusions are especially good heat sinks, spreading temperature changes throughout, rather than bending from differential heating. And it is helpful to keep hot lights from hitting one side of a rig, regardless of the material.
Wood and composite materials are bones of contention regarding how best to prevent them from shifting. Humidity is the prime cause for wood shifting, so many consider sealing wooden structures.
In the age of flawless, photoreal computer graphics, the quest for perfection is a common hang-up in stop-motion. One can worry it to death, throwing a lot of resources at a minor problem. Or one can remember that such real-world anomalies are part of stop-motion’s hand-made charm, perhaps the very reason for choosing the process.
Evolution of a Shot
On a mostly live-action film, the VFX Supervisor may be standing in for the director for visual effects animation. Working with animators and cameramen, he or she has to tailor direction to fit the individual, just as in CG animation. In the stop-motion feature model, a given shot begins in crude form, starting as a roughed-in response to an initial briefing.
Much like blocking a live-action shot, the performer (in this case, the animator) works directly with the cameraman/motion control operator. Based on the briefing, they make key position marks for the puppet to hit, and the motion control is keyframed to those marks. Several quick tests are shot to coordinate puppet location and camera move. When it is close enough, they shoot a pop-through, which is a run-through with minimal animation.
Typically, this is a first look at timing, with the puppet at least hitting key positions. It also informs detail work in lighting. Thus it is not the time for finesse, as many things may change when it is shown to the supervisor. It may be viewed on set, but more can be learned by cutting the pop-through into the reel.
Then the animator does a rough rehearsal, in response to comments on the pop-through. The amount of animation finesse is agreed on, so the supervisor gets what he needs, without the animator wasting time by overworking the shot. It should contain camera and lighting tweaks at this point as well; this could be the dress rehearsal, and such rehearsals have been known to end up in the movie. So if this is a possibility, everyone contributing should know in advance.
Depending on how that goes, and how the budget is holding up, the next event will be the final performance, the real deal. It may take several days to shoot, so broadband communication is crucial at this time to avoid a reshoot.
Thanks to digital photography, the supervisor can check in on how it’s going, usually on set. If absolutely necessary, the shot in progress can be cut in. Once in awhile, segments of shots in progress go to visual effects so labor-intensive work such as roto can get started before the animator is done.
The traditional gut-wrenching moment as the projector is threaded up is a thing of the past; everyone involved has already seen the performance in progress, and camera/lighting issues have been seen as well, so the only surprise is how great it looks on the big screen.
Use of Stop-Motion in Visual Effects
Aside from creature effects, stop-motion was regularly used for supporting effects, such as enhancing motion-controlled miniatures where mechanization was not practical. Stop-motion has provided many stunt doubles over the years, such as the ubiquitous falling man, complete with flailing arms and legs.

Figure 3.76 Tim Hittle animates a crazed simian grabbing a motion control arm, tracked to a live actor’s arm movements in the background plate. (Image courtesy of Pete Kozachik, Monkeybone © 2001 Twentieth Century Fox. All rights reserved.)
On rare occasions, the tone of a film fits the stop-motion look, and it is called on to deliver creature effects in a live-action setting. Modern filmmakers expect greater interaction between actors and puppets and more freedom for camera movement. This has become more possible for stop-motion effects thanks to advances in motion control and motion tracking, not to mention the powerful new capabilities in compositing. If a director wants the look, it can be done with confidence.

Figure 3.77 Brian Demoskoff animates Corpse Bride’s wedding outfit, made with bendable wires sewed in. Animating cloth is a challenge in stop-motion as well as CG. Several shots used a CG wedding veil on the film. (Image courtesy of Pete Kozachik for Tim Burton’s Corpse Bride (2005). TIM BURTON’s CORPSE BRIDE © Patalex II Productions Limited. Licensed By: Warner Bros. Entertainment Inc. All rights reserved.)
Good Moves to Make at the Beginning of a Project
VFX Producers and Supervisors new to stop-motion are wise to bring in an experienced adviser and go over script or boards. Get that person’s take on how to maximize the use of stop-motion for the project’s particular circumstances. He or she might have simple suggestions that could save a lot of money, on set or in post. Stop-motion isn’t a minefield, but it can go smoother if someone on the team has already been there.
Similarly, supervisors can benefit by knowing why the director chose stop-motion as a technique; such an understanding will get the initial prep on the right track. The director may want enhancements such as motion blur added in post or may be seeking a period look, complete with sharp edges in motion.
Spend some time perusing this website: www.stopmotionanimation.com. It is hosted by an A-list stop-motion animator/animation supervisor and contains a comprehensive resource list.
WHAT ARE MINIATURES?
Matthew Gratzner
What Are Miniatures and Why Are They Used?
Miniature effects are one of the oldest visual effects techniques, dating back to the silent era. Miniatures, or models as they are sometimes referred to, are scaled replicas of the object they represent, designed and intricately detailed to photograph as a full-scale, real object. Miniatures have provided a practical solution to creating landscapes, cities, vehicles, and catastrophic events through a technique that is not only physically practical but can be financially beneficial as well.

Figure 3.78 A 1:24-scale period model of Grauman’s Chinese Theater and Hollywood Boulevard. (Image courtesy of New Deal Studios for THE AVIATOR (2005). THE AVIATOR © IMF International Medin Unfo Film Gmbh & Co3 Produktions Kg. Licensed By: Warner Bros. Entertainment Inc. All rights reserved.)
Though the explosion of digital effects has replaced the use of some miniature effects in today’s filmmaking, the combination of digital and miniature effects has made it far more practical in cost and in post-production manipulation. With the advances in digital technology, particularly regarding tracking and compositing, miniatures have become more easily integrated into sequences, truly blurring the lines between the old and new techniques, giving audiences a hyperreality in visual effects.
The Advantages and Disadvantages of Miniature Effects
The advantage of employing a miniature effect is that a physical object is fabricated and photographed. Therefore the texture, highlights, shadows, and focal length are all within the photography and do not need to be created artificially as with digital effects. When dealing with destruction action, physically destroying a model will be affected by real physics and unpredictable random actions and imperfections that subconsciously fool the eye into believing it is real. Essentially, if the miniature is detailed correctly and photographs as a full-scale object, most of the battle of making it convincingly real has been won. The remaining challenge is integrating it into the scene.

Figure 3.79 A 1:6-scale 360-degree church interior miniature and effects from End of Days. (Image courtesy of New Deal Studios, © 1999 Universal Studios Licensing, LLLP All rights reserved.)
Another advantage of miniature effects is cost. If a miniature is utilized in a number of shots, then the cost of the miniature’s design and fabrication can be amortized over each shot, making it far more cost effective to use. Also when dealing with high-speed events, multiple cameras are used to capture the moment, in essence giving the filmmaker multiple angles or multiple shots in one take.
As dynamic as miniature effects can be to lend a sense of realism to a shot, the technique has one major disadvantage. Unlike the incessant versioning of digital shots, committal is the true deciding factor as to whether to use a miniature to achieve a shot. Even though most miniature effects are achieved in post, long after the first unit has wrapped, the decisions on what to fabricate, how to shoot it, and how it will be integrated into a scene need to be determined well ahead of time. The construction schedules on some miniatures can be as much as 4 months, so a well-executed plan is crucial to a miniature effect sequence’s success.
In other words, once committed to a miniature, its scale, how its fabrication will be accomplished and how it is photographed, one is more or less committed to this technique. Certainly shots can and will be manipulated later, but the more a plan is adhered to, the greater success one will have using miniature effects.
Execution of Planning
Like any visual effects shot, a concise plan is the only key to success when dealing with sometimes hundreds of artists collaborating with the same goal. That plan should be in the form of storyboarding, followed by previs. In the storyboarding process, the director has the ability to very inexpensively commit his or her vision to paper. A VFX Supervisor should work with the director to determine how to achieve the shots and, at this point, depending on what’s needed, miniature effects can be determined. Once storyboards are locked, a previs can be developed.
In designing the miniatures that match existing objects or feature-approved art department designs, the miniatures can be developed in a CAD-based software, such as Rhino. As digital technology becomes more prevalent in film, art departments are transitioning from the traditional techniques of drafting their plans on velum by hand to designing their sets, vehicles, and props in the computer. This process creates a 3D digital model that can be used to generate dimensionally accurate blueprints for the physical construction. These digital files can be converted to object files and then imported into Maya, thus becoming the assets to generate the previs. Then, the previs can be utilized to drive the motion control camera rigs, therefore shooting exactly what has been created in the virtual environment (more on this subject later). Once the miniatures have been photographed, any precomps74 with the miniatures can be achieved using the previs as the guide, since the camera data should be the same.
The point is that from storyboarding to previs to miniature fabrication to shooting and finishing with post-production manipulation, creating a planning strategy that is a closed loop guarantees a consistent goal without the fear of deviation from the director’s original vision.
Design and Integration within the Film
Far too often 1st unit pre-production schedules are shortened, not providing the proper design time art departments need for the 1st unit, let alone visual effects. It is imperative to keep the continuity throughout the film between 1st unit production and the visual effects unit. If a miniature is being used as a set extension, consult with the production designer to maintain a seamless blend between the 1st unit and miniature designs. Obtain every blueprint, concept sketch, and any paint samples used for the design and construction of the film’s sets. If possible, go to the 1st unit photography and document the set with measurements and photographs. Photographs with a known scale object in each shot can help immensely since, even though an art department plan was generated, the final set construction could have changed or developed in a slightly different direction.
Photographic Continuity
One of the key reasons for a miniature effects shot standing out in a project is a difference in style in terms of how it was photographed. To keep the continuity of the film, meet with the director and DP and discuss their techniques for shooting the picture. If the film features an extensive amount of wildly moving cameras on cranes or cable rigs, then the miniature photography should mirror this look. In contrast, if a director favors more lock-offs and gentle camera moves, don’t shoot the miniatures with dizzying shots that will not cut in to the live action.
Miniature Categories
For ease of explanation, the following two categories break down the types of miniature effects used: static models and action models. The term static models refers to any miniature used as a set extension, a photographic element, or an in-camera background or foreground (i.e., forced perspective, hanging foreground miniature, or split scale). While there can be mechanized movement within the model, this category primarily refers to models that do not blow up or have any destruction effects designed into them. Static models tend to be models filmed with a single motion control camera rig or photographed as stills and used as textures to be applied to a computer-generated model. In this category the models also tend to be fabricated on a smaller scale since there is no reliance on any nonscalable elements (i.e., water, fire, smoke) to manipulate their actions.
The term action models refers to a miniature designed to be destroyed, that is, blown up via explosives or air mortars, crushed, or in general used for scaled physical effects and stunts. In this category the scales will be much larger and the photography is usually achieved with multiple high-speed cameras.
Scale Determinations
A miniature scale is the ratio of size compared to the full-sized object. As written, a 1:12 scale miniature is 12 times smaller than the actual object. In 1:12 scale, a person who is 6 feet tall is 6 inches because 6 feet 0 inches divided by 12 = 6 inches. In 1:12 scale, 1 foot equals 1 inch; 1:24 scale is 24 times smaller than the actual object. In 1:24 scale, a person who is 6 feet tall is 3 inches because 6 feet 0 inches divided by 24 = 3 inches. In 1:24 scale, 1 foot equals 0.5 inch.
When determining a scale it is always best to choose even numbers that break down the larger units of measurements into manageable increments; this makes the calculations easier. It also helps if the scale of the model is used within the field of architecture, therefore utilizing a three-sided architectural scale ruler for smaller measurements. Arbitrarily making up sizes for miniature scales (i.e., 1:13.5 scale) makes it more difficult for the fabrication and photography personnel.
Another consideration for determining a scale is choosing a scale that is commonly found in the hobby industry. This affords the use of prefabricated objects, from the simple vacuum-formed brick-patterned sheet to military vehicles and aircraft to beautifully detailed furniture. Common hobbyist scales are as follows:
• Dollhouse: 1:12
• Model train: G-gauge, 1:24; O-gauge, 1:48; HO-gauge, 1:87
• Militaria: 1:35
The determining factor for the scale at which to design a miniature effect is based primarily on sheer practicality. The driving factor in the fabrication of static models is how small it can be made without compromising detail and depth of field. Most importantly, can the lens physically fit within the area that needs to be photographed? The number one factor that gives away a model shot is poor depth of field, that is, are the foreground, midground, and background holding focus? In the early days of film, if objects within the shot or the camera required movement, prior to the advent of motion-controlled cameras that could shoot with longer exposures and faster film stocks and lenses, miniatures tended to feel “modelly.” It was not that the models were poorly made or detailed, it was just that the equipment to capture the image on film was not as advanced. So with today’s equipment, models can be constructed in much smaller scales and photographed at slower camera speeds. (Motion control photography is covered in more depth in the section titled Photography of Miniature Effects: Motion Control later in this chapter.)

Figure 3.80 A 1:24-scale house and yard model with intricate garbage details for Matthew Gratzner’s short film Huntin´ (2009). (Image courtesy of New Deal Studios.)
As for scale considerations for action miniatures, build them as physically large as possible to fit within the selected stage or location and within the allotted budget. The larger the scale, the better smoke, fire, and water look in an effects shot. Depending on the shot requirements, these could be physically real or digitally created elements layered in the compositing stage. There are trade-offs among interactivity, scale, and control when determining the use of practical versus CG. Sometimes it’s far easier to utilize a controlled destruction of miniatures with prescribed breaks and rehearsed mechanical actuation than dealing with the difficulty of dynamic CG simulations.

Figure 3.81 A 1:5-scale stylized city of Venice and canals for The League of Extraordinary Gentlemen (2003) from New Deal Studios. (Image courtesy of The League of Extraordinary Gentlemen © 2003 Twentieth Century Fox. All rights reserved.)
These physical elements cannot be scaled very easily, so through the use of a larger miniature and high-speed photography, the shot becomes more convincing. Just remember scaling is exponential. If the sequence requires an airplane hangar that is surrounded by a tarmac section to blow up, consider the entire size of both hangar and surrounding terrain. While it makes sense to build the hangar in 1:6 scale, meaning the miniature will be 12 × 16 feet, if the surrounding area is included, now the whole table-top including the hangar becomes 40 × 80 feet and may not fit within the stage/location parameters or, more importantly, may exceed the allotted budget. In this case, the scale chosen would need to be smaller and photographed at a higher frame rate. (High-speed photography is covered in more depth in Photography of Miniature Effects: High-Speed Photography in this chapter.)
As an example for the 2004 film The Aviator, a section of a Beverly Hills neighborhood was fabricated for a miniature plane crash sequence. Because of the high-speed nature of the shot, 1:4 scale was determined as the size that would provide a large enough miniature for the destruction action but would also be small enough to ship the models on trucks to the location where they were to be photographed. Each of the three neighborhood houses fabricated in 1:4 scale was approximately 20 feet long by 8 feet wide. These dimensions scaled up to full size would make each house 80 feet long by 32 feet wide. The layout with all of the houses, foliage, and dressing measured approximately 160 feet long by 60 feet wide. This may seem colossal in size, but relative to the actual size of the matched location, it was quite manageable. The layout’s size allowed access and the control needed to crash a 1:4 scale aircraft in the complex scene without compromising the space for camera rigs, lighting, or crew.

Figure 3.82 A 1:4-scale model of the Howard Hughes XF-11 plane crashing into a Beverly Hills neighborhood. (Image courtesy of New Deal Studios for The Aviator (2005). THE AVIATOR © IMF International Medin Unfo Film Gmbh & Co3 Produktions Kg. Licensed By: Warner Bros. Entertainment Inc. All rights reserved.)
With today’s advancements in digital technology, anything imagined can be created for a film. But are the images convincingly real? Though miniature effects may not be cutting edge in the current state of technology, that doesn’t mean that the technique should be cast aside as outdated and unusable. By combining old and new technology, these visual effects disciplines can give today’s audience images that won’t appear to look dated in 2 years. Remember, a miniature effect will look as real 10 years from now as the day it was photographed. Taking a photographic image and combining it with digital animation and compositing gives the filmmaker an arsenal of visual effects tools that keeps sequences and shots looking new but also stands up to the test of time.
FORCED PERSPECTIVE MINIATURES75
Dan Curry, ASC Associate Member
In-Camera Compositing of Miniatures with Full-Scale Live-Action Actors
Hanging or foreground miniatures have been a valuable method of creating production value since the earliest days of filmmaking. In-camera compositing makes the use of miniatures an attractive alternative when post-production compositing may not be possible. These techniques may be of special interest to any filmmakers working with extremely small budgets.
With the exception of 3D, photographed images are two dimensional. The camera, and the audience, cannot tell how far or near an object may actually be as there is no stereoscopic depth perception. The only clues are linear perspective, aerial perspective (caused by natural atmospheric density), and focus. Filmmakers can take advantage of this by placing a miniature within the frame to create the illusion that it is part of the full-scale world being photographed. There are many ingenious ways to incorporate live actors into foreground miniatures using platforms, ladders, and devices to cast shadows. Once the basic principles of photographing miniatures are understood, filmmakers can expand on them to suit their specific needs.
Some Advantages of Hanging Miniatures
• In-camera compositing eliminates compositing costs.
• One miniature can be photographed from many different angles and therefore used for different shots.
• Good miniature builders may be as easy to find as matte painters.
• When shot in daylight, light on the miniature will naturally match the light in the scene.
• Nodal pan/tilts can be utilized to achieve camera moves.
• When carefully aligned, people can be positioned inside or on the miniature.
Important Considerations When Photographing Hanging Miniatures
• Scout and shoot reference photos of the location in advance and prepare the miniature for specific location requirements.
• Establish adequate depth of field.
• Plan proper setup for accurate perspective and miniature stability.
• Make sure that light angles and cast shadows work with the illusion. A backlit structure that would naturally cast a shadow on the ground in front of it (which it cannot do unless the ground is built into the miniature set piece) will shatter the illusion of reality without a properly cast shadow. Key light should be forward of the miniature. When scouting locations note time of day for the best light angle.
• If actors are to appear inside or on the miniature, provisions must be made to cast shadows on them where needed to complete the illusion.
• Short focal length lenses offer the greatest depth of field.
• Aerial perspective (natural atmospheric density) can be simulated with diffusion sprayed onto a foreground glass in appropriate areas. Clear varnishes and dulling spray work well. In interior situations, judicious use of smoke can be an effective way to scale air density.
It is impossible to predict every situation that may arise, but the following examples may provide useful guidelines:

Figure 3.83 In this example actors approach a distant city or structure. (Image courtesy of Dan Curry and the American Society of Cinematographers.)
• If the actual height of the lens is 10 feet, the ground level on the miniature must be set below the lens an equal distance in scale. If the scale of the miniature is 1/2 inch = 1 foot, then the ground level on the miniature should be 5 inches below the lens.
• Depth of field must be determined (use any depth-of-field chart such as the one found in the ASC Manual) to carry focus to include the miniature and the appropriate area of the full scale environment. If the nearest point on the model is 4 feet from the camera with an 18mm lens (on a 35mm camera) an f-stop of 5.6 with focus set at 6 1/2 feet will carry focus from 3 feet 6 inches to infinity.
• Note that shadows can be a problem. It is generally wise to have the sun or key light behind the camera so that the shadow cast by the miniature falls away from camera where the viewer would not expect to see it on the ground, otherwise provision must be made to cast an appropriate shadow on the full scale environment.
• Foreground miniature ceilings can be useful on sound stages where lighting grids must be used to illuminate the set and there is no room for a practical ceiling.

Figure 3.84 Using a miniature as a foreground cutting piece. (Image courtesy of Dan Curry and the American Society of Cinematographers.)

Figure 3.85 Three-point perspective from a tall structure. (Image courtesy of Dan Curry and the American Society of Cinematographers.)

Figure 3.86 Using a hanging miniature as a ceiling extension. (Image courtesy of Dan Curry and the American Society of Cinematographers.)
Nodal Pans and Tilts
Pans and tilts are possible if the camera is mounted so that the pivot point is set at the nodal point of the lens. A simple way to confirm that the camera is properly mounted at the nodal point is to set two objects (C-stands, stakes, etc.) directly in line with one another in front of the camera. Try a test pan. If the foreground object appears to move in the opposite direction of the pan against the background reference object, then the camera is mounted in front of the nodal point; slide it back on the head until the two objects remain in alignment when the camera pans.
Forced Perspective
Situations may arise where forced perspective or constantly changing scales may provide the best solution to production needs. If this is the case, close coordination between director, director of photography, VFX Supervisor, production designer, and a highly skilled model maker is required, as there is no room for error if the illusion is to be successful.
Mixed Scales
To gain a greater illusion of distance, elements within a miniature scene can be built working from larger scale in the foreground to smaller scale the farther away objects are intended to appear.
THE FABRICATION OF MINIATURE EFFECTS
Brian Gernand
Methodologies and materials selected for miniatures are entirely based on the requirements of the specific shot or series of shots to be accomplished. For instance, the types of materials used to create a model that is going to be used in an action sequence (where miniatures blow up, burn, crash, or crumble) are going to be very different from a scene where miniatures will be photographed for a nonaction beauty or establishing shot.
Scale and Purpose Requirements of a Miniature
The first step is to identify the requirements for the miniature; that is, to define the action and uses for the model through script, previsualization, and discussions with creative leads. Next comes the conceptual phase, in which the scale and construction techniques are determined based on shot requirements. If the model is a static model to be photographed from a distance, the scale can be much smaller; a 1:48 scale or 1:96 scale could work. This allows for slightly less detail to be added to the miniature or miniature environment. It is also important to take into consideration stage space, ceiling heights, etc., when determining the best scale to use in a miniature scene. If the model is going to be photographed as a static model and the camera is going to be very close, the scale must be larger and the miniature will require more detail to give it a realistic look.
Frequently miniatures are selected as the visual effects technique when the model must perform action. This includes pyro models depicting vehicles or architectural models that need to blow up. Or the miniature may be a landscape that will experience a natural disaster such as a landslide or earthquake. It might also be some large architectural structure that collapses on camera. In all of these cases, the material requirements and the choices of materials are very different from a typical static miniature construction because the model needs to break apart or crumble in the proper scale and have the desired action, look, and feel of a realistic event.

Figure 3.87 VFX DP Pat Sweeney surveys a large-scale miniature in preparation for pyro destruction for Terminator Salvation (2009). (Image courtesy of Kerner FX and The Halcyon Company. All rights reserved.)
When models/miniatures are destroyed—crashed, blown up, crumbled, and broken apart in dramatic ways—they need to interact with their environment. Air, water, fire, and smoke are key elements that help sell realism in a miniature. Typically this action type of miniature is constructed at a much larger scale than a static model in order for the event to be believable. Common scales for action miniatures are 1:3, 1:4, and 1:6. Sometimes a smaller scale can be used; however, that increases the risk of destroying the reality by having an event where the fire, smoke, or debris is out of scale.

Figure 3.88 For Terminator Salvation’s (2009) climactic finale, this large-scale miniature was constructed using laser cut acrylic and glass. (Image courtesy of Lucasfilm Ltd. and The Halcyon Company. All rights reserved.)
Most of the reason for the expanded scale of these miniatures is that it is very difficult to control the scale of natural elements like fire, smoke, debris, and water. For instance, a drop of water is a drop of water and it is nearly impossible to change the scale of that element. If a miniature must interact with water, then it must be built at a large enough scale so the difference between the water and the miniature is not noticeably in conflict.
The choice of materials to construct a miniature is critical and depends on the scale chosen. The designer/artist must imagine how this model is going to act in its environment and choose materials carefully to give the miniature the desired look. For instance, if a building is going to be blowing up, constructing this model using conventional materials like plywood would not give the event a realistic look. In the design phase determining what the real object is made from is paramount; for example, if it is a building, is it concrete or wood? If it is an airplane, then most likely it is made from metal, but not always—and the type of metal and construction play a part as well. The ingenuity of the model crew comes into play at this point because designing and choosing the correct materials and constructing a large miniature will require a lot of creativity and vision to accomplish this task in order pull off shots that have a 100% believable look and scale.
Construction Materials
Frequently, the type of material used in model making is acrylic, which can be laser cut in a variety of thicknesses. Wood is another standard building material. Depending on the way the model is to be used, different types of wood in various thicknesses are selected in combination to obtain structural integrity—or carefully constructed with lack of integrity to achieve a weak point or breaking point in a model where it must come apart. Typical wood materials are plywood and particle board. However, there are no definite rules to what materials are used and sometimes materials as simple as cardboard can be used. All types of metals are often used and can be manipulated in many different ways. A favorite is brass etching, which will provide tremendous detail from a very thin brass sheet, and often helps with the detail of a fine scale model. Laser cutting is also an option to achieve a variety of different looks; however, a fairly powerful laser is required for this technique if metal is selected. The look of concrete can be done by using faux finishes in the paint stages of a miniature project. However, if the concrete must crumble, then often tinted plasters are used, enabling the model to crumble appropriately.
The material choices relate directly to how a model must specifically perform. A performing model can be anything from a crashing airplane, a burning building, or a miniature that will blow up. In all of these cases, the material choice is critical. For instance, in the case of the burning building, a nonpoisonous flammable material should be the obvious choice. For the crashing vehicle, oftentimes lead sheeting is used to give the event the realism of crushing metal.

Figure 3.89 Fire, smoke, and pyro interact with brick and wood building structure leading to dramatic collapse in Backdraft (1991). (Image courtesy of Lucasfilm Ltd. and Universal Studios Licensing, LLLP. All rights reserved.)
When pyrotechnics are involved and a miniature is being blown up, it is important to use materials that will react properly and have the appropriate scale. Some commonly used materials like glass, acrylic, or various thicknesses of ultrathin aluminum are often prescored so the materials break in a pre-designated area. The balance of materials is tricky. If the balance is too light, it will vaporize in the pyrotechnic event; if too strong, the model may not come apart properly or a scaled look will not be achieved. All of this must be balanced and depends on the size of the pyrotechnic event and the scale of the model.

Figure 3.90 Kerner model crew sculpted the Geonosian Arena out of high-density foam. (Star Wars: Episode II—Attack of the Clones™ & © 2002 Lucasfilm Ltd. All rights reserved. Used under authorization.)
Many models will have sculptural aspects (or multiple sculptural aspects) to accomplish the desired look of the miniature. In these cases, a sculpture can be created from clay or foam. The type of clay chosen depends on the detail level of the sculpture and ranges from very hard oil-based clay to super soft water-based clay. Foam is another favorite material for miniature builders and is also available in a variety of densities, which usually must be sealed.
The sculpture is then molded, oftentimes out of silicone or a hard-cased fiberglass. It is then cast by using a variety of resins or stone, depending on the look, size, and application of the model part or sculpture. If a miniature has a large quantity of repeating elements, then molding and casting can be a very efficient solution to creating the volume required to accomplish a highly detailed look or dense environment.
Vacuum forming is another tool in the production of miniatures. Vacuum forming is the process of pulling a heated sheet of plastic over a pattern and applying vacuum, thus forming the heated plastic to the shape of the created pattern. The pattern is usually made of wood, metal, various densities of polyurethane, or whatever material is appropriate to achieve the proper look from the pattern as long as the material is hard and will not collapse under the extreme vacuum pressure that will be applied. This technique is typically used to create multiples of any given shape when the requirements for the shape allow or require it to be hollow. This technique is very useful when a shape must be clear and cannot be flat, like the windshield of a car or airplane, or when weight is a factor or if sheets of a very specific texture are required.
The molding process is used to add small details, re-create beautiful sculptures, and mold large shapes like an airplane fuselage, wings, or even the whole airplane. In this case high-detail patterns are created, again using the appropriate materials. In the case of a large airplane construction, high-density urethane foam is a good choice for its ability to be shaped and sealed upon completion. These parts are then given to the mold maker, who will create a mold. The mold is then used to create a casting of the original part. In the case of a large airplane, this casting is usually done out of fiberglass or carbon fiber if weight and strength are a factor. These parts are then cleaned up and assembled.
At this point details are added and electronics are installed. If needed, this is the point where a high-strength metal armature to support the miniature and provide a mounting point is integrated. This mounting point enables the miniature to be mounted on whatever rig has been designed for it, from motion control to pneumatic special effect rigs, to motivate it to move at any speed required.
Mechanical devices are also frequently incorporated in the model build process. Typically, these mechanical devices are designed in CAD and then created in a machine shop, usually out of a variety of metals. They are typically designed to be a functioning mechanism. Oftentimes these functioning mechanisms are motivated through the use of pneumatics, hydraulics, or a servocontroller. A good example of functioning mechanics would be functioning landing gear for an airplane or possibly a vehicle that is required to transform in the middle of a shot.
Electronics are used in almost every miniature project whether they are used simply to add a few miniature streetlights, light dozens of architectural structures, power the rotor blades of a miniature helicopter, or assist in the transformation of a vehicle. For miniatures that require mechanical movement, this is achieved by using servos or compact electric motors. These servos and motors must contain the ability to be controlled so speed can be adjusted. This will enable any mechanical movement to move faster or slower depending on the camera’s frame rate or the desired look of the mechanical movement. For instance, if a miniature is being photographed using motion control, servos able to read electronic pulses are used so the motor moves extremely slowly in conjunction with a very slow frame rate, or in the case of photographing a miniature helicopter where the frame rate is overcranked, a high rpm motor would be used to enable the rotor blades to rotate much faster, achieving the proper scale rpm for the rotor blades.

Figure 3.91 Kerner model crew puts finishing touches using miniature lights to enhance ambient lighting within model. (Star Wars: Episode II—Attack of the Clones™ & © 2002 Lucasfilm Ltd. All rights reserved. Used under authorization.)
Miniature lights are frequently used to help the Director of Photography sneak some lighting into an area impossible to get to by conventional stage lights. Usually the type of lighting selected is dependent on how the model is to be photographed. For instance, when shooting at a higher frame rate, the miniature lights typically must be very bright and often need to be run at levels beyond their standard rating in order to achieve the proper light levels. This will cause the life of the bulb to be severely shortened, so these lights should be run at higher levels only when the camera is rolling or during exposure wedges. It is also important to design miniatures so the lights can easily be replaced on set in the event of a burnout. In most cases when miniature lights are used the DP will need to do exposure wedges to determine light levels and color temperature. In some cases a separate light pass will be required when the proper exposure for the miniature lights is different from the proper exposure for the beauty photography pass. Using miniature lighting and other types of electronics, including mechanical movement, provides depth, richness, and realism that help bring scale miniatures to life.

Figure 3.92 Kerner crew applying paint to enhance the aging process on this architectural structure for A.I. Artificial Intelligence (2001). (Image courtesy of Lucasfilm Ltd. All rights reserved. A.I. ARTIFICIAL INTELLIGENCE: © Warner Bros., a division of Time Warner Entertainment Company, L.P. and DreamWorks LLC. All rights reserved.)
The Paint Process
Along with all of the other processes required to get a miniature ready for shooting is the paint process. The paint process is an extremely important step in creating realistic scale miniatures. With regard to the sheen of the base coat, the specularity must be balanced. Too much shine and the kicks of light are going to give away the scale. Too dull, and a lifeless miniature may result. If reference photos are available they usually stand as an invaluable guide toward realistic representation.
Aging is the key to realism with miniatures. Almost every miniature, model or environment, will require the use of some age-enhancing techniques. A subtle layer of dirt or aging usually helps a model feel planted in its environment. For miniatures that require heavier aging or are representing a dirtier environment, it is important to keep in mind the scale of everything that is being applied. The drips must be in scale and have the right weight and feel for a naturalistic environment. For a vehicle model, all of the appropriate places on the vehicle should have some dirt and wear, as well as things like exhaust output. If there’s damage, the paint job may require tiny little bits of metal showing through. All of these types of treatments add up to make the miniature look real and totally believable.
The same is applicable for landscapes. All of the materials chosen to create a natural landscape environment must be carefully selected and based on the scale of the miniature. The larger the scale, the easier it will be to use natural materials. When working in smaller scales, great care must be taken when choosing materials. For instance, at a 1:96 scale natural sand cannot be used to represent sand; the grains of sand will be too big and give away the miniature, so a much finer material like ground walnut shells should be utilized to represent sand.
Previsualization and Miniatures
When building any type of model, previsualization is a handy tool. If previsualization is available, then the object can be brought in from Maya to AutoCAD and broken down into individual planes, allowing a model maker to choose laser cutting as a starting point for the general geometry of the model. This can work for both architectural or vehicular models and for any other compound three-dimensional shapes. As an example, when using AutoCAD and a laser cutter, a 3D object can be built by creating notched bulkheads strung together by stringers and ultimately clad in the material of choice, enabling the model maker to create a 3D object out of laser-cut 2D shapes.
The Basic Standard Tools
Not all miniature construction requires the use of high-tech equipment and tools such as a laser cutter. Much of the construction can be done in a traditional model shop, as long as the shop is equipped with a standard tool set like table saws, band saws, radial arm saws, router tables, sanders, and nail guns. Using just these standard tools, a skilled craftsman will be able to create many different types of miniatures and miniature environments.
THE INCORPORATION OF MECHANICAL, PRACTICAL, AND PYROTECHNIC EFFECTS WITH MINIATURES
Ian Hunter
Many miniature shots rely on the integration of mechanical, pyrotechnic, and practical effects for their success. These effects can take many forms such as flying, traveling along a road or track, collapsing, or exploding. Miniatures used like this differ from statically shot miniatures in that they perform an action and could be called action miniatures. The action that the miniature performs can be as important to the shot as the miniature itself, and therefore thought should be given to incorporating the mechanical or pyrotechnic effects into the miniature.
The miniature maker and the special effects technician should work together concurrently when building a miniature for an action effects shot. For instance, if a model of a truck or train is to travel down a road or track, then the method used to move the model down the track should be designed at the same time as the model itself. Provisions should be made in the model to accept a reinforced frame and mounting plate to allow the special effects crew to attach whatever motorizing system will be used to pull the model, such as a cable. Models that are to be flown should have a frame with mounting tabs for flying wires. The model maker and special effects technician should also work out the estimated weight and size of the model beforehand so that the effects technician can accurately size the flying trapeze, carrying wire, pull cables, etc.
Too often a model will be built without the input of the special effects department and the resulting miniature is either too heavy for the effects rig or too weakly constructed to survive the stresses put on it. Conversely, special effects rigging built without consideration of the miniature can often be oversized and not fit the miniature or be made too lightly and not have the strength to lift or pull the miniature. Since it is always easier to run a motorized system at less than full speed versus making a motor pull more than its rated load, it is advisable to design a drive system with greater pulling capacity than the projected miniature’s weight.

Figure 3.93 A 1:5-scale F35 fighter plane crash sequence for Live Free or Die Hard from New Deal Studios. (Image courtesy of Live Free or Die Hard © 2007 Twentieth Century Fox. All rights reserved.)
The effects rig should be built and tested with a matching sized and weighted stand-in or mule of the miniature so that speeds and actions can be practiced and refined before risking the detailed camera-ready miniature. Only after thorough testing should the picture miniature be mounted onto the effects system. This usually means that the miniature becomes dressing to cover the effects rigging. By rehearsing an effect before getting to the stage, the special effects crew is more likely to have a successful take in front of the camera, where shooting delays due to untested and unreliable special effects can become expensive quickly.
Water Effects
Miniatures that will be used with water effects such as water tanks or ships should obviously be made of waterproof materials or sealed with waterproof coatings. Also, water can exert a great deal of force on a miniature and its special effects rigging, so models used in water should be very strong. For sinking effects a way to evacuate air and flood in water should be built into the model. Don’t make a sinking model out of a material that is naturally buoyant, because even more powerful winches or pull-down rigging will be needed to overcome the model’s tendency to float. Pick points should be attached to the miniature’s frame to allow the mounting of line or cables to hoist the miniature back up after a take is completed.

Figure 3.94 A 1:4-scale ice waterfall action sequence for The Chronicles of Narnia: The Lion, The Witch and The Wardrobe (2005). (Image courtesy of New Deal Studios © 2005 Disney Enterprises, Inc. and Walden Media, LLC. All rights reserved.)
Fire, Explosives, and Collapsing
Miniatures that will be used with fire or explosives have their own special considerations. If a model is going to sustain a long fire or burn, then fire-retardant materials or coatings should be used on the miniature to allow it a fighting chance of surviving more than one take. On the other hand, if the intent is to have the flames consume the miniature, then the model should be constructed out of flammable materials. Pyro sources such as copper flame bars can be built into the model during its construction. Materials that could give off noxious fumes should be avoided for a model exposed to flame.
For models used in collapsing or exploding shots, the material used to make the model and its framing should be weakened so that minimal amounts of explosive will be needed to destroy the miniature. Balsa wood is a good example of a relatively weak yet safe material from which to build breakaway miniatures. Often safer air cannons and pneumatic pull cables can be used to supplement the actual explosives, further keeping the pyro materials to a minimum. Weak knees, weighted pull cables, etc., that can be triggered from a timing box should be used to motivate the action and direction a model will take in an effects shot. The primary use of pyrotechnics should be to provide a spectacular filmable flame coming from the miniature, with some form of mechanical effect actually being used to bring down the model.

Figure 3.95 A 1:8-scale collapsing federal building for The X-Files: Fight the Future from New Deal Studios. (Image courtesy of The X-Files: Fight The Future © 1998 Twentieth Century Fox. All rights reserved.)
Shooting Locations and Conditions
The shooting location and conditions the miniature will be shot in need to be examined. If installation of a miniature at a location involves mounting of the frame to the building’s foundation with bolts or screws, then permission to alter and later repair the site needs to be asked and given. Room to carry the miniature and special effects crew and their equipment should also be allowed for. Space will always fill up with every department’s gear, so designating the proper space for the miniature and the location of the cameras at the proper distance should be established from the beginning. Remember, miniatures are like actors and sets in that they are the items that are photographed. Everything else is there to support achieving the shot through the use of the miniature.
Often measurements can be made of the potential location and a simplified digital model can be made along with digital models of the miniatures, cameras, cranes, etc., in volume to verify that everything will fit. Don’t forget the third dimension, height, such that one only scales the floor and finds that the stage is not tall enough to get the required camera angle. If a miniature cannot be built adjacent to its shooting location and must be transported there, then the model department will need to know the maximum size any component of the miniature can be built to in order to transport it to location by truck. While the term miniature suggests a small, table-top item, action miniatures used in film are often 1:4, 1:3, or even 1:2 the size of the real objects and sets and can in reality be quite large.
When using miniatures for an action sequence, it is important to clearly define the effect that the miniature will perform and to build it and its integral practical effects with the common goal of accomplishing the action asked of it. The VFX Supervisor, model makers, effects technicians, and pyrotechnicians should work together to define and achieve this common goal.
PHOTOGRAPHY OF MINIATURE EFFECTS: MOTION CONTROL
Matthew Gratzner
What Is Motion Control and What Are Its Benefits to Miniature Photography?
Shooting a miniature with motion control equipment (moco for short) involves the use of a computer-controlled camera system. Motion control is a technology in which all axes of the camera and rig are controlled by a series of stepper or servo motors driven via computer using preprogrammed commands. This allows the camera moves to be precisely repeatable, which in turn allows for any number of identical camera passes.
The motion control process allows individual elements to be photographed with an identical, registered camera move. The separately photographed elements can then be composited, with each element locked together in the same camera move, without misalignment or sliding. Typical passes include a beauty light pass, practical light pass, rim light pass, fill light pass, focus pass, smoke pass, and matte pass. Each pass is photographed featuring only certain lighting or conditions that are set. Since these passes are exposed on the film separately, they can be dialed up or down within the composite. A smoke pass is a photographic pass in which the model is shot in a water-based atomized “smoke” that gives the model a level of atmosphere. This pass, when composited with a beauty light pass, can give the sense of atmospheric distance and depth in a shot.

Figure 3.96 A 1:4-scale replication of a hallway at the Louvre Museum into which computergenerated characters were composited. (Image courtesy of New Deal Studios for Looney Tunes Back in Action (2003). LOONEY TUNES BACK IN ACTION © Lonely Film Productions GmbH & Co. KG Licensed By: Warner Bros. Entertainment Inc. All rights reserved.)
The concept of shooting individual elements was used as early as 1914, but the camera and dolly movement was achieved not with a computer, but manually, with the aid of reference marks and precise timing. The recording and playback of camera moves has developed from the analog technology of vinyl records in the 1940s, to magnetic tape in the early 1970s, to digital technology in the mid-1970s, developed for the film Star Wars (1977) by John Dykstra and his team. Some of these early digital systems used strictly electronics, which were later replaced with computer-based systems.
Other pioneers in the use of motion control photography, particularly in motion graphics-prominent television commercials, were Robert Abel and Con Pedersen of Robert Abel & Associates. These motion control systems were adapted from systems that Con Pedersen, Douglas Trumbull, and his team developed for 2001: A Space Odyssey (1968). Commercials featuring elaborate motion graphics sequences benefited greatly from the ability to shoot separate elements with the use of these motion control systems capable of repeatable camera moves.
Today motion control camera systems are computer driven, but physical camera moves can be created in a computergenerated previsualization or previs, using a virtual camera. This method, if properly planned, has the advantage of allowing the shot to be designed before the miniatures are fabricated and working out any photography issues well before the stage is rented and the camera equipment is ordered.
But the main advantage in shooting miniatures using motion control is the ability to control exposure and increase the depth of field. Depth of field is the one make-or-break factor in shooting miniatures. Motion-controlled photography enables the shutter to be opened and closed at a preprogrammed rate, synced to the camera move. This, combined with a stopped-down aperture, can, depending on how long each frame is exposed, provide an almost infinite depth of field—thereby emulating the exposure and associated depth of field that would be associated when filming a full-size real event.

Figure 3.97 A 1:6-scale bomb bay and bomb launcher from Broken Arrow from New Deal Studios. (Image courtesy of Broken Arrow © 1996 Twentieth Century Fox. All rights reserved.)
Another great feature with motion control photography is the ability to photograph fly-through shots that when played back, travel at an extremely high rate. Because the shutter speed and exposure are synced to the camera movement, a miniature can be photographed at a very slow speed, say 2 fps, with the programmed move negotiating the lens in and around tight spaces. This slower speed allows the system to be free of the physical speed limits of the equipment. When this footage is played back at 24 fps, the camera move is 12 times faster than as photographed, giving the illusion that the camera is racing through the scene. Shooting at slower frame rates also enables the DP to use less light since the exposures are much longer. Each pass can be shot at a different speed and exposure depending on the needs of the shot.
The disadvantage to shooting at slower frame rates is that the model makers, grips, and technicians need to be extremely careful during the photography not to bump the miniature or have any component within the miniature move or be affected by wind. This movement, when played back, will be exaggerated and could possibly ruin the shot because it is being photographed at a very slow rate. It is also very important not to displace or adjust the model between photographic passes; this action will cause misalignment of the objects being photographed and result in errors that will have to be fixed at the subsequent compositing stage in post.
Execution and Technique Using Previs
When planning a visual effects shot using miniatures, it is always best, if possible, to have the previs approved and locked before commencing any fabrication or production. The previs can be used to determine miniature scale, live-action components, digital characters and elements, and most importantly, the feasibility of a camera move. When prevising a motion control camera move, it is advisable to create the camera and rig as a 3D model within the previs. The model should accurately represent all of the dimensions of both the camera and rig and especially all of the pivot and movement points that enable pan, tilt, roll, dolly, etc. The virtual camera should be linked to the 3D model of the camera and rig, with all of the camera’s movements slaved to the CG rig itself. Also, setting the previs in a computer-modeled stage or location space will help in the practical design of a shot. This simple step can help alleviate camera clearance issues. Far too often a beautifully designed camera move is created in a pre-vis only to find out that the camera move starts with the camera traveling through the ground plane of the miniature set and concluding in a dramatic move exiting through the quite immovable wall of a skyscraper miniature. (Previs is discussed in depth in Chapter 2.)
Photography
One of the dynamic aspects of motion control photography is the ability to shoot full-scale, live-action elements and then rescale the camera move to a corresponding scale that represents a miniature set that could be integrated into the shot in post. Essentially, one is creating the exact camera move that was created for full-scale photography but scaled for a miniature set. With both live-action and miniature elements photographed with the same camera move, the two components should assemble in the compositing stage relatively seamlessly.
If motion control is not an option during principal photography, then motion control data can be derived from digitally tracking the principal photography in post. This post-tracked data can be generated with the use of 3D tracking software programs such as Boujou, Syntheyes, or Maya Live or as a 2D track with Nuke, Moca, or Shake. But again, data acquisition of the 1st unit photography is crucial to the success of creating an accurate digital track of the camera move in post. While tracking software can estimate a focal length of a lens and distance to a subject, the more accurate the information from the 1st unit utilized in the posttracking, the easier it is to line up the elements in the composite.
When photographing any miniature or element to be combined with a live-action image, if possible, always use the same focal length of lens with which the live action was shot. If the live action was shot with a 21mm lens, shoot the model with a 21mm lens. The same goes for camera angle. If the live-action camera had a 15-degree tilt-up, the miniature shot should have the same 15-degree tilt-up. Lenses and angles are not to be scaled in miniature photography. In contrast, camera distance from the subject and speed do need to be scaled. (See the discussion of scale determinations in the What Are Miniatures? section for how to scale an object.) As for film stock, again, if possible, use the same stock that was used in the 1st unit photography. This is one of the necessities for comprehensive data acquisition during live-action production photography.
Because models photographed with motion control tend to be of a smaller scale, lens configuration is the first task at hand in production. If the set features a large number of shots tightly framed in and around the miniature, a periscope lens76 will probably be needed. The advantage of using a periscope lens is the ability to get the lens into a small area without having to deal with the mass of the camera body or camera head colliding with the surrounding miniature. This configuration of lens is ideal for shooting fly-throughs of elaborate table-top models that need to travel though a confined space. This lens can also be configured into a straight shooter or probe lens by removing the 90-degree bend and mounting the lens directly to the tube. For keyhole shots where the camera needs to pass through a relatively small opening this lens can be ideal. The disadvantage of a periscope lens is that because the photographed image is being reflected by mirrors and lenses over a distance in a tube, a loss of a couple of stops can be expected. This needs to be considered when lighting and for length of exposure. Also with some periscope lenses, because the mirror is used to reflect the image back to the film plane, the filmed image might need to be flopped in post.
Motion control photography can take advantage of the preplanning of a shot developed though previs or with the use of tracking software by tracking an existing shot, thus expanding the scene by photographing miniatures with a matched move. Motion control gives the filmmaker the freedom to use extremely small-scale miniatures shot in various lighting conditions and environments. Essentially, motion control photography bridges the gap between practical photography and the digital world, allowing the filmmaker to craft scenes seamlessly with the regimented nature of production but with the control and flexibility of post.

Figure 3.98 A 1:4-scale XF-11 complete with contra-rotating propellers and puppet of Leonardo DiCaprio as Howard Hughes. (Image courtesy of New Deal Studios for The Aviator (2005). THE AVIATOR © IMF International Medin Unfo Film Gmbh & Co3 Produktions Kg. Licensed By: Warner Bros. Entertainment Inc. All rights reserved.)
PHOTOGRAPHY OF MINIATURE EFFECTS: HIGH-SPEED PHOTOGRAPHY
Ian Hunter
Oftentimes a film will require an effect to be photographed, but doing the effect full size can become costly and logistically difficult. An alternative is to carry out the effect using a miniature shot at high speed. High speed denotes any frame rate at which a camera will run that is greater than the base speed of the camera for the venue being used. For this section 35mm film rates of 24 fps are considered standard. But if one is shooting for a television commercial, then that medium’s base frame rate should be used (29.97 fps, which can be rounded up to 30 fps for miniature photography). The primary reason for shooting miniatures at higher frame rates is to slow the miniature’s action down when the film is projected back at its normal frame rate. A miniature is proportionally smaller than its full-size brother—but because gravity is a constant, the action of the miniature at a normal frame rate gives away its apparent size. Therefore, to cinematically increase the apparent screen time it takes for the motion of the miniature and any debris the action might create, the miniature is filmed at a proportionally higher frame rate. The film is then projected back at its normal rate and the slower action is revealed.

Figure 3.99 Collapsing 1:5-scale Warner Bros. water tower. (Image courtesy of New Deal Studios for Looney Tunes Back in Action (2003). LOONEY TUNES BACK IN ACTION © Lonely Film Productions GmbH & Co. KG Licensed By: Warner Bros. Entertainment Inc. All rights reserved.)
Following is the formula to determine the proper frame rate to the scale being used:
(√m) × (r) = f
m = Miniature’s scale
r = Base frame rate
f = New frame rate
1:4 scale at 24 fps = (√4) × (24) = (2) × (24) = 48 fps
High-speed frame rates for miniature effects will vary depending mainly on scale. The basic formula for estimating a frame rate to account for adjusting the apparent speed of objects affected by gravity (things falling) is to take the square root of the miniature’s scale (m) and multiply it by the base frame rate (r). An example would be a 1:4 scale model truck falling off a cliff. The square root of the scale factor 4 is 2. Multiply by the base frame rate for film (24) = 2 × 24 = 48 frames per second. As expected, the smaller the scale, the greater the frame rate: 1:5 scale square root = 2.23 × 24 = 53.66 fps, 1:8 scale square root = 2.82 × 24 = 67.88 fps, and so forth. In practice, the frame rate can be rounded up to the nearest even number.
Following is the formula to determine the proper actual speed of a scale object at a scaled frame rate:
(rs/m) = (b)
(b) × (r) = (as)
36 mph × 1:6 scale car = 8.8 feet per second
8.8 feet per second × 2.5 normal frame rate = 22 feet per second
When estimating the traveling speed of an object, such as a car or train in miniature, divide the real sized object’s speed (rs) by the model’s scale factor (m) to get the base speed (b). Then multiply that base speed (b) by the increase in frame rate factor (r) to get the actual speed (as) of the object while filming. For instance, a 1:6 scale car traveling a simulated 36 mph should travel 8.8 feet per second at 24 fps, but should be photographed at 60 fps or 2.5 times normal speed, meaning 8.8 feet per second (real-time scale distance) × 2.5 (frame rate factor over normal) = 22 feet per second real time. It is surprising how often that “22 feet per second” travel rate for miniatures will come up regardless of scale and frame rate.
Shooting high speed requires a camera that can record the event at the proper frame rate. Older Fries Mitchell 35mm cameras can get up to 120 fps and have the advantage of pin-registered camera movement for a stable image. While a stable image was vital during the optical/photochemical period of film compositing, stabilizing software can now be used to take out unwanted movement. The Arri 435, which is capable of 150 fps, is another commonly used high-speed camera. For ultrahigh speeds, in the 200- to 360-fps plus range, Photosonics cameras can be used. Newer digital cameras also have the ability to shoot high speed but with the downside of the image being created at less than maximum resolution depending on the frame rate (the higher the frame rate, the less resolution per frame).
Depth of Field
A major consideration to make while shooting miniatures is that in order to create sufficient depth of field and keep the majority of the miniature in focus, the camera needs to be stopped down. Therefore, the lighting on a high-speed miniature set will need to be increased due to the shorter exposure times. The higher the frame rate and the smaller the stop, the greater the amount of light needed. Typically each time the frame rate goes up by a factor of 1 (two times base frame rate, three times base frame rate, etc.), the amount of light needs to go up a stop from the normal exposure. Adding tremendous amounts of light to compensate for frame rate and stop can put a great amount of heat onto a model and its setting, which over anything but a short period of time can cause damage through melting or warping of the miniature. The shooting lights should only be brought up to full power just before rolling the camera and turned off when the take is completed to avoid damaging the miniature.

Figure 3.100 Freeze-frame diorama of a battle built in 1:11 scale for the Halo 3 “Believe” campaign. (Image courtesy of New Deal Studios.)
Pyrotechnics
The square of the scale times base frame rate equation should only be considered a starting point to determine shooting speed (but it’s a good one). Pyrotechnics can have a major influence on frame rate. Pyrotechnic explosions in miniature happen over a much shorter time than their full-size counterparts. Shot at the base high-speed frame rate for gravity may make the explosion appear to happen too quickly, so the frame rate can be increased to compensate or the pyro can be timed with an electronic timing box so that the apparent explosion can be sustained using multiple explosions overlapping to appear continuous. If the explosion cannot be stretched out, then the main components of a miniature that will be falling may need to be accelerated faster than gravity to pull the miniature down at a speed that balances out the higher frame rate set by the pyro. This could be considered the application of “forced gravity.” Pneumatic pistons attached to cables can be used to pull down the model. Another method is to attach the model to cables that are in turn attached to weights on a trip release. The dropped weights are run through pulleys with a mechanical advantage (2:1 or more). The dropped weights pull the cable that the model is attached to faster than gravity would and force the miniature down at a rate faster than gravity.
Smoke, Fire, and Water
Often a high-speed miniature shot will require some physical element to interact with the miniature. The most typical elements are smoke, fire, and water, with smoke generally being the easiest to make look scale, followed by fire and then water. Fire flickers at a rate that when reduced to a scale makes it appear that the size of flame flicker is not fast enough and the size of the flames edges are overscale. This makes flames look too big on a model. Flames that are used in a sustained burn need to be executed in a bigger scale. Flames that are being pushed around by explosions or the movement of the model can be done in a smaller scale if needed. Building and shooting the model in as large a scale as possible will help this problem.
As the scale of the miniature decreases, a way to increase the flicker rate of the flame must be added. Blowing on the flames with locally placed compressed air jets or using a high-airflow fan or air mover blown against the flame will help break up the flame to make it look more scale. The main point is to agitate the flames using some external method to increase the flame’s flicker rate. Too fast a camera speed can have the reverse effect and make the flames move too slow, which makes the shot cry out “effects”! So while shooting flames, frame rate tests should be done to determine the proper shooting speed. Fire creates smoke, so unless the smoke is desired within the shot, the lighting should be flagged to avoid lighting up the smoke. An off-camera fan can be directed at the smoke and away from the camera to help dissipate the smoke.
Water is even harder to deal with when shooting in miniature. The main issue is that the surface tension of water makes the droplets appear out of scale and therefore as large a scale miniature as possible should be used. Standing or flowing water shot as an element should be built in as large a scale as possible also. Water being agitated through wind, rocking, or an explosion can mean a slightly smaller scale. If the water element will fill a large part of the frame, then a scale no less than 1:4 should be used (if not larger.)
Blowing water with compressed air, shooting water out of a high-speed washer nozzle, and hitting the water on the edges with an external fan helps break up the droplet size and therefore increase the apparent scale size. Shooting water at pressure through a fire hose with a fine-mesh grating will help break up the water droplet size. Large bodies of water that are agitated also can create foaming within the water, which has a telltale white look to its edges. To help add this subtle look to a miniature, add diatomaceous earth or 2% white milk to the water, which will increase its translucency. Food coloring can also be added to the water to increase apparent depth. Using agitation and foaming agents will allow the use of scales slightly smaller than 1:4 scale.
Smoke and other elements such as dust and debris can be integrated within the shot or shot separately and composited into a shot. Elements such as these can be shot at high speed and added to otherwise static matte paintings to impart some life to the shot. Smoke is usually shot against black screen to make pulling the element easier for the compositor. However, some elements such as dirt or dust have color and are better shot against blue or green screen.
Smoke can often be shot at a smaller scale if being added to a shot as long as the frame rate is sufficient to slow the smoke’s motion. Smoke should be shot inside if possible where the air current can be controlled, because even a light breeze will break up a smoke plume. A light amount of fanned air can be directed over the top of a smoke plume to break up or redirect the smoke for the shot. Black smoke can be problematic, because it is illegal in most places for environmental reasons. Consider shooting white smoke and reversing the lighting direction and then process the smoke as a negative to get the dark smoke. Talcum powder, Fuller’s earth, and decomposed granite can be shot out of air cannons or blown with air jets against black to create swirling dust effects or impact hits.
At times it is appropriate to shoot an effect using a highspeed miniature. This method utilizes real objects reacting to real physics. It can convey mass and scale at a smaller size. This allows complicated action effects to be performed in a controlled situation for reduced costs.
THE USE OF MINIATURES IN THE DIGITAL WORLD
Ian Hunter
Though the ease and availability of digital animation and compositing have enabled filmmakers to create credible renderings of impossible effects constrained only by the limits of the imagination, there are still times when, due to the nature of the desired effect, a traditional effects technique like the use of miniatures is still the best way to achieve impossible shots that look convincingly real. Even though great advances in computer-generated renderings are occurring on an almost regular basis, they still require a great commitment of time, talent, and expense to create a fully digitally rendered object or environment with an end result that often lacks substance or some ineffable quality that makes it seem less than real. Sometimes, for this reason alone, a practical model or miniature provides an easier path to tricking the brain into believing that something is really there—because subconsciously, the brain knows it really is there.

Figure 3.101 The 1:3-scale “tumbler” Batmobile and 1:3 scale Lower Wacker Drive for The Dark Knight (2008). (Image courtesy of New Deal Studios. THE DARK KNIGHT © Warner Bros. Entertainment Inc. All rights reserved.)
The archetypal situation that would suggest the use of miniatures would be a shot or sequence where real-world physics can be relied on to achieve the effect more convincingly and with less effort than computer-generated physics simulators. Quoting Terry Gilliam, “The behavior of real physical interactions is much more unpredictable than computer-generated action, and we seem to empathize with it subconsciously.”77 Simply put, if an effect requires interactive destruction through collapse, explosion, implosion, fire, flood, or other calamity and is too expensive or impractical to achieve full scale, then miniatures are the obvious next best solution. By necessity such miniatures are usually larger in scale than miniatures or models that are not going to be destroyed or interact with destruction. Most destructive miniature effects will fall somewhere between 1:8 scale to 1:2 scale but larger is almost always better. Many factors determine the ideal scale for an effect including distance to lens, size of effect, material being affected, and cost.
There are other times where the emotional impact of a cinematic moment relies on absolute acceptance of the reality of an image on screen that must be delivered as a visual effect—for whatever reason. The technology certainly exists to deliver impressive simulations of real-world geology, architecture, and natural phenomena, but again, it is sometimes more cost effective and easy for the viewer to accept the visual truth if the thing is built, lit, and photographed using the same real-world techniques as the film into which the effect is going. When speaking about a large-scale digital visual effect Gilliam went on to say, “It’s very impressive, but it doesn’t resonate. I think somehow, subconsciously we can see it even if we can’t see it.”78 And that reflects a common belief among practitioners. The surface textures of miniature buildings, vehicles, landscapes, and even alien planets and spaceships have a certain magic about their physical reality that would need to be painstakingly added when fully realized in the computer. And these types of miniatures—the towering cliff, the bombed-out city, the snow-covered town, or the perfect lighthouse at dawn—can often be achieved in a very small scale without sacrificing verisimilitude.

Figure 3.102 A 1:48-scale church and snow-covered landscape, shot against a blue Los Angeles sky from New Deal Studios. (DECK THE HALLS © 2006 Twentieth Century Fox Film Corporation and Regency Entertainment (USA), Inc. in the U.S. only. © 2006 Twentieth Century Fox Film Corporation and Monarchy Enterprises, S.a.r.l. in all other territories. All rights reserved.)
Scales from 1:12 down to 1:48 are common and can result in the most startling and emotionally powerful visual effects.
Often the call to build and shoot miniatures comes from the digital artists themselves. They, more than anyone, know how critical credible imagery is to creating a believable visual effect. As digital technology has evolved, much more can be done using much less. A puff of dust against a blue screen photographed practically can help create a convincing hoofprint from a digital Centaur. A miniature frozen waterfall, even in a very small scale, looks real compared to a fully digital version because humans have an ingrained ability to recognize the subtle infinite cues that distinguish between when something is actually there and when it’s made up of pixels.
As digital compositing has become so advanced, it is a fairly easy task to integrate miniatures into live-action photography. High-resolution still photographs can be taken of miniatures and used to texture computer-generated 3D objects to give digital shapes and forms some of the richness and physicality of miniatures. Even when digital artists are generating the majority of elements in a scene, select real-world objects and/or subjects photographed in a real-world setting can generate live-action elements that can then be composited with the digital elements to create a more convincing image.
Another advantage of using miniatures in visual effects is revealed by the use of 2D and 3D programs such as AutoCAD and Rhino. These applications allow the resulting digital object to be used not only to generate construction drawings, but also as a digital model that can be transferred into digital applications such as Maya for CG production. With today’s shortened production schedules, this sharing of assets is increasingly valuable. Thus, in a shot where a fighter plane crashes, it can be a miniature, but in the shots where it is chasing another fighter plane, it can be a CG model. Texture reference from the miniature can be used to enhance the look of the digital model so it appears to be an exact match of the miniature. This has immense value in terms of time, money, and look.
Miniatures do not lend themselves to last minute changes or reversioning the way digital effects might. To commit to the use of a miniature, certain decisions about design need to be locked up ahead of time. Using previsualization to aid in this task allows miniature sequences to be conceived, manipulated, fully explored, and designed before a single piece of wood, foam, or metal is cut or shaped.
The best visual effects use a combination of all available techniques. One recent real-world example, The Good Shepherd (2006), involved a flyover of a burned-out 1940s Berlin neighborhood lining up to a shot of extras in a street setting. Drawings and photographs of the set along with reference images of the real postwar Berlin were used to design the destroyed setting. Built in Rhino, the 3D model buildings were transferred into Maya and used to animate the flyover. The resulting previs animation was used as a guide to determine which sections would be full size, which would be miniature, and which would be matte paintings. To construct the models, laser-cut details and wax-printed patterns were combined with handmade parts. To ensure that the head end of the shot (the miniature) lined up with the tail end of the shot (a camera crane over the set), the moving miniature photography needed to match up with the moving live-action plate. The shot was scanned and tracked with a 3D program and a camera move was derived from the live-action shot. This move was then used to drive a motion control camera that photographed the miniature. Scaling the move to film the model with the same move allowed the combination of miniature and live-action settings to integrate into a single sweeping dramatic shot, perfectly matching the director’s vision.
The decision to use miniatures is sometimes a matter of taste and cost. If a director decides at the last minute that a cliff needs to be not 50 feet but 100 feet tall, the digital model can more easily accommodate the requested change. But if molds, castings, sculptured foam, and surface detail need to be doubled in size after the physical construction of a miniature has already begun, the cost and time required to accommodate the requested change may be catastrophic. But if there is a shot where a historical character has a life-altering small plane crash, it might be important that the crash seemed real. The use of a miniature may be appropriate here. On the other hand, if there is a shot where giant robots crush vehicles as they fight each other in the streets, the use of digital models or a hybrid of both might be more appropriate.
Finally, it’s important to remember that the richness of detail provided by miniatures is somewhat diminished if the intended viewing platform is smaller than a theater screen. The bigger a miniature effect is projected, the better it looks. Depending on the nature of the visual effect in question, miniatures can often be the most reliable, affordable, spectacular technique.
SPECIAL EFFECTS FOR MINIATURES
Clark James
Shrinking Reality
Scripts often call for sets, props, and characters to be destroyed in some spectacular manner that serves the excitement level of the story. Events such as downing a building, exploding a planet, flooding a town, sinking an ocean liner, triggering an avalanche, and so many other imaginative events can often be created in miniature for less expense and more photographic control than if it were accomplished on a full-scale set or with digital effects. Creating these effects full scale on location can be prohibitively large or expensive, extremely unsafe, or not permitted at a particular location. Alternatively, creating these moments digitally can be a time-consuming and expensive challenge that yields less directorial control and unconvincing physics.
Creating the special effects in miniature reduces the size of the event and makes it more manageable and cost efficient. Simply slowing down the playback speed (overcranking79 while shooting) can take advantage of the true physics associated with the event, making it appear larger in scale. Part of the secret is to find that magic ratio between the full-scale and miniature-scale shooting speeds. Camera shoot speeds and scaling are not exactly proportional. In other words, shooting a 1:4 scale set and event doesn’t necessarily mean it needs to be shot at 96 fps (24 fps × 4) to look real. There is a middle ground that provides a more realistic appearance. Finding that middle ground is a matter of testing, experience, and style. (Please consult the other sections on miniatures in this chapter for more details and formulas on this subject.)
This section examines the choices for miniature special effects, the scales and construction methods, and the camera settings used in popular movies and sequences, providing examples of what’s been accomplished in the past in order to offer some guidance on how to develop new effects for films to come. Meanwhile, remember that there are always new methods to be developed, and new materials that can be included in future miniature special effects. A creative shortcut can be worth tens to hundreds of thousands of dollars to a project. Be inventive and remain open to new possibilities.
And a final and important reminder: Although the scale is smaller, miniature effects can be just as dangerous as full-scale effects. Do not become complacent just because it’s smaller. The technologies often use the same high-energy devices: hydraulics, bungee rigs, explosives, high-velocity wind, rushing water, falling objects, etc.
Safety First
Maintaining safety must be a priority. Use only trained professionals to operate dangerous and specialized effects.
As with full-size effects, foster an atmosphere of vigilance toward safe practices and always watch for ways to improve that safety. One can never know how many injuries, or lives, will be spared by this thoroughness, but it’s much better than knowing for sure how many were not. Slow down; think.
Scale Considerations
Determining scale can be a process unto itself. Many factors play into the choice. One-third to 1:20 scale or so is a favored range when realistic action and close visual detail are needed. Downward toward 1:200 scale or even smaller is acceptable for static background elements where close-up detail isn’t as important.
Determining the best scale for a miniature that will optimize the look requires some familiarity with the limitations of various elements to be miniaturized such as water and fire. Many factors figure into the decision of scaling: camera distance, lighting, shot lengths, visual effects, etc.
Some miniatures work well at 1:200 scale. Some require the detail found in 1:4 scale models or larger. Still others might be optimized somewhere in between. There are no hard-set rules, but various processes have been used to help choose the optimal scale. One of them is to build and test shoot a mock-up of the planned miniature effect, even if it’s shot on video. Testing leads to knowledge, improvement, and greater reliability of the event. Don’t be shy about conducting tests. It can help prevent headaches and delays down the road.
Scales can also be combined. It works fine to have a 1:4 scale foreground object in front of a much smaller scale background—a spaceship flying over a town, for example. They can also be connected and blended together. A forest can be 1:3 scale in the foreground and gradually taper into 1:12 scale or smaller in the background. To aid the illusion of depth, the background surface should ramp slightly upward to raise the apparent horizon line, making it appear farther away. This is known as forced perspective. Cut-outs are a great way to camera test these kinds of layouts. Likewise multiple scales can be digitally composited together. If a camera move is included, it might need to be accomplished with motion control; then camera moves for each scale must be proportional to one another to create the proper parallax effect.
Camera
The camera itself has requirements that will help determine the scale that is appropriate to the effect. Here are some questions that will help determine the scale:
• Will the camera fit in the set?
• Can it move as needed?
• Can the focal depth be increased and appropriate lighting be incorporated to accomplish this focal stretch?
• Can the camera move scale down in proportion to the miniature’s scale?
• Are the shots motion control?
• What film speed is needed?
• What lens angle is preferred?
• What will the shutter angle be?
• Is a previs available?
One of the first issues to determine is the camera lens’s depth of field. This is a major key that reveals scale to most viewers. When shooting an actual cityscape, the camera’s focus is typically set to infinity. Everything is so far away from the camera that everything is in focus. When shooting a miniature, however, everything is much closer, requiring setting focus to specific distances. Unfortunately, this reduces the depth of field, making the near-background much softer than the sharply focused foreground. Because of this, the depth of field must be forced to expand. This is accomplished by setting the camera’s aperture as small as possible.80 This will significantly reduce the amount of light entering the lens, but increase the depth of field. Shooting in a bright environment using bright lighting, using faster film, and/or increasing the exposure time of each frame can counter this loss of light. Using a wide-angle lens also helps increase the apparent depth of field and helps to avoid the problem of reducing the amount of light entering the lens.

Figure 3.103 Focal study comparing a sharp image of a Legoland ride to a variation showing less depth of field. (Images courtesy of Clark James.)
The image on the left of Figure 3.107 was shot at a full-size amusement park, with people standing behind the white wall on the left. The image on the right is the same image doctored with a gradient blur to reduce the apparent depth of field. Notice how the blur creates the illusion of a miniature set. When shooting miniatures to appear full scale, keep the entire frame sharp unless style dictates otherwise.
Water
Physical realities often limit the degree of scaling down that is possible with some effects. If moving water is involved, for instance, the size will probably be limited to a minimum of 1:4 scale. This is because water doesn’t scale down well. The surface tension of water creates splashes and droplets of familiar sizes that reveal its scale.
Most importantly, the water surfaces must be broken up by some means. Whether it is accomplished with turbulence, surface froth, and/or debris, large smooth surface areas must be broken up because not doing so will reveal the scale. Splashes that look glassy also reveal the scale.

Figure 3.104 Possibly the largest miniature ever built, a portion of this set featured a bridge that was swept away by turbulent flood waters as victims made their escape. (Image courtesy of Dante’s Peak © 1997 Universal Studios Licensing, LLLP. All rights reserved.)
In the film Dante’s Peak (1997), Digital Domain built the river bridge portion of the set at 1:4 scale. The background hills with trees tapered down to 1:12 scale. That limited the shooting angles but compressed the set and reduced expenses. The 1:4 scale water surface in the bridge sequence was broken up using water pumps, turbulence pipes, air injectors, debris, and a giant dump tank (about 700,000 gallons) to cause a flood wave; quite a spectacular feat of engineering.
A quick note here: Chemicals known as surfactants can reduce the surface tension of water (reduce the normal droplet size), thus reducing the visible physics involved. These include certain detergents, solvents, and photographic chemicals such as Photo-Flo. Using them can reduce the surface tension and droplet size about 30%. Be very careful, however, when using and disposing of such chemicals, because they are considered hazardous waste and must be disposed of accordingly.
Even without chemical additives, large amounts of water used in special effects are typically considered hazardous waste. Be very aware of this issue. There are companies that will send out trucks to suck up all of the liquids and dispose of them properly. And by all means, do not pour these liquids down the street sewers. They usually lead straight to natural rivers, lakes, or oceans without any processing or purification.
Rain
Rain is an element that is hardly ever created in a miniature set, thanks again to physics and the very perceptive brains of the audience. The size of raindrops can be reduced using spray heads, but they are then much lighter, fall slower, and are easily disturbed by the slightest breeze. A full-size raindrop makes a familiar looking splash when it hits a puddle; miniature droplets give no splash when they hit a puddle. What a miniature needs to look real are small drops that fall fast. That’s a bit of a challenge.
Miniature rain has its best hopes of usage in high-velocity situations such as a storm sequence where the smaller raindrops can be swirling through turbulent wind streams created by fans and blended with puffs of smoke to simulate the mist. Miniature rain also works well as small raindrops swooshing over and past a miniature aircraft using high-velocity wind machines. Even splashes look nice as they impact surfaces when combined with high-velocity wind. The fast wind counters the surface tension of the droplets and speeds up the physics. Of course, the scale needs to be kept as large as possible, perhaps no smaller than 1:6 scale. As always, thorough planning and testing will reveal the sweetest drop sizes, angles, and speeds to achieve the best look.
Full-size rain can work as foreground elements for miniatures. A curtain of rain properly placed can blend in well with a miniature shot. Also remember that rain, like smoke, is most visible when backlit and can be invisible when only frontlit. Just don’t let the splashes of the drops be visible unless the foreground perspective is being shifted to full scale.
Misty rain can also be useful in the background of a miniature set and can help fog out the deeper background. Mist sprayers can reduce the drop size and place the rain behind a set. When backlit, this mist becomes a blanket of light; when frontlit, it’s almost invisible. The key is finding the best balance in light direction. Be careful not to reveal any dripping from surfaces on which the mist collects, because the droplets would appear too large for the miniature.
When rain is used in conjunction with a miniature, it’s usually added in post, whether it’s a filmed element or created wholly on the computer. Filmed elements typically involve plumbing together a rain rig and shooting it against a black or green background. The droplet splashes can also be used. It can then be composited onto the miniature shot with its physics appearing properly in scale. Digital rain can also work really well. The methods ultimately used to create rain on a miniature are a matter of taste and comfort level.
Fire
Fire is very dangerous in the hectic environment of a film set, miniature or not. Think about how intense and distracted everyone is prior to rolling cameras. Think about how to safely fit fire into this mayhem. Recognize the many risks that are involved. Plan sufficient safety measures and use them religiously. Always have sufficient fire suppression equipment on hand—charged water hoses, H2O fire extinguishers, CO2 fire extinguishers, wet burlap, sand—anything that will efficiently extinguish the flames. Designate someone with expertise to be the fire supervisor. Assign additional security to monitor the flames if it helps. Determine emergency exit routes. Conduct a safety briefing with the entire crew prior to lighting any flames to communicate the risk level, shoot procedure, emergency procedures, and warnings.
Most importantly, obtain a permit from the local fire jurisdiction. This cannot be emphasized strongly enough. Contact the local fire authority and tell them what is being planned no matter how small. Be completely up-front and cooperative with them. They may require the presence of a fire safety officer on set and enforce stringent safety constraints, but it’s worth it. Cooperate with them and they’ll cooperate with the production. Safety is in everyone’s best interest.
Fire in miniature presents similar challenges as water. The fire can shrink, but its visible physics can’t. Miniatures incorporating fire, therefore, are usually limited to a minimum of 1:2 to 1:4 scale. Again, there are ways to push the visible physics such as adding additional flammables to give the fire more details, adding air turbulence to break up the fire, and overcranking the camera.

Figure 3.105 A 1:3 scale miniature rooftop on fire, built by New Deal Studios for the film Watchmen. (Image courtesy New Deal Studios and Paramount Pictures for Watchmen (2009). WATCHMEN © Warner Bros. Entertainment Inc., Paramount Pictures Corporation, and Legendary Pictures. All rights reserved.)
New Deal Studios constructed a 1:3 scale miniature for the film Watchmen that featured a rooftop fire along with a collapsing water tower. The fire was fueled by propane fed through plumbing that snaked through the model. Its many flames could be precisely controlled individually. Of course, the building is designed and constructed to be highly fire resistant where necessary using drywall and plaster-type materials. The cameras shot the action at 48 fps.
When working with fire, to help push the scale, the flames need to be smaller and more turbulent. Dark turbulent smoke blended in can also aid the look. However, sometimes a cleaner shot is preferred to which smoke can be added later. When the flames require more visual detail, propane is sometimes substituted with MAPP gas (a mixture of methylacetylene and propadiene). Handled similar to propane, MAPP gas burns with more color variations, produces a black smoke81, and burns hotter than pure propane.
Turbulence can be introduced by adding a velocity-amplifying nozzle or some light wind sources (more and smaller wind sources work better than one giant breeze). Experimentation will be needed to determine the best source and direction to achieve the desired look. There are also liquid formulas that can produce an excellent miniature flame, but these sacrifice the ability to turn the flame on and off at will. These are all important considerations when planning such an event.

Figure 3.106 The command module of Apollo 13 makes its reentry into Earth’s atmosphere (Image courtesy of Apollo 13 © 1995 Universal Studios Licensing, LLLP. All rights reserved.)
For the reentry sequence in the film Apollo 13 (1995), fire physics was also scaled down to simulate traveling at 12,000 miles per hour. To accomplish this, a 1:4 scale capsule shape was made out of sheet steel. No details; just a bottomless cone. Several replaceable heat shields were shaped out of fiberglass and attached, and plumbing was fitted inside to feed propane through hundreds of small holes in the “heat shield.” This was positioned upright, high on a black stage with a heat-dissipating baffle hanging above it. An E-fan82 was positioned below the model and aimed straight up. The camera ran at 2 seconds per frame to achieve lots of motion blur, and the flames were brought up very slowly over a 16-minute shot.
By the end of each take, the “heat shield” had burned out all of its resin (the smell of which could be detected on that stage and in adjoining offices for almost a year after). New “heat shields” were repeatedly installed and more takes were shot. Another 1:4 scale heat shield was painted with fluorescent paint streaks and shot without fire under UV lighting as a glowing shield element for compositing. Also, a detailed 1:4 scale capsule model was painted with fluorescent paint applied mostly to leading edges and surfaces that the heat would make glow. After the shots were completed and layered, some additional digital elements were added along with a background for a very realistic rendition of reentry. Again, research, creativity, and testing led to a beautiful solution.
Smoke
Essentially, two categories of smoke are used in miniature photography:
• general haze and atmosphere, intended to enhance scale and image depth, and
• practical miniature smoke effects.
Atmospheric smoke is used to increase the apparent depth of an image or set. A series of mountains or hills in the distance appears grayer and softer the farther away it is from the viewer. This is because of the moisture and dust suspended in the air between the viewer and the hillsides. The smoke simulates this effect on a miniature scale. Smoke needs light from the proper direction relative to the camera to be seen. When it’s frontlit, it is transparent; but when it’s backlit, it glows brightly and obscures the objects behind it. Therefore, if the smoke is too light, perhaps just add some backlight to thicken it up.
This type of atmosphere is also used during motion control photography. In the film The Fifth Element (1997), the flying car chase sequence in a futuristic Manhattan was shot on a motion control stage dressed with about 25 miniature skyscrapers, built to 1:24 scale, each about 30 feet tall. A custom smoke system was installed on the stage that could maintain an exact smoke level for long periods of time. The smoke was shot in three camera passes: (1) light smoke, (2) medium smoke, and (3) heavy smoke.
In compositing, the light smoke was used for the buildings just past the foreground. The medium smoke was used for the buildings behind those. The heavy smoke was used for the buildings farthest away. Digital set extensions completed the background and sky. This layered smoke level process also helped push the physics of the smoke, causing a greater difference of visibility between the foreground and background buildings, making the distances appear even greater.
In contrast to a smooth haze effect, specific puffs or clouds of smoke as an element don’t scale down well, such as from a miniature house chimney: 1:2 to 1:3 scale is typically the limit. It is a common practice to shoot a full-scale smoke element on black and then digitally composite it into the image or just generate it completely on the computer. Unless there is a lot of turbulent velocity behind it, like from “rocket engines” or a “storm environment,” specific smoke plumes are almost useless in smaller miniatures.
When associated with the force of an explosion, smoke can be imparted with enough turbulence to pull the scale down and can work quite nicely. Another method creates smoke plumes by blasting quantities of dust (Fuller’s earth or FX Dust) with air cannons or air blasters. Fuller’s earth is a finely ground calcium-based diatomaceous earth mineral. Health implications are associated with this dust due to the grinding process, which leaves some silica residue in the mix. FX Dirt is the same thing but without the health risk of Fuller’s. It does, however, cost about 10 times as much as basic Fuller’s earth. Use either or both of them, but pay close attention to air ventilation, visibility, breathing protection, and general safety with whatever is chosen.
Explosions
Due to the extreme dangers involved, explosives must be handled only by qualified pyrotechnicians, typically holding valid state and federal licenses and working under the guidelines of a temporary permit provided by the local fire jurisdiction. Safety rules and procedures must be followed. Especially since the tragedy of 9/11, the explosives industry is heavily regulated. Always approach pyrotechnics with respect for protocol and safety.
Explosions, when properly designed, can work in the range of 1:4 to 1:12 scale. The chemicals used, such as naphthalene and MAPP, generate fireballs full of contrasting intricate details. This hides the true scale and looks beautiful on screen. As in the 1:8 scale explosion shown in Figure 3.111, which was created for The X-Files (1998), smoke, secondary explosions, air cannons, and carefully rigged breakaway elements can accompany such fireballs.

Figure 3.107 This 1:8 scale miniature explosion was engineered by Ian O’Connor for the The X-Files: Fight the Future (1998) from New Deal Studios. (Image courtesy of The X-Files: Fight the Future © 1998 Twentieth Century Fox. All rights reserved.)
These processes use the same technologies as full-scale effects. One difference, however, is that they are triggered using a firing box that uses microtimers that can be precisely sequenced to 1000th of a second. This is necessary for cameras shooting at 96 to 120 frames or more per second. During the take, all of the events happen really fast but then look much bigger during slower playback.
Breakaways
The same methods used in most full-scale effects are used in miniature effects:
• electronic
• mechanical
• steel cable pull-rigs
• air cannons
• prescoring and weakening of materials
• pneumatics
• motion control
Miniature breakaways are approached in much the same way as full-scale breakaways. The only difference other than that of size is the choice of materials. Full-scale materials scale down fine in appearance, but their physics don’t. Wood structures snap with a visible grain and look strange in miniature breakaways. Steel beams look like mush when a real building collapses but are too rigid when scaled down. Therefore, other materials need to be substituted when displaying their physics in miniature. Preshattered and reassembled balsa wood can replicate the wooden structures in miniature. Sheet lead and annealed aluminum make good substitutes for steel framing and sheet metal. Sometimes pyrotechnics are used to cut cables or embellish impacts. It is important to suppress any visible flash from these charges, because that can not only look out of place but can reveal true scale as well.
Following is a partial list of full-scale materials and common miniature-scale counterparts used in breakaways.
| Steel Bars and Beams | Annealed Aluminum, Formed Sheet Lead, Solder |
| Sheet Metal | Aluminum, Sheet Lead, Foil |
| Wood and Lumber | Balsa Wood, Rigid Foam |
| Snow | Sodium Bicarbonate, Gypsum |
| Ice | Resin, Wax, Hot Glue, Super Glue, Acrylic |
| Glass | Plexiglas, Candy (Breakaway) Glass, Cellophane, Glitter |
| Cement | Snow Plaster, Urethane Carving Foams |
| Flowing Fabric | Silk, Flexible Fabrics |
| Brick and Mortar | Plaster, Snow Plaster, Urethane Carving Foam |
| Practical Lighting | Grains of Wheat/Rice Bulbs, Microfluorescent Bulbs, L.E.D.s |
| Assorted Fasteners | Super Glue, Hot Glue, Tape, Baling Wire |
... And Remember Safety
Most of all, as the creative plan of the miniature effects evolves and comes together, remember to keep safety as the highest priority. Be willing to wait for any safety issues. Don’t forget: It is better not to know how many lives or injuries were spared due to this diligence than it is to know for sure how many were not. Be safe.
1 See the section Monster Sticks in this chapter for more details.
2 Block a scene: when a director works with the actors to determine their action during the scene. Once done, the camera positions are determined.
3 Transit: surveyor’s tool to measure positions and distances; used for large sets and exteriors.
4 Witness cameras: video cameras used to record the scene for matchmoving purposes.
5 Trunnion gun: small device used to create bullet holes in car windows or to break glass; also known as a trunnion launcher. Trunnion guns have the appearance of a small cannon mounted to a small heavy metal plate with a swivel arm, and they can be adjusted to various angles. They have a removable end cap with a small hole in it. A squib is placed inside the end cap with the wires passing through the hole. A small projectile made from epoxy putty or a ball bearing is then placed in the tube. When the squib is triggered, the projectile will exit the barrel and create a hole in the glass it was aimed at. They are commonly used in autos with actors to achieve the effect of bullet holes in the car windows. A protective shield of Lexan must be used between the window and the actor to prevent injury because the projectile may ricochet or the tempered glass may disintegrate.
6 Detonating cord: waterproof explosive that has the appearance of a cord; also known as det cord or primer cord. It is available in different diameters that relate directly to the explosive power of this product. All det cord has a white core of powerful explosive that detonates at about 4 miles per second. It is commonly used in special effects work to destroy something quickly, such as to vaporize a building facade on a miniature or to create the effect of a traveling shock wave when buried just below a dirt surface.
7 A picture car is a vehicle that is featured in the production, or any vehicle that is involved in a stunt or special effect.
8 In live composites, full-bandwidth HD video is fed to an HD Ultimatte hardware device with a second camera, an HD deck, or a digital workstation providing the background.
9 A noted researcher and pioneer in the field, Jonathan Erland of Composite Components Co. in Los Angeles, won an Academy Award for CCC’s line of patented Digital Green and Digital Blue lamps, fabric, and paint.
10 Flickerless electronic ballasts prevent the light from being unevenly exposed on film at speeds that are faster or slower than 24 frames per second. If one does not use them and shoots at any other speed than 24 frames per second, the image will appear to flicker.
11 Incident light reading is usually measured with a light meter. The meter measures the light that is illuminating or falling on the subject. It also takes into account the angle, or geometry, of the light—what direction it is coming from—and averages these two things together into a single reading.
12 It should be noted that film builders use a roughly equivalent compromise: Green-and red-sensitive negative layers have more grain and less resolution than the green layer.
13 Plate: visual effects term for live-action footage to be used for later visual effects work. FG plate refers to foreground images, BG plates to background images, BS plates to bluescreen images, etc.
14 Takes to be used with the actors or action.
15 Eye line: specific direction in which the actor looks. This is a point that is frequently off camera to represent another actor or object. Crew members need to avoid walking through this during the take since the actor is focused.
16 Foam core: white, strong, and lightweight sheets of poster-type material usually in 1/8- or 1/4-inch thicknesses.
17 Maquette: sculpture of the creature or character for design purposes.
18 Split-diopter: a diopter is an auxiliary lens that goes in front of the camera lens to allow for close-up photography. A split version is half lens and half plain glass so only half of the scene is focused for close-ups.
19 C-stand: common three-legged adjustable stand used by the grip department to hold things such as lighting flags. Sand bags are placed on the legs to prevent it from falling over.
20 Spud: short metal rod a few inches long mounted onto a flat plate in most cases. Used in conjunction with C-stands.
21 Light stand: heavy-duty, three-legged stand used to hold motion picture lighting equipment.
22 Roto: short for rotoscope; process used to trace images by hand to create mattes.
23 Video tape: the video signal from the production camera that sends the camera’s “through the lens view” to on-set video recording personnel and separate video monitors.
24 Strictly speaking, the use of the term nodal point to describe the point within a lens around which the perspective rotates is contrary to the use of the term in geometric optics and lens design. In scientific optics, the nodal points (plural) of a lens are defined as “either of two points so located on the axis of a lens or optical system that any incident ray directed through one will produce a parallel emergent ray directed through the other” and in scientific usage the correct term for the point of rotation of a lens is entrance pupil. However, this section will continue to use the term nodal point as it is commonly and universally used by the visual effects community.
25 This type of HD camera pushes the low end of cinema color space and color resolution—a good deal below motion picture film. If using for cinema projects, one must do so with an understanding of the compromises that are being made and recognition that those choices have repercussions later in the workflow that will show in the final release.
26 A consortium of major movie studios that have come together to set standards in the digital realm. D-cinema may be “2K” (nominally, 2048 × 1080) at 24 or 48 fps (which allows stereoscopic 3D at 24 fps per eye) or “4K” (nominally, 4096 × 2160) at 24 fps, with up to 16 channels of uncompressed audio. D-cinema content is compressed with JPEG-2000 at a maximum of 250 Mbps. D-cinema is intended to provide a quality comparable to 35mm film.
27 In terms of the Ansel Adams Zone System, properly exposed film can record and reproduce highlights in zone 8, gray tones in zones 4, 5, and 6, and black details in zone 1, with room to print up or down by at least one f-stop.
28 A decibel (dB) is a unit of measurement that expresses a ratio using logarithmic scales to give results related to human perception.
29 Noise exists in film as well, but due to the nature of film grain, the noise is random, as opposed to the fixed pattern noise of digital. The random noise produced by film grain is more compatible to the human visual system and, when properly exposed and processed, does not call attention to itself.
30 American Standards Association, renamed American National Standards Institute (ANSI).
31 International Organization for Standardization.
32 Much attention is being paid to various 16-bit floating-point RGB formats as the eventual future of digital cinema color representation, and several research and development efforts are under way to implement 16-bit floating-point file formats for image acquisition, color correction, and display purposes. One of those efforts, the Academy of Motion Picture Arts and Sciences Image Interchange Framework (IIF) project, is an attempt to create an overall framework for motion picture color management that includes a 16-bit image file format that is intended to serve the industry all the way from acquisition through archive. IIF uses a constrained OpenEXR 16-bit floating-point container and a careful and extensive set of definitions to specify a highly capable and interoperable system.
33 Bayer pattern: named after the inventor, Dr. Bryce E. Bayer of Eastman Kodak.
34 For a more in-depth discussion on the resolving powers and capabilities of the human vision system, Michael F. Deering’s paper “A Photon-Accurate Model of the Human Eye” is recommended. It is a large (and intimidating) work, but once understood, yields many critical and valuable insights into the physiology and mechanics of how human beings see.
35 It is important to note here that the original design spec for the 1920 × 1080 HD standard called for a viewing distance of four screen heights, yielding about 40 cycles per degree of resolution for the same pictures. But four screen heights is much farther than typical viewing distances currently found in either cinemas or homes.
36 Bake in: take the various parameters and change the data to take those into account. This can eliminate some of the post-process work but also eliminates much of the flexibility later to make changes.
37 Unit Production Managers will often be inclined to get the Second Unit DP or one of the camera operators to go off and form a splinter unit to shoot elements, but real value is added when using an experienced VFX Director of Photography. A VFX DP thinks out of the box for a living with regard to frame rates, camera positions, and numerous other aspects of the job, and making use of that experience can often result in accomplishing the goal faster than a generalist’s methodology of trial and error.
38 VistaVision: a special format camera that shoots with horizontal running motion picture film to provide a large size image equivalent to a 35mm still camera.
39 Elements shot for stereoscopic 3D production must be carefully shot with stereo camera rigs, because elements shot “single eye” will often be very difficult to integrate into a 3D shot.
40 Before the rise of digital compositing and CG effects, most visual effects were referred to as special photographic effects.
41 Care should be taken when filming any material that may produce dust or small particles. Use eye protection and breathing masks.
42 See Triangulation as a Method of Recording Camera Data earlier in this chapter for more information.
43 Given a bit of lead time, the editorial department should be able to provide resized images to match the video tap, but they will need to see a sample of the tap image in order to do so.
44 For standard-definition video taps and monitors, the standard switcher in the visual effects world for decades has been the Panasonic MX50. Long discontinued by Panasonic, they can still be found all over the world.
45 DX is short for “double exposure.”
46 When working with HD cameras, be aware that if a downconverter and standard-definition video are used, the downconverter will delay the camera’s signal by at least a frame, potentially causing temporal offsets.
47 This rule of thumb can be found in an article on miniatures by L.B. Abbott, ASC, in the 1980 ASC Manual and has been repeated in numerous subsequent publications.
48 The fireball elements for the title sequence of The Dark Knight (2008) were shot with a high-speed VistaVision camera in order to provide enough resolution for blow-up to IMAX for release.
49 The VFX Supervisor determined that given the uneven texture of the wall and the unavoidable proximity of the actors to the wall, it made more sense to rotoscope the actors off of the wall than to attempt to pull a key from a horrible blue or green screen.
50 Some shots call for flames filmed against green screen in order to allow for letting parts of the back plate bleed through the transparent parts of the flames. As always, consult with the visual effects facility that is working on the shot for their input. When in doubt, shoot it both ways—in front of black and in front of green. Blue screen is generally not a good choice for natural gas flames, which burn with a blue inner cone when sufficiently oxygenated.
51 Sold in industrial supply stores for use as lubricating oil for machining metal.
52 UPM: Unit Production Manager.
53 Painstakingly slow setup and programming time in the early days of motion control photography earned the technique a reputation for killing shoot schedules. It has somewhat outgrown this reputation, but the old attitudes persist.
54 MOS: no sync sound recording.
55 Waldo: input device named after the Robert A. Heinlein short story Waldo.
56 ECU: extreme close-up shot.
57 While the optical era of visual effects required great precision for this type of work, modern digital tools have relaxed some of those requirements—repeatable remote heads are often sufficiently accurate.
58 ASCI file: pure, simple text file based on an American standard.
59 A camera is mounted nodally when the pan, tilt, and roll axes of the head pass through the rear nodal point of the lens. A nodal setup like this allows the camera to pan, tilt, and roll without creating any parallax shift between foreground and background elements.
60 Traditionally, motion control stepper motors had to be mounted to control the focus, iris, and zoom lens rings, but in the past few years, several motion control equipment suppliers have begun using interface boxes that allow the use of Preston MDR wireless digital focus iris zoom motors and controllers. In a live-action situation, this can be quite beneficial because it allows the focus-puller to work with his or her usual tools, instead of having to become accustomed to a new piece of equipment.
61 This sort of simple rig removal shot is rapidly becoming the realm of the repeatable remote head, which is a remotely operated head capable of recording and playing back moves. These heads are not truly motion control heads, lacking the accuracy of frame and phase synchronization, but they are often adequate to the task.
62 Go-motion photography is shot at very slow frame rates, but with the motion control rig moving continuously through the shot, rather than repositioning and stopping still for each frame. This allows for naturalistic motion blur when shooting miniatures.
63 High-dynamic-range imaging (HDRI) is a technique for capturing the extended tonal range in a scene by shooting multiple pictures at different exposures and combining them into a single image file that can express a greater dynamic range than can be captured with current imaging technology.
64 It is advisable to shoot background tiles for an anamorphic show with VistaVision cameras, for instance, in order to allow for punching in to close-ups without having to shoot background plates for specific angles. The same resolution can be achieved with 4-perf cameras shooting longer focal length lenses, but more tiles will be needed to cover the same background area. Where camera size is an issue, a greater number of smaller tiles might make sense—a background made up of four VistaVision tiles will have the same resolution as an IMAX frame.
65 A nodal head is a pan/tilt head that is designed so that the pan and tilt axes can be lined up with the point inside the lens where the light rays forming the image cross. This allows the camera to be panned and tilted without revealing any parallax shift between foreground and background objects within the scene.
66 Parallax shift is the apparent movement of objects relative to each other dependent on their distance to the camera when the camera pans or tilts.
67 In the 1990s, Jim Dickson built a smaller, lighter, modular version of the CircleVision rig that aims up to nine cameras up into 45-degree mirrors. Portions of this rig have been used to shoot synchronous plates. It has the advantage of a relatively small nodal offset over the multiple cameras shooting a wide angle of view but does have some of the disadvantages associated with multiple mirrors on a moving rig.
68 Bokeh: a photographic term referring to the appearance of point of light sources in an out-of-focus area of an image produced by a camera lens using a shallow depth of field. Different lens bokeh produce different aesthetic qualities in out-of-focus backgrounds, which are often used to reduce distractions and emphasize the primary subject.
69 Some modern autofocus still lenses lack mechanical manual controls. With these lenses it is impossible to tape off the focus or aperture rings. When these cameras are powered up, they will hunt for a new position. With this in mind, it is important to come up with a routine that allows the photographer to reset these parameters if the camera is powered down during a tiling pass.
70 Skinning: process in which an image is overlaid onto a CG object; also known as texture mapping.
71 The term baked-in is often used to denote a characteristic of an image that is integral to the image and cannot easily be modified in post-production.
72 SLR: single-lens-reflex still camera.
73 Slop: a degree of unwanted looseness in a mechanical system.
74 Precomps: non-final composites that preview how elements will ultimately come together.
75 Reprinted from the American Cinematographer Manual, 9th Edition with permission from the American Society of Cinematographers.
76 A periscope lens is a lens mounted to a tube that extends out from the camera (typically 20 inches or so) and can photograph objects at a 90-degree angle to the body of the camera. This extended tube is engineered with a series of mirrors and lenses that reflect the image back to the film plane. It is also known as a snorkel. In some cases a small mirror at 45 degrees will be enough to allow the camera to scrape over the surface of a model.
77 Terry Gilliam, “Salman Rushdie Talks with Terry Gilliam,” The Believer, March 2003.
78 Gilliam, “Salman Rushdie Talks.”
79 Overcranking: shooting at a higher frame rate than normal to achieve a slow motion effect (above 24 fps for film).
80 Very small apertures may result in diffraction and softer images. Best to test.
81 Production of large amounts of smoke, especially black smoke, is highly regulated or outright illegal in many counties. Check with the local fire department and air quality management prior to engaging in such activities.
82 E-fan: Abbreviation for “effects fan”. Manufactured by the Mole Richardson Company in Hollywood, it is commonly used because of its portability, ease of control, and powerful airflow.