
Data is a part of everyday life nowadays. If it weren't for data, you wouldn't be reading this book or trying to learn more about Vue.
Knowing how to fetch and send your data inside an application is a requirement for a developer, not just an extra skill that's nice to have. The best way to learn it is by practicing it and finding out how it is done behind the scenes.
In this chapter, we will learn how to build our own API data manipulation with the Fetch API and the most popular API library in the web right now, axios.
In this chapter, we'll cover the following recipes:
Creating a wrapper for the Fetch API as an HTTP client
Creating a random cat image or GIF component
Creating your local fake JSON API server with MirageJS
Using axios as the new HTTP client
Creating different axios instances
Creating a request and response interceptor for axios
Creating a CRUD interface with axios and Vuesax
Technical requirements
In this chapter, we will be using Node.js and Vue CLI.
> npm install -g windows-build-tools
To install Vue CLI, open Terminal (macOS or Linux) or Command Prompt/PowerShell (Windows) and execute the following command:
> npm install -g @vue/cli @vue/cli-service-global
Creating a wrapper for the Fetch API as an HTTP client
The Fetch API is the child of the old XMLHttpRequest. It has an improved API and a new and powerful set of features completely based on Promises.
The Fetch API is both simple and based on a generic definition of two objects, Request, and Response, which allow it to be used everywhere in the browser. The browser Fetch API can be executed inside the window or the service worker as well. There is no limitation on the usage of this API.
In this recipe, we will learn how to create a wrapper around the Fetch API to make the API calls more simple.
Getting ready
The pre-requisite for this recipe is as follows:
Node.js 12+
The Node.js global objects that are required are as follows:
@vue/cli
@vue/cli-service-global
How to do it...
To start our component, we can use the Vue project with Vue CLI we created in the 'Creating Your first project with Vue CLI' recipe in Chapter 2, Introducing TypeScript and the Vue Ecosystem, or we can start a new one.
To start a new one, open Terminal (macOS or Linux) or Command Prompt/PowerShell (Windows) and execute the following command:
> vue create http-project
The CLI will ask some questions that will help with the creation of the project. You can use the arrow keys to navigate, the Enter key to continue, and the Spacebar to select an option. Choose the default option:
? Please pick a preset: (Use arrow keys)
❯ default (babel, eslint)
Manually select features
Creating the wrapper
First, we need to create a new API wrapper to be used in this recipe. This will be the main file we will use on all the HTTP methods.
Let's create the base wrapper by following these steps:
Create a new file called baseFetch.js in the src/http folder.
We will create an asynchronous function that will receive as an argument the three variables of url, method, and options. This will be a currying function, which the second function will receive as an argument, type:
export default async (url, method, options = {}) => {
  let httpRequest;
  if (method.toUpperCase() === 'GET') {
    httpRequest = await fetch(url, {
      cache: 'reload',
      ...options,
    });
  } else {
    httpRequest = fetch(url, {
      method: method.toUpperCase(),
      cache: 'reload',
      ...options,
    });
  }
  return (type) => {
    switch (type.toLocaleLowerCase()) {
      case 'json':
        return httpRequest.json();
      case 'blob':
        return httpRequest.blob();
      case 'text':
        return httpRequest.text();
      case 'formdata':
        return httpRequest.formData();
      default:
        return httpRequest.arrayBuffer();
    }
  };
};
Creating the API methods
Now we need to make our HTTP method function. These functions will use the wrapper to execute the browser Fetch API and return the response.
Follow these steps to create each one of the API method calls:
Let's create a new file called fetchApi.js in the src/http folder.
We need to import the baseHttp from the file we created in the first step:
import baseHttp from './baseFetch';
Now in the following parts, we will create each one of the HTTP methods that will be available in our wrapper.
GET method function
In these steps, we are going to create the HTTP GET method. Follow each of the following instructions to create the getHttp function:
Create a constant called getHttp.
Define that constant as an asynchronous function that receives three arguments, url, type, and options. The type argument will have the default value of 'json'.
In this function return, we will execute the baseHttp function, passing the url that we received, 'get' as the second argument, the options as the third argument, and immediately execute the function with the type argument we received:
export const getHttp = async (url, type = 'json', options) => (await
   baseHttp(url, 'get', options))(type);
POST method function
In this part, we are creating the HTTP POST method. Follow these steps to create the postHttp function:
Create a constant called postHttp.
Assign to that constant an asynchronous function that receives four arguments, url, body, type, and options. The type argument will have the default value of 'json'.
In this function return, we will execute the baseHttp function, passing the url argument that we received, and 'post' as the second argument. In the third argument, we will pass an object with the body variable, and the deconstructed options argument that we received. Because of the currying property of baseHttp, we will execute the returned function with the type argument we received. The body is usually a JSON or a JavaScript object. If this request is going to be a file upload, body needs to be a FormData object:
export const postHttp = async (
  url,
  body,
  type = 'json',
  options,
) => (await baseHttp(url,
  'post',
  {
    body,
    ...options,
  }))(type);
PUT method function
Now we are creating an HTTP PUT method. Use the following steps to create the putHttp function:
Create a constant called putHttp.
Assign to that constant an asynchronous function that receives four arguments, url, body, type, and options. The type argument will have the default value of 'json'.
In this function return, we will execute the baseHttp function, passing the url that we received, and 'put' as the second argument. In the third argument, we will pass an object with the body variable, and the deconstructed options argument that we received. Because of the currying property of baseHttp, we will execute the returned function with the type argument we received. body is usually a JSON or a JavaScript object, but if this request is going to be a file upload, body needs to be a FormData object:
export const putHttp = async (
  url,
  body,
  type = 'json',
  options,
) => (await baseHttp(url,
  'put',
  {
    body,
    ...options,
  }))(type);
PATCH method function
It's time to create an HTTP PATCH method. Follow these steps to create the patchHttp function:
Create a constant called patchHttp.
Assign to that constant an asynchronous function that receives four arguments, url, body, type, and options. The type argument will have the default value of 'json'.
In this function return, we will execute the baseHttp function, passing the url that we received, and 'patch' as the second argument. In the third argument, we will pass an object with the body variable, and the deconstructed options argument that we received. Because of the currying property of baseHttp, we will execute the returned function with the type we received. body is usually a JSON or a JavaScript object, but if this request is going to be a file upload, body needs to be a FormData object:
export const patchHttp = async (
  url,
  body,
  type = 'json',
  options,
) => (await baseHttp(url,
  'patch',
  {
    body,
    ...options,
  }))(type);
UPDATE method function
In this section, we are creating an HTTP UPDATE method. Follow these steps to create the updateHttp function:
Create a constant called updateHttp.
Assign to that constant an asynchronous function that receives four arguments, url, body, type, and options. The type argument will have the default value of 'json'.
In this function return, we will execute the baseHttp function, passing the url that we received, and 'update' as the second argument. In the third argument, we will pass an object with the body variable, and the deconstructed options argument that we received. Because of the currying property of baseHttp, we will execute the returned function with the type we received. body is usually a JSON or a JavaScript object, but if this request is going to be a file upload, body needs to be a FormData object:
export const updateHttp = async (
  url,
  body,
  type = 'json',
  options,
) => (await baseHttp(url,
  'update',
  {
    body,
    ...options,
  }))(type);
DELETE method function
In this final step, we will create a DELETE HTTP method. Follow these steps to create the deleteHttp function:
Create a constant called deleteHttp.
Assign to that constant an asynchronous function that receives four arguments, url, body, type, and options. The type argument will have the default value of 'json'.
In this function return, we will execute the baseHttp function, passing the url that we received, and 'delete' as the second argument. In the third argument, we will pass an object with the body variable, and the deconstructed options argument that we received. Because of the currying property of baseHttp, we will execute the returned function with the type we received. body is usually a JSON or a JavaScript object, but if this request is going to be a file upload, body needs to be a FormData object:
export const deleteHttp = async (
  url,
  body,
  type = 'json',
  options,
) => (await baseHttp(url,
  'delete',
  {
    body,
    ...options,
  }))(type);
How it works...
In this recipe, we created a wrapper for the Fetch API that is presented on the window element. This wrapper consists of a currying and closure function, where the first function receives the URL data, method, and options for the Fetch API, and the resulting function is the Fetch API response translator.
In the wrapper, the first part of the function will create our fetch request. There, we need to check whether it's a GET method, so we just need to execute it with the url parameter and omit the others. The second part of the function is responsible for the conversion of the fetch response. It will switch between the type parameter and execute the retrieving function according to the correct one.
To receive the final data for your request, you always need to call the response translator after the request, as in the following example:
getHttp('https://jsonplaceholder.typicode.com/todos/1',
          'json').then((response) => { console.log(response)); }
This will get the data from the URL and transform the response into a JSON/JavaScript object.
The second part we made was the methods translator. We made functions for each one of the REST verbs to be used more easily. The GET verb doesn't have the ability to pass any body but all the others are capable of passing a body in the request.
See also
You can find more information about the Fetch API at https://developer.mozilla.org/en-US/docs/Web/API/Fetch_API.
You can find more information about FormData at https://developer.mozilla.org/en-US/docs/Web/API/FormData/FormData.
You can find more information about the Fetch response body at https://developer.mozilla.org/en-US/docs/Web/API/Body/body.
You can find more information about headers at https://developer.mozilla.org/en-US/docs/Web/API/Headers.
You can find more information about requests at https://developer.mozilla.org/en-US/docs/Web/API/Request.
Creating a random cat image or GIF component
It's common knowledge that the internet is made of many GIFs and videos of cats. I'm sure that if we took down all cat-related content, we would have a web blackout.
The best way to understand more about the Fetch API and how it can be used inside a component is to make a random cat image or GIF component.
Getting ready
The pre-requisite for this recipe is as follows:
Node.js 12+
The Node.js global objects that are required are as follows:
@vue/cli
@vue/cli-service-global
How to do it...
To start our component, we can use the Vue project with Vue CLI that we used in the 'Creating a wrapper for the Fetch API as an HTTP client' recipe, or we can start a new one.
To start a new one, open Terminal (macOS or Linux) or Command Prompt/PowerShell (Windows) and execute the following command:
> vue create http-project
The CLI will ask some questions that will help with the creation of the project. You can use the arrow keys to navigate, the Enter key to continue, and the Spacebar to select an option. Choose the default option:
? Please pick a preset: (Use arrow keys)
❯ default (babel, eslint)
Manually select features
Creating the component
In this recipe, we will be using the components created in Chapter 4, Components, Mixins, and Functional Components, for visual elements. You can achieve the same results with simple HTML elements.
We will divide the creation of this component in three steps: <script>, <template>, and <style>.
Single file component <script> section
Follow these steps to create the <script> section of the single file component:
Create a new file called RandomCat.vue in the src/components folder and open it.
Import the getHttp function from the fetchApi wrapper we made in the 'Creating a wrapper for the Fetch API as an HTTP client' recipe:
import { getHttp } from '../http/fetchApi';
Asynchronously import the MaterialButton and MaterialCardBox components in the component property:
components: {
  MaterialButton: () => import('./MaterialButton.vue'),
  MaterialCardBox: () => import('./MaterialCardBox.vue'),
},
In the data property, we need to create a new data value named kittyImage, which will be by default an empty string:
data: () => ({
  kittyImage: '',
}),
In the methods property, we need to create the getImage method, which will fetch the image as a Blob and return it as a URL.createObjectURL. We also need to create the newCatImage method that will fetch a new still image of a cat and the newCatGif method that will fetch a new cat GIF:
methods: {
    async getImage(url) {
      return URL.createObjectURL(await getHttp(url, 'blob'));
    },
    async newCatImage() {
      this.kittyImage = await
          this.getImage('https://cataas.com/cat');
    },
    async newCatGif() {
      this.kittyImage = await
          this.getImage('https://cataas.com/cat/gif');
    },
  },
In the beforeMount life cycle hook, we need to make it asynchronous and execute the newCatImage method:
async beforeMount() {
    await this.newCatImage();
  },
Single file component <template> section
Follow these steps to create the <template> section of the single file component:
First, we need to add the MaterialCardBox component with a header and sub-header, activate the media and action sections, and create the <template> named slots for media and action:
<MaterialCardBox
  header="Cat as a Service"
  sub-header="Random Cat Image"
  show-media
  show-actions
>
  <template
    v-slot:media>
  </template>
  <template v-slot:action>
  </template>
</MaterialCardBox>
In the <template> named slot for media, we need to add an <img> element that will receive a URI Blob, which will be displayed when there is any data in the kittyImage variable, or it will display a loading icon:
<img
  v-if="kittyImage"
  alt="Meow!"
  :src="kittyImage"
  style="width: 300px;"
>
 <p v-else style="text-align: center">
   <i class="material-icons">
     cached
   </i>
 </p>
At the <template> named slot for action, we will create two buttons, one for fetching cat images and another for fetching cat GIFs, and both will have an event listener on the @click directive that calls a function that fetches the corresponding image:
<MaterialButton
  background-color="#4ba3c7"
  text-color="#fff"
  @click="newCatImage"
>
  <i class="material-icons">
    pets
  </i> Cat Image
</MaterialButton>
<MaterialButton
  background-color="#005b9f"
  text-color="#fff"
  @click="newCatGif"
>
  <i class="material-icons">
    pets
  </i> Cat GIF
</MaterialButton>
Single file component <style> section
In the <style> part of the component, we need to set the body font-size for the CSS style calculation based on rem and em:
<style>
  body {
    font-size: 14px;
  }
</style>
Getting up and running with your new component
Follow these steps to add your component to your Vue application:
Open the App.vue file in the src folder.
In the components property, asynchronously import the RandomCat.vue component:
<script>
export default {
  name: 'App',
  components: {
    RandomCat: () => import('./components/RandomCat'),
  },
};
</script>
In the <template> section of the file, declare the imported component:
<template>
  <div id="app">
    <random-cat />
  </div>
</template>
To run the server and see your component, you need to open Terminal (macOS or Linux) or Command Prompt/PowerShell (Windows) and execute the following command:
> npm run serve
Here is your component rendered and running:

How it works...
Using the getHttp wrapper, the component was able to get the URL and retrieve it as a Blob type. With this response, we can use the URL.createObjectUrl navigator method and pass the Blob as an argument to get a valid image URL that can be used as the src attribute.
See also
You can find more information about URL.createObjectUrl at https://developer.mozilla.org/en-US/docs/Web/API/URL/createObjectURL.
You can find more information about the Blob response type at https://developer.mozilla.org/en-US/docs/Web/API/Body/blob.
Creating your fake JSON API server with MirageJS
Faking data for testing, developing, or designing is always a problem. You need to have a big JSON or make a custom server to handle any data changes when presenting the application at the development stage.
There is now a way to help developers and UI designers achieve this without needing to code an external server – a new tool called MirageJS, a server emulator that runs on the browser.
In this recipe, we will learn how to use the MirageJS as a mock server and execute HTTP requests on it.
Getting ready
The pre-requisite for this recipe is as follows:
Node.js 12+
The Node.js global objects that are required are as follows:
@vue/cli
@vue/cli-service-global
How to do it...
To start our component, we can use the Vue project with Vue CLI that we did in the 'Creating a wrapper for the Fetch API as an HTTP client' recipe, or we can start a new one.
To start a new one, open Terminal (macOS or Linux) or Command Prompt/PowerShell (Windows) and execute the following command:
> vue create visual-component
The CLI will ask some questions that will help with the creation of the project. You can use the arrow keys to navigate, the Enter key to continue, and the Spacebar to select an option. Choose the default option:
? Please pick a preset: (Use arrow keys)
❯ default (babel, eslint)
Manually select features
Creating the mock server
In this recipe, we will be using the getHttp function from the fetchApi wrapper we made in the 'Creating a wrapper for the Fetch API as an HTTP client' recipe.
Work through the next steps and sections to create your MirageJS mock server:
Install the MirageJS server to your packages. You need to open Terminal (macOS or Linux) or Command Prompt/PowerShell (Windows) and execute the following command:
> npm install --save miragejs
Now in the following sections, we will create each one of the HTTP methods that will be mocked by the MirageJS server.
Creating the mock database
In this section, we will create a MirageJS database that will be used to store the temporary data. Follow these steps to create it:
Create a new file called db.js file in the src/server folder for the initial loaded data.
We need to make a JavaScript object the default export for this file, containing the initial data that we want the server to have:
export default {
  users: [
    {
      name: 'Heitor Ramon Ribeiro',
      email: '[email protected]',
      age: 31,
      country: 'Brazil',
      active: true,
    },
  ],
};
Creating the GET route function
In this section, we are going to create the HTTP GET method that will be mocked by the MirageJS server. Follow these steps to create it:
For the GET methods, we need to create a new file called get.js in the src/server folder.
For this recipe, we will make a generic getFrom function that receives a key as an argument and returns a function. This returned function returns a direct point to the local database with the indicated key:
export const getFrom = key => ({ db }) => db[key];

export default {
  getFrom,
};
Creating the POST route function
In this section, we are going to create the HTTP POST method, that will be mocked by the MirageJS server. Follow these steps to create it:
For the POST methods, we need to create a new file called post.js in the src/server folder.
For this recipe, we will make a generic postFrom function that receives a key as an argument and returns a function. This returned function will parse the data property of the HTTP request body and returns an internal function of the server schema that inserts the data inside the database. Using the key argument, the schema knows which table we are handling:
export const postFrom = key => (schema, request) => {
  const { data } = typeof request.requestBody === 'string'
    ? JSON.parse(request.requestBody)
    : request.requestBody;

  return schema.db[key].insert(data);
};

export default {
  postFrom,
};
Creating the PATCH route function
In this section, we are going to create the HTTP PATCH method that will be mocked by the MirageJS server. Follow these steps to create it:
For the PATCH methods, we need to create a new file called patch.js in the src/server folder.
For this recipe, we will make a generic patchFrom function that receives a key as an argument and returns a function. This returned function will parse the data property of the HTTP request body and returns an internal function of the server schema that updates a specific object with the id property that was passed along with the data. Using the key argument, the schema knows which table we are handling:
export const patchFrom = key => (schema, request) => {
  const { data } = typeof request.requestBody === 'string'
    ? JSON.parse(request.requestBody)
    : request.requestBody;

  return schema.db[key].update(data.id, data);
};

export default {
  patchFrom,
};
Creating the DELETE route function
In this section, we are going to create the HTTP DELETE method that will be mocked by the MirageJS server. Follow these steps to create it:
For the DELETE methods, we need to create a new file called delete.js in the src/server folder.
For this recipe, we will make a generic patchFrom function that receives a key as an argument and returns a function. This returned function will parse the data property of the HTTP request body and return an internal function of the server schema that deletes a specific object with the id property, which was passed to the server via the route REST parameter. Using the key argument, the schema knows which table we are handling:
export const deleteFrom = key => (schema, request) =>
   schema.db[key].remove(request.params.id);

export default {
  deleteFrom,
};
Creating the server
In this section, we are going to create the MirageJS server and the routes that will be available. Follow these steps to create the server:
Create a new file called server.js inside the src/server folder.
Next, we need to import the Server class, the baseData, and the router methods:
import { Server } from 'miragejs';
import baseData from './db';
import { getFrom } from './get';
import { postFrom } from './post';
import { patchFrom } from './patch';
import { deleteFrom } from './delete';
Create a global variable to the window scope, called server, and set this variable as a new execution of the Server class:
window.server = new Server({});
In the Server class construction options, add a new property called seeds. This property is a function that receives the server (srv) as an argument and executes the srv.db.loadData function passing the baseDate as a parameter:
seeds(srv) {
  srv.db.loadData({ ...baseData });
},
Now we need to add in the same construction options to a new property called routes, which will create the mock server routes. This property is a function and on the function body, we will need to set the namespace of the mock server and the delay in milliseconds within which the server will respond. There will be four routes. For the Create route, we will make a new route called /users that listen to the POST method. For the Read route, we will make a new route called /users that listen to the GET method. For the Update route, we will make a new route called /users/:id that listens to the PATCH method, and finally, for the Delete route, we will make a new route called /users that listen to the DELETE method:
routes() {
    this.namespace = 'api';

    this.timing = 750;

    this.get('/users', getFrom('users'));

    this.post('/users', postFrom('users'));

    this.patch('/users/:id', patchFrom('users'));

    this.delete('/users/:id', deleteFrom('users'));
  },
Adding to the application
In this section, we will add the MirageJS server to the Vue application. Follow these steps to make the server available to your Vue application:
Open the main.js file in the src folder.
We need to declare the server as the first imported declaration, so it's available on the initial loading of the application:
import './server/server';
import Vue from 'vue';
import App from './App.vue';

Vue.config.productionTip = false;

new Vue({
  render: h => h(App),
}).$mount('#app');
Creating the component
Now that we have our server, we need to test it. To do so, we will create a simple application that will run each of the HTTP methods and show the results of each call.
In the following parts, we will create a simple Vue application.
Single file component <script> section
In this part, we will create the <script> section of the single file component. Follow these steps to create it:
Open the App.vue file in the src folder.
Import the getHttp, postHttp, patchHttp, and deleteHTTP methods from the fetchHttp wrapper that we made in the 'Creating a wrapper for the Fetch API as an HTTP client' recipe:
import {
  getHttp,
  postHttp,
  patchHttp,
  deleteHttp,
} from './http/fetchApi';
In the data property, we need to create three new properties to be used, response, userData, and userId:
data: () => ({
    response: undefined,
    userData: '',
    userId: undefined,
  }),
In the methods property, we need to create four new methods, getAllUsers, createUser, updateUser, and deleteUser:
methods: {
  async getAllUsers() {
  },
  async createUser() {
  },
  async updateUser() {
  },
  async deleteUser() {
  },
},
In the getAllUsers method, we will set the response data property as the result of the getHttp function of the api/users route:
async getAllUsers() {
  this.response = await getHttp(`${window.location.href}api/users`);
},
In the createUser method, we will receive a data argument, which will be an object that we will pass to the postHttp on the api/users route, and after that, we will execute the getAllUsers method:
async createUser(data) {
  await postHttp(`${window.location.href}api/users`, { data });
  await this.getAllUsers();
},
For the updateUser method, we will receive a data argument, which will be an object that we will pass to the patchHttp on the api/users/:id route, using the id property on the object as the :id on the route. After that, we will execute the getAllUsers method:
async updateUser(data) {
  await patchHttp(`${window.location.href}api/users/${data.id}`,
     { data });
  await this.getAllUsers();
},
Finally, on the deleteUser method, we receive the user id as the argument, which is a number, then we pass it to the deleteHttp on the api/users/:id route, using the ID as :id. After that, we execute the getAllUsers method:
async deleteUser(id) {
  await deleteHttp(`${window.location.href}api/users/${id}`, {},
     'text');
  await this.getAllUsers();
},
Single file component <template> section
In this part, we will create the <template> section of the single file component. Follow these steps to create it:
At the top of the template, we need to add the response property, wrapped in an <pre> HTML element:
<h3>Response</h3>
<pre>{{ response }}</pre>
For the creation and updating of a user, we need to create a textarea HTML input with a v-model directive bound to the userData property:
<hr/>
<h1> Create / Update User </h1>
<label for="userData">
 User JSON:
 <textarea
 id="userData"
 v-model="userData"
 rows="10"
 cols="40"
 style="display: block;"
 ></textarea>
</label>
To send this data, we need to create two buttons, both having an event listener bound on the click event with the @click directive targeting the createUser and updateUser respectively, and passing the userData in the execution:
<button
  style="margin: 20px;"
  @click="createUser(JSON.parse(userData))"
>
  Create User
</button>
<button
  style="margin: 20px;"
  @click="updateUser(JSON.parse(userData))"
>
  Update User
</button>
To execute the DELETE method, we need to create an input HTML element of type number with a v-model directive bound to the userId property:
<h1> Delete User </h1>
<label for="userData">
  User Id:
<input type="number" step="1" v-model="userId">
</label>
Finally, to execute this action we need to create a button that will have an event listener bound on the click event with the @click directive, targeting the deleteUser method and passing the userId property on the execution:
<button
  style="margin: 20px;"
  @click="deleteUser(userId)"
>
  Delete User
</button>
To run the server and see your component, you need to open Terminal (macOS or Linux) or Command Prompt/PowerShell (Windows) and execute the following command:
> npm run serve
Here is your component rendered and running:

How it works...
MirageJS works like an interceptor of every HTTP request that happens on the application. The server intercepts all XHR (XMLHttpRequest) executions on the browsers and checks for the route to see whether it matches any one of the routes created on server creation. If it matches, the server will execute the function accordingly on the respective route.
Working as a simple REST server with basic CRUD functions, the server has a schema-like database structure that helps in the process of making a virtual database for storing the data.
See also
You can find more information about MirageJS at https://github.com/miragejs/miragejs.
Using axios as the new HTTP client
When you need a library for HTTP requests, there is no doubt that axios is the one you should go to. Used by more than 1.5 million open-source projects and countless closed ones, this library is the king of HTTP libraries.
It's built to work with most browsers and provides one of the most complete sets of options out there – you can customize everything in your request.
In this recipe, we will learn how to change our Fetch API wrapper to axios and start working around it.
Getting ready
The pre-requisite for this recipe is as follows:
Node.js 12+
The Node.js global objects that are required are as follows:
@vue/cli
@vue/cli-service-global
How to do it...
To start our component, we can use the Vue project with Vue CLI that we made in the 'Creating your fake JSON API Server with MirageJS' recipe, or we can start a new one.
To start a new one, open Terminal (macOS or Linux) or Command Prompt/PowerShell (Windows) and execute the following command:
> vue create http-project
The CLI will ask some questions that will help with the creation of the project. You can use the arrow keys to navigate, the Enter key to continue, and the Spacebar to select an option. Choose the default option:
? Please pick a preset: (Use arrow keys)
❯ default (babel, eslint)
Manually select features
Changing from the Fetch API to Axios
In the next steps, we will change the Fetch API used in the HTTP wrapper for the axios library. Follow these steps to change it correctly:
Install axios in your packages. You need to open Terminal (macOS or Linux) or Command Prompt/PowerShell (Windows) and execute the following command:
> npm install --save axios
Open the baseFetch.js file inside the src/http folder.
Simplify the method so that it will receive three arguments, url, method, and options, and return an axios method, calling the HTTP request with the methods passed as the constructor of the instance:
import axios from 'axios';

export default async (url, method, options = {}) => axios({
  method: method.toUpperCase(),
  url,
  ...options,
});
Changing the GET method function
In this part, we are changing the HTTP GET method. Follow these instructions to change the getHttp function:
Open the fetchApi.js file inside the src/http folder.
In the getHttp function, we will add a new argument param, and remove the currying functions:
export const getHttp = async (
  url,
  params,
  options,
) => baseHttp(url,
  'get',
  {
    ...options,
    params,
  });
Changing the POST method function
In this part, we are changing the HTTP POST method. Follow these instructions to change the postHttp function:
Open the fetchApi.js file inside the http folder.
In the postHttp function, we will change the body argument to data, and remove the currying functions:
export const postHttp = async (
  url,
  data,
  options,
) => baseHttp(url,
  'post',
  {
    data,
    ...options,
  });
Changing the PUT method function
In this part, we are changing the HTTP PUT method. Follow these instructions to change the putHttp function:
Open the fetchApi.js file inside the http folder.
In the putHttp function, we will change the body argument to data, and remove the currying functions:
export const putHttp = async (
  url,
  data,
  options,
) => baseHttp(url,
  'put',
  {
    data,
    ...options,
  });
Changing the PATCH method function
In this part, we are changing the HTTP PATCH method. Follow these instructions to change the patchHttp function:
Open the fetchApi.js file inside the http folder.
In the patchHttp function, we will change the body argument to data, and remove the currying functions:
export const patchHttp = async (
  url,
  data,
  options,
) => baseHttp(url,
  'patch',
  {
    data,
    ...options,
  });
Changing the UPDATE method function
In this part, we are changing the HTTP UPDATE method. Follow these instructions to change the updateHttp function:
Open the fetchApi.js file inside the http folder.
In the updateHttp function, we will add a new argument param, and remove the currying functions:
export const updateHttp = async (
  url,
  data,
  options,
) => baseHttp(url,
  'update',
  {
    data,
    ...options,
  });
Changing the DELETE method function
In this part, we are changing the HTTP DELETE method. Follow these instructions to change the deleteHttp function:
Open the fetchApi.js file inside the http folder.
On the deleteHttp function, we will change the body argument to data, and remove the currying functions:
export const deleteHttp = async (
  url,
  data,
  options,
) => baseHttp(url,
  'delete',
  {
    data,
    ...options,
  });
Changing the component
In this part, we will change how the component works with the new functions. Follow these instructions to change it correctly:
Open the App.vue file inside the src folder.
In the getAllUsers method, we will need to change the way the response is defined because axios gives us a completely different response object than the Fetch API:
async getAllUsers() {
  const { data } = await getHttp(`${window.location.href}api/users`);
  this.response = data;
 },
In the deleteUser method, we can just pass the URL as the parameter:
async deleteUser(id) {
  await deleteHttp(`${window.location.href}api/users/${id}`);
  await this.getAllUsers();
 },
To run the server and see your component, you need to open Terminal (macOS or Linux) or Command Prompt/PowerShell (Windows) and execute the following command:
> npm run serve
How it works...
When we made the wrapper for the Fetch API, we used a technique of abstracting the API into another interface, which made it possible to change from the Fetch API to the axios library. By doing this we were able to improve the methods and simplify how the functions are called and handled. For example, the GET method can now receive a new argument called params, which are objects of URL query parameters that will be automatically injected into the URL.
We also had to change the way that the responses were interpreted because axios have a more robust and complete response object than the Fetch API, which returns just the fetched response itself.
See also
You can find more information about axios at https://github.com/axios/axios.
Creating different axios instances
When using axios, you can have multiple instances of it running with none of them interfering with each other. For example, you have an instance pointing to a user API that is on version 1 and another pointing to the payment API that is on version 2, both sharing the same namespace.
Here, we are going to learn how to create various axios instances, so you are able to work with as many API namespaces as you want without problems or interference.
Getting ready
The pre-requisite for this recipe is as follows:
Node.js 12+
The Node.js global objects that are required are as follows:
@vue/cli
@vue/cli-service-global
How to do it...
To start our component, we can use the Vue project with Vue CLI that we did in the 'Using axios as the new HTTP client' recipe, or we can start a new one.
To start a new one, open Terminal (macOS or Linux) or Command Prompt/PowerShell (Windows) and execute the following command:
> vue create http-project
The CLI will ask some questions that will help with the creation of the project. You can use the arrow keys to navigate, the Enter key to continue, and the Spacebar to select an option. Choose the default option:
? Please pick a preset: (Use arrow keys)
❯ default (babel, eslint)
Manually select features
Changing the HTTP function
When creating multiple axios instances, the process of calling the axios library changes. Because of that, we need to change how our HTTP wrapper instantiates the axios library.
In the following parts, we will change how the HTTP wrapper works with the creation of a new axios instance, and make it available to the application.
Changing the HTTP Fetch wrapper
In the following steps, we will create a new custom axios instance that will be used in the HTTP wrapper. Follow these instructions to add the new instance to the application:
Open the baseFetch.js file in the src/http folder.
We need to create a new factory function called createAxios to generate a new axios instance each time it's executed:
export function createAxios(options = {}) {
  return axios.create({
    ...options,
  });
}
Now we need to create the localApi constant, the value of which will be the result of the execution of the createAxios factory:
const localApi = createAxios();
For the JSONPlaceHolder we will create a constant that will be exported, named jsonPlaceholderApi, the value of which will be the execution of the createAxios factory. We will also pass an object as an argument with the baseURL property defined:
export const jsonPlaceholderApi = createAxios({
  baseURL: 'https://jsonplaceholder.typicode.com/',
});
In the export default function, we need to change from axios to localApi:
export default async (url, method, options = {}) => localApi({
  method: method.toUpperCase(),
  url,
  ...options,
});
Changing the HTTP methods function
In this part, we will change how the HTTP methods will work with the new axios instances. Follow the instructions to do it correctly:
Open the fetchApi.js file in the src/http folder.
We will import the jsonPlaceholderApi function from baseFetch as an extra imported value:
import baseHttp, { jsonPlaceholderApi } from './baseFetch';
We need to create a new constant called getTodos that will be exported. This constant will be a function that will receive a userId as a parameter and return the GET function from axios, with the userId parameter we just received, inside a configuration object in a property called params:
export const getTodos = async userId => jsonPlaceholderApi.get('todos',
  {
    params: {
      userId,
    },
  });
Changing the MirageJS server
In this part, we will change how the MirageJS server works with the new axios instance that was created. Follow the instructions to do it correctly:
Open the server.js file in the src/server folder.
On the routes property in the constructor object, we need to add a passthrough declaration, which will indicate to the MirageJS that all the calls to that URL won't be intercepted:
import { Server } from 'miragejs';
import baseData from './db';
import { getFrom } from './get';
import { postFrom } from './post';
import { patchFrom } from './patch';
import { deleteFrom } from './delete';

window.server = new Server({
  seeds(srv) {
    srv.db.loadData({ ...baseData });
  },

  routes() {
    this.passthrough();
    this.passthrough('https://jsonplaceholder.typicode.com/**');

    this.namespace = 'api';

    this.timing = 750;

    this.get('/users', getFrom('users'));

    this.post('/users', postFrom('users'));

    this.patch('/users/:id', patchFrom('users'));

    this.delete('/users/:id', deleteFrom('users'));
  },
});
Changing the component
After the changes in the wrapper functions, the MirageJS server methods, and the HTTP methods, we need to change the component to the new library that was implemented.
In the following parts, we will change the component to match the new library that was implemented.
Single file component <script> section
In this part, we will change the <script> section of the single file component. Follow these steps to do it:
Open the App.vue file in the src folder.
We need to import the new getTodos function as follows:
import {
  getHttp,
  postHttp,
  patchHttp,
  deleteHttp,
  getTodos,
} from './http/fetchApi';
In the data property of the Vue object, we need to create a new property called userTodo, with the default value of an empty array:
data: () => ({
  response: undefined,
  userData: '',
  userId: undefined,
  userTodo: [],
}),
In the methods property, we need to create a new method called getUserTodo that receives the userId argument. This method will fetch the list of to-do items of the user and will attribute the response to the userTodo property:
async getUserTodo(userId) {
  this.userTodo = await getTodos(userId);
},
Single file component <template> section
In this part, we will change the <template> section of the single file component. Follow these steps to do it:
Open the App.vue file in the src folder.
At the bottom of the template, we need to create a new input HTML element, with the v-model directive bound to the userId property:
<h1> Get User ToDos </h1>
<label for="userData">
  User Id:
  <input type="number" step="1" v-model="userId">
</label>
To fetch the list of items, we need to create a button with an event listener bound on the click event with the @click directive, targeting the getUserTodo, and passing the userId in the execution:
<button
  style="margin: 20px;"
  @click="getUserTodo(userId)"
>
  Fetch Data
</button>
To run the server and see your component, you need to open Terminal (macOS or Linux) or Command Prompt/PowerShell (Windows) and execute the following command:
> npm run serve
Here is your component rendered and running:

How it works...
When we create a new instance of axios, a new object is created, and new configurations, headers, interceptors, and manipulators are defined. This happens because axios declares the create functions as the same as new Class. It's the same interface but different objects.
Using this possibility, we were able to create two connection drivers, one for the local API and another for the JSONPlaceHolder API, which has a different baseURL.
Because of MirageJS server integration, all the HTTP requests are intercepted by MirageJS, so we needed to add a directive in the router constructor that indicates the routes that MirageJS won't intercept.
See also
You can find more information about the JSONPlaceHolder API at https://jsonplaceholder.typicode.com/.
You can find more information about axios instances at https://github.com/axios/axios#creating-an-instance.
You can find more information about MirageJS at https://github.com/miragejs/miragejs.
Creating a request and response interceptor for axios
Using axios as the main HTTP manipulator in our application allows us to use request and response interceptors. Those are used to manipulate the data before sending it to the server or when receiving the data, manipulating it before sending it back to the JavaScript code.
The most common way an interceptor is used is in JWT token validation and refreshing the requests that receive a specific error or API error manipulation.
In this recipe, we will learn how to create a request interceptor to check the POST, PATCH, and DELETE methods and a response error manipulator.
Getting ready
The pre-requisite for this recipe is as follows:
Node.js 12+
The Node.js global objects that are required are as follows:
@vue/cli
@vue/cli-service-global
How to do it...
To start our component, we can use the Vue project with Vue CLI that we made in the 'Creating different axios instances' recipe, or we can start a new one.
To start a new one, open Terminal (macOS or Linux) or Command Prompt/PowerShell (Windows) and execute the following command:
> vue create http-project
The CLI will ask some questions that will help with the creation of the project. You can use the arrow keys to navigate, the Enter key to continue, and the Spacebar to select an option. Choose the default option:
? Please pick a preset: (Use arrow keys)
❯ default (babel, eslint)
Manually select features
Creating the interceptor
In the following steps, we will create an axios interceptor that will work as a middleware. Follow the instructions do it correctly:
Install the Sweet Alert package. To do this you need to open Terminal (macOS or Linux) or Command Prompt/PowerShell (Windows) and execute the following command:
> npm install --save sweetalert2
Create a new file called interceptors.js in the src/http folder and open it.
Then, we import the Sweet Alert package:
import Swal from 'sweetalert2';
We need to create a constant with an array of the POST methods that will be intercepted:
const postMethods = ['post', 'patch'];
We need to create a function named requestInterceptor and export it. This function will receive one argument, config, which is an axios configuration object. We need to check whether the request method is included in the array we created earlier and whether the data property of the data body has an id property. If any of the checks didn't pass, we will throw an Error, otherwise, we will return config:
export function requestInterceptor(config) {
  if (
    postMethods.includes(config.method.toLocaleLowerCase()) &&
    Object.prototype.hasOwnProperty.call('id', config.data.data) &&
      !config.data.data.id)
    {
      throw new Error('You need to pass an ID for this request');
    }

 return config;
}
For the response interceptor, we need to create a new function called responseInterceptor that returns the response, as we won't change anything in this interceptor:
export function responseInterceptor(response) {
  return response;
}
For catching the error, we need to create an errorInterceptor function, which will be exported. This function receives an error as an argument and will display a sweetalert2 alert error message and return a Promise.reject with the error:
export function errorInterceptor(error) {
  Swal.fire({
    type: 'error',
    title: 'Error!',
    text: error.message,
  });

  return Promise.reject(error);
}
Adding the interceptors to the HTTP methods functions
In the following steps, we will add the axios interceptor to the HTTP method functions. Follow these steps to do it correctly:
Open the baseFetch.js file in the src/http folder.
We need to import the three interceptors we just created:
import {
  errorInterceptor,
  requestInterceptor,
  responseInterceptor,
} from './interceptors';
After the creation of the localApi instance, we declare the use of the request and response interceptor:
localApi.interceptors
  .request.use(requestInterceptor, errorInterceptor);

localApi.interceptors
  .response.use(responseInterceptor, errorInterceptor);
After the creation of the jsonPlaceholderApi instance, we declare the use of the request and response interceptor:
jsonPlaceholderApi.interceptors
  .request.use(requestInterceptor, errorInterceptor);

jsonPlaceholderApi.interceptors
  .response.use(responseInterceptor, errorInterceptor);
How it works...
Each request that axios do passes through each of any one of the interceptors in the set. The same thing happens for the response. If any error is thrown on the interceptor, it will automatically be passed to the error manipulator, so the request won't be executed at all, or the response will be sent to the JavaScript code as an error.
We checked each request that was done for the POST, PATCH, and DELETE method to see if there was an id property in the body data. If there wasn't, we threw an error to the user, saying that they need to pass an ID for the request.
See also
You can find more information about Sweet Alert 2 at https://sweetalert2.github.io.
You can find more information about the axios request interceptor at https://github.com/axios/axios#interceptors.
Creating a CRUD interface with Axios and Vuesax
When dealing with data, there is something that we will always need to do: a CRUD process. Regardless of what kind of application you are developing, a CRUD interface is needed in order to input and manipulate any data on the server, the administrator panel, the backend of your application, or even the client side.
Here, we will learn how to create a simple CRUD interface using the Vuesax framework for the UI and axios for the HTTP request.
Getting ready
The pre-requisite for this recipe is as follows:
Node.js 12+
The Node.js global objects that are required are as follows:
@vue/cli
@vue/cli-service-global
How to do it...
To start our component, use the Vue project with Vue CLI that we used in the 'Creating a request and response interceptor for axios' recipe, or start a new one.
To start a new one, open Terminal (macOS or Linux) or Command Prompt/PowerShell (Windows) and execute the following command:
> vue create http-project
The CLI will ask some questions that will help with the creation of the project. You can use the arrow keys to navigate, the Enter key to continue, and the Spacebar to select an option. Choose the default option:
? Please pick a preset: (Use arrow keys)
❯ default (babel, eslint)
Manually select features
Adding Vuesax to the application
In the following steps, we will cover how to add the Vuesax UI library to your Vue application. Follow these instructions to do it correctly:
Open Terminal (macOS or Linux) or Command Prompt/PowerShell (Windows) and execute the following command:
> npm install --save vuesax material-icons
Create a file called style.css in the src folder and open it.
Import the vuesax, material-icon, and Open Sans font stylesheets:
@import url('https://fonts.googleapis.com/css?family=Open+Sans:300,300i,400,400i,600,600i,700,700i,800,
    800i&display=swap');
@import url('~vuesax/dist/vuesax.css');
@import url('~material-icons/iconfont/material-icons.css');

* {
  font-family: 'Open Sans', sans-serif;
}
Open the main.js file in the src folder.
Import the style.css file and Vuesax. After that, you need to inform Vue to use Vuesax:
import './server/server';
import Vue from 'vue';
import App from './App.vue';
import Vuesax from 'vuesax';
import './style.css';

Vue.use(Vuesax);

Vue.config.productionTip = false;

new Vue({
  render: h => h(App),
}).$mount('#app');
Creating the component routing
We will continue the recipe in five parts: List, Create, Read, Update, and Delete. Our application will be a dynamic component application, so we will create five components, one for each part. Those components will be like our pages.
First, we need to change App.vue to be our main route manager and create a mixin for changing the component.
Single file component <script> section
In this part, we will create the <script> section of the single file component. Follow these instructions to create the component correctly:
Open App.vue in the src folder.
Import each one of the components that will be created here:
import List from './components/list';
import Create from './components/create';
import View from './components/view';
import Update from './components/update';
In the data property, create two new values: componentIs with a default value of 'list', and userId with a default value of 0:
data: () => ({
  componentIs: 'list',
  userId: 0,
}),
We need to add a new property to the Vue object, called provide. This property will be a function, so the provided values to the components can be reactive:
provide () {
  const base = {};

  Object.defineProperty(base, 'userId', {
    enumerable: true,
    get: () => Number(this.userId),
  });

  return base;
},
In the computed properties, we need to create a new property called component. This will be a switch case that will return our component, based on the componentIs property:
computed: {
  component() {
    switch (this.componentIs) {
      case 'list':
        return List;
      case 'create':
        return Create;
      case 'view':
        return View;
      case 'edit':
        return Update;
      default:
        return undefined;
    }
  }
},
Finally, in the methods, we need to create a changeComponent method that will update the current component to a new one:
methods: {
  changeComponent(payload) {
    this.componentIs = payload.component;
    this.userId = Number(payload.userId);
  },
},
Single file component <template> section
In this part, we will create the <template> section of the single file component. Follow these instructions to create the component correctly:
In the div#app HTML element, we need to add a vs-row component:
<div id="app">
    <vs-row></vs-row>
</div>
In the vs-row component, we need to add a vs-col component with the following attributes: vs-type defined as flex, vs-justify defined as left, vs-align defined as left, and vs-w defined as 12:
<vs-col
  vs-type="flex"
  vs-justify="left"
  vs-align="left"
  vs-w="12">
</vs-col>
Finally, inside the vs-col component, we will add a dynamic component that has an is attribute to the computed property component and point the event listener at the "change-component" event that will execute the changeComponent method:
<component
 :is="component"
 @change-component="changeComponent"
/>
Creating the route mixin
In this part, we will create the component mixin to be re-used in other components. Follow these instructions to create the component correctly:
Create a new file called changeComponent.js in the src/mixin folder and open it.
This mixin will have a method called changeComponent, which will emit a 'change-component' event with the name of the new component that needs to be rendered, and the userId:
export default {
  methods: {
    changeComponent(component, userId = 0) {
      this.$emit('change-component', { component, userId });
    },
  }
}
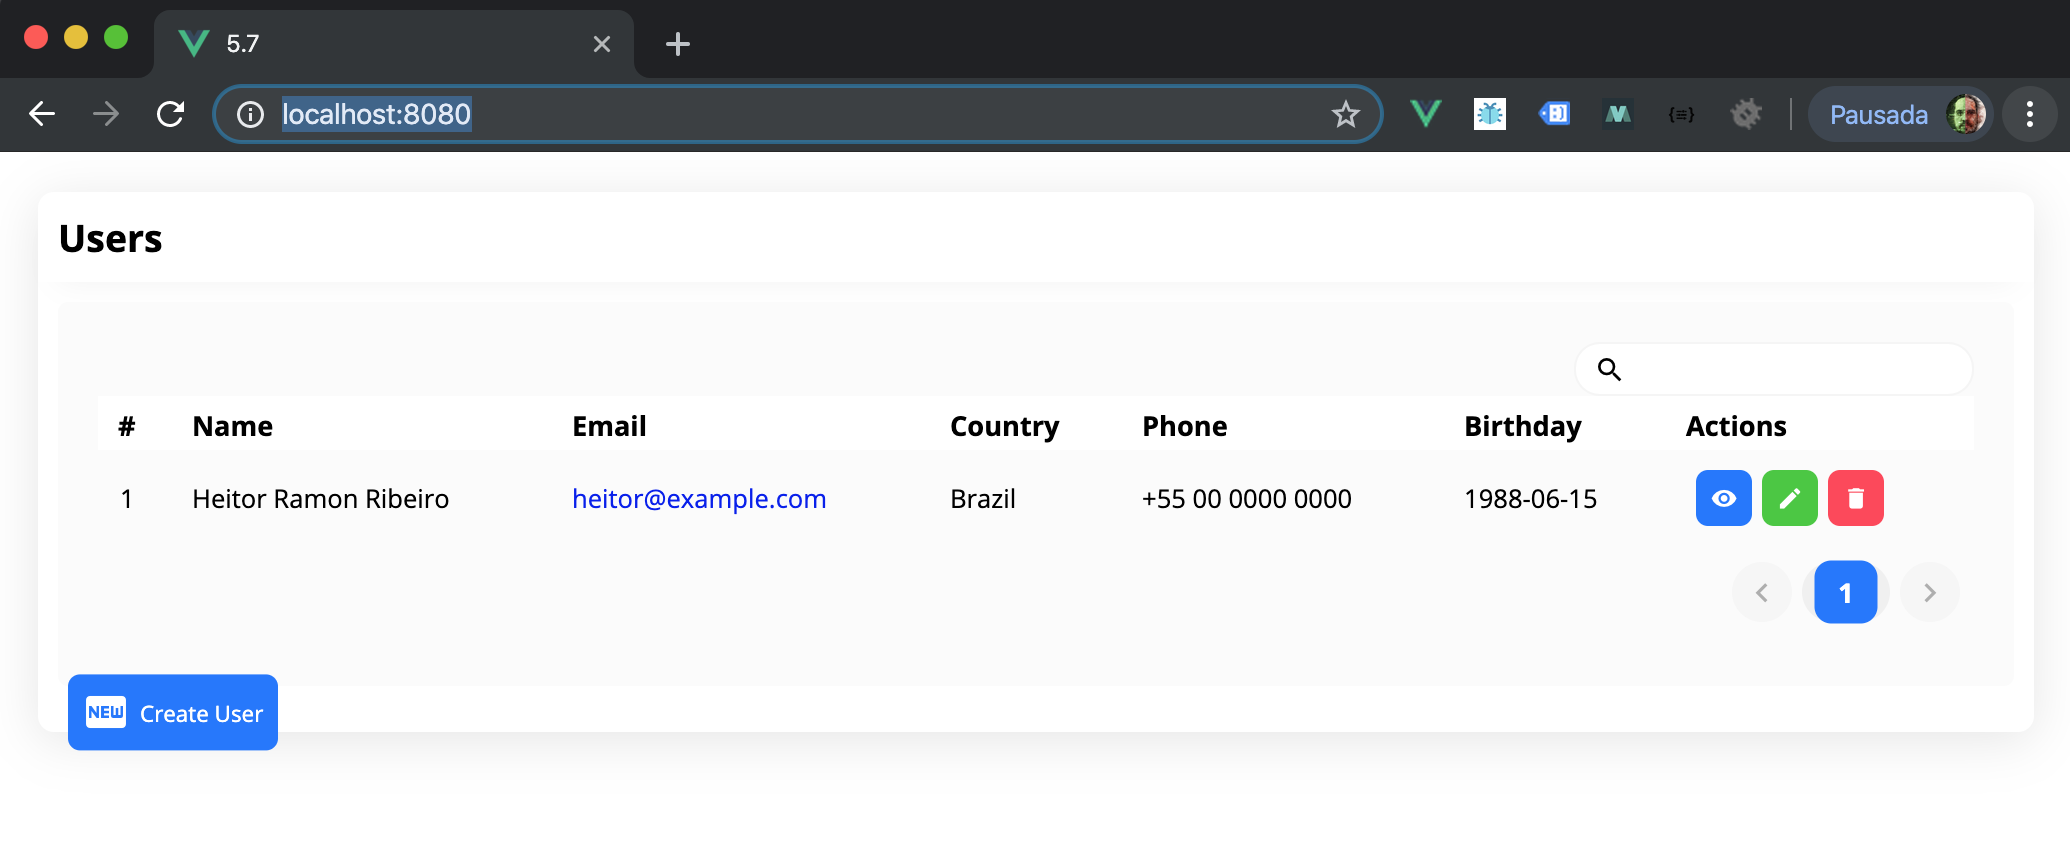
Creating the list component
The list component will be the index component. It will list the users in the application and have all the links for the other CRUD actions.
Single file component <script> section
In this part, we will create the <script> section of the single file component. Follow these instructions to create the component correctly:
Create a new file called list.vue in the src/components folder and open it.
Import the getHttp and deleteHttp from fetchApi and the changeComponent mixin:
import {
    getHttp,
    deleteHttp,
  } from '../http/fetchApi';
  import changeComponent from '../mixin/changeComponent';
In the component mixins property, we need to add the imported changeComponent mixin:
mixins: [changeComponent],
In the data property of the component, we add a new property named userList, with a default empty array:
data: () => ({
  userList: [],
}),
For the methods, we create getAllUsers and deleteUsers methods. In the getAllUsers method, we fetch the user lists and set the userList value as the response from the getHttp function execution. The deleteUser method will execute the deleteHttp function, and then execute the getAllUsers method:
methods: {
  async getAllUsers() {
    const { data } = await getHttp(`${window.location.href}api/users`);
    this.userList = data;
  },
  async deleteUser(id) {
    await deleteHttp(`${window.location.href}api/users/${id}`);
    await this.getAllUsers();
  },
}
Lastly, we make the beforeMount life cycle hook asynchronous, calling the getAllUsers method:
async beforeMount() {
  await this.getAllUsers();
},
Single file component <template> section
In this part, we will create the <template> section of the single file component. Follow these instructions to create the component correctly:
Create a vs-card component with the style attribute defined as margin: 20px:
<vs-card
    style="margin: 20px;"
  >
</vs-card>
Inside the vs-card component, create a dynamic <template> named slot for header, with an <h3> tag and your title:
<template slot="header">
  <h3>
    Users
  </h3>
</template>
After that, create a vs-row component with a vs-col component inside of it, with the following attributes: vs-type defined as flex, vs-justify defined as left, vs-align defined as left, and vs-w defined as 12:
<vs-row>
  <vs-col
    vs-type="flex"
    vs-justify="left"
    vs-align="left"
    vs-w="12">
  </vs-col>
</vs-row>
Inside the vs-col component, we need to create a vs-table component. This component will have the data attribute pointed to the userList variable, and will have the search, stripe, and pagination attributes defined as true. The max-items attribute will be defined as 10 and the style attribute will have the value of width: 100%; padding: 20px;:
<vs-table
  :data="userList"
  search
  stripe
  pagination
  max-items="10"
  style="width: 100%; padding: 20px;"
></vs-table>
For the table header, we need to create a dynamic <template> named slot thead, and create for each column a vs-th component with the sort-key attribute defined as the respective object key property and the display as the name you want:
<template slot="thead">
<vs-th sort-key="id">
#
</vs-th>
<vs-th sort-key="name">
Name
</vs-th>
<vs-th sort-key="email">
</vs-th>
<vs-th sort-key="country">
Country
</vs-th>
<vs-th sort-key="phone">
Phone
</vs-th>
<vs-th sort-key="Birthday">
Birthday
</vs-th>
<vs-th>
Actions
</vs-th>
</template>
For the table body, we need to create a dynamic <template> with a slot-scope attribute defined as the data property. Inside this <template> we need to create a vs-tr component that will iterate the data property and have a vs-td component for each column that you set on the head of the table. Each vs-td component has a data property set to the respective column data object property, and the content will be the same data rendered. The final column that is the actions column will have three buttons, one for Read, another for Update, and the last for Delete. The Read button will have an event listener on the "click" event pointing to the changeComponent, and the same goes for the Update button. The Delete button "click" event listener will be pointing to the deleteUser method:
<template slot-scope="{data}">
  <vs-tr :key="index" v-for="(tr, index) in data">
    <vs-td :data="data[index].id">
      {{data[index].id}}
    </vs-td>
    <vs-td :data="data[index].name">
      {{data[index].name}}
    </vs-td>
    <vs-td :data="data[index].email">
      <a :href="`mailto:${data[index].email}`">
        {{data[index].email}}
      </a>
    </vs-td>
    <vs-td :data="data[index].country">
      {{data[index].country}}
    </vs-td>
    <vs-td :data="data[index].phone">
      {{data[index].phone}}
    </vs-td>
    <vs-td :data="data[index].birthday">
      {{data[index].birthday}}
    </vs-td>
    <vs-td :data="data[index].id">
      <vs-button
        color="primary"
        type="filled"
        icon="remove_red_eye"
        size="small"
        @click="changeComponent('view', data[index].id)"
      />
      <vs-button
        color="success"
        type="filled"
        icon="edit"
        size="small"
        @click="changeComponent('edit', data[index].id)"
      />
      <vs-button
        color="danger"
        type="filled"
        icon="delete"
        size="small"
        @click="deleteUser(data[index].id)"
      />
    </vs-td>
  </vs-tr>
</template>
Finally, in the card footer, we need to create a dynamic <template> named slot for footer. Inside this <template> we will add a vs-row component with the vs-justify attribute defined as flex-start and insert a vs-button with the color attribute defined as primary, type defined as filled, icon defined as fiber_new, and size defined as small. The @click event listener will target the changeComponent method with the parameters 'create' and 0:
<template slot="footer">
  <vs-row vs-justify="flex-start">
    <vs-button
      color="primary"
      type="filled"
      icon="fiber_new"
      size="small"
      @click="changeComponent('create', 0)"
    >
      Create User
    </vs-button>
  </vs-row>
</template>
Single file component <style> section
In this part, we will create the <style> section of the single file component. Follow these instructions to create the component correctly:
Create a declaration of margin to the vs-button component class:
<style scoped>
  .vs-button {
    margin-left: 5px;
  }
</style>
To run the server and see your component, you need to open Terminal (macOS or Linux) or Command Prompt/PowerShell (Windows) and execute the following command:
> npm run serve
Here is your component rendered and running:
Creating a generic user form component
In the following parts, we will create a generic user form component that will be used by other components. This component is considered generic because it is a component that can be used by anyone.
Single file component <script> section
In this part, we will create the <script> section of the single file component. Follow these instructions to create the component correctly:
Create a new file called userForm.vue in the src/components folder and open it.
In the props Vue property, create two new properties called value and disabled, both being objects and having the three properties of type, required, and default. For the value property, the type will be Object, required will be false, and default will be a factory returning an object. For the disabled property, the type will be Boolean, required will be false, and the default will also be false:
props: {
  value: {
    type: Object,
    required: false,
    default: () => {
    },
  },
  disabled: {
    type: Boolean,
    required: false,
    default: false,
  }
},
In the data property, we need to add a new value of tmpForm, with the default value of an empty object:
data: () => ({
  tmpForm: {},
}),
In the Vue watch property, we need to create the handler for the tmpForm and the value. For the tmpForm watcher, we will add a handler function that will emit an 'input' event on each change with the new value, and add the deep property to true. Finally, on the value watcher, we will add a handler function that will set the value of the tmpForm as the new value. We also need to define the deep and immediate properties as true:
watch: {
  tmpForm: {
    handler(value) {
      this.$emit('input', value);
    },
    deep: true,
  },
  value: {
    handler(value) {
      this.tmpForm = value;
    },
    deep: true,
    immediate: true,
  }
},
Single file component <template> section
In this part, we will create the <template> section of the single file component. Follow these instructions to create the component correctly:
For the inputs wrapper, we need to create a vs-row component. Inside the vs-row component, we will create each input for our user form:
<vs-row></vs-row>
For the name input, we need to create a vs-col component, with the attributes of vs-type defined as 'flex', vs-justify defined as 'left', vs-align defined as 'left', and vs-w defined as '6'. Inside of the vs-col component, we need to create a vs-input component, with the v-model directive bound to tmpForm.name, the attributes of disabled bound to the disabled props, label defined as 'Name', placeholder defined as 'User Name', and class defined as 'inputMargin full-width':
<vs-col
  vs-type="flex"
  vs-justify="left"
  vs-align="left"
  vs-w="6">
  <vs-input
    v-model="tmpForm.name"
    :disabled="disabled"
    label="Name"
    placeholder="User Name"
    class="inputMargin full-width"
  />
</vs-col>
For the email input, we need to create a vs-col component, with the attributes of vs-type defined as 'flex', vs-justify defined as 'left', vs-align defined as 'left', and vs-w defined as '6'. Inside of the vs-col component, we need to create a vs-input component, with the v-model directive bound to tmpForm.email, the disabled attributes bound to the disabled props, label defined as 'Email', placeholder defined as 'User Email', and class defined as 'inputMargin full-width':
<vs-col
  vs-type="flex"
  vs-justify="left"
  vs-align="left"
  vs-w="6">
  <vs-input
    v-model="tmpForm.email"
    :disabled="disabled"
    label="Email"
    placeholder="User Email"
    class="inputMargin full-width"
  />
</vs-col>
For the country input, we need to create a vs-col component, with the attributes of vs-type defined as 'flex', vs-justify defined as 'left', vs-align defined as 'left', and vs-w defined as '6'. Inside of the vs-col component, we need to create a vs-input component, with the v-model directive bound to tmpForm.country, the disabled attributes bound to the disabled props, label defined as 'Country', placeholder defined as 'User Country', and class defined as 'inputMargin full-width':
<vs-col
  vs-type="flex"
  vs-justify="left"
  vs-align="left"
  vs-w="6">
  <vs-input
    v-model="tmpForm.country"
    :disabled="disabled"
    label="Country"
    placeholder="User Country"
    class="inputMargin full-width"
  />
</vs-col>
For the phone input, we need to create a vs-col component, with the attributes of vs-type defined as 'flex', vs-justify defined as 'left', vs-align defined as 'left', and vs-w defined as '6'. Inside of the vs-col component, we need to create a vs-input component, with the v-model directive bound to tmpForm.phone, the disabled attributes bound to the disabled props, label defined as 'Phone', placeholder defined as 'User Phone', and class defined as 'inputMargin full-width':
<vs-col
  vs-type="flex"
  vs-justify="left"
  vs-align="left"
  vs-w="6">
  <vs-input
    v-model="tmpForm.phone"
    :disabled="disabled"
    label="Phone"
    placeholder="User Phone"
    class="inputMargin full-width"
  />
</vs-col>
For the birthday input, we need to create a vs-col component, with the attributes of vs-type defined as 'flex', vs-justify defined as 'left', vs-align defined as 'left', and vs-w defined as '6'. Inside of the vs-col component, we need to create a vs-input component, with the v-model directive bound to tmpForm.birthday, the disabled attributes bound to the disabled props, label defined as 'Birthday', placeholder defined as 'User Birthday', and class defined as 'inputMargin full-width':
<vs-col
  vs-type="flex"
  vs-justify="left"
  vs-align="left"
  vs-w="6">
  <vs-input
    v-model="tmpForm.birthday"
    :disabled="disabled"
    label="Birthday"
    placeholder="User Birthday"
    class="inputMargin full-width"
  />
</vs-col>
Single file component <style> section
In this part, we will create the <style> section of the single file component. Follow these instructions to create the component correctly:
Create a new scoped class called inputMargin with the margin property defined as 15px:
<style>
  .inputMargin {
    margin: 15px;
  }
</style>
Creating the create user component
To start our process with user manipulation, we need to create an initial base user form to be shared between the View, Create, and Update components.
Single file component <script> section
In this part, we will create the <script> section of the single file component. Follow these instructions to create the component correctly:
Create a new file called create.vue in the src/components folder and open it.
Import the UserForm component, the changeComponent mixin, and postHttp from fetchApi:
import UserForm from './userForm';
import changeComponent from '../mixin/changeComponent';
import { postHttp } from '../http/fetchApi';
It the data property, we will add a userData object with the name, email, birthday, country, and phone properties all defined as empty strings:
data: () => ({
  userData: {
    name: '',
    email: '',
    birthday: '',
    country: '',
    phone: '',
  },
}),
In the Vue mixins property, we need to add the changeComponent:
mixins: [changeComponent],
In the Vue components property, add the UserForm component:
components: {
  UserForm,
},
In the methods property, we need to create the createUser method that will use the data on the userData property and will create a new user on the server and then redirect the user to the users lists:
methods: {
  async createUser() {
    await postHttp(`${window.location.href}api/users`, {
      data: {
        ...this.userData,
      }
    });
    this.changeComponent('list', 0);
  },
},
Single file component <template> section
In this part, we will create the <template> section of the single file component. Follow these instructions to create the component correctly:
Create a vs-card component with the style attribute defined as margin: 20px:
<vs-card
    style="margin: 20px;"
  >
</vs-card>
Inside the vs-card component, create a dynamic <template> named slot for header, with an <h3> tag and your title:
<template slot="header">
  <h3>
    Create User
  </h3>
</template>
After that, create a vs-row component with a vs-col component inside of it, with the attributes of vs-type defined as flex, vs-justify defined as left, vs-align defined as left, and vs-w defined as 12:
<vs-row>
  <vs-col
    vs-type="flex"
    vs-justify="left"
    vs-align="left"
    vs-w="12">
  </vs-col>
</vs-row>
Inside the vs-col component, we will add the user-form component with the v-model directive bound to userData:
<user-form
  v-model="userData"

/>
Finally, in the card footer, we need to create a dynamic <template> named slot for footer. Inside this <template> we will add a vs-row component with the vs-justify attribute defined as flex-start and insert two vs-button components. The first will be for creating the user and will have the attributes of color defined as success, type defined as filled, icon defined as save, and size defined as small. The @click event listener will target the createUser method and the second vs-button component will be for canceling this action and returning to the users lists. It will have the attributes of color defined as danger, type defined as filled, icon defined as cancel, size defined as small, style defined as margin-left: 5px, and the @click event listener target to the changeComponent method with the 'list' and 0 parameters:
<template slot="footer">
  <vs-row vs-justify="flex-start">
    <vs-button
      color="success"
      type="filled"
      icon="save"
      size="small"
      @click="createUser"
    >
      Create User
    </vs-button>
    <vs-button
      color="danger"
      type="filled"
      icon="cancel"
      size="small"
      style="margin-left: 5px"
      @click="changeComponent('list', 0)"
    >
      Cancel
    </vs-button>
  </vs-row>
</template>
To run the server and see your component, you need to open Terminal (macOS or Linux) or Command Prompt/PowerShell (Windows) and execute the following command:
> npm run serve
Here is your component rendered and running:

View component
In the following parts, we will create the visualization component. This component will be used for viewing the information of the user only.
Single file component <script> section
In this part, we will create the <script> section of the single file component. Follow these instructions to create the component correctly:
Create a file named view.vue in the src/components folder and open it.
Import the UserForm component, the changeComponent mixin, and the getHttp from fetchApi:
import {
  getHttp,
} from '../http/fetchApi';
import UserForm from './userForm';
import changeComponent from '../mixin/changeComponent';
In the data property, we will add a userData object with the name, email, birthday, country, and phone properties all defined as empty strings:
data: () => ({
  userData: {
    name: '',
    email: '',
    birthday: '',
    country: '',
    phone: '',
  },
}),
In the Vue mixins property, we need to add the changeComponent mixin:
mixins: [changeComponent],
In the Vue inject property, we need to declare the 'userId' property:
inject: ['userId'],
In the Vue components property, add the UserForm component:
components: {
  UserForm,
},
For the methods, we will create the getUserById method. This method will fetch the user data by the current ID and set the userData value as the response from the getHttp function execution:
methods: {
  async getUserById() {
    const { data } = await getHttp(`${window.location.href}api/users/${this.userId}`);
    this.userData = data;
  },
}
In the beforeMount life cycle hook, we will make it asynchronous, calling the getUserById method:
async beforeMount() {
  await this.getUserById();
},
Single file component <template> section
In this part, we will create the <template> section of the single file component. Follow these instructions to create the component correctly:
Create a vs-card component with the style attribute defined as margin: 20px:
<vs-card
    style="margin: 20px;"
  >
</vs-card>
Inside the vs-card component, create a dynamic <template> named slot for header, with an <h3> tag and your title:
<template slot="header">
  <h3>
    View User
  </h3>
</template>
After that, create a vs-row component with a vs-col component inside of it, with the attributes of vs-type defined as flex, vs-justify defined as left, vs-align defined as left, and vs-w defined as 12:
<vs-row>
  <vs-col
    vs-type="flex"
    vs-justify="left"
    vs-align="left"
    vs-w="12">
  </vs-col>
</vs-row>
Inside the vs-col component, we will add the UserForm component with the v-model directive bound to userData and the disabled attribute set to true:
<user-form
  v-model="userData"
  disabled
/>
Finally, in the card footer, we need to create a dynamic <template> named slot for footer. Inside this <template> we will add a vs-row component with the vs-justify attribute defined as flex-start and insert two vs-button components. The first will be for canceling this action and returning to the users lists. It will have the attributes of color defined as danger, type defined as filled, icon defined as cancel, size defined as small, and the@click event listener target to the changeComponent method with the 'list' and 0 parameters. The second vs-button component will be for the editing the user and will have the attributes of color defined as success, type defined as filled, icon defined as save, size defined as small style defined as margin-left: 5px, and the @click event listener target to the changeComponent method with the 'list' parameter and the injected userId:
<template slot="footer">
  <vs-row vs-justify="flex-start">
    <vs-button
      color="primary"
      type="filled"
      icon="arrow_back"
      size="small"
      style="margin-left: 5px"
      @click="changeComponent('list', 0)"
    >
      Back
    </vs-button>
    <vs-button
      color="success"
      type="filled"
      icon="edit"
      size="small"
      style="margin-left: 5px"
      @click="changeComponent('edit', userId)"
    >
      Edit User
    </vs-button>
  </vs-row>
</template>
To run the server and see your component, you need to open Terminal (macOS or Linux) or Command Prompt/PowerShell (Windows) and execute the following command:
> npm run serve
Here is your component rendered and running:

Updating the user component
We just viewed the user data, and now we want to update it. We need to make a new component that is almost the same as the view component but has the method of updating the user and has the form enabled.
Single file component <script> section
In this part, we will create the <script> section of the single file component. Follow these instructions to create the component correctly:
Create a file named update.vue in the src/components folder and open it.
Import the UserForm component, the changeComponent mixin, and the getHttp and patchHttp functions from fetchApi:
import UserForm from './userForm';
import changeComponent from '../mixin/changeComponent';
import {
  getHttp,
  patchHttp,
} from '../http/fetchApi';
In the data property, we will add a userData object, with the name, email, birthday, country, and phone properties, all defined as empty strings:
data: () => ({
  userData: {
    name: '',
    email: '',
    birthday: '',
    country: '',
    phone: '',
  },
}),
In the Vue mixins property, we need to add the changeComponent mixin:
mixins: [changeComponent],
In the Vue inject property, we need to declare the 'userId' property:
inject: ['userId'],
In the Vue components property, add the UserForm component:
components: {
  UserForm,
},
For the methods, we will create two: getUserById and updateUser. The getUserById method will fetch the user data by the current ID and set the userData value as the response from the getHttp function execution, and the updateUser will send the current userDate to the server via the patchHttp function and redirect back to the users list:
methods: {
  async getUserById() {
    const { data } = await
      getHttp(`${window.location.href}api/users/${this.userId}`);
    this.userData = data;
  },
  async updateUser() {
    await patchHttp
      (`${window.location.href}api/users/${this.userData.id}`, {
      data: {
        ...this.userData,
      }
    });
    this.changeComponent('list', 0);
  },
},
On the beforeMount life cycle hook, we will make it asynchronous, calling the getUserById method:
async beforeMount() {
 await this.getUserById();
},
Single file component <template> section
In this part, we will create the <template> section of the single file component. Follow these instructions to create the component correctly:
Create a vs-card component with the style attribute defined as margin: 20px:
<vs-card
    style="margin: 20px;"
  >
</vs-card>
Inside the vs-card component, create a dynamic <template> named slot for header, with an <h3> tag and your title:
<template slot="header">
  <h3>
    Update User
  </h3>
</template>
After that, create a vs-row component with a vs-col component inside of it, with the attributes of vs-type defined as flex, vs-justify defined as left, vs-align defined as left, and vs-w defined as 12:
<vs-row>
  <vs-col
    vs-type="flex"
    vs-justify="left"
    vs-align="left"
    vs-w="12">
  </vs-col>
</vs-row>
Inside the vs-col component, we will add the UserForm component with the v-model directive bound to userData and the disabled attribute set to true:
<user-form
  v-model="userData"
  disabled
/>
Finally, in the card footer, we need to create a dynamic <template> named slot for footer. Inside <template>, we will add a vs-row component with the vs-justify attribute defined as flex-start and insert two vs-button components. The first will be for creating the user and will have the attributes of color defined as success, type defined as filled, icon defined as save, size defined as small, and the @click event listener target to the updateUser method. The second vs-button component will be for canceling this action and returning to the users lists. It will have the attributes of color defined as danger, type defined as filled, icon defined as cancel, size defined as small, style defined as margin-left: 5px, and the @click event listener target to the changeComponent method with the 'list' and 0 parameters:
<template slot="footer">
  <vs-row vs-justify="flex-start">
    <vs-button
      color="success"
      type="filled"
      icon="save"
      size="small"
      @click="updateUser"
    >
      Update User
    </vs-button>
    <vs-button
      color="danger"
      type="filled"
      icon="cancel"
      size="small"
      style="margin-left: 5px"
      @click="changeComponent('list', 0)"
    >
      Cancel
    </vs-button>
  </vs-row>
</template>
To run the server and see your component, you need to open Terminal (macOS or Linux) or Command Prompt/PowerShell (Windows) and execute the following command:
> npm run serve
Here is your component rendered and running:

How it works...
The CRUD interface that we created works like a router application, with three routes, the index or list, the view, and the edit route. Each route has its own screen and components, with separated logic functions.
We created an abstract UserForm component that was used on the View and Update components. This abstract component can be used in many other components, as it does not require any base logic to work; it's like an input but made of several inputs.
Using the provide/inject API of Vue, we were able to pass the userId to each of the components in an observable way, which means that when the variable is updated, the component receives the updated variable. This is not achievable using the normal Vue API, so we had to use the Object.defineProperty and use the provide property as a factory function to return the final object.
See also
You can find more information about Vuesax at https://lusaxweb.github.io/vuesax/.
You can find more information about Object.defineProperty at https://developer.mozilla.org/en-US/docs/Web/JavaScript/Reference/Global_Objects/Object/defineProperty.
You can find more information about the Vue provide/inject API at https://vuejs.org/v2/guide/components-edge-cases.html.