
Transferring data between sibling components can be very easy, but imagine making a tree of components react to any data change. You will need to trigger an event in an event bus or send the event through all the parent components until it reaches over the top of the event chain and then gets sent all the way down to the desired component; this process can be very tedious and painful. If you are developing a large-scale application, this process is not sustainable.
Flux libraries were developed to help with this process, with the idea of bringing the reactivity outside of the component bounds, as Vuex is capable of maintaining one single source of truth of your data and, at the same time, is the place for you to have your business rules.
In this chapter, we will learn how to use Vuex, develop our store, apply it to our components, and namespace it so we can have different modules of Vuex inside the same store.
In this chapter, we'll cover the following recipes:
Creating a simple Vuex store
Creating and understanding the Vuex state
Creating and understanding the Vuex mutations
Creating and understanding the Vuex actions
Creating and understanding the Vuex getters
Creating a dynamic component with Vuex
Adding hot module reload for development
Creating a Vuex module
Technical requirements
In this chapter, we will be using Node.js and Vue-CLI.
> npm install -g windows-build-tools
To install Vue-CLI, you need to open Terminal (macOS or Linux) or Command Prompt/PowerShell (Windows) and execute the following command:
> npm install -g @vue/cli @vue/cli-service-global
Creating a simple Vuex store
Creating a single source of truth in your application gives you the power to simplify the flow of your data, enabling the reactivity of the data to flow into another perspective, where you are not tied to a parent-child relationship anymore. The data can now be stored in a single place and everyone can fetch or request data.
In this recipe, we will learn how to install the Vuex library and create our first single store, and how we can manipulate it with reactive actions and data getters.
Getting ready
The prerequisite for this recipe is as follows:
Node.js 12+
The Node.js global objects that are required are as follows:
@vue/cli
@vue/cli-service-global
How to do it...
To create a Vue-CLI project, follow these steps:
We need to open Terminal (macOS or Linux) or the Command Prompt/PowerShell (Windows) and execute the following command:
> vue create initial-vuex
The CLI will ask some questions that will help with the creation of the project. You can use the arrow keys to navigate, the Enter key to continue, and the Spacebar to select an option.
There are two methods for starting a new project. The default method is a basic babel and eslint project without any plugin or configuration, and the Manually mode, where you can select more modes, plugins, linters, and options. We will go for Manually:
? Please pick a preset: (Use arrow keys)
  default (babel, eslint)
❯ Manually select features
Now we are asked about the features that we will want in the project. Those features are some Vue plugins such as Vuex or Router (Vue-Router), testers, linters, and more. Select Babel, Router, Vuex, and Linter / Formatter:
? Check the features needed for your project: (Use arrow keys)
❯ Babel
  TypeScript
  Progressive Web App (PWA) Support
❯ Router
❯ Vuex
  CSS Pre-processors
❯ Linter / Formatter
  Unit Testing
  E2E Testing
Continue this process by selecting a linter and formatter. In our case, we will select the ESLint + Airbnb config:
? Pick a linter / formatter config: (Use arrow keys)
  ESLint with error prevention only
❯ ESLint + Airbnb config
  ESLint + Standard config
  ESLint + Prettier
After the linting rules are set, we need to define when they are applied to your code. They can be either applied on save or fixed on commit:
? Pick additional lint features: (Use arrow keys)
  Lint on save
❯ Lint and fix on commit
After all those plugins, linters, and processors are defined, we need to choose where the settings and configs are stored. The best place to store them is on a dedicated file, but it is also possible to store them in the package.json file:
? Where do you prefer placing config for Babel, ESLint, etc.? (Use
  arrow keys)
❯ In dedicated config files
  In package.json
Now you can choose if you want to make this selection a preset for future projects, so you don't need to reselect everything again:
? Save this as a preset for future projects? (y/N) n
Our recipe will be divided into two parts:
Creating the store
Creating the reactive component with Vuex
Let's get started.
Creating the store
Now you have the project with the Vuex library, and we need to create our first store. In the following steps, we will create the Vuex store:
Open the index.js from the src/store folder.
In the state property, add a new key called counter and set the value to 0:
state: {
  counter: 0,
},
In the mutations property, add two new functions, increment and decrement. Both of the functions will have a state argument, which is the current Vuex state object. The increment function will increment the counter by 1 and the decrement function will decrement the counter by 1:
mutations: {
  increment: (state) => {
    state.counter += 1;
  },
  decrement: (state) => {
    state.counter -= 1;
  },
},
Finally, in the actions property, add two new functions, increment and decrement. Both of the functions will have a deconstructed argument, commit, which is a function to call the Vuex mutation. In each function, we will execute the commit function, passing as a parameter the name of the current function as a string:
actions: {
 increment({ commit }) {
 commit('increment');
 },
 decrement({ commit }) {
 commit('decrement');
 },
},
Creating the reactive component with Vuex
Now that you have your Vuex store defined, you need to interact with it. We will create a reactive component that will display the current state counter on the screen, and show two buttons, one for incrementing the counter, and another for decrementing the counter.
Single file component <script> section
Here we are going to write the <script> section of the single file component:
Open the App.vue file from the src folder.
Create the <script> section in the file, with an export default object:
<script>
  export default {};
</script>
In the newly created object, add the Vue computed property with a property called counter. In this property we need to return the current $store.state.counter:
computed: {
  counter() {
    return this.$store.state.counter;
  },
},
Finally, create a Vue methods property with two functions, increment and decrement. Both of the functions will execute a $store.dispatch with a parameter being the function name as a string:
methods: {
  increment() {
    this.$store.dispatch('increment');
  },
  decrement() {
    this.$store.dispatch('decrement');
  },
},
Single file component <template> section
Let's code the <template> section of the single file component:
Open the App.vue file in the src folder.
In the <template> section, remove everything inside the div#app.
Create an h1 HTML element with the counter variable inside of it.
Create a button with an event listener on the @click directive that calls the increment function, and have + as a label:
<button @click="increment">+</button>
Create a button with an event listener on the @click directive that calls the decrement function, and - as a label:
<button @click="decrement">-</button>
To run the server and see your component, you need to open Terminal (macOS or Linux) or Command Prompt/PowerShell (Windows) and execute the following command:
> npm run serve
Here is your component rendered and running:

How it works...
When you declare your Vuex store, you need to create three main properties, state, mutations, and actions. Those properties act as a single structure, bounded to the Vue application through the $store injected prototype or the exported store variable.
A state is a centralized object that holds your information and makes it available to be used by the mutation, actions, or the components. Changing the state always requires a synchronous function executed through a mutation.
A mutation is a synchronous function that can change the state and is traceable, so when developing, you can time travel through all the executed mutations in the Vuex store.
An action is an asynchronous function, which can be used to hold business logic, API calls, dispatch other actions, and execute mutations. Those functions are the common entrance point of any change in a Vuex store.
A simple representation of a Vuex store can be seen in this chart:

See also
You can find more information about Vuex at https://vuex.vuejs.org/.
Creating and understanding the Vuex state
The Vuex state can seem straightforward to understand. However, as the data gets more in-depth and nested, its complexity and maintainability can get more complicated.
In this recipe, we will learn how to create a Vuex state that can be used in the scenarios of both a Progressive Web Application (PWA)/ Single Page Application (SPA) and a Server Side Rendering (SSR), without any problems.
Getting ready
The prerequisite for this recipe is as follows:
Node.js 12+
The Node.js global objects that are required are as follows:
@vue/cli
@vue/cli-service-global
How to do it...
To start our component, we will use the Vue project with Vue-CLI that we used in the 'Lazy Loading your pages asynchronously' recipe in Chapter 6, Managing Routes with vue-router, or we can start a new one.
To start a new one, open Terminal (macOS or Linux) or Command Prompt/PowerShell (Windows) and execute the following command:
> vue create vuex-store
Choose the manual features, add Router and Vuex as required features, as indicated in the 'How to do it...' section of the 'Creating a simple Vuex store' recipe.
Our recipe will be divided into two parts:
Adding Vuex via the vue ui
Creating the Vuex state
Let's get started.
Adding Vuex via the vue ui
When importing an old project that was created via the Vue-CLI, it is possible to automatically add Vuex through the vue ui interface without any effort at all. We will learn how to add the Vuex library to the old project, so we can continue developing the recipe.
In the following steps, we will add the Vuex with the vue ui interface:
In the project folder, open the vue ui by executing the following command on Terminal (macOS or Linux) or Command Prompt/PowerShell (Windows):
> vue ui
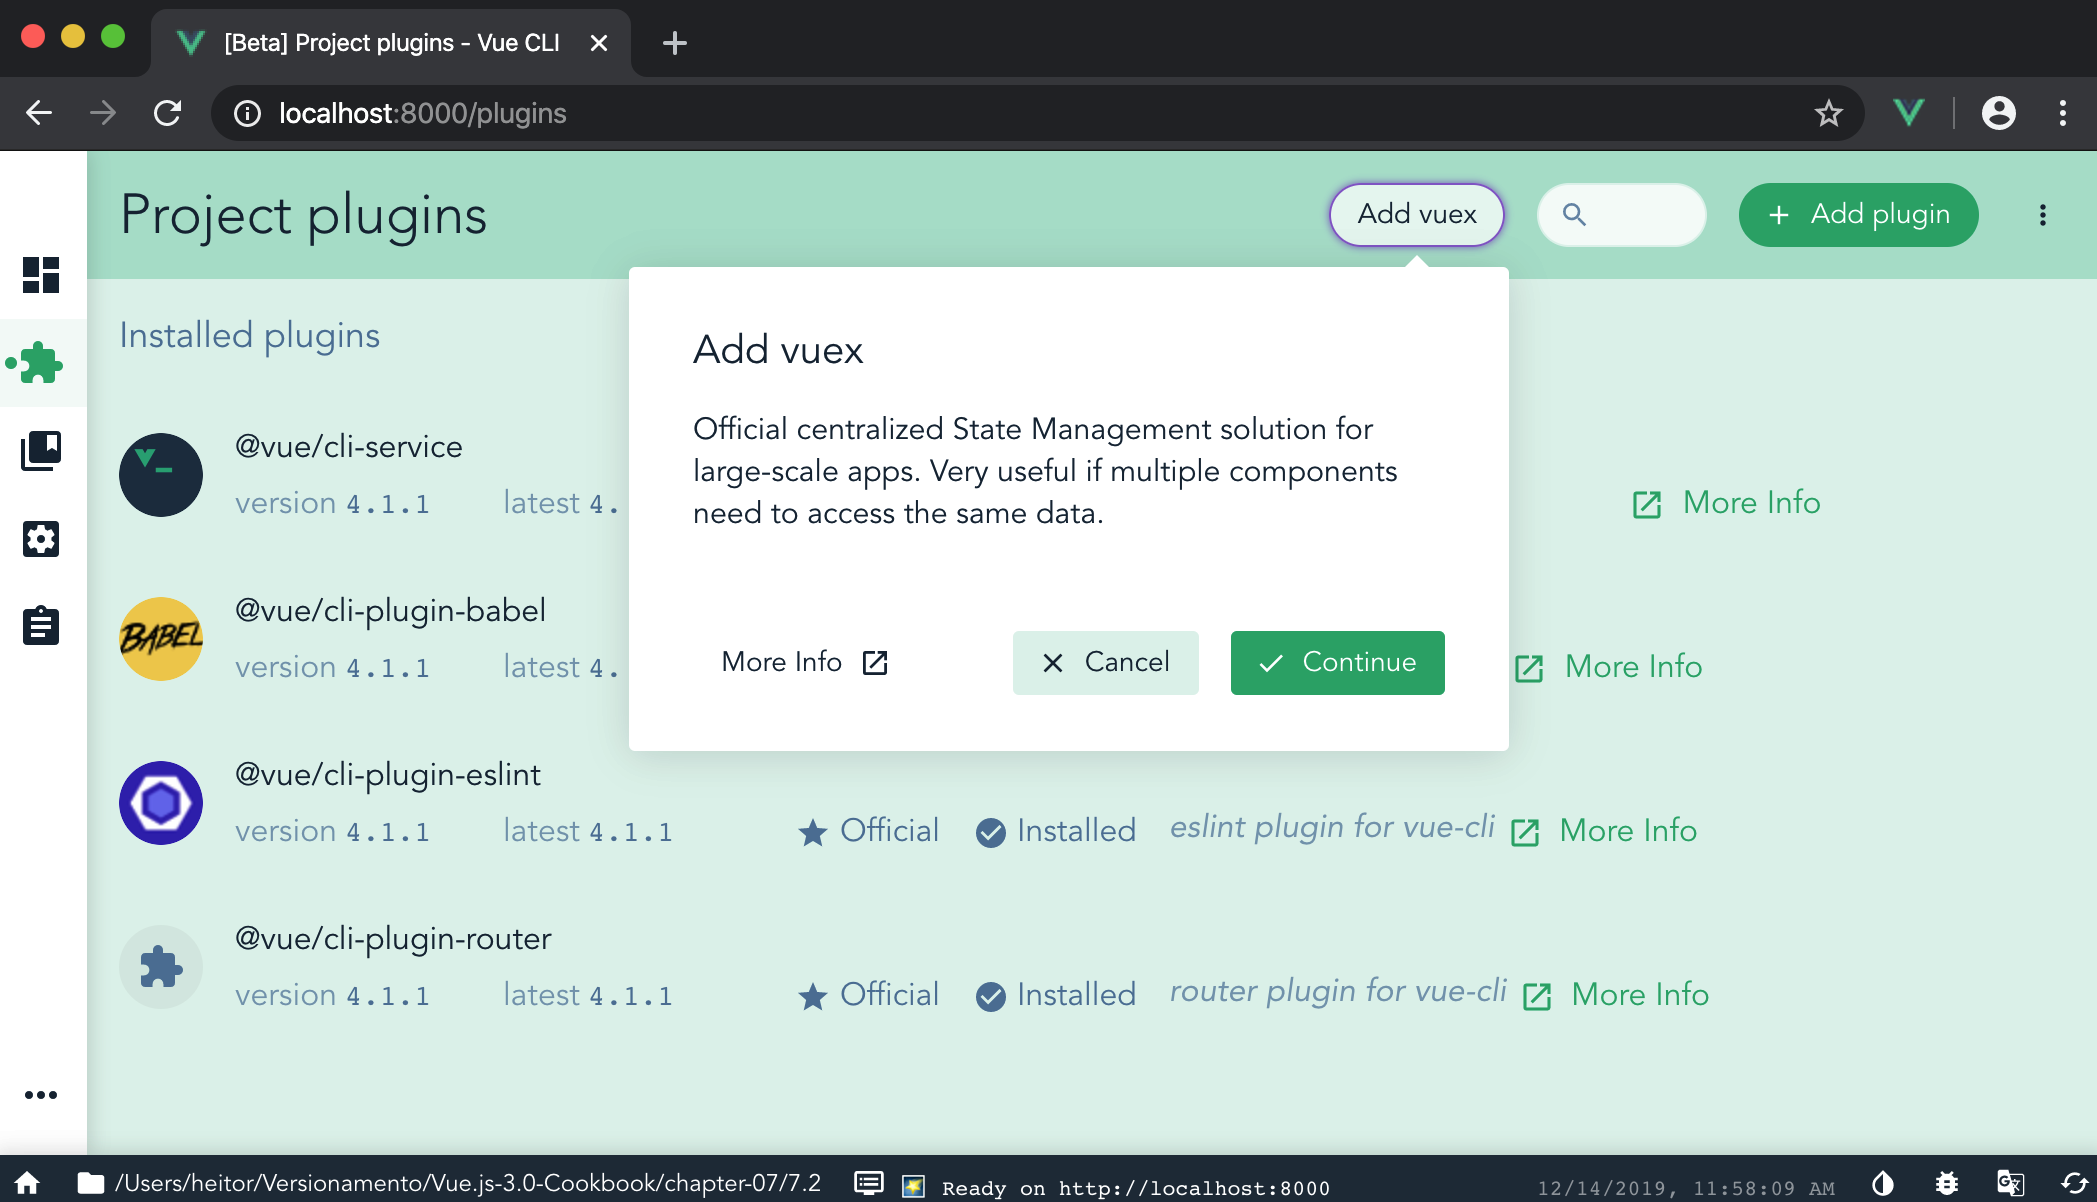
Select the correct project that you are working on. In the right sidebar, click on the Plugins menu icon:

On the plugins page, on the top bar, click on the Add vuex button. This will trigger a pop-up modal, then click on the Continue button to finish the installation of Vuex on the application:
Adding the Vuex to our application will change the structure of the application. First, we will notice that there is a new folder called store in the src folder, and in the main.js file, it was added to the imports and the injection of the store in the Vue application:
import './server/server';
import Vue from 'vue';
import App from './App.vue';
import Vuesax from 'vuesax';
import './style.css';
import router from './router'
import store from './store'

Vue.use(Vuesax);

Vue.config.productionTip = false;

new Vue({
  router,
  store,
  render: h => h(App)
}).$mount('#app');
Creating the Vuex state
In order to save the data inside of Vuex, you need to have an initial state that is loaded with the application and defined as the default one when the user enters your application. Here, we are going to learn how to create the Vuex state and use it as a singleton, so that Vuex can be used in an SPA and an SSR page:
Now we will create a Vuex store that can be used in an SSR and an SPA:
In the src/store folder, create a new folder called user, and inside this folder create a new file named state.js.
Create a new generateState function. This function will return a JavaScript object, with three main properties, data, loading, and error. The data property will be a JavaScript object, with a property called usersList defined as an empty array as default, and a property called userData with the default object of a user. The loading property will be a boolean, set to false by default, and error will have a default value initializing to null:
const generateState = () => ({
  data: {
    usersList: [],
    userData: {
      name: '',
      email: '',
      birthday: '',
      country: '',
      phone: '',
    },
  },
  loading: false,
  error: null,
});
After creating the function, we will create an export default object at the end of the file, which will be a JavaScript object, and we will destruct the return of the generateState function:
export default { ...generateState() };
Create a new file named index.js in the user folder and open it.
Import the newly created state:
import state from './state';
At the end of the file, create an export default file as a JavaScript object. In this object, we will add the imported state:
export default {
  state,
};
Open the index.js file from the src/store folder.
Import the index.js file from the user folder:
import Vue from 'vue';
import Vuex from 'vuex';
import UserStore from './user';
In the export default function, which creates a new Vuex store, we will remove all the properties inside of it, and put the imported UserStore deconstructed object inside the Vuex.Store parameter:
export default new Vuex.Store({
  ...UserStore,
})
How it works...
When using the vue ui to add Vuex as a plugin, the vue ui will automatically add the required files, and import everything that is needed. This is the initial phase of the creation of a Vuex store.
First is the creation of an exclusive file for managing the state that we can use to separate, from the store, the process of how the state begins and how it can be initialized.
In this case of this state, we used a function to generate a completely new state every time it's called. This is a good practice, because in an SSR environment, the state of the server will always be the same, and we need to create a new state for each new connection.
After the creation of the state, we needed to create the default file for exporting the Vuex files that will be created in the user folder. This file is a simple import of all the files that will be created in the folder, state, actions, mutation, and getters. After the import, we export an object with the name of the required Vuex properties, state, actions, mutations, and getters.
Finally, in the Vuex store, we import the file that aggregates everything and deconstructs it into our store to initialize it.
There's more...
The Vuex state is a single source of truth in your application, it works like a global data manager, and it should not be changed directly. This is because we need to prevent the mutation of data with a concurrent mutation of the same data. To avoid that, we always need to change our state through the mutations, because the functions are synchronous and controlled by Vuex.
See also
Find more information about the Vuex state at https://vuex.vuejs.org/guide/state.html.
Creating and understanding the Vuex mutations
When there is a change in Vuex, we need a way to execute this change in asynchronous form and keep track of it so it won't execute over another change before the first change finishes.
For this case, we need the mutations, which are functions that are only responsible for changing the state of your application.
In this recipe, we will learn how to create Vuex mutations and the best practices by which to do it.
Getting ready
The prerequisite for this recipe is as follows:
Node.js 12+
The Node.js global objects that are required are as follows:
@vue/cli
@vue/cli-service-global
How to do it...
To start our component, we will use the Vue project with Vue-CLI that we used in the 'Creating and understanding the Vuex state' recipe, or we can start a new one.
To start a new one, open Terminal (macOS or Linux) or Command Prompt/PowerShell (Windows) and execute the following command:
> vue create vuex-store
Choose the manual features, add Router and Vuex as required features, as indicated in the 'How to do it...' section of the 'Creating a simple Vuex store' recipe.
Now we create a Vuex mutation and base type for the mutations:
Create a new file called types.js in the user folder inside the src/store folder, and open it.
In this file, we will create an export default JavaScript object, with a group of keys that will be the names of our mutations. Those keys will be LOADING, ERROR, SET_USER_LIST, SET_USER_DATA, UPDATE_USER, and REMOVE_USER:
export default {
  LOADING: 'LOADING',
  ERROR: 'ERROR',
  SET_USER_LIST: 'SET_USER_LIST',
  SET_USER_DATA: 'SET_USER_DATA',
  UPDATE_USER: 'UPDATE_USER',
  REMOVE_USER: 'REMOVE_USER',
}
Create a new file called mutations.js in the user folder, and open it.
Import the newly created types.js file:
import MT from './types';
Create a new function called setLoading, which will receive the Vuex state as an argument and will define the loading property of the state to true when executed:
const setLoading = state => {
  state.loading = true;
};
Create a new function called setError, which will receive the Vuex state as an argument and payload. This function will set the loading property of the state to false, and the error property to the received payload argument:
const setError = (state, payload) => {
  state.loading = false;
  state.error = payload;
};
Create a new function called setUserList, which will receive the Vuex state and payload as an argument. This function will define the usersList property of the state.data to the received payload argument, set the loading property of the state to false, and the error property to null:
const setUserList = (state, payload) => {
  state.data.usersList = payload;
  state.loading = false;
  state.error = null;
};
Create a new function called setUserData, which will receive the Vuex state and payload as arguments. This function will define the userData property of the state.data to the received payload argument, set the loading property of the state to false, and the error property to null:
const setUserData = (state, payload) => {
  state.data.userData = payload;
  state.loading = false;
  state.error = null;
};
Create a new function called updateUser, which will receive the Vuex state and payload as an argument. This function will update the user data in the usersList property of the state.data, define the loading property of the state to false, and the error property to null:
const updateUser = (state, payload) => {
  const userIndex = state.data.usersList.findIndex(u => u.id ===
     payload.id);
  if (userIndex > -1) {
    state.data.usersList[userIndex] = payload;
  }
  state.loading = false;
  state.error = null;
};
Create a new function called removeUser, which will receive the Vuex state and payload as an argument. This function will remove the user data from the usersList property of the state.data, define the loading property of the state to false, and the error property to null:
const removeUser = (state, payload) => {
  const userIndex = state.data.usersList.findIndex(u => u.id ===
     payload);
  if (userIndex > -1) {
    state.data.usersList.splice(userIndex, 1);
  }
  state.loading = false;
  state.error = null;
};
Finally, create an export default object, with the keys being the types we created in the types.js file, and define each of the keys to the functions we created:
export default {
  [MT.LOADING]: setLoading,
  [MT.ERROR]: setError,
  [MT.SET_USER_LIST]: setUserList,
  [MT.SET_USER_DATA]: setUserData,
  [MT.UPDATE_USER]: updateUser,
  [MT.REMOVE_USER]: removeUser,
}
Open the index.js file in the user folder.
Import the newly created mutations.js file, and add it to the export default JavaScript object:
import state from './state';
import mutations from './mutations';

export default {
  state,
  mutations,
};
How it works...
Each mutation is a function that will be called as a commit, and will have an identifier in the Vuex store. This identifier is the mutation key in the exported JavaScript object. In this recipe, we created a file that holds all the identifiers as an object value so that it can be used as a constant inside our code.
This pattern helps us in the development of Vuex actions, which need to know each mutation name.
When exporting the mutation JavaScript object, we use the constant as the key and the corresponding function as its value, so the Vuex store can execute the correct function when called.
See also
Find more information about Vuex mutations at https://vuex.vuejs.org/guide/mutations.html.
Creating and understanding the Vuex getters
Accessing data from Vuex can be done through the state itself, which can be very dangerous, or via the getters. The getters are like data that can be preprocessed and delivered without touching or messing with the Vuex store state.
The whole idea behind getters is the possibility to write custom functions that can extract data from your state in a single place when you need it, so that you get just the data you need.
In this recipe, we will learn how to create a Vuex getter and a dynamic getter that can be used as a high-order function.
Getting ready
The prerequisite for this recipe is as follows:
Node.js 12+
The Node.js global objects that are required are as follows:
@vue/cli
@vue/cli-service-global
How to do it...
To start our component, we will use the Vue project with Vue-CLI that we used in the 'Creating and understanding the Vuex mutations' recipe, or we can start a new one.
To start a new one, open Terminal (macOS or Linux) or Command Prompt/PowerShell (Windows) and execute the following command:
> vue create vuex-store
Choose the manual features, and add Router and Vuex as needed features, as indicated in the 'How to do it...' section of the 'Creating a simple Vuex store' recipe.
In the following steps, we will create the Vuex getters:
Create a new file called getters.js in the src/store/user folder.
Create a new function called getUsersList, and return the state.data.usersList property:
function getUsersList(state) {
  return state.data.usersList;
}
Create a new function called getUserData, and return the state.data.userData property:
function getUserData(state) {
  return state.data.userData;
}
Create a new function called getUserById, and return another function that receives userId as an argument. This returning function will return the result of a search of state.data.usersList that matches the same id as the userId received:
function getUserById(state) {
  return (userId) => {
    return state.data.usersList.find(u => u.id === userId);
  }
}
Create a new function called isLoading, and return the state.loading property:
function isLoading(state) {
  return state.loading;
}
Create a new function called hasError, and return the state.error property:
function hasError(state) {
  return state.error;
}
Finally, create an export default JavaScript object, with all the created functions as properties:
export default {
  getUsersList,
  getUserData,
  getUserById,
  isLoading,
  hasError,
};
Open the index.js file in the src/store/user folder.
Import the newly created getters.js file, and add it to the export default JavaScript object:
import state from './state';
import mutations from './mutations';
import getters from './getters';

export default {
  state,
  mutations,
  getters,
};
How it works...
Getters are like a GET function from an object and are static cached functions – they only change the returned value when the state has changed. But if you add the return as a high-order function, you can give it more power to use a more sophisticated algorithm and provide specific data.
In this recipe, we created two types of getters: the most basic, with simple data return, and the high-order function, which needs to be called as a function to retrieve the value you want.
There's more...
Using getters with business logic is a good way to gather more data on the state. This is a good pattern because, on larger projects, it helps other developers to understand more what is going on in each of the GET functions and how it works behind the curtain.
You always need to remember that getters are synchronous functions and reactive to the state change, so the data on the getters is memoized and cached until the single source of truth receives a commit and changes it.
See also
You can find more information about Vuex getters at https://vuex.vuejs.org/guide/getters.html.
Creating and understanding the Vuex actions
You have all your state ready, your dataset, and now you need to fetch new data from an outside source or change this data inside your application. Here comes the part where actions do their job.
Actions are responsible for orchestrating the process in this communication between the application and the outside world. Controlling when the data need to be mutated on the state and returned to the caller of the action.
Usually, the action is a dispatch through a component or a view, but there are some occasions where actions can dispatch another action to create a chain of actions in your application.
In this recipe, we will learn how to create the actions needed in our application to define a user's list, update a user, and remove a user.
Getting ready
The prerequisite for this recipe is as follows:
Node.js 12+
The Node.js global objects that are required are as follows:
@vue/cli
@vue/cli-service-global
How to do it...
To start our component, we will use the Vue project with Vue-CLI that we used in the 'Creating and understanding the Vuex getters' recipe, or we can start a new one.
To start a new one, open Terminal (macOS or Linux) or Command Prompt/PowerShell (Windows) and execute the following command:
> vue create vuex-store
Choose the manual features, and add Router and Vuex as required features, as indicated in the 'How to do it... section of the 'Creating a simple Vuex store' recipe.
Now follow these steps to create the Vuex actions:
Create a new file called actions.js in the src/store/user folder.
Import the mutation types files (types.js), and the getHttp, patchHttp, postHttp, and deleteHttp functions from the fetchApi wrapper:
import {
  getHttp,
  patchHttp,
  deleteHttp,
  postHttp,
} from '@/http/fetchApi';
import MT from './types';
Create a new asynchronous function called createUser, which receives as the first argument a deconstructed JavaScript object, with the commit property, and userData as the second argument, which will be used to create the user. Add a try/catch statement, in the try context. First, we execute commit(MT.LOADING), then we fetch the users lists from the API, and finally, commit(MT.SET_USER_DATA, data), passing the users lists to be mutated. If we receive an exception and get into the Catch statement, we will execute commit(MT.ERROR, error), passing the error that we receive to the state:
async function createUser({ commit }, userData) {
  try {
    commit(MT.LOADING);
    await postHttp(`/api/users`, {
      data: {
        ...userData,
      }
    });
    commit(MT.SET_USER_DATA, userData);
  } catch (error) {
    commit(MT.ERROR, error);
  }
}
Create a new asynchronous function called fetchUsersList, which receives as the first argument a deconstructed JavaScript object, with the commit property. Add a try/catch statement in the try context. We execute commit(MT.LOADING), then we fetch the users lists from the API, and finally, commit(MT.SET_USER_LIST, data), passing the users lists to be mutated. If we receive an exception and get into the catch statement, we will execute a mutation of commit(MT.ERROR, error), passing the error that we receive to the state:
async function fetchUsersList({ commit }) {
  try {
    commit(MT.LOADING);
    const { data } = await getHttp(`api/users`);
    commit(MT.SET_USER_LIST, data);
  } catch (error) {
    commit(MT.ERROR, error);
  }
}
Create a new asynchronous function called fetchUsersData, which receives as the first argument a deconstructed JavaScript object, with the commit property, and the second argument the userId that will be fetched. Add a try/catch statement, in the try context. We execute commit(MT.LOADING), then we fetch the users lists from the API, and finally, commit(MT.SET_USER_DATA, data), passing the users lists to be mutated. If we receive an exception and get into the catch statement, we will execute a mutation of commit(MT.ERROR, error), passing the error that we receive to the state:
async function fetchUserData({ commit }, userId) {
  try {
    commit(MT.LOADING);
    const { data } = await getHttp(`api/users/${userId}`);
    commit(MT.SET_USER_DATA, data);
  } catch (error) {
    commit(MT.ERROR, error);
  }
}
Create a new asynchronous function called updateUser, which receives as the first argument a deconstructed JavaScript object, with the commit property, and payload as the second argument. Add a try/catch statement, in the try context. We execute commit(MT.LOADING), then we patch the user data to the API and finally commit(MT.UPDATE_USER, payload), passing the user new data to be mutated. If we receive an exception and get into the catch statement, we will execute a mutation of commit(MT.ERROR, error), passing the error that we received to the state:
async function updateUser({ commit }, payload) {
  try {
    commit(MT.LOADING);
    await patchHttp(`api/users/${payload.id}`, {
      data: {
        ...payload,
      }
    });
    commit(MT.UPDATE_USER, payload);
  } catch (error) {
    commit(MT.ERROR, error);
  }
}
Create a new asynchronous function called removeUser, which receives as the first argument a deconstructed JavaScript object, with the commit property, and userId as the second argument. Add a try/catch statement, in the try context. We execute commit(MT.LOADING), then we delete the user data from the API and finally, commit(MT.REMOVE_USER, userId), passing the userId to be used in the mutation. If we receive an exception and get into the Catch statement, we will execute a mutation of commit(MT.ERROR, error), passing the error that we receive to the state:
async function removeUser({ commit }, userId) {
  try {
    commit(MT.LOADING);
    await deleteHttp(`api/users/${userId}`);
    commit(MT.REMOVE_USER, userId);
  } catch (error) {
    commit(MT.ERROR, error);
  }
}
Finally, we will create an export default JavaScript object, with all the created functions as properties:
export default {
  createUser,
  fetchUsersList,
  fetchUserData,
  updateUser,
  removeUser,
}
Import the newly created actions.js file in the index.js in the src/store/user folder, and add it to the export default JavaScript object:
import state from './state';
import mutations from './mutations';
import getters from './getters';
import actions from './actions';

export default {
  state,
  mutations,
  getters,
  actions,
};
How it works...
Actions are the initializers of all the Vuex life cycle changes. When dispatched, the action can execute a mutation commit, or another action dispatch, or even an API call to the server.
In our case, we took our API calls and put it inside the actions, so when the asynchronous function returns, we can execute the commit and set the state to the result of the function.
See also
Find more information about Vuex actions at https://vuex.vuejs.org/guide/actions.html.
Creating a dynamic component with Vuex
Combining Vuex with Vue components, it's possible to employ the reactivity between multiple components without the need for direct parent-child communication, and split the responsibilities of the components.
Using this method allows the developer to enhance the scale of the application, where there is no need to store the state of the data inside the components itself, but using a single source of truth as a store for the whole application.
In this recipe, we will use the last recipes to improve an application, where it was using parent-child communication and making it as a single source of truth available in the whole application.
Getting ready
The prerequisite for this recipe is as follows:
Node.js 12+
The Node.js global objects that are required are as follows:
@vue/cli
@vue/cli-service-global
How to do it...
To create our dynamic component, we will transform the components from stateful to stateless, and will extract some parts that can be made into new components as well.
We will use the Vue project with Vue-CLI that we used in the 'Creating and understanding the Vuex actions' recipe, or we can start a new one.
To start a new one, open Terminal (macOS or Linux) or Command Prompt/PowerShell (Windows) and execute the following command:
> vue create vuex-store
Choose the manual features, and add Router and Vuex as required features, as indicated in the 'How to do it...' section of the 'Creating a simple Vuex store' recipe.
Our recipe will be divided into five parts:
Creating the user list component
Editing the user list page
Editing the user view page
Editing the user view page
Editing the user create page
Let's get started.
Creating the user list component
Because Vuex gives us the ability to have a single source of truth on our application, we can create a new component for our application that will handle the user listing and triggers the Vuex action that fetches the users list from the server. This component can be stateless and execute the Vuex actions by itself.
Single file component <script> section
Let's code the <script> section of the single file component:
Create a new file called userList.vue in the src/components folder.
Import the changeRouterMixin from the src/mixin folder:
import changeRouteMixin from '@/mixin/changeRoute';
Create an export default JavaScript object, and add a new Vue property called mixin, with a default value of an array. To this array, add the imported changeRouteMixin:
mixins: [changeRouteMixin],
Create a new Vue property called computed. In this property, create a new value called userList. This property will be a function returning the Vuex store getter getUsersList:
computed: {
  userList() {
    return this.$store.getters.getUsersList;
  },
},
Single file component <template> section
Here, we are going to code the <template> section of the single file component:
Open the List.vue file from the users folder inside the views folder and copy the content and component from the VsTable component.
Open the userList.vue file from the src/components folder.
Paste the content you'd copied from the List.vue file inside the <template> section:
<template>
<vs-table
:data="userList"
search
stripe
pagination
max-items="10"
style="width: 100%; padding: 20px;"
>
<template slot="thead">
<vs-th sort-key="name">
#
</vs-th>
<vs-th sort-key="name">
Name
</vs-th>
<vs-th sort-key="email">
</vs-th>
<vs-th sort-key="country">
Country
</vs-th>
<vs-th sort-key="phone">
Phone
</vs-th>
<vs-th sort-key="Birthday">
Birthday
</vs-th>
<vs-th>
Actions
</vs-th>
</template>
<template slot-scope="{data}">
<vs-tr :key="index" v-for="(tr, index) in data">
<vs-td :data="data[index].id">
{{data[index].id}}
</vs-td>
<vs-td :data="data[index].name">
{{data[index].name}}
</vs-td>
<vs-td :data="data[index].email">
<a :href="`mailto:${data[index].email}`">
{{data[index].email}}
</a>
</vs-td>
<vs-td :data="data[index].country">
{{data[index].country}}
</vs-td>
<vs-td :data="data[index].phone">
{{data[index].phone}}
</vs-td>
<vs-td :data="data[index].birthday">
{{data[index].birthday}}
</vs-td>
<vs-td :data="data[index].id">
<vs-button
color="primary"
type="filled"
icon="remove_red_eye"
size="small"
@click="changeRoute('view', data[index].id)"
/>
<vs-button
color="success"
type="filled"
icon="edit"
size="small"
@click="changeRoute('edit', data[index].id)"
/>
<vs-button
color="danger"
type="filled"
icon="delete"
size="small"
@click="deleteUser(data[index].id)"
/>
</vs-td>
</vs-tr>
</template>
</vs-table>
</template>
Editing the user list page
Now that we have extracted the user list into a new component, we need to import this component and remove the old VsTable that was cluttering our view.
Single file component <script> section
In this step, we are going to write the <script> section of the single file component:
Open the List.vue file in the users folder inside the views folder.
Import the newly created Users List component, from the components folder:
import changeRouteMixin from '@/mixin/changeRoute';
import UserTableList from '@/components/userList';
In the export default JavaScript object, add a new property called components. Declare the property as a JavaScript object, and add the imported UserTableList component to the object:
components: { UserTableList },
In the methods property, at the getAllUsers function, we need to change the content to execute a Vuex dispatch when called. This method will perform the fetchUsersList Vuex action:
async getAllUsers() {
  this.$store.dispatch('fetchUsersList');
},
Finally, in the deleteUser function, we need to change the content to execute a Vuex dispatch when called. This method will perform the removeUser Vuex action, passing the userId as the argument:
async deleteUser(id) {
  this.$store.dispatch('removeUser', id);
  await this.getAllUsers();
},
Single file component <template> section
Let's code the <template> section of the single file component:
Open the List.vue file in the users folder inside the view folder.
Replace the VsTable component and its contents with the newly imported UserTableList:
<vs-col
  vs-type="flex"
  vs-justify="left"
  vs-align="left"
  vs-w="12">
  <user-table-list />
</vs-col>
Editing the user view page
Now we can add the Vuex to the user view page. We will add the Vuex actions and getters to manipulate the data, and extract from the page the responsibility of managing it.
Single file component <script> section
Now you are going to create the <script> section of the single file component:
Open the View.vue file from the users folder inside the view folder.
Remove the Vue data property.
Inside the Vue computed property, add the userData, returning a Vuex getter, getUserData:
userData() {
  return this.$store.getters.getUserData;
},
Finally, in the getUserById method, change the content to dispatch a Vuex action, fetchUserData, passing the computed userId property as a parameter:
async getUserById() {
  await this.$store.dispatch('fetchUserData', this.userId);
},
Single file component <template> section
It's time to write the <template> section of the single file component:
Open the View.vue file in the users folder inside the view folder.
In the UserForm component, change the v-model directive to a :value directive:
<user-form
  :value="userData"
  disabled
/>
Editing the user edit page
We need to edit our user. In the last recipe, we used a stateful page and executed everything within the page. We will transform the state into a temporary state, and execute the API calls on the Vuex actions.
Single file component <script> section
Here, we are going to create the <script> section of the single file component:
Open the Edit.vue file in the users folder inside the view folder.
In the Vue data property, change the name of the data from userData to tmpUserData:
data: () => ({
  tmpUserData: {
    name: '',
    email: '',
    birthday: '',
    country: '',
    phone: '',
  },
}),
In the Vue computed property, add a new property called userData, which will return the Vuex getter getUserData:
userData() {
  return this.$store.getters.getUserData;
}
Add a new Vue property named watch, and add a new property, userData, which will be a JavaScript object. In this object, add three properties, handler, immediate, and deep. The handler property will be a function that receives an argument called newData, which will set tmpUserData to this argument. The immediate and deep properties are both boolean properties set to true:
watch: {
  userData: {
    handler(newData) {
      this.tmpUserData = newData;
    },
    immediate: true,
    deep: true,
  }
},
In the Vue methods property, we need to change the contents of getUserById to dispatch a Vuex action named fetchUserData, passing the computed property userId as a parameter:
async getUserById() {
  await this.$store.dispatch('fetchUserData', this.userId);
},
In the updateUser method, change the content to dispatch a Vuex action named updateUser, passing tmpUserData as a parameter:
async updateUser() {
  await this.$store.dispatch('updateUser', this.tmpUserData);
  this.changeRoute('list');
},
Single file component <template> section
In this part, we are going to write the <template> section of the single file component:
Open the Edit.vue in the users folder inside the view folder.
Change the target of the v-model directive of the UserForm component to tmpUserData:
<vs-col
  vs-type="flex"
  vs-justify="left"
  vs-align="left"
  vs-w="12"
  style="margin: 20px"
>
  <user-form
    v-model="tmpUserData"
  />
</vs-col>
Editing the user create page
For the user create page, the changes will be minimal, as it only executes an API call. We need to add the Vuex action dispatch.
Single file component <script> section
Here, we are going to create the <script> section of the single file component:
Open the Create.vue file in the users folder inside the view folder.
Change the content of the createUser method to dispatch a Vuex action named createUser, passing userData as the parameter:
async createUser() {
  await this.$store.dispatch('createUser', this.userData);
  this.changeRoute('list');
},
How it works...
In all four pages, we made changes that removed the business logic or API calls from the page to the Vuex store and tried making it less responsible for maintaining the data.
Because of that, we could place a piece of code into a new component that can be placed anywhere in our application, and will show the current users lists without any limitations from the container that is instantiating it.
This pattern helps us in the development of more prominent applications, where there is a need for components that are less business-oriented and more focused on their tasks.
See also
You can find more information about Vuex application structures at https://vuex.vuejs.org/guide/structure.html.
Adding hot-module-reload for development
The hot-module-reload (HMR) is a technique used for the faster development of the application, where you don't need to refresh the whole page to get the new code you have just changed on the editor. The HMR will change and refresh only the part that were updated by you on the editor.
In all the Vue-CLI projects or Vue-based frameworks, such as Quasar Framework, the HMR is present in the presentation of the application. So each time you change any file that is a Vue component and it's rendered, the application will replace the old code for the new one on the fly.
In this recipe, we will learn how to add HMR to a Vuex store and be able to change the Vuex store without the need to refresh our entire application.
Getting ready
The prerequisite for this recipe is as follows:
Node.js 12+
The Node.js global objects that are required are as follows:
@vue/cli
@vue/cli-service-global
How to do it...
To start our component, we will use the Vue project with Vue-CLI that we used in the 'Creating a dynamic component with Vuex' recipe, or we can start a new one.
To start a new one, open Terminal (macOS or Linux) or Command Prompt/PowerShell (Windows) and execute the following command:
> vue create vuex-store
Choose the manual features, add Router and Vuex as required features, as indicated in the 'How to do it...' section of the 'Creating a simple Vuex store' recipe.
In the following steps, we will add HMR to Vuex:
Open the index.js file in the src/store folder.
Transform the export default into a constant called store, and make it exportable:
export const store = new Vuex.Store({
  ...UserStore,
});
Check if the webpack hot-module-reload plugin is active:
if (module.hot) {}
Create a new constant called hmr, which is an array containing the direction to the index.js, getters.js, actions.js, and mutations.js files of the user folder:
const hmr = [
  './user',
  './user/getters',
  './user/actions',
  './user/mutations',
];
Create a new function called reloadCallback. In this function, create three constants, getters, actions, and mutations. Each constant will point to the equivalent file inside the user folder, and call the store.hotUpdate function, passing an object as an argument with the values for the constants you created:
const reloadCallback = () => {
  const getters = require('./user/getters').default;
  const actions = require('./user/actions').default;
  const mutations =  require('./user/mutations').default;

  store.hotUpdate({
    getters,
    actions,
    mutations,
  })
};
Execute the webpack HMR accept function, passing as the first argument the hmr constant and reloadCallback as the second argument:
module.hot.accept(hmr, reloadCallback);
Finally, default export the created store:
export default store;
How it works...
The Vuex store supports HMR with the API of the webpack HMR plugin.
When it's available, we create a list of possible files that can be updated, so that webpack can be aware of any updates to those files. When any of those files are updated, a special callback that you created is executed. This callback is the one that enables Vuex to update or change the behavior of the updated file entirely.
See also
You can find more information about Vuex hot reloading at https://vuex.vuejs.org/guide/hot-reload.html.
You can find more information about webpack HMR at https://webpack.js.org/guides/hot-module-replacement/.
Creating a Vuex module
As our application grows, working in a single object can be very risky. The maintainability of the project and the risks that it can generate on every change get worse each time.
Vuex has an approach called modules that helps us to separate our store into different branches of stores. These branches, or modules, have on each one of them a different set of state, mutation, getter, and action. This pattern helps with development and cuts the risk of adding new features to the application.
In this recipe, we will learn how to create a module and how to work with it, separating it into dedicated branches.
Getting ready
The prerequisite for this recipe is as follows:
Node.js 12+
The Node.js global objects that are required are as follows:
@vue/cli
@vue/cli-service-global
How to do it...
To start our component, we will use the Vue project with Vue-CLI that we used in the 'Creating a dynamic component with Vuex' recipe, or we can start a new one.
To start a new one, open Terminal (macOS or Linux) or Command Prompt/PowerShell (Windows) and execute the following command:
> vue create vuex-store
Choose the manual features and add Router and Vuex as required features, as indicated in the 'How to do it...' section of the 'Creating a simple Vuex store' recipe.
Our recipe will be divided into two parts:
Creating the new authentication module
Adding modules to Vuex
Let's get started.
Creating the new authentication module
To start, we need to create a new Vuex module. This example module will be called authentication, and will store the credentials data for the user.
In these steps, we will create the authentication module for Vuex:
Create a new folder called authentication in the src/store folder.
In this newly created folder, create a new file called state.js, and open it.
Create a function called generateState that will return a JavaScript object with the properties of data.username, data.token, data.expiresAt, loading, and error:
const generateState = () => ({
  data: {
    username: '',
    token: '',
    expiresAt: null,
  },
  loading: false,
  error: null,
});
Create an export default object at the end of the file. This object will be a JavaScript object. We will destruct the return of the generateState function:
export default { ...generateState() };
Create a new file called index.js in the authentication folder inside the src/store folder, and open it.
Import the newly created state.js file:
import state from './state';
Create an export default object at the end of the file. This object will be a JavaScript object. Add a new property called namespaced with the value set to true, and add the imported state:
export default {
  namespaced: true,
  state,
};
Adding the modules to Vuex
Now that we've created our modules, we will add them to the Vuex store. We can integrate the new modules with our old code. This is not a problem because Vuex will handle the new module as a namespaced object, with a completely separate Vuex store.
Now in these steps, we will add the created modules to the Vuex:
Open the index.js file in the src/store folder.
Import the index.js file from the authentication folder:
import Vue from 'vue';
import Vuex from 'vuex';
import UserStore from './user';
import Authentication from './authentication';
In the Vuex.Store function, add a new property called modules, which is a JavaScript object. Then add the imported User and Authentication modules:
export default new Vuex.Store({
  ...UserStore,
  modules: {
    Authentication,
  }
})
How it works...
Modules work like separate Vuex stores but in the same Vuex single source of truth. This helps in the development of larger-scale applications because you can maintain and work with a more complex structure without the need to check for problems in the same file.
In the meantime, it's possible to work with modules and the plain Vuex store, migrating from legacy applications so you don't have to re-write everything from the ground up to be able to use the module structure.
In our case, we added a new module named authentication with just a state present in the store, and continued with the old user Vuex store, so that in the future we can refactor the user store into a new module and separate it off into a more specific, domain-driven architecture.
See also
You can find more information about Vuex modules at https://vuex.vuejs.org/guide/modules.html.