
Chapter 10: Build a Shopping List App with Vue, Vuex and Bootstrap Vue
by Michael Wanyoike
As a Vue app grows, keeping track of state throughout the app can become a tricky process. For example, a given piece of state might need to be used in multiple components. Or maybe it’s needed by a component which is nested several components deeper than the one in which it’s stored.
Vuex is the official state management solution for Vue and is designed to help you manage state throughout your app as your application grows. In this tutorial, I’ll offer a practical example of how to get up and running with Vuex by building a shopping list app (which is a glorified to-do app, to be honest).
Demo and Code
If you’re curious to see what we’ll end up with, you can view the live version running on CodeSandbox. If you’d like to grab a copy of the code, please see this GitHub repo.
Prerequisites
Before we start, I’ll assume that you:
- have a basic knowledge of Vue.js
- have a basic knowledge of Vuex and its core concepts (check out “Getting Started with Vuex: a Beginner’s Guide” in this Vue series)
- are familiar with ES6 and ES7 language features
To follow along with this tutorial, I recommend you install code highlighting for Vue in your editor of choice. Vetur for VSCode is a popular choice for this, as is Vue Syntax Highlight for Sublime.
I also recommend that you install the Vue.js DevTools for your browser, as I’ll be making use of them later on to inspect the state of our application. You can find the Chrome extension here, or the Firefox extension here.
In addition, you’ll need to have a recent version of Node.js that’s not older than version 6.0. At the time of writing, Node.js v10.13.0 (LTS) and npm version 6.4.1 are the most recent. If you don’t have a suitable version of Node installed on your system already, I recommend using a version manager.
Finally, you should have the most recent version of Vue CLI installed:
npm install -g @vue/cli
At the time of writing, this was v3.1.3.
Create a New Project
Let’s generate a new project using the CLI:
vue create vuex-todo
A wizard will open up to guide you through the project creation. Select Manually select features and ensure that you choose to install Vuex. After you’ve finished selecting your options, Vue CLI will scaffold your project and install the dependencies.
We’re going to use the following dependencies for our Vuex project. They’re not part of Vuex, but they’ll make our web interface pretty and interactive.
- Bootstrap Vue - Bootstrap CSS framework V4 re-engineered for Vue.js projects
- VeeValidate, a form validation framework for Vue.js projects
Let’s change into the project directory and install them:
cd vuex-todo
npm install bootstrap-vue vee-validate
To test everything has run correctly, start up the app using npm run serve and visit http://localhost:8080. You should see a welcome screen.
Basic Project Setup
Now that we have all our dependencies installed, we can now go ahead and start building our main application structure. Under the src/components folder, delete the HelloWorld.vue file, then create two new files—TodoList.vue and TodoItem.vue:
rm src/components/HelloWorld.vue
touch src/components/{TodoList.vue,TodoItem.vue}
Next, let’s inject Bootstrap Vue and VeeValidate by adding the following code to main.js:
...
import BootstrapVue from 'bootstrap-vue'
import VeeValidate from 'vee-validate';
import 'bootstrap/dist/css/bootstrap.css'
import 'bootstrap-vue/dist/bootstrap-vue.css'
...
Vue.config.productionTip = false
Vue.use(BootstrapVue)
Vue.use(VeeValidate);
Now open up src/App.vue and replace the existing code with the following:
<template>
  <div id="app">
   <b-jumbotron  bg-variant="info" text-variant="white">
      <template slot="header">
        <b-container>Vuex ToDo App</b-container>
      </template>
      <template slot="lead">
        <b-container>Built using Bootstrap-Vue.js</b-container>
      </template>
    </b-jumbotron>

    <b-container>
      <div class="todo-page">
        <h2>Shopping List</h2>
        <hr>
        <TodoList />
      </div>
    </b-container>
  </div>
</template>

<script>
  import TodoList from '@/components/TodoList.vue'

  export default {
    name: 'TodoView',
    components: {
      TodoList
    }
  }
</script>
Here we’re using Bootstrap components to lay out our application page. It’s easier this way instead of defining Bootstrap class names for each HTML element. You can find the documentation for the components used on the Bootstrap Vue.js website.
For the components, we’ll just insert some placeholder code. Insert the following code into components/TodoList.vue:
<template>
    <p>To-do List component under construction</p>
</template>
Insert the following code for components/TodoItem.vue:
<template>
  <p>To-do Item component under construction</p>
</template>
Finally, head back to http://localhost:8080, where you should have the following page view:

Building the To-do List
To build our to-do list, we’ll take a bottom-up approach. In other words, we’ll start by building our Vuex store, then finish by creating the components. We’ll use a very simple TodoItem model for our TodoList collection that only consists of two properties:
{
  name: "Butter",
  done: false
}
Creating the Store
Open src/store.js and replace the default export with the following code:
export default new Vuex.Store({
  state: {
    items: [
      {
        name: "Milk",
        done: false
      },
      {
        name: "Bread",
        done: true
      },
      {
        name: "Cake",
        done: false
      }
    ]
  },
  mutations: {
    addItem(state, item) {
      state.items.push(item)
    },
    editItem(state, { item, name = item.name, done = item.done }) {
      item.name = name;
      item.done = done;
    },
    removeItem(state, item) {
      state.items.splice(state.items.indexOf(item), 1);
    }
  },
  actions: {
    addItem({ commit }, item) {
      commit("addItem", {
        name: item,
        done: false
      })
    },
    editItem({ commit }, { item, name }) {
      commit("editItem", { item, name });
    },
    toggleItem({ commit }, item) {
      commit("editItem", { item, done: !item.done });
    },
  }
});
As you can see, we start off by declaring our items in a state object.
We then have three mutations for manipulating the state—addItem, editItem and removeItem. The addItem mutation handler takes an item and pushes it on to state, and the removeItem mutation handler takes an item and uses Array’s splice method to remove it from state. The editItem mutation handler perhaps looks a bit funky, but all it’s doing is accepting an object as an argument with three properties:
item: the record to be updated.name: the new value fornamefield. If none is provided, it usesitem.name.done: the new value for thedonefield. If none is provided, it usesitem.done.
It then updates the properties accordingly.
This syntax is new to ES6. You can read more about it in our post “ES6 in Action: Destructuring Assignment”.
Finally come the actions. These will call our mutations to create a new item, to edit an item and to toggle an item’s done property. Notice how the editItem and toggleItem action handlers also take advantage of destructuring to accomplish their tasks.
If you’d like a refresher on these core concepts of Vuex, please refer to “Getting Started with Vuex: a Beginner’s Guide” in this Vue series.
Building the TodoList Component
Let’s now build out our src/components/TodoList component.
Start by adding the following code to src/comnponents/TodoList.vue:
<template>
  <div class="todo-list">
    <!-- start of to-do form -->
    <b-form class="row" >
      <b-col cols="10">
        <b-form-input
          id="item"
          name="item"
          class="w-100"
          placeholder="What do you want to buy?"
        ></b-form-input>
      </b-col>
      <b-col cols="2">
        <b-button type="submit" variant="primary">Add Item</b-button>
      </b-col>
    </b-form>
    <!-- end of to-do form -->

    <!-- start of to-do list -->
    <b-row>
      <b-col md="10">
        <b-list-group>
          <b-list-group-item v-for="(item, index) in items" :key="index" :item="item">
            {{ item.name }}
          </b-list-group-item>
        </b-list-group>
      </b-col>
    </b-row>
    <!-- end of to-do list -->
  </div>
</template>

<script>
import { mapState } from 'vuex';

export default {
  name: 'TodoList',
  computed: {
    ...mapState([
      'items'
    ])
  },
};
</script>

<style>
form {
  margin-bottom: 25px;
}
.list-group-item {
  display: flex;
}
.list-group-item:hover{
  background-color: aliceblue;
}
.checked {
  font-style: italic;
  text-decoration: line-through !important;
  color: gray;
  background-color: #eeeeee;
}
</style>
It’s essentially made up of a form and list group for displaying the shopping list items. There’s a bit of CSS and Bootstrap styling classes to make the layout look right. If there’s anything here you’re not sure of, please consult the Bootstrap Vue documentation.
This is what you should have on the to-do page:

Inspect the App’s State Using the Vue DevTools
If you’ve installed the Vue.js browser extension mentioned at the beginning of this guide, you can press F12 and then click the Vue tab. In here, you’ll see another tab called Vuex. Click it. You should be able to see the entire store for your application.

Once we’ve made the component interactive, you’ll be able to add new items or delete old ones and see the Vuex store update accordingly. You’ll also be able to revert mutations by clicking on the Revert button.
Adding an Item
Let’s now make our shopping list interactive. There are several things we need to do here:
- Allow users to add items, mark them as
doneand delete them. - Add validation to the input form using the VeeValidate package. The only rule we’re using is
v-validate="'required'"that will prevent the submission of a blank form. - Display validation error messages if present using VeeValidate
errorsobject. - Create a local state variable called
itemthat will bind to the input form. - Create an
onSubmit()function that will handle the form’sPOSTevents using Vue.js@submit.preventmodifier.
Let’s start enabling the “Add Item” feature. Update the template section in src/components/TodoList.vue as follows:
<!-- start of to-do form -->
<b-row>
  <b-col>
    <!-- display validation error -->
      <b-alert v-if="errors.has('item')" show dismissible variant="danger">
      {{ errors.first('item') }}
    </b-alert>
  </b-col>
</b-row>
<!-- post to onSubmit function -->
<b-form class="row" @submit.prevent="onSubmit">
  <b-col cols="10">
  <!-- bind to local `item` state -->
    <b-form-input
      id="item"
      class="w-100"
      name="item"
      type="text"
      placeholder="What do you want to buy?"
      v-model="item"
      v-validate="'required'"
      autocomplete="off"
    ></b-form-input>
  </b-col>
  <b-col cols="2">
    <b-button type="submit" variant="primary">Add Task</b-button>
  </b-col>
</b-form>
<!-- end of to-do form -->
Let’s now define the local state item and onSubmit() function in the <script> section as follows:
import { mapState, mapActions } from 'vuex';

export default {
  name: 'TodoList',
  data() {
    return {
      item:''
    }
  },
  computed: {
    ...mapState([
      'items'
    ])
  },
   methods: {
    ...mapActions([
      'addItem',
    ]),
    async onSubmit() {
      const isvalid = await this.$validator.validateAll();
      if(isvalid) {
        await this.addItem(this.item);
        this.item=''; // Clear form after successful save
        this.$validator.reset();
      }
    },
  }
};
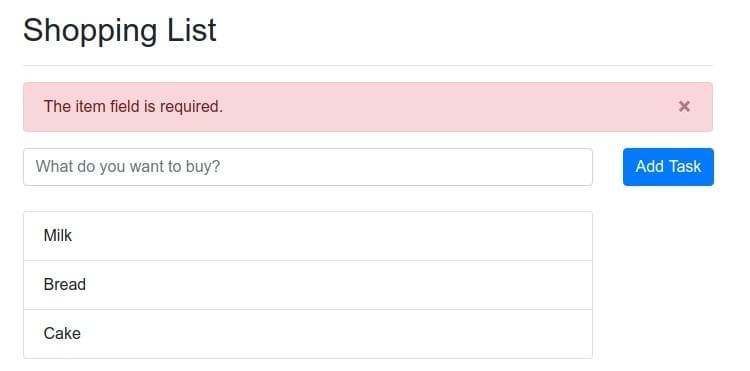
In the onSubmit method, we first execute a validation method to ensure that the form input value is valid. If it’s not valid, an error message is displayed. If it’s valid, the item is passed to the addItem action. The local state item is cleared and the validator is reset to prevent incorrect error messages from showing up. After you’ve implemented the changes and tested the form, you should have something similar:
Remember to check out the Vue DevTools to see how the store reacts to your input events.
The To-do Item Component
Let’s now work on the src/components/TodoItem component. Copy the following code:
<template>
  <div class="todo-item">
    <b-list-group-item class="row">
      {{ item.name }}
    </b-list-group-item>
  </div>
</template>

<script>
  export default {
    name: 'TodoItem',
    props: ['item']
  }
</script>
Next, go back to src/components/TodoList. We need to replace the <b-list-group-item> code section with the new component TodoItem. Go to the template section and replace the code section with <b-list-group> with this:
<b-list-group>
  <TodoItem v-for="(item, index) in items" :key="index" :item="item" />
</b-list-group>
In order to use the TodoItem component in TodoList, you’ll need to import it in the <script> section like this:
import TodoItem from './TodoItem.vue'
//..

export default {
  name: 'TodoList',
  components: {
    TodoItem
  },
  //..
}
That’s it. Save your changes and the to-do shopping list should operate as before. Now that we have a dedicated TodoItem component, we can now easily add more features:
- toggle item state (
donefield) - edit item names
- delete items
Toggling an Item’s State
Let’s start by toggling the item status. In the todo store, we already have an action that can do that for us:
toggleItem({ commit }, item) {
  commit("editItem", { item, done: !item.done })
}
By mapping the action locally using the mapAction helper, we can access this function directly from the TodoItem component like this:
this.toggleItem(item)
Let’s add a checkbox input by updating the <template> code as follows:
<template>
  <div class="todo-item">
    <b-list-group-item v-bind:class="{ checked: item.done }">
      <b-row>
        <b-col cols="1">
          <b-form-checkbox
            :checked="item.done"
            @change="changeItemStatus(item)"
          >
          </b-form-checkbox>
        </b-col>
        <b-col cols="9">
          <span>{{ item.name }}</span>
        </b-col>
      </b-row>
    </b-list-group-item>
  </div>
</template>
We now should have the following view:

However, do note that we run into an error if we try to toggle any of the checkboxes. This is because we haven’t defined the changeItemStatus function.
Let’s do that now:
import { mapActions } from 'vuex'

export default {
  name: 'TodoItem',
  props: ['item'],
  methods: {
    ...mapActions([
      'toggleItem'
    ]),
    changeItemStatus(item) {
      this.toggleItem(item);
    }
  }
};
Go ahead and test the checkbox. The items should now be toggleable. You can confirm via the DevTools extension that the store is actually reacting to your clicks and that the item’s done property is updating in state.
Removing an Item
Next, let’s add a remove feature. For this, we won’t dispatch an action, but instead we’ll commit the removeItem mutation directly from the TodoItem component. This is the code to accomplish that:
<template>
  ...
  <b-col cols="10">
    <span>{{ item.name }}</span>
  </b-col>
  <b-col cols="1">
    <b-button-close @click="removeItem(item)"></b-button-close>
  </b-col>
  ...
</template>

<script>
  ...
  methods: {
    ...mapActions([
      'toggleItem'
    ]),
    changeItemStatus(item) {
      this.toggleItem(item);
    },
     removeItem(item) {
      this.$store.commit("removeItem", item)
    },
  }
  ...
</script>
After you’ve saved your changes, go ahead and test the delete button to make sure that it’s working properly.

Updating an Item
Finally, let’s add the edit feature. This one is going to be a bit tricky. This is what we’re going to do:
- We’ll create a local state called
editing, which by default will be set tofalse. - When it’s false, the item’s name will be displayed via a span element.
- When it’s true, the item’s name will be displayed via an input text box.
- We’ll create a custom Vue.js directive for automatically setting focus on the text box when it’s visible.
- Using events triggered via
@keyup.enterand@blur, we’ll call a custom functiondoneEdit, for handling the edit changes. - Using the event triggered via
@keyup.esc, we’ll call a custom function,cancelEdit, for cancelling the edit. This function will also reset theitem.namestate back to its original, and set theeditingvalue to false.
Let’s now start implementing the changes. We’ll add the text box by replacing the relevant code in the template section in src/components/TodoItem.vue with this:
<template>
...
<b-col cols="10">
  <span v-if="!editing" @dblclick="editing = true">{{ item.name }}</span>
  <input class="edit"
    v-show="editing"
    v-focus="editing"
    :value="item.name"
    @keyup.enter="doneEdit"
    @keyup.esc="cancelEdit"
    @blur="doneEdit"
  >
</b-col>
...
</template>
Next, we’ll add the editing Boolean state variable, the focus directive, as well as the doneEdit and cancelEdit functions in the script section.
Update the code as follows:
export default {
  //...
  data () {
    return {
      editing: false
    }
  },
  directives: {
    focus (el, { value }, { context }) {
      if (value) {
        context.$nextTick(() => {
          el.focus()
        })
      }
    }
  },
  methods: {
    ...mapActions([
      'toggleItem',
      'editItem'
    ]),
    //..
     doneEdit(event) {
        const value = event.target.value.trim();
        const { item } = this;
        if (!value) {
          this.removeItem(item)
        } else if (this.editing) {
          this.editItem({ item, name:value });
          this.editing = false
        }
      },
      cancelEdit(event){
        event.target.value = this.item.name;
        this.editing = false;
      }
  }
}
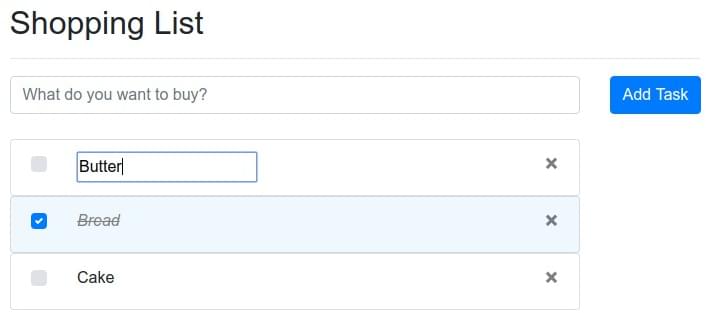
Save the changes and test the new editing feature. To make a change on an item, simply double click on it. You can press Return or click away to save the changes. You can also hit ESC if you don’t want to save the change. You should have a similar view as below:
Taking it Further
Well done if you made it this far! You’ve grasped the majority of the skills you need to build a Vuex project. I’m going to leave you with a challenge. The project we just built is using a hard-coded list of to-do items. In other words, every time we perform a full browser refresh, the todo store is reset back to its hard-coded values:
state: {
    items: [
      {
        name: "Milk",
        done: false
      },
      {
        name: "Bread",
        done: true
      },
      {
        name: "Cake",
        done: false
      }
    ]
  },
I want you set the initial state for items to an empty array like this:
state: {
  items: []
}
Then, I want you to use a real database for persisting the items collection. You can use any database system you’re comfortable using, such as MongoDB, a ready-made API interface such as JSON server, or a cloud-hosted database such as mLab. You can then use a library like axios to fetch data from your remote API to the application’s store.
Here’s some clues on how you can set it up. You’ll need to create a new mutation for this task in your todo store that looks like this:
export default {
  state: {
    items: []
  },
  mutations: {
    fetchTodos(state, items) {
      state.items = items
    }
  },
  actions: {
    async fetchTodos({commit}) {
      const response = await axios.get('http://localhost:4000/api/todos');
      commit("fetchItems", response.data)
    }
  }
}
Then in your TodoList component, you can use Vue’s created lifecycle hook to retrieve the data:
<script>
import { mapActions } from 'vuex'

export default {
  computed: {
    ...mapActions([
      'fetchTodos'
    ])
  }
  created: function() {
    this.fetchTodos()
  }
}
</script>
Note that I haven’t done any error handling. I’ll leave it to you to figure out how to display an appropriate error message in case the fetchTodos function fails.
Summary
On a personal level, I really like Vuex as someone coming from a background in Redux and MobX state management libraries. I find Vuex to be a bit leaner and cleaner. It does a lot of the heavy lifting for you, making it easy to implement your code. The Vue DevTools are a big bonus that allow you to debug your Vuex store easily in the event that something goes wrong.
Vuex is tightly integrated with Vue.js and is maintained by the Vue.js team. I would say that’s a pretty good reason to rely on Vuex for a commercial project. Being open source, you can easily confirm that the project is being actively maintained on GitHub. You can also confirm that it doesn’t have too many unresolved issues.
With that said, you should note that I haven’t been able to cover 100% of the features available in the Vuex library. I would highly recommend you check out their current documentation to learn more about its advanced features.