Chapter 9: How to Build a Game with Vue.js
by Ivaylo Gerchev
One the reasons I like Vue.js so much is that it can be used in a wide variety of scenarios and can be integrated into many different kinds of projects. So to me, Vue is a universal, multipurpose framework. In this aspect, it reminds me of the Python programming language, which is also easy to learn and use, and can be applied in many areas.
In this tutorial, we’ll explore one of the less obvious uses for Vue—game development.
This Tutorial’s Code Repository
The code for this tutorial can be found on GitHub. You can also view a demo of the finished game here.
Why Vue Instead of a Real Game Development Framework
Obviously, Vue is not tailored to game development. So why we would want to choose it instead of a real game development framework/engine? Well, let’s explore two good reasons:
- If you’re familiar with Vue and/or you work with it on a daily basis, you already have the necessary skills and knowledge. To create a game with Vue, you just apply what you already know while shifting your mind to a different context—instead of having to learn a whole new game framework.
- Vue offers features that make game development easy:
- Vue’s reactivity system allows for building highly interactive interfaces with minimum effort.
- Transitions and animations are an essential part of most games. Vue has built-in support for them.
- Vue’s ecosystem is rich enough to supply you with whatever feature you need for your game project.
Planning the Game
What we’re going to build today is an electronic variant of the popular Match Pairs game. Let’s now lay out the features we want to implement, along with the components we’ll need for that.
The game UI will be composed of four components:
- A cards board, which will hold the cards.
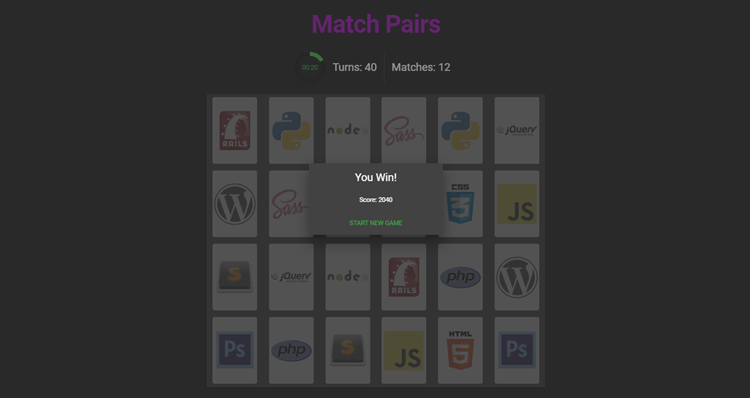
- An animated countdown timer, which will display the time remaining for the player to match all the pairs. When the time remaining is 10 seconds or less, the color of the timer will change to red.
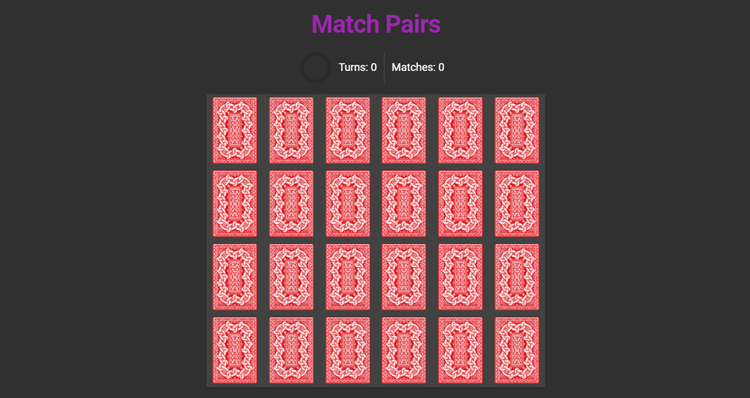
- A status bar, which will display the number of the turns taken and matches found.
- A splash screen, which will show up when the game is finished—either because the time ran out or because all pairs were discovered. It will display a “You Lose!” or “You Win!” message accordingly, as well as the game’s score.
Here are three screenshots showing the starting, playing, and finishing phases of the game:

Getting Started
Now it’s time for action. To follow along with this, you’ll need to have Node, npm and Vue CLI installed on your system.
To install Node (and by default npm), you can download the binaries for from the official website, or use a version manager. This is probably the easiest way, as it allows you to manage multiple versions of Node on the same machine.
To install the CLI run:
npm i -g @vue/cli
That done, we’ll create a new match-pairs project, selecting the “default” preset when prompted:
vue create match-pairs
cd match-pairs
Next, we add the Vuetify plugin:
vue add vuetify
Again, choose the “default” preset, which has the a la carte system enabled. To activate it, we need to create a webpack.config.js file, in the project’s root, with the following content:
const VuetifyLoaderPlugin = require('vuetify-loader/lib/plugin')
module.exports = {
  plugins: [
    new VuetifyLoaderPlugin()
  ]
}
Now let’s add two more packages that we’ll need—Lodash and MomentJS:
npm i lodash moment
Finally, we can run the app with this command:
npm run serve
Preparing the Project Files and Components
Now we need to do some preparation.
First, we need to modify the src/main.js file. We swap its content with the following:
import Vue from 'vue'
import './plugins/vuetify'
import App from './App.vue'

import _ from 'lodash'

Vue.config.productionTip = false

new Vue({
  render: h => h(App),
}).$mount('#app')
Now, in the src/components directory, we delete the HelloWorld.vue example file and create the necessary components for the game: CardsBoard.vue, Timer.vue, StatusBar.vue, and Splash.vue.
Next, we open src/App.vue, delete the content and insert the following instead:
<template>
  <v-app dark>
    <v-container>
      <v-layout class="font-weight-bold display-3 purple--text" justify-center mb-4>Match Pairs</v-layout>
      <v-layout mb-4>
        <timer></timer>
        <status-bar></status-bar>
      </v-layout>
      <cards-board></cards-board>
    </v-container>
    <splash></splash>
  </v-app>
</template>
Here, we construct the game layout using the components we’ve just created.
Next, we populate the script with the following:
<script>
const cardsSet = [
  {
    name: "php",
    img: "https://s3-us-west-2.amazonaws.com/s.cdpn.io/74196/php-logo_1.png"
  },
  {
    name: "css3",
    img: "https://s3-us-west-2.amazonaws.com/s.cdpn.io/74196/css3-logo.png"
  },
  ...
];

let shuffleCards = () => {
  let cards = [].concat(_.cloneDeep(cardsSet), _.cloneDeep(cardsSet));
  return _.shuffle(cards);
};

import CardsBoard from "./components/CardsBoard";
import StatusBar from "./components/StatusBar";
import Timer from "./components/Timer";
import Splash from "./components/Splash";
import _ from "lodash";
import moment from "moment";

export default {
  name: "App",
  components: {
    CardsBoard,
    StatusBar,
    Timer,
    Splash
  },
  data() {
    return {
      cards: [],
      started: false,
      duration: 120000,
      progress: 0,
      time: null,
      timer: null,
      flipBackTimer: null,
      turns: 0,
      matches: 0,
      showSplash: false,
      result: "",
      score: 0
    };
  },
  created() {
    this.resetGame();
  },
  methods: {
    resetGame() {
      this.started = false;
      this.progress = 0;
      this.time = null;
      this.turns = 0;
      this.matches = 0;
      this.showSplash = false;
      this.score = 0;

      let cards = shuffleCards();

      _.each(cards, card => {
        card.flipped = false;
        card.found = false;
      });

      this.cards = cards;
    },
  }
};
</script>
First, we add the necessary images for the cards. For the sake of brevity, I’ve left many of them out. You can get the full list from the GitHub repo.
The shuffleCards() function doubles the images to make them pairs and shuffles them all.
Next, we import our components and register them in the components object. We also import Lodash and Moment.
After that, we define all data properties which we’ll need for the game. We add the created() hook, which will invoke the resetGame() method on the app’s creation. The resetGame() turns back all data properties to their initial states.
Now we can add some helper methods used to manage flipped and found states of the cards:
methods: {
  ...

  flippedCards() {
    return _.filter(this.cards, card => card.flipped);
  },

  sameFlippedCard() {
    let flippedCards = this.flippedCards();
    if (flippedCards.length == 2) {
      if (flippedCards[0].name == flippedCards[1].name) return true;
    }
  },

  setCardFounds() {
    _.each(this.cards, card => {
      if (card.flipped) card.found = true;
    });
  },

  checkAllFound() {
    let foundCards = _.filter(this.cards, card => card.found);
    if (foundCards.length == this.cards.length) return true;
  },

  clearFlips() {
    _.map(this.cards, card => (card.flipped = false));
  },

  clearFlipBackTimer() {
    clearTimeout(this.flipBackTimer);
    this.flipBackTimer = null;
  },
}
Here is what the helpers do:
flippedCards()returns all flipped cards—that is, those havingflippedproperty set to truesameFlippedCarduses the above helper to check whether two flipped cards are samesetCardFounds()sets the flipped cards as foundcheckAllFoundchecks whether all cards are foundclearFlips()clears all flipped cardsclearFlipBackTimerresets the timer used when we flip the cards.
Finally, we add methods for starting and finishing the game:
methods: {
  ...

  startGame() {
    this.started = true;
    let duration = this.duration;
    this.timer = setInterval(() => {
      if (duration == 1000) {
        this.finishGame();
      }
      duration -= 1000;
      this.time = moment(duration).format("mm:ss");
      this.progress = (duration / this.duration) * 100;
    }, 1000);
  },

  finishGame() {
    this.started = false;
    clearInterval(this.timer);
    this.score = Math.round(this.progress) * 10 * this.matches;

    if (this.matches == cardsSet.length) {
      this.result = "Win";
    } else {
      this.result = "Lose";
    }

    this.showSplash = true;
  }
}
As we’ll see a bit later, startGame() is called after we flip the first card. It creates the game timer, which is used in the Timer.vue component. It also updates the time and progress props. When one second is left, the finishGame() is called. The latter clears the game timer, calculates the score and result props, and activates the splash screen.
Building the Game Components
Okay, it’s time to build the components we created earlier.
The CardsBoard Component
We open the CardsBoard.vue and put the following:
<template>
  <v-layout>
    <v-flex xs12 sm10 offset-sm1 lg8 offset-lg2>
      <v-card>
        <div class="flex-container">
          <div
            v-for="(card, i) in cards"
            :key="i"
            class="card"
            :class="{ flipped: card.flipped, found: card.found }"
            @click="flipCard(card)"
          >
            <div class="back"></div>
            <div class="front" :style="{ backgroundImage: 'url(' + card.img + ')' }"></div>
          </div>
        </div>
      </v-card>
    </v-flex>
  </v-layout>
</template>

<script>
export default {
  props: ["cards"],
  methods: {
    flipCard(card) {
      this.$emit("flipcard", card);
    }
  }
};
</script>
Here, we use the v-for directive to populate the board with the cards by using the passed cards prop. For each card we bind .flipped and/or .found class(es), depending on the states of their flipped and found props. We create the back and front faces of the cards and populate the front using the img prop. And of course, we add a click event listener, which will emit a flipcard event.
For the code above to work, we’ll need some CSS. So we put this in the style section:
<style>
.flex-container {
  display: flex;
  flex-flow: row wrap;
  justify-content: space-around;
}
.card {
  position: relative;
  width: 100px;
  height: 150px;
  margin: 1px;
  transition: opacity 0.5s;
}
@media only screen and (max-width: 768px) {
  .card {
    width: 50px;
    height: 75px;
  }
}
.card .front,
.card .back {
  border-radius: 5px;
  position: absolute;
  left: 0;
  right: 0;
  top: 0;
  bottom: 0;
  width: 100%;
  height: 100%;
  backface-visibility: hidden;
  transition: transform 0.3s;
  transform-style: preserve-3d;
}
.card .back {
  background-image: url("https://s3-us-west-2.amazonaws.com/s.cdpn.io/102308/card_backside.jpg");
  background-size: 100%;
  background-repeat: no-repeat;
}
.card .front {
  transform: rotateY(-180deg);
  background-size: 100%;
  background-repeat: no-repeat;
  background-position: center;
  background-color: white;
}
.card.flipped .back,
.card.found .back {
  transform: rotateY(180deg);
}
.card.flipped .front,
.card.found .front {
  transform: rotateY(0deg);
}
.card.found {
  opacity: 0.3;
}
</style>
I’m not going into too much detail here. Basically, these styles create correct cards layout and add flipping transitions.
Now, let’s move to the App.vue and add the following:
<cards-board :cards="cards" @flipcard="flipCard"></cards-board>
Here, we bind the cards prop and register the flipcard event listener. Now, let’s add the flipCard() method to the methods in the script section:
methods: {
  ...

  flipCard(card) {
    if (card.found || card.flipped) return;

    if (!this.started) {
      this.startGame();
    }

    let flipCount = this.flippedCards().length;
    if (flipCount == 0) {
      card.flipped = !card.flipped;
    } else if (flipCount == 1) {
      card.flipped = !card.flipped;
      this.turns += 1;

      if (this.sameFlippedCard()) {
        this.matches += 1;
        this.flipBackTimer = setTimeout(() => {
          this.clearFlipBackTimer();
          this.setCardFounds();
          this.clearFlips();

          if (this.checkAllFound()) {
            this.finishGame();
          }
        }, 1000);
      } else {
        this.flipBackTimer = setTimeout(() => {
          this.clearFlipBackTimer();
          this.clearFlips();
        }, 1000);
      }
    }
  }
}
First, if we click on a flipped or found card, the function will terminate. If started is false, it will start the game. Next, when we open the first card, it will change its flipped prop to true. When we open the second card, it will change its flipped prop to true and will increase the turns prop. Next, if the cards are the same, it will increase the matches prop and set a flipBackTimer. It will wait one second and will set the cards found props to true, and will clear the flipped cards. If all cards are found, the game will finish. If the two opened cards are not same, it will just clear the flipped cards.
The Timer Component
Open Timer.vue and add the following:
<template>
  <v-layout justify-end>
    <v-progress-circular
      :rotate="-90"
      :value="progress"
      :size="70"
      :width="9"
      :color="color"
    >{{time}}</v-progress-circular>
  </v-layout>
</template>

<script>
export default {
  props: ["progress", "time"],
  data() {
    return {
      color: "success"
    };
  },
  watch: {
    progress() {
      if (this.progress <= 10) {
        this.color = "red";
      } else {
        this.color = "success";
      }
    }
  }
};
</script>
Here, we use the Vuetify Progress component. We need to change the timer’s color dynamically depending on the progress value. In order to update the progress prop constantly, we need to add a watcher for it.
Now we move to App.vue and bind the passed props:
<timer :progress="progress" :time="time"></timer>
StatusBar
Open StatusBar.vue and add the following:
<template>
  <v-layout align-center class="headline">
    <span class="mx-3">Turns: {{ turns }}</span>
    <v-divider vertical></v-divider>
    <span class="mx-3">Matches: {{ matches }}</span>
  </v-layout>
</template>

<script>
export default {
  props: ["turns", "matches"]
};
</script>
Here, we just pass the turns and matches props, and use them in the template.
In App.vue, we bind the passed props:
<status-bar :turns="turns" :matches="matches"></status-bar>
Splash
Finally, open Splash.vue and add the following:
<template>
  <v-layout row>
    <v-dialog v-model="showSplash" persistent max-width="300">
      <v-card class="text-xs-center">
        <v-card-text>
          <div class="headline mb-4">You {{result}}!</div>
          <div>Score: {{score}}</div>
        </v-card-text>
        <v-card-actions>
          <v-spacer></v-spacer>
          <v-btn color="green darken-1" flat @click="resetGame">Start New Game</v-btn>
          <v-spacer></v-spacer>
        </v-card-actions>
      </v-card>
    </v-dialog>
  </v-layout>
</template>

<script>
export default {
  props: ["showSplash", "result", "score"],
  methods: {
    resetGame() {
      this.$emit("resetgame");
    }
  }
};
</script>
We use the Vuetify Dialog component for the splash screen. The splash will show up when the showSplash is true.
In App.vue, we bind the passed props and register the emitted resetgame event:
<splash :showSplash="showSplash" :result="result" :score="score" @resetgame="resetGame"></splash>
And with that, our journey into the world of game development is at an end. Now, just start the game (npm run serve) and enjoy!
Conclusion
As you saw, building a game with Vue is easy and fun. In many cases, Vue can successfully replace a real game framework. With a little imagination and some effort we can create interesting and creative games with different levels of complexity. Check this collection for some examples. Happy game development!