
Chapter 25. GD-Graph3d
When it comes to understanding large amounts of data, we humans have two stages of interpretation. First, we analyze the data, organizing it in myriad ways to find the hidden relationships, quantities, and trends that deliver meaning to our world. Second, we present it somehow, often by displaying it visually. With graphs and charts we can visualize trends, understand relationships, and compare quantities at a glance.
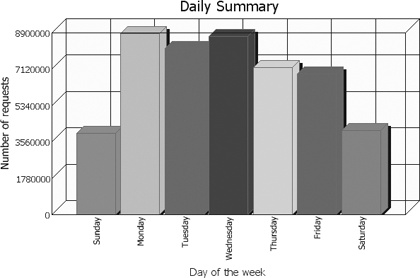
I developed the Perl package GD-Graph3d to accompany some statistics presentation tools I work on for analyzing the huge amounts of data available to and generated by web servers. Our freely available Report Magic presentation package uses GD-Graph3d to present analyses in a friendly manner with graphs like Figure 25-1.
GD-Graph3d is an extension to Martien Verbruggen’s GDGraph
package. GDGraph draws only two-dimensional images (except for the
3d option on pie charts) but provides the basis for
data management, labeling, legends, and other routine graph operations
that are common to both packages.
Using GD-Graph3d
In order to use GD-Graph3d, you will need to install several
packages: at a minimum, the GDGraph, GD-TextUtil, and GD Perl modules,
and the libgd library. Fortunately for Windows and
Mac users, GD and the libgd library are included in
ActivePerl and MacPerl. If you have ActivePerl, you can use the PPM or
VPM tool to acquire the latest version of GD. With PPM you can simply
use this command:
> ppm install GDOn Unix (and Unix-like) systems, the installation is a lot more complex.
libgd itself is a C library that depends on the
libpng and zlib libraries. If
you want TrueType font support (recommended if you’re using a
character set other than Latin-1), you’ll need FreeType’s
libfreetype. In order to build GD on top of
libgd, you will also need to install the
jpeg-6b library. Complete details for installing
this are listed on the libgd web site (http://www.boutell.com/gd/); a summary is available at
the end of this article.
Installing GDGraph and GD-Graph3d is simple. They’re on CPAN and can be found with the CPAN search engine at http://search.cpan.org. Install the GDTextUtil package, which you can find there as well. Once you have the proper modules and libraries installed, write some code and make some pictures. Example 25-1 contains a simple script to generate the graph in Figure 25-2. We’ll go through the script line by line.
#!/usr/bin/perl -w
############################################################
#
# Description:
# Draws a basic multi-set line chart with GD-Graph3d
#
# Created: 31.May.2000 by Jeremy Wadsack for Wadsack-Allen Digital Group
# Copyright (C) 2000 Wadsack-Allen. All rights reserved.
#
# This script is free software; you can redistribute it and/or
# modify it under the same terms as Perl itself.
############################################################
use strict;

# **** Line numbering in the article starts here ****
use GD::Graph::lines3d;

# Create an array of data
my @data = (
 [ "Jan", "Feb", "Mar", "Apr", "May", "Jun", "Jul", "Aug", "Sep", "Oct", "Nov", "Dec"],
 [  860,   813,   1694,  957,   1805,  1835,  2335,  1272,  1562,  2296,  2123,  1882,],
 [  1249,  483,   1731,  1617,  1166,  1761,  1111,  1635,  2158,  2007,  2250,  2858,],
 [  747,   1216,  525,   1028,  1053,  1860,  2282,  1871,  2143,  1845,  2924, 2858,],
 [  1220,  864,   1325,  967,   1200,  1371,  1759,  1512,  1484,  1683,  1965,  2458,],
 [  1276,  639,   931,   1288,  2049,  909,   1617,  1432,  1615,  2605,  2712,  2429,],
);

# Make a new graph object that is 600 pixels wide by 400 pixels high
my $graph = new GD::Graph::lines3d( 600, 400 );

# Set some labels
$graph->set(
             x_label => 'Month, 1999',
             y_label => 'Revenue ($US)',
               title => 'Monthly revenue for 1999',
);

# Plot the graph to a GD object
my $gd = $graph->plot( @data );

# Figure out what the default output format is
my $format = $graph->export_format;

# Now open a file locally and write it
open(IMG, ">sample.$format") or die $!;
binmode IMG;
print IMG $gd->$format();
close IMG;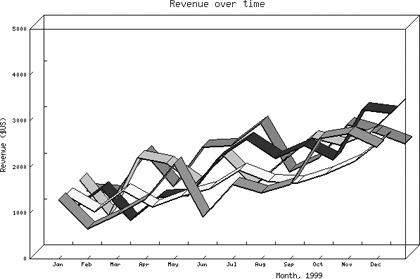
The first line tells Perl which graph module you want to use.
With both GDGraph and GD-Graph3d, you use the type
of graph you wish to make. So in this instance, because we are making
a line graph, we use GD::Graph::lines3d.
The next set of lines creates a data structure containing the data to be graphed. GD-Graph3d uses an array of an array of values. The first row holds the labels for the x-axis, and the subsequent rows are the data for each line of the graph. In this example, we’ve coded the values by hand, but in a real application, you’d get these from a database, an external file, or some other source. Check out the GD::Graph::Data class for methods that make it easy to read data from delimited text files and DBI sources.
On line 14, we create a new graph lines3d
object. GD-Graph3d objects cannot be reused—you create a new one for
each set of data you wish to plot. Lines 17 to 21 set several
self-explanatory options for the graph. GD-Graph3d supports all the
options that GDGraph does (and there are many), as well as a few
options specifically for three-dimensional output (such as the z-directional depth of the lines).
We go into more detail later about using options to improve the look
of the graph. Line 24 tells GD-Graph3d to plot the data to an image.
The plot method returns a reference to a GD image
object. If you wish, you can further process this image with
additional GD methods.
Because the GD library can output in different formats (GIF,
PNG, JPEG, and so on) GD-Graph3d offers the
export_format method to return the default format.
For new installations, this call will return png.
If you happen to have an old version of GD and
libgd on your system, this returns the
patent-infringing gif.
Now, using the format that GD-Graph3d found for us, we can write
the contents of the image to a file on the system: in our example,
either sample.png or sample.gif.
The binmode call is included for systems that make
a distinction between binary and text files (like Windows). On other
systems, this has no effect.
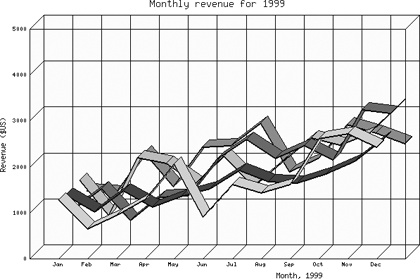
GDGraph and GD-Graph3d allow you to adjust the graph in many
ways. We start by setting some colors. GD-Graph3d has 29 predefined colors (white,
lgray, gray, dgray, black, lblue, blue, dblue, gold, lyellow, yellow,
dyellow, lgreen, green, dgreen, lred, red, dred, lpurple, purple,
dpurple, lorange, orange, pink, dpink, marine, cyan, lbrown, and
dbrown) or can accept any RGB color defined with HTML syntax. To set
the colors, add some key/value pairs to the
$graph->set statement so it looks like
this:
# Set some labels
$graph->set(
    x_label  => 'Month, 1999',
    y_label  => 'Revenue ($US)',
      title  => 'Monthly revenue for 1999',
      dclrs  => ['#9999CC', '#CCCC66', '#339900', '#990000', '#FFCC33'],
     boxclr  => '#FFFFCC',
 long_ticks  => 1,
);
dclrs sets a list of colors to use for each
data set, boxclr sets the color to use in the
background of the plot, and setting long_ticks to a
true value tells GD-Graph3d to draw a grid on the background
(connecting all the ticks). See Figure 25-3 for
the results.
Now let’s work on the fonts. GD-Graph3d uses GD’s font mechanisms (through GD::Text).
This means, that by default, you can choose one of five predefined
fonts, defined in the GD::Font class (GD::Font->Small,
GD::Font->Large, GD::Font->MediumBold,
GD::Font->Tiny, or
GD::Font->Giant). If you built
libgd with TrueType support (ActiveState’s build
includes this on Win32), then you can also use TrueType fonts (if you
give the full pathname to the font). For this example, we’ll use
built-in fonts and insert these three lines after the
$graph->set call to specify the fonts to use for
the title above the graph and the labels on each axis:
$graph->set_title_font  ( GD::Font->Giant );
$graph->set_x_label_font( GD::Font->MediumBold );
$graph->set_y_label_font( GD::Font->MediumBold );
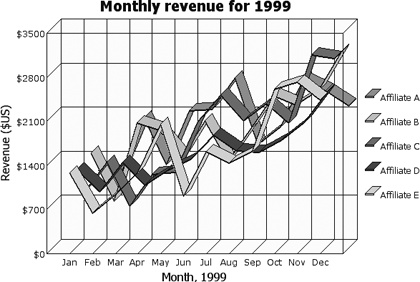
We’d also like to add a legend to the graph so that the people
who see it know what each line refers to. First, we add these
key/value pairs to the $graph->set
statement:
legend_placement  => 'RC',
legend_spacing    => 10,
(RC means Right Center.) We also add these
two new statements later to create the legend, by defining the labels
associated with each data set and setting the font for the legend
text.
# Define a legend
$graph->set_legend( 'Affiliate A', 'Affiliate B', 'Affiliate C',
                    'Affiliate D', 'Affiliate E' );
$graph->set_legend_font( GD::Font->MediumBold );
The result is shown in Figure 25-4.

There’s a lot more you can do with GD-Graph3d. For example, you could format the y-axis labels to include the “$” sign, or you could adjust the maximum y-value by hand to better fit the data, as shown in Figure 25-5. Read the documentation in GDGraph and GD-Graph3d for details on the options and settings available.
What the Future Holds
Like many Perl modules, GD-Graph3d is a work in progress. I’d like to include a drop-shadow option for the pie charts. The drop-shadow rendering could be improved to look more shadow-like, although it would slow down graph generation. I would also like to complete three-dimensional versions of the point, area, and point-and-line graphs available in GDGraph. Finally, the ultimate goal of GD-Graph3d would be to handle the projections for any viewing angle.
GD-Graph3d isn’t meant to meet the needs of all applications. There are now a number of graphing modules available for Perl, mainly differentiated by which graphics library they require under the hood. GD-Graph3d also does not provide for graphing of true three-dimensional data—it merely graphs two-dimensional data with a three-dimensional extrusion. For real three-dimensional rendering, users should use the Perl Data Language (PDL) and its associated graphing and rendering modules.
Installing GD
To install GD on your system, you’ll need to install some system libraries first. Here is a step-by-step guide to retrieving and installing them. Again, none of this is necessary if you’re using Perl on Windows or a Mac.
zlibThe
zlibcompression library can be obtained from one of the mirrors listed at http://www.info-zip.org/pub/infozip/zlib/. Download and extract the archive. On most systems (Solaris is an exception) you will not have to build thezliblibrary, because when you buildlibpnglater, it incorporates the source files rather than the actual library. If you choose to build and installzlib, use the standard install procedure:%
./configure%make#make install(as root)libpngInstalling
libpngis a little more complicated. You can get the latest version from a mirror listed at http://www.libpng.org/pub/png/libpng.html. Look for something like libpng-x.y.z.tar.gz, where x.y.z is the highest version number. Download and extract the archive. You’ll needzlibon the same level as thelibpngdirectory, and they should both be named without their versions. In other words, your directory structure should look like this:| +- zlib | +- libpng
Something like the following should do it. The actual commands may differ from system to system. You’ll have to remove the archive before doing this (
rm *.tarorrm *.tar.gz).%
mv zlib* zlib%mv libpng* libpng%cd libpng%cp scripts/makefile.stf Makefile%make#make install(as root)You should choose one of the makefiles in the libpng/scripts directory according to your system (such as scripts/makefile.linux for Linux or scripts/makefile.sunos for Solaris).
libfreetype(optional)If you want support for TrueType fonts in your graphs (say, because you want your axis labels in Japanese), you can install the
libfreetypelibrary. You cannot build this if you don’t have X Windows installed. You can downloadlttffrom http://freetype.sourceforge.net/download.html and then build it as usual:%
./configure%make#make install(as root)jpeg-6bYou will need the
jpeg-6a(or later) library on your system for GD.pm to compile. It is often already installed, so check /usr/lib or /usr/local/lib for libjpeg. If it’s not installed, you can download it from ftp://ftp.uu.net/graphics/jpeg/ and build it with the steps shown previously. Alternately, there may be a precompiled packaged version (RPM, DEB, etc.) available from your local package site.libgdInstalling
libgdshould now be straightforward. Download the latest version from http://www.boutell.com/gd/. After extracting the archive, edit the Makefile so that it includes support forjpegandttfif you installed those packages. You may also have to add-I/usr/local/include/freetypeto theINCLUDEDIRS=line to make it work withfreetype-1.3.1. You can then build the library as follows:%
make#make install(as root)You will now be able to install GD and the rest of the Perl modules mentioned in this article.