
Chapter 39. Drawing on a Canvas
Last year, I mowed my lawn on a warm and wonderful late summer day. As I followed my usual mowing pattern. I wondered if there was a better way to do it. In this article, we’ll use Perl/Tk to visualize some different mowing patterns and see how well they represent reality—and along the way demonstrate drawing on a Perl/Tk canvas.
Our Mower Is Programmable!
For this exercise we have at our disposal a programmable robotic mower. Our job is to write a software simulation of lawnmowing. It’s exceedingly difficult to model the complexities of the physical world with a computer, so we’ll make some simplifying assumptions. First, we’ll define the lawn as a rectangular area without trees, gardens, rocks, ponds, or cats.[11] The lawn is also a perfect mowing surface without bumps or undulations, and the grass has uniform thickness; this way we know that the mower can be steered accurately. Finally, we’ll assume the mower has a turning radius of zero: that is, it can pivot. (Automatic mowers that are always going forward have a nonzero turning radius.)
A Canvas Widget Is the Lawn
To represent the mowing area, we’ll use a Perl/Tk canvas widget, colored chlorophyll green of course. Let’s assume that to program the mower all we need is to write Perl/Tk code that overlays various items that display the mower’s path (lines, arcs, ovals, and such) on the canvas, making sure that no green remains.
Our first program starts by mowing (drawing a line) 100 feet in a straight line and turning right. It repeats three times until it’s mowed the periphery of the lawn. Then the mower shifts right by the width of one cut (I mow clockwise) and repeats the process until there’s nothing left to mow.
Defining the Perl Mowing Module
We’ll be creating several variants of the mowing program, so we’ll program for reusability by including constants in a module, Mow.pm. This module simply exports a list of variables. It’s not object-oriented, although it does inherit some methods from Exporter. Here it is:
# Mow.pm - mowing module.

package Mow;

use 5.004;
use Exporter;
@ISA = qw(Exporter);
@EXPORT = qw/$CHLOROPHYLL $COLOR $CUT $D2R $PPF $SIDE $TURN/;

$CHLOROPHYLL = '#8395ffff0000';    # Rye-grass-green, maybe
$COLOR       = 0xffff;             # Initial line color
$CUT         = (38 / 12);          # Cut width in feet
$D2R         = 3.14159265 / 180.0; # Map degrees to radians
$PPF         = 2;                  # Pixels/foot
$SIDE        = 100;                # Size of square mow area
$TURN        = (27 / 12);          # Turn radius in feet

1;
When Perl sees a use Mow statement it
populates the program with the variables from the
@EXPORT list. With the definitions
$CHLOROPHYLL, $CUT, and $SIDE in
place (more on “color numbers” like $CHLOROPHYLL
shortly) we can write a simple zero turning radius mowing
program.
Zero Turning Radius, Take One
use Mow;
use Tk;
my $mw = MainWindow->new;
my $canvas = $mw->Canvas(     -width => $SIDE, -height => $SIDE,
                         -background => $CHLOROPHYLL)->grid;
$mw->waitVisibility;
A chlorophyll green, 100-pixel-square canvas is created and
gridded. The waitVisibility statement forces Tk to
display the canvas before the program can proceed, so we can watch the
mowing process in real time. Otherwise, the simulation might complete
before we could see it. All we need to do now is define a recursive
subroutine and call it once:
mow $canvas, 0, 0, $SIDE, $SIDE;

sub mow { # Recursively mow until done.
    my ($canvas, $x1, $y1, $x2, $y2) = @_;
    return if $x1 >= $x2 or $y1 >= $y2;
    $canvas->createLine($x1, $y1, $x2, $y1, $x2, $y2, $x1, $y2, $x1, $y1);
    $canvas->idletasks;
    $canvas->after(250);

    mow $canvas, $x1+$CUT, $y1+$CUT, $x2-$CUT, $y2-$CUT;
}
Besides the reference to the canvas, the arguments to
mow are simply coordinates of the top left and
bottom right corners of a square. mow invokes
createLine to paint four line segments—one across
the top, right, bottom, and left of the canvas, in that order. Then
mow updates the display and waits a quarter of a
second ($canvas->after(250)) before invoking
itself again, to mow a smaller square. Figure 39-1 shows the
not-so-satisfying result.
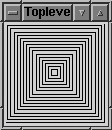
The main problem is that the width of the cut is pencil thin, so
the robot leaves lots of green behind. Luckily,
createLine has some options that help.
The Canvas Line Item Type
createLine draws a line between two points.
If you provide more than two points, it draws a series of joined line
segments. The line segments can even be smoothed using a Bezier spline
with the smooth parameter, as this code
demonstrates:
my $mw = MainWindow->new;
my $canvas = $mw->Canvas(qw/-width 90 -height 100/)->grid;

$canvas->createLine(qw/10 25 20 55 48 15 80 95 -fill blue/);
$canvas->createLine(qw/10 25 20 55 48 15 80 95 -fill red -smooth yes/);
Figure 39-2 shows the smoothing effect of splines.

The ends of a single line segment can be adorned in several
ways—with arrowheads (the widget demo, which Tk
installs in the same directory as Perl, shows you the arrowheads to
choose from), or one of these shapes, called a
capstyle (Figure 39-3):

Capstyles become important as the width of the line increases. In the previous picture the fat lines with capstyles were each 25 pixels long and 20 pixels wide. The skinny white lines connect the same canvas points, but have a width of 1 and no capstyle. Notice that the width of the fat items is equally apportioned on each side of the connecting line.
But our mowing program cuts with multiple, fat, and connected line segments, so we need to use another attribute called the joinstyle (Figure 39-4).

The miter’s right angle looks ideal. Finally, fat lines can be
filled with a solid color or a stipple. The next version of
mow uses graduated fill colors to highlight the
mower’s path.
Zero Turning Radius, Take Two
Putting everything together gives us the program below, called
zero-tr2 on the web site for this book (http://www.oreilly.com/catalog/tpj2).
my $canvas = init;
mow $canvas, (0, 0), ($SIDE, $SIDE);
MainLoop;
sub init {
my $mw = MainWindow->new;
my $mow_side = $SIDE * $PPF;
my $canvas = $mw->Canvas( -width => $mow_side, -height => $mow_side,
-background => $CHLOROPHYLL)->grid;
$mw->waitVisibility;
$mw->after(1000);
return $canvas;
}
sub mow { # Recursively mow until done.
my ($canvas, $x1, $y1, $x2, $y2) = @_;
return if $x1 >= $x2 or $y1 >= $y2;
my $color = sprintf("#ffff%04x%04x", $COLOR, $COLOR);
$COLOR -= 0x0800;
$canvas->createLine($x1 * $PPF, $y1 * $PPF, $x2 * $PPF, $y1 * $PPF,
$x2 * $PPF, $y2 * $PPF, $x1 * $PPF, $y2 * $PPF,
$x1 * $PPF, $y1 * $PPF, -width => $CUT * $PPF + 0.5,
-fill => $color, -joinstyle => 'miter'),
$canvas->idletasks;
$canvas->after(250);
mow $canvas, $x1+$CUT, $y1+$CUT, $x2-$CUT, $y2-$CUT;
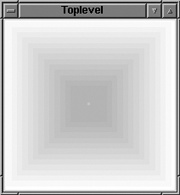
}Four comments about zero-tr2:
The variable
$PPFis the scaling factor, in pixels per foot, which enlarges the canvas for better viewing.Anywhere a color name like
CadetBlueorMediumOrchid4is specified, a hexadecimal RGB number can be substituted. The program starts by drawing lines with a fully saturated color and darkens it slightly each timemowis called.The mowing width is a floating point number that must be rounded after scaling, otherwise we miss mowing parts of the lawn. Try running
zero-tr2without the 0.5 rounding term and see what happens. For a great primer on floating point gotchas, read the article “Unreal Numbers” in Computer Science & Perl Programming: Best of the Perl Journal (O’Reilly).All line segments are joined with a miter cut.
Figure 39-5 shows the result of
zero-tr2.
Rotating Simple Objects in Canvas Space
Let’s complicate matters and assume our robot is in the shop for
repairs. We have an older model with a nonzero turning radius; that
is, it turns with an arc, leaving a small swath of green behind. To
simulate this, the mowing program could draw connected lines and arcs
for each side of the mowing area. While these eight items are still
manageable, it might be easier to define one line and one arc, and
have mow rotate them as required.
Rotating a line in a Cartesian coordinate space is simple if one of the endpoints is at (0, 0). Then the rotation reduces to rotating the other endpoint. Given such a point (x, y), we can rotate it through the angle Θ using these equations:
| x’ = x cos Θ- y sin Θ |
| y’ = x sin Θ + y cos Θ |
| (x’, y’) is the new location of the point. |
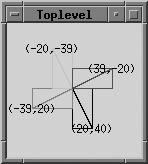
Rotating a line about an arbitrary point requires that the line be translated to the origin, rotated, and then translated back to its original location. The following code rotates (clockwise) the line whose endpoints are (0,0) and (20,40) about the center point of the canvas, (65,65). It draws a line and then creates an invisible bounding rectangle. We’ll employ one of those shortly to define an oval for the turning radius arc.
my $mw = MainWindow->new;
my $canvas = $mw->Canvas(-width => 130, -height => 130)->grid;
$mw->waitVisibility;

my $origin = 65;                        # Origin of canvas
my($x2, $y2) = (20, 40);                # Endpoint of line segment

rotate $canvas, 0, $x2, $y2, 'black';
rotate $canvas, 90, $x2, $y2, 'red';
rotate $canvas, 180, $x2, $y2, 'green';
rotate $canvas, 270, $x2, $y2, 'blue';

MainLoop;

sub rotate {
    my ($canvas, $theta, $x2, $y2, $color) = @_;

    $theta *= $D2R;                     # Degrees to radians
    my $nx2 = $x2 * cos($theta) - $y2 * sin($theta);
    my $ny2 = $x2 * sin($theta) + $y2 * cos($theta);

    $canvas->createLine(0+$origin, 0+$origin, $nx2+$origin, $ny2+$origin,
                        -fill => $color);
    $canvas->createRectangle(0+$origin, 0+$origin, $nx2+$origin, $ny2+$origin,
                            -outline => $color);

    my $coords = sprintf("(%d,%d)", int($nx2), int($ny2));
    $canvas->createText ($nx2+$origin, $ny2+$origin,
                         -text => $coords, -font => 'fixed'),
    $canvas->idletasks;
    $canvas->after(250);
}
Figure 39-6 shows four rotations of a line.
The Canvas Rectangle and Text Item Types
The previous code introduced two new canvas items:
rectangle and text. Like the
mowing area, two diagonally opposed corners define a
rectangle (here, the endpoints of the rotating line segment). You
can’t do much else with a rectangle other than specify the width and
color of its outline, or fill it with a color or stipple.
The canvas text item annotates the business end of a line with its coordinates (the other endpoint is always (0,0)). These floating point values are truncated without rounding, which is why some of the numbers are a bit off. Text items can be anchored, justified and filled, as you’d expect. There are methods to insert and delete characters, too.
The Canvas Arc Item Type
The tools for the next mowing program are now at hand. We can
take a line and rotate it through an arbitrary angle and draw it
anywhere on the canvas. We can also use the two points that define a
line and draw a rectangle instead, at any angle, anywhere on the
canvas. And since an arc is defined by an oval which is defined by a
bounding rectangle, we can rotate and draw an arc anywhere on the
canvas. Figure 39-7 shows three arc styles:
pieslice, chord, and arc.
The three arc styles were created with the following statements. The first four elements represent the bounding boxes:
$canvas->createArc(qw/10 10 50 50 -start 0 -extent 270
                      -style pieslice -fill black -stipple error/);

$canvas->createArc(qw/70 10 110 50 -start 45 -extent -135 -style chord/);

$canvas->createArc(qw/130 10 170 50 -start -90 -extent -180 -style arc/);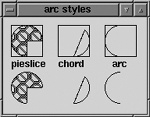
Each arc has a starting angle and an extent, both in degrees, with zero degrees along the x-axis. Positive angles rotate counterclockwise and negative angles clockwise. The pie slice arc is stipple filled with a built-in bitmap.
Nonzero Turning Radius, Take One
The new controller code starts by defining two points: an endpoint of a line, and one corner of the arc’s bounding box. The point (0,0) doubles as the line’s other endpoint, as well as the opposite corner of the arc’s bounding box. The bounding box is square, because the mower’s circular turning radius must fit inside.
@LINE = ($SIDE, 0);     # Initial straight line mowing path
@ARC  = ($TURN, $TURN); # Generic turning radius arc
The change to mow: it now rotates the line
and arc, computes three points, and then draws the two items (the full
program is called nz-tr1). Points one and two are
the line’s endpoints; points two and three are the arc’s bounding box.
Thus, the end of the line and the start of the arc coincide. Here’s an
excerpt:
$canvas->createLine($start[0], $start[1], $end[0], $end[1],
                    -fill => $color, -width => $CUT,
                    -capstyle => 'round', -tags => 'path'),

($x2, $y2) = @ARC[0,1];

$nx2 = $x2 * cos($theta) - $y2 * sin($theta);
$ny2 = $x2 * sin($theta) + $y2 * cos($theta);

$canvas->createArc($end[0], $end[1], $end[0]+$nx2, $end[1]+$ny2,
                   -start => 270-20-$angle, -extent => 180+40,
                   -style => 'arc', -outline => $color,
                   -width => $CUT, -tags => 'path'),
This simulation produces the same visible results as the zero turning radius code.
Canvas Tags
The previous snippet demonstrates tags, a
powerful canvas concept. Tags are simply strings used to identify
canvas items, which you add or delete as needed. A canvas item can
have any number of tags, and the same tag can be applied to any number
of items. The mowing program uses the path tag to
group all the lines and arcs that define the mowing path. (Every
canvas item has at least one tag, the string
all.)
Tags are supplied to canvas methods to select which items to operate upon; for example, this binding turns all fat lines and arcs into skinny lines and arcs. This allows the green canvas background to show through:
$canvas->CanvasBind('<Double-1>' =>
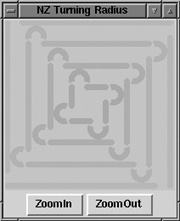
sub { $canvas->itemconfigure('path', -width => 1) });Figure 39-8 shows the
output of nz-tr1.

Scaling Canvas Items
A canvas can also be scaled to implement a primitive zoom
function. Scaling adjusts each of the points defining an item by
changing the points’ distance from an origin by the scale factor. For
example, this code uses the middle of the canvas as the origin and
doubles the x and y
coordinates of all items tagged with the string
path. Scaling doesn’t affect the line width,
however.
my $origin = $SIDE / 2;

my $zi = $zf->Button(qw/-text ZoomIn -command/ =>
                     [$canvas => 'scale', 'path', $origin, $origin, 2.0, 2.0]);
After a few presses of the ZoomIn button we see the detail shown in Figure 39-9.
The Real World Is Uncertain
I can’t mow as nicely as the robot. As I turn my tractor it continues to move forward, so the turning arc is almost teardrop in shape. My mowing surface is sloping and bumpy, and I don’t always start and finish turns at the same time. No two turns are identical. My sloppiness often leads to uncut grass, as illustrated in Figure 39-10.

I realized this was more like reality, and the global view of the situation gave me an idea. Modifying the program, I used two lines to paint a large X on the canvas, and a few trials later found that this code sufficed to cut the remaining grass:
$canvas->createLine(0, 0, $SIDE, $SIDE, -width => (2 * $CUT)+0.5, -fill => 'yellow'),
$canvas->createLine($SIDE, 0, 0, $SIDE, -width => (2 * $CUT)+0.5, -fill => 'yellow'),
The magic number was two mower widths, a trip up and back each diagonal. Last year I went out and performed the experiment, and the results agreed nicely with theory.
[11] I once saw a solar-powered robot that mowed in a random direction until it bumped into something, at which time it took off in a new, random direction. Given enough time, it would mow any area completely. I hear these mowers use color/luminance to detect edges, so I guess my cats are safe as long as they don’t turn green.