Mohammad Khorasani1, Mohamed Abdou2 and Javier Hernández Fernández1
(1)
Doha, Qatar
(2)
Cambridge, United Kingdom
After acquainting ourselves with the necessary building blocks of a well-structured Streamlit web application, we require an additional feature to deploy a production-ready application, namely, a secure user authentication service. Once all users requesting access to the application are authenticated, we can guarantee a secure user experience whereby private data is safe and any unwelcome or malicious requests are formidably denied. In this chapter, we will learn how to establish user accounts, verify user actions, and implement other housekeeping measures that are expected of any well-versed software engineer.
8.1 Developing User Accounts
In this chapter, we will build on the example from Chapters 5 and 6, by introducing HR admins who get to see and add employees and their pay grades. Assume there are admins responsible to do those actions, and the company keeps changing and assigning new admins. In this case, we need our application to support making more admin accounts and authorize them.
Now those actions need authorized people to execute them, so we mainly need three main additions: adding an admin table in our database, allowing admin account creations, and authorizing users with admin accounts to use the rest of the service.
8.1.1 Hashing
To add a new table to the database, we will need to follow a step similar to what was done previously and as shown in Figure 8-1. Notice that we are storing mainly two pieces of information per admin, username and password hash. The hash or a nonguessable representation of the password is stored instead of the password itself. By doing this, we are protecting our users’ privacy and credentials in case of a data breach. As if this happens, the attacker will have to spend billions of years to brute-force all hashes to find a single user’s actual password. So what hashing mainly does is a one-way transformation of data that is not reversible.
Figure 8-1
Creating a new table to store admin credentials, using the contents of Flask/create_admins_table.sql
After creating the new table, we will need to create a corresponding Python class to make an ORM for SQLAlchemy as shown in Listing 8-1. Hashing a password can be done in multiple ways, a few of which can be MD5, SHA256, SHA512, and others. However, the most commonly used algorithm by modern systems is Bcrypt. Infact Bcrypt is used by default to protect users’ passwords in Linux environments. Before explaining how Bcrypt works, we first need to know what methods are used to make a hash more secure.
As mentioned before, hashing transforms data. So, for instance, the text
Password123
maps to
42f749ade7f9e195bf475f37a44cafcb
using MD5. However, a slight modification to the original plain text would make a bigger difference in the hashed output as such:
Including extra bytes in the password, also known as adding a salt, gives a totally different hash. This helps in password reusability cases by users across different websites, and one has been breached. By doing so, attackers won’t know whether the same user uses the same password among multiple domains. And it will give them a harder time to break the hash. However, this trick will not be useful if the attacker knows the hashing salt and how it is applied. Hence, Bcrypt falls under the spotlight by introducing a cryptographic way to store randomly generated salts within the hash. This makes it possible to check if a Bcrypt hash is generated from a plain text, using an abstracted Bcrypt library’s function, as shown in Listing 8-2.
Now after we have the needed service and storage support to manage passwords, we can proceed with the backend refactoring to support authentication for every route. This means we need to intercept every request to the server and decide whether it is authenticated or not. In other words, we need to have an independent piece of software to sit between the client’s request and the access controller; this is usually referred to as middleware among backend developers. The authentication process has to be checking for a specific identifier of the request that the server can trust; such identifier is referred to as “authentication token,” or “token” for short. This token shall be issued by the server, and it shall be verified.
Tokens are mainly either of the two: custom session IDs or JWTs. For this example, we will proceed with JWTs as it doesn’t require the server to store it, which makes it stateless. JWTs consist of three main parts encoded in base64 and separated by a period. The first part contains information about the payload signing mechanism, the second holds the raw payload, and lastly the third contains a password-protected signature of the payload using the same hashing mechanisms in the first part. This can be seen in more detail in Figure 8-2 from jwt.io.
Figure 8-2
JSON Web Token (JWT) content
So on a new request, we will check the headers for a token. The token’s payload will be signed, and the signature will be compared against the passed token’s signature; if they match, we have confirmed that the token is issued by the server. And for more security purposes, to avoid attackers stealing other people’s legit tokens, we shall have an expiration date (30 days from issuing by default), which will require the user to log in again upon expiration. Since this will contain many logic parts, it is best to isolate it as a whole service to manage tokens as shown in Listing 8-3.
from jwt import PyJWT
from time import time
from typing import Union
class JWTService:
expires_in_seconds = 2592000
signing_algorithm = "HS256"
def __init__(self, signing_key: str, expires_in_seconds: int = 2592000):
self.signing_key = signing_key
self.expires_in_seconds = expires_in_seconds
def generate(self,
data: dict,
expires_in_seconds: int = expires_in_seconds) -> Union[str, None]:
if verify_time and 'exp' in payload and payload['exp'] < int(time()):
return False
return True
except:
return False
def get_payload(self, token: str):
try:
instance = PyJWT()
payload = instance.decode(
jwt=token,
key=self.signing_key,
algorithms=[self.signing_algorithm])
return payload
except Exception as e:
return None
Listing 8-3
Flask/DataBase/Services/JWTService.py
Since we have a way to issue and validate any token, we can integrate it with our middleware class in Listing 8-4, which has a function responsible to check if the requested route shall be authenticated or not. If authentication is needed, it will check if the JWT passed is valid. If it is not, it will return a famous 401 error which is the status code equivalent to “Not Authorized”; otherwise, a None is returned which means proceed to the next step in the backend’s code, which will be the controller in our case. And as seen on line 8, we are declaring login and sign-up routes – which will be introduced later – don’t need to be authenticated, because after a successful login, a token will be supplied. The same for signing up, but another layer of protection will be introduced later, to avoid abuse by externals making new accounts without control and supervision.
is_route_unauthenticated = request.path in self.unauthenticated_route_names
if is_route_unauthenticated:
return None
if "token" in request.headers:
token = request.headers['token']
is_valid = self.jwt_service.is_valid(token)
if is_valid:
return None
else:
return exceptions.Unauthorized()
return exceptions.Unauthorized()
Listing 8-4
Flask/DataBase/Middleware.py
Finally, we need to initialize the previously made services and make three more routes for logging in, signing up, and checking login status. We need the last route to allow the frontend to make the decision whether to display the login page or not. So the server’s main file shall look like Listing 8-5. We can notice that secrets and keys are read from an external YAML file and then parsed. One of those secrets is to make sure only who knows it can make new accounts as shown in Figures 8-3 and 8-4 using Postman.
from flask import Flask, request
from DataBase import Connection, Employees, Admins
Creating an admin account step 1: adding a sign-up key
Figure 8-4
Creating an admin account step 2: setting the new account’s credentials
After creating the account, we can manually check the database if the new credentials are present. This can be verified in Figure 8-5, where the username is as supplied and the other column is a valid Bcrypt hash for the supplied password.
Figure 8-5
Created account details in the database
Now as we have admin accounts ready, we can test logging in with Postman before moving on to the next steps. By inserting the same username and password used in signing up, in a JSON format to a POST of the responsible route, we get a token back as seen in Figure 8-6.
Figure 8-6
Logging in with Postman using credentials from Figure 8-4
Taking this to the next phase of development on Streamlit’s side, we will first refactor Listing 8-6 to support initialization with an authentication token. Then use this token as part of every request, except the one used for logging in as it is not needed. Good to note that the is logged in function is implemented for a quick check of the current token’s validity if supplied.
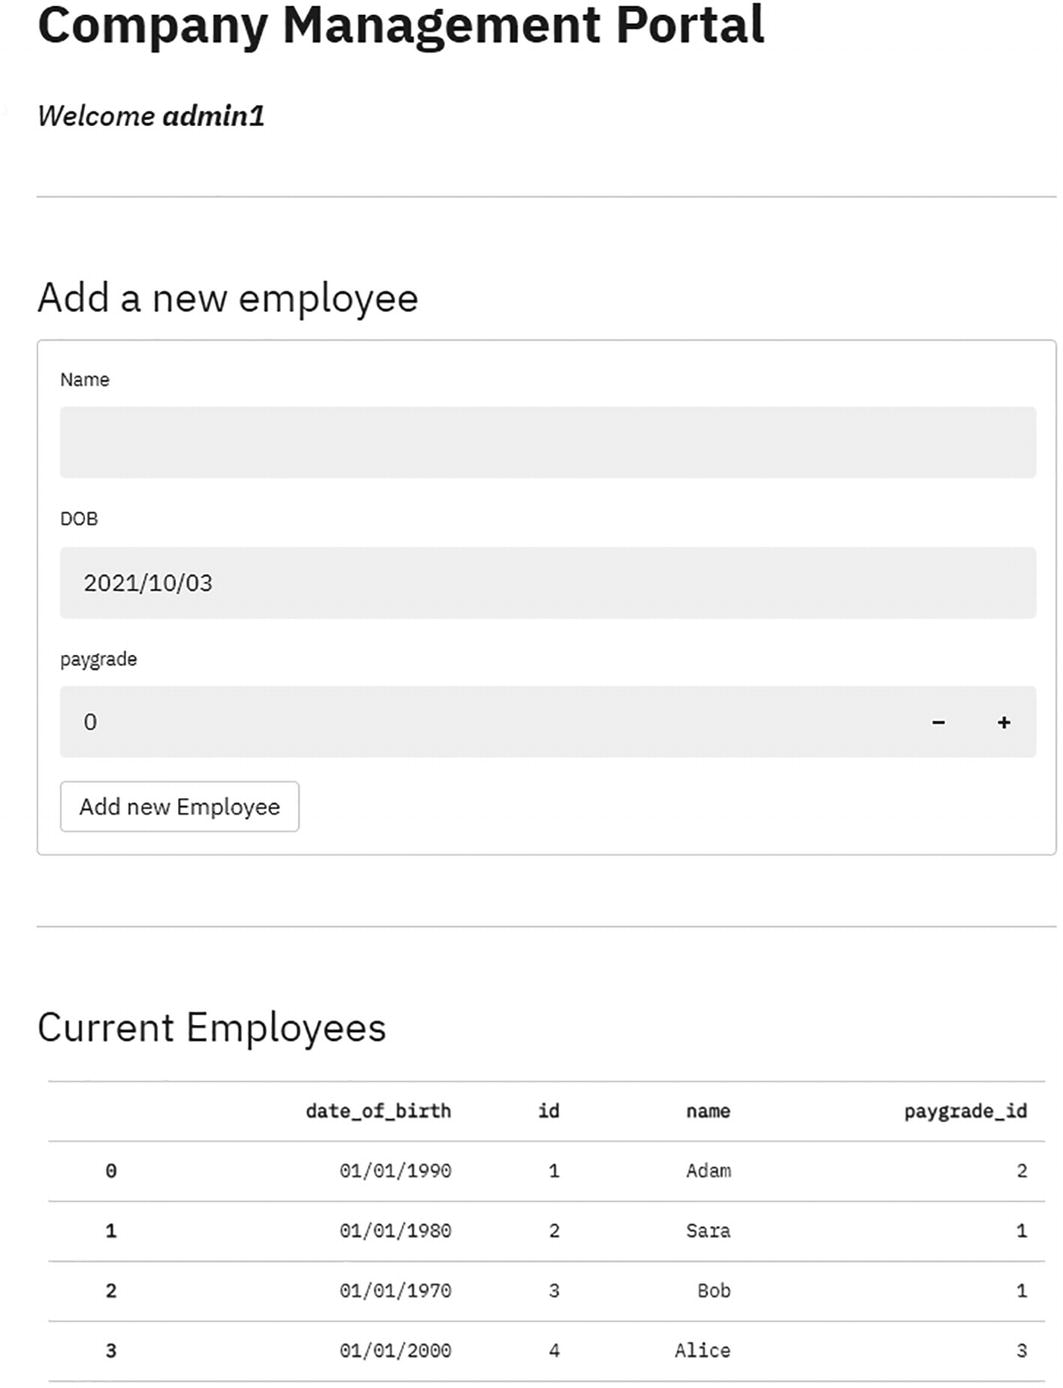
Having our API adapted to authentication tokens as shown in Listing 8-7, we can take it to the actual frontend side by implementing cookie support to store the authentication tokens and use it wherever needed as shown in Listing 8-8. Whenever the Streamlit renders, it will check the local cookies and look for authentication tokens; if the token is valid, it will display the management portal as shown in Figure 8-8 with a customized welcome message. Otherwise, it will prompt for an obligatory login, which can be seen in Figure 8-7.
Adding and viewing the list of authenticated employees
Looking closely into the Streamlit side code, we see that almost the same coding pattern to the backend – dependency injection – has been used. This makes the code coherent end to end. Simply the actions of the API are passed down to the views which are abstracted with a class as shown in Listings 8-9, 8-10, and 8-11.
st.error("Incorrect username and password combination")
Listing 8-11
Streamlit/Views/Login.py
8.3 Secrets Management
As we have already discussed how to keep a Streamlit application’s secret credentials safe from an external’s reach, we now will introduce another way to be used in Flask and that can also be applied in a Streamlit context. Basically, we need a file to add the secrets in. This means the JWT signing key and the signing up header key need to be stored somewhere on disk and then loaded into our application’s memory usage. Secrets and keys can be stored in different ways, but one of the most user-friendly ways is using YAML files, as shown in Listing 8-12, which are then parsed and converted to a Python dictionary.
jwt_secret: "A RANDOM TEXT HERE"
sing_up_key: "ANOTHER RANDOM TEXT HERE"
Listing 8-12
Flask/secrets.yaml
8.4 Anti-SQL Injection Measures with SQLAlchemy
As a final code implemented protection, we aim to protect the backend’s SQL queries by preventing a nonintended action to happen. First, we need to identify what a SQL injection is. It is mostly when a user-controlled text changes the SQL command behavior. For instance, assume we want to support searching for employees starting with a string of character to be input by the end user; it will result in a final query as such: SELECT * FROM Employees WHERE name = 'input%'. This poses a threat if the input was OR 1=1 -- as it would result in a final query of SELECT * FROM Employees WHERE name = '%' OR 1=1 -- which orders the database to select all employees, instead of treating the input as the search string.
To overcome this problem, we need to use parameterization which is a technique to isolate the original SQL command from the changing variables. So, for the example from before, it would rather look something like SELECT * FROM Employees WHERE name = '@name%' where @name is a SQL variable initialized before submitting the query. As a developer, this might be an overhead toward a more secure SQL. Thus, we use libraries and/or packages to do this on our behalf. For this scenario, we are using SQLAlchemy, which is a library that can connect to many types of databases and change SQL command formats depending on the architecture, origin, and version, all by following an intuitive API that is documented in docs.sqlalchemy.org.
8.5 Configuring Gitignore Variables
Having all files tracked with a version control system like Git is a must for big projects, as it adds more simplicity in managing what files are important and their modification history. However, not all files must be tracked, and some will pose security threats if tracked, as the code base can be accessed by anyone if it is public, or broken into if it is private. This makes the secrets managed under threat; hence, it is widely agreed among software developers to not track the secrets file and store the actual secrets in a security vault, which is accessible using multiple methods of authentication.
As this adds one more layer of security over the application’s secrets, it gives a direct hit to code readability and understanding if an unaware developer started working on the code. This can be fixed by adding another file with the following naming conventions: Flask/secrets.example.yaml which will host similar content to what is shown in Listing 8-12 albeit with a replacement of the actual key values with something vague yet understandable, as shown in Listing 8-13. Subsequently, we can remove the original secrets file from Git by updating the .gitignore file as shown in Listing 8-14. If needed, any file and folder in or under the same folder as .gitignore can be set to be ignored or excluded depending on the syntax.
# Copy the content of this file to secrets.yaml
# and replace its contents with the correct values
jwt_secret: "<INSERT TEXT>"
sing_up_key: "<INSERT TEXT HERE>"
Listing 8-13
Flask/secrets.example.yaml
secrets.yaml
Listing 8-14
Flask/.gitignore
8.6 Summary
As part of making any web application public, you are required to manage resources served, by verifying each and every user’s authorization level. In this chapter, we have explained how to create and manage user accounts and how to utilize them for authentication. We introduced essential application security mechanisms such as generating JSON Web Tokens, hashing passwords, and embedding secure signatures into cookies. In addition, this chapter showcased techniques to obstruct SQL injection attacks to prevent unauthorized access to databases. Finally, we observed how application keys and secrets can be secured during deployment, and also how they can be excluded from being committed toa version control framework such as Git.