

✓ | How to send e-mail messages from a Web page. |
✓ | How to write an ASP.NET page that updates databases and allows visitors to create their own registration records. This page also sends the visitor an e-mail message. A hyperlink in that message contains a confirmation number. |
✓ | How to write an ASP.NET page that updates databases and runs when the visitor clicks the hyperlink in the e-mail message. This action changes the visitor’s registration record from unconfirmed to confirmed status. |
✓ | How to write an ASP.NET page that updates databases and that registered visitors can use to post a classified ad. |
This chapter is the first of two that illustrate a variety of ways ASP.NET pages can update a database. Getting information out of a database is usually easier and more fulfilling that putting it in, but therein lies the challenge. Especially on the Internet, data entry pages should be very easy to use and provide something the visitor wants.
Because one of the examples not only updates a database but also sends e-mail, the first topic briefly explains how to send electronic mail from an ASP.NET page.
Although Web sites that send e-mail are very common, classic ASP has no built-in facilities for sending e-mail. IIS provides a COM object called CDONTS.NewMail, but this object has so many limitations that many Web designers have resorted to using third-party e-mail objects.
The .NET Framework addresses this situation by providing the following objects:
MailMessage constructs an e-mail message in preparation for sending it.
MailAttachment identifies a file that will accompany a message.
SmtpMail uses the Collaboration Data Objects for Windows 2000 (CDOSYS) message component to send a message.
All three objects are members of the System.Web.Mail namespace. Any ASP.NET pages that use them must therefore include the following directive:
<%@ Import Namespace="System.Web.Mail" %>
To create a message, simply create a new MailMessage object and then assign any and all properties you like from the following table. You’ll almost certainly want to assign values to the To, From, Subject, and Body properties, but the rest are entirely at your discretion.
To install all the objects that the SmtpMail object uses, you must install the Microsoft SMTP service on the Web server. For more information, refer to "Install Internet Information Services" in Chapter 2.
To avoid unathorized use, many SMTP servers refuse to relay messages. They’ll reject any message that has a From or Reply-To address the server doesn’t consider one of its own. To avoid such rejection, either specify From and Reply-To addressess that the server accepts or configure the server to accept the domain you want to use. To configure relay settings on the Microsoft SMTP server, open Internet Services Manager, open the computer where the services is running, right-click Default SMTP Virtual Server, choose Properties, click the Access tab, and then click the Relay button.
Here, for example, is some typical code that creates a message and assigns some properties:
Dim msgMail as New MailMessage
msgMail.To = "[email protected]"
msgMail.From = "[email protected]"
msgMail.Subject = "Beverage for Beverage"
msgMail.Body = "Would you be willing to trade " & _
               "Chardonnay for Colombian?"
The following statement attaches a file to the same message. The file must already exist on the Web server, and you must specify its physical location.
msgMail.Attachments.Add(New MailAttachment( _
    "C:fourthcoffeelogo.gif"))
To actually send the message, you must call the Send method of the built-in SmtpMail object. Here’s an example:
SmtpMail.Send msgMail
By default, the Send method looks for an SMTP mail service running on the Web server. This could be the SMTP service that comes with IIS, for example. To send the mail through a different server, modify the SmtpMail object’s SmtpServer property as shown in this example:
SmtpMail.SmtpServer = "mail.contoso.com"
SmtpMail.Send msgMail
MailMessage Object Properties | |
|---|---|
Property | Description |
Attachments | A collection of Attachment objects describing files that will accompany the message. |
Bcc | A semicolon-delimited list of e-mail addresses that will receive a blind carbon copy (BCC) of the message. |
Body | The body of the message. |
BodyEncoding | The encoding type of the body of the message. Acceptable values are MailEncoding.Base64 and MailEncoding.UUEncode. |
BodyFormat | The content type of the body of the message. Acceptable values are MailFormat.HTML and MailFormat.Text. |
Cc | A semicolon-delimited list of e-mail addresses that will receive a carbon copy (CC) of the message. |
From | The e-mail address of the sender. |
Headers | A collection of custom headers that will accompany the message. |
Priority | The priority of the message. Acceptable values are MailPriority.High, MailPriority.Normal, and MailPriority.Low. |
Subject | The subject line of the message. |
To | The e-mail address of the recipient. |
UrlContentBase | The Content-Base HTTP header. This identifies the base location for all relative URLs used within an HTML-encoded message body. |
UrlContentLocation | The Content-Location HTTP header for the message. |
The previous chapter showed how to block unregistered visitors from certain parts of your site. This, of course, raises the question of how visitors can register. That’s the issue this section resolves.
The insert.aspx page from Chapter 7 demonstrated the basics of inserting a new member record (or, for that matter, of inserting any sort of record at all). This is hardly the sort of page you’d want to use on the Web, however. For one thing, it’s a freestanding Web page and not at all integrated with the rest of the Contoso Classified Web site. For another, it performs no validation of the input fields. Finally, there’s no assurance that the given e-mail address even works. The procedures in this section will correct those deficiencies.
This procedure assumes that you’ve successfully completed all the procedures in the previous chapter and want to preserve that environment. If you completed the procedures and don’t care to preserve the results, you can skip this procedure and use the ch11 folder for all the examples in this chapter. Otherwise, proceed as follows:
Create a new folder on your Web server and name it ch12.
Copy all the files and folders from the ch11 folder into the ch12 folder.
If you think some of the files in your ch11 folder might not be working properly, copy all the files and folders from the ch11 folder you installed from the companion CD.
Mark the ch12 folder as an IIS application. This is something you or the Web server’s administrator must use Internet Services Manager to do. For instructions, refer to "Creating a Web Server Application" in Chapter 2.
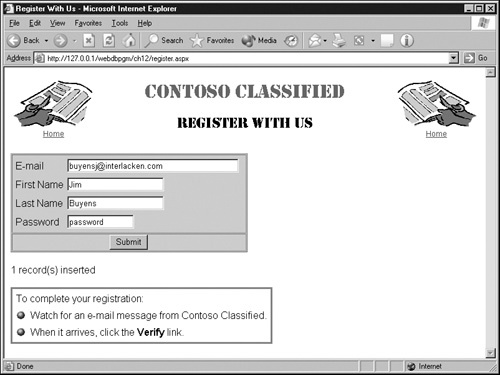
This procedure will create the Web page shown in the following graphic. Like the insert.aspx page from Chapter 7, this page adds one record to the members table in the classified.mdb database. If you don’t remember the insert.aspx page very well, you might want to review that portion of Chapter 7 or refer frequently to the full code listing at the end of this section.
As well as adding a record to the members table, this page sends the visitor an e-mail message that contains a special hyperlink. The query string portion of this hyperlink contains the visitor’s e-mail address and confirmation number. The procedure that follows this one will create a page that receives these two values, verifies that they match a record in the members table, and only then sets the confirmed field in the members table to True. Because a visitor can get the confirmation number only by e-mail, this approach proves that the visitor’s e-mail address worked at least once.
If you’d rather look at the finished results than make all the changes yourself, refer to the ch12 folder you installed from the companion CD. Otherwise, proceed as follows:
Copy the insert.aspx file you created in Chapter 7 into the ch12 folder you created in the previous procedure. (If you can’t find the insert.aspx file or believe it isn’t working properly, copy the same file from the ch07 folder you installed from the companion CD.)
Change the name of the new insert.aspx file to register.aspx.
Open the register.aspx file in your favorite HTML or text editor.
At the top of the Web page, add the directives shown in blue in the following code:
<%@Page language="vb" explicit="true" debug="true"%>
<%@Import Namespace="System.Data"%>
<%@Import Namespace="System.Data.OleDb"%>
<%@Import Namespace="System.Web.Mail" %>
<%@Register TagPrefix="webdbpgm" TagName="banner"
            src="banner.ascx" %>
<script runat="server">
Change the title of the page from Insert Member Record to Register With Us. If the page contains a line such as the following that links to a cascading style sheet file, adjust its path as necessary.
<link rel="stylesheet" type="text/css" href="normal.css">
Delete the following heading just after the <body> tag:
<h1>Insert Member Record</h1>
Replace it with the standard Contoso Classified banner:
<body>
<webdbpgm:banner id="banner" runat="server" />
If you like the gray form area, add the code shown in blue just after the existing <form> tag:
<form method="POST" runat="server">
  <table border="1" cellspacing="1" bgcolor="#CCCCCC"
         bordercolorlight="#999999"
         bordercolordark="#666666">
    <tr>
      <td>
Also add the following code shown in blue just before the existing </form> tag:
      </td>
    </tr>
    <tr>
      <td align="center">
      <!-- Submit button will go here --></td>
    </tr>
  </table>
</form>
Move the code for the Submit button named btnSub so that it replaces the comment shown above, and then delete the table row that previously contained the button. The following code now appears in place of the comment:
<input type="submit" value="Submit" id="btnSub"
             runat="server" />
Just before the </body> tag, create a formatted message like the one shown in the graphic. The sample results use an HTML table for this, but you can use any HTML element you want. Just be sure to include the following attributes in the outermost element (in the <table> tag, for example): runat="server", id="tblVerify", and visible="false".
<table runat="server" id="tblVerify" visible="false"
       cellspacing="0" cellpadding="0" border="2"
       bordercolor="#009900">
<!-- table contents go here  -->
</table>
Change the statements that open the database connection so that they use a centrally managed connection string as described in the previous chapter. To do this, in the InsertRecord subroutine, change the statements that open the database connection from
strClasf = "Provider=Microsoft.Jet.OLEDB.4.0;" & _
           "Data Source=" & _
           server.mappath("classified.mdb") & ";"
conClasf = New OleDbConnection(strClasf)
conClasf.Open
to
conClasf = New OleDbConnection(Session("conClasf"))
conClasf.Open
After you make this change, the following statement, which appears earlier in the InsertRecord subroutine, has no further use. Delete it.
Dim strClasf As String
Save the page and try using it to create a few records in the members table. It should now look like the previous graphic and work as well as it did in Chapter 7. However, it still won’t send e-mail. To add that feature, complete the next procedure.
This procedure will modify the register.aspx page so that new registrants receive an e-mail message that invites them to confirm their registration. Here’s how:
When the insert.aspx page created the SQL statement to add a new members record, it used the following expression to calculate the confirmation number:
Clng(Rnd() * 9000000) + 1000000
This process is inconvenient because the register.aspx page needs to use the resulting value in two places: in the SQL statement (as before) and in the mail message (which is new). Therefore, in the InsertRecord subroutine:
Declare a Long variable named lngConfNumber.
After the Randomize statement and before creating the SQL statement, calculate the confirmation number and save it in the lngConfNumber variable.
When building the SQL statement, use the lngConfNumber variable rather than the calculation.
After you make these changes, the middle of the InsertRecord subroutine should look like this:
Dim lngConfNumber As Integer

lblErrMsg.Text = ""
lblOkMsg.Text = ""
conClasf = New OleDbConnection(Session("conClasf"))
conClasf.Open

Randomize
lngConfNumber = Clng(Rnd() * 9000000) + 1000000
strSQL = "INSERT INTO members (" & _
          "memberid, "   & _
          "firstname, "  & _
          "lastname, "   & _
          "[password], " & _
          "confnumber, " & _
          "confirmed "   & _
") VALUES ('" & _
          Replace(txtMemberId.Value, "'", "''") & _
          "', '" & _
          Replace(txtFirstName.Value, "'", "''") & _
          "', '" & _
          Replace(txtLastName.Value, "'", "''") & _
          "', '" & _
          Replace(txtPassword.Value, "'", "''") & _
          "', " & _
          lngConfNumber & _
          ", " & _
          "False) "
In the next block of code, the statements shown in black immediately follow the code shown in the previous step. Add the statements shown in blue, which will execute only if the ExecuteNonQuery method was successful in adding a record. In that case, the new statements will first call a subroutine that sends e-mail and then make the message from step 8 of the previous procedure visible.
cmdClasf = New OleDbCommand(strSQL, conClasf)
Try
  intRowsAff = cmdClasf.ExecuteNonQuery()
  If intRowsAff = 1 Then
    SendIntroMail(lngConfNumber)
    tblVerify.Visible = True
  End If
Catch ex As Exception
  lblErrMsg.Text = ex.Message
End Try
Locate the </script> tag that terminates the page’s only code declaration block. Immediately before that tag, define a subroutine named SendIntroMail. This subroutine will receive a Long argument named alngConfNumber.
Sub SendIntroMail(alngConfNumber)
' Code to send mail will go here.
End Sub
</script>
Replace the comment in step 3 with a statement that creates a new MailMessage object named msgIntro:
Sub SendIntroMail(alngConfNumber)
  Dim msgIntro as New MailMessage
End Sub
Next, specify that the body of the message will consist of HTML. Then, specify the To and From addresses, a Reply-To address, a priority of High, and a subject line of Your Contoso Classfied Registration. To do all this, add the following code after the statement you added in step 4:
msgIntro.BodyFormat = MailFormat.HTML
msgIntro.To = txtFirstName.Value & _
        " " & txtLastName.Value & _
       " (" & txtMemberId.Value & ")"
msgIntro.From = "[email protected]"
msgIntro.Headers.Add("Reply-To", "[email protected]")
msgIntro.Priority = MailPriority.High
msgIntro.Subject = "Your Contoso Classified Registration"
Note that the To address will contain both the visitor name and the visitor’s address, such as Jim Buyens ([email protected]). If you omit the visitor’s name, you can omit the parentheses as well.
Attach the clad-left.gif file from the images folder to the message by taking the following steps:
Use the Server.MapPath method to convert the URL path images/clad-left.gif to a physical file name.
Create a new MailAttachment object that points to the physical file name.
Add the new MailAttachment object to the message’s Attachments collection.
You can do all of these things in the two lines of code shown here. Put it after the code you added in step 5:
msgIntro.Attachments.Add(New MailAttachment( _
    Server.MapPath("images/clad-left.gif")))
The example formats the body of the message as a three-row, two-column HTML table with all three cells in the first column merged. The <img> tag shown in blue occupies the merged cell. Note that the src attribute of this tag doesn’t have a path; this tells the browser to look for the clad-left.gif file among the message’s attachments. You can format your message body any way you want, but don’t omit the hyperlink shown in blue. This code follows the code you entered in step 6:
msgIntro.Body = _
  "<table>" & vbCrLf & _
  "<tr><td rowspan=3><img src=clad-left.gif></td>" & _
      "<td>Thanks for registering at Contoso " & _
           "Classified!</td></tr>" & vbCrLf & _
"<tr><td>Please click the following link to verify " & _
        "that you've received this message." & _
        "</td></tr>" & vbCrLf & _
"<tr><td><a href=" & chr(34) & _
   "http://" & Request.ServerVariables("SERVER_NAME") & _
   Request.ApplicationPath & "/verify.aspx" & _
   "?mbr=" & server.urlencode(txtMemberId.Value) & _
   "&cnf=" & alngConfNumber & _
  chr(34) & ">Verify</a></td></tr>" & vbCrLf & _
  "</table>" & vbCrLf
When assembled, the hyperlink URL will look like this (all on one line, of course):
http://collar/webdbpgm/ch12/
    verify.aspx?mbr=[email protected]&cnf=9867698
Note that the code gets the server name in this URL from Request.ServerVariables("SERVER_NAME"). This expression returns the server name that the visitor specified in the request URL. If you’re the visitor and you specify a URL that begins http://127.0.0.1 or http://localhost, that’s the host name that will appear in the mail message you receive. If a visitor on the Web requests the same page with a URL that begins http://www.contoso.com, that host name will appear in the visitor’s message. Building this kind of customization into your code eliminates countless problems when you move the application from test to production and from server to server.
Similarly, the code always uses the application path as the URL path. Retrieving this path from Request.ApplicationPath ensures that the URL will be correct even if you move the application from one folder location to another.
The values shown in blue will vary from one visitor to the next. The next procedure in this section will explain how to create the verify.aspx page. Basically, though, it will look up the given member ID, verify that the confirmation numbers match, and then, if all is well, change the confirmed field to True.
To finish the subroutine and send the message, add this statement after the code from the previous step and just before the End Sub statement:
SmtpMail.Send(msgIntro)
If the Microsoft SMTP service isn’t running on your Web server, precede this statement with one like the following. In place of mail.contoso.com, enter the DNS name or IP address of the server you want to use.
SmtpMail.SmtpServer = "mail.contoso.com"
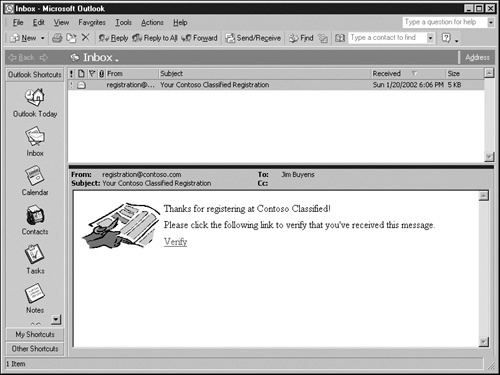
Save the page and try using it to create a few more records in the members table. It should do everything it did in the previous procedure and send e-mail as well. The following graphic shows typical results.
If you don’t receive any messages, verify that the mail server is running and available. Try specifying a different server if necessary. Also, make sure that the site registration specifies your e-mail address. If the members table already contains a record with that address, you’ll need to delete it.
The only remaining detail is to add some validity checking for each form field. To begin, proceed as follows:
Add a new table cell just after the one that contains the text box titled E-mail. Then, within this new cell, add a RequiredFieldValidator control that displays the message Required field if the text box is empty:
<tr>
  <td>E-mail</td>
  <td><input type="text" id="txtMemberId" size="40"
       runat="server" /></td>
  <td><asp:RequiredFieldValidator id="vldMemberid"
       ControlToValidate="txtMemberId" Display="Dynamic"
       ErrorMessage="Required field" runat="server" />
  </td>
</tr>
Note that the size= attribute in the <input type="text"> tag is 40 rather than 20, as it was in Chapter 7. This change is purely cosmetic and makes it easier to enter long e-mail addresses.
Add similar RequiredFieldValidator controls after the remaining three text boxes. Name these controls vldFirstName, vldLastName, and vldPassword, and make sure their ControlToValidate properties are txtFirstName, txtLastName, and txtPassword.
The HTML for these controls will be very similar to that shown in the previous step. If you have trouble visualizing this, refer to the complete HTML listing at the end of this section.
To verify that the member ID text box contains a properly constructed e-mail address, add a RegularExpressionValidator immediately after the RequiredFieldValidator you added in step 1. Here’s the required code:
<asp:RegularExpressionValidator id="vldMemberid2"
     ControlToValidate="txtMemberId" Display="Dynamic"
     ValidationExpression="..*@..*...*"
     ErrorMessage="Invalid Address" runat="server" />
Here’s how to interpret the regular expression "..*@..*...*":
The first period means "any character other than the newline character."
The two characters .* mean "zero to any number of characters other than the newline character."
The combination ..* therefore means "one to any number of characters other than the newline character."
The @ character means itself and . means a real period.
The entire regular expression ..*@..*...* therefore means "some characters, an @ sign, some characters, a period, and then some characters."
Move the following statements out of the InsertRecord subroutine and make them the first statement in the Page_Load subroutine:
lblErrMsg.Text = ""
lblRecsAff.Text = ""
Also in the Page_Load subroutine, make sure the InsertRecord subroutine executes only if there are no validation errors. The Page_Load subroutine should now look like this:
Sub Page_Load(sender As Object, e As EventArgs)
  lblErrMsg.Text = ""
  lblRecsAff.Text = ""
  If Page.IsPostBack Then
    Page.Validate
    If Page.IsValid Then
      InsertRecord()
    End If
  End If
End Sub
Note that if the first two statements remained in the InsertRecord subroutine, they wouldn’t clear the lblErrMsg and lblRecsAff controls if a validation error occurred.
This completes the coding for this Web page. The complete code listing for the register.aspx page is as follows:
<%@ Page language="vb" explicit="true" debug="true"%>
<%@ Import Namespace="System.Data"%>
<%@ Import Namespace="System.Data.OleDb"%>
<%@ Import Namespace="System.Web.Mail" %>
<%@ Register TagPrefix="webdbpgm" TagName="banner"
             src="banner.ascx" %>
<script runat="server">
Sub Page_Load(sender As Object, e As EventArgs)
  lblErrMsg.Text = ""
  lblRecsAff.Text = ""
  If Page.IsPostBack Then
    Page.Validate
    If Page.IsValid Then
      InsertRecord()
    End If
  End If
End Sub
' --------------------------------------------------
Sub InsertRecord()
  Dim conClasf As OleDbConnection
  Dim cmdClasf As New OleDbCommand
  Dim strSQL As String
  Dim intRowsAff As Integer
  Dim lngConfNumber As Integer

  conClasf = New OleDbConnection(Session("conClasf"))
  conClasf.Open

  Randomize
  lngConfNumber = Clng(Rnd() * 9000000) + 1000000
  strSQL = "INSERT INTO members (" & _
            "memberid, "   & _
            "firstname, "  & _
            "lastname, "   & _
            "[password], " & _
            "confnumber, " & _
            "confirmed "   & _
  ") VALUES ('" & _
            Replace(txtMemberId.Value, "'", "''") & _
            "', '" & _
            Replace(txtFirstName.Value, "'", "''") & _
            "', '" & _
            Replace(txtLastName.Value, "'", "''") & _
            "', '" & _
            Replace(txtPassword.Value, "'", "''") & _
            "', " & _
            lngConfNumber & _
            ", " & _
            "False) "
  cmdClasf = New OleDbCommand(strSQL, conClasf)
  Try
    intRowsAff = cmdClasf.ExecuteNonQuery()
    If intRowsAff = 1 Then
      SendIntroMail(lngConfNumber)
      tblVerify.Visible = True
    End If
  Catch ex As Exception
    lblErrMsg.Text = ex.Message
  End Try
  lblRecsAff.Text = intRowsAff & " record(s) inserted"
  conClasf.Close
End Sub
' --------------------------------------------------
Sub SendIntroMail(alngConfNumber)
  Dim msgIntro as New MailMessage
  msgIntro.BodyFormat = MailFormat.HTML
  msgIntro.To = txtFirstName.Value & _
          " " & txtLastName.Value & _
         " (" & txtMemberId.Value & ")"
  msgIntro.From = "[email protected]"
  msgIntro.Headers.Add("Reply-To", "[email protected]")
  msgIntro.Priority = MailPriority.High
  msgIntro.Subject = "Your Contoso Classified Registration"
  msgIntro.Attachments.Add(New MailAttachment( _
    Server.MapPath("images/clad-left.gif")))
  msgIntro.Body = _
    "<table>" & vbCrLf & _
    "<tr><td rowspan=3><img src=clad-left.gif></td>" & _
        "<td>Thanks for registering at Contoso " & _
             "Classified!</td></tr>" & vbCrLf & _
    "<tr><td>Please click the following link to verify " & _
            "that you've received this message." & _
            "</td></tr>" & vbCrLf & _
    "<tr><td><a href=" & chr(34) & _
       "http://" & Request.ServerVariables("SERVER_NAME") & _
       Request.ApplicationPath & "/verify.aspx" & _
       "?mbr=" & server.urlencode(txtMemberId.Value) & _
       "&cnf=" & alngConfNumber & _
      chr(34) & ">Verify</a></td></tr>" & vbCrLf & _
      "</table>" & vbCrLf
  SmtpMail.Send(msgIntro)
End Sub
</script>
<html>
<head>
<title>Register With Us</title>
<link rel="stylesheet" type="text/css" href="normal.css">
</head>
<body>
<webdbpgm:banner id="banner" runat="server" />
<form method="POST" runat="server">
  <table border="1" cellspacing="1" bgcolor="#CCCCCC"
         bordercolorlight="#999999" bordercolordark="#666666">
    <tr>
      <td>
      <table border="0" cellpadding="2" cellspacing="2">
        <tr>
          <td>E-mail</td>
          <td><input type="text" id="txtMemberId" size="40"
               runat="server" /></td>
          <td>
          <asp:RequiredFieldValidator id="vldMemberid"
               ControlToValidate="txtMemberId" Display="Dynamic"
               ErrorMessage="Required field" runat="server" />
          <asp:RegularExpressionValidator id="vldMemberid2"
               ControlToValidate="txtMemberId" Display="Dynamic"
               ValidationExpression="..*@..*...*"
               ErrorMessage="Invalid Address" runat="server" />
          </td>
        </tr>
        <tr>
          <td>First Name</td>
          <td><input type="text" id="txtFirstName" size="20"
               runat="server" /></td>
          <td>
          <asp:RequiredFieldValidator id="vldFirstName"
               ControlToValidate="txtFirstName" Display="Dynamic"
               ErrorMessage="Required field" runat="server" />
          </td>
        </tr>
        <tr>
          <td>Last Name</td>
          <td><input type="text" id="txtLastName" size="20"
               runat="server" /></td>
          <td>
          <asp:RequiredFieldValidator id="vldLastName"
               ControlToValidate="txtLastName" Display="Dynamic"
               ErrorMessage="Required field" runat="server" />
          </td>
        </tr>
        <tr>
          <td>Password</td>
          <td><input type="text" id="txtPassword" size="12"
               runat="server" /></td>
          <td>
          <asp:RequiredFieldValidator id="vldPassword"
               ControlToValidate="txtPassword" Display="Dynamic"
               ErrorMessage="Required field" runat="server" />
          </td>
        </tr>
      </table>
      </td>
    </tr>
    <tr>
      <td align="center">
      <input type="submit" value="Submit" id="btnSub"
             runat="server" /></td>
    </tr>
  </table>
</form>
<p class="msg"><asp:Label id="lblRecsAff" runat="server" /></p>
<p class="err"><asp:Label id="lblErrMsg" runat="server" /></p>
<table runat="server" id="tblVerify" visible="false"
       cellspacing="0" cellpadding="0" border="2"
       bordercolor="#009900">
  <tr>
    <td>
    <table border="0" cellpadding="3" cellspacing="3">
      <tr>
        <td colspan="2">To complete your registration:</td>
      </tr>
      <tr>
        <td><img border="0" src="images/ballgrn.gif"
             width="14" height="14"></td>
        <td>Watch for an e-mail message from
            Contoso Classified.</td>
      </tr>
      <tr>
        <td><img border="0" src="images/ballgrn.gif"
             width="14" height="14"></td>
        <td>When it arrives, click the <b>Verify</b> link.</td>
      </tr>
    </table>
    </td>
  </tr>
</table>
</body>
</html>
Once you get this page working, you might want to change the code for the Password text box from
<input type="text" id="txtPassword" size="12"
       runat="server" />
to
<input type="password" id="txtPassword" size="12"
       runat="server" />
This change has two effects. First, the text box will display asterisks rather than the actual characters you type. Second, ASP.NET will clear the box after each form submission.
Note that the size= attribute in the txtPassword control is 12 rather than 20 as it was in Chapter 7—another purely cosmetic change.
Visitors who use the register.aspx page to join the Contoso Classified Web site will receive an e-mail message that contains a hyperlink like this:
http://<your-web-server>/webdbpgm/
    ch12/verify.aspx?mbr=[email protected]&cnf=9867698
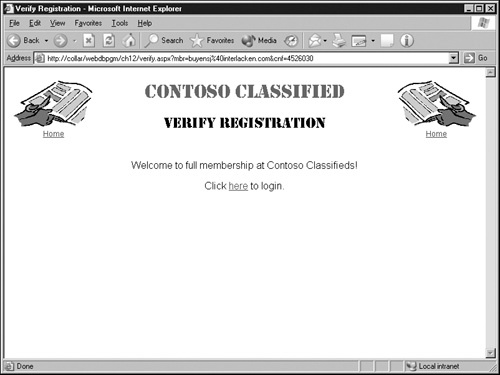
The server name and path will vary depending on your setup. But in any event, you’ll need to code a page named verify.aspx that looks up the given member ID, verifies that the confirmation numbers match, and then, if they match, changes the confirmed field to True. If the verification is successful, the visitor receives the Web page shown in the following graphic. If the verification fails, the same page displays an error message.
Here’s the procedure that creates this page:
If you’d rather look at the finished code than enter it yourself, open the verify.aspx page in the ch12 folder you installed from the companion CD. Otherwise, proceed as follows:
Create a new, empty Web page that contains the usual structural tags. Apply any page-level formatting you want. For example, the sample results include the following statement, which links to a shared cascading style sheet file named normal.css:
<link rel="stylesheet" type="text/css" href="normal.css">
In the <head> section, insert a set of <title> and </title> tags and between them, enter the text Verify Registration.
Add the following directives, a code declaration block, and an empty Page_Load subroutine to the top of the page:
<%@Page language="vb" explicit="true" debug="true"%>
<%@Import Namespace="System.Data"%>
<%@Import Namespace="System.Data.OleDb"%>
<%@Register TagPrefix="webdbpgm" TagName="banner"
            src="banner.ascx" %>
<script runat="server">
Sub Page_Load(sender As Object, e As EventArgs)
' Page_Load code will go here.
End Sub
</script>
Between the <body> and </body> tags, add a tag that displays the standard page banner and then a paragraph that contains a literal control named litErrMsg. This requires the new code shown here in blue:
<body>
<webdbpgm:banner runat="server" />
<p><asp:Literal id="litErrMsg" EnableViewState="False"
        runat="server" /></p>
</body>
Setting the literal control’s EnableViewState property to False tells ASP.NET not to save the contents of this control from one page execution to the next. This spares you the nuisance of writing code to clear it.
Just before the closing </body> tag, create a formatted message like the one shown in the graphic. The sample results use an HTML table, but you can use any HTML. Be sure to include the following attributes in the outermost element: runat="server", id="tblWelcome", and visible="false".
<table id="tblWelcome" visible="false" runat="server"
       border="0" cellpadding="5" cellspacing="5"
       align="center">
<!-- table contents go here  -->
</table>
To review the complete contents of this table, refer to the full HTML listing at the end of this section.
Declare the following variables within the Page_Load subroutine. Their usefulness will become apparent in the next few procedure steps. (This code replaces the comment in step 3.)
Dim conClasf As OleDbConnection
Dim cmdClasf As New OleDbCommand
Dim strSQL As String
Dim intRowsAff As Integer
Dim strMember As String
Dim strConfNumber As String
Dim lngConfNumber As Long
Dim lngDbConf As Long = -100
Retrieve the value of the query string variable mbr (that is, the value that appears after mbr= in the URL) and store it in the strMember variable you defined in the previous step. If this value is empty, store an error message in the litErrMsg literal control and exit the Page_Load subroutine. This code follows the declarations you entered in the previous step:
strMember = Request.QueryString("mbr")
If strMember = "" Then
  litErrMsg.Text = "Verification failed. " & _
                   "Member ID is missing."
  Exit Sub
End If
In much the same way, retrieve the value of the cnf query string variable and store it in the strConfNumber variable. If it’s empty, exit the subroutine.
strConfNumber = Request.QueryString("cnf")
If strConfNumber = "" Then
  litErrMsg.Text = "Verification failed. " & _
                   "Confirmation number is missing."
  Exit Sub
End If
The confirmation number must be numeric. If it isn’t, display an error message and exit. Otherwise, convert the value to a Long and save it in the lngConfNumber variable. This code follows the previous code:
If Not IsNumeric(strConfNumber) Then
  litErrMsg.Text = "Verification failed. " & _
                   "Confirmation number is invalid."
  Exit Sub
End If
lngConfNumber = Clng(strConfNumber)
Open and close a connection to the classified.mdb database. Again, these statements follow the previous code:
conClasf = New OleDbConnection(Session("conClasf"))
conClasf.Open
' Database code will go here.
conClasf.Close
Construct a SQL statement that retrieves the confnumber field from the members record that matches the given member ID. This code replaces the comment in the previous step.
strSQL = "SELECT confnumber " & _
           "FROM members " & _
          "WHERE memberid = '" & strMember & "' "
Use the connection from step 10 and the SQL statement from step 11 to construct an OleDbCommand object. Then use this object’s ExecuteScalar method to get the confirmation number from the database. These statements follow the previous code:
cmdClasf = New OleDbCommand(strSQL, conClasf)
lngDbConf = cmdClasf.ExecuteScalar()
If the given member ID has no record in the members table, the ExecuteScalar method makes no change to the lngDbConf variable. That’s why step 6 initialized this variable to -100. Because confirmation numbers in the database range from 1 million to 10 million, -100 can’t possibly be a match.
If the confirmation number from the database and the confirmation number from the visitor’s request don’t match, store an error message in the litErrMsg literal:
If lngDbConf = lngConfNumber Then
' Code to process matching confirmation numbers will go here.
Else
  litErrMsg.Text = "Verification failed. " & _
                   "Confirmation number is incorrect."
End If
Change the CommandText property of the cmdClasf command object to contain a SQL statement that changes the confirmed field for the given member to True. This statement replaces the comment in the previous step:
cmdClasf.CommandText = _
       "UPDATE members " & _
          "SET confirmed = True " & _
        "WHERE memberid = '" & strMember & "' "
Use the command object’s ExecuteNonQuery method to run the SQL statement and update the database. Receive the number of rows affected in the intRowsAff variable. Code this statement next in sequence.
intRowsAff = cmdClasf.ExecuteNonQuery
If the number of affected rows is—as it should be—one, set the Visible property of the tblWelcome control to True. This displays the elaborate success message you created in step 5.
If the number of affected rows isn’t one, display an error message in the litErrMsg literal control.
This requires the following code immediately after the code from step 15:
If intRowsAff = 1 Then
  tblWelcome.Visible = True
Else
  litErrMsg.Text = "Verification update failed."
End if
Save the page as verify.aspx in the root folder of your application.
Clicking the Verify link in the message shown in the graphic on page 430 should now start your browser if necessary and then run the page. If it doesn’t, display the e-mail message’s HTML source and check the URL in the Verify hyperlink.
This completes the code for this example. The complete HTML listing is shown on the next two pages.
<%@Page language="vb" explicit="true" debug="true"%>
<%@Import Namespace="System.Data"%>
<%@Import Namespace="System.Data.OleDb"%>
<%@ Register TagPrefix="webdbpgm" TagName="banner"
             src="banner.ascx" %>
<script runat="server">
Sub Page_Load(sender As Object, e As EventArgs)
  Dim conClasf As OleDbConnection
  Dim cmdClasf As New OleDbCommand
  Dim strSQL As String
  Dim intRowsAff As Integer
  Dim strMember As String
  Dim strConfNumber As String
  Dim lngConfNumber As Long
  Dim lngDbConf As Long = -100

  strMember = Request.QueryString("mbr")
  If strMember = "" Then
    litErrMsg.Text = "Verification failed. " & _
                     "Member ID is missing."
    Exit Sub
  End If

  strConfNumber = Request.QueryString("cnf")
  If strConfNumber = "" Then
    litErrMsg.Text = "Verification failed. " & _
                     "Confirmation number is missing."
    Exit Sub
  End If

  If Not IsNumeric(strConfNumber) Then
    litErrMsg.Text = "Verification failed. " & _
                     "Confirmation number is invalid."
    Exit Sub
  End If
  lngConfNumber = Clng(strConfNumber)

  conClasf = New OleDbConnection(Session("conClasf"))
  conClasf.Open
  strSQL = "SELECT confnumber " & _
             "FROM members " & _
            "WHERE memberid = '" & strMember  & "' "
  cmdClasf = New OleDbCommand(strSQL, conClasf)
  lngDbConf = cmdClasf.ExecuteScalar()
  If lngDbConf = lngConfNumber Then
    cmdClasf.CommandText = _
           "UPDATE members " & _
              "SET confirmed = True " & _
            "WHERE memberid = '" & strMember  & "' "
    intRowsAff = cmdClasf.ExecuteNonQuery
    If intRowsAff = 1 Then
      tblWelcome.Visible = True
    Else
      litErrMsg.Text = "Verification update failed."
    End if
  Else
    litErrMsg.Text = "Verification failed. " & _
                     "Confirmation number is incorrect."
  End If
  conClasf.Close
End Sub
</script>
<html>
<head>
<title>Verify Registration</title>
<link rel="stylesheet" type="text/css" href="normal.css">
</head>
<body>
<webdbpgm:banner runat="server" />
<p><asp:Literal id="litErrMsg" EnableViewState="False"
        runat="server" /></p>
<table id="tblWelcome" visible="false" runat="server"
       border="0" cellpadding="5" cellspacing="5"
       align="center">
  <tr>
    <td>Welcome to full membership
        at Contoso Classifieds!</td>
  </tr>
  <tr>
    <td>
    <p align="center">Click <a href="login.aspx">here</a>
       to login.</td>
  </tr>
</table>
</body>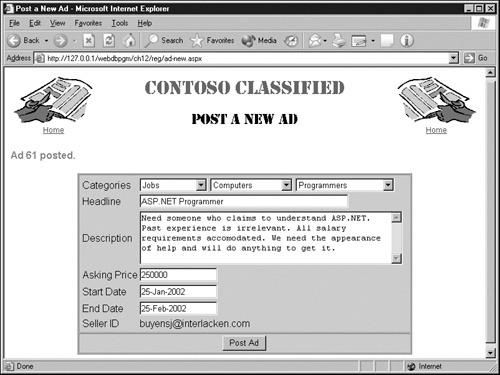
</html>The procedure in this section will explain how to create a Web page named ad-new.aspx that registered visitors can use to post new ads. The following graphic shows this page in action.
Because the ad-new.aspx page will reside in the reg folder of the ch12 application, and because the application’s web.config file puts forms-based authentication into effect for that folder, only logged-in, registered visitors will be able to post ads. If a visitor who isn’t logged in tries to access the ad-new.aspx page, ASP.NET will instead display the login.aspx page. Visitors who aren’t registered can’t log in using the login.aspx page.
Once a registered visitor is logged in, the expression Request.ServerVariables("AUTH_USER") returns the visitor’s memberid (which is also the visitor’s e-mail address). As the previous chapter explained, this is because the login.aspx page specified that value when it called the FormsAuthentication.RedirectFromLoginPage method.
This page will borrow heavily from the insert-da.aspx page in Chapter 7, which added four random records to the ads table of the classified.mdb database. If you don’t recall that page or didn’t understand it before, now would be a good time to review it.
A key feature (so to speak) of the insert-da.aspx page is its ability to retrieve the AutoNumber value that Microsoft Access assigns to the adid field in the new ads record. The adid field is the primary key for the ads table. The ad-new.aspx page needs this value so that it can provide links to other pages that further modify the ad. (More on this in the next chapter.)
This procedure creates a Web page that posts new ads in the classified.mdb database. If you’d rather look at the finished results than make all the changes yourself, open the ad-new.aspx file in the ch12 folder you installed from the companion CD. Otherwise, proceed as follows:
Copy the insert-da.aspx page you created in Chapter 7 into the ch12/reg subfolder and then rename the file to ad-new.aspx. (If you think your version of the insert-da.aspx page might not be working properly, copy the file from the ch07 folder you installed from the companion CD.) Open the page and change its title to Post an Ad.
Add the following directives just before the code declaration block:
<%@ Register TagPrefix="webdbpgm" TagName="banner"
             src="../banner.ascx" %>
<%@ Register TagPrefix="webdbpgm" TagName="selcat"
             src="../selcat.ascx" %>
<script runat="server">
Delete everything between the <body> and </body> tags. If you followed the instructions in Chapter 7, there should be only two lines between these tags.
To begin rebuilding the <body> section, add the tag shown below in blue. As before, this displays the standard page banner.
<body>
<webdbpgm:banner id="banner" runat="server" />
</body>
Immediately after the code you just entered, add a paragraph that contains a Literal Web server control named litOkMsg. This control will eventually display a message stating that the ad posting was successful. To avoid writing code that clears this message after each page execution, set its EnableViewState property to False.
<p class="msg"><asp:Literal id="litOkMsg"
               EnableViewState="false" runat="server"/></p>
The paragraph attribute class="msg" applies a predefined CSS style to the message.
Next, add an ASP.NET Web form to the page. This code belongs after the code you just added:
<form method="post" runat="server">
<!-- form contents will go here. -->
</form>
To reproduce the look of the example, replace the comment in step 6 with a one-column, two-row HTML table that has a gray background. The sample page uses the following layout:
<table border="1" cellspacing="1" cellpadding="3"
       align="center" bgcolor="#CCCCCC"
       bordercolorlight="#999999"
       bordercolordark="#666666">
<tr><td><!-- Form input fields will go here --></td></tr>
<tr><td><!-- Submit button will go here.    --></td></tr>
</table>
Replace the second comment in step 7 with an HtmlInputButton control named btnPost. Specify a text attribute of Post Ad and an OnClick event handler of PostNewAd. Here’s the required code:
<asp:button type="submit" text="Post Ad" id="btnPost"
     OnClick="PostNewAd" runat="server" />
Replace the first comment in step 7 with a three-column, seven-row table that has a border width of zero. You should know by now what this HTML looks like.
Add the following titles, in sequence, to the cells in the first column:
Categories, Headline, Description, Asking Price, Start Date, End Date, Seller ID
Add the ubiquitous selcat.ascx user control to cell 2 of the first row:
<td><webdbpgm:selcat id="catctl" runat="server" /></td>Add four HtmlInputText controls to column 2 as follows:
Row
id=
size=
2
txtHeadline
50
4
txtAskingPrice
15
5
txtStartDate
15
6
txtEndDate
15
Here’s the code for the first control. The text in blue will vary for each tag.
<input type="text" id="txtHeadline" size="50"
       runat="server" />
In row 3, column 2, add an HtmlTextArea control named txtDescription. The size is up to you, but the example uses 5 rows and 50 columns.
<textarea id="txtDescription" rows="5" cols="50"
                 runat="server"></textarea>
In row 7, column 2, add a Literal Web server control named litMemberId. This will eventually display the logged-on visitor’s e-mail address and is a field the visitor can’t change.
<asp:Literal id="litMemberId" runat="server" />
Add a RequiredFieldValidator control to each cell in rows 2 through 6, column 3. In each case:
The ControlToValidate property should specify the name of the control in column 2 of the same row.
The id property should be the same as the ControlToValidate property, with the prefix txt changed to val.
The code for the first control appears here. The text shown in blue will vary for each tag.
<asp:RequiredFieldValidator id="valHeadline"
     ControlToValidate="txtHeadline"
     Display="Dynamic" runat="server">
     Required field.</asp:RequiredFieldValidator>
In row 4, immediately after the valAskingPrice control that validates txtAskingPrice, add a CompareValidator that checks for a currency value. Here’s the required code:
<asp:CompareValidator id="vldAskingPrice2"
     ControlToValidate="txtAskingPrice"
     Operator="DataTypeCheck" Type="Currency"
     Display="Dynamic" runat="server">
     Must be currency.</asp:CompareValidator></td>
When you’re done, there should be two validation controls within the <td> and </td> tags for row 4, column 3.
In rows 5 and 6, follow the RequiredFieldValidator control with Literal controls named lblStartDate and lblEndDate, respectively. To avoid writing code that clears this message after each page execution, set the EnableViewState property of both Literal controls to False. Here, for example, is the complete code for row 5, column 3. Row 6, column 3, should contain the same code with Start everywhere changed to End.
<td><asp:RequiredFieldValidator id="vldStartDate"
         ControlToValidate="txtStartDate"
         Display="Dynamic" runat="server">
         Required field.</asp:RequiredFieldValidator>
    <asp:Label id="lblStartDate" EnableViewState="false"
         runat="server"/></td>
Save the file. Its name should still be ad-new.aspx, and it should still reside in the ch12/reg folder.
This completes the visual design of the Web page. If you load it into your browser, you’ll get an error message because the PostNewAd event handler you specified in step 8 doesn’t exist yet. The next procedure will correct this deficiency.
To examine all the HTML for this page, open the ad-new.aspx file in the ch12 /reg folder you installed from the companion CD.
At this point, the ad-new.aspx page still contains the program code from the insert-da.aspx page. This code, however, doesn’t include the PostNewAd subroutine that will handle events from the Post Ad button, and it doesn’t make use of data from the submitted form fields. To address these issues, proceed as follows:
Open the ad-new.aspx file you saved in the previous procedure.
Immediately after the Sub statement for the Page_Load subroutine, insert the statements shown in blue:
Public Sub Page_Load(sender As Object, e As EventArgs)
End Sub
Sub PostNewAd(sender As Object, e As EventArgs)
  Dim conClasf As OleDbConnection
This addition has the effect of moving all the code that was formerly in the Page_Load subroutine into a new subroutine named PostNewAd. Recall that PostNewAd is the name of the missing event handler.
Add code to the Page_Load subroutine that initializes the txtStartDate form field to the current date, the txtEndDate form field to the current date plus one month, and the litMemberId control to the memberid of the current, logged-in, registered visitor. Make sure this code runs only once, when the visitor first displays the page.
Public Sub Page_Load(sender As Object, e As EventArgs)
If Not Page.IsPostBack Then
  txtStartDate.Value = Format(Today, "dd-MMM-yyy")
  txtEndDate.Value = _
          Format(Today.AddMonths(1), "dd-MMM-yyy")
  litMemberId.Text = Request.ServerVariables("AUTH_USER")
End If
End Sub
Add the following declarations shown in blue to the PostNewAd subroutine. The dteStart and dteEnd variables will hold the submitted Start Date and End Date values, should they prove to be valid. The booDateErr variable indicates whether either date is in error.
Dim intPrice As integer
Dim dteStart As Date
Dim dteEnd As Date
Dim booDateErr as Boolean = False
Use the Visual Basic .NET IsDate function to test the submitted Start Date value for valid syntax. If the test fails, store an error message in the lblStartDate control and set the booDateErr variable to True. To do this, add the following code immediately after the code from the previous step.
If IsDate(txtStartDate.Value) Then
'  Code to process a valid start date will go here.
Else
  lblStartDate.Text = "Not a date."
  booDateErr = True
End If
Rather than coding this test in Visual Basic .NET, the example could have used a CompareValidator control to perform a DataTypeCheck of type Date. However, that method doesn’t accept date values like 15-MAR-2003, which are attractive for use on the Internet. The Visual Basic .NET IsDate function does accept dates in this format.
If the submitted Start Date value is valid, convert it to .NET date format and save the results in the dteStart variable. If, however, the converted value is prior to the current date, store an error message in the lblStartDate control and set the booDateErr variable to True. Replace the comment in the previous step with the code shown here in blue:
If IsDate(txtStartDate.Value) Then
  dteStart = CDate(txtStartDate.Value)
  If dteStart < Today Then
    lblStartDate.Text = "Can't be a past date."
    booDateErr = True
  End If
Else
  lblStartDate.Text = "Not a date."
  booDateErr = True
End If
Copy all the code shown in step 6 and paste it immediately after the same code. Then change all six occurrences of Start to End. Here are the results with the changed characters shown in blue.
If IsDate(txtEndDate.Value) Then
  dteEnd = CDate(txtEndDate.Value)
  If dteEnd < Today Then
    blbEndDate.Text = "Can't be a past date."
    booDateErr = True
  End If
Else
  blbEndDate.Text = "Not a date."
    booDateErr = True
End If
If there are no date errors so far, determine whether the converted End Date value is prior to the converted Start Date value. If so, store an error message in the lblStartDate control and set the booDateErr variable to True. In other words, add the following code next in sequence:
If Not booDateErr then
  If dteEnd < dteStart Then
    blbEndDate.Text = "Must be after start date."
    booDateErr = True
  End If
End If
If any dates are in error, exit the subroutine. The visitor will receive (and presumably deal with) the accompanying error messages. Also exit the subroutine if any validation controls have detected an error. This requires adding the following code next in sequence:
If booDateErr then
  Exit Sub
End If

If Not Page.IsValid Then
  Exit Sub
End If
The next statement should be the following, which is left over from the insert-da.aspx page:
conClasf = New OleDbConnection( _
  "Provider=Microsoft.Jet.OLEDB.4.0;" & _
  "Data Source=" & server.mappath("classified.mdb") & ";")
To get the connection string from the Session object, replace this statement with the following code, as all recent examples have done.
conClasf = New OleDbConnection(Session("conClasf"))Chapter 11 explained how the database connection string arrived in the Session variable conClasf.
The following statements from the insert-da.aspx page require no change. As you no doubt recall, they open the database connection, retrieve an empty result set from the ads table, and then load the empty result set into a data adapter named dapAds. The objective is to load the data adapter with the structure of the ads table, even though the Web page has no use for any existing records.
conClasf.Open()

strSQL = "SELECT * FROM ads WHERE 1=0"
dapAds = New OleDbDataAdapter(strSQL, conClasf)
dstAds = New DataSet()
dapAds.Fill(dstAds, "ads")
The following statements also require no change. The first two build a model INSERT command that the data adapter will later use for adding a record to the ads table. The last specifies that an event handler named OnRowUpd should run whenever the data adapter adds, changes, or removes a row from the database. As you should recall from Chapter 7, the OnRowUpd subroutine performs magic to retrieve the value that Access assigns to the adid AutoNumber field.
bldAds = New OleDbCommandBuilder(dapAds)
dapAds.InsertCommand = bldAds.GetInsertCommand()

AddHandler dapAds.RowUpdated, _
   New OleDbRowUpdatedEventHandler(AddressOf OnRowUpd)
The following block of code, all from the insert-da.aspx page, should appear next.
For intPrice = 1 To 4
  rowAds = dstAds.Tables("ads").NewRow()
  rowAds("headline") = "Clock " & timeofday
  rowAds("askingprice") = intPrice
  rowAds("memberid") = "[email protected]"
  dstAds.Tables("ads").Rows.Add(rowAds)
  Next
This is the code that added four dummy records to the database. This exercise, of course, seeks to add one real record. Therefore:
Delete the For and Next statements.
Add a statement that loads the catid field with the value of the visitor’s selection in the selcat.ascx user control (named catctl).
Load the headline and askingprice fields from their corresponding form field controls.
Add statements to load the description, startdate, and enddate fields from their corresponding form fields as well.
Load the memberid field with the identity of the current, logged-in, registered visitor.
These modifications should result in the code shown below. Except for the first and last statements, their order is immaterial. They appear here in the order that Access uses to display the table definition.
rowAds = dstAds.Tables("ads").NewRow()
rowAds("catid") = catctl.catlistid
rowAds("headline") = txtHeadline.Value
rowAds("description") = txtDescription.Value
rowAds("askingprice") = txtAskingPrice.Value
rowAds("startdate") = txtStartDate.Value
rowAds("enddate") = txtEndDate.Value
rowAds("memberid") = Request.ServerVariables("AUTH_USER")
dstAds.Tables("ads").Rows.Add(rowAds)
The following lines now remain from the insert-da.aspx page:
  dapAds.Update(dstAds, "ads")
  gridAds.DataSource = dstAds.Tables("ads")
  gridAds.DataBind
  conClasf.Close
End Sub
In the preceding code, replace the two lines shown in blue with the following single line shown in blue. Rather than displaying four dummy records, the new line simply displays a message containing the adid value. The next chapter will modify this line to do some more interesting things.
  dapAds.Update(dstAds, "ads")
  litOkMsg.Text = "Ad " & rowAds("adid") & " posted."
  conClasf.Close
End Sub
The last remaining code to consider is the OnRowUpd subroutine. This is unchanged from Chapter 7, so please refer to that chapter if you’ve forgotten how it works.
Save the file. Its name should still be ad-new.aspx, and it should still reside in the ch12/reg folder.
This completes the coding for the ad-new.aspx Web page. Load the page into your browser, satisfy the login.aspx if you aren’t already logged in, and enter values in each of the form fields. After clicking the Post Ad button, you should receive a message like Ad 59 posted. Furthermore, if you open the classified.mdb database in Access, a record in the ads table should contain the record values you entered.
To view the complete code listing, open the ad-new.aspx file from the ch12/reg folder you installed from the companion CD.
This chapter first explained how an ASP.NET page can send an e-mail message containing whatever message body the developer provides. It then described how to create a page that both inserts a database record and sends mail. The second example created a page that responded to a link in that e-mail message and updated the newly inserted record. A third example illustrated a fairly full-featured page that used a data adapter to insert records and get back the AutoNumber field that Microsoft Access assigned.
The next chapter will explain how to provide a file upload capability for Web visitors and how to record information about those files in a database.