
Chapter 6. The Request and Response Objects
In this chapter, we’ll learn the important details of the request and response objects—which are very much the beginning and end of everything that happens in an Express application. When you’re building a web server with Express, most of what you’ll be doing starts with a request object and ends with a response object.
These two objects originate in Node and are extended by Express. Before we delve into what these objects offer us, let’s establish a little background on how a client (a browser, usually) requests a page from a server and how that page is returned.
The Parts of a URL
We see URLs all the time, but we don’t often stop to think about their component parts. Let’s consider three URLs and examine their component parts:
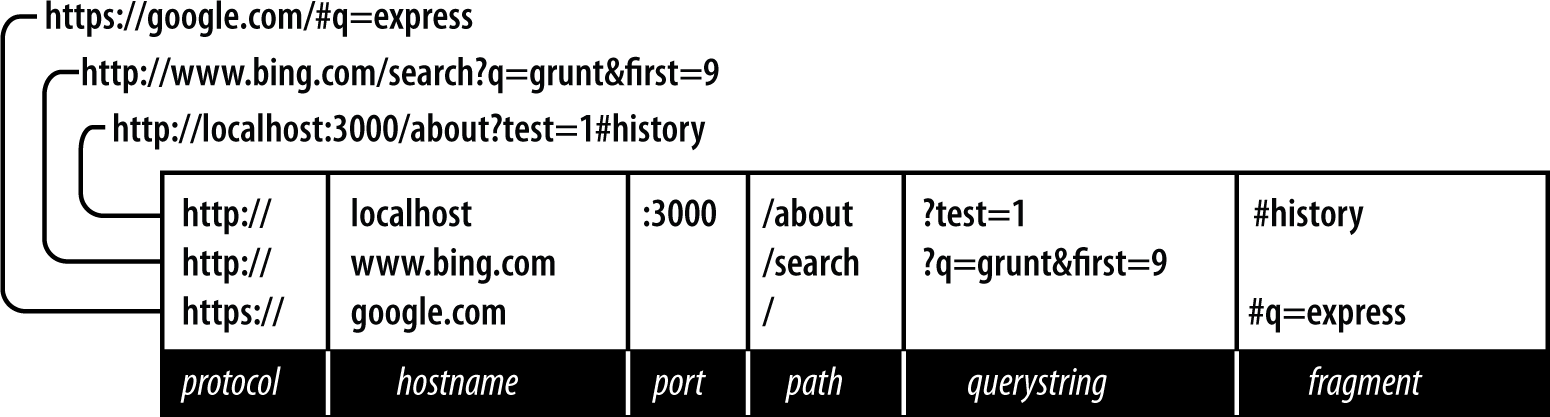
- Protocol
-
The protocol determines how the request will be transmitted. We will be dealing exclusively with http and https. Other common protocols include file and ftp.
- Host
-
The host identifies the server. Servers on your computer (localhost) or a local network may be identified simply be one word or by a numeric IP address. On the internet, the host will end in a top-level domain (TLD) like .com or .net. Additionally, there may be subdomains, which prefix the hostname. www is a common subdomain, though it can be anything. Subdomains are optional.
- Port
-
Each server has a collection of numbered ports. Some port numbers are special, like 80 and 443. If you omit the port, port 80 is assumed for HTTP and 443 for HTTPS. In general, if you aren’t using port 80 or 443, you should use a port number greater than 1023.1 It’s common to use easy-to-remember port numbers like 3000, 8080, and 8088. Only one server can be associated with a given port, and even though there are plenty of numbers to choose from, you may have to change the port number if you’re using a commonly used port number.
- Path
-
The path is generally the first part of the URL that your app cares about (it is possible to make decisions based on protocol, host, and port, but it’s not good practice). The path should be used to uniquely identify pages or other resources in your app.
- Querystring
-
The querystring is an optional collection of name/value pairs. The querystring starts with a question mark (?), and name/value pairs are separated by ampersands (&). Both names and values should be URL encoded. JavaScript provides a built-in function to do that:
encodeURIComponent. For example, spaces will be replaced with plus signs (+). Other special characters will be replaced with numeric character references. Sometimes the querystring will be referred to as the search string or simply the search. - Fragment
-
The fragment (or hash) is not passed to the server at all; it is strictly for use by the browser. Some single-page applications use the fragment to control application navigation. Originally, the fragment’s sole purpose was to cause the browser to display a specific part of the document, marked by an anchor tag (for example:
<a id="chapter06">).
HTTP Request Methods
The HTTP protocol defines a collection of request methods (often referred
to as HTTP verbs) that a client uses to communicate with a server.
Far and away, the most common methods are GET and
POST.
When you type a URL into a browser (or click a link), the browser issues an
HTTP GET request to the server. The important information passed to the
server is the URL path and querystring. The combination of method, path,
and querystring is what your app uses to determine how to respond.
For a website, most of your pages will respond to GET requests. POST
requests are usually reserved for sending information back to the server
(form processing, for example). It’s quite common for
POST requests to respond with the same HTML as the corresponding GET
request after the server has processed any information included in the
request (like a form). Browsers will primarily use the GET and POST
methods when communicating with your server. The Ajax requests your
application makes, however, may use any HTTP verb. For example, there’s an
HTTP method called DELETE that is useful for, well,
an API call that deletes things.
With Node and Express, you are fully in charge of what methods you respond to. In Express, you’ll usually be writing handlers for specific methods.
Request Headers
The URL isn’t the only thing that’s passed to the server when you navigate
to a page. Your browser is sending a lot
of “invisible” information every time you visit a website. I’m not talking
about spooky personal information (though if your browser is infected by
malware, that can happen). The browser will tell the server what language
it prefers to receive the page in (for example, if you download Chrome in
Spain, it will request the Spanish version of pages you visit, if they
exist). It will also send information about the user agent (the browser,
operating system, and hardware) and other bits of information. All this
information is sent as a request header, which is made available to you
through the request object’s headers property. If you’re curious to see the information your browser
is sending, you can create a simple Express route to display that
information (ch06/00-echo-headers.js in the companion repo):
app.get('/headers',(req,res)=>{res.type('text/plain')constheaders=Object.entries(req.headers).map(([key,value])=>`${key}:${value}`)res.send(headers.join(' '))})
Response Headers
Just as your browser sends hidden information to the server in the form of
request headers, when the server responds, it also sends information back
that is not necessarily rendered or displayed by the browser. The
information typically included in response headers is metadata and server
information. We’ve already seen the Content-Type header,
which tells the browser what kind of content is
being transmitted (HTML, an image, CSS, JavaScript, etc.). Note that the browser will respect the
Content-Type header regardless of what the URL path is. So you could
serve HTML from a path of /image.jpg
or an image from a path of /text.html. (There’s no legitimate reason to
do this; it’s just important to understand that paths are abstract, and the
browser uses Content-Type to determine how to render content.) In
addition to Content-Type, headers can indicate whether the response is
compressed and what kind of encoding it’s using. Response headers can also
contain hints for the browser about how long it can cache the resource.
This is an important consideration for optimizing your website, and we’ll
be discussing that in detail in Chapter 17.
It is also common
for response headers to contain some information about the server,
indicating what type of server it is and sometimes even details about the
operating system. The downside about returning server information is that
it gives hackers a starting point to compromise your site. Extremely
security-conscious servers often omit this information or even provide
false information. Disabling Express’s
default X-Powered-By header is easy (ch06/01-disable-x-powered-by.js in
the companion repo):
app.disable('x-powered-by')
If you want to see the response headers, they can be found in your browser’s developer tools. To see the response headers in Chrome, for example:
-
Open the JavaScript console.
-
Click the Network tab.
-
Reload the page.
-
Pick the HTML from the list of requests (it will be the first one).
-
Click the Headers tab; you will see all response headers.
Internet Media Types
The Content-Type header is critically important; without it, the client
would have to painfully guess how to render the content. The format of
the Content-Type header is an internet media type, which consists of a
type, subtype, and optional parameters. For example, text/html;
charset=UTF-8 specifies a type of “text,” a subtype of “html,” and a
character encoding of UTF-8. The Internet Assigned Numbers Authority
maintains an
official list
of internet media types. Often, you will hear “content type,” “Internet
media type,” and “MIME type” used interchangeably. MIME (Multipurpose Internet Mail
Extensions) was a precursor of internet media types and, for the most part,
is equivalent.
Request Body
In addition to the request headers, a request can have a body (just like
the body of a response is the actual content that’s being
returned). Normal
GET requests don’t have bodies, but POST requests usually do. The most common media type for
POST bodies is application/x-www-form-urlencoded, which is simply
encoded name/value pairs separated by ampersands (essentially the same
format as a querystring). If the POST needs to support file uploads, the
media type is multipart/form-data, which is a more complicated format.
Lastly, Ajax requests can use application/json for the body. We’ll learn
more about request bodies in Chapter 8.
The Request Object
The request object (which is passed as the first parameter of a request
handler, meaning you can name it whatever you want; it is common to name it
req or request) starts its life as an instance of
http.IncomingMessage, a core Node object. Express adds
further functionality. Let’s look at the most useful properties and
methods of the request object (all of these methods are added by Express,
except for req.headers and req.url, which originate in Node):
req.params-
An array containing the named route parameters. We’ll learn more about this in Chapter 14.
req.query-
An object containing querystring parameters (sometimes called
GETparameters) as name/value pairs. req.body-
An object containing
POSTparameters. It is so named becausePOSTparameters are passed in the body of the request, not in the URL as querystring parameters are. To makereq.bodyavailable, you’ll need middleware that can parse the body content type, which we will learn about in Chapter 10. req.route-
Information about the currently matched route. This is primarily useful for route debugging.
req.cookies/req.signedCookies-
Objects containing cookie values passed from the client. See Chapter 9.
req.headers-
The request headers received from the client. This is an object whose keys are the header names and whose values are the header values. Note that this comes from the underlying
http.IncomingMessageobject, so you won’t find it listed in the Express documentation. req.accepts(types)-
A convenience method to determine whether the client accepts a given type or types (optional
typescan be a single MIME type, such asapplication/json, a comma-delimited list, or an array). This method is of primary interest to those writing public APIs; it is assumed that browsers will always accept HTML by default. req.ipreq.path-
The request path (without protocol, host, port, or querystring).
req.hostname-
A convenience method that returns the hostname reported by the client. This information can be spoofed and should not be used for security purposes.
req.xhr-
A convenience property that returns
trueif the request originated from an Ajax call. req.protocol-
The protocol used in making this request (for our purposes, it will be either
httporhttps). req.secure-
A convenience property that returns
trueif the connection is secure. This is equivalent toreq.protocol === 'https'. req.url/req.originalUrl-
A bit of a misnomer, these properties return the path and querystring (they do not include protocol, host, or port).
req.urlcan be rewritten for internal routing purposes, butreq.originalUrlis designed to remain the original request and querystring.
The Response Object
The response object (which is passed as the second parameter of a request
handler, meaning you can name it whatever you want; it is common to name it
res, resp, or response) starts its life as an instance of
http.ServerResponse, a core Node object. Express adds
further functionality. Let’s look at the most useful properties and
methods of the response object (all of these are added by Express):
res.status(code)-
Sets the HTTP status code. Express defaults to 200 (OK), so you will have to use this method to return a status of 404 (Not Found) or 500 (Server Error), or any other status code you want to use. For redirects (status codes 301, 302, 303, and 307), there is a method
redirect, which is preferable. Note thatres.statusreturns the response object, meaning you can chain calls:res.status(404).send('Not found'). res.set(name, value)-
Sets a response header. This is not something you will normally be doing manually. You can also set multiple headers at once by passing a single object argument whose keys are the header names and whose values are the header values.
res.cookie(name, value, [options]),res.clearCookie(name, [options])-
Sets or clears cookies that will be stored on the client. This requires some middleware support; see Chapter 9.
res.redirect([status], url)-
Redirects the browser. The default redirect code is 302 (Found). In general, you should minimize redirection unless you are permanently moving a page, in which case you should use the code 301 (Moved Permanently).
res.send(body)-
Sends a response to the client. Express defaults to a content type of
text/html, so if you want to change it totext/plain(for example), you’ll have to callres.type('text/plain’)before callingres.send. Ifbodyis an object or an array, the response is sent as JSON (with the content type being set appropriately), though if you want to send JSON, I recommend doing so explicitly by callingres.jsoninstead. res.json(json)res.jsonp(json)res.end()-
Ends the connection without sending a response. To learn more about the differences between
res.send,res.json, andres.end, see this article by Tamas Piros. res.type(type)-
A convenience method to set the
Content-Typeheader. This is essentially equivalent tores.set('Content-Type ', type), except that it will also attempt to map file extensions to an internet media type if you provide a string without a slash in it. For example,res.type('txt ')will result in aContent-Typeoftext/plain. There are areas where this functionality could be useful (for example, automatically serving disparate multimedia files), but in general, you should avoid it in favor of explicitly setting the correct internet media type. res.format(object)-
This method allows you to send different content depending on the
Acceptrequest header. This is of primary use in APIs, and we will discuss this more in Chapter 15. Here’s a simple example:res.format({'text/plain': 'hi there', 'text/html': '<b>hi there</b>'}). res.attachment([filename]),res.download(path, [filename], [callback])-
Both of these methods set a response header called
Content-Dispositiontoattachment; this will prompt the browser to download the content instead of displaying it in a browser. You may specifyfilenameas a hint to the browser. Withres.download, you can specify the file to download, whereasres.attachmentjust sets the header; you still have to send content to the client. res.sendFile(path, [options], [callback])-
This method will read a file specified by
pathand send its contents to the client. There should be little need for this method; it’s easier to use thestaticmiddleware and put files you want available to the client in the public directory. However, if you want to have a different resource served from the same URL depending on some condition, this method could come in handy. res.links(links)-
Sets the
Linksresponse header. This is a specialized header that has little use in most applications. res.locals,res.render(view, [locals], callback)-
res.localsis an object containing default context for rendering views.res.renderwill render a view using the configured templating engine (thelocalsparameter tores.rendershouldn’t be confused withres.locals: it will override the context inres.locals, but context not overridden will still be available). Note thatres.renderwill default to a response code of 200; useres.statusto specify a different response code. Rendering views will be covered in depth in Chapter 7.
Getting More Information
Because of JavaScript’s prototypal inheritance, knowing exactly what you’re dealing with can sometimes be challenging. Node provides you with objects that Express extends, and packages that you add may also extend those. Figuring out exactly what’s available to you can be challenging sometimes. In general, I recommend working backward: if you’re looking for some functionality, first check the Express API documentation. The Express API is pretty complete, and chances are, you’ll find what you’re looking for there.
If you need information that isn’t documented, sometimes you have to dive into the Express source. I encourage you to do this! You’ll probably find that it’s a lot less intimidating than you might think. Here’s a quick roadmap to where you’ll find things in the Express source:
- lib/application.js
-
The main Express interface. If you want to understand how middleware is linked in or how views are rendered, this is the place to look.
- lib/express.js
-
A relatively short file that primarily provides the
createApplicationfunction (the default export of this file), which creates an Express application instance. - lib/request.js
-
Extends Node’s
http.IncomingMessageobject to provide a robust request object. For information about all the request object properties and methods, this is where to look. - lib/response.js
-
Extends Node’s
http.ServerResponseobject to provide the response object. For information about response object properties and methods, this is where to look. - lib/router/route.js
-
Provides basic routing support. While routing is central to your app, this file is less than 230 lines long; you’ll find that it’s quite simple and elegant.
As you dig into the Express source code, you’ll probably want to refer to
the Node documentation, especially the section
on the HTTP module.
Boiling It Down
This chapter has provided an overview of the request and response objects, which are the meat and potatoes of an Express application. However, the chances are that you will be using a small subset of this functionality most of the time. So let’s break it down by functionality you’ll be using most frequently.
Rendering Content
When you’re rendering content, you’ll be using res.render most often,
which renders views within layouts, providing maximum value. Occasionally, you may want to write a quick test page, so you might use
res.send if you just want a test page. You may use req.query to
get querystring values, req.session to get session values, or
req.cookie/req.signedCookies to get
cookies. Example 6-1 to Example 6-8 demonstrate common
content rendering tasks.
Example 6-1. Basic usage (ch06/02-basic-rendering.js)
// basic usageapp.get('/about',(req,res)=>{res.render('about')})
Example 6-2. Response codes other than 200 (ch06/03-different-response-codes.js)
app.get('/error',(req,res)=>{res.status(500)res.render('error')})// or on one line...app.get('/error',(req,res)=>res.status(500).render('error'))
Example 6-3. Passing a context to a view, including querystring, cookie, and session values (ch06/04-view-with-content.js)
app.get('/greeting',(req,res)=>{res.render('greeting',{message:'Hello esteemed programmer!',style:req.query.style,userid:req.cookies.userid,username:req.session.username})})
Example 6-4. Rendering a view without a layout (ch06/05-view-without-layout.js)
// the following layout doesn't have a layout file, so// views/no-layout.handlebars must include all necessary HTMLapp.get('/no-layout',(req,res)=>res.render('no-layout',{layout:null}))
Example 6-5. Rendering a view with a custom layout (ch06/06-custom-layout.js)
// the layout file views/layouts/custom.handlebars will be usedapp.get('/custom-layout',(req,res)=>res.render('custom-layout',{layout:'custom'}))
Example 6-6. Rendering plain text output (ch06/07-plaintext-output.js)
app.get('/text',(req,res)=>{res.type('text/plain')res.send('this is a test')})
Example 6-7. Adding an error handler (ch06/08-error-handler.js)
// this should appear AFTER all of your routes// note that even if you don't need the "next" function, it must be// included for Express to recognize this as an error handlerapp.use((err,req,res,next)=>{console.error('** SERVER ERROR: '+err.message)res.status(500).render('08-error',{message:"you shouldn't have clicked that!"})})
Example 6-8. Adding a 404 handler (ch06/09-custom-404.js)
// this should appear AFTER all of your routesapp.use((req,res)=>res.status(404).render('404'))
Processing Forms
When you’re processing forms, the information from the forms will usually
be in req.body (or occasionally in req.query). You may use
req.xhr to determine whether the request was an Ajax request or a browser
request (this will be covered in depth in Chapter 8). See Example 6-9 and Example 6-10. For the
following examples, you’ll need to have body parser middleware linked in:
constbodyParser=require('body-parser')app.use(bodyParser.urlencoded({extended:false}))
We’ll learn more about body parser middleware in Chapter 8.
Example 6-9. Basic form processing (ch06/10-basic-form-processing.js)
app.post('/process-contact',(req,res)=>{console.log(`received contact from${req.body.name}<${req.body.}>`)res.redirect(303,'10-thank-you')})
Example 6-10. More robust form processing (ch06/11-more-robust-form-processing.js)
app.post('/process-contact',(req,res)=>{try{// here's where we would try to save contact to database or other// persistence mechanism...for now, we'll just simulate an errorif(req.body.simulateError)thrownewError("error saving contact!")console.log(`contact from${req.body.name}<${req.body.}>`)res.format({'text/html':()=>res.redirect(303,'/thank-you'),'application/json':()=>res.json({success:true}),})}catch(err){// here's where we would handle any persistence failuresconsole.error(`error processing contact from${req.body.name}`+`<${req.body.}>`)res.format({'text/html':()=>res.redirect(303,'/contact-error'),'application/json':()=>res.status(500).json({error:'error saving contact information'}),})}})
Providing an API
When you’re providing an API, much like processing forms, the parameters
will usually be in req.query, though you can also use
req.body. What’s different about APIs is that you’ll usually be returning
JSON, XML, or even plain text, instead of HTML, and you’ll often be using
less common HTTP methods like PUT, POST, and DELETE. Providing an
API will be covered in Chapter 15.
Example 6-11 and Example 6-12 use the following “products”
array (which would normally be retrieved from a database):
consttours=[{id:0,name:'Hood River',price:99.99},{id:1,name:'Oregon Coast',price:149.95},]
Note
The term endpoint is often used to describe a single function in an API.
Example 6-11. Simple GET endpoint returning only JSON (ch06/12-api.get.js)
app.get('/api/tours',(req,res)=>res.json(tours))
Example 6-12 uses the res.format method in Express to respond
according to the preferences of the client.
Example 6-12. GET endpoint that returns JSON, XML, or text (ch06/13-api-json-xml-text.js)
app.get('/api/tours',(req,res)=>{consttoursXml='<?xml version="1.0"?><tours>'+tours.map(p=>`<tour price="${p.price}" id="${p.id}">${p.name}</tour>`).join('')+'</tours>'consttoursText=tours.map(p=>`${p.id}:${p.name}(${p.price})`).join(' ')res.format({'application/json':()=>res.json(tours),'application/xml':()=>res.type('application/xml').send(toursXml),'text/xml':()=>res.type('text/xml').send(toursXml),'text/plain':()=>res.type('text/plain').send(toursXml),})})
In Example 6-13, the PUT endpoint updates a product and returns
JSON. Parameters are passed in the request body (the :id in the route
string tells Express to add an id property to req.params).
Example 6-13. PUT endpoint for updating (ch06/14-api-put.js)
app.put('/api/tour/:id',(req,res)=>{constp=tours.find(p=>p.id===parseInt(req.params.id))if(!p)returnres.status(404).json({error:'No such tour exists'})if(req.body.name)p.name=req.body.nameif(req.body.price)p.price=req.body.priceres.json({success:true})})
Finally, Example 6-14 shows a DELETE endpoint.
Example 6-14. DELETE endpoint for deleting (ch06/15-api-del.js)
app.delete('/api/tour/:id',(req,res)=>{constidx=tours.findIndex(tour=>tour.id===parseInt(req.params.id))if(idx<0)returnres.json({error:'No such tour exists.'})tours.splice(idx,1)res.json({success:true})})
Conclusion
I hope the micro-examples in this chapter gave you a feel for the kind of functionality that is common in an Express application. These examples are intended to be a quick reference you can revisit in the future.
In the next chapter, we’ll dig deeper into templating, which we touched on in the rendering examples in this chapter.
1 Ports 0–1023 are “well-known ports” reserved for common services.