Chapter 7. Templating with Handlebars
In this chapter, we’ll cover templating, which is a technique for constructing and formating your content to display to the user. You can think of templating as an evolution of the form letter: “Dear [Name]: we regret to inform you nobody uses [Outdated Technology] anymore, but templating is alive and well!” To send that letter to a bunch of people, you just have to replace [Name] and [Outdated Technology].
Note
This process of replacing fields is sometimes called interpolation, which is just a fancy word for “supplying missing information” in this context.
While server-side templating is being fast supplanted by frontend frameworks like React, Angular, and Vue, it still has applications, like creating HTML email. Also, Angular and Vue both use a template-like approach to writing HTML, so what you learn about server-side templating will transfer to those frontend frameworks.
If you’re coming from a PHP background, you may wonder what the fuss is all about: PHP is one of the first languages that could really be called a templating language. Almost all major languages that have been adapted for the web have included some kind of templating support. What is different today is that the templating engine is being decoupled from the language.
So what does templating look like? Let’s start with what templating is replacing by considering the most obvious and straightforward way to generate one language from another (specifically, we’ll generate some HTML with JavaScript):
document.write('<h1>Please Don't Do This</h1>')document.write('<p><span class="code">document.write</span> is naughty, ')document.write('and should be avoided at all costs.</p>')document.write('<p>Today's date is '+newDate()+'.</p>')
Perhaps the only reason this seems “obvious” is that it’s the way programming has always been taught:
10"Hello world!"
In imperative languages, we’re used to saying, “Do this, then do that, then
do something else.” For some things, this approach works fine. If you
have 500 lines of JavaScript to perform a complicated calculation that
results in a single number, and every step is dependent on the previous
step, there’s no harm in it. What if it’s the other way around, though?
You have 500 lines of HTML and 3 lines of JavaScript. Does it make sense
to write document.write 500 times? Not at all.
Really, the problem boils down to this: switching context is problematic.
If you’re writing lots of JavaScript, it’s inconvenient and confusing to be
mixing in HTML. The other way isn’t so bad. We’re quite used to writing
JavaScript in <script> blocks, but I hope you see the difference:
there’s still a context switch, and either you’re writing HTML or you’re in
a <script> block writing JavaScript. Having JavaScript emit HTML is
fraught with problems:
-
You have to constantly worry about what characters need to be escaped and how to do that.
-
Using JavaScript to generate HTML that itself includes JavaScript quickly leads to madness.
-
You usually lose the nice syntax highlighting and other handy language-specific features your editor has.
-
It can be much harder to spot malformed HTML.
-
Your code is hard to visually parse.
-
It can make it harder for other people to understand your code.
Templating solves the problem by allowing you to write in the target language, while at the same time providing the ability to insert dynamic data. Consider the previous example rewritten as a Mustache template:
<h1>Much Better</h1><p>No<spanclass="code">document.write</span>here!</p><p>Today's date is {{today}}.</p>
Now all we have to do is provide a value for {{today}},
and that’s at the heart of templating languages.
There Are No Absolute Rules Except This One
I’m not suggesting that you should never write HTML in JavaScript, only that you should avoid it whenever possible. In particular, it’s slightly more palatable in frontend code, especially if you’re using a robust frontend framework. For example, this would pass with little comment from me:
document.querySelector('#error').innerHTML='Something <b>very bad</b> happened!'
However, say that eventually mutated into this:
document.querySelector('#error').innerHTML='<div class="error"><h3>Error</h3>'+'<p>Something <b><a href="/error-detail/'+errorNumber+'">very bad</a></b> '+'happened. <a href="/try-again">Try again<a>, or '+'<a href="/contact">contact support</a>.</p></div>'
Then I might suggest it’s time to employ a template. The point is, I suggest you develop good judgment when deciding where to draw the line between HTML in strings and using templates. I would err on the side of templates, however, and avoid generating HTML with JavaScript except for the simplest cases.
Choosing a Template Engine
In the Node world, you have many templating engines to choose from, so how to pick? It’s a complicated question, and very much depends on your needs. Here are some criteria to consider, though:
- Performance
-
Clearly, you want your templating engine to be as fast as possible. It’s not something you want slowing down your website.
- Client, server, or both?
-
Most, but not all, templating engines are available on both the server and client sides. If you need to use templates in both realms (and you will), I recommend you pick something that is equally capable in either capacity.
- Abstraction
-
Do you want something familiar (like normal HTML with curly brackets thrown in, for example), or do you secretly hate HTML and would love something that saves you from all those angle brackets? Templating (especially server-side templating) gives you some choices here.
These are just some of the more prominent criteria in selecting a templating language. Templating options are pretty mature at this point, so you probably can’t go too wrong with whatever you pick.
Express allows you to use any templating engine you wish, so if Handlebars is not to your liking, you’ll find it’s easy to switch it out. If you want to explore your options, you can use the fun and useful Template-Engine-Chooser (it’s still useful even though it’s no longer being updated).
Let’s take a look at a particularly abstract templating engine before we get to our discussion of Handlebars.
Pug: A Different Approach
Whereas most templating engines take an HTML-centric approach, Pug stands out by abstracting the details of HTML away from you. It is also worth noting that Pug is the brainchild of TJ Holowaychuk, the same person who brought us Express. It should come as no surprise, then, that Pug integration with Express is very good. The approach that Pug takes is noble: at its core is the assertion that HTML is a fussy and tedious language to write by hand. Let’s take a look at what a Pug template looks like, along with the HTML it will output (originally taken from the Pug home page and modified slightly to fit the book format):
doctype html                        <!DOCTYPE html>
html(lang="en")                     <html lang="en">
  head                              <head>
    title= pageTitle                <title>Pug Demo</title>
    script.                         <script>
      if (foo) {                        if (foo) {
         bar(1 + 5)                         bar(1 + 5)
      }                                 }
  body                              </script>
                                    <body>
    h1 Pug                         <h1>Pug</h1>
    #container                      <div id="container">
      if youAreUsingPug
        p You are amazing           <p>You are amazing</p>
      else
        p Get on it!
      p.                            <p>
        Pug is a terse and           Pug is a terse and
        simple templating             simple templating
        language with a               language with a
        strong focus on               strong focus on
        performance and               performance and
        powerful features.            powerful features.
                                    </p>
                                    </body>
                                    </html>
Pug certainly represents a lot less typing (no more angle brackets or closing tags). Instead, it relies on indentation and some commonsense rules, making it easier to say what you mean. Pug has an additional advantage: theoretically, when HTML itself changes, you can simply get Pug to retarget the newest version of HTML, allowing you to “future proof” your content.
As much as I admire the Pug philosophy and the elegance of its execution, I’ve found that I don’t want the details of HTML abstracted away from me. As a web developer, HTML is at the heart of everything I do, and if the price is wearing out the angle bracket keys on my keyboard, then so be it. A lot of frontend developers I talk to feel the same, so maybe the world just isn’t ready for Pug.
Here’s where we’ll part ways with Pug; you won’t be seeing it in this book. However, if the abstraction appeals to you, you will certainly have no problems using Pug with Express, and there are plenty of resources to help you do so.
Handlebars Basics
Handlebars is an extension of Mustache, another popular templating engine. I recommend Handlebars for its easy JavaScript integration (both frontend and backend) and familiar syntax. For me, it strikes all the right balances and is what we’ll be focusing on in this book. The concepts we’re discussing are broadly applicable to other templating engines, though, so you will be well prepared to try different templating engines if Handlebars doesn’t strike your fancy.
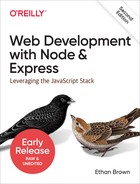
The key to understanding templating is understanding the concept of context. When you render a template, you pass the templating engine an object called the context object, and this is what allows replacements to work.
For example, if my context object is
{name:'Buttercup'}
and my template is
<p>Hello, {{name}}!</p>
then {{name}} will be replaced with Buttercup.
What if you want to pass HTML to the template? For example, if our context
was instead
{name:'<b>Buttercup</b>'}
then using the previous template will result in <p>Hello,
<b>Buttercup<b></p>, which is probably not what you’re
looking for. To solve this problem, simply use three curly brackets
instead of two: {{{name}}}.
Note
While we’ve already established that we should avoid writing HTML in JavaScript, the ability to turn off HTML escaping with triple curly brackets has some important uses. For example, if you were building a content management system (CMS) with what you see is what you get (WYSIWYG) editors, you would probably want to be able to pass HTML to your views. Also, the ability to render properties from the context without HTML escaping is important for layouts and sections, which we’ll learn about shortly.
In Figure 7-1, we see how the Handlebars engine uses the context (represented by an oval) combined with the template to render HTML.

Figure 7-1. Rendering HTML with Handlebars
Comments
Comments in Handlebars look like {{! comment goes here
}}.
It’s important to understand the distinction
between Handlebars comments and HTML comments. Consider the following
template:
{{! super-secret comment }}
<!-- not-so-secret comment -->
Assuming this is a server-side template, the super-secret comment will never be sent to the browser, whereas the not-so-secret comment will be visible if the user inspects the HTML source. You should prefer Handlebars comments for anything that exposes implementation details, or anything else you don’t want exposed.
Blocks
Things start to get more complicated when you consider blocks. Blocks provide flow control, conditional execution, and extensibility. Consider the following context object:
{currency:{name:'United States dollars',abbrev:'USD',},tours:[{name:'Hood River',price:'$99.95'},{name:'Oregon Coast',price:'$159.95'},],specialsUrl:'/january-specials',currencies:['USD','GBP','BTC'],}
Now let’s examine a template we can pass that context to:
<ul>{{#each tours}} {{! I'm in a new block...and the context has changed }}<li>{{name}} - {{price}} {{#if ../currencies}} ({{../currency.abbrev}}) {{/if}}</li>{{/each}}</ul>{{#unless currencies}}<p>All prices in {{currency.name}}.</p>{{/unless}} {{#if specialsUrl}} {{! I'm in a new block...but the context hasn't changed (sortof) }}<p>Check out our<ahref="{{specialsUrl}}">specials!</p>{{else}}<p>Please check back often for specials.</p>{{/if}}<p>{{#each currencies}}<ahref="#"class="currency">{{.}}</a>{{else}} Unfortunately, we currently only accept {{currency.name}}. {{/each}}</p>
A lot is going on in this template, so let’s break it down. It starts
off with the each helper, which allows us to iterate over an array.
What’s important to understand is that between {{#each
tours}} and {{/each tours}}, the context
changes. On the first pass, it changes to { name: 'Hood
River', price: '$99.95' }, and on the second pass, the context is
{ name: 'Oregon Coast', price: '$159.95' }. So within
that block, we can refer to {{name}} and
{{price}}. However, if we want to access the
currency object, we have to use ../ to access the parent context.
If a property of the context is itself an object, we can access its
properties as normal with a period, such as
{{currency.name}}.
Both if and each have an optional else block (with each, if there
are no elements in the array, the else block will execute). We’ve also
used the unless helper, which is essentially the opposite of the if
helper: it executes only if the argument is false.
The last thing to note about this template is the use of
{{.}} in the {{#each currencies}}
block. {{.}} refers to the current context; in
this case, the current context is simply a string in an array that we want
to print out.
Tip
Accessing the current context with a lone period has another use: it can
distinguish helpers (which we’ll learn about soon) from properties of the
current context. For example, if you have a helper called foo and a
property in the current context called foo, {{foo}}
refers to the helper, and {{./foo}} refers to the
property.
Server-Side Templates
Server-side templates allow you to render HTML before it’s sent to the client. Unlike client-side templating, where the templates are available for the curious user who knows how to view the HTML source, your users will never see your server-side template or the context objects used to generate the final HTML.
Server-side templates, in addition to hiding your implementation details, support template caching, which is important for performance. The templating engine will cache compiled templates (recompiling and recaching only when the template itself changes), which will improve the performance of templated views. By default, view caching is disabled in development mode and enabled in production mode. If you want to explicitly enable view caching, you can do so thusly:
app.set('view cache',true)
Out of the box, Express supports Pug, EJS, and JSHTML. We’ve already discussed Pug, and I find little to recommend EJS or JSHTML (neither go far enough, syntactically, for my taste). So we’ll need to add a Node package that provides Handlebars support for Express:
npm install express-handlebars
Then we’ll link it into Express (ch07/00/meadowlark.js in the companion repo):
constexpressHandlebars=require('express-handlebars')app.engine('handlebars',expressHandlebars({defaultLayout:'main',})app.set('view engine','handlebars')
Tip
express-handlebars expects Handlebars templates to have the
.handlebars extension. I’ve grown used to this, but if it’s too wordy
for you, you can change the extension to the also common .hbs when you
create the express-handlebars instance: app.engine('handlebars',
expressHandlebars({ extname: '.hbs' })).
Views and Layouts
A view usually represents an individual page on your website (though it
could represent an Ajax-loaded portion of a page, an email, or anything
else for that matter). By default, Express looks for views in the views
subdirectory. A layout is a special kind of view—essentially, a template
for templates. Layouts are essential because most (if not
all) of the pages on your site will have an almost identical layout. For
example, they must have an <html> element and a <title> element, they
usually all load the same CSS files, and so on. You don’t want to have to
duplicate that code for every single page, which is where layouts come in.
Let’s look at a bare-bones layout file:
<!doctype html><html><head><title>Meadowlark Travel</title><linkrel="stylesheet"href="/css/main.css"></head><body>{{{body}}}</body></html>
Notice the text inside the <body> tag: {{{body}}}.
That’s so the view engine knows where to render the content of your view.
It’s important to use three curly brackets instead of two: our view is most
likely to contain HTML, and we don’t want Handlebars trying to escape it.
Note that there’s no restriction on where you place the
{{{body}}} field. For example, if you were building a
responsive layout in Bootstrap, you would probably want to put your view
inside a container <div>. Also, common page elements like headers and
footers usually live in the layout, not the view. Here’s an example:
<!-- ... --><body><divclass="container"><header><divclass="container"><h1>Meadowlark Travel</h1><imgsrc="/img/logo.png"alt="Meadowlark Travel Logo"></div></header><divclass="container">{{{body}}}</div><footer>©2019 Meadowlark Travel</footer></div></body>
In Figure 7-2, we see how the template engine combines the view, layout, and context. The important thing that this diagram makes clear is the order of operations. The view is rendered first, before the layout. At first, this may seem counterintuitive: the view is being rendered inside the layout, so shouldn’t the layout be rendered first? While it could technically be done this way, there are advantages to doing it in reverse. Particularly, it allows the view itself to further customize the layout, which will come in handy when we discuss sections later in this chapter.
Note
Because of the order of operations, you can pass a property called body
into the view, and it will render correctly in the view. However, when the
layout is rendered, the value of body will be overwritten by the rendered
view.
Using Layouts (or Not) in Express
Chances are, most (if not all) of your pages will use the same layout, so it doesn’t make sense to keep specifying the layout every time we render a view. You’ll notice that when we created the view engine, we specified the name of the default layout:
app.engine('handlebars',expressHandlebars({defaultLayout:'main',})
By default, Express looks for views in the views subdirectory, and layouts in views/layouts. So if you have a view views/foo.handlebars, you can render it this way:
app.get('/foo',(req,res)=>res.render('foo'))
It will use views/layouts/main.handlebars as the layout. If you don’t
want to use a layout at all (meaning you’ll have to have all of the
boilerplate in the view), you can specify layout: null in the context
object:
app.get('/foo',(req,res)=>res.render('foo',{layout:null}))
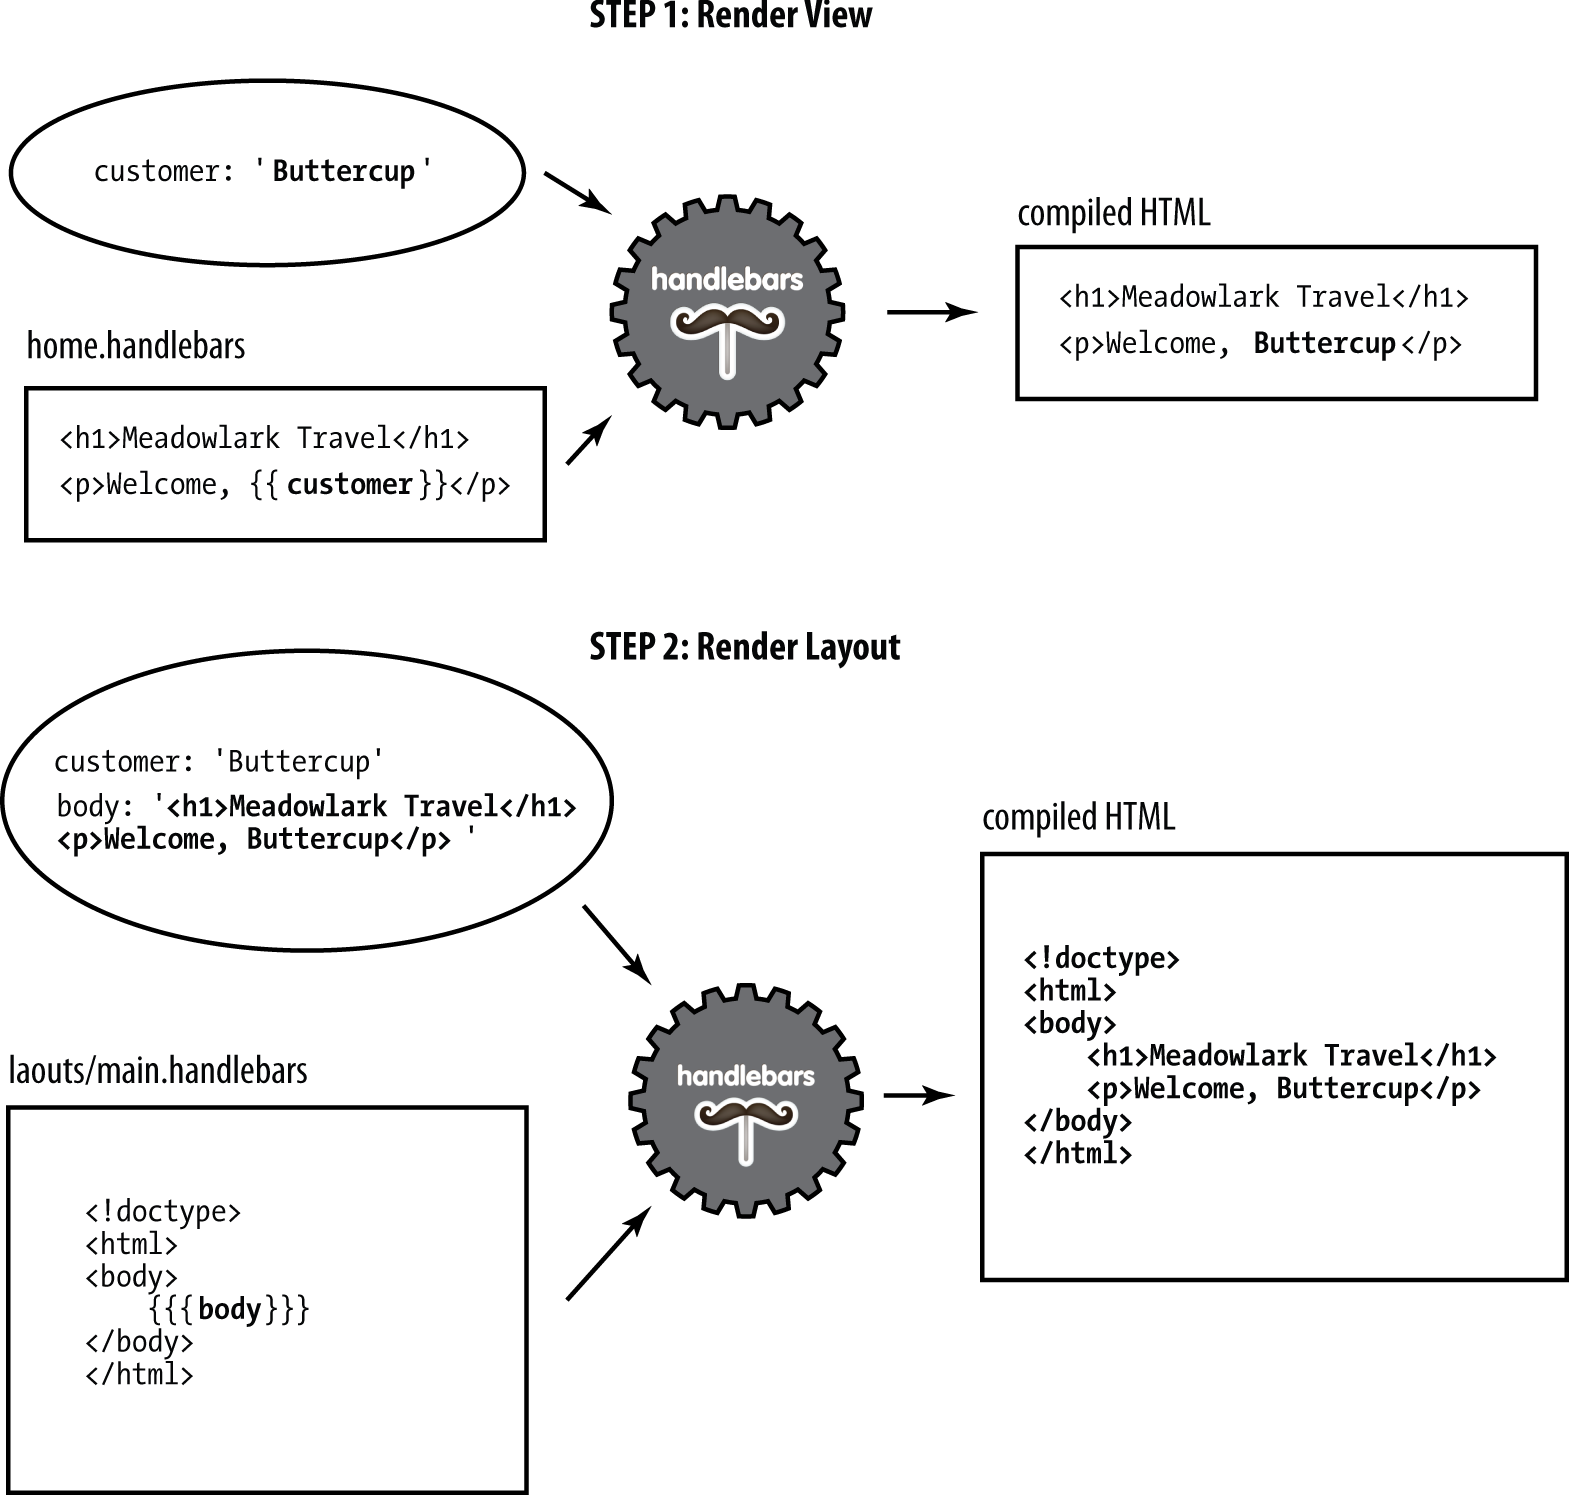
Figure 7-2. Rendering a view with a layout
Or, if we want to use a different template, we can specify the template name:
app.get('/foo',(req,res)=>res.render('foo',{layout:'microsite'}))
This will render the view with layout views/layouts/microsite.handlebars.
Keep in mind that the more templates you have, the more basic HTML layout you have to maintain. On the other hand, if you have pages that are substantially different in layout, it may be worth it; you have to find a balance that works for your projects.
Sections
One technique I’m borrowing from Microsoft’s excellent Razor template
engine is the idea of sections. Layouts work well if all of your view fits neatly within a single element in
your layout, but what happens when your view needs to inject itself into
different parts of your layout? A common example of this is a view needing to
add something to the <head> element or to insert a <script>, which is
sometimes the very last thing in the layout, for performance reasons.
Neither Handlebars nor express-handlebars has a built-in way to do this.
Fortunately, Handlebars helpers make this really easy. When we instantiate
the Handlebars object, we’ll add a helper called section
(ch07/01/meadowlark.js in the companion repo):
app.engine('handlebars',expressHandlebars({defaultLayout:'main',helpers:{section:function(name,options){if(!this._sections)this._sections={}this._sections[name]=options.fn(this)returnnull},},}))
Now we can use the section helper in a view. Let’s add a view
(views/section-test.handlebars) to add something to the <head> and a
script:
{{#section 'head'}}
  <!-- we want Google to ignore this page -->
  <meta name="robots" content="noindex">
{{/section}}

<h1>Test Page</h1>
<p>We're testing some script stuff.</p>

{{#section 'scripts'}}
  <script>
    document.querySelector('body')
      .insertAdjacentHTML('beforeEnd', '<small>(scripting works!)</small>')
  </script>
{{/section}}
Now in our layout, we can place the sections just as we place
{{{body}}}:
{{#section 'head'}}
  <!-- we want Google to ignore this page -->
  <meta name="robots" content="noindex">
{{/section}}

<h1>Test Page</h1>
<p>We're testing some script stuff.</p>

{{#section 'scripts'}}
  <script>
    const div = document.createElement('div')
    div.appendChild(document.createTextNode('(scripting works!)'))
    document.querySelector('body').appendChild(div)
  </script>
{{/section}}
Partials
Very often, you’ll have components that you want to reuse on different pages (sometimes called widgets in frontend circles). One way to achieve that with templates is to use partials (so named because they don’t render a whole view or a whole page). Let’s imagine we want a Current Weather component that displays the current weather conditions in Portland, Bend, and Manzanita. We want this component to be reusable so we can easily put it on whatever page we want, so we’ll use a partial. First, we create a partial file, views/partials/weather.handlebars:
<divclass="weatherWidget">{{#each partials.weatherContext}}<divclass="location"><h3>{{location.name}}</h3><ahref="{{location.forecastUrl}}"><imgsrc="{{iconUrl}}"alt="{{weather}}">{{weather}}, {{temp}}</a></div>{{/each}}<small>Source:<ahref="https://www.weather.gov/documentation/services-web-api">National Weather Service</a></small></div>
Note that we namespace our context by starting with
partials.weatherContext. Since we want to be able to use the partial on
any page, it’s not practical to pass the context in for every view, so
instead we use res.locals (which is available to every view). But because we don’t want to
interfere with the context specified by individual views, we put all
partial context in the partials object.
Warning
express-handlebars allows you to pass in partial templates as part of the
context. For example, if you add partials.foo = "Template!" to your
context, you can render this partial with {{> foo}}. This usage will
override any .handlebars view files, which is why we used
partials.weatherContext earlier, instead of partials.weather, which would
override views/partials/weather.handlebars.
In Chapter 19, we’ll see how to get
current weather information from the free National Weather Service API. For
now, we’re just going to use dummy data returned from a function we’ll call
getWeatherData.
In this example, we want this weather data to be available to any view, and
the best mechanism for that is middleware (which we’ll learn more about in
Chapter 10). Our middleware will inject the weather data into the
res.locals.partials object, which will make it available as the context
for our partial.
To make our middleware more testable, we’ll put it in its own file, lib/middleware/weather.js (ch07/01/lib/middleware/weather.js in the companion repo):
constgetWeatherData=()=>Promise.resolve([{location:{name:'Portland',coordinates:{lat:45.5154586,lng:-122.6793461},},forecastUrl:'https://api.weather.gov/gridpoints/PQR/112,103/forecast',iconUrl:'https://api.weather.gov/icons/land/day/tsra,40?size=medium',weather:'Chance Showers And Thunderstorms',temp:'59 F',},{location:{name:'Bend',coordinates:{lat:44.0581728,lng:-121.3153096},},forecastUrl:'https://api.weather.gov/gridpoints/PDT/34,40/forecast',iconUrl:'https://api.weather.gov/icons/land/day/tsra_sct,50?size=medium',weather:'Scattered Showers And Thunderstorms',temp:'51 F',},{location:{name:'Manzanita',coordinates:{lat:45.7184398,lng:-123.9351354},},forecastUrl:'https://api.weather.gov/gridpoints/PQR/73,120/forecast',iconUrl:'https://api.weather.gov/icons/land/day/tsra,90?size=medium',weather:'Showers And Thunderstorms',temp:'55 F',},])constweatherMiddleware=async(req,res,next)=>{if(!res.locals.partials)res.locals.partials={}res.locals.partials.weatherContext=awaitgetWeatherData()next()}module.exports=weatherMiddleware
Now that everything is set up, all we have to do is use the partial in a view. For example, to put our widget on the home page, edit views/home.handlebars:
<h2>Home</h2>{{> weather}}
The {{> partial_name}} syntax is how you include a
partial in a view: express-handlebars will know to look in
views/partials for a view called partial_name.handlebars (or
weather.handlebars, in our example).
Perfecting Your Templates
Your templates are at the heart of your website. A good template structure will save you development time, promote consistency across your website, and reduce the number of places that layout quirks can hide. To achieve these benefits, though, you must spend some time crafting your templates carefully. Deciding how many templates you should have is an art; generally, fewer is better, but there is a point of diminishing returns, depending on the uniformity of your pages. Your templates are also your first line of defense against cross-browser compatibility issues and valid HTML. They should be lovingly crafted and maintained by someone who is well versed in frontend development. A great place to start—especially if you’re new—is HTML5 Boilerplate. In the previous examples, we’ve been using a minimal HTML5 template to fit the book format, but for our actual project, we’ll be using HTML5 Boilerplate.
Another popular place to start with your template are third-party
themes. Sites like
Themeforest
and WrapBootstrap
have hundreds of ready-to-use HTML5 themes that you
can use as a starting place for your template. Using a third-party theme
starts with taking the primary file (usually index.html), renaming
it to main.handlebars (or whatever you choose to call your layout
file), and placing any resources (CSS, JavaScript, images) in the
public directory you use for static files. Then you’ll have to edit the
template file and figure out where you want to put the
{{{body}}} expression.
Depending on the elements of your template, you may want to move some of them into partials. A great example is a hero (a tall banner designed to grab the user’s attention. If the hero appears on every page (probably a poor choice), you would leave the hero in the template file. If it appears on only one page (usually the home page), then it would go only in that view. If it appears on several—but not all—pages, then you might consider putting it in a partial. The choice is yours, and herein lies the artistry of making a unique, captivating website.
Conclusion
We’ve seen how templating can make our code easier to write, read, and maintain. Thanks to templates, we don’t have to painfully cobble together HTML from JavaScript strings; we can write HTML in our favorite editor and use a compact and easy-to-read templating language to make it dynamic.
Now that we’ve seen how to format our content for display, we’ll turn our attention to how to get data into our system with HTML forms.