
Chapter 18. Security
Most websites and applications these days have some kind of security requirement. If you are allowing people to log in, or if you’re storing personally identifiable information (PII), you’ll want to implement security for your site. In this chapter, we’ll be discussing HTTP Secure (HTTPS), which establishes a foundation on which you can build a secure website, and authentication mechanisms, with a focus on third-party authentication.
Security is a big topic that could fill up an entire book. For that reason, our focus is going to be on leveraging existing authentication modules. Writing your own authentication system is certainly possible, but is a large and complicated undertaking. Furthermore, there are good reasons to prefer a third-party login approach, which we will discuss later in this chapter.
HTTPS
The first step in providing secure services is using HTTPS. The nature of the internet makes it possible for a third party to intercept packets being transmitted between clients and servers. HTTPS encrypts those packets, making it extremely difficult for an attacker to get access to the information being transmitted. (I say “very difficult,” not “impossible,” because there’s no such thing as perfect security. However, HTTPS is considered sufficiently secure for banking, corporate security, and healthcare.)
You can think of HTTPS as sort of a foundation for securing your website. It does not provide authentication, but it lays the groundwork for authentication. For example, your authentication system probably involves transmitting a password; if that password is transmitted unencrypted, no amount of authentication sophistication will secure your system. Security is as strong as the weakest link, and the first link in that chain is the network protocol.
The HTTPS protocol is based on the server having a public-key certificate, sometimes called an SSL certificate. The current standard format for SSL certificates is called X.509. The idea behind certificates is that there are certificate authorities (CAs) that issue certificates. A certificate authority makes trusted root certificates available to browser vendors. Browsers include these trusted root certificates when you install a browser, and that’s what establishes the chain of trust between the CA and the browser. For this chain to work, your server must use a certificate issued by a CA.
The upshot of this is that to provide HTTPS, you need a certificate from a CA, so how does one go about acquiring such a thing? Broadly speaking, you can generate your own, get one from a free CA, or purchase one from a commercial CA.
Generating Your Own Certificate
Generating your own certificate is easy, but generally suitable only for development and testing purposes (and possibly for intranet deployment). Because of the hierarchical nature established by certificate authorities, browsers will trust only certificates generated by a known CA (and that’s probably not you). If your website uses a certificate from a CA that’s not known to the browser, the browser will warn you in very alarming language that you’re establishing a secure connection with an unknown (and therefore untrusted) entity. In development and testing, this is fine: you and your team know that you generated your own certificate, and you expect this behavior from browsers. If you were to deploy such a website to production for consumption by the public, they would turn away in droves.
Note
If you control the distribution and installation of browsers, you can automatically install your own root certificate when you install the browser. This will prevent people using that browser from being warned when they connect to your website. This is not trivial to set up, however, and applies only to environments in which you control the browser(s) being used. Unless you have a very solid reason to take this approach, it’s generally more trouble than it’s worth.
To generate your own certificate, you’ll need an OpenSSL implementation. Table 18-1 shows how to acquire an implementation.
| Platform | Instructions |
|---|---|
macOS |
|
Ubuntu, Debian |
|
Other Linux |
Download from http://www.openssl.org/source/; extract tarball and follow instructions |
Windows |
Download from http://gnuwin32.sourceforge.net/packages/openssl.htm |
Tip
If you are a Windows user, you may need to specify the location of the OpenSSL configuration file, which can be tricky due to Windows pathnames. The surefire way is to locate the openssl.cnf file (usually in the share directory of the installation), and before you run the openssl command, set the OPENSSL_CNF environment variable: SET OPENSSL_CONF=openssl.cnf.
Once you’ve installed OpenSSL, you can generate a private key and a public certificate:
openssl req -x509 -nodes -days 365 -newkey rsa:2048 -keyout meadowlark.pem
	-out meadowlark.crt
You will be asked for some details, such as your country code, city, and state, fully qualified domain name (FQDN, also called common name or fully qualified hostname), and email address. Since this certificate is for development/testing purposes, the values you provide are not particularly important (in fact, they’re all optional, but leaving them out will result in a certificate that will be regarded with even more suspicion by a browser). The common name (FQDN) is what the browser uses to identify the domain. So if you’re using localhost, you can use that for your FQDN, or you can use the IP address of the server, or the server name, if available. The encryption will still work if the common name and domain you use in the URL don’t match, but your browser will give you an additional warning about the discrepancy.
If you’re curious about the details of this command, you can read about them on the OpenSSL documentation page. It is worth pointing out that the -nodes option doesn’t have anything to do with Node, or even the plural word “nodes”: it actually means “no DES,” meaning the private key is not DES-encrypted.
The result of this command is two files, meadowlark.pem and meadowlark.crt. The Privacy-Enhanced Electronic Mail (PEM) file is your private key, and should not be made available to the client. The CRT file is the self-signed certificate that will be sent to the browser to establish a secure connection.
Alternatively, there are websites that will provide free self-signed certificates, such as this one.
Using a Free Certificate Authority
HTTPS is based on trust, and it’s an unfortunate reality that one of the easiest ways to gain trust on the internet is to buy it. And it’s not all snake oil, either: establishing the security infrastructure, insuring certificates, and maintaining relationships with browser vendors is expensive.
Buying a certificate is not your only legitimate option for production-ready certificates: Let’s Encrypt, a free, automated CA based on open source, has become a great option. As a matter of fact, unless you’re already invested in an infrastructure that offers free or inexpensive certificates as its part of your hosting (AWS, for example), Let’s Encrypt is a great option. The only downside to Let’s Encrypt is that the maximum lifetime for their certificates is 90 days. This downside is offset by the fact that Let’s Encrypt makes it very easy to automatically renew the certificates, and recommends setting up an automated process to do so every 60 days to ensure the certificates don’t expire.
All of the major certificate vendors (such as Comodo and Symantec) offer free trial certificates that last anywhere from 30 to 90 days. This is a valid option if you want to test a commercial certificate, but you will need to purchase a certificate before the trial period is up if you want to ensure continuity of service.
Purchasing a Certificate
Currently, 90% of the approximately 50 root certificates distributed with every major browser are owned by four companies: Symantec (which purchased VeriSign), Comodo Group, Go Daddy, and GlobalSign. Purchasing directly from a CA can be quite expensive: it usually starts around $300 per year (though some offer certificates for less than $100 per year). A less expensive option is going through a reseller, from whom you can get an SSL certificate for as little as $10 per year or less.
It’s important to understand exactly what it is you’re paying for, and why you would pay $10, $150, or $300 (or more) for a certificate. The first important point to understand is that there is no difference whatsoever in the level of encryption offered between a $10 certificate and a $1,500 certificate. This is something that expensive certificate authorities would rather you not know: their marketing tries hard to obscure this fact.
If you choose to go with a commercial certificate vendor, I recommend the following three considerations in making your choice:
- Customer support
-
If you ever have problems with your certificate, whether it be browser support (customers will let you know if your certificate is flagged by their browser as not trustworthy), installation issues, or renewal hassles, you will appreciate good customer support. This is one reason you might purchase a more expensive certificate. Often, your hosting provider will resell certificates, and in my experience, they provide a higher level of customer support, because they want to keep you as a hosting client as well.
- Single-domain, multisubdomain, wildcard, and multidomain certificates
-
The most inexpensive certificates are usually single domain. That may not sound so bad, but remember that it means that if you purchase a certificate for meadowlarktravel.com, then the certificate will not work for www.meadowlarktravel.com, or vice versa. For this reason, I tend to avoid single-domain certificates, though it can be a good option for the extremely budget conscious (you can always set up redirects to funnel requests to the proper domain). Multisubdomain certificates are good in that you can purchase a single certificate that covers meadowlarktravel.com, www.meadowlark.com, blog.meadowlarktravel.com, shop.meadowlarktravel.com, etc. The downside is that you have to know in advance what subdomains you want to use.
If you see yourself adding or using different subdomains over the course of a year (that need to support HTTPS), you might be better off going with a wildcard certificate, which are generally more expensive. But they will work for any subdomain, and you never have to specify what the subdomains are.
Lastly, there are multidomain certificates, which, like wildcard certificates, tend to be more expensive. These certificates support whole multiple domains so, for example, you could have meadowlarktravel.com, meadowlarktravel.us, meadowlarktravel.com, and the www variants.
- Domain, organization, and extended validation certificates
-
There are three kinds of certificates: domain, organization, and extended validation. Domain certificates, as the name indicates, simply provide confidence that you’re doing business with the domain that you think you are. Organization certificates, on the other hand, provide some assurance about the actual organization you’re dealing with. They’re more difficult to get: there’s usually paperwork involved, and you must provide things like state and/or federal business name records, physical addresses, etc. Different certificate vendors will require different documentation, so make sure to ask your certificate vendor what’s required to get one of these certificates. Lastly are extended validation certificates, which are the Rolls Royce of SLL certificates. They are like organization certificates in that they verify the existence of the organization, but they require a higher standard of proof, and can even require expensive audits to establish your data security practices (though this seems to be increasingly rare). They can be had for as little as $150 for a single domain.
I recommend either the less expensive domain certificates or the extended validation certificates. Organization certificates, while they verify the existence of your organization, are not displayed any differently than browsers, so in my experience, unless the user actually examines the certificate (which is rare), there will be no apparent difference between this and a domain certificate. Extended validation certificates, on the other hand, usually display some clues to users that they are dealing with a legitimate business (such as the URL bar being displayed in green, and the organization name being displayed next to the SSL icon).
If you’ve dealt with SSL certificates before, you might be wondering why I didn’t mention certificate insurance. I’ve omitted that price differentiator because essentially it’s insurance against something that’s almost impossible. The idea is that if someone suffers financial loss due to a transaction on your website, and they can prove it was due to inadequate encryption, the insurance is there to cover your damages. While it is certainly possible that, if your application involves financial transactions, someone may attempt to take legal action against you for financial loss, the likelihood of it being due to inadequate encryption is essentially zero. If I were to attempt to seek damages from a company due to financial loss linked to their online services, the absolute last approach I would take is to attempt to prove that the SSL encryption was broken. If you’re faced with two certificates that differ only in price and insurance coverage, buy the cheaper certificate.
The process of purchasing a certificate starts with the creation of a private key (as we did previously for the self-signed certificate). You will then generate a certificate signing request (CSR) that will be uploaded during the certificate purchase process (the certificate issuer will provide instructions for doing this). Note that the certificate issuer never has access to your private key, nor is your private key transmitted over the internet, which protects the security of the private key. The issuer will then send you the certificate, which will have an extension of .crt, .cer, or .der (the certificate will be in a format called Distinguished Encoding Rules or DER, hence the less common .der extension). You will also receive any certificates in the certificate chain. It is safe to email this certificate because it won’t work without the private key you generated.
Enabling HTTPS for Your Express App
You can modify your Express app to serve your website over HTTPS. In practice and in production, this is extremely uncommon, which we’ll learn about in the next section. However, for advanced applications, testing, and your own understanding of HTTPS, it’s useful to know how to serve HTTPS.
Once you have your private key and certificate, using them in your app is easy. Let’s revisit how we’ve been creating our server:
app.listen(app.get('port'),()=>{console.log(`Express started in${app.get('env')}mode `+`on port +${app.get('port')}.`)})
Switching over to HTTPS is simple. I recommend that you put your private key and SSL cert in a subdirectory called ssl (though it’s quite common to keep it in your project root). Then you just use the https module instead of http, and pass an options object along to the createServer method:
consthttps=require('https')constfs=require('fs')// usually at top of file// ...the rest of your application configurationconstoptions={key:fs.readFileSync(__dirname+'/ssl/meadowlark.pem'),cert:fs.readFileSync(__dirname+'/ssl/meadowlark.crt'),}constport=process.env.PORT||3000https.createServer(options,app).listen(port,()=>{console.log(`Express started in${app.get('env')}mode `+`on port +${port}.`)})
That’s all there is to it. Assuming you’re still running your server on port 3000, you can now connect to https://localhost:3000. If you try to connect to http://localhost:3000, it will simply time out.
A Note on Ports
Whether you know it or not, when you visit a website, you’re always connecting to a specific port, even though it’s not specified in the URL. If you don’t specify a port, port 80 is assumed for HTTP. As a matter of fact, most browsers will simply not display the port number if you explicitly specify port 80. For example, navigate to http://www.apple.com:80; chances are, when the page loads, the browser will simply strip off the :80. It’s still connecting on port 80; it’s just implicit.
Similarly, there’s a standard port for HTTPS, 443. Browser behavior is similar: if you connect to https://www.google.com:443, most browsers will simply not display the :443, but that’s the port they’re connecting over.
If you’re not using port 80 for HTTP or port 443 for HTTPS, you’ll have to explicitly specify the port and the protocol to connect correctly. There’s no way to run HTTP and HTTPS on the same port (technically, it’s possible, but there’s no good reason to do it, and the implementation would be very complicated).
If you want to run your HTTP app on port 80, or your HTTPS app on port 443 so you don’t have to specify the port explicitly, you have two things to consider. First is that many systems already have a default web server running on port 80.
The other thing to know is that on most operating systems, ports 1–1023
require elevated privileges to open. For
example, on a Linux or macOS machine, if you attempt to start your app on
port 80, it will probably fail with an EACCES error. To run on port 80
or 443 (or any port under 1024), you’ll need to elevate your privileges by
using the sudo command. If you don’t have administrator rights, you will
be unable to start the server directly on port 80 or 443.
Unless you’re managing your own servers, you probably don’t have root access to your hosted account: so what happens when you want to run on port 80 or 443? Generally, hosting providers have some kind of proxy service that runs with elevated privileges that will pass requests through to your app, which is running on a nonprivileged port. We’ll learn more about this in the next section.
HTTPS and Proxies
As we’ve seen, it’s very easy to use HTTPS with Express, and for development, it will work fine. However, when you want to scale your site out to handle more traffic, you will want to use a proxy server such as NGINX (see Chapter 12). If your site is running in a shared hosting environment, it is almost certain that there will be a proxy server that will route requests to your application.
If you’re using a proxy server, then the client (the user’s browser) will communicate with the proxy server, not your server. The proxy server, in turn, will most likely communicate with your app over regular HTTP (since your app and the proxy server will be running together on a trusted network). You will often hear people say that the HTTPS terminates at the proxy server, or that the proxy is performing “SSL termination.”
For the most part, once you or your hosting provider has correctly configured the proxy server to handle HTTPS requests, you won’t need to do any additional work. The exception to that rule is if your application needs to handle both secure and insecure requests.
There are three solutions to this problem. The first is simply to configure your proxy to redirect all HTTP traffic to HTTPS, in essence forcing all communication with your application to be over HTTPS. This approach is becoming much more common, and it’s certainly an easy solution to the problem.
The second approach is to somehow communicate the protocol used in the client-proxy communication to the server. The usual way to communicate this is through the X-Forwarded-Proto header. For example, to set this header in NGINX:
proxy_set_header X-Forwarded-Proto $scheme;
Then, in your app, you could test to see if the protocol was HTTPS:
app.get('/',(req,res)=>{// the following is essentially// equivalent to: if(req.secure)if(req.headers['x-forwarded-proto']==='https'){res.send('line is secure')}else{res.send('you are insecure!')}})
Caution
In NGINX, there is a separate server configuration block for HTTP and HTTPS. If you fail to set the X-Forwarded-Protocol in the configuration block corresponding to HTTP, you open yourself up to the possibility of a client spoofing the header and thereby fooling your application into thinking that the connection is secure even though it isn’t. If you take this approach, make sure you always set the X-Forwarded-Protocol header.
When you’re using a proxy, Express provides some convenience properties
that make the proxy more “transparent” (as if you weren’t using one,
without sacrificing the benefits). To take advantage of that, tell
Express to trust the proxy by using app.enable('trust
proxy'). Once you do, req.protocol, req.secure, and req.ip
will refer to the client’s connection to the proxy, not to your app.
Cross-Site Request Forgery
Cross-site request forgery (CSRF) attacks exploit the fact that users generally trust their browser and visit multiple sites in the same session. In a CSRF attack, script on a malicious site makes requests of another site: if you are logged in on the other site, the malicious site can successfully access secure data from another site.
To prevent CSRF attacks, you must have a way to make sure a request
legitimately came from your website. The way we do this is to pass a
unique token to the browser. When the browser then submits a form, the
server checks to make sure the token matches. The csurf
middleware will handle the token creation and
verification for you; all you’ll have to do is make sure the token is
included in requests to the server. Install the csurf middleware (npm
install csurf); then link it in and add a token to res.locals.
Make sure you link in the csurf middleware after you link in
body-parser, cookie-parser, and express-session:
// this must come after we link in body-parser,// cookie-parser, and express-sessionconstcsrf=require('csurf')app.use(csrf({cookie:true}))app.use((req,res,next)=>{res.locals._csrfToken=req.csrfToken()next()})
The csurf middleware adds the csrfToken method to the request object. We don’t have to assign it to res.locals; we could just pass req.csrfToken() explicitly to every view that needs it, but this is generally less work.
Note
Note that the package itself is called csurf, but most of the variables and methods are csrf, without the “u.” It’s easy to get tripped up here, so mind your vowels!
Now on all of your forms (and AJAX calls), you’ll have to provide a field called _csrf, which must match the generated token. Let’s see how we would add this to one of our forms:
<formaction="/newsletter"method="POST"><inputtype="hidden"name="_csrf"value="{{_csrfToken}}">Name:<inputtype="text"name="name"><br>Email:<inputtype="email"name="email"><br><buttontype="submit">Submit</button></form>
The csurf middleware will handle the rest: if the body contains fields, but no valid _csrf field, it will raise an error (make sure you have an error route in your middleware!). Go ahead and remove the hidden field and see what happens.
Tip
If you have an API, you probably don’t want the csurf middleware interfering with it. If you want to restrict access to your API from other websites, you should look into the “API key” functionality of an API library like connect-rest. To prevent csurf from interfering with your middleware, link it in before you link in csurf.
Authentication
Authentication is a big, complicated topic. Unfortunately, it’s also a vital part of most nontrivial web applications. The most important piece of wisdom I can impart to you is don’t try to do it yourself. If you look at your business card and it doesn’t say “Security Expert,” you probably aren’t prepared for the complex considerations involved in designing a secure authentication system.
I’m not saying that you shouldn’t try to understand the security systems in your application. I’m just recommending that you don’t try to build it yourself. Feel free to study the open source code of the authentication techniques I’m going to recommend. It will certainly give you some insight as to why you might not want to take on this task unaided!
Authentication Versus Authorization
While the two terms are often used interchangeably, there is a difference. Authentication refers to verifying users’ identities. That is, they are who they say they are. Authorization refers to determining what a user is authorized to access, modify, or view. For example, customers might be authorized to access their account information, whereas a Meadowlark Travel employee would be authorized to access another person’s account information or sales notes.
Note
Authentication is often abbreviated as authN and “authorization” as authZ.
Usually (but not always), authentication comes first, and then authorization is determined. Authorization can be very simple (authorized/not authorized), broad (user/administrator), or very fine-grained, specifying read, write, delete, and update privileges against different account types. The complexity of your authorization system is dependent on the type of application you’re writing.
Because authorization is so dependent on the details of your application, I’ll be giving only a rough outline in this book, using a very broad authentication scheme (customer/employee). I will often use the abbreviation “auth,” but only when it is clear from the context whether it means “authentication” or “authorization,” or when it doesn’t matter.
The Problem with Passwords
The problem with passwords is that every security system is only as strong as its weakest link. And passwords require the user to invent a password—and there’s your weakest link. Humans are notoriously bad at coming up with secure passwords. In an analysis of security breaches in 2018, the most popular password is “123456.” “password” is second. Even in the security conscious year of 2018, people are still choosing abysmally bad passwords. Having password policies requiring, for example, a capital letter, a number, and a punctuation mark is just going to result in a password of “Password1!”.
Even analyzing passwords against a list of common passwords doesn’t do much to stop the problem. Then people start writing down their higher-quality passwords on notepads, leaving them in unencrypted files on their computers, or emailing them to themselves.
At the end of the day, it’s a problem that you, the app designer, cannot do much to fix. However, there are things you can do that promote more secure passwords. One is to pass the buck and rely on a third party for authentication. The other is to make your login system friendly to password management services, like 1Password, Bitwarden, and LastPass.
Third-Party Authentication
Third-party authentication takes advantage of the fact that pretty much everyone on the internet has an account on at least one major service, such as Google, Facebook, Twitter, or LinkedIn. All of these services provide a mechanism to authenticate and identify your users through their service.
Note
Third-party authentication is often referred to as federated authentication or delegated authentication. The terms are largely interchangeable, though federated authentication is usually associated with Security Assertion Markup Language (SAML) and OpenID, and delegated authentication is often associated with OAuth.
Third-party authentication has three major advantages. First, your authentication burden is lowered. You do not have to worry about authenticating individual users, only interacting with a trusted third party. The second advantage is that it reduces password fatigue: the stress associated with having too many accounts. I use LastPass, and I just checked my password vault: I have almost 400 passwords. As a technology professional, I may have more than your average internet user, but it’s not uncommon for even a casual internet user to have dozens or even hundreds of accounts. Lastly, third-party authentication is frictionless: it allows your users to start using your site more quickly, with credentials they already have. Often, if users see that they have to create yet another username and password, they will simply move on.
If you don’t use a password manager, the chances are, you’re using the same password for most of those sites (most people have a “secure” password they use for banking and the like, and an “insecure” password they use for everything else). The problem with this approach is that if even one of the sites you use that password for is breached, and your password becomes known, then hackers will try using that same password with other services. It’s like putting all of your eggs in one basket.
Third-party authentication has its downsides. Hard as it is to believe, there are folks out there who don’t have an account on Google, Facebook, Twitter, or LinkedIn. Then, among the people who do have such accounts, suspicion (or a desire for privacy) may make them unwilling to use those credentials to log onto your website. Many websites solve this particular problem by encouraging users to use an existing account, but those who don’t have them (or are unwilling to use them to access your service) can create a new login for your service.
Storing Users in Your Database
Whether or not you rely on a third party to authenticate your users, you will want to store a record of users in your own database. For example, if you’re using Facebook for authentication, that only verifies a user’s identity. If you need to save settings specific to that user, you can’t reasonably use Facebook for that: you have to store information about that user in your own database. Also, you probably want to associate an email address with your users, and they may not wish to use the same email address they use for Facebook (or whatever third-party authentication service you use). Lastly, storing user information in your database allows you to perform authentication yourself, should you wish to provide that option.
So let’s create a model for our users, models/user.js:
constmongoose=require('mongoose')constuserSchema=mongoose.Schema({authId:String,name:String,:String,role:String,created:Date,})constUser=mongoose.model('User',userSchema)module.exports=User
And modify db.js with the appropriate abstractions (if you’re using PostgreSQL, I’ll leave it as an exercise to hook up this abstraction):
constUser=require('./models/user')module.exports={//...getUserById:asyncid=>User.findById(id),getUserByAuthId:asyncauthId=>User.findOne({authId}),addUser:asyncdata=>newUser(data).save(),}
Recall that every object in a MongoDB database has its own unique ID, stored in its _id property. However, that ID is controlled by MongoDB, and we need some way to map a user record to a third-party ID, so we have our own ID property, called authId. Since we’ll be using multiple authentication strategies, that ID will be a combination of a strategy type and a third-party ID, to prevent collisions. For example, a Facebook user might have an authId of facebook:525764102, whereas a Twitter user would have an authId of twitter:376841763.
We will be using two roles in our example: “customer” and “employee.”
Authentication Versus Registration and the User Experience
Authentication refers to verifying a user’s identity, either with a trusted third party, or through credentials you’ve provided the user (such as a username and password). Registration is the process by which a user gets an account on your site (from our perspective, registration is when we create a user record in the database).
When users join your site for the first time, it should be clear to them that they’re registering. Using a third-party authentication system, we could register them without their knowledge if they successfully authenticate through the third party. This is not generally considered a good practice, and it should be clear to users that they’re registering for your site (whether they’re authenticating through a third party or not), and provide a clear mechanism for canceling their membership.
One user experience situation to consider is “third-party confusion.” If a user registers in January for your service using Facebook, then returns in July, and is confronted with a screen offering the choices of logging in with Facebook, Twitter, Google, or LinkedIn, the user may very well have forgotten what registration service was originally used. This is one of the pitfalls of third-party authentication, and there is precious little you can do about it. It’s another good reason to ask the user to provide an email address: this way, you can give the user an option to look up their account by email, and send an email to that address specifying what service was used for authentication.
If you feel that you have a firm grasp on the social networks your users use, you can ease this problem by having a primary authentication service. For example, if you feel pretty confident that the majority of your users have a Facebook account, you could have a big button that says, “Log in with Facebook.” Then, using smaller buttons or even just text links, say, “or log in with Google, Twitter, or LinkedIn.” This approach can cut down on the instance of third-party confusion.
Passport
Passport is a very popular and robust authentication module for Node/Express. It is not tied to any one authentication mechanism; rather, it is based on the idea of pluggable authentication strategies (including a local strategy if you don’t want to use third-party authentication). Understanding the flow of authentication information can be overwhelming, so we’ll start with just one authentication mechanism and add more later.
The detail that’s important to understand is that, with third-party authentication, your app never receives a password. That is handled entirely by the third party. This is a good thing: it’s putting the burden of secure handling and storage of passwords on the third party.1
The whole process, then, relies on redirects (it must, if your application is never to receive the user’s third-party password). At first, you might be confused about why you can pass localhost URLs to the third party and still successfully authenticate (after all, the third-party server handling your request doesn’t know about your localhost). It works because the third party simply instructs your browser to redirect, and your browser is inside your network, and can therefore redirect to local addresses.
The basic flow is shown in Figure 18-1. This diagram shows the important flow of functionality, making it clear that the authentication actually occurs on the third-party website. Enjoy the simplicity of the diagram—things are about to get a lot more complicated.
When you use Passport, there are four steps that your app will be responsible for. Consider a more detailed view of the third-party authentication flow, as shown in Figure 18-2.
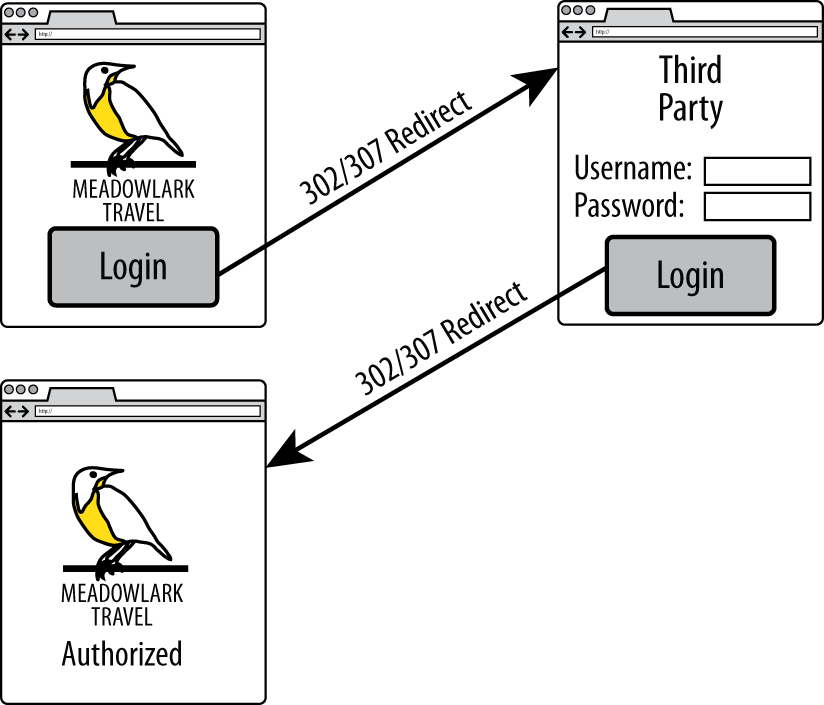
Figure 18-1. Third-party authentication flow
For simplicity, we are using Meadowlark Travel to represent your app, and Facebook for the third-party authentication mechanism. Figure 18-2 illustrates how the user goes from the login page to the secure Account Info page (the Account Info page is just used for illustration purposes: this could be any page on your website that requires authentication).
This diagram shows detail you don’t normally think about, but is important to understand in this context. In particular, when you visit a URL, you aren’t making the request of the server: the browser is actually doing that. That said, the browser can do three things: make an HTTP request, display the response, and perform a redirect (which is essentially making another request and displaying another response…which in turn could be another redirect).
In the Meadowlark column, you can see the four steps your application is actually responsible for. Fortunately, we’ll be leveraging Passport (and pluggable strategies) to perform the details of those steps; otherwise, this book would be much, much longer.
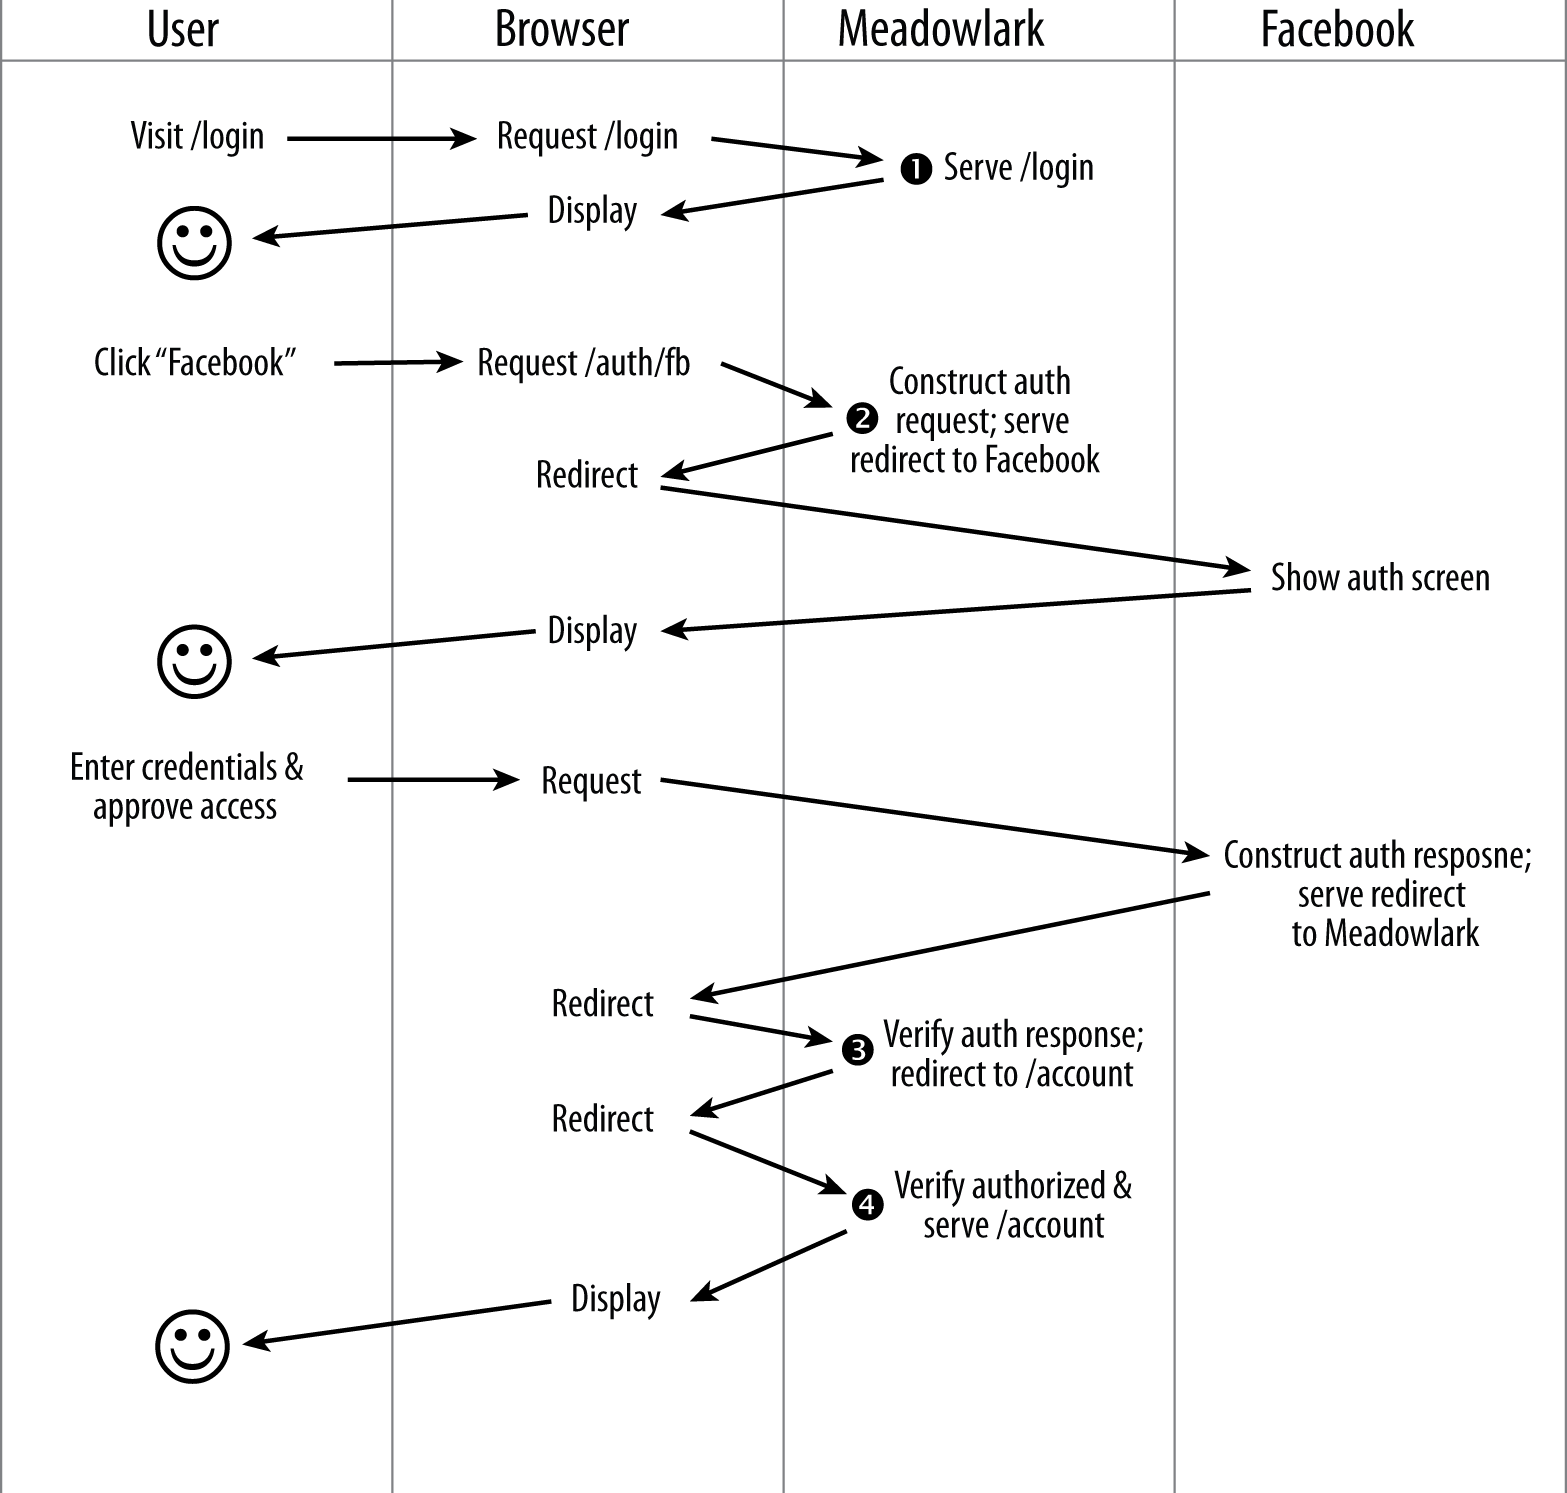
Figure 18-2. Detailed view of third-party authentication flow
Before we get into implementation details, let’s consider each of the steps in a little more detail:
- Login page
-
The login page is where the user can choose the login method. If you’re using a third-party authentication, it’s usually just a button or a link. If you’re using local authentication, it will include username and password fields. If the user attempts to access a URL requiring authentication (such as
/accountin our example) without being logged in, this is probably the page you will want to redirect to (alternatively, you could redirect to a Not Authorized page with a link to the login page). - Construct authentication request
-
In this step, you’ll be constructing a request to be sent to a third party (via a redirect). The details of this request are complicated and specific to the authentication strategy. Passport (and the strategy plugin) will be doing all the heavy lifting here. The auth request includes protection against man-in-the-middle attacks, as well as other vectors an attacker might exploit. Usually the auth request is short-lived, so you can’t store it and expect to use it later: this helps prevent attacks by limiting the window in which an attacker has time to act. This is where you can request additional information from the third-party authorization mechanism. For example, it’s common to request the user’s name, and possibly email address. Keep in mind that the more information you request from users, the less likely they are to authorize your application.
- Verify authentication response
-
Assuming the user authorized your application, you’ll get back a valid auth response from the third party, which is proof of the user’s identity. Once again, the details of this validation are complicated and will be handled by Passport (and the strategy plugin). If the auth response indicates that the user is not authorized (if invalid credentials were entered, or your application wasn’t authorized by the user), you would then redirect to an appropriate page (either back to the login page, or to a Not Authorized or Unable to Authorize page). Included in the auth response will be an ID for the user that is unique to that specific third party, as well as any additional details you requested in step 2. To enable step 4, we must “remember” that the user is authorized. The usual way to do this is to set a session variable containing the user’s ID, indicating that this session has been authorized (cookies can also be used, though I recommend using sessions).
- Verify authorization
-
In step 3, we stored a user ID in the session. The presence of that user ID allows us to retrieve a user object from the database that contains information about what the user is authorized to do. In this manner, we don’t have to authenticate with the third party for every request (which would result in a slow and painful user experience). This task is simple, and we no longer need Passport for this: we have our own user object that contains our own authentication rules. (If that object isn’t available, it indicates the request isn’t authorized, and we can redirect to the login or Not Authorized page.)
Tip
Using Passport for authentication is a fair amount of work, as you’ll see in this chapter. However, authentication is an important part of your application, and I feel that it is wise to invest some time in getting it right. There are projects such as LockIt that try to provide a more “off the shelf” solution. Another increasingly popular option is Auth0, which is very robust but isn’t as easy to set up as LockIt. To make the most effective use of LockIt or Auth0 (or similar solutions), however, it behooves you to understand the details of authentication and authorization, which is what this chapter is designed to do. Also, if you ever need to customize an authentication solution, Passport is a great place to start.
Setting up Passport
To keep things simple, we’ll start with a single authentication provider. Arbitrarily, we’ll choose Facebook. Before we can set up Passport and the Facebook strategy, we’ll need to do a little configuration in Facebook. For Facebook authentication, you’ll need a Facebook app. If you already have a suitable Facebook app, you can use that, or you can create a new one specifically for authentication. If possible, you should use your organization’s official Facebook account to create the app. That is, if you worked for Meadowlark Travel, you would use the Meadowlark Travel Facebook account to create the app (you can always add your personal Facebook account as an administrator of the app for ease of administration). For testing purposes, it’s fine to use your own Facebook account, but using a personal account for production will appear unprofessional and suspicious to your users.
The details of Facebook app administration seem to change fairly frequently, so I am not going to explain the details here. Consult the Facebook developer documentation if you need details on creating and administering your app.
For development and testing purposes, you will need to associate the development/testing domain name with the app. Facebook allows you to use localhost (and port numbers), which is great for testing purposes. Alternatively, you can specify a local IP address, which can be helpful if you’re using a virtualized server, or another server on your network for testing. The important thing is that the URL you enter into your browser to test the app (for example, http://localhost:3000) is associated with the Facebook app. Currently, you can associate only one domain with your app: if you need to be able to use multiple domains, you will have to create multiple apps (for example, you could have Meadowlark Dev, Meadowlark Test, and Meadowlark Staging; your production app can simply be called Meadowlark Travel).
Once you’ve configured your app, you will need its unique app ID, and its app secret, both of which can be found on the Facebook app management page for that app.
Tip
One of the biggest frustrations you’ll probably face is receiving a message from Facebook such as “Given URL is not allowed by the Application configuration.” This indicates that the hostname and port in the callback URL do not match what you’ve configured in your app. If you look at the URL in your browser, you will see the encoded URL, which should give you a clue. For example, if I’m using 192.168.0.103:3443, and I get that message, I look at the URL. If I see redirect_uri=https%3A%2F%2F192.68.0.103%3A3443%2F auth%2Ffacebook%2Fcallback in the querystring, I can quickly spot the mistake: I used 68 instead of 168 in my hostname.
Now let’s install Passport and the Facebook authentication strategy:
npm install passport passport-facebook
Before we’re done, there’s going to be a lot of authentication code
(especially if we’re supporting multiple strategies), and we don’t want to
clutter up meadowlark.js with all that code. Instead, we’ll create a
module called lib/auth.js. This is going to be a large file, so we’re
going to take it piece by piece (see ch18 in the companion repo for the
finished example). We’ll start with the imports and two methods that
Passport requires, serializeUser and deserializeUser:
constpassport=require('passport')constFacebookStrategy=require('passport-facebook').Strategyconstdb=require('../db')passport.serializeUser((user,done)=>done(null,user._id))passport.deserializeUser((id,done)=>{db.getUserById(id).then(user=>done(null,user)).catch(err=>done(err,null))})
Passport uses serializeUser and deserializeUser to map requests to the authenticated user, allowing you to use whatever storage method you want. In our case, we are only going to store our database ID (the _id property) in the session. The way we’re using the ID here makes “serialize” and “deserialize” soft of into misnomers: we’re actually just storing a user ID in the session. Then, when needed, we can get a user object by finding that ID in the database.
Once these two methods are implemented, as long as there is an active session, and the user has successfully authenticated, req.session.passport.user will be the corresponding user object as retrieved from the database.
Next, we’re going to choose what to export. To enable Passport’s functionality, we’ll need to do two distinct activities: initialize Passport, and register routes that will handle authentication and the redirected callbacks from our third-party authentication services. We don’t want to combine these two in one function because in our main application file, we may want to choose when Passport is linked into the middleware chain (remember that order is significant when adding middleware). So, instead of having our module export function that does either of these things, we’re going to have it return a function that returns an object that has the methods we need. Why not just return an object to start with? Because we need to bake in some configuration values. Also, since we need to link the Passport middleware into our application, a function is an easy way to pass in the Express application object:
module.exports=(app,options)=>{// if success and failure redirects aren't specified,// set some reasonable defaultsif(!options.successRedirect)options.successRedirect='/account'if(!options.failureRedirect)options.failureRedirect='/login'return{init:function(){/* TODO */},registerRoutes:function(){/* TODO */},}}
Before we get into the details of the init and registerRoutes methods, let’s look at how we’ll use this module (hopefully that will make this business of returning a function that returns an object a little more clear):
constcreateAuth=require('./lib/auth')// ...other app configurationconstauth=createAuth(app,{// baseUrl is optional; it will default to localhost if you omit it;// it can be helpful to set this if you're not working on// your local machine. For example, if you were using a staging server,// you might set the BASE_URL environment variable to// https://staging.meadowlark.combaseUrl:process.env.BASE_URL,providers:credentials.authProviders,successRedirect:'/account',failureRedirect:'/unauthorized',})// auth.init() links in Passport middleware:auth.init()// now we can specify our auth routes:auth.registerRoutes()
Notice that, in addition to specifying the success and failure redirect
paths, we also specify a property called providers, which we’ve
externalized in the credentials file (see Chapter 13). We’ll need
to add the authProviders property to .credentials.development.json:
"authProviders":{"facebook":{"appId":"your_app_id","appSecret":"your_app_secret"}}
Tip
Another reason to bundle our authentication code in a module like this is that we can reuse it for other projects; as a matter of fact, there are already some authentication packages that do essentially what we’re doing here. However, it’s important to understand the details of what’s going on, so even if you end up using a module someone else wrote, this will help you understand everything that’s going on in your authentication flow.
Now let’s take care of our init method (previously a “TODO” in auth.js):
init:function(){varconfig=options.providers// configure Facebook strategypassport.use(newFacebookStrategy({clientID:config..appId,clientSecret:config..appSecret,callbackURL:(options.baseUrl||'')+'/auth/facebook/callback',},(accessToken,refreshToken,profile,done)=>{constauthId='facebook:'+profile.iddb.getUserByAuthId(authId).then(user=>{if(user)returndone(null,user)db.addUser({authId:authId,name:profile.displayName,created:newDate(),role:'customer',}).then(user=>done(null,user)).catch(err=>done(err,null))}).catch(err=>{if(err)returndone(err,null);})}))app.use(passport.initialize())app.use(passport.sessionp))},
This is a pretty dense bit of code, but most of it is actually just Passport boilerplate. The important bit is inside the function that gets passed to the FacebookStrategy instance. When this function gets called (after the user has successfully authenticated), the profile parameter contains information about the Facebook user. Most important, it includes a Facebook ID: that’s what we’ll use to associate a Facebook account to our own user object. Note that we namespace our authId property by prefixing facebook:. Slight as the chance may be, this prevents the possibility of a Facebook ID colliding with a Twitter or Google ID (it also allows us to examine user models to see what authentication method a user is using, which could be useful). If the database already contains an entry for this namespaced ID, we simply return it (this is when serializeUser gets called, which will put our own user ID into the session). If no user record is returned, we create a new user object and save it to the database.
The last thing we have to do is create our registerRoutes method (don’t worry, this one is much shorter):
registerRoutes:()=>{app.get('/auth/facebook',(req,res,next)=>{if(req.query.redirect)req.session.authRedirect=req.query.redirectpassport.authenticate('facebook')(req,res,next)})app.get('/auth/facebook/callback',passport.authenticate('facebook',{failureRedirect:options.failureRedirect}),(req,res)=>{// we only get here on successful authenticationconstredirect=req.session.authRedirectif(redirect)deletereq.session.authRedirectres.redirect(303,redirect||options.successRedirect)})},
Now we have the path /auth/facebook; visiting this path will automatically redirect the visitor to Facebook’s authentication screen (this is done by passport.authenticate('facebook’)), step 2 in Figure 18-1. Note that we check to see if there’s a querystring parameter redirect; if there is, we save it in the session. This is so we can automatically redirect to the intended destination after completing authentication. Once the user authorizes with Twitter, the browser will be redirected back to your site—specifically, to the /auth/facebook/callback path (with the optional redirect querystring indicating where the user was originally).
Also on the querystring are authentication tokens that Passport will verify. If the verification fails, Passport will redirect the browser to options.failureRedirect. If the verification is successful, Passport will call next, which is where your application comes back in. Note how the middleware is chained in the handler for /auth/facebook/callback: passport.authenticate is called first. If it calls next, control passes over to your function, which then redirects to either the original location or options.successRedirect, if the redirect querystring parameter wasn’t specified.
Tip
Omitting the redirect querystring parameter can simplify your authentication routes, which may be tempting if you have only one URL that requires authentication. However, having this functionality available will eventually come in handy and provide a better user experience. No doubt you’ve experienced this yourself before: you’ve found the page you want, and you’re instructed to log in. You do, and you’re redirected to a default page, and you have to navigate back to the original page. It’s not a very satisfying user experience.
The “magic” that Passport is doing during this process is saving the user (in our case, just a database user ID) to the session. This is a good thing, because the browser is redirecting, which is a different HTTP request: without having that information in the session, we wouldn’t have any way to know that the user had been authenticated! Once a user has been successfully authenticated, req.session.passport.user will be set, and that’s how future requests will know that the user has been authenticated.
Let’s look at our /account handler to see how it checks to make sure the user is authenticated (this route handler will be in our main application file, or in a separate routing module, not in /lib/auth.js):
app.get('/account',(req,res)=>{if(!req.user)returnres.redirect(303,'/unauthorized')res.render('account',{username:req.user.name})})// we also need an 'unauthorized' pageapp.get('/unauthorized',(req,res)=>{res.status(403).render('unauthorized')})// and a way to logoutapp.get('/logout',(req,res)=>{req.logout()res.redirect('/')})
Now only authenticated users will see the account page; everyone else will be redirected to a Not Authorized page.
Role-Based Authorization
So far, we’re not technically doing any authorization (we’re only differentiating between authorized and unauthorized users). However, let’s say we want only customers to see their account views (employees might have an entirely different view where they can see user account information).
Remember that in a single route, you can have multiple functions, which get called in order. Let’s create a function called customerOnly that will allow only customers:
constcustomerOnly=(req,res,next)=>{if(req.user&&req.user.role==='customer')returnnext()// we want customer-only pages to know they need to logonres.redirect(303,'/unauthorized')}
Let’s also create am employeeOnly function that will operate a little differently. Let’s say we have a path /sales that we want to be available only to employees. Furthermore, we don’t want nonemployees to even be aware of its existence, even if they stumble on it by accident. If a potential attacker went to the /sales path, and saw a Not Authorized page, that is a little information that might make an attack easier (simply by knowing that the page is there). So, for a little added security, we want nonemployees to see a regular 404 page when they visit the /sales page, giving potential attackers nothing to work with:
constemployeeOnly=(req,res,next)=>{if(req.user&&req.user.role==='employee')returnnext()// we want employee-only authorization failures to be "hidden", to// prevent potential hackers from even knowing that such a page existsnext('route')}
Calling next('route’) will not simply execute the next handler in the route: it will skip this route altogether. Assuming there’s not a route further on down the line that will handle /account, this will eventually pass to the 404 handler, giving us the desired result.
Here’s how easy it is to put these functions to use:
// customer routesapp.get('/account',customerOnly,(req,res)=>{res.render('account',{username:req.user.name})})app.get('/account/order-history',customerOnly,(req,res)=>{res.render('account/order-history')})app.get('/account/email-prefs',customerOnly,(req,res)=>{res.render('account/email-prefs')})// employer routesapp.get('/sales',employeeOnly,(req,res)=>{res.render('sales')})
It should be clear that role-based authorization can be as simple or as complicated as you wish. For example, what if you want to allow multiple roles? You could use the following function and route:
constallow=roles=>(req,res,next)=>{if(req.user&&roles.split(',').includes(req.user.role))returnnext()res.redirect(303,'/unauthorized')}
Hopefully that example gives you an idea of how creative you can be with role-based authorization. You could even authorize on other properties, such as the length of time a user has been a member or how many vacations that user has booked with you.
Adding Authentication Providers
Now that our framework is in place, adding more authentication providers is easy. Let’s say we want to authenticate with Google. Before we start adding code, you’ll have to set up a project on your Google account.
Go to your Google Developers Console and choose a project from the navigation bar (if you don’t already have a project, click New Project and follow the instructions. Once you’ve selected a project, click “Enable APIs and Services” and enable Cloud Identity API. Click Credentials, and then Create Credentials, and choose “OAuth client ID,” and then “Web application.” Enter the appropriate URLs for your app: for testing you can use http://localhost:3000 for the authorized origins, and http://localhost:3000/auth/google/callback for authorized redirect URIs.
Once you have got everything set up on the Google side, run npm install passport-google-oauth20, and add the following code to lib/auth.js:
// configure Google strategypassport.use(newGoogleStrategy({clientID:config..clientID,clientSecret:config..clientSecret,callbackURL:(options.baseUrl||'')+'/auth/google/callback',},(token,tokenSecret,profile,done)=>{constauthId='google:'+profile.iddb.getUserByAuthId(authId).then(user=>{if(user)returndone(null,user)db.addUser({authId:authId,name:profile.displayName,created:newDate(),role:'customer',}).then(user=>done(null,user)).catch(err=>done(err,null))}).catch(err=>{console.log('whoops, there was an error: ',err.message)if(err)returndone(err,null);})}))
And the following to the registerRoutes method:
app.get('/auth/google',(req,res,next)=>{if(req.query.redirect)req.session.authRedirect=req.query.redirectpassport.authenticate('google',{scope:['profile']})(req,res,next)})app.get('/auth/google/callback',passport.authenticate('google',{failureRedirect:options.failureRedirect}),(req,res)=>{// we only get here on successful authenticationconstredirect=req.session.authRedirectif(redirect)deletereq.session.authRedirectres.redirect(303,req.query.redirect||options.successRedirect)})
Conclusion
Congratulations on making it through the most intricate chapter! It’s unfortunate that such an important feature (authentication and authorization) is so complicated, but in a world rife with security threats, it’s an unavoidable complexity. Fortunately, projects like Passport (and the excellent authentication schemes based on it) lessen our burden somewhat. Still, I encourage you not to give short shrift to this area of your application: exercising diligence in the area of security will make you a good internet citizen. Your users may never thank you for it, but woe be to the owners of an application who allow user data to be compromised because of poor security.
1 It is unlikely that the third party is storing passwords either. A password can be verified by storing something called a salted hash, which is a one-way transformation of the password. That is, once you generate a hash from a password, you can’t recover the password. Salting the hash provides additional protection against certain kinds of attacks.