
Getting your own wiki engine running
</objective> <objective>Finding an Internet mechanic
</objective> <objective>The basic requirements for getting started
</objective> <objective>Getting help during installation
</objective> <objective>Configuring the TWiki engine
</objective> </feature>Wikis are run by programs called wiki engines. For most of the history of wikis, getting a wiki engine running was much harder than most people could handle. That’s why engineers had all the fun with wikis. They had the servers and advanced technical skills, allowing them to set up their own wiki engines in a snap. Today, hosted wikis (also known as wiki farms) allow many more people to get in the game. At a hosted wiki, a generic wiki engine is already set up and running on the farm. To get a hosted wiki up and running now takes only five or ten minutes and very little technical expertise.
Although hosted wikis have their place, many organizations and situations require their own wiki engine that is under their control and not shared in any way. The market has responded in a variety of ways to this demand. No longer do you need access to your own server to get your own wiki engine going. There are many ways to have a wiki that you can call your own.
Chapter 10 shows you how to select a wiki engine. This chapter helps you get your chosen wiki engine up and running. To give you an idea of what exactly is involved in installing and configuring a wiki, we tell you how to set up a TWiki engine, one of the most popular wiki engines. Although every engine is different, this chapter walks you through the basic steps of setting up pretty much any wiki engine that you might choose.
For many people, hosted wikis don’t make sense for a variety of reasons. Perhaps the information on the wiki is sensitive. Or, the access to the wiki needs to be controlled. You might want to have the wiki tightly integrated with your work environment so you don’t have to sign on separately to the wiki and keep track of an additional login account. Compliance regulations might forbid any sort of hosted arrangement.
Many people get started on a hosted wiki and then at some point want to customize more than the hosted environment allows. Hosted environments are always adding features to prevent this exodus, but it happens anyway, especially when you want to create structured wiki applications.
Whatever your reasons, if you want to host your own wiki, you must find a way to get your own wiki engine up and running on a server that you control. Of the many ways to make this happen, we recommend the following three as the most viable.
If you’re getting a wiki engine running on your own, the best plan is to find one of the many hosting providers on the Internet that sell access to shared or dedicated servers. One such site is www.wikihosting.net, which lists wiki-hosting offers. (See Figure 11-1.)

Shared and dedicated servers differ in the following ways:
✓ | Shared server: A shared server allows your Web site to run on a machine that hosts many other Web sites. You control your Web site but share the server space with other Web sites. If everything works well, none of the Web sites interfere with each other. Shared web hosting can run anywhere from $5 to $40 per month. |
✓ | Dedicated server: A dedicated server is one on which your Web site runs on a server exclusively. This is the model that Dan prefers for his wikis, though it is more expensive than using a shared server. Dedicated servers run anywhere from $100 to $300 per month, depending on the services offered and size of the machine being rented. |
In either of these hosting methods, you might be able to install a wiki when you purchase your server. This is not usually the case, however, and you must find someone to help you who has the necessary skills and know-how — an Internet mechanic, if you will. After you find your mechanic, you grant the helper access to the server so that he or she can install your wiki.
For many small businesses or organizations that want to use advanced wikis, dedicated hosting can be a good choice. In larger organizations, though, this approach might not work because users must go outside the approved environment and must also remember a new username and password.
A second wiki-hosting choice is to use a computer inside your organization. Two reasons why wikis have flourished inside engineering organizations is that they have plenty of servers and that engineers know how to be their own Internet mechanics.
The rest of us aren’t so lucky. If you try to set up a server on your own, you might run afoul of organizational policy. If you ask for a server to be set up, you might run into a lengthy bureaucratic process, or you might be forced to find financing in some budget. This is often harder than you’d like. Although complaining about red tape is easy, that crimson cord is usually in place to make sure that any server is properly supported, backed up, and maintained.
The demand for wikis has become so great that the market has developed all sorts of services. Some dedicated and shared hosting providers give you a server with a wiki already installed. MediaWiki is probably the most common wiki engine used in this way. After you get started with such a wiki, though, you must perform maintenance and make updates to it on your own.
If you don’t have access to your own Internet mechanic to handle advanced wiki configuration, consider looking for a hosting solution that provides professional wiki consulting as well. XWiki.com (www.xwiki.com) is a hosted wiki that truly offers all-in-one service. In addition to basic various hosted and self-run wiki services, you can hire XWiki.com consultants to help you get everything going and afterward on an as-needed basis.
Getting help requires money, of course, but XWiki (see Figure 11-2) has an impressive list of happy clients on its site. Fees to set up a wiki can run from several hundred dollars to several thousand dollars, based on how much customization you are seeking, whether there is existing content to convert, and the number of servers you will need to run your wiki.

Most people are comfortable with flipping a compact disc into a computer and then clicking through the steps to install a word processor program or a photo database. Wikis don’t run on your desktop computer, though. For a wiki engine to run properly, it must be installed on a Web server, which requires some knowledge of how Web servers work. Expertise is also required to set up the storehouse of wiki pages, configure account login settings for users, and so on. If installing a program on your desktop is like filling up the gas tank of your car, installing a wiki engine is like changing your own oil and spark plugs and resetting the ignition timing.
The technical challenges of running a wiki engine mean that you must make a choice:
✓ | Take the time to master all the different aspects of Web hosting and system administration to get a wiki engine running. |
✓ | Find someone else to do it for you. |
For most wiki owners, including Dan, the right answer is to find someone to help. You likely want someone with the following skills:
✓ | System administration: Your Internet mechanic should know how to set up and run a server as well as be knowledgeable about system and network administration. |
✓ | Internet administration: The Internet mechanic should be knowledgeable about Web servers and the Internet in general. |
✓ | Programming and database experience: Programming skills are usually beneficial, as is having experience managing databases. |
✓ | Security experience: An understanding of Internet security and the changing threat-landscape is very important. |
✓ | Backup and recovery expertise: Wikis are often work repositories. As a result, they must be carefully backed up by someone who doesn’t take chances. Losing your hard drive is nothing compared with the pain that you could feel when your entire wiki is lost or can be recovered only from month-old backups. |
If you’re serious about getting a wiki going, sit down and make a list of all of the people you know who are programmers and system administrators and anyone else who might be qualified. Web sites such as Guru.com (www.guru.com) or RentACoder (www.rentacoder.com) help you find freelance Internet mechanics. Although setting up a wiki does require special knowledge, an expert Internet mechanic can help you get a wiki engine running in just two to three hours.
All you really need to tell your Internet mechanic is
✓ | Which wiki engine you want to set up |
✓ | Where he can download it from |
Then, grant your mechanic access to the administrative account for the server that you’re going to use for your wiki.
It helps if you get an Internet mechanic who is familiar with the wiki software you want to have installed. Some open source wikis list consultants on their Web sites. On TWiki.org, you can find this list at
http://twiki.org/cgi-bin/view/Codev/ConsultantsForHire 
If you’re setting up a wiki inside a company, your information technology (IT) department is the place to start. In some companies, getting help can be as easy as getting someone to throw a wiki on a development server so you can play with it. In other companies, it might mean a lengthy process of getting the wiki approved.
Here’s another good resource for information about what it takes to be an Internet mechanic for wikis:
http://twiki.org/cgi-bin/view/TWiki/AdminSkillsAssumptions This page at TWiki.org — the wiki shown in most of the examples in this chapter — lists the desirable attributes for a wiki Internet mechanic, as shown in Figure 11-3.

The first requirements for getting a wiki engine running are getting access to a server and (unless you have the expertise yourself) finding a qualified Internet mechanic to help you. At this point, we assume that you’ve done both these things. If you haven’t, please refer to the earlier sections of this chapter. The following sections help you prepare for and configure a wiki engine.
After you have a server and a mechanic lined up, the next step is to make sure that your server has everything you need. For TWiki (one of the more well-documented engines available), this is as simple as going to the Web page at
http://twiki.org/cgi-bin/view/TWiki/TWikiSystemRequirements This page (as shown in Figure 11-4) lists the detailed system requirements for the TWiki engine.
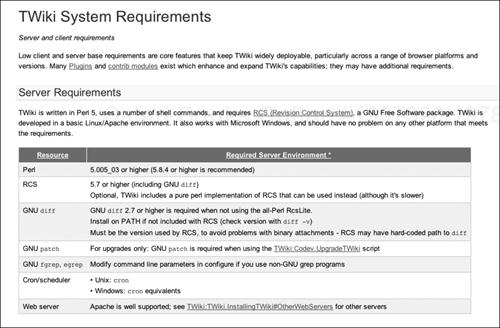
In addition to hardware requirements for the server, TWiki also requires that certain software be installed. This is very typical of wiki engines and many other open source applications. Some of the open source programs that TWiki requires are
✓ | Perl: This is the programming language used to write TWiki. TWiki came to life because Peter Thoeny, inspired by another wiki, started writing a new wiki in the Perl language. To make TWiki work, a version of the Perl language must be installed on your server. Version 4 of TWiki requires Perl Version 5.6.1 or higher. (The or higher means that newer versions [those with a higher version number] will also work.) |
✓ | CPAN Modules: CPAN, the Comprehensive Perl Archive Network, is a repository of thousands of these modules. CPAN modules are programs written in Perl that perform special functions. These modules are the software equivalent of an inventory of special-purpose, reusable parts. The developers of TWiki used these modules to save time, but it’s crucial that all the required modules are installed; otherwise, TWiki won’t work. The TWiki requirements page also lists optional CPAN modules that could be useful for special purposes. |
✓ | Other software: TWiki uses RCS (a version control system), GNU utilities for determining the differences between files and applying changes to the software, |
Besides required software, there is often also a recommended list of software. For TWiki, the recommended software for the operating system and Web server are

✓ | Linux: This is the famous, open source operating system created by Linus Torvalds. Linux is a Unix-like operating system that runs on personal computers (PCs) and servers. Linux isn’t mentioned as a requirement on the TWiki system requirements page. The page says that TWiki is developed in a Linux/Apache environment and that it will also work in Microsoft Windows. In practice, however, unless you are an expert and want to fight a lot of technical battles, Linux is recommended. The installation will work smoothly on Linux, will be pretty easy in other flavors of Unix (such as Mac OS X), and will be more difficult on Microsoft Windows. Nevertheless, TWiki has been installed on many different operating systems, all the way from PDAs to mainframes. |
✓ | Apache: This is an open source Web server that accepts requests for pages from your browser and then sends back pages. TWiki communicates through the Web server. |

TWiki has its own environment. This environment is the combination of the Web server, language, language modules, and utilities that TWiki needs to work. Every other open source wiki (and most of them are open source) has its own collection of requirements. Choosing a wiki that your Internet mechanic understands means choosing one that uses a set of components your mechanic already knows so that he or she won’t have to start from scratch when learning about the wiki.
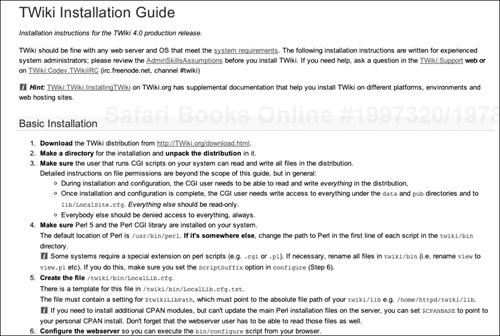
After you and your Internet mechanic create a system that meets all these requirements, the next step is to visit the TWiki Installation Guide at
http://twiki.org/cgi-bin/view/TWiki/TWikiInstallationGuide The Installation Guide — as shown in Figure 11-5 — takes you through the step-by-step process of installing TWiki. Because TWiki is one of the most mature wiki engines, the installation and configuration process is highly automated and contains a lot of fill-in-the-blanks procedures. Other, more bare-bones wikis, such as DokuWiki and Kwiki, require more fiddling with complicated settings contained in parameter files.
No matter what your skill or experience level, when you install TWiki or any other wiki engine, you will have questions. TWiki.org has many ways to find answers, including
✓ | Installation Guide: Read the Installation Guide carefully before you start installing so that you understand the configuration process. When you start installing, though, you might have questions that are not answered in the guide. The guide refers to other parts of the detailed and extensive TWiki documentation. To view the documentation guide, visit http://twiki.org and click the Documentation link in the left navigation bar. |
✓ | Support Web: This is the second help stop for most users. Here, you can look through other questions that people have asked and also add your own questions. At TWiki.org, the Support Web is found at http://twiki.org/cgi-bin/view/Support/WebHome |
✓ | IRC: You can often find wiki help using IRC (Internet Relay Chat), which is an open source precursor to the instant messaging (IM) programs that are so popular. IRC is an early version of IM that is used quite a bit in open source communities. IRC allows you to join the equivalent of a chat room and then ask questions to experts who might be hanging out in the chat room, waiting to help. Instructions for downloading the TWiki IRC software are on the TWiki Support Web. |
✓ | Mailing lists: Usually, open source projects have one electronic mailing list for the developers and another list for the users. These mailing lists can be used to keep track of developments and to see the kinds of questions being asked and answered. You, of course, can ask your own questions on these mailing lists. At TWiki.org, the mailing lists are primarily for development and system administrators. The lists are listed at http://twiki.org/cgi-bin/view/Codev/TWikiMailingLists |
Observe certain ethics and protocols when asking questions in open source communities. For example, if you spend but a few minutes trying to figure something out and then start asking basic questions that are already answered in documentation, don’t be surprised if the responses to your inquiries are a little frosty. However, if you precede your questions with a description of all the information you found to help solve your problem and detailed explanations that show you did your homework, you’ll likely get a rapid and helpful response.
If you’re installing another open source wiki, you’ll probably find support options similar to the ones listed here, especially for projects that have been around a few years. For commercial wikis, you’ll find some of the same support sources that we just mentioned as well as others, such as telephone- or IM-based support.
When your wiki server environment is ready, your Internet mechanic is all revved up, and you know how to get questions answered, let the installation process begin.
The first step is to download the wiki engine software from the Web site. At TWiki.org (like most open source projects), you’ll find a link to download the binaries — the distribution — of the software, prominently placed on the home page. Figure 11-6 shows the TWiki.org home page with the Download link at the top-right.

The download page has a lot of information about the current release, such as what new features have been added and other ways in which TWiki might have changed. To download the software, follow these steps:
Click the TWiki Release link.
The download page for the current release version of TWiki appears.
Click either the Zip or the Tgz link in the box marked Download TWiki, as shown in Figure 11-7. (Read about these formats in the nearby sidebar, “ZIP and TGZ.”)
Go refill your coffee cup while the download commences.
When the download is complete, double-click on the ZIP or the TGZ file to unzip it.
After the download is complete and you unzipped the files, you’re ready to connect to the wiki’s Web server and begin the actual installation process.

Downloading and unpacking the binaries for the wiki engine is pretty easy. The next step — connecting to the Web server that will host the wiki — is a lot trickier. After that’s done, though, the rest of the TWiki installation is pretty much downhill. By connecting, we mean that you tell the Web server that when a request for a URL comes in the View program in TWiki, binaries should run and display the pages requested by the URL. A typical URL might look like this:
www.mysite.com/twiki/bin/view Here’s where you start putting a lot of things together. The view program is a Perl 5 program that uses all the CPAN modules, the utilities, and the RCS repository to perform the functions of the TWiki engine. So far, so good.
ZIP and TGZ

ZIP and TGZ file formats are two ways how TWiki binaries are compressed. ZIP is popular on Windows PCs. TGZ is a form of compression used on Linux and other Unix operating systems. Your Internet mechanic will know which one to use.
However, telling you exactly how to configure your Web server correctly so that it connects the URL to the TWiki binary is beyond the scope of this book. The TWiki documentation doesn’t even explain it because it can vary in so many ways, depending on what sort of Web server you use and what version you use. This step is where you really need your Internet mechanic.
What should happen is something like this:
When the Internet mechanic gets to the connecting step, he or she will stroke his beard (or curl her hair) and mumble in a knowing way.
The mechanic follows the instructions in the Basic Installation section of the TWiki Installation Guide.
After performing the basic installation, the Internet mechanic goes to the
http.conffile on the server and makes a few changes to connect the wiki’s URL to the right directory in the file system.The mechanic enters a URL into a browser.
The TWiki engine spits out the configure page described in the next section.
This is an exciting moment. Often, the process doesn’t work the first time you do it (for example, because permissions in the file system are set wrong or because the Web server needed to be restarted), but eventually it does. After you see the configure page delivered from TWiki, you’re almost done.
The configure script is the basic script that controls configuration of your wiki. In most Linux-style installations, you have to run this script at the command line. Because TWiki is more evolved, you can configure your wiki by using a browser. (We still call this section “Running the configure script” so that you can impress any geeky friends you might have by saying, “And then I ran the configure script.”) To configure your wiki, enter this URL in a Web browser:
www.mysite.com/twiki/bin/configure The page that appears lists the current configuration settings for your wiki, as shown in Figure 11-8. Use this page to finish the configuration and installation process.
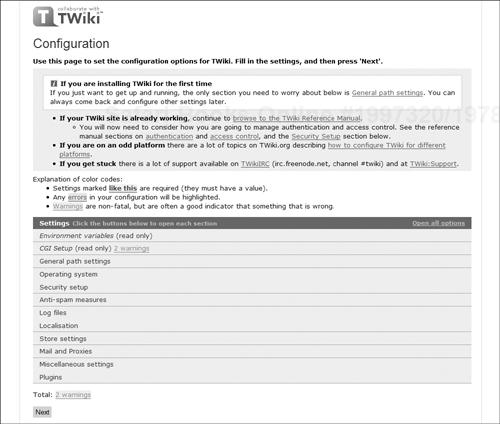
The TWiki configure page sets a high standard for ease of use that is rare in open source software. With other wiki engines, you might find yourself editing parameter files or changing variables in programming language files. This is how it starts out for most open source software; after a while, though, someone takes on the task of making configuration easier. The TWiki configure page represents just such an effort.
To configure your wiki, review each section of the configure page and adjust settings as needed. The sections are
✓ | General Path Settings: These variables tell TWiki where all the wiki’s moving parts are located. The settings here tell TWiki the external URL — for example, |
✓ | Operating System: This section contains settings that tell TWiki under which operating system it is running. This should rarely have to be changed. |
✓ | Security Setup: Here you set how sessions are managed, what security mechanisms are used, and how passwords are handled. This section is a good one to discuss in detail with your Internet mechanic to make sure that your system is secure. The sort of issues that arise in these settings include
|
✓ | Anti-Spam Measures: This section controls anti-spam settings on your wiki and rarely needs to be changed. |
✓ | Log Files: Another seldom changed section, this specifies the location of wiki log files. The log files are where TWiki keeps track of what happens with the wiki, such as registering users or accessing, saving, renaming, or deleting wiki pages. |
✓ | Localisation: Modify this section if languages other than English are supported by your TWiki engine. |
✓ | Store Settings: This section lets you choose the kind of repository in which your wiki pages will be stored. RCS (a version control system) is the typical choice although other options, such as using the file system or a database, are possible. |
✓ | Mail and Proxies: TWiki has an excellent integration with mail. Alerts of various kinds can be sent when pages change or when project management deadline entries expire. |
✓ | Miscellaneous Settings: This section controls a general mishmash of TWiki settings, such as the default names for various pages and the length of time that pages remain locked for editing before they expire. |
✓ | Plugins: These settings list which plug-ins are installed and enabled. Plug-ins are extensions to TWiki that provide support for calendars, spreadsheets, editable tables, and other such items inside TWiki pages. |
After making changes to the configuration settings, click Next and then save your changes using the triple-top-secret password that your Internet mechanic set for you. You are ready to start making wiki pages and letting the magic happen.