Exploring the wide world of wiki linking
</objective> <objective>Creating external links to the outside world
</objective> <objective>Adding files, images, and multimedia links
</objective> <objective>Grouping pages with category and tag linking
</objective> </feature>Even without links, wikis are an easy way to create and share content. With links, though, each page has depth because each link is an invitation to read more, explore, and jump to another topic. Because links are easier to create in wikis than in any other sort of Web technology, you have no excuse not to use them. The readers of your wiki will thank you for helping them find the information they need.
Of course, linking in wikis has its own strange history. As we describe in Chapter 2, wikis use camel case links. Camel case was created as a quick and easy linking scheme by Ward Cunningham, the inventor of wikis. As the wiki concept has grown, other needs arose, and camel case is no longer the only way to create a link. For example, free linking provides more flexibility and has become quite popular, especially because Wikipedia adopted it in lieu of using camel case. This chapter tells you about both types of linking, including the ways that wiki links go beyond the sort of links you see in plain old HTML Web pages.
Two other kinds of links used in wikis are adding images and linking to YouTube videos. Including pages — that is, inserting an entire Web page into your wiki page — can be considered a form of linking as well, albeit an extreme one. Using categories and tags also creates links to pages, so we cover them here, also.
When most people think of links in wikis, they usually compare wiki links with links on Web pages, but this is a big mistake. Links in wikis are much more than just a way to move from one page to the next. The following sections show you the true power and capabilities of wiki links. This method and other linking methods are explained in this chapter.
In order for links to work, pages need unique names. Wikis use namespaces to ensure unique page names. The web is then the namespace, and each page name is a combination of the page name and the web name. You could think of the page name as a first name and the web name as a last name. There might be a lot of Dans, but only so many Dan Woods (and even fewer Peter Thoenys). This also makes it easier to have a common structure in all your webs. A wiki might have 50 webs representing 50 different clubs, but each club could have its own MeetingMinutes page without fear that the Bridge club and the mud wrestling club would get their meeting minutes mixed up.
Some wiki engines allow one namespace covering the entire wiki engine (this would not be the right wiki engine for the 50-club wiki). Other wiki engines, such as TWiki.org, use webs as namespaces.
In Chapter 2, we explain the basics of automatic linking using camel case links. Camel case links are formed by using words with a special character pattern that uses capital letters inside the words. The following examples show what is and is not camel case:
✓ | ThisIsCamelCase |
✓ | Thisisnot |
✓ | thisisnoT |
✓ | thisIsNot |
✓ | THisisnot |
✓ | ThisIs |
✓ | SoisthiS |
Camel case describes a string of letters that meets three rules:
✓ | The string begins with an uppercase letter. |
✓ | The string doesn’t contain any blanks. |
✓ | The string has at least two uppercase letters separated by at least one lowercase character. |
Camel case words used for wiki links are WikiWords. To create a link in a wiki page, simply put in a camel case word and then save the page. If the page named by your WikiWord exists, the word shows up as a link to the appropriate page. If the page doesn’t exist, the link shows up in the page but it doesn’t lead anywhere — yet. When you click the link, you create the page as described later in this chapter. (See the section, “Creating pages using links.”)
The good thing about WikiWords is that you can create links lickety-split. For example, you’re writing furiously when you think of a topic like rhubarb pie, which is important to the page that you’re writing. All you have to do is type RhubarbPie, and there you have it — the link is created. What could be easier?

Most wiki engines are trending away from WikiWord linking in favor of free linking, which we describe later in this chapter. Many engines turn off WikiWord linking by default. Check the settings for your engine for whether WikiWord linking is enabled for your wiki.
WikiWord linking does present some problems. First of all, some words don’t really lend themselves to camel case linking. For example, if you want to link to rhubarb instead of rhubarb pie, what do you do? One trick is to write RhubarB or RhuBarb, both of which would result in a link. The problem is that both of these words look like typing mistakes.
Another problem is the growing trend of using camel case-style syntax in brand names. For example, NetWeaver (the SAP business technology platform) looks like a WikiWord, as do some surnames (such as McCullough). Without intervention, these words would be seen as links in most wiki engines.
The remedy to false WikiWords used by TWiki.org and some other wikis is to have a special character that stops camel case linking from happening. In TWiki.org, any of the following methods stop automatic WikiWord linking:
✓ |
|
✓ |
|
✓ |
No text here would be automatically linked, not even |

TWiki.org can also stop automatic WikiWord linking for specific words in every wiki by using a plug-in. See Chapter 14 for more on using wiki plug-ins.
Free linking provides more flexibility than WikiWord linking, but you do have to type some extra characters. Suppose you’re writing a Wikipedia page, and you want to add a link to a page about rhubarb pie. With free linking, you would type
[[rhubarb pie]] When you save the page, a link is created to the page named Rhubarb pie. (Note how MediaWiki capitalizes the first letter when it creates the new page, even though the link was lowercase. Maybe the developers decided that otherwise the pages would look like they were all written by ee cummings or k.d. lang.)
When MediaWiki (the wiki engine that runs Wikipedia) encounters words in double square brackets, like the ones shown in Figure 7-1, it turns them into links when you save the page. The resulting links, shown in Figure 7-2, appear without the brackets and in a different color so that users know they can click those words and be taken elsewhere. Red means the link doesn’t exist; blue means it does.


The MediaWiki engine has some other tricks as well. Table 7-1 lists some of the link methods available in MediaWiki and many other engines.
Table 7-1. Free Linking
Link Syntax | Result |
|---|---|
| The link shows up as |
| The link shows up as |
| The link shows up as |
For more linking tips and tricks, visit
http://en.wikipedia.org/wiki/Wikipedia:How_to_edit_a_page#Links_and_URLs Perhaps the most important difference between wiki links and Web links is that wiki links can be used to create new pages. When writing a wiki page, a common practice is to create links to a topic that you’ll come back to later, or perhaps to a topic that you think someone else should come back to later.
When you save a page on which you inserted a link, one of two things happens:
✓ | The page to which you link already exists, in which case clicking the link goes to that page. |
✓ | The page to which you link does not exist. If you click this type of link, a new page is automatically created, ready for you to add content. |
Most wikis indicate when a link leads to a page that doesn’t yet exist. For example, TWiki puts a question mark after the link, as shown in Figure 7-3. On wikispaces.com and Wikipedia, links to pages that don’t exist are shown in red. If you click these indicators — a TWiki question mark, or a Wikipedia red link — a new page is automatically created.

Creating links to pages that don’t yet exist has some important implications for how you edit and use wikis. Someone creating a link to a page that he thinks should exist and then that same person going back to fill it in is a pretty straightforward process. It is sort of like saying, “Note to self: Remember to add this page later.”
However, when someone creates a link to a page that he thinks someone else should fill in, that’s a different matter altogether. It is a request to the community: “Hey community! Does someone else know enough to create this page?” If you think of such links as requests or votes, you have a way to see what types of pages the wiki community wants to see created. Chances are that the pages with the most requests or votes are the ones that the community wants most.
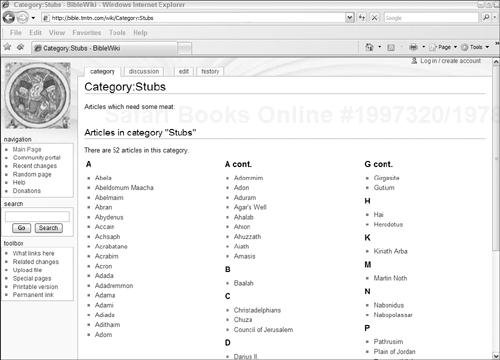
Many wikis keep lists of pages that don’t exist or have just a small amount of information in them. These pages are stubs or short pages. Figure 7-4 shows the stubs page for BibleWiki. If you’re looking for a good way to contribute to your favorite wiki, peruse that wiki’s stubs page to see what needs to be done.
Unlike HTML-based Web sites, wiki engines are aware of every link. This leads to some very powerful capabilities, including the ability to quickly see all the links that point to a given page. This can be useful both for wiki maintenance as well as for finding related information. To see how link listing works, follow these steps:
Visit Wikipedia and view the article on Ward Cunningham, the inventor of wikis.
Chapter 4 shows how to find specific pages at Wikipedia.
On the left side of the Ward Cunningham page, locate the link labeled Toolbox.
At the top of the Toolbox list, click the What Links Here link.
A list of all pages that link to the Ward Cunningham article appears, as shown in Figure 7-5.

Lonely pages that have no links leading to them are orphans. How do you get to an orphan page? The only way is to jump directly to the page if you know its name; or you can navigate to the page displaying a list of all the pages on the wiki. (In TWiki, you click Index to display such a list.) Removing orphan pages is one of the tasks performed during wiki management, which we describe in Chapter 12.
Another extremely useful wiki feature is the ability to simultaneously rename a page and all the links leading to that page. TWiki probably has the best implementation of this feature. There, you can rename a page and all the links to that page in one command. TWiki.org not only searches the web in which the page resides but all webs run by the wiki engine. To rename a page in TWiki, follow these steps:
Scroll to the bottom of the page in question and click More Topic Actions.
TWiki displays a More Actions on Topic page. This page lists a variety of actions you can take, including deleting and renaming pages.
Click the Rename/Move Topic link that specifies that it looks for references in all public webs.
TWiki displays a page where you can rename the page.
In the Topic Name field, enter the new name for the page and click the Rename/Move button.
TWiki changes all the links as well as renames the page.
On some other wikis, the process is a bit more complex. If you rename or move a page on MediaWiki or WikiSpaces, for example, links to the old page are redirected to the new page. You must manually change each link to skip the redirection step. Confluence, a commercial wiki, behaves like TWiki and changes links automatically (and the process is also a little easier; you rename right from the editing page).
The creators of wikis try to provide all the information a reader needs, but there are always good reasons to link to information outside your own wiki. In the following sections, we introduce you to many different ways to create external links.
The surefire way to link to a Web site outside your wiki is to use a URL, which is the common Web site address that usually looks something like this:
http://anywebsite.com/anydirectory/anypage.html Most wikis recognize URLs as links. In some wikis (such as MediaWiki), you need to type single square brackets around URLs like this:
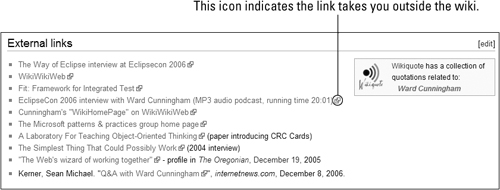
[http://anywebsite.com/anydirectory/anypage.html] When a page containing a URL is displayed, it automatically links to the URL’s destination. In many wikis, URL-generated links are followed by special icons, as shown in Figure 7-6. These icons tell you that if you click the link, you will be taken to a location outside the current wiki.
Wikis often link to other wikis. In the early days of wikis, this was done by using long URLs, which worked like any other external link. This became a bit tedious because it meant entering long URLs every time you wanted to link to other wikis.
To solve this problem, Interwiki link prefixes were created. Prefixes identify the external wiki to which the link points. Interwiki prefixes are unique. The Interwiki name for BibleWiki, for example, is BibleWiki. The format of an Interwiki link is the same as a normal free link except that the Interwiki name is used as a prefix. So, instead of entering this URL to get to the Book of Deuteronomy page:
http://bible.tmtm.com/wiki/Book_of_Deuteronomy you enter a wiki free link, prefixing the page name with the Interwiki name and a colon, like this:
[[BibleWiki:Book_of_Deuteronomy]] Most wiki engines that use Interwiki prefix names put external link icons after the link (refer to Figure 7-6). You can find the list of Interwiki link prefixes at
http://meta.wikimedia.org/wiki/Interwiki_map Larger wikis are often organized into webs (sections or subsets of a wiki). The TWiki.org wiki that was used to write this book, for example, has more than 30 webs. Sometimes linking from one web to another is useful. TWiki.org handles cross-web links by using prefixes. To link to a page in a web called Otherweb, enter
[[Otherweb.PageName]] This link takes you to the PageName page in the Otherweb web.
Some wikis have multiple namespaces, and the exact method for linking across namespaces varies with each wiki. In MediaWiki, for example, you prefix the page name with the namespace name, like this:
[[Help:Link]] One of the least standardized but most valuable wiki linking tools involves attaching files to pages, including images and multimedia. Like with many things about wikis, the general approach to attaching files or inserting images is pretty much the same for most wiki engines, but the details are vastly different. The basic similarities include
✓ | Most wiki engines allow file uploads. Sometimes, the files are attached to individual pages (like at TWiki.org). Other times, they are put in a central area (like at MediaWiki, PBwiki, and WikiSpaces). |
✓ | Images are uploaded as files and then can be linked to from wiki pages. |
✓ | Multimedia elements are included via URLs, JavaScript, or both. These links bring videos or advanced functionality, such as calendars, into pages. Some wikis use wizards to help add such elements to pages. |
In Chapter 1, we introduce you to PBwiki and the Wikisfordummies. pbwiki.com site that can be used as a sandbox. If you don’t have your own wiki, use this wiki to practice adding files, images, and multimedia elements to wiki pages in the following sections. We point out some of the differences between various wikis along the way.
Attaching files to a wiki page is much like attaching files to an e-mail in that you usually just click an Attach Files button and then browse to the desired file. Wiki file attachments are particularly handy if you need to share PDFs or other file types with other wiki members. In PBwiki, the easiest way to attach files is to use the point-and-click editor. Follow these basic steps, which are similar in most wikis:
Create or open a PBwiki page to which you want to attach a file.
If you open a page, click Edit Page to display the page in the editor.
Make sure you are in the Point and Click editor, which displays icons, rather than the Classic Mode editor, which displays wiki markup.
The link in the upper-right corner should read Switch to Classic Mode. If it reads Point-and-Click Mode instead, click that link to go to Point-and-Click Mode.
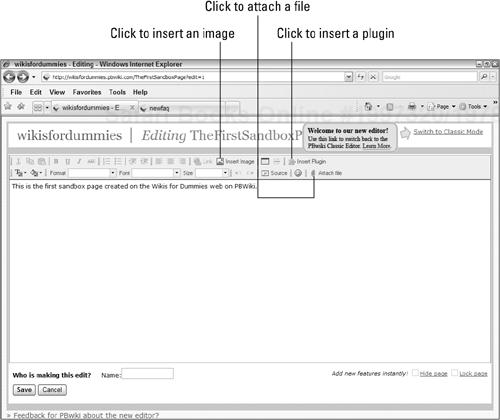
A page like the one shown in Figure 7-7 appears.
The editing toolbar has three buttons that are of interest to you (as shown in Figure 7-7):
Attach File: Click this button to attach a file, such as a PDF or a ZIP archive.
Insert Plugin: If you have a plug-in to use with the wiki page (see Chapter 14 for more on plug-ins), click this button to attach it.
Insert Image: Click this button to insert an image.
Click the appropriate button for the type of file (file, plug-in, or image) that you want to attach.
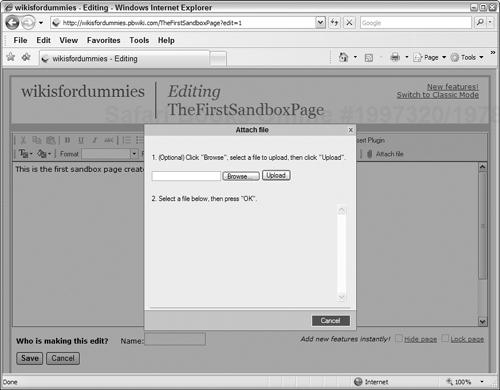
A screen like the one in Figure 7-8 appears.
Click the Browse button and then navigate to the file that you want to upload.
Choose the file and then click Upload.
When the file finishes uploading, it appears in the list of the page’s attached files, as shown in Figure 7-9. In this example, we attached a JPEG file containing the logo of a legendary children’s soccer team in New York.

Attaching a file to a wiki page is usually just the first step in making use of uploaded files. After attaching the file, you might want to use it in a page somewhere. You can always see what files have been uploaded to a wiki by clicking the Files button at the top of every page.
To insert a link to an uploaded file, simply go to the Files page and hover your mouse over the file to which you want to link. Right-click the file and choose Copy Link from the menu that appears. Then paste the link into a wiki page. The syntax for a link in PBwiki looks like this:
<a href="/f/filename.ext">link text</a> 
If you’re familiar with HTML, the preceding syntax should look familiar. In PBwiki, all uploaded files go to the /f directory. The preceding link names this directory in the path to the filename.
In some wikis — such as those running the TWiki.org engine — uploaded files are attached to specific pages instead of the wiki as a whole. In this case, you use the special variable %ATTACHURL% to link to page-specific files. A link looks like this:
<a href="%ATTACHURL%/filename.ext">link text</a> In Wikipedia, a separate namespace is used. Linking to a file looks like this:
[[Image:filename.ext]] As you can see, you’ll find variations in how different wikis handle file attachments. More advanced features — such as thumbnails, graphic sizing, and captions — are more complex and unique to each wiki engine. Whatever wiki engine you use, spend time discovering its file attachment specifics.
If you know the basics of uploading and linking to wiki file attachments, using images is quite easy. If you want to insert an image into your wiki page, first upload it as a file attachment, as we describe earlier in this chapter.
After the image file is uploaded, click the Insert Image button on the editing screen of the desired page. A window like the one shown in Figure 7-10 appears. Select the image that you want to insert and then click OK to produce a link tag that looks something like this:
<img src="/f/littlepebblesB&W.jpg" border="0"/> 
After you save your edits, the image appears in the page, as shown in Figure 7-11.

Before clicking OK to close the Insert Image window and insert the image, right-click the image (Control-click, Mac) to access advanced options and properties, such as size and alignment.
Links to multimedia files — such as MP3s, movies, or YouTube videos — work much like links to images. You either upload the files and then link to them, or link to the source from which the videos are streamed. Multimedia links are also frequently associated with inserting advanced features, such as calendars or tables with lots of fancy elements. In PBwiki, all these things are handled by the Insert Plugin button. Click this button while editing a page to open the window shown in Figure 7-12.
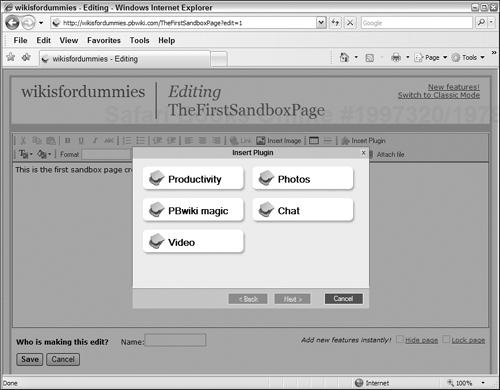
The Insert Plugin window has choices for all sorts of multimedia elements and structures, such as calendars, Google gadgets and maps, stock charts, Web site stats, links to photo sharing sites, YouTube videos, chat rooms, and more.
Most wiki engines use categories and tags to organize and link related pages. Both categories and tags have the same mission: to associate pages into groups so that people can easily find related content. Wikipedia uses categories extensively, and they are open to any site that uses the MediaWiki engine. Other wikis like TWiki.org have extensions that allow users to tag pages. The following sections show you how to use categories and tags in various kinds of wikis.
Chapter 8 discusses categories from the perspective of a wiki designer. In wiki parlance, a category is a label applied to many pages so you can find all those pages that share the same label. Any given page can have more than one category. For example, the Wikipedia page about Ward Cunningham is assigned to the following categories: 1949 births | Living people | American computer programmers | Wiki | Extreme Programming | People from Portland, Oregon | American technology writers | Purdue University alumni. Here, our goal is to show how the MediaWiki engine can insert links that either put a given page in a category or display a list of all the pages in a category.
Including a page in a category is incredibly easy. If you create a page about this book (Wikis For Dummies), and you want to include it in a category called Books about wikis, just include the following link at the bottom of the page:
[[Category:Books about wikis]] The MediaWiki engine creates that category if it didn’t already exist, and then it includes the page in that category. So, if the category already existed, the page will be added. If the category didn’t exist, a new category will be created, and the page will become the first member of the category.
In addition to including a page in a category, you might sometimes want to create links to the category pages themselves. You have to be careful here because if you include a category link of the sort shown earlier, the page on which the link is included becomes part of the named category, which is not what you want. You just want to link to that category. To avoid this problem, add an extra colon in front of the word Category, like this:
[[:Category:Books about wikis]] Using categories is a complicated topic with lots of ins and outs. For all you ever want to know about categories and how to make them work, visit
http://en.wikipedia.org/wiki/Wikipedia:Categorization Tags are similar to categories, but tags are intended to be a bit more inclusive. To use categories, you have to know how to use category links and manually edit them. Tags, though, can easily be entered by almost anyone. Tags describe topics or keywords in articles, and wiki search engines use these tags to rank search results. In other words, tags are pretty much the same as categories but they are assigned to pages differently, and you search for pages included in each tag differently, as well.
In TWiki.org, the Tag-me plug-in allows you to involve users in the tagging process. Figure 7-13 shows how the Tag-me plug-in adds tags to the tops of pages. (We don’t go into the process of adding the Tag-me plug-in to a page. See Chapter 14 for more about plug-ins.) Anyone reading the page can click a tag to add a vote for it, or they can use the text box to add new tags. To add a tag to a page, follow these steps:
Select a tag from the drop-down box.
Click the plus sign just to the right of the drop-down box to add the tag to the page.
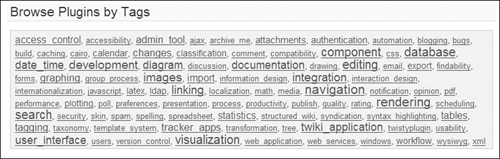
Navigating by using tags is different from navigating through categories. The Tag Cloud plug-in displays tags, as shown in Figure 7-14. Tags with larger type have more pages associated with them. To use the Tag Cloud plug-in (which, like the Tag-me plug-in, must be installed), you just click a word in the tag cloud to see a list of pages associated with that tag.