
Structuring your wiki’s content
</objective> <objective>Creating logical navigation for your wiki
</objective> <objective>Filling the blank pages
</objective> <objective>Dressing up your wiki with colors and graphics
</objective> </feature>Designing a wiki means putting together all your wiki skills and knowledge to create a useful form for your wiki. The best wikis look a lot more like a Volkswagen Beetle — that is to say, utilitarian — than a sleek Ferrari, but they are beautiful all the same. Ideally, the design of your wiki should help people find what they want and join the content creation process if they feel so moved. To help you create such a design, throughout this chapter, we discuss the four dimensions of wiki design:
Find the right structure for your information. When designing your wiki, the key thing to remember is that the structure of the information being captured must be in charge. Information architecture — taxonomy — is a fancy name for organizing the content of your wiki. Whatever the name you give this process, finding the right structure for your information is the secret sauce to making a wiki sing.
Create a clear way to navigate a wiki. Everything you see when you encounter a wiki, from the front page to all pages deeper inside, must keep reminding you where you are, what sort information you’re looking at, and how you can find your way around. Of course, the reason to navigate a wiki is to find just the right page that has the information you want.
Design the structure of the pages. Use the techniques shown in Chapters 6 and 7 (which cover content and linking, respectively), but also employ the benefits of the page template. Templates, by nature, ensure consistency in a user-friendly way.
Adjust colors and fonts, adding images where needed, to make your wiki pleasing to the eye. Use themes and colors to give visitors visual cues about organization and navigation. By adding logos and other graphical elements, you personalize the wiki as well as make it unique.

Designing a wiki is an ongoing process. Wikis were made to be changed. The design that you start with should be improved as experience and ideas from those using the wiki point to ways to make it better. This chapter gives you the conceptual foundation of a well-designed wiki so that you can quickly get your wiki up and running and then have the fun of redesigning it over and over again.
In Chapter 1, we introduce the idea of index cards to explain wikis. (The gist is this: If you have a box of index cards, you can add cards to the box, remove them, search through them, change the information on them, and so forth. Likewise, you can do the same with information on a wiki.) Information architecture is all about how many types of cards you have, how they are related, and what to write on each card. But what good is a box of cards if you can’t find the card you want? Taxonomies, effective patterns of linking, and clear page names (all covered in this section), are the foundation of a well-organized wiki. Having the information architecture show up on the front pages and section front pages of your wiki makes your wiki easy to navigate. We cover that in the following section.
One way to begin organizing your wiki is to act like a biologist. Biologists love to classify things. They’re not satisfied with calling people humans; instead, they call us Homo sapiens. Biologists systematically classify the animals and plants in our world by using taxonomy. Taxonomy is a way to classify things based on their relationships to one another and is a key part of any good information architecture for a wiki.
Taxonomy has nothing to do with that stuffed moose head hanging on the wall. (Still, those folks who attend the National Taxidermists Association probably know the difference between Antilocapra americana and Antilocapra anteflexa, which are taxonomic names for different families of pronghorn antelope.) Flashback to high school biology class: Each species belongs to a genus; each genus belongs to a family; each freshman can’t wait for summer vacation. (It is high school, after all.)
With wikis, the equivalent of species and genus are wikis, webs, and pages:
✓ | Wiki: A wiki is usually defined as all the pages under the umbrella of one domain, such as www.mywiki.com. |
✓ | Web: A web is a self-contained group of pages inside a wiki, which are intended to be linked. Linking pages across a web usually requires some special notation. |
✓ | Page: A page is a unit that is edited and displayed. A page contains text, images, and any other content included in the wiki. |
If a wiki followed the hierarchical organization of species used in biology, it would look something like this:
Wiki
Web
Page
Okay, that’s easy enough for the average Homo sapien to grasp on a conceptual level. So how, exactly, does the concept get turned into reality? Simple! Just think of how the project you are involved with is organized already.
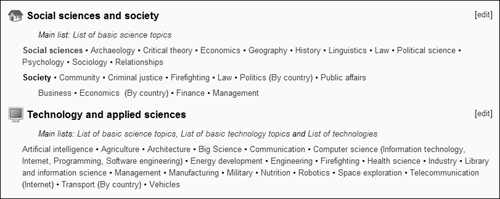
Inside a web, the pages can be grouped in many different taxonomies. In a project management wiki, for example, each project can have its own web; or, one web can have many projects, each with its own group of pages. (A project is anything you might undertake, from compiling a Girl Scout troop cookbook to coordinating a Harley-Davidson club road trip to writing a grant for the study of penguin mating patterns.) Or, for a wiki on The Beatles, each album might have its own web, and each web might have a group of pages dedicated to each song. Wikipedia uses a set of basic topics, as shown in Figure 8-1.

Each of these basic topics is a web within Wikipedia. Because of the sheer scale of Wikipedia, these webs also have sub-webs for subtopics, as shown in Figure 8-2.
One of the biggest favors that you can do for yourself is to use a taxonomy that everyone using the wiki already knows, clearly depicting the taxonomy on the front page of the wiki. You can see an example in Figure 8-3. Here are some popular taxonomies used to organize the pages inside wikis:
✓ | Whole, parts, and subparts: Many things that wikis track have natural groupings to them. For example, albums have songs, books have chapters, software has different menu areas and screens, and cars have makes and models. Content-focused wikis of the sort described in Chapter 3 usually are organized around the natural groupings of the topic being discussed. For example, the front page of the Case Western Reserve University Wiki (http://wiki.case.edu) shows several categories (People, Academics, Organizations, Campus Life, Around Case, Other Categories), each with subcategories listed. |
✓ | Organizational chart: The boss is at the top, and every department that reports to her branches outward, like a big, happy family tree. This is an effective structure for smaller internal wikis that are being used primarily for project management or are otherwise process-focused. |
✓ | Actions in a sequence: Open an order, place a bid, add data — this type of taxonomy is useful for process-focused wikis. For the wiki used to write this book, we have a list of pages that mimic the steps taken to write a book: project management and planning, content design, research, interviews, and writing. |
✓ | Alphabetical or other natural order for a list: When in doubt, use A–Z. Topics, projects, webs, and registered users can all be organized this way and be quite effective in steering visitors to their destination. If a natural order to the content exists that would be easily recognized and understood, use it. For example, BibleWiki, (http://bible.tmtm.com) has a list of the parts of the Bible and a list of the books in each part. |
✓ | Timeline: Whether you’re engaged in a project on the history of the species or one that has distinct phases and a strict deadline, organizing the pages in time order can help keep everyone on track and on time. For project management applications, this can mean having a list of all the steps taken on the front page. For a research project, the timeline could show the events of the topic being discussed it chronological order. WikiTimeScale (www.wikitimescale.org) is a good example. |
✓ | Order of importance: An old-fashioned to-do list is a good way of drawing the user’s attention to the most important topics or projects on a wiki. This is a great structure for a punch list of items to be completed at the end of a project. |
✓ | Geography: When the information you’re organizing is associated with regions, states, countries, or other geographical boundaries, use that to your advantage. For example, Wikitravel (www.wikitravel.com) divides its contents by continents. |
These taxonomies cover most cases. Your wiki might end up following one of these taxonomies, a combination of several styles, or even another taxonomy of your own design.

Don’t over-think your taxonomy. It should be a natural fit for the information that you’re organizing. The goal is that when users of your wiki arrive at the front page, they should know exactly where to go to find what they need. The easiest way to do this is to build on a structure they already know. Put yourself in the mindset of a user and make a mental picture of what the front page should look like. Also, remember that wikis are inherently organic. Start simple, study the patterns of usage, and add structure in iterations as needed.
Think about the different ways in which people will want to access information on your wiki.
For example, suppose you’re creating a wiki on The Beatles. Depending on the depth of the content, you probably need page albums that have all the descriptive information for each respective album, and another type of page that has information for each song. Such a structure allows all sorts of flexibility:
✓ | Create separate pages for two versions of the same album and then link to the individual song pages for songs shared by each album. |
✓ | Create playlist pages that have lists of links to song pages. As many playlist pages can be created as you like without duplicating the song pages. |
✓ | Link to an individual song page when you discuss that song in other locations on the site. Using such links draws people into finding more content on the wiki. |
✓ | Create pages that summarize or compile certain kinds of content. For example, a wiki covering The Beatles can include a page listing all songs written by Ringo Starr. This short but useful list could then link to the individual song pages. |
All this linking is possible if the information on a page is properly designed. By properly, we mean that the information that goes together naturally is grouped on a certain type of page. Understanding what goes together naturally might be easy to figure out — such as with the example of albums and songs — or it might be harder to determine. The great thing about wikis is that if you get it wrong, you can always change it later.
Teach your users that adding many links in wiki pages is a good thing. This makes it easy to find related content. Make frequent use of WikiWords, which are linked automatically to pages of that name. (See Chapter 7 for more on using WikiWords.)
A successful wiki will quickly grow many content pages. Correctly naming content pages allows you to create links easily, makes pages easier to find, and lays the foundation for certain types of automation discussed in Chapter 14.
Suppose that you’re creating a project management wiki. On the one side, having consistency on your wiki is a good thing. Say that Project A has a schedule yet Project B features a calendar: Both pages do the same thing — that is, track important dates — but things can get confusing for the user. When you have multiple pages on a wiki with similar, interchangeable names, it can inadvertently sow the seeds of mass confusion. To understand why, just think of what happens when you enter the word schedule into your wiki’s search engine. It spits back a list of pages titled Schedule, but you have no clue to which project each schedule relates.
Hence the need for good naming. Remember those biologists and their taxonomies? They use Latin because it’s descriptive — you know that Antilocapra americana and Antilocapra anteflexa are related just by reading the name. The pages on your wiki should work that way, too. Okay, you don’t have to name your pages in Latin, but the name of the page should hold the key to decoding the page’s specific contents. Table 8-1 identifies several common patterns that appear in wiki page names.
Table 8-1. Common Patterns for Page Names
Page Name Pattern | When Used |
|---|---|
| The Widget prefix defines several types of documents related to the Widget project. |
ProposalNewcorp20070228 | The date suffix identifies a version. |
| The Contacts prefix identifies the type of information, and the suffix divides it into a group. |
You can always hide the page’s true name through linking. For example, if you name a page ProjectASchedule20060928, but all you want the user to see is the word Schedule, link it like this:
[[ProjectASchedule20060928][Schedule]] See Chapter 7 for more on creating and formatting links in wikis.
Webs can also be a source of naming ambiguity. If you find that multiple webs have the same name, the problem is likely that the web names aren’t general enough. In other words, the webs are being named as if they were topics. Consider the word Schedule again. Even if the web is a collection of important company-wide dates, it is better to name it descriptively, such as Holiday Schedule or Human Resources Schedule.
When designing wikis or Web sites, navigation is the term used to describe how information architecture is presented to users. The navigation for your wiki includes the links that appear on the three sorts of pages in every wiki: the front pages (including the section and category pages), the content pages, and the supporting pages. Front pages and section front pages summarize the information in various groups of pages and tell you how to find what you need. Supporting pages describe the process of creating content. Graphics and colors make everything look pretty and clear. Navigation also includes headers, footers, and the left-hand side of content pages. By following Prof. Tufte’s advice and using proven navigation models, you can find the right structure for your home page in no time. (See the sidebar, “Prof. Tufte’s design advice.”)
The front page of your wiki is the first thing that people see when they arrive, so it better tell them right away what the wiki is all about and how to find what they’re looking for. To design an effective front page, start by asking yourself some basic questions:
✓ | Is your wiki content- or process-focused? Or do you have a community wiki or some sort of brochureware? (See Chapter 3 for more on wiki categories.) Depending on the type of wiki you’re designing, the content, process, community, or product should be the star of the show on the front page. |
✓ | Will people who arrive at the wiki know how the wiki fits into their lives? If this is a project management wiki inside a company, everyone using the wiki might know what it is before they arrive. If it’s a content wiki on the web, you might have to explain the wiki’s purpose. |
✓ | Will people arrive at the wiki knowing their own role? If you want people to contribute, you must ask them to do so on the front page. If they’re just looking for information. you must tell them how to find it. |
✓ | How nerdy are the users of the wiki? Do they know all about wikis and how to use Web sites, or are they newbies? Skilled Web surfers are more familiar with the conventions of interactive design. For example, they intuitively understand how to browse a long list of links as a result of, say, shopping at Amazon.com. |
The answers to these questions will illuminate the proper design of your front page.
Fundamentally, your front page must tell visitors how to use your wiki. The front page is your billboard that people see as they drive by. It shouldn’t be subtle. It should grab the reader’s attention and yell out the wiki’s purpose. Some examples of what should be on the front pages of wikis include the following:
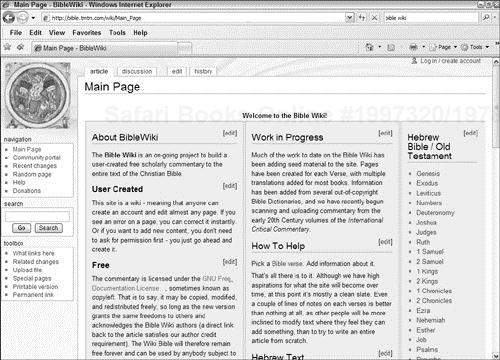
✓ | A content-focused wiki seeking input from new users: This should say clearly what content is being created on the wiki and how the content is organized, providing interesting examples to inspire people. If the content-focused wiki is just getting started, the front page should spend more time recruiting new contributors and provide links to instructions on how to contribute content. If the wiki is well established, perhaps appeals for donations are more appropriate. The BibleWiki home page shown in Figure 8-4 touches all these bases. |
✓ | A process-focused wiki used for project management: This should start with a clear list of all the projects on the wiki. If the population using the wiki is really nerdy, not much needs to be explained. If this wiki introduces project management to a bunch of newbies, the front page should include a huge link to a page explaining what the wiki is all about and how to use it. |
✓ | A process-focused wiki used for capturing tips on how to perform a task: This should clearly show the steps involved in the task. |
✓ | A community wiki: This should have a front page that reflects the interests of the community. If the community is all about events, a listing of events should be right up front. If it is about educating people on a topic or issue, that topic or issue should be most prominent. |
✓ | A brochureware wiki: This need not explain that it is a wiki at all. Small businesses that use wikis to publish Web sites just need to display their products and services and provide contact information. |
There is no single right or wrong way to design your front page. The goal is to start with something simple and then let the design emerge organically as the wiki is used. In some cases, the organic design of a wiki might not become obvious until after it’s being used regularly and you hear complaints or ideas from the user community. Changing the front page is a cinch — just click Edit and redesign it to fit your needs. Three days or three months later, it might be time to change the front page again based on new feedback from the users. This is part of the natural evolution of a wiki.
As your wiki grows, the number of categories of information that it tracks will likely expand quickly. One project becomes many, and you can branch out into whole new areas.
Section pages are the home pages for each category in a particular web of your wiki. Section pages provide more detail about specific topics.
Section pages can be used in all sorts of ways:
✓ | For a content-focused wiki, you might have one section for each basic topic. Figure 8-5 shows a section page for branches of technology at Wikipedia. This section page serves as a portal to various technology topics. |

✓ | For a brochureware wiki, you might have a section page for each type of product or service that your company offers. |
✓ | For a content-focused wiki, you might have a section page that shows how to contribute content, such as the TaxAlmanac page shown in Figure 8-6. |

✓ | For a process-focused wiki, you might have a section page explaining the stages that a project goes through or the roles involved in managing each project. |
The repeated tragedy of wiki design is that often just when you get the basic structure of front and section pages exactly right, a new idea occurs to you for another way to organize the content. Categories are the remedy for this problem because they allow many different groupings of content.
Categories are an alternate taxonomy to the one used in your information architecture. Categories create the equivalent of section pages that link to all the articles in a given category. Figure 8-7 shows the Wikipedia index of categories.

Each category is a keyword tag indicating that an article is related to that category. For example, a Wikipedia article on Agile CMMI (a kind of software development) has the category tags shown in Figure 8-8. As you can see, a content page can be part of many different categories. Click a category name to link to its category page as shown in Figure 8-9.


Most hosted wikis and installable wiki engines have support for categories. Categories are sometimes called tags or tag clouds, depending on the wiki farm or engine. For more on categories and tags, see Chapter 7.
With front and section pages, you can guide the user to certain parts of your wiki. But how do users get around after they arrive at content pages? As you’ve probably already seen, most wiki pages have links all over the place. As users click link after link, they can easily get lost, so the wiki needs some parts of the information architecture available on each and every page. Headers and footers provide this architecture on every page of the wiki. Left-hand navigation — the column of links often found on the left side of the screen — can do the same thing, or it can also provide links that are related to the current page.
Manually generate headers and footers for every page on your wiki is silly. Most wiki engines help you template or automate headers and footers. For now, consider how you want your headers and footers to look as well as how they can enhance your wiki. We discuss templates later in this chapter. (See “Using Templates to Design Content Pages.”)
Now you can see how Prof. Tufte’s advice can help you. (Read the sidebar on his work, elsewhere in this chapter.) Go to the wikis that you like. Look at what links and other explanatory information are in the headers, footers, and left-hand navigation. Make a list of the links you think would work for your site. Whenever you face another design issue, rinse and repeat.
The following sections show a few of the many well-oiled ways to use headers, footers, and left-hand navigation. The TWiki.org site — which is used as an example here — has been created over a period of eight years and has been honed to be as useful as possible. If you are going to follow Prof. Tufte’s advice to follow proven examples, TWiki.org is a great example to copy. Plenty of other header designs could better fit your topic or web. Browse the wikis and Web sites that you admire, examine their navigation, and copy what works for you.
Wikis tend to follow the design conventions used by Web sites all over the Internet. Take a look at the TWiki.org page shown in Figure 8-10. Note that most of the links shown in Figure 8-10 are common to many wikis. The left-hand navigation links serve general housekeeping functions and include
✓ | Support Web: These are links to the home page of the support web, allowing users to return to a known page from any location. |
✓ | Support Guidelines: This page explains general support practices. |
✓ | Open Questions and My Questions: These list support questions from the individual user and from other users. |
✓ | Search: These give quick access to the search page. |
✓ | Changes: These show recent changes to the wiki. |
✓ | Subscribe: These allow users to sign up for the wiki’s RSS (really simple syndication) feed. |
✓ | Notifications: These allow users to sign up for e-mail notifications about changes to the wiki. |
✓ | Register: This sends users to the registration pages so they can create an account. |
On some hosted wikis, such as WikiSpaces and PBwiki, the left-hand navigation is simply a special page, and customizing that page to include your own left-hand navigation links is very easy. You might want to add links to all the webs within your wiki as well as links to the sections within the current web for easy navigation.
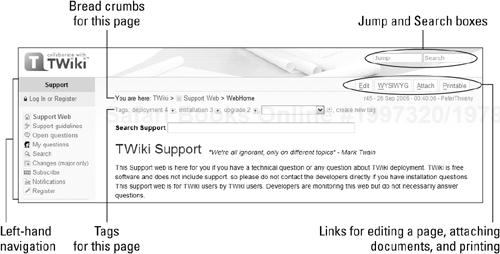
Like left-hand navigation, headers are a Web-wide standard, and most share some common elements. The header on the TWiki.org support web (refer to Figure 8-10) has several useful features:
✓ | The header is a great place to play Hansel and Gretel — that is, to leave bread crumbs. Bread crumbs — the part of the page that begins with |
✓ | Below the bread crumbs in the header are tags for the current page. This is another way that categories, mentioned earlier in this chapter, are implemented. |
✓ | In the top-right corner of most wiki headers are the Jump and Search boxes. Enter a page name in the Jump box and press Enter to quickly jump to that page. The search box allows you to search the entire wiki. |
✓ | Underneath the Jump and Search boxes are links that allow you to edit the page it text mode, edit the page in WYSIWYG (What You See Is What You Get) mode, attach files to the page, or display a printable version of the page. For more on using these features, see Chapters 2, 6, and 7. |
The key to getting your headers correct — or any part of your wiki navigation, for that matter — is understanding how people use the wiki. Can everybody find what they need? That’s great; maybe you don’t need to update your headers or other parts of the navigation. If people can’t find things they need, though, perhaps links to those materials should go in the header or other parts of the navigation. One way to listen to user input is to make sure that a link that provides feedback is prominent on all pages of your wiki.
The footer of each page is another functional space. Because the user is at the bottom of the page, he is likely to want a different set of functions than what he had at the top of the page although some navigational elements like bread crumbs should show up in both headers and footers. Figure 8-11 shows what the footers look like at TWiki.org. This footer contains the most common elements of a wiki footer, including these:
✓ | Edit, WYSIWYG, Attach, and Printable links are repeated from the header. These are the most commonly used links, so having them in the footer adds convenience because people don’t have to scroll back to the top of the page to find them. |
✓ | Raw View offers a way to view the underlying source code of the page. It is similar to the Edit button except that you can’t save any changes. Raw View is useful if you want to copy and paste a bit of code or wiki formatting onto another page. |
✓ | Backlinks are links that search the web or the entire wiki for links to the page you are currently viewing. |
✓ | History provides links to recent versions and the changes made from version to version. For example, version numbers appear as |
✓ | More Topic Actions is a shortcut to a page showing more advanced changes that can be made to the page you are on, such as delete, rename, and move. |
Supporting pages add information to the wiki to meet special needs that are infrequent but necessary. Pages in the supporting cast can include any of the following:
✓ | Explanatory pages that tell the rules of the wiki and describe community practices |
✓ | Pages that describe the processes for adding content |
✓ | Site Map (an overview of all the webs on the wiki) |
✓ | Users (a list of people who use the wiki) |
✓ | Groups (a list of the project groups or business divisions using the wiki) |
✓ | Templates that show how contributed pages should look |
✓ | About Us pages that explain who created the wiki |
✓ | Frequently Asked Question (FAQ) pages |
✓ | Copyright and content licensing pages |
Although these pages aren’t always the most exciting to create, they are a great investment most of the time because they help expand the range of your wiki to include newbies. Keeping up such pages is an important task in managing a wiki, which we discuss in Chapter 12.
Supporting pages are one place where Prof. Tufte’s design advice (“copy what works”) applies quite well. (See the sidebar, “Prof. Tufte’s design advice.”) Supporting pages are copied from one wiki to the next all the time. Sites running the MediaWiki engine (see Chapter 10) start off with an excellent structure for supporting pages, including pages that solicit donations and explain what is happening with the community.
The content pages are the heart and soul of every wiki. Chapter 6 covers all the ways that content can be added to a page using bullets, tables, images, and other formatting ideas. Chapter 7 walks through the various techniques for linking pages. Ideally, after a wiki gets going, the community of people using the wiki keeps busy adding and adjusting pages.
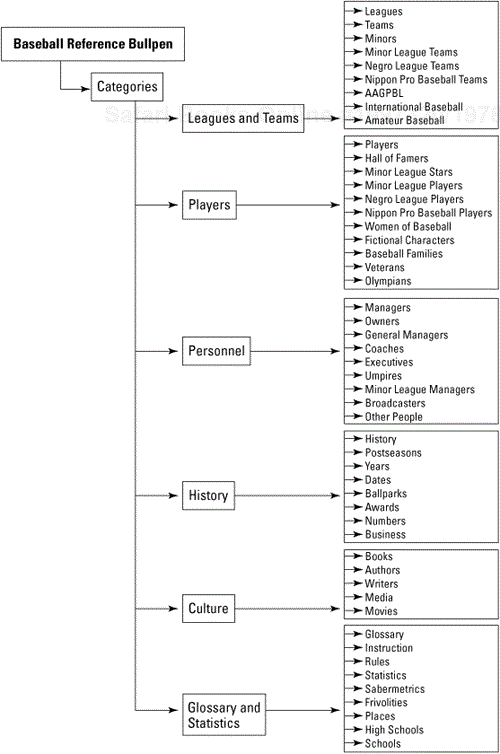
Wikis should be flexible, not trapping content into a rigid structure. However, the potential flexibility of wikis doesn’t mean that structure is always a bad thing or that contributors to a wiki don’t want or need help creating pages. When you look at a wiki like the Baseball Reference Wiki (www.baseball-reference.com) or Encyclopedia Gamia (http://egamia.com), you see pages and page elements that look just like one another. If your wiki has pages that look the same or share common elements, it makes sense to give wiki contributors a leg up on creating those pages. Page templates do exactly that.
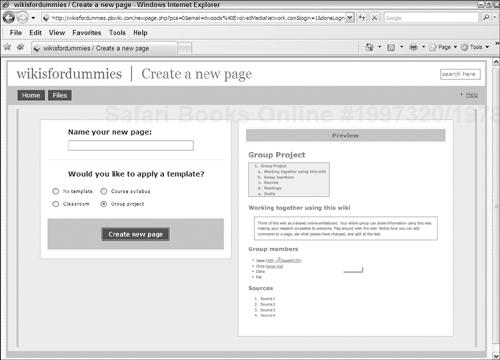
The simplest sort of page template appears on hosted wikis like WikiSpaces, PBwiki, and others that focus on making wikis easy to use. Page templates on these sites offer a page that has headings for various sections, along with sample lists of bullets or table entries. Figure 8-12 shows the screen at PBwiki that allows you to choose from a variety of templates.
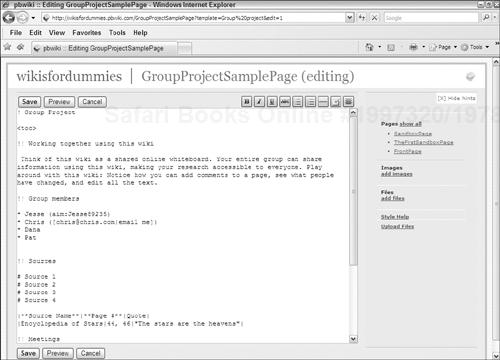
When a page is created from a template, some generic placeholder content is inserted in the new page, as shown in Figure 8-13. You can then fill in your own content for the new page. Most hosted wikis allow you to use predefined templates, and some allow you to create your own templates either in the free version or after an upgrade.
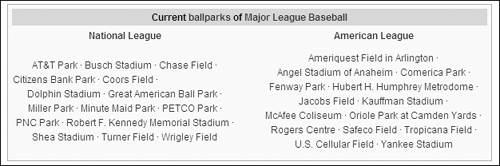
The idea of templates applies to parts of pages as well as entire pages. Content-focused wikis, such as www.Baseball-Reference.com, feature hundreds of parts of pages than can be included in other pages to provide links to useful information. For example, the Baseball Reference Wiki includes pages discussing Major League Baseball ballparks. The page for each individual park includes a box with links to all the other ballparks. If this box is a template, it can easily be inserted on each page by entering the following text:
{{MLB ballparks}} The box shown in Figure 8-14 appears as a result of this wiki markup.
Creating templates for portions of pages is a process that varies widely depending on the wiki engine you’re using. To get a general idea about how templates can be created and used, see the Wikipedia article on templates at en.wikipedia.org/wiki/Wikipedia:Template_namespace. Chapter 12 describes how to manage templates.
Another method for populating pages automatically is to use forms and variables. Forms are often filled in with variables that contain useful information, such as the name of the page or the name of the wiki. Forms and variables are discussed in Chapter 14.
Black text on a white (or off-white) background has been used by newspapers for centuries as the standard way of presenting useful information. It works for wikis, too. The information age is not bound by the physical world of ink and paper, though. The color and images on a wiki can convey just as much information as the content of the webs, topics, and pages.
Take another gander at the Wikipedia home page. This time, go online (http://en.wikipedia.org/wiki/Main_Page) to see it in color. The Wikipedia front page has a blue section and a green section, and below those is a purple section. You know just by looking at the page, consciously or not, that those colors signify different sections. The page also has logos, icons, and photographs that make up the page’s graphic design.
Graphic design is a subtle and tricky art. People spend entire careers perfecting the balance of type, color, and imagery that appear on a page. Wikis provide you with the basic knobs and dials to control the graphic look of pages. While doing it yourself, it is always a good idea to follow Prof. Tufte’s advice and copy attractive designs. If your site really becomes popular, consider turning to a trained graphic designer to at least give your wiki a visual once-over.
Most hosted wikis and all the installed wiki engines allow a large degree of control over how pages look. Some of these changes — such as colors and graphics — are simple. Others — such as the ability to display your wiki on a cellphone or PDA screen — require advanced knowledge of things like Cascading Style Sheets (CSS), XSL Transformations (XSLT), and other ways of controlling the layout of pages.
Most hosted wikis offer a variety of visual themes to choose from. A theme, also sometimes called a skin, is a collection of all the advanced settings — color, fonts, backgrounds, text size, and more — combined to create a certain look. Sometimes themes and skins just change the colors and graphics. Other times they change the entire layout of a page. To change a theme on WikiSpaces (www.WikiSpaces.com), follow these steps:
Click the Manage Space link in the left-hand navigation area.
In the Space Settings section, about halfway down the page, click the Look and Feel link.
Click the link under Themes to display the page shown in Figure 8-15.
Select a theme and then select the appearance of all the pages on your wikis changes.

By choosing a theme, you get a different combination of fonts, colors, graphics, and layout to give your wiki a new personality. You can create your own themes on WikiSpaces and other hosted wikis, but frequently, this involves an upgrade to a premium version of the site for a fee. Be aware that building new themes and skins usually requires some knowledge of CSS or XSLT.
One of the most effective uses of color on a wiki is to assign each web its own color. This does not mean that all the text, background, and other elements of the web should be shades of, say, orange. However, giving each web a small colored box next to its name, and then automatically having that color be used in key places throughout that web, can enhance a user’s sense of place and make your wiki look professional.
For example, suppose that you have a wiki that’s primarily used for collaboration, but a blog also resides on the wiki where users can post links to news articles. One way to differentiate the blog portion of the wiki from the collaborative sections is to give the blog web a different background color. That way, anyone visiting the blog will understand that this page has a different purpose than other parts of the wiki.
Note: Using color in page backgrounds should be handled with caution. It is all too easy to have background color overwhelm both the text and the rest of the page. That said, much like the use of colors to signify different webs, background colors on a page can be an excellent way to differentiate the type of information being presented.
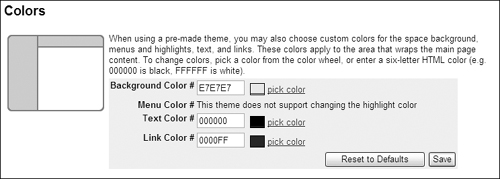
One way to use colors is to explicitly enter the colors you wish for table backgrounds or fonts, as described in Chapter 6. Hosted wikis, such as WikiSpaces, make color choice easier. In the Look and Feel section of the Manage Space area of WikiSpaces, the form shown in Figure 8-16 allows you to change colors used for the background, text, and links in the wiki’s theme.
If you don’t already have a logo, you probably want one. Just a simple image can really set your wiki apart and make it more memorable. Logo design is an art unto itself, best handled by an artist or graphic designer. The question for wiki builders is not whether to use a logo but where?
The conventional use of logos, which has been evolving since the earliest days of Web sites, is to place the logo in (or near) the upper-left corner of the page. Visit Amazon.com, Motorola, or AOL — pretty much any well-known Web site — to see a logo in virtually the same place on every site. Of the many reasons for this placement, consider this: No matter how small you make your browser window, a logo in the upper-left corner will still be visible. Suffice it to say, it’s a tried-and-true place to put your logo.
Putting your logo in the upper-left corner of every page is a simple exercise for most hosted wikis. In the Look and Feel section of the Manage Space area of WikiSpaces, for example, is a form that enables you to upload your logo.
If you want your logo to look good, make sure it is a size that will fit into the area allotted for it in the wiki theme. In the themes on WikiSpaces, logos are 150 x 150 pixels or smaller.
Another way to spruce up your wiki is with a favicon. Favicons are fav orite icons, which are 16 x 16 pixels. Browsers display the small icons in the address bar, browser tabs, and bookmarks. Favicons help users find your wiki more easily. To add a favicon to your wiki, typically you upload an image file with the icon to the wiki and then refer to it using an HTML <IMG> tag. Some wikis, like TWiki, make this easier by creating variables that make inserting the favicons easier.