
Chapter 26. Local Databases
In This Chapter
• Code-first and database-first data model creation
• Differences between isolated storage and XAP file deployment
• Change tracking with LINQ to SQL
• Defining one-to-many relationships
• Retrieving a local database from isolated storage
• Using SqlMetal to generate your data model
• Deploying a prepopulated database to isolated storage
• A testable navigation service
• Mapping inheritance hierarchies
• Controlling optimistic concurrency
• A Twitter timeline viewer
For some apps, having to rely on a cloud service for storing application data is not practical. Some scenarios cry out for local storage of structured data on the phone.
With the Mango release of Windows Phone (7.5), Microsoft introduced a relational database system to the phone, allowing you to place a local database in either isolated storage or in your app’s XAP file.
Windows Phone apps use LINQ to SQL for all database operations; LINQ to SQL is used to define the database schema, and to select, insert, update, and delete data from the database. LINQ to SQL provides an object-oriented approach to working with relational data and is comprised of an object model and a runtime. With LINQ to SQL, classes represent database tables, and foreign key relationships between tables are represented by aggregated collections.
This chapter begins with an overview of how local databases are deployed to the phone and discusses the main elements of LINQ to SQL.
The chapter then explores the code-first approach to data model creation and walks through a sample Twitter timeline viewer that caches data in a local database, during which you explore several facets of LINQ to SQL including entity creation, change tracking, and entity multiplicity (one-to-many relationships).
The database-first approach to data model creation is then discussed. You see how to retrieve a local database file from isolated storage and how to use the SqlMetal tool to generate a data model from a database.
The chapter then takes a short deviation and examines a custom navigation service that allows navigation from a viewmodel without being coupled to the built-in navigation of the phone, which can increase the testability of your viewmodel classes.
The chapter then gets back on topic to examine a technique for observing LINQ to SQL queries using a custom log. You see how to upgrade a schema without losing data and how to use version numbering to provide incremental updates to your database schema.
Finally, you look at mapping inheritance hierarchies using LINQ to SQL, and at concurrency and conflict detection when performing updates.
SQL Server Compact
The database used on the phone is based on SQL Server Compact Edition (SQL CE). SQL CE shares a common API with the other Microsoft SQL Server editions. Each SQL CE database resides in a single .sdf file, which can be up to 4GB in size. The .sdf file can be encrypted, using a password, with 128-bit encryption for data security.
On Windows Phone, the database filename is required to use the .sdf file extension. A NotSupportedException is raised if you attempt to create a database with a name not ending in .sdf.
Deployment of Local Databases
Understanding how local databases can be deployed to the phone is important when determining the best approach for your app. This section looks behind the scenes at what happens when an app is installed on the phone and at the two locations for local database deployment.
It so happens that a XAP file, which is produced when you build your project, is also a Zip file. When an app is installed on the phone, the package manager extracts the app’s XAP file into an install directory (see Figure 26.1).

Figure 26.1. Install and Application Data directories
For more information on XAP files see the section “Understanding the Role of XAP Files” in Chapter 2, “Fundamental Concepts in Silverlight Development for Windows Phone.”
The install directory is read-only. An app is not able to add or remove items from its install directory, nor is it able to make any changes to any items in the directory.
During installation, the app is also assigned a data directory. The contents of this directory and all subdirectories are readable and writable by the app.
A local database can be placed either in isolated storage or in the app’s install directory by including it within the XAP. You see why the choice of where to place a local database is important in a moment.
An app’s data directory is persistent, while its install directory is not. When publishing an update for your app on the Windows Phone Marketplace, the install directory of your app is replaced, but the data directory for your app remains intact.
Moreover, when placed in the install directory, a database is read-only. This suits certain scenarios, such as when you want to include structured reference data with your app, data that may change with each application update, but that is not modifiable by the app itself. An example of this kind of data is a dictionary of word definitions.
The most common place for a database, however, is in isolated storage. When in isolated storage the database is readable and writable, and is retained during an app update.
There are two common scenarios for deploying a database to isolated storage. The first is where your app has a complex domain model and you want to persist its state. Perhaps your app is a shopping cart or a todo list. The second scenario is where you fetch a subset of reference data from the cloud, cache it locally, and combine it with user-specific data.
This chapter demonstrates each deployment option and focuses on using a local database as a cache by creating a Twitter app that downloads timeline information and caches it in a database so that it is available when the phone is offline.
LINQ to SQL on the Phone
Retrieval and storage of data in a local database is done entirely using LINQ to SQL, which provides object-relational mapping (ORM) capabilities, allowing you to use LINQ to communicate with a relational database. LINQ to SQL maps the object model, which you define by decorating entity classes with attributes, to a relational database. When your app runs, LINQ to SQL translates language-integrated queries into Transact-SQL and then sends the queries to the database for execution. When the database returns the results, LINQ to SQL translates the results back to objects.
When first learning of Microsoft’s choice to go with LINQ to SQL in Windows Phone, I was somewhat dismayed that it was chosen over the Entity Framework. Yet, while the Entity Framework offers a more powerful API and set of tools, it is not optimized for mobile devices. I have since come to see LINQ to SQL as a good fit for the phone, as it offers a simple API for rapid data layer construction.
LINQ to SQL makes heavy use of the System.Data.Linq.DataContext class, which serves as a proxy to your database, allowing you to query the database via Table objects representing tables in the database (see Figure 26.2). Each Table member of a DataContext allows the storage and retrieval of entity objects; an instance of an entity represents a table row. Persisting changes to the local database is done using the DataContext.SubmitChanges method.
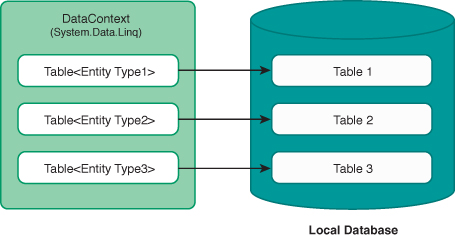
Figure 26.2. DataContext Table members are associated with database tables.
By default, DataContext also tracks changes to your entity objects so that you can easily push changes back to your database.
An entity is a POCO (Plain Old CLR Object), representing a domain object, and is decorated with a System.Data.Linq.Mapping.Table attribute. Other data related attributes, placed on and within each entity class, define the mapping between the object model and the schema of the database and determine the structure of the database.
LINQ to SQL Platform Differences
Windows Phone supports most of the features of LINQ to SQL, apart from several notable absences present on other platforms, and some additional features not seen in LINQ to SQL on other platforms. The following is a list of some of the most notable differences:
• LINQ to SQL on Windows Phone does not directly support the execution of Transact-SQL, which includes Data Definition Language (DDL) and Data Modeling Language (DML) statements.
• Local databases run in your app’s process and not in a background process, as is the case with most desktop based databases.
• A local database cannot be accessed by other apps; it lives in the sandboxed execution environment of your app.
• Transactions are not directly supported.
For more detailed information on the various API differences see http://bit.ly/xQMxmm.
New features have also been added to LINQ to SQL, specifically for Windows Phone apps. These include support for multiple table indexes and the ability to programmatically alter the database schema (described later in this chapter).
Getting Started with Local Databases
Using LINQ to SQL in your phone app requires referencing the assembly System.Data.Linq, which is included in the Windows Phone Framework Class Library (FCL).
There are two commonly used approaches to the creation of an application’s data model: code-first and database-first. Code-first entails writing your classes first and then using those classes to generate the database. Conversely, database-first entails creating your database schema and then using a tool to generate an object model for interacting with the database. The database-first approach is discussed later in the chapter. For now, though, we concentrate on the code-first approach.
Code-First Data Model Creation
Code-first is the recommended approach for creating your data model in Windows Phone. It involves writing your classes and then generating your database using metadata contained in those classes.
Until now, I have never been a fan of code-first when building desktop and client-server applications because I saw how it can lead to a lack of attention being paid to the database schema—to its structure, constraints, and indexes. Yet, applied wisely, code-first offers some key advantages. One such advantage is that you do not break the application by forgetting to propagate a schema change to other developers on your team, since all changes to the schema are done via code metadata.
The following list outlines the steps for creating a data model and generating a database using the code-first approach and LINQ to SQL:
1. Manually create POCO classes representing your domain entities.
2. Create a class deriving from DataContext, with properties within the class representing tables within the database.
3. When instantiating your DataContext, provide a connection string with the location of your database file in isolated storage. The DataContext creates a database with the relationships defined in your data model.
Once the database is in place, you are able to interact with the DataContext and the entity objects using LINQ to SQL.
The following section looks at each of these steps in detail during the creation of a sample Twitter timeline viewer.
Sample Twitter Timeline Viewer
The principle example for this chapter is a Twitter timeline viewer that downloads the tweets of a specified Twitter user, caches them in a local database, and displays them on a page. The code for this example is located in the DataDrivenApps/TwitterExample directory of the WindowsPhone7Unleashed.Examples project.
The Twitter timeline viewer has a simple data model consisting of two entities representing a Twitter user and a tweet or TimelineItem (see Figure 26.3), and demonstrates using a local database to cache cloud data.
Figure 26.3. A TwitterUser has many TimelineItems.
TimelineItem represents a status update (tweet) that contains information including the tweet text, the time the tweet occurred, and the user’s id (see Listing 26.1). The TwitterUser class holds a collection, specifically an EntitySet of TimelineItem objects.
Listing 26.1. TimelineItem Class (excerpt)
[Table]
public class TimelineItem : NotifyPropertyChangeBase
{
string id;
[Column(IsPrimaryKey = true)]
public string Id
{
get
{
return id;
}
set
{
Assign("Id", ref id, value);
}
}
string text;
[Column(DbType = "NVarChar(140)")]
public string Text
{
get
{
return text;
}
set
{
Assign("Text", ref text, value);
}
}
DateTime? receivedTime;
[Column]
public DateTime? ReceivedTime
{
get
{
return receivedTime;
}
set
{
Assign("ReceivedTime", ref receivedTime, value);
}
}
string twitterUserId;
[Column(CanBeNull = false)]
public string TwitterUserId
{
get
{
return twitterUserId;
}
set
{
Assign("TwitterUserId", ref twitterUserId, value);
}
}
EntityRef<TwitterUser> user;
[Association(Storage = "user",
ThisKey = "TwitterUserId",
IsForeignKey = true)]
public TwitterUser TwitterUser
{
get
{
return user.Entity;
}
set
{
user.Entity = value;
}
}
}
To declare the TimelineItem class as representing a table in the database, it is decorated with a Table attribute. The TableAttribute class includes a Name property, which allows you to explicitly define the name of the database table. If it is not provided, the name of the class is used as the table name. For example, to override the TimelineItem table name to something else, the following could be used:
[Table(Name = "SomethingElse")]
public class TimelineItem : NotifyPropertyChangeBase
{ ... }
Using the Column Attribute
Each property of the TimelineItem is decorated with a Column attribute, which tells the DataContext that the property is stored in a column by the same name. As with TableAttribute, you can use its Name property to specify a different name for the column in the database.
ColumnAttribute includes various other properties described in the following sections.
IsPrimaryKey
IsPrimaryKey is used to designate the member or members of the entity class that comprise the primary key of the table. Composite keys are also supported by supplying more than one property decorated with a Column attribute with IsPrimaryKey set to true.
At least one member of an entity class must be designated as the primary key or else the entity is deemed to be read-only. If an attempt is made to create, update, or delete a read-only entity, an InvalidOperationException is raised.
AutoSync
AutoSync is used to specify whether the column is automatically synchronized from the value generated by the database on insert or update commands.
The following is a list of valid values for this property:
• Default
• Always
• Never
• OnInsert
• OnUpdate
If the column in your database provides a default value, set this property to OnInsert, OnUpdate, or Always.
CanBeNull
CanBeNull indicates whether a column can contain null values. This property is relevant when inserting data into the database but not during the creation of the table.
The DataContext.CreateDatabase method uses only the ColumnAttribute.DbType property and not the ColumnAttribute.CanBeNull property when determining whether a column should allow null values. For this reason, you must specify whether a column can contain null values in the DbType property as well as setting CanBeNull to true.
If not specified, CanBeNull defaults to true if the member is a reference type; if the member is a value type, such as an int, then CanBeNull defaults to false.
DbType
DbType specifies the text that defines the column in a Transact-SQL create table statement. Using this property allows you to tailor a column data type to better match the data being stored in the column. If used correctly, it can help to decrease the size of your database and may improve the speed of some queries.
For example, by not specifying the DbType of a string property, LINQ to SQL generates DDL for a column containing up to 4000 Unicode characters (NVARCHAR(4000)). If you, however, know that a field will always contain values of relatively the same length (within two characters difference), then NCHAR can be faster and more space efficient for data, and it may pay dividends to specify it using DbType.
SQL CE is a Unicode-only database so you must use Unicode data types when assigning the DbType property. In particular, use NVARCHAR instead of VARCHAR, and NCHAR instead of CHAR.
Expression
Expression allows you to automatically populate a field using a SQL expression. Use this property to define a column as containing computed values when you use DataContext.CreateDatabase to generate your database.
For example, if you want to create a column defined in SQL as InventoryValue AS UnitPrice * UnitsInStock, use the following Expression string:
UnitPrice * UnitsInStock
IsDbGenerated
Entity members with IsDbGenerated are synchronized immediately after the row of data representing the entity is inserted into the database. The entity member’s value is set when DataContext.SubmitChanges completes.
IsDescriminator
IsDescriminator is used in conjunction with the InheritanceMapping attribute to provide an inheritance hierarchy in your data model. For more information, see the section “Mapping an Inheritance Hierarchy,” later in this chapter.
IsVersion
IsVersion allows you to designate an entity class member to be used for optimistic concurrency control (OCC). This property is discussed in the later section “Concurrency.”
UpdateCheck
UpdateCheck tells the data context when to detect change conflicts. This property is discussed in the later section “Concurrency.”
DataContext Change Tracking
The dirty state of an entity is monitored by the data context. This is usually accomplished with change notifications, provided through the INotifyPropertyChanging.PropertyChanging and INotifyPropertyChanged.PropertyChanged events, raised in the property setters of the entity.
Combining the PropertyChanged and PropertyChanging events raising into every property setter can add up to a lot of plumbing code. Fortunately, the Assign method in the custom ViewModelBase class used throughout this book raises the events required for change tracking.
For more information on the property change notification, in relation to the ViewModelBase class, see Chapter 2.
For entities that do not implement INotifyPropertyChanging, LINQ to SQL maintains a copy of their values. When DataContext.SubmitChanges is called, the current and original values are compared to determine whether the object has changed.
To decrease the amount of memory used by your app, ensure that entity classes implement INotifyPropertyChanged and INotifyPropertyChanging.
TwitterUser Class
The TwitterUser class contains various properties, such as the screen name of the Twitter user. It also includes a collection of TimelineItem objects that are maintained using an EntitySet. An EntitySet provides for deferred loading and manages the relationship of the collection side of one-to-many relationships between entities.
The TwitterUser constructor initializes the EntitySet, specifying two handlers: one that is called when a TimelineItem is added to its collection; the other, when a TimelineItem is removed (see Listing 26.2).
The TwitterUser class also uses the Index attribute, which tells the DataContext to create a database index for the secondary column ScreenName.
Indexes improve the speed of data retrieval operations by allowing the database engine to quickly locate a record. Without an index, potentially all rows in a table need to be scanned, an expensive O(n) operation.1
1 O(n) describes algorithm complexity. For more information on Big O notation see http://en.wikipedia.org/wiki/Big_O_notation.
Listing 26.2. TwitterUser Class (excerpt)
[Table]
[Index(Columns = "ScreenName")]
public class TwitterUser : NotifyPropertyChangeBase
{
public TwitterUser()
{
timelineItems = new EntitySet<TimelineItem>(
AttachTimelineItem, DetachTimelineItems);
}
string id;
[Column(IsPrimaryKey = true)]
public string Id
{
get
{
return id;
}
set
{
Assign("Id", ref id, value);
}
}
string screenName;
[Column]
public string ScreenName
{
get
{
return screenName;
}
set
{
Assign("ScreenName", ref screenName, value);
}
}
... (ImageUrl and Description properties omitted)
readonly EntitySet<TimelineItem> timelineItems;
[Association(
Storage = "timelineItems",
OtherKey = "TwitterUserId")]
public EntitySet<TimelineItem> TimelineItems
{
get
{
return timelineItems;
}
set
{
timelineItems.Assign(value);
}
}
void AttachTimelineItem(TimelineItem entity)
{
OnPropertyChanging("TimelineItems", timelineItems, timelineItems);
entity.TwitterUser = this;
OnPropertyChanged("TimelineItems");
}
void DetachTimelineItems(TimelineItem entity)
{
OnPropertyChanging("TimelineItems", timelineItems, null);
entity.TwitterUser = null;
OnPropertyChanged("TimelineItems");
}
}
The PropertyChanging event is raised manually before the assignment of the TimelineItem.TwitterUser property, and the PropertyChanged event is raised after it has been assigned. These calls indicate to the change tracking infrastructure that the TwitterUser object is dirty and differs from the stored value in the database.
Multiplicity and the Association Attribute
One-to-many entity relationships can be defined by decorating entity properties with Association attributes. Two entities participating in a one-to-many relationship with each other each use properties of the Association attribute to indicate on which side each resides.
One-to-many entity relationships are represented as foreign key relationships in the database.
The one-to-many relationship between TwitterUser and TimelineItem is defined with an Association attribute placed on the TwitterUser property of the TimelineItem class. The attribute declares that the TwitterUserId column of the TimelineItem table is a foreign key of the TwitterUser table. It also declares that the user field holds a reference (an EntityRef) to a TwitterUser object.
Conversely, on the many side of the relationship, the TwitterUser property of the TimelineItem declares that the TwitterUserId property holds the foreign key of the TwitterUser.
An EntityRef represents the one side of a one-to-many relationship, while an EntitySet is the reciprocal and represents the many side.
Twitter DataContext
The TwitterDataContext class is the proxy to the Twitter local database and includes two public Table<TSource> properties: TwitterUsers and TimelineItems (see Listing 26.3).
The assignment of the DataContext.Log property allows you to monitor the activities of the DataContext at runtime, and in particular, to observe the generated SQL as it is being sent to the database. This customized logging is examined later in the chapter.
The GetTable property of the DataContext class retrieves a Table<TEntity> object representing a table in the underlying database. Table objects can be queried using LINQ to SQL.
Listing 26.3. TwitterDataContext Class
public class TwitterDataContext : DataContext
{
public TwitterDataContext(string connection) : base(connection)
{
Log = new DebugStreamWriter();
}
public Table<TwitterUser> TwitterUsers
{
get
{
return GetTable<TwitterUser>();
}
}
public Table<TimelineItem> TimelineItems
{
get
{
return GetTable<TimelineItem>();
}
}
}
The Table<TEntity> class allows you to perform CRUD (create, read, update, delete) operations on a table. For example, you can insert a row (representing an entity) into the underlying table using the Table.InsertOnSubmit(TEntity entity) method.
The Table<TEntity> class also allows you to attach a disconnected (or detached) entity to a new DataContext.
As an aside, the DataContext base class automatically initializes its public fields of type Table<TEntity>. By placing a public field in a DataContext derived class, such as the following, the field is automatically assigned when the DataContext is instantiated:
public Table<TwitterUser>;
While this offers a way of exposing Table objects from your DataContext using less code, the use of public fields is not recommended because it breaks the convention that fields should have private visibility; nonprivate fields violate the encapsulation of the class and make the class less amenable to change.
Database Utilities
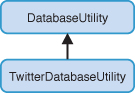
While DataContext enables you to create and delete a database file, a custom class, called DatabaseUtility, is used to directly create and delete the database in isolated storage and to build the connection string for the database.
TwitterDatabaseUtility extends the DatabaseUtility class, providing the default database filename. TwitterDatabaseUtility is used in various locations to create a DataContext for the Twitter database.
DatabaseUtility includes an InitializeDatabase method that creates the isolated storage file for the database. When it is called, if the wipe parameter is true and the database already exists, then it is deleted before being re-created. See the following excerpt:
public void InitializeDatabase(DataContext dataContext, bool wipe = false)
{
ArgumentValidator.AssertNotNull(dataContext, "dataContext");
if (localDatabaseMode != LocalDatabaseMode.ReadWrite
&& localDatabaseMode != LocalDatabaseMode.Exclusive)
{
return;
}
if (wipe && dataContext.DatabaseExists())
{
dataContext.DeleteDatabase();
}
if (!dataContext.DatabaseExists())
{
dataContext.CreateDatabase();
}
}
Initialization of the local database occurs when the Launching event of the PhoneApplicationService is raised. For testing purposes, if a debugger is attached, the database is deleted so as to begin with a clean slate. The following excerpt shows the Launching event handler:
void Application_Launching(object sender, LaunchingEventArgs e)
{
Debug.WriteLine("Application Launching");
StateManager.Initialize();
/* For the Twitter demo. */
var twitterDatabaseUtility = new TwitterDatabaseUtility();
bool wipeDatabase = Debugger.IsAttached;
twitterDatabaseUtility.InitializeDatabase(wipeDatabase);
}
When the app is launched, the handler ensures that the database file is created in isolated storage.
Connection Strings
When instantiating a DataContext, a connection string must be supplied, indicating the location of the database file and an optional password. See the following example:
string connectionString
= "Data Source='isostore:/DirectoryName/FileName.sdf';Password='password'";
DataContext dataContext = new DataContext(connectionString);
The Data Source parameter defines the location of the database file in isolated storage, while the Password parameter is used to access (or create) an encrypted database.
The isostore prefix of the Data Source value specifies that the file is located in isolated storage. By omitting the isostore prefix, it indicates that the file is located in the XAP file relative to its root directory. You see an example of using a database located in the XAP file later in the chapter.
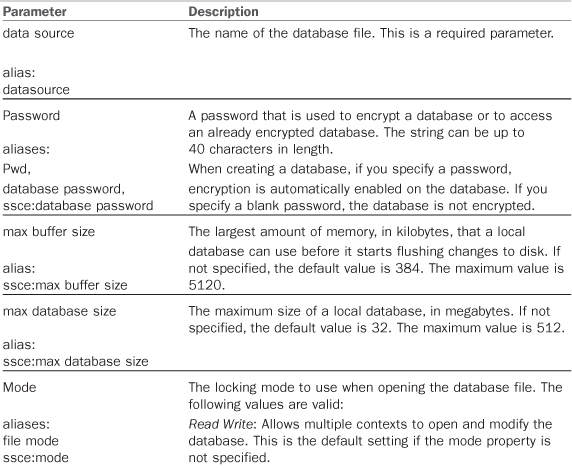
Table 26.1 describes the database connection string parameters in more detail.
Table 26.1. Local Database Connection String Parameters for Windows Phone

A database must be encrypted when it is created; a password cannot be used to encrypt the database after it has been created.
The ConnectionString property of the custom DatabaseUtility class constructs a connection string using its DatabasePassword property, its DataSource property, and the localDatabaseMode field represented as a custom enum value. See the following excerpt:
public string ConnectionString
{
get
{
if (string.IsNullOrWhiteSpace(DatabasePassword))
{
return string.Format("Data Source='{0}';Mode={1}",
DataSource, localDatabaseMode.ToConnectionStringValue());
}
return string.Format("Data Source='{0}';Password='{1}';Mode={2}",
DataSource,
DatabasePassword,
localDatabaseMode.ToConnectionStringValue());
}
}
The following excerpt shows the LocalDatabaseMode enum, which represents the four connection string Mode values that were listed in Table 26.1:
public enum LocalDatabaseMode
{
ReadWrite,
ReadOnly,
Exclusive,
SharedRead
}
An extension method is used to convert an enum value to a valid Mode value. Using an enum, combined with an extension method for conversion, is an elegant alternative to loosely typed strings. The following excerpt shows the ToConnectionStringValue method:
public static class LocalDatabaseModeExtensions
{
public static string ToConnectionStringValue(
this LocalDatabaseMode mode)
{
switch (mode)
{
case LocalDatabaseMode.ReadWrite:
return "Read Write";
case LocalDatabaseMode.ReadOnly:
return "Read Only";
case LocalDatabaseMode.Exclusive:
return "Exclusive";
case LocalDatabaseMode.SharedRead:
return "Shared Read";
default:
throw new ArgumentException(
"Unknown mode: " + mode);
}
}
}
Connection Strings for XAP File Databases
To target a database file in your app’s XAP file, do not include the isostore prefix in the Data Source segment of its connection string. The following example shows a connection string for an .sdf file located in a XAP file:
string connectionString
= "Data Source='/ProjectDirectoryName/FileName.sdf';Mode=Read Only";
DataContext dataContext = new DataContext(connectionString);
The connection string for a database located in your XAP file must use the Mode of Read Only; otherwise a System.Data.SqlServerCe.SqlCeException is raised when attempting to access the database, regardless of whether your query is only attempting to read, such as with a select operation.
The custom DatabaseUtility class takes care of building the connection string. A preprocessor directive in the TwitterDatabaseUtility class allows you to change the location of the Twitter database to the XAP file. If enabled, the Read Only mode is automatically introduced into the connection string. Being in read-only mode, however, breaks the app, because the TwitterService needs to write to the database.
Leveraging a Custom Twitter Service
A custom Twitter service is used for all communication with the Twitter web API. The service also provides the ability to cache the results of calls to Twitter using a local database.
The viewmodel, which presents the Twitter timeline information, consumes the Twitter service using an ITwitterService interface.
The ITwitterService contains two methods designed to execute asynchronously. They are as follows:
• GetTimeline(string screenName, Action<ResultEventArgs<TwitterUser>> completeAction)
• GetCachedTimeline(string screenName, Action<ResultEventArgs<TwitterUser>> completeAction)
A caller of either method provides an Action argument, which, on completion of the method, is invoked, notifying the caller of the result.
The ResultEventArgs class either contains the result produced by the operation, or an Exception object. ResultEventArgs is presented in Chapter 24, “Network Services.”
GetTimeline uses the Twitter web API to retrieve a Twitter user’s details and her list of status updates. Once a response is received from the Web, the result is converted into entity objects representing the Twitter user and the status updates (TimelineItem objects).
GetCachedTimeline is used to retrieve a TwitterUser from the database. This method does not produce a result until GetTimeline has successfully completed at least once because until then no data has been placed in the database.
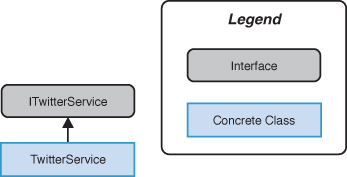
The default implementation of the ITwitterService is the TwitterService class. TwitterService relies on the TwitterDatabaseUtility. A TwitterDataContext is created when the TwitterService is instantiated, as shown:
public class TwitterService : ITwitterService
{
readonly TwitterDatabaseUtility twitterDatabaseUtility
= new TwitterDatabaseUtility();
readonly TwitterDataContext dataContext;
public TwitterService()
{
dataContext = twitterDatabaseUtility.CreateContext();
}
...
}
The public GetTimeline method queues the Twitter call on a ThreadPool thread. To demonstrate population using the local database, the ThreadPool thread is made to wait for 3 seconds before calling the main GetTimelineCore method. If an exception is raised, the complete action is called, as shown:
public void GetTimeline(
string screenName, Action<ResultEventArgs<TwitterUser>> completeAction)
{
ArgumentValidator.AssertNotNullOrWhiteSpace(screenName, "userName");
ArgumentValidator.AssertNotNull(completeAction, "completeAction");
ThreadPool.QueueUserWorkItem(
delegate
{
try
{
/*Wait for a moment to demonstrate the database retrieval.*/
Wait(3000); /* Equivalent to Thread.Sleep(3000); */
GetTimelineCore(screenName, completeAction);
}
catch (Exception ex)
{
Console.WriteLine(ex);
completeAction(new ResultEventArgs<TwitterUser>(null, ex));
}
});
}
GetTimelineCore uses the Twitter web API (see Listing 26.4). A WebClient is used to dispatch an HTTP request to the site. When the call returns it is handled within a lambda expression. The result of the call is an XML fragment, which we convert to an XElement using the XElement.Parse method.
The user information is then extracted from the root element before building a list of TimelineItems. Finally, the data context is used to store the TwitterUser and its associated TimelineItems in the database.
Listing 26.4. GetTimelineCore Method
void GetTimelineCore(
string screenName, Action<ResultEventArgs<TwitterUser>> completeAction)
{
WebClient twitterClient = new WebClient();
twitterClient.DownloadStringCompleted
+= (o, args) =>
{
if (args.Error != null)
{
completeAction(
new ResultEventArgs<TwitterUser>(null, args.Error));
return;
}
try
{
XElement rootElement = XElement.Parse(args.Result);
XElement element = rootElement.Descendants("status").First();
XElement userElement = element.Descendants("user").First();
var twitterUser = new TwitterUser
{
Id = userElement.Element("id").Value,
ScreenName = userElement.Element("screen_name").Value,
Description = userElement.Element("description").Value,
ImageUrl = userElement.Element("profile_image_url").Value,
};
IEnumerable<TimelineItem> items = from statusElement
in rootElement.Descendants("status")
select new TimelineItem
{
Id = statusElement.Element("id").Value,
ReceivedTime = ConvertToDateTime(
statusElement.Element("created_at").Value),
Text = statusElement.Element("text").Value
};
TwitterUser storedUser = dataContext.TwitterUsers.Where(
user => user.ScreenName == screenName).FirstOrDefault();
if (storedUser != null)
{
dataContext.TimelineItems.DeleteAllOnSubmit(
dataContext.TimelineItems.Where(
item => item.TwitterUserId == storedUser.Id));
dataContext.TwitterUsers.DeleteOnSubmit(storedUser);
dataContext.SubmitChanges();
}
twitterUser.TimelineItems.AddRange(items);
dataContext.TwitterUsers.InsertOnSubmit(twitterUser);
dataContext.SubmitChanges();
completeAction(new ResultEventArgs<TwitterUser>(twitterUser));
}
catch (Exception ex)
{
Debug.WriteLine("Unable to get timeline. " + ex);
completeAction(new ResultEventArgs<TwitterUser>(null, ex));
return;
}
};
twitterClient.DownloadStringAsync(new Uri(
"http://api.twitter.com/1/statuses/user_timeline.xml?screen_name="
+ screenName));
}
Once the Twitter web API has been queried and the result stored in the database, the cached data can be retrieved from the database. This allows the Twitter timeline information to remain viewable when no network connection is available.
Changes to the entity model are not persisted to the database until DataContext.SubmitChanges is called. New entity objects that have been added to the data context are not inserted into the database until SubmitChanges is called, and entities that have been removed from the data context are not deleted from the database until SubmitChanges is called.
Retrieving the cached data from the local database is the task of the TwitterService object’s GetCachedTimeline method.
You see the same pattern applied as earlier; the principle GetCachedTimelineCore method is called from a ThreadPool thread as shown:
public void GetCachedTimeline(
string screenName, Action<ResultEventArgs<TwitterUser>> completeAction)
{
ArgumentValidator.AssertNotNullOrWhiteSpace(screenName, "userName");
ArgumentValidator.AssertNotNull(completeAction, "completeAction");
ThreadPool.QueueUserWorkItem(
delegate
{
try
{
GetCachedTimelineCore(screenName, completeAction);
}
catch (Exception ex)
{
Console.WriteLine(ex);
completeAction(new ResultEventArgs<TwitterUser>(null, ex));
}
});
}
The GetCachedTimelineCore method uses the data context to retrieve the Twitter user with the specified screen name, shown in the following excerpt:
void GetCachedTimelineCore(
string userName, Action<ResultEventArgs<TwitterUser>> completeAction)
{
TwitterUser storedUser = dataContext.TwitterUsers.Where(
user => user.ScreenName == userName).FirstOrDefault();
completeAction(new ResultEventArgs<TwitterUser>(storedUser));
}
You saw how the TwitterService is able to retrieve live data from the Twitter web API and then cache it using a local database. Subsequent sections look at presenting this data to the user.
Gathering the User’s Credentials with the Sign-In View
The TwitterSignInView and associated viewmodel provide the UI for gathering the user’s Twitter credentials. The sample, however, does not actually require the user to sign in to Twitter because we are merely retrieving the timeline for the user, and this does not require authentication.
A sign-in screen is included to provide the infrastructure to extend the app in the direction of being a fully blown Twitter app. It also provides a nice segue to demonstrate the custom INavigationService, which is discussed later in the chapter.
The TwitterSignInViewModel class contains properties for the user’s Twitter credentials and a property that causes the password to be retained by the app (see Listing 26.5).
The viewmodel relies on the ViewModelBase class for state persistency. The Username, Password, and RememberPassword properties are each decorated with the custom State attribute so that they are persisted to isolated storage. For details on the custom state preservation system, see Chapter 25, “Isolated Storage and State Preservation.”
When executed, the viewmodel’s SignInCommand is responsible for navigating to the TwitterTimeline page and for deregistering state preservation for the Password property if the user has indicated that the app should not remember the password.
The Navigate method and the custom navigation functionality are discussed later in this chapter.
Listing 26.5. TwitterSignInViewModel Class
public class TwitterSignInViewModel : ViewModelBase
{
public TwitterSignInViewModel()
{
signInCommand = new DelegateCommand(
obj =>
{
if (!rememberPassword)
{
DeregisterStatefulProperty(
ApplicationStateType.Persistent, () => Password);
}
Navigate("/TwitterTimeline/" + username);
});
}
string username;
[Stateful(ApplicationStateType.Persistent)]
public string Username
{
get
{
return username;
}
set
{
Assign(() => Username, ref username, value);
}
}
string password;
[Stateful(ApplicationStateType.Persistent)]
public string Password
{
get
{
return password;
}
set
{
Assign(() => Password, ref password, value);
}
}
readonly DelegateCommand signInCommand;
public ICommand SignInCommand
{
get
{
return signInCommand;
}
}
bool rememberPassword = true;
[Stateful(ApplicationStateType.Persistent)]
public bool RememberPassword
{
get
{
return rememberPassword;
}
set
{
Assign(() => RememberPassword, ref rememberPassword, value);
}
}
}
Within the view’s XAML, an AppBarIconButton is bound to the SignInCommand.
A ToggleSwitch from the Silverlight Toolkit is used to set the RememberPassword property of the viewmodel. See the following excerpt:
<Grid x:Name="LayoutRoot" Background="Transparent">
<Grid.RowDefinitions>
<RowDefinition Height="Auto"/>
<RowDefinition Height="*"/>
</Grid.RowDefinitions>
<u:AppBar>
<u:AppBarIconButton
Command="{Binding SignInCommand}"
Text="Sign In"
IconUri="/Images/ApplicationBarIcons/ApplicationBar.Check.png" />
</u:AppBar>
<StackPanel Grid.Row="0" Style="{StaticResource PageTitlePanelStyle}">
<TextBlock Text="Windows Phone 7 Unleashed"
Style="{StaticResource PhoneTextAppTitleStyle}" />
<TextBlock Text="Twitter sign in"
Style="{StaticResource PhoneTextPageTitleStyle}" />
</StackPanel>
<StackPanel x:Name="ContentPanel" Grid.Row="1"
Margin="{StaticResource PhoneHorizontalMargin}">
<TextBlock Text="username"
Style="{StaticResource LabelTextIndentedStyle}" />
<TextBox Text="{Binding Username, Mode=TwoWay}" />
<TextBlock Text="password"
Style="{StaticResource LabelTextIndentedStyle}" />
<!--<PasswordBox Password="{Binding Password, Mode=TwoWay}" />-->
<TextBox Text="not required in this example." IsReadOnly="True" />
<toolkit:ToggleSwitch
IsChecked="{Binding RememberPassword, Mode=TwoWay}"
Header="Remember Password" />
</StackPanel>
</Grid>
Tapping the application bar button executes the SignInCommand, which causes the app to navigate to the timeline view page (see Figure 26.4).
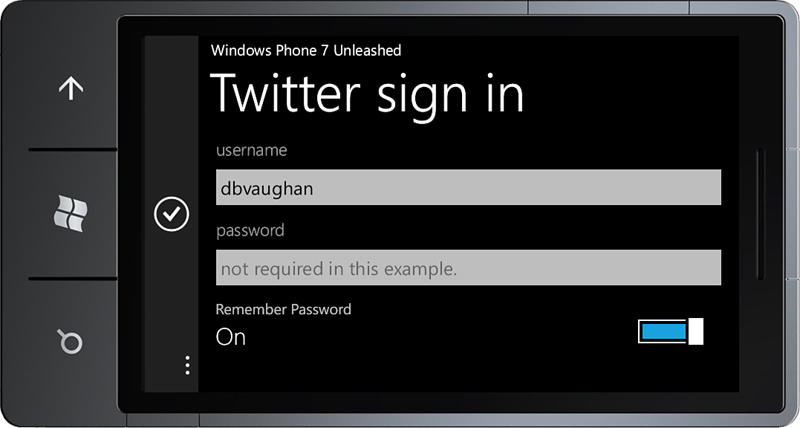
Figure 26.4. Twitter sign-in page
If the app happens to be tombstoned or exited, the state of the various controls is retained in persistent storage.
Tapping the ApplicationBarIconButton navigates the app to the timeline view page.
Viewing Tweets with the Timeline View
The timeline view presents a Twitter user’s list of recent tweets (status updates). The TwitterTimelineViewModel class relies on the ITwitterService to retrieve the list of tweets.
TwitterTimelineViewModel contains several properties, which are described in the following list:
• TimelineItems—An IEnumerable of TimelineItem objects, which is populated using the ITwitterService. This list is bound to a ListBox control in the view.
• ScreenName—The Twitter screen name that was supplied by the user on the sign-in view.
• ImageUrl—The URL to the Twitter user’s avatar. This is retrieved from the Twitter web API.
• Message—An arbitrary string used to supply feedback to the user during retrieval.
• Busy—A bool value indicating whether an asynchronous operation is under way.
The viewmodel also includes a command of type DelegateCommand<string> named loadUserTimelineCommand, which coordinates the retrieval of the list of status updates. LoadUserTimelineCommand receives a Twitter screen name, which is passed to the ITwitterService. See the following excerpt:
public class TwitterTimelineViewModel : ViewModelBase
{
readonly ITwitterService twitterService;
public TwitterTimelineViewModel(ITwitterService twitterService)
{
this.twitterService = ArgumentValidator.AssertNotNull(
twitterService, "twitterService");
loadUserTimelineCommand = new DelegateCommand<string>(LoadTimeline);
}
...
}
When the LoadUserTimelineCommand executes, the LoadTimeline method is called. This method first ensures that a Twitter screen name has been supplied; if not, it navigates back to the sign-in page.
The ITwitterService.GetCachedTimeline method executes asynchronously and attempts to retrieve the cached timeline from the local database. When it returns, the viewmodel is populated using the HandleGetTimelineResult. After attempting to restore the cached timeline, the ITwitterService.GetTimeline method is used to retrieve the latest data from the Twitter web API. See the following excerpt:
void LoadTimeline(string twitterScreenName)
{
if (string.IsNullOrWhiteSpace(twitterScreenName))
{
var messageService = Dependency.Resolve<IMessageService>();
messageService.ShowError("Please provide a twitter screen name.");
var navigationService = Dependency.Resolve<INavigationService>();
navigationService.GoBack();
return;
}
if (twitterScreenName == screenName)
{
return;
}
Busy = true;
try
{
Message = "Retrieving cached timeline from database.";
twitterService.GetCachedTimeline(twitterScreenName,
args =>
{
HandleGetTimelineResult(args);
Message = "Retrieving real data from Twitter.";
Busy = true;
twitterService.GetTimeline(
twitterScreenName, HandleGetTimelineResult);
});
}
catch (Exception ex)
{
Busy = false;
Message = string.Format("Error retrieving items.");
Console.WriteLine(ex);
}
}
The HandleGetTimelineResult method is called twice, once for the cached items and then for the live Twitter data. The Error property of the ResultEventArgs is used to determine whether the call completed successfully, and if so, the viewmodel’s properties are populated accordingly:
void HandleGetTimelineResult(ResultEventArgs<TwitterUser> e)
{
Busy = false;
if (e.Error != null)
{
Message = "Unable to retrieve timeline.";
return;
}
if (e.Result == null)
{
Message = "No result";
return;
}
Message = "Received result.";
TimelineItems = e.Result.TimelineItems.ToList();
ScreenName = e.Result.ScreenName;
ImageUrl = e.Result.ImageUrl;
}
When the viewmodel is instantiated, in the view’s code-beside class, it is passed a TwitterService object, as shown:
public TwitterTimelineView()
{
InitializeComponent();
DataContext = new TwitterTimelineViewModel(new TwitterService());
}
The view executes the LoadUserTimelineCommand in its OnNavigatedTo handler, as shown:
protected override void OnNavigatedTo(NavigationEventArgs e)
{
base.OnNavigatedTo(e);
string twitterName;
if (NavigationContext.QueryString.TryGetValue("name", out twitterName))
{
ViewModel.LoadUserTimelineCommand.Execute(twitterName);
}
}
The view XAML contains controls to display the Twitter timeline information, as well as the Twitter user information. A ListBox presents each TimelineItem using a DataTemplate, as shown in the following excerpt:
<Grid x:Name="ContentPanel" Grid.Row="1">
<Grid.RowDefinitions>
<RowDefinition Height="Auto" />
<RowDefinition Height="*" />
<RowDefinition Height="Auto" />
</Grid.RowDefinitions>
<Grid Margin="{StaticResource PhoneMargin}">
<Grid.ColumnDefinitions>
<ColumnDefinition Width="Auto" />
<ColumnDefinition Width="*" />
</Grid.ColumnDefinitions>
<Image Source="{Binding ImageUrl}"
MaxWidth="60" MaxHeight="60" />
<TextBlock Grid.Column="1" Text="{Binding ScreenName}"
Style="{StaticResource PhoneTextExtraLargeStyle}" />
</Grid>
<ListBox Grid.Row="1"
ItemsSource="{Binding TimelineItems}"
Margin="{StaticResource PhoneHorizontalMargin}">
<ListBox.ItemTemplate>
<DataTemplate>
<Border CornerRadius="10"
BorderBrush="{StaticResource PhoneBorderBrush}"
BorderThickness="2"
Margin="14,5,4,10">
<Grid Margin="10">
<Grid.RowDefinitions>
<RowDefinition />
<RowDefinition />
</Grid.RowDefinitions>
<Grid.ColumnDefinitions>
<ColumnDefinition Width="100" />
<ColumnDefinition Width="*" />
</Grid.ColumnDefinitions>
<TextBlock
Text="{Binding ReceivedTime,
StringFormat='0:HH:mm:ss'}"
MaxWidth="100" />
<TextBlock Text="{Binding Text}"
Grid.Column="1"
TextWrapping="Wrap"
Style="{StaticResource PhoneTextSmallStyle}" />
</Grid>
</Border>
</DataTemplate>
</ListBox.ItemTemplate>
</ListBox>
</Grid>
A ProgressIndicator is used to monitor the Busy property of the viewmodel and to display the viewmodel’s Message text, as shown:
<shell:SystemTray.ProgressIndicator>
<shell:ProgressIndicator IsIndeterminate="{Binding Busy}"
IsVisible="{Binding Busy}"
Text="{Binding Message}" />
</shell:SystemTray.ProgressIndicator>
When a result is received from the Twitter service it is displayed in the view as shown in Figure 26.5.
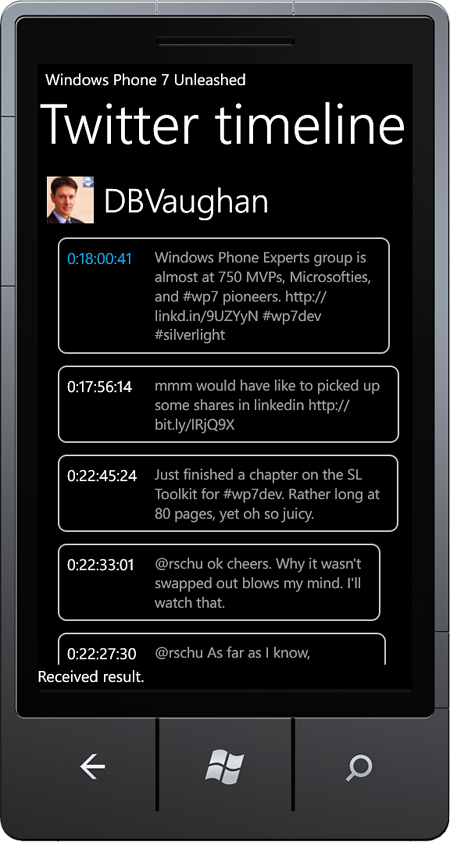
Figure 26.5. TwitterTimelineView page
Viewing a Local Database Schema
Visually exploring your database schema can help to reveal inadequacies in its structure. Missing indexes and foreign key relationships can be overlooked when relying solely on metadata in your code. In addition, having the ability to arbitrarily query your tables to see what is in your database can be useful during development.
Given that SQL CE database files usually reside in isolated storage, however, makes exploring the schema difficult.
This section looks at tools to retrieve your local database file from isolated storage and at using Visual Studio and SQL Server Management Studio to view the database on your desktop.
File Explorers for Isolated Storage
The Windows Phone 7.5 SDK comes with a tool that allows you to read and write to your app’s isolated storage area via the command line. The first part of this section examines the Isolated Storage Explorer present in the Windows Phone SDK. The second part examines a free alternative third-party explorer named WP7 Isolated Storage Explorer.
Windows Phone 7.5 SDK Isolated Storage Explorer
Depending on your operating system, Isolated Storage Explorer is installed in one of following locations:
• Program FilesMicrosoft SDKsWindows Phonev7.1ToolsIsolatedStorageExplorerTool
• Program Files (x86)Microsoft SDKsWindows Phonev7.1ToolsIsolatedStorageExplorerTool
When using Isolated Storage Explorer, your app must be deployed to the device or emulator. The emulator or device must be running, but the app does not have to be running.
Isolated Storage Explorer uses the following syntax:
ISETool.exe <ts|rs|dir[:device-folder]> <xd|de> <Product GUID> [<desktop-path>]
Table 26.2 lists the command-line options for Isolated Storage Explorer.
Table 26.2. Isolated Storage Explorer Command-Line Options
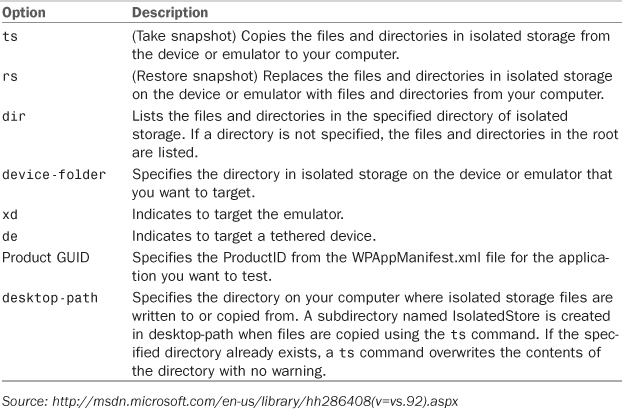
To use the Isolated Storage Explorer, open a command window and navigate to the location of ISETool.exe. Retrieve the product GUID from the ProductID attribute of the App element in the project’s WMAppManifest.xml file.
Listing the files and directories at the root directory of an app’s isolated storage area can be done using the following command (replacing the GUID with your app’s product GUID):
ISETool.exe dir xd 11111111-2222-3333-4444-555555555555
To copy all of the files from isolated storage to your computer, use the following command:
ISETool.exe ts xd 11111111-2222-3333-4444-555555555555 "C:Phone"
This command creates a directory on your computer named C:PhoneIsolatedStore and copies the files and directories in isolated storage into the directory.
If the IsolatedStore directory exists and the copy command is performed, the contents of the IsolatedStore directory are overwritten without any warning.
Use the following command to replace all the files in isolated storage with files from your computer:
SETool.exe rs xd 11111111-2222-3333-4444-555555555555 "C:PhoneIsolatedStore"
WP7 Isolated Storage Explorer
A useful alternative to the built-in Isolated Storage Explorer is the WP7 Isolated Storage Explorer, which can be found at http://wp7explorer.codeplex.com/. This open source tool can be used to retrieve a local database from isolated storage, and works both on the emulator and a real device. The advantage of the WP7 Isolated Storage Explorer is that it comes with a GUI.
The tool can be used either as a standalone application or within Visual Studio and provides a dockable tool window that displays the contents of your app’s isolated storage directory (see Figure 26.6).
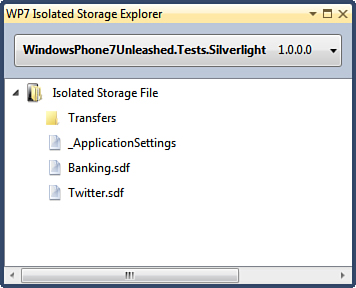
Figure 26.6. WP7 Isolated Storage Explorer dockable window
WP7 Isolated Storage Explorer uses WCF service to communicate with your app.
After installing the tool, to use it in your project, add a reference to the IsolatedStorageExplorer assembly and then add some initialization code to your app’s launching and activated events, as shown:
void Application_Launching(object sender, LaunchingEventArgs e)
{
IsolatedStorageExplorer.Explorer.Start("localhost");
}
void Application_Activated(object sender, ActivatedEventArgs e)
{
IsolatedStorageExplorer.Explorer.RestoreFromTombstone();
}
The ability to retrieve files from isolated storage and open them on your desktop is very useful, and being able to retrieve a local database from isolated storage means that it can then be loaded into Visual Studio or SQL Server Management Studio, allowing you to explore the schema and to verify the results of your mapping attributes. It is also possible to modify the structure of a database and use the SqlMetal tool to generate your data model, including its DataContext and entity classes. The database-first approach using SqlMetal is discussed in a later section.
Viewing and Modifying an SQL CE Database File
Once an SQL CE file has been retrieved from isolated storage, it can be opened in an application such as Visual Studio or Microsoft SQL Server Management Studio.
To open an .sdf file in Visual Studio, follow these steps:
1. Within Visual Studio, right-click on the Data Connections node in the Server Explorer and select Add Connection. The Add Connection dialog is displayed (see Figure 26.7).
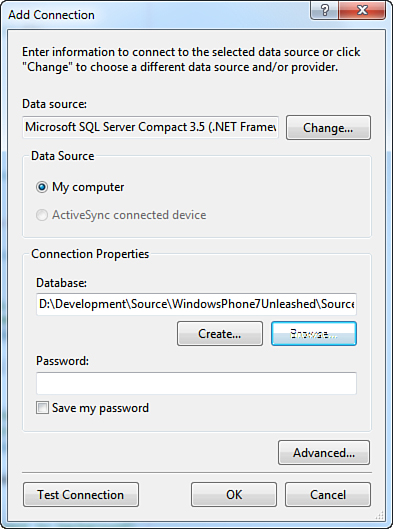
Figure 26.7. Visual Studio’s Add Connection dialog
2. Within the Add Connection dialog, set the Data Source to Microsoft SQL Server Compact 3.5.
3. Browse and locate the .sdf file using the Connection Properties section.
4. Select OK.
The Server Explorer pane allows you to explore and modify the database schema (see Figure 26.8), and to view table data by right-clicking on a table node and selecting Show Table Data.
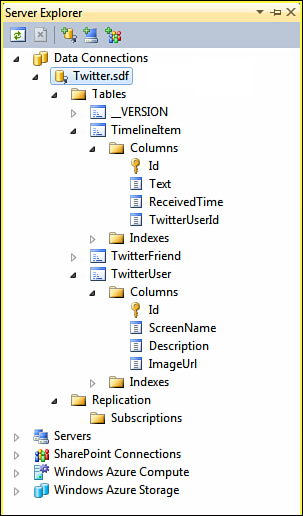
Figure 26.8. Server Explorer with the Twitter.sdf database connected
If you prefer to use a dedicated database management tool, such as Microsoft SQL Server Management Studio, you can. The 2008 version was used for this demonstration, but the 2005 version can also be used if it has at least service pack 2 installed.
To open an .sdf file in SQL Server Management Studio, follow these steps:
1. Within SQL Server Management Studio select File and then Connect Object Explorer (see Figure 26.9).
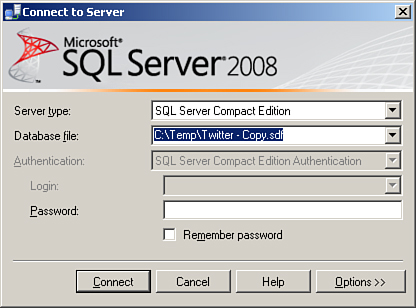
Figure 26.9. The SQL Server Management Studio Connect to Server dialog
2. Within the Connect to Server dialog, set the Server Type to SQL Server Compact Edition.
3. Use the Database File combo box to browse to your .sdf file.
4. Select Connect.
Once connected, the database is displayed in the Object Explorer. You can write queries to explore the table data using the New Query button on the toolbar (see Figure 26.10).
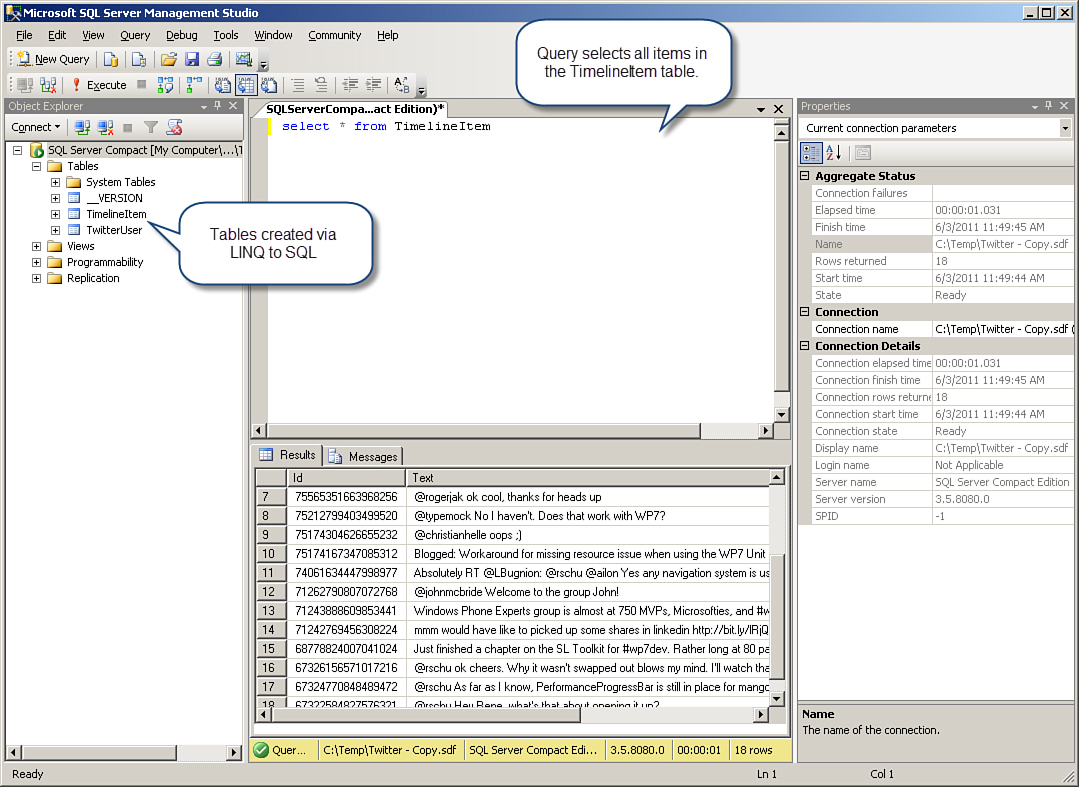
Figure 26.10. An .sdf file opened in SQL Server Management Studio
The ability to visually explore your database schema is important during development. The next section looks at how to generate an entity model from a database using a database-first approach, allowing you to not only view the schema but to make changes to it also.
Database-First Using SqlMetal
So far, this chapter has focused on a code-first approach for generating a local database. To reiterate, code-first is the recommended approach for developing on the phone. The database-first approach, however, can also be used, though it is not fully supported.
SqlMetal is a command-line tool used to generate an entity model from a database. SqlMetal is not fully compatible with Windows Phone, as the code it generates does not compile until some minor alterations are made to it.
SqlMetal generates a DataContext derived class and entities representing database tables. Associations are inferred from the foreign key relationships in the database.
SqlMetal can be launched via a Visual Studio Command Prompt by selecting Microsoft Visual Studio 2010/Visual Studio Tools/Visual Studio Command Prompt (2010) in the Windows Start menu.
In the following example, the database file has been downloaded from isolated storage, using the WP7 Isolated Storage Explorer, and placed in a directory called C:Unleashed. SqlMetal is provided with the database path, the name code file to output, and the namespace in which to place all generated classes (ignore line breaks):
C:Unleashed>SqlMetal C:UnleashedTwitter.sdf
/code:C:UnleashedTwitterDataModel.cs
/namespace:DanielVaughan.WindowsPhone7Unleashed.Examples
Once the code file has been generated, it can be added to your project. But before it can be compiled, two constructors must be removed. The key to identifying the errant constructors is that they both accept an IDbConnection and resemble the methods shown in the following excerpt:
public Twitter(System.Data.IDbConnection connection)
: base(connection, mappingSource)
{
OnCreated();
}
public Twitter(
System.Data.IDbConnection connection,
System.Data.Linq.Mapping.MappingSource mappingSource) :
base(connection, mappingSource)
{
OnCreated();
}
An example of a generated code file is located in the downloadable sample code. The file is named TwitterDataModel_Generated_Unused.cs.
Deploying a Database to Isolated Storage
As stated earlier in this chapter, a local database is read-only when it is located in a XAP file. If you want to provide a prepopulated database that is writable from your app, the database must be copied by your app, from your XAP file, to isolated storage.
Like any other resource, such as an image file, an .sdf database file may be stored as content within your app’s XAP file. The app then reads the database file as a Stream of bytes and writes the bytes to isolated storage. Once the database has been copied to isolated storage, it is ready to be used by your app.
To prevent the size of your project’s assembly from being unnecessarily increased by the inclusion of a database file, set the file’s Build Action to Content in the Visual Studio Properties pane. This decreases your app’s startup time because it takes less time for the CLR to load a smaller assembly. It does not, however, affect your project’s XAP file size.
Listing 26.6 shows the custom IsolatedStorageUtility class, whose CopyApplicationResourceToIsolatedStorage method locates an application resource and copies it as a stream to a specified location in isolated storage.
Listing 26.6. IsolatedStorageUtility Class (excerpt)
public class IsolatedStorageUtility : IIsolatedStorageUtility, ISettingsService
{
public void CopyApplicationResourceToIsolatedStorage(
string inResourceName, string outFilename)
{
ArgumentValidator.AssertNotNull(inResourceName, "inResourceName");
ArgumentValidator.AssertNotNullOrWhiteSpace(outFilename, "outFilename");
Uri uri = new Uri(inResourceName, UriKind.Relative);
string destination = outFilename;
int seperatorIndex = destination.LastIndexOf("/");
if (seperatorIndex == destination.Length - 1)
{
throw new InvalidOperationException(
string.Format("Destination '{0}' should not end with '/'",
destination));
}
string directory = null;
if (seperatorIndex != -1)
{
directory = destination.Substring(0, seperatorIndex);
}
using (Stream resourceStream = Application.GetResourceStream(uri).Stream)
{
using (IsolatedStorageFile isolatedStorageFile
= IsolatedStorageFile.GetUserStoreForApplication())
{
if (!string.IsNullOrWhiteSpace(directory)
&& !isolatedStorageFile.DirectoryExists(directory))
{
isolatedStorageFile.CreateDirectory(directory);
}
using (IsolatedStorageFileStream outStream
= isolatedStorageFile.OpenFile(
destination, FileMode.Create))
{
resourceStream.CopyTo(outStream);
}
}
}
}
...
}
A database file can then be copied from a XAP file to isolated storage in a single step:
IsolatedStorageUtility.CopyApplicationResourceToIsolatedStorage(
"/Subdirectory/XapDatabase.sdf",
"/Subdirectory/IsolatedStorageDatabase.sdf");
This can be seen in action in the unit test class named IsolatedStorageUtilityTests, located in the downloadable sample code (see Listing 26.7). The CopyDatabaseToIsolatedStorage test method copies an .sdf file to isolated storage and then verifies that the bytes of both files are equivalent.
The CollectionAssert.AreEquivalent method compares the members of both collections. If all members match, the assert succeeds. The CollectionAssert class is a part of the Silverlight Unit Testing Framework, discussed in Chapter 22, “Unit Testing.”
Listing 26.7. IsolatedStorageUtilityTests.CopyDatabaseToIsolatedStorage Method
[TestMethod]
public void CopyDatabaseToIsolatedStorage()
{
const string databaseName = "TestDatabase.sdf";
IsolatedStorageUtility utility = new IsolatedStorageUtility();
utility.CopyApplicationResourceToIsolatedStorage(databaseName, databaseName);
Uri uri = new Uri(databaseName, UriKind.Relative);
byte[] resourceBytes;
using (Stream resourceStream = Application.GetResourceStream(uri).Stream)
{
resourceBytes = resourceStream.ReadAllBytes();
}
Assert.IsNotNull(resourceBytes, "Resource bytes in null");
Assert.IsTrue(resourceBytes.Length > 0, "Resource bytes length <= 0.");
using (IsolatedStorageFile isolatedStorageFile
= IsolatedStorageFile.GetUserStoreForApplication())
{
using (IsolatedStorageFileStream outStream
= isolatedStorageFile.OpenFile(databaseName, FileMode.Open))
{
byte[] isolatedStorageBytes = outStream.ReadAllBytes();
Assert.IsNotNull(isolatedStorageBytes);
Assert.IsTrue(isolatedStorageBytes.Length > 0);
CollectionAssert.AreEquivalent(resourceBytes, isolatedStorageBytes);
}
}
}
Abstracting the Navigation Service
This section begins with a brief note about its inclusion. I did not intend to show the abstraction of the navigation service. When I began work on the sample for this chapter, however, and I reached the point of needing to navigate from the sign-in page to the timeline page, I felt that it would make for a nice demonstration of a custom testable navigation service.
The custom navigation service abstracts the navigation mechanism provided by the System.Windows.Controls.Frame component or the System.Windows.Navigation.NavigationService (available via the NavigationService property of the Page class).
A custom INavigationService interface is used to navigate in a UI technology agnostic manner and allows the class implementation of the interface to be replaced to enable unit testing of viewmodels. INavigationService contains the following three methods:
• GoBack—Navigates the application to the most recent entry in the back navigation history or raises an exception if no entry exists.
• Navigate(Uri source)—Navigates to the content specified by the uniform resource identifier (URI).
• Navigate(string relativeUrl)—Navigates to the content specified by the relative URL.
Included in the downloadable sample code are two implementations of the INavigationService, which are also present and maintained in the open-source project Calcium (http://calciumsdk.net). The first implementation, named NavigationServiceWrapper, leverages the System.Windows.Navigation.NavigationService of a Page. The second implementation, named FrameNavigationService, relies on the phone app’s root Frame (see Listing 26.8). The FrameNavigationService is the implementation used in the sample for this chapter and is the recommended implementation for use on the phone.
Listing 26.8. FrameNavigationService Class
public class FrameNavigationService : INavigationService
{
Frame frameUseProperty;
Frame Frame
{
get
{
if (frameUseProperty == null)
{
frameUseProperty = (Frame)Application.Current.RootVisual;
}
return frameUseProperty;
}
}
public FrameNavigationService(Frame frame)
{
frameUseProperty = ArgumentValidator.AssertNotNull(frame, "frame");
}
[InjectDependencies]
public FrameNavigationService()
{
/* Intentionally left blank. */
}
public void GoBack()
{
Frame.GoBack();
}
public void Navigate(Uri source)
{
ArgumentValidator.AssertNotNull(source, "source");
Frame.Navigate(source);
}
public void Navigate(string relativeUrl)
{
ArgumentValidator.AssertNotNull(relativeUrl, "relativeUrl");
Frame.Navigate(new Uri(relativeUrl, UriKind.Relative));
}
}
The INavigationService is placed in the IoC container in the App class’s InitializeContainer method, as shown:
void InitializeContainer()
{
SimpleContainer container = new SimpleContainer();
container.InitializeServiceLocator();
...
Dependency.Register<INavigationService, FrameNavigationService>(true);
}
The InjectDependencies attribute on the FrameNavigationService parameterless constructor, indicates to the dependency injection system that it should use that particular constructor when instantiating the class.
In the Twitter timeline viewer sample for this chapter, the TwitterSignInViewModel class uses the INavigationService to navigate to the TimelineView page. TwitterSignInViewModel relies on a UriMapping to navigate to the page. The URI mapping is located in the App.xaml file of the project and causes the root frame of the app to direct to TwitterTimelineView.xaml whenever an attempt is made to navigate to a URI beginning with /TwitterTimeline/. See the following excerpt from the App.xaml file:
<phone:PhoneApplicationFrame.UriMapper>
<navigation:UriMapper>
<navigation:UriMapper.UriMappings>
<navigation:UriMapping Uri="/TwitterTimeline/{name}"
MappedUri="/DataDrivenApps/TwitterExample
/TwitterTimelineView.xaml?name={name}" />
</navigation:UriMapper.UriMappings>
</navigation:UriMapper>
</phone:PhoneApplicationFrame.UriMapper>
The screen name of the Twitter user is passed using a query string parameter called name.
By abstracting the INavigationService, you increase the reusability of your viewmodel code, and it enables you to coordinate navigation via viewmodel logic. This alleviates the logic fragmentation that can occur when relying on the view to perform navigation.
Observing LINQ to SQL Queries with a Custom Log
LINQ to SQL allows you to capture the generated SQL as it is being sent to a local database. This can be achieved by creating a custom TextWriter that outputs to the Visual Studio console window using Debug.WriteLine. An instance of the custom TextWriter is assigned to the Log property of the DataContext class.
John Gallardo demonstrates how to do this on his blog at http://bit.ly/mJYY74. The custom TextWriter, called DebugStreamWriter, is shown in Listing 26.9.
Listing 26.9. DebugStreamWriter Class
public class DebugStreamWriter : TextWriter
{
readonly int bufferSize = 256;
readonly StringBuilder stringBuilder;
public DebugStreamWriter(int bufferSize = 256)
{
this.bufferSize
= ArgumentValidator.AssertGreaterThan(0, bufferSize, "bufferSize");
stringBuilder = new StringBuilder(bufferSize);
}
public override Encoding Encoding
{
get
{
return Encoding.UTF8;
}
}
public override void Write(char value)
{
stringBuilder.Append(value);
if (stringBuilder.Length >= bufferSize)
{
Flush();
}
}
public override void WriteLine(string value)
{
Flush();
using (var reader = new StringReader(value))
{
string line;
while ((line = reader.ReadLine()) != null)
{
Debug.WriteLine(line);
}
}
}
protected override void Dispose(bool disposing)
{
if (disposing)
{
Flush();
}
}
public override void Flush()
{
if (stringBuilder.Length > 0)
{
Debug.WriteLine(stringBuilder);
stringBuilder.Clear();
}
}
}
To send all LINQ to SQL logging output to the DebugStreamWriter, it is assigned to the Log property of the DataContext class. I have chosen to do this in the TwitterDataContext class, as shown:
public class TwitterDataContext : DataContext
{
public TwitterDataContext(string connection) : base(connection)
{
Log = new DebugStreamWriter();
}
...
}
With this in place, we are able to view the activity of the DataContext via the Visual Studio Output pane (see Figure 26.11).
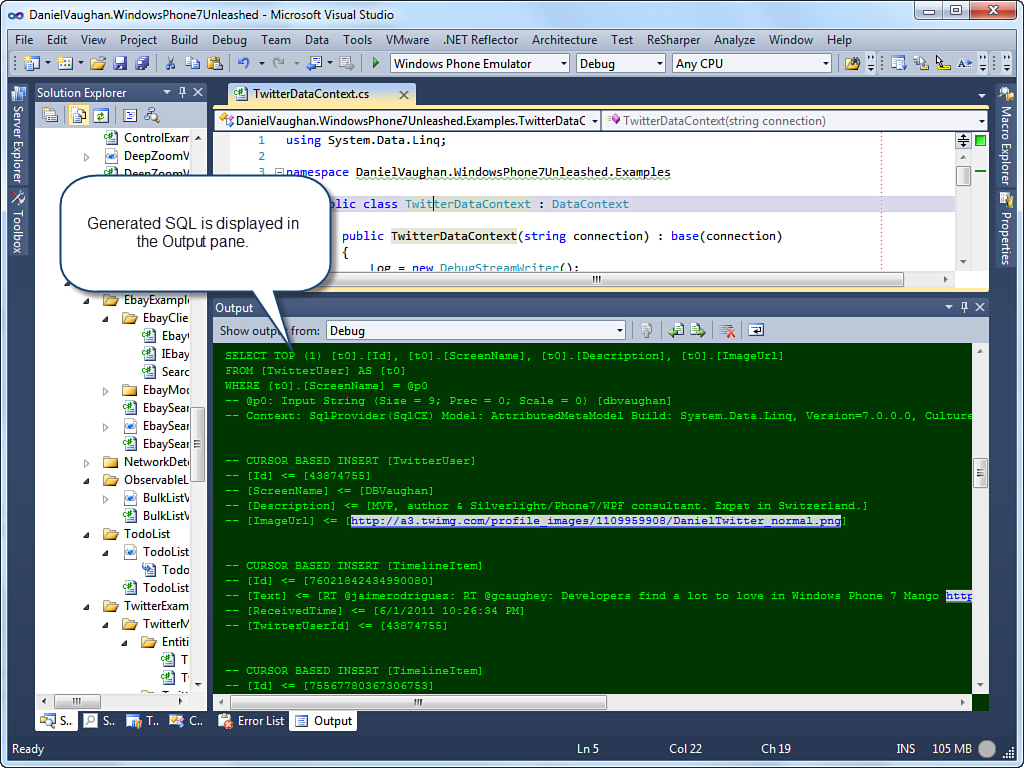
Figure 26.11. The Output pane displays the LINQ to SQL query.
Observing the generated SQL can help you gain an understanding of how LINQ to SQL works, as well as giving you the opportunity to optimize query complexity.
Updating a Database Schema
It is almost inevitable that when updating your app, adding new features and so forth, you will want to make changes to your database schema. Fortunately, local database support on the phone includes the ability to perform additive changes to a database, such as adding tables, columns, indexes, or associations, while preserving the data in the database.
For more complex schema changes, however, such as dropping a column from a table, you need to create a new database and migrate the data to the new schema.
Changes to your local database schema begin with changing the object model of the corresponding data context. Therefore, modify your entity classes first to reflect the desired state of the schema.
The Microsoft.Phone.Data.Linq.DatabaseSchemaUpdater class provides four schema altering methods:
• AddColumn<T>(string columnPropertyName)
• AddTable<T>()
• AddIndex<T>(string indexName)
• AddAssociation<T>(string associationPropertyName)
The following sections discuss each of these methods in greater detail.
AddColumn
AddColumn allows you to add a new column to an existing table. For example, if you added a new property to the TwitterUser class to record the user’s age, you would then need to use the DatabaseSchemaUpdater to create a new column to store the Age value. This could be achieved in the following manner:
using (DataContext dataContext
= new TwitterDataContext("isostore:Twitter.sdf"))
{
DatabaseSchemaUpdater updater
= dataContext.CreateDatabaseSchemaUpdater();
updater.AddColumn<TwitterUser>("Age");
updater.Execute();
}
The AddColumn method only allows columns to be added that can contain null values. Therefore, decorating a property with [Column(CanBeNull = false)] prevents the AddColumn method from succeeding and causes an SqlCeException to be raised when the DatabaseSchemaUpdater.Execute method is called.
The database does not change to reflect updates from the DatabaseSchemaUpdater until its Execute method is called, at which point all changes are submitted to the local database as a single transaction, which ensures the database maintains integrity if it is interrupted, such as when the user exits the app during an upgrade.
AddTable
Using the AddTable method allows you to create a new table for an entity class. On adding a new table, the DatabaseSchemaUpdater also applies the metadata associated with the entity class and creates any related indexes or foreign key constraints.
To add a new entity to the Twitter data model, we first create that entity and decorate it with Table and Column attributes. In the following example, the TwitterFriend class represents a Twitter user who happens to be a contact of another Twitter user (see Listing 26.10). TwitterFriend contains an Id and a ScreenName property. In addition, an index is declared for the ScreenName property.
Listing 26.10. TwitterFriend Class
[Table]
[Index(Columns = "ScreenName")]
public class TwitterFriend : NotifyPropertyChangeBase
{
string id;
[Column(IsPrimaryKey = true)]
public string Id
{
get
{
return id;
}
set
{
Assign("Id", ref id, value);
}
}
string screenName;
[Column]
public string ScreenName
{
get
{
return screenName;
}
set
{
Assign("ScreenName", ref screenName, value);
}
}
}
The following code is used to upgrade the schema to include a new table for storing TwitterFriend data:
using (DataContext dataContext
= new TwitterDataContext("isostore:Twitter.sdf"))
{
DatabaseSchemaUpdater updater
= dataContext.CreateDatabaseSchemaUpdater();
updater.AddTable<TwitterFriend>();
updater.Execute();
}
It can be seen from Figure 26.12 that after execution, the Twitter database contains the new table, with a secondary index on the ScreenName column, as desired.
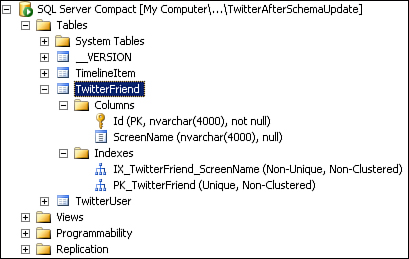
Figure 26.12. The TwitterFriend table has been added to the schema.
AddIndex
Suboptimal query performance is sometimes caused by table scans, where a query causes every row of a table to be examined. Depending on the kind of data in a column, bottlenecks of this nature can often be rectified by placing an index on the column.
The need for an index may be discovered after a table has been populated with a substantial number of records and after an app has been published to the marketplace, or the need may arise with the introduction of a new feature that causes the table to be queried in a different way. In both cases, adding an index to an existing table is done by decorating the entity class with an Index attribute and then by calling DatabaseSchemaUpdater.AddIndex.
For example, if we add an EmailAddress property to the TwitterFriend class and later decide to add an index to improve query performance, we would first decorate the TwitterFriend class with an index attribute like so:
[Index(Name = "EmailAddressIndex",
Columns = "EmailAddress", IsUnique = true)]
public class TwitterFriend : NotifyPropertyChangeBase
{
...
}
Once decorated with the Index attribute, the schema can be updated to include a new index for the column, as shown in the following excerpt:
using (DataContext dataContext
= new TwitterDataContext("isostore:Twitter.sdf"))
{
DatabaseSchemaUpdater updater
= dataContext.CreateDatabaseSchemaUpdater();
updater.AddIndex<TwitterFriend>("EmailAddressIndex");
updater.Execute();
}
AddAssociation
AddAssociation allows you to add a one-to-many association between two entities. This method results in a foreign key constraint being added to the column that holds the primary key of the foreign table.
AddAssociation accepts a single parameter: associationPropertyName, which is the name of the entity member that holds the foreign key of another table.
To illustrate, if we were to add a new association between the TwitterUser and the TimelineItem classes that matches the existing association, we would first set about by adding a new property to the TimelineItem class to hold the id of a TwitterUser like so:
[Table]
public class TimelineItem : NotifyPropertyChangeBase
{
string twitterUser2Id;
[Column]
public string TwitterUser2Id
{
get
{
return twitterUser2Id;
}
set
{
Assign("TwitterUser2Id", ref twitterUser2Id, value);
}
}
EntityRef<TwitterUser> user2;
[Association(Storage = "user2", ThisKey = "TwitterUser2Id",
IsForeignKey = true, Name = "FK_TwitterUser2")]
public TwitterUser TwitterUser2
{
get
{
return user2.Entity;
}
set
{
user2.Entity = value;
}
}
...
}
Explicitly providing a name for the foreign key constraint avoids collisions with existing constraint names, especially if similar associations have already been defined, as is the case with our TwitterUser property.
On the other side, the one side of the association, we would create a new EntitySet property for the new TimelineItem children, as shown:
[Table]
[Index(Columns = "ScreenName")]
public class TwitterUser : NotifyPropertyChangeBase
{
readonly EntitySet<TimelineItem> timelineItems2;
[Association(
Storage = "timelineItems2",
OtherKey = "TwitterUserId")]
public EntitySet<TimelineItem> TimelineItems2
{
get
{
return timelineItems2;
}
set
{
timelineItems2.Assign(value);
}
}
...
}
To materialize the association in the database, we would then perform the following updates:
using (TwitterDataContext dataContext
= twitterDatabaseUtility.CreateContext())
{
DatabaseSchemaUpdater updater
= dataContext.CreateDatabaseSchemaUpdater();
updater.AddColumn<TimelineItem>("TwitterUser2Id");
updater.AddAssociation<TimelineItem>("TwitterUser2");
updater.Execute();
}
Schema Versioning
The DatabaseSchemaUpdater class provides a DatabaseSchemaVersion property that allows you to programmatically distinguish between different versions of your database.
When a local database is created with the DataContext.CreateDatabase method, a table named _Version is automatically created. This table holds the current DatabaseSchemaVersion number.
In the following example, the database version is used to determine what needs to be done to update the schema to the current version:
using (TwitterDataContext dataContext
= twitterDatabaseUtility.CreateContext())
{
DatabaseSchemaUpdater updater
= dataContext.CreateDatabaseSchemaUpdater();
int databaseVersion = updater.DatabaseSchemaVersion;
if (databaseVersion < 2)
{
updater.AddColumn<TwitterUser>("Homepage");
updater.DatabaseSchemaVersion = 2;
updater.Execute();
}
if (databaseVersion < 3)
{
updater.AddColumn<TwitterUser>("Birthday");
updater.DatabaseSchemaVersion = 3;
updater.Execute();
}
}
As you make changes to your schema, take note of them. This eases the burden of writing schema versioning code later.
Mapping an Inheritance Hierarchy
So far in this chapter, you have seen how LINQ to SQL has been used to map entity classes to database tables in a one-to-one fashion. There are times, however, when constraining an entity model to a flat hierarchy can feel too restrictive, and you may want to use inheritance in your entity model. This is possible with LINQ to SQL using single table inheritance.
When multiple classes of a hierarchy are stored within the same table, this is called single table inheritance. It works by dedicating a column within the table to represent the type of the particular entity class.
While this approach decreases the level of normalization in a database, it can be an effective approach for entity classes that have a small degree of variation in their storage needs.
The following example creates an entity model representing bank accounts. These bank account objects are stored using a single table in a local database.
The example code for this section is located in the /DataDrivenApps /LinqToSqlInheritanceMapping directory of the WindowsPhone7Unleashed.Examples project in the downloadable sample code.
At the base of the class hierarchy is the BankAccount class, and deriving from this are the three classes: SavingsAccount, CheckingAccount, and FixedDepositAccount (see Figure 26.13).
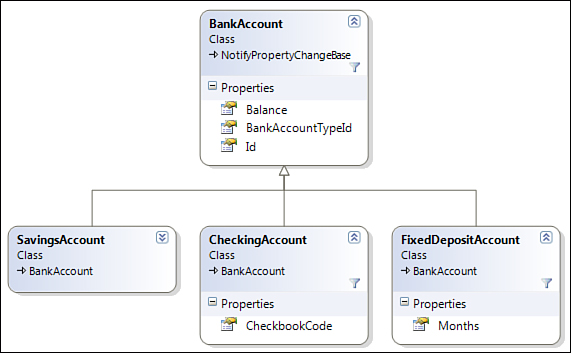
Figure 26.13. Bank account class hierarchy
The two primary elements for mapping an inheritance hierarchy are the InheritanceMapping attribute and the Column attribute’s IsDiscriminator property.
Listing 26.11 shows that the BankAccount class declares each of its derived types using the InheritanceMapping attribute. The Code property of the InheritanceMapping attribute is the unique column value representing the derived type. The BankAccountTypeId is decorated with a Column attribute that has its IsDescriminator property set to true, indicating that it corresponds to the InheritanceMapping attribute’s Code property.
Thus, if an entity is a SavingsAccount, then LINQ to SQL sets its BankAccountTypeId to 0. If the entity is a CheckingAccount, then BankAccountTypeId is set to 1. And so on.
Listing 26.11. BankAccount Class
[Table]
[InheritanceMapping(Code = 0, Type = typeof(SavingsAccount), IsDefault = true)]
[InheritanceMapping(Code = 1, Type = typeof(CheckingAccount))]
[InheritanceMapping(Code = 2, Type = typeof(FixedDepositAccount))]
public class BankAccount : NotifyPropertyChangeBase
{
int id;
[Column(
IsPrimaryKey = true,
DbType = "INT IDENTITY NOT NULL",
IsDbGenerated = true,
UpdateCheck = UpdateCheck.Never)]
public int Id
{
get
{
return id;
}
set
{
Assign("Id", ref id, value);
}
}
int bankAccountTypeId;
[Column(DbType = "Int NOT NULL", IsDiscriminator = true)]
public int BankAccountTypeId
{
get
{
return bankAccountTypeId;
}
set
{
Assign("BankAccountTypeId", ref bankAccountTypeId, value);
}
}
decimal balance;
[Column]
public decimal Balance
{
get
{
return balance;
}
set
{
Assign("Balance", ref balance, value);
}
}
}
Only the base class is decorated with a Table attribute; entity subclasses are not. Members of the subclass that are to be stored in the database are decorated with a Column attribute (see Listing 26.12).
Listing 26.12. CheckingAccount Class
[Index(Columns = "CheckbookCode")]
public class CheckingAccount : BankAccount
{
string checkbookCode;
[Column(DbType = "NCHAR(16)")]
public string CheckbookCode
{
get
{
return checkbookCode;
}
set
{
Assign("CheckbookCode", ref checkbookCode, value);
}
}
}
The custom BankingDataContext class has a single BankAccounts property and is used in the same manner as the Twitter example earlier in this chapter (see Listing 26.13).
Listing 26.13. BankingDataContext Class
public class BankingDataContext : DataContext
{
public BankingDataContext(string connection) : base(connection)
{
Log = new DebugStreamWriter();
}
public Table<BankAccount> BankAccounts
{
get
{
return GetTable<BankAccount>();
}
}
}
The BankingDataContextTests class, in the WindowsPhone7Unleashed.Tests project, demonstrates storage and retrieval of various banking entity types. A custom BankingDatabaseUtility is used to initialize the database file. Two accounts are inserted into the database and then retrieved using LINQ to SQL. See the following excerpt:
[TestMethod]
[Tag("i1")]
public void ContextShouldReadAndWrite()
{
using (BankingDataContext context = databaseUtility.CreateContext())
{
SavingsAccount savingsAccount = new SavingsAccount {Balance = 50};
CheckingAccount checkingAccount = new CheckingAccount
{
Balance = 100,
CheckbookCode = "12345"
};
context.BankAccounts.InsertAllOnSubmit(new List<BankAccount>
{
savingsAccount,
checkingAccount
});
context.SubmitChanges();
}
using (BankingDataContext context = databaseUtility.CreateContext())
{
List<BankAccount> accounts = context.BankAccounts.ToList();
Assert.IsTrue(accounts.Count > 2, "There should be two accounts.");
IQueryable<SavingsAccount> savingsAccounts
= context.BankAccounts.OfType<SavingsAccount>();
Assert.IsTrue(savingsAccounts.Any());
SavingsAccount account = savingsAccounts.First();
Assert.IsTrue(account.Balance == 50, "Balance should be 50");
}
}
Having support for mapping inheritance hierarchies in LINQ to SQL is a tolerable way of bridging the object relational divide.
Concurrency
LINQ to SQL has built-in support for optimistic concurrency; an entity is able to be retrieved and used in more than one operation at a time. When an entity is retrieved from the database, and then updated, if changes by another party occur in the interim, they are identified and a conflict is detected.
The mechanism supporting this feature is configured using two Column attribute properties: IsVersion and UpdateCheck.
IsVersion allows you to designate an entity class member to be used for optimistic concurrency control (OCC). Before committing a change to an entity, the data context verifies that no other transaction has modified its data. If the check reveals conflicting modifications, the committing transaction rolls back and an exception is raised.
IsVersion is not required for conflict detection. When not specified, however, the data context must retain copies of the entity’s member values and must compare the original values with the database values to detect conflicts, which is not terribly efficient.
LINQ to SQL supports multitier applications by allowing entities to be attached to a DataContext. Such an entity may have been retrieved using a different DataContext instance or deserialized after being sent over the wire from another tier via a web service.
In the following example you see that by adding a version property to the BankAccount class (presented in the previous section), you can prevent conflicting changes from being written to the database. BankAccount now contains a DateVersion property of type byte[]:
byte[] dataVersion;
[Column(
IsVersion = true,
IsDbGenerated = true,
UpdateCheck = UpdateCheck.Never)]
public byte[] DataVersion
{
get
{
return dataVersion;
}
set
{
Assign("DataVersion", ref dataVersion, value);
}
}
The DataVersion value is materialized as a ROWVERSION field in the database (see Figure 26.14). The ROWVERSION data type causes the table field to be automatically updated whenever a row update occurs.
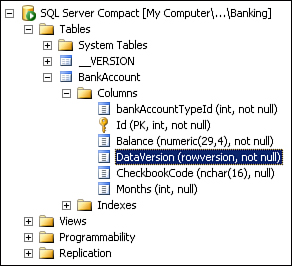
Figure 26.14. By default, the version member is materialized as a ROWVERSION column.
The BankingDataContextTests class contains a test method for demonstrating conflict detection. It creates a CheckingAccount, called beforeAccount, and inserts it into the database.
It then retrieves the same account, this time in the scope of a new BankingDataContext, sets its CheckbookCode to a new value, and then updates the database.
Finally, it attaches the beforeAccount instance to a new DataContext and attempts to update the CheckbookCode to a new value. See the following excerpt:
[TestMethod]
[Tag("i2")]
[ExpectedException(typeof(ChangeConflictException))]
public void ContextShouldEnforceUpdateChecking()
{
CheckingAccount beforeAccount;
using (BankingDataContext context = databaseUtility.CreateContext())
{
beforeAccount = new CheckingAccount
{
Balance = 100,
CheckbookCode = "11111"
};
context.BankAccounts.InsertOnSubmit(beforeAccount);
context.SubmitChanges();
}
using (BankingDataContext context = databaseUtility.CreateContext())
{
CheckingAccount afterAccount
= (CheckingAccount)context.BankAccounts.Where(
x => x.Id == beforeAccount.Id).First();
afterAccount.CheckbookCode = "22222";
context.SubmitChanges();
}
using (BankingDataContext context = databaseUtility.CreateContext())
{
context.BankAccounts.Attach(beforeAccount);
beforeAccount.CheckbookCode = "33333";
context.SubmitChanges();
}
}
When context.SubmitChanges is called, a conflict is detected because the afterAccount object, representing the same account, was updated in the database in the interim. This raises a ChangeConflictException (see Figure 26.15), which is defined as an expected exception, using the ExpectedException test attribute shown in the previous excerpt.
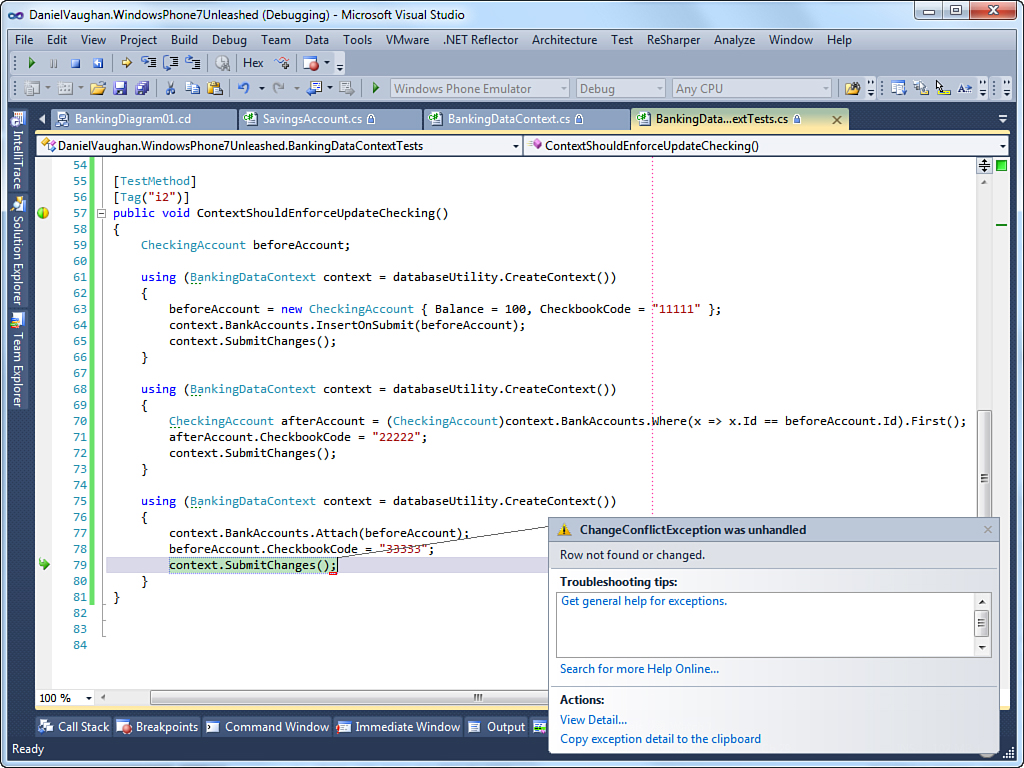
Figure 26.15. A ChangeConflictException is raised when a conflict is detected.
Providing a dedicated version property within your entity classes is good practice when enabling conflict detection. When not used, the data context relies solely on the Column attribute’s UpdateCheck property for inferring conflict detection behavior.
ColumnAttribute.UpdateCheck
UpdateCheck informs the data context when to verify that a member value in the database has not changed since it was retrieved. The following is the list of valid UpdateCheck values:
• Always
• Never
• WhenChanged
When performing an update without the existence of a dedicated version member, LINQ to SQL generates an UPDATE statement with a WHERE clause that includes the original column values. If the values do not match those in the database, no update occurs, and a conflict is detected, raising an exception.
The default value of UpdateCheck is UpdateCheck.Always. If set to UpdateCheck.Always, conflict detection occurs even if the entity’s member value has not changed.
If the UpdateCheck attribute property is set to UpdateCheck.Never, the member does not participate in conflict detection. You can use this value to effectively switch off conflict detection for a particular member.
If the UpdateCheck attribute property is set to UpdateCheck.WhenChanged, conflict detection for the member occurs only if the value has changed in the entity object.
Summary
This chapter began with an overview of how local databases are deployed to Windows Phone.
The chapter explored the code-first approach to data model creation and walked through a sample Twitter timeline viewer that caches data in a local database, during which you explored several facets of LINQ to SQL including entity creation, change tracking, and entity multiplicity.
The chapter then looked at the database-first approach to data model creation. You saw how to retrieve a local database file from isolated storage, and how to use the SqlMetal tool to generate a data model from a database.
The chapter then examined a custom navigation service that allows navigation from a viewmodel without reliance on the built-in navigation of the phone, which can increase the testability of viewmodel classes.
A technique for observing LINQ to SQL queries using a custom log was discussed. You saw how to upgrade a schema without losing data, and how to use version numbering to provide incremental updates to your database schema.
Finally, the chapter looked at mapping inheritance hierarchies using LINQ to SQL, and at concurrency and conflict detection.