
Chapter 27. Scheduled Actions
In This Chapter
• Alarms and reminders
• Periodic and resource intensive tasks
• Shell tile deep linking
• Using a Mutex to access shared resources safely
• LongListSelector custom grouping keys
The need to perform background processing is not uncommon for Windows Phone apps. The transient nature of the app’s life cycle makes performing some long-running or periodic tasks difficult.
One of Microsoft’s goals with Windows Phone has been to forestall the battery life limitations present on other phone platforms. One way that it first did this was to limit the number of apps that could run simultaneously to just one app. This meant that using a cloud service and push notification was the only way to simulate background processing.
With the introduction of multitasking capabilities in the Windows Phone 7.5 (Mango) release, a limit of one foreground app in execution is still in place, yet now Microsoft has introduced a new way to run part of your app in the background.
This chapter looks at the scheduled notification system, which consists of a useful set of classes for setting reminders and alarms, which are able to present a message to the user at a predetermined time regardless of whether your app is running in the foreground.
The chapter then examines the scheduled task system, which extends the principles underpinning the notification system and offers the capability to run your own code in the background. You see how to create a todo list app that leverages a local database and updates live tiles from a background agent.
Finally, the chapter delves into a more advanced topic that explains how to use a Mutex to provide safe access to resources shared by your foreground app and your background agent.
Background Tasks
Background tasks refer collectively to actions that are registered with the phone OS to run in the background and that occupy the following four distinct areas of application functionality:
• Scheduled notifications
• Scheduled tasks
• Background file transfers
• Background audio
Of these, scheduled notifications are the simplest to use and understand. They are notifications that can be set from your app to display a message to the user at some time in the future.
Scheduled tasks allow you to register a class containing a method that is called periodically, even when your app is not running. They are multipurpose and offer the greatest utility for extending your app to perform background activities. Scheduled tasks may be used to perform some action periodically, such as querying a cloud service and updating a live tile, or they may be used to perform a less frequent resource intensive action, such as batch processing a set of images.
Transferring large files is difficult when your app may be tombstoned or closed at any time. The phone includes a background file transfer system that allows you to request a file to be downloaded from the Web to isolated storage or uploaded from isolated storage to a cloud service.
Windows Phone devices generally offer a rich multimedia experience for users. Users today are frequently forgoing a dedicated audio device and turning instead to the phone to play audio. Windows Phone allows you to build an audio app that can respond to the phone’s built-in play controls even when your app is not running.
The following sections explore scheduled notification and scheduled tasks in detail. Background file transfers and background audio are discussed in subsequent chapters.
Scheduled Notifications
Sometimes an app may need to schedule a message to be displayed to the user at a future date. One way to achieve this, without relying on the user to have the app open to display the message, is to use a scheduled notification. Scheduled notifications present a dialog to the user at a predefined date and time that provides the user with the following three options:
• A snooze button allows the user to postpone the notification for several minutes. The snooze period can be set by the user when using a reminder.
• A dismiss button allows the user to close the notification.
• Tapping elsewhere within the notification dialog launches your app.
The Windows Phone notification system consists of two types of notifications: alarms and reminders. These provide a simple way to link back to your app and do not depend on your app being in the foreground. Figure 27.1 shows an alarm being displayed.

Figure 27.1. An alarm may be snoozed or dismissed by the user.
Tapping an alarm or reminder launches your app. If your app is in the foreground and the user taps the alarm, the alarm dialog is simply dismissed.
The two types of scheduled notifications are represented by the Alarm and Reminder classes. Both types may be set to be periodic, occurring every day for example, or they may be set to occur only once.
Registration of a notification is done using the ScheduledActionService class, which is demonstrated later in this section. ScheduledActionService handles the registration of both scheduled notifications and scheduled tasks.
While scheduled notifications offer an effective and easy way to link back to your app, there is a limit to how many can be registered by your app. This limit is 50 alarms and reminders in total. Attempting to register more than this number raises an InvalidOperationException.
Alarm and Reminder classes are derived from the ScheduleNotification class, which contains a Content property and a Title property that are displayed to the user (see Figure 27.2).
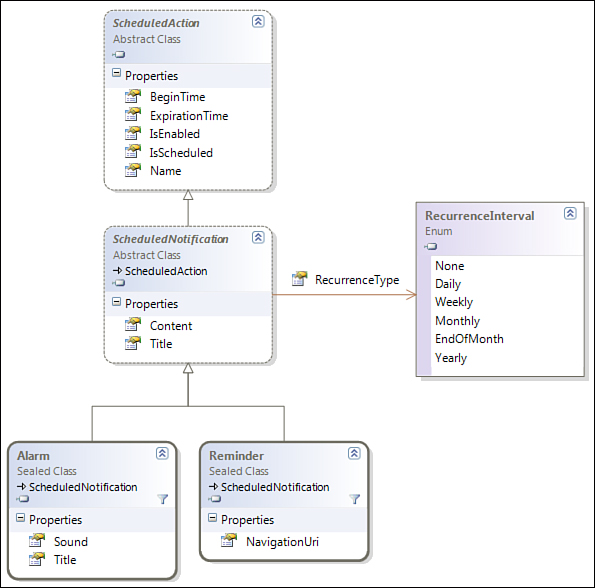
Figure 27.2. Scheduled notifications class diagram
The Title property is supported only by the Reminder class and not by the Alarm class. Alarm overrides the Title property, and its setter raises a NotSupportedException if it is used. When the alarm notification is displayed, the title in the alarm dialog is always Alarm.
The most important distinction between alarms and reminders is that reminders allow you to deep link to your app. This means that a URI can be associated with the reminder so that when the user taps the reminder, your app is launched to a specific page and you can determine the course of action based on the URI’s query string. While tapping an alarm also launches the app, it does not provide an equivalent URI property.
Another distinction between the Alarm and Reminder classes is that the Alarm class includes a Sound property, which allows you to specify the sound file to play when an alarm occurs, which the Reminder class does not.
The time and date of the notification are specified using the ScheduledAction.BeginTime property, which is of type DateTime. The date component of the BeginTime property is relevant only when using a RecurrenceType of None. RecurrenceType defines if, and for what period, scheduled notifications should be periodically presented to the user. If the value is None (the default), the notification is raised only once.
When setting the BeginTime property of a notification, the value must fall after the current time, or an InvalidOperationException ensues.
The ScheduledAction.ExpirationTime property is used to define the window for which the notification is raised; when the date and time on the phone occur after the ExpirationTime value, the notification schedule expires and the notification is no longer raised. If not specified, ExpirationTime is set to DateTime.MaxValue, resulting in it never expiring.
The following sections examine the use of each notification type in greater detail.
Alarm Registration
As previously stated, registering an alarm is done via the ScheduledActionService. When using the ScheduledActionService, each notification must be given a unique name, or an exception is raised when you try and add it to the service. In the following example, we avoid reregistering a notification by detecting whether a notification with the same name has already been registered. We then use the ScheduledActionService class’s Add method to register the alarm, as shown:
Alarm alarm = new Alarm(alarmName)
{
BeginTime = DateTime.Now.AddDays(1),
Content = "A test alarm.",
RecurrenceType = RecurrenceInterval.None,
Sound = new Uri("/Sounds/Alarm.wma", UriKind.Relative),
};
if (ScheduledActionService.Find(alarm.Name) != null)
{
ScheduledActionService.Remove(alarm.Name);
}
ScheduledActionService.Add(alarm);
The BeginTime property indicates when the alarm is due to occur. RecurrenceInterval.None specifies that the alarm is not recurring, which need not be specified as it is the default value.
The Alarm.wma audio file is located in the project and has its Build Action set to Content. When the alarm occurs, the audio file is played.
The Alarm class properties are examined in greater detail in the following section, where you explore the downloadable sample code for this section.
Alarm Sample
The sample code for this section includes a page that allows you to enter the details of a new alarm—including its name and begin time—and to set the alarm via an application bar button. The code is located in the Alarms directory of the WindowsPhone7Unleashed.BackgroundAgents project, in the BackgroundAgents solution.
Within the sample, the AlarmViewModel class contains various properties that correspond to the following properties of the Alarm class:
• BeginTime—A DateTime value indicating when the alarm should occur.
• Name—A unique string identifier for the alarm.
• RecurrenceType—A RecurrenceInterval enum value that specifies whether the alarm is a one-time alarm, or that it should recur every day or month.
• ExpirationTime—When the alarm is a recurring alarm, this value indicates when the alarm is to be deemed no longer valid, and removed by the OS.
• Content—A string that is presented in the alarm dialog when the alarm occurs.
• Sound—When the alarm occurs, a sound is played. This property is a relative URI to an audio file within the assembly, allowing you to change the default sound that is played to one of your choosing.
The viewmodel contains a single ICommand called AlarmSetCommand, which is initialized in the viewmodel’s constructor, as shown:
public AlarmViewModel()
{
alarmSetCommand = new DelegateCommand(obj => SetAlarm());
}
When executed, the command calls the SetAlarm method, which creates a new Alarm using the viewmodel’s property values. The built-in ScheduledActionService is used to register the alarm, as shown in the following excerpt:
void SetAlarm()
{
Alarm alarm = new Alarm(alarmName)
{
BeginTime = alarmBeginTime,
ExpirationTime = alarmExpirationTime,
Content = alarmContent,
RecurrenceType = alarmRecurrenceType,
Sound = alarmSound,
/* Alarm does not support setting the Title. */
// Title = alarmTitle
};
if (ScheduledActionService.Find(alarm.Name) != null)
{
ScheduledActionService.Remove(alarm.Name);
}
ScheduledActionService.Add(alarm);
MessageService.ShowMessage("alarm set");
}
The alarmSound field of the viewmodel is set to a Content resource located in the project’s Sounds directory, as shown:
readonly Uri alarmSound = new Uri("/Sounds/Alarm.wma", UriKind.Relative);
While nearly all of the viewmodel’s properties are used merely as values for a new Alarm, one property, RecurrenceIntervals, allows the user to pick the recurrence type of the alarm using a Silverlight Toolkit ListPicker in the view. The ListPicker is bound to the RecurrenceIntervals property of the viewmodel.
Population of the recurrenceIntervals backing field is done using the custom EnumUtility class, presented in Chapter 6, “Text Elements.” The CreateEnumValueList method retrieves the possible enum values using reflection. See the following excerpt:
readonly IEnumerable<RecurrenceInterval> recurrenceIntervals
= EnumUtility.CreateEnumValueList<RecurrenceInterval>();
public IEnumerable<RecurrenceInterval> RecurrenceIntervals
{
get
{
return recurrenceIntervals;
}
}
By using reflection to retrieve the list of enum values, it means they do not have to be hard-coded into the viewmodel.
The view allows the user to set the properties of a new alarm. Silverlight Toolkit TimePicker and DatePicker controls are used to set the begin and expiration times of the alarm, as shown in the following excerpt:
<StackPanel Grid.Row="1" Margin="12,0,12,0">
<TextBlock Text="name" />
<TextBox Text="{Binding AlarmName, Mode=TwoWay}" />
<TextBlock Text="content" />
<TextBox Text="{Binding AlarmContent, Mode=TwoWay}" />
<StackPanel Orientation="Horizontal">
<StackPanel>
<TextBlock Text="begin time" />
<toolkit:TimePicker
Value="{Binding AlarmBeginTime, Mode=TwoWay}" />
</StackPanel>
<StackPanel>
<TextBlock Text="expires" />
<toolkit:DatePicker
Value="{Binding AlarmExpirationTime, Mode=TwoWay}" />
</StackPanel>
</StackPanel>
<toolkit:ListPicker
Header="recurrence interval"
ItemsSource="{Binding RecurrenceIntervals}"
SelectedItem="{Binding AlarmRecurrenceType, Mode=TwoWay}" />
</StackPanel>
The view also includes an AppBar with a button that is bound to the AlarmSetCommand, like so:
<u:AppBar>
<u:AppBarIconButton
Command="{Binding AlarmSetCommand}"
Text="Set Alarm"
IconUri="/Images/ApplicationBarIcons/Check.png" />
</u:AppBar>
The various viewmodel properties are initialized with default values. Figure 27.3 shows the set alarm view, which allows the user to enter the new alarm information.
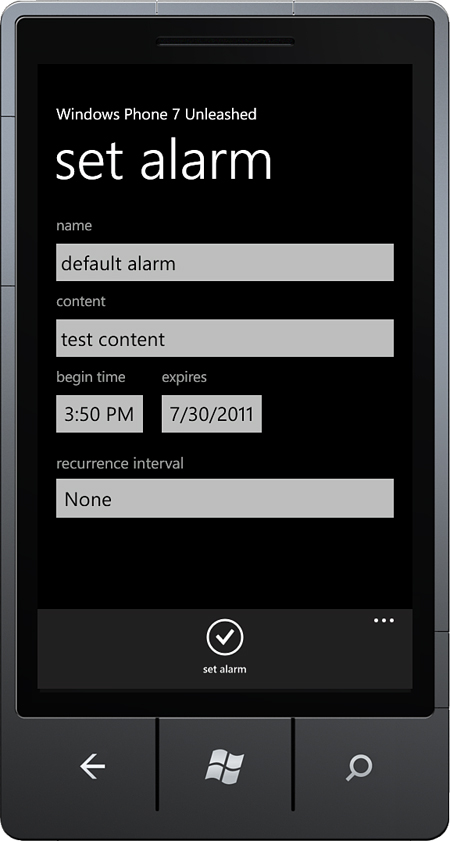
Figure 27.3. The set alarm view
When the set alarm button is tapped, the AlarmSetCommand is executed, registering the alarm with the OS. Once the begin time for the alarm comes around, the alarm dialog is displayed to the user.
Reminder Registration
Reminder registration is done in much the same way as for Alarm objects. The reminder is instantiated and then registered with the ScheduledActionService. With reminders, however, you are able to provide a URI that allows you to deep link back to a particular page within the app, as shown in the following excerpt:
Reminder reminder = new Reminder("ReminderName")
{
BeginTime = DateTime.Now.AddMinutes(5),
ExpirationTime = DateTime.Now.AddDays(5),
Content = "Your daily reminder.",
RecurrenceType = RecurrenceInterval.Daily,
NavigationUri = new Uri("/ReminderView.xaml?Id=ReminderName",
UriKind.Relative),
Title = reminderTitle
};
if (ScheduledActionService.Find(reminder.Name) != null)
{
ScheduledActionService.Remove(reminder.Name);
}
ScheduledActionService.Add(reminder);
The following section looks at creating a page that allows you to experiment with reminders.
Reminder Sample
The Reminder sample mirrors the alarm sample; however, the reminder sample demonstrates how to use the deep linking feature of reminders to allow editing of a reminder after it has been created.
The sample code for this section is located in the Reminders directory of the WindowsPhone7Unleashed.BackgroundAgents project in the BackgroundAgents solution.
Like the Alarm sample, the ReminderView page allows the user to enter the details of a new reminder and to set the reminder via an application bar button.
The ReminderViewModel class contains various properties that correspond to the Reminder class properties. Unlike the Alarm class, however, the Reminder class does not provide the ability to customize the sound effect of the notification.
The viewmodel contains two ICommand properties: one for registering a new reminder, the other for displaying an existing reminder after it has been navigated to via a deep link. The backing fields for both commands are initialized in the viewmodel constructor, like so:
public ReminderViewModel()
{
reminderSetCommand = new DelegateCommand(obj => SetReminder());
loadReminderCommand = new DelegateCommand<string>(LoadReminder);
}
When executed, the ReminderSet command calls the SetReminder method, which creates a new Reminder using the viewmodel’s property values. In addition, we construct a Uri object that links back to the page if and when the user taps the reminder when it is displayed. See the following excerpt:
void SetReminder()
{
const string reminderUrlFormat = "/Reminders/ReminderView.xaml?Id={0}";
string navigationUrl = string.Format(reminderUrlFormat, ReminderName);
Uri navigationUri = new Uri(navigationUrl, UriKind.Relative);
Reminder reminder = new Reminder(ReminderName)
{
BeginTime = reminderBeginTime,
ExpirationTime = reminderExpirationTime,
Content = reminderContent,
RecurrenceType = reminderRecurrenceType,
NavigationUri = navigationUri,
Title = reminderTitle
};
if (ScheduledActionService.Find(reminder.Name) != null)
{
ScheduledActionService.Remove(reminder.Name);
}
ScheduledActionService.Add(reminder);
MessageService.ShowMessage("reminder set");
}
When the LoadReminderCommand executes, the LoadReminder method is called with the command parameter, which should be the name of a registered Reminder. The ScheduledActionService is used to retrieve the Reminder by name. If it is located, then the viewmodel’s properties are populated with the Reminder values, as shown:
void LoadReminder(string name)
{
Reminder reminder = ScheduledActionService.Find(name) as Reminder;
if (reminder == null)
{
MessageService.ShowError("Reminder not found.");
return;
}
ReminderBeginTime = reminder.BeginTime;
ReminderContent = reminder.Content;
ReminderName = reminder.Name;
ReminderRecurrenceType = reminder.RecurrenceType;
ReminderTitle = reminder.Title;
}
LoadReminderCommand is executed via the view’s OnNavigatedTo method. When the user taps a reminder, the app starts with the ReminderView displayed. The OnNavigatedTo method extracts the Reminder name using a key exposed by the viewmodel (see Listing 27.1).
The command is prevented from being executed more than once using an initialized flag. OnNavigatedTo may be called more than once if the app was tombstoned or a back navigation took place.
Listing 27.1. ReminderView Class
public partial class ReminderView : PhoneApplicationPage
{
bool initialized;
readonly ReminderViewModel viewModel;
public ReminderView()
{
InitializeComponent();
DataContext = viewModel = new ReminderViewModel();
}
protected override void OnNavigatedTo(NavigationEventArgs e)
{
base.OnNavigatedTo(e);
if (initialized)
{
return;
}
initialized = true;
string reminderId;
if (NavigationContext.QueryString.TryGetValue(
ReminderViewModel.IdQueryKey, out reminderId))
{
viewModel.LoadReminderCommand.Execute(reminderId);
}
}
}
The root grid within the view XAML contains a custom AppBar that includes an AppBarIconButton bound to the ReminderSetCommand, like so:
<u:AppBar>
<u:AppBarIconButton
Command="{Binding ReminderSetCommand}"
Text="Set"
IconUri="/Images/ApplicationBarIcons/Check.png" />
</u:AppBar>
The view allows the user to set the properties of a new Reminder or to edit the properties of an existing Reminder.
<StackPanel Grid.Row="1" Margin="12,0,12,0">
<TextBlock Text="name" />
<TextBox Text="{Binding ReminderName, Mode=TwoWay}" />
<TextBlock Text="title" />
<TextBox Text="{Binding ReminderTitle, Mode=TwoWay}" />
<TextBlock Text="content" />
<TextBox Text="{Binding ReminderContent, Mode=TwoWay}" />
<StackPanel Orientation="Horizontal">
<StackPanel>
<TextBlock Text="begin time" />
<toolkit:TimePicker
Value="{Binding ReminderBeginTime, Mode=TwoWay}" />
</StackPanel>
<StackPanel>
<TextBlock Text="expires" />
<toolkit:DatePicker
Value="{Binding ReminderExpirationTime, Mode=TwoWay}" />
</StackPanel>
</StackPanel>
<toolkit:ListPicker
Header="recurrence interval"
ItemsSource="{Binding RecurrenceIntervals}"
SelectedItem="{Binding ReminderRecurrenceType, Mode=TwoWay}" />
</StackPanel>
Figure 27.4 shows the set reminder view, which allows the user to enter the new reminder information.
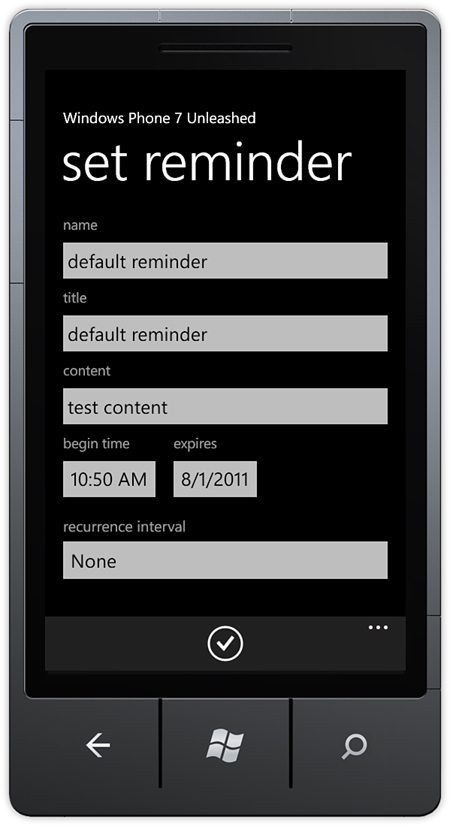
Figure 27.4. Set Reminder view
Once the reminder has been set and the begin time arrives, a dialog is presented to the user, displaying the reminder information (see Figure 27.5).

Figure 27.5. A reminder can be snoozed or dismissed by the user.
Tapping the reminder launches the app and automatically causes the app to navigate to the NavigateUri property of the Reminder, which allows the Reminder to be modified and reregistered.
Alarms and reminders offer a simple way to add notification support to your app. The next section looks at scheduled tasks and how they offer the ability to perform application logic in the background.
Scheduled Tasks
A scheduled task allows you to perform an activity in the background while your app is, or is not, running. A task can be used to query a cloud service and update the app’s shell tiles and provides your users with the opportunity to respond to some event.
Scheduled tasks follow the same model as scheduled notifications, yet they add one other dimension: user-defined task agents. While scheduled notifications rely solely on built-in task agents for presenting notification dialogs, with scheduled tasks, you define your own.
Like scheduled notifications, scheduled tasks are registered with the ScheduledActionService when your app is running. Registration causes your task agent to run in the background at an indeterminate time and in a separate process.
Once a scheduled task is registered, it is persisted across reboots of the OS. The user can view and/or disable background tasks from the Settings screen by navigating to Settings/applications/background tasks (see Figure 27.6).

Figure 27.6. The user can disable scheduled tasks via the background tasks screen.
The scheduled task system consists of the following three components:
• A task registration service called ScheduledActionService, which is the same service used by the scheduled notification system (uses Alarms and Reminders).
• A background agent that derives from ScheduledTaskAgent, which is used to perform the background activity.
• The tasks themselves, which can be either of type PeriodicTask or ResourceIntensiveTask. Task objects allow you to pass information to your task agent from your app, determine how the task agent is executed, and when it expires.
Background Agent Types
Windows Phone supports three types of background agents: ScheduledTaskAgent, AudioPlayerAgent, and AudioStreamingAgent (see Figure 27.7).

Figure 27.7. BackgroundAgent types
Audio player agents are specialized agents used to retrieve audio files and coordinate the playback of background audio. AudioPlayerAgent and AudioStreamingAgent are explored in Chapter 29, “Background Audio.”
ScheduledTaskAgent is an abstract class, which you subclass to provide your own logic to be performed whenever the OS chooses to invoke your agent. When invoked, the OS passes the registered task object to the task agent, which allows you to determine what kind of activity is to be performed.
ScheduledTaskAgents handle two kinds of tasks: periodic and resource intensive, which are represented by the PeriodicTask and ResourceIntensiveTask classes, respectively.
An app may have only one periodic task and/or one resource intensive task. If an attempt is made to register more than one of either type, an InvalidOperationException is raised.
Scheduled tasks are registered in the same manner as ScheduledNotification objects: with the ScheduledActionService. At an indeterminate time after registration, the operating system instantiates your task agent and passes it the scheduled task (see Figure 27.8). The agent then performs any processing it needs to do in the background and then signals that it has either completed its work or that it is unable to complete.

Figure 27.8. Periodic tasks are registered with the ScheduledActionService. The OS invokes the ScheduledTaskAgent, passing it the PeriodicTask object.
It is important to recognize the distinction between the roles of tasks and task agents. Tasks contain information that is passed to the task agent. Their purpose is to allow the ScheduledActionService to determine how and when to run the task agent. It is the task agent that performs the background activity, and it is there that you can place your code to be executed in the background.
PeriodicTask and ResourceIntensiveTask are analogous to the ScheduledNotification classes: Alarm and Reminder. ScheduledTask and ScheduledNotification both derive from ScheduledAction, which includes properties for the name and expiration date of the task (see Figure 27.9).
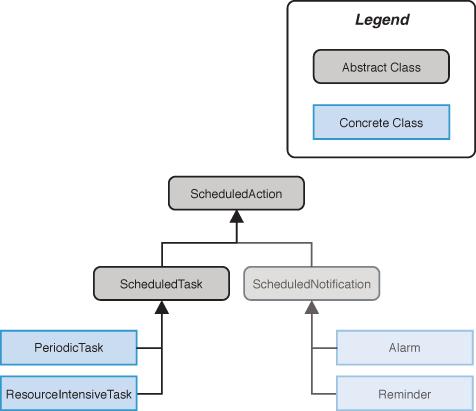
Figure 27.9. ScheduledTask is derived from ScheduledAction, the same base class for scheduled notifications.
The following sections examine the two ScheduledTask types, PeriodicTask and ResourceIntensiveTask, in greater detail.
Periodic Tasks
A periodic task is used to perform short operations and is allocated a 15-second window to complete its work. Periodic tasks run, at most, every 30 minutes. Typical scenarios for periodic tasks include performing small incremental data synchronization with a cloud service, using geographic location to track the location of the device, or polling a social network cloud service for new messages or status updates.
When retrieving the geographic location of the device within a scheduled task (via a GeoCoordinateWatcher), a cached location value is used instead of real-time data. This helps to minimize the power consumption of background agents. It does, however, also introduce a lag for determining the location of the device, which may be problematic in some scenarios.
Periodic Task Invocation
There are no guarantees that a periodic task will ever run. To minimize resources, the phone OS launches all periodic tasks for all apps on the device at approximately the same time. This can mean that if a large number of periodic tasks are registered, not all will be invoked. Moreover, Battery Saver mode is an option that the user can enable on the device to indicate that battery life should be prioritized. If this mode is enabled, periodic agents may not run, even if the task interval has elapsed.
There is also a limit on the total number of periodic agents that can be scheduled on a device. This limit varies from device to device, but it can be as low as six. If this limit is approached, the user is warned that multiple background agents are running and that it may cause faster battery consumption.
Resource Intensive Tasks
Resource intensive tasks (also known as on idle tasks) are allocated a substantially longer execution time than periodic tasks. Resource intensive tasks, however, only run when the phone meets a minimum set of requirements relating to processor activity, power source, and network connection type (see Table 27.1). This task is typically used to synchronize large amounts of data to the phone during periods of inactivity.
Table 27.1. Run Eligibility Requirements for Resource Intensive Tasks

Resource intensive tasks typically run for a maximum of 10 minutes. The runtime is cut short, however, if one or more of the requirements that determine eligibility to launch are no longer met.
Due to the hefty requirements for resource intensive tasks, it is possible that a resource intensive task may never be launched. Be mindful of this when designing your app and allow your foreground app to adapt to the absence of any processing that should have taken place in the background but did not.
Using Scheduled Tasks
Using scheduled tasks in your app involves creating an agent class and adding an XML fragment to your WMAppManifest.xml file. This process can be done manually or by using the Windows Phone Scheduled Task Agent project template that resides beneath the Silverlight for Windows Phone node of the Add New Project dialog (see Figure 27.10).

Figure 27.10. Adding a new Windows Phone Scheduled Task Agent project
The benefit of using the project template to create a scheduled task agent is seen when you reference that project from your primary phone project; a required XML fragment is automatically placed in the WMAppManifest.xml file.
Scheduled tasks have restricted capabilities, and some APIs are off-limits. Even if your scheduled task does not use any of the restricted APIs, the mere presence of code that does, in a referenced assembly, may cause your app to fail the Windows Phone Marketplace certification process. It is therefore wise to segregate your scheduled task in a separate project. If there is shared code between your foreground app and scheduled task projects, it can be placed in a third project and referenced by both.
In the samples for this chapter, I have chosen to place the background agent code within the same project as the main application, purely for the sake of convenience.
For more information on scheduled task limitations, see the section “Scheduled Task API Limitations” later in the chapter.
A secondary benefit that can arise from using a separate project for your agent is that it can help to minimize the size of the assembly that is loaded by the CLR when your agent is invoked, which may marginally improve the load time of your agent; the larger an assembly is, the longer it takes the CLR to load it.
The XML fragment placed in the WMAppManifest.xml file informs the OS of the agent class type, so that it can be resolved and invoked. The XML fragment resembles the following:
<Tasks>
<DefaultTask Name ="_default" NavigationPage="MainPage.xaml"/>
<ExtendedTask Name="BackgroundTask">
<BackgroundServiceAgent Specifier="ScheduledTaskAgent"
Name="[An identifier]"
Source="[Assembly Name]"
Type="[Class Name]" />
</ExtendedTask>
</Tasks>
Table 27.2 provides descriptions of the attributes of the BackgroundServiceAgent element.
Table 27.2. BackgroundServiceAgent Attributes
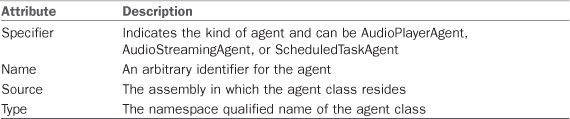
If an attribute of the BackgroundServiceAgent element is incorrect—for example, the type is unresolvable or the Specifier is not a known value—then an InvalidOperationException is raised when the OS attempts to invoke the task agent, and not before.
Scheduled Task Agent
When using the Windows Phone Scheduled Task Agent project template, you begin with a class resembling the following:
public class ScheduledAgent : ScheduledTaskAgent
{
protected override void OnInvoke(ScheduledTask task)
{
//TODO: Add code to perform your task in background
NotifyComplete();
}
}
Your agent’s OnInvoke method is called by the OS. In this method, your app can determine the type of ScheduledTask that triggered the invocation of the agent and perform actions accordingly. The task passed to the OnInvoke method is either a PeriodicTask or a ResourceIntensiveTask. To branch according to the type of task, something like the following can be used:
if (task is PeriodicTask)
{
ProcessPeriodicTask();
}
else
{
ProcessResourceIntensiveTask();
}
The NotifyComplete method of the base class informs the background task system that your task has finished its activities and signals that it is okay for the process to be terminated.
Only call NotifyComplete when your agent has finished everything it needs to do, or your agent may be terminated along with any child threads spawned along the way.
If your agent is unable to perform its work because of an unavailable resource, a cloud service for example, call the Abort method instead of the NotifyComplete method. Abort has the same effect on task termination, but causes the task’s IsScheduled property to be set to false, which can then be detected and dealt with appropriately by your foreground app. If IsScheduled is false, you know that Abort was called.
To maximize the number of dormant applications, each scheduled task agent is limited to 6MB of RAM. If your agent exceeds that amount, the agent is terminated. Two consecutive violations result in schedule suspension.
Be mindful, however, that this limitation is not enforced while debugging.
The amount of memory available to your agent can be measured like so:
long usedBytes
= Microsoft.Phone.Info.DeviceStatus.ApplicationCurrentMemoryUsage;
long limitBytes
= Microsoft.Phone.Info.DeviceStatus.ApplicationMemoryUsageLimit;
if ((usedBytes + 1048576) < limitBytes) // 1 048 576 = 1 MB
{
/* Do work with 1 MB. */
}
Scheduled Task Registration
Registering a task is achieved from your foreground app.
ScheduledAction objects can be registered only when your app is in the foreground and not from a background agent. Attempting to register ScheduledAction in a background agent raises an InvalidOperationException.
The following shows how to create a new PeriodicTask:
string taskName = "a unique name";
PeriodicTask periodicTask = new PeriodicTask(taskName)
{
/* Description is required. */
Description = "A description for the task"
};
All ScheduledAction objects added to the ScheduledActionService must be named uniquely. Therefore, you should test whether the task has already been added to the scheduled action service. The task may then be added to the service as shown:
if (ScheduledActionService.Find(taskName) != null)
{
ScheduledActionService.Remove(taskName);
}
/* This can only be called when the application
* is running in the foreground. */
ScheduledActionService.Add(periodicTask);
Tasks expire after a maximum of 14 days. If the task’s ExpirationTime property is not set, it defaults to 14 days.
Tasks can be renewed by removing them, re-creating them, and then adding them back to the ScheduledActionService. This can, however, only be done from a foreground app, which means that if the user does not launch your app, you have no way to prevent your tasks from expiring after the default expiration period of 14 days.
The next section looks at putting periodic tasks into action.
Todo List Scheduled Task Sample
This section looks at creating a todo list app that uses periodic tasks in conjunction with a scheduled task agent. The app allows the user to enter a todo item, which is stored in a local database and which can be pinned as a live tile on the start experience. We look at using a periodic task to update the status of the todo item live tiles.
TodoItem
Todo items are represented by the TodoItem class, which contains three properties: Id, Description, and DueDate. DueDate is of type DateTime and indicates when the todo item should be considered overdue. TodoItem objects are persisted using LINQ to SQL. The TodoItem class is decorated with a Table attribute, and its properties with Column attributes (see Listing 27.2).
[Table]
public class TodoItem : NotifyPropertyChangeBase
{
int id;
[Column(
IsPrimaryKey = true,
DbType = "INT IDENTITY NOT NULL",
IsDbGenerated = true,
UpdateCheck = UpdateCheck.Never)]
public int Id
{
get
{
return id;
}
set
{
Assign("Id", ref id, value);
}
}
string description;
[Column]
public string Description
{
...
}
DateTime dueDate;
[Column]
public DateTime DueDate
{
...
}
}
For more information on LINQ to SQL and using databases in Windows Phone, see Chapter 26, “Local Databases.”
We now look briefly at the app’s data layer before moving on to its viewmodels. Persistence of TodoItem objects is performed using a LINQ to SQL DataContext instance, and an intermediary service that decouples the data context from the app’s viewmodels.
TodoDataContext
To retrieve and store TodoItem objects in a database, we use a custom DataContext class called TodoDataContext. This class allows TodoItem objects to be retrieved via its TodoItems property (see Listing 27.3).
Listing 27.3. TodoDataContext Class
public class TodoDataContext : DataContext
{
public TodoDataContext(string connection)
: base(connection)
{
}
public Table<TodoItem> TodoItems
{
get
{
return GetTable<TodoItem>();
}
}
}
In the sample app, viewmodels do not directly interact with the TodoDataContext but rather perform all CRUD operations via a todo service. This decouples the data context from the viewmodels, allowing you to replace the todo service with an implementation that could, for example, use a cloud service rather than a local database. Decoupling the data context also means that you have the flexibility to unit test the code outside an emulator, perhaps on a build server.
TodoService
A custom service provides for all CRUD operations for the TodoItem objects. It serves as an intermediary between the LINQ to SQL DataContext for TodoItems and viewmodel logic.
When the TodoService is instantiated, a TodoDataContext is created. TodoItem objects can then be retrieved using the GetTodoItem method, shown in the following excerpt:
public TodoItem GetTodoItem(int itemId)
{
TodoItem item = dataContext.TodoItems.Where(
todoItem => todoItem.Id == itemId).FirstOrDefault();
if (item == null)
{
throw new KeyNotFoundException(
string.Format("Item with key '{0}' was not found.", itemId));
}
return item;
}
Conversely, inserting a new TodoItem into the database is done using the service’s AddOrUpdateItem method.
If the TodoItem has an Id that is less than 1, it indicates that the TodoItem does not already exist in the database. If greater than 0, it is indicative of an update. See the following excerpt:
public void AddOrUpdateItem(TodoItem todoItem)
{
ArgumentValidator.AssertNotNull(todoItem, "todoItem");
if (todoItem.Id <= 0)
{
dataContext.TodoItems.InsertOnSubmit(todoItem);
}
dataContext.SubmitChanges();
}
The third method of the TodoService worth noting is GetTodoItems, which retrieves all TodoItem objects via the TodoItems property of the data context, like so:
public IEnumerable<TodoItem> GetTodoItems()
{
return dataContext.TodoItems;
}
As you see in a moment, GetTodoItems is used by the TodoListViewModel.
With the TodoService in place, we now look at how the service is used by the app’s viewmodels to display all todo items and to create new todo items.
TodoItemViewModel
The TodoItemView page retrieves all TodoItem objects for the user and displays them in a list. Its viewmodel relies on the todo service being passed as a constructor argument.
Retrieving the TodoItem objects is performed in the viewmodel’s PopulateItems method. The todo service is used to retrieve the items, and then, using a LINQ expression, the items are grouped by the TodoItem.DueDate property. This allows the list to be bound to a Silverlight Toolkit LongListSelector in the view. See the following excerpt:
void PopulateItems()
{
try
{
IEnumerable<TodoItem> items = todoService.GetTodoItems();
IEnumerable<Grouping<TodoItem>> groups
= from todoItem in items
orderby todoItem.DueDate
group todoItem by todoItem.DueDate.Date
into grouping
select new Grouping<TodoItem>(
new DateGroupingKey(grouping.Key),
grouping.AsEnumerable());
GroupedTodoItems = groups;
}
catch (Exception ex)
{
Message = "Unable to retrieve items.";
Console.WriteLine(ex);
}
}
TodoItems are grouped using a custom class called DateGroupingKey, which allows us to provide some additional logic to the item groupings, namely an Overdue property (see Listing 27.4). This allows you to change the background for the grouping header to red if the todo items in the group have due dates occurring in the past.
Alternatively, you may choose to use a value converter for determining whether the date is overdue. The example uses a custom key class, however, because it better encapsulates the date value and the logic for determining whether it is overdue.
Listing 27.4. DateGroupingKey Class
public class DateGroupingKey
{
public DateTime DateTime { get; private set; }
public DateGroupingKey(DateTime dateTime)
{
DateTime = dateTime;
Overdue = DateTime.Now > dateTime;
}
public bool Overdue { get; private set; }
}
The viewmodel’s Load method commences population of the todo items asynchronously, using a thread from the thread pool. This prevents blocking the UI thread during a potentially long-running operation.
A PeriodicTask is registered with the ScheduledActionService. If the PeriodicTask has already been registered, it is first removed. This resets the task’s expiration date. See the following excerpt:
public void Load()
{
ThreadPool.QueueUserWorkItem(delegate { PopulateItems(); });
PeriodicTask periodicTask = new PeriodicTask(agentName)
{
Description = "Updates a tile.",
ExpirationTime = DateTime.Now.AddDays(14)
};
if (ScheduledActionService.Find(agentName) != null)
{
ScheduledActionService.Remove(agentName);
}
/* This can only be called when the app
* is running in the foreground. */
ScheduledActionService.Add(periodicTask);
}
The TodoListViewModel constructor calls its Load method after initializing various ICommands (see Listing 27.5). NewItemCommand uses the ViewModelBase class’s Navigate method to open the TodoItemView page. EditItemCommand also navigates to the TodoItemView page, but passes the Id of the TodoItem; provided as a command argument.
Listing 27.5. TodoListViewModel Constructor
public TodoListViewModel(
ITodoService todoService, IDeviceProperties deviceProperties)
{
this.todoService = ArgumentValidator.AssertNotNull(
todoService, "todoService");
this.deviceProperties = ArgumentValidator.AssertNotNull(
deviceProperties, "deviceProperties");
editItemCommand = new DelegateCommand<int>(
todoItemId => Navigate(todoItemViewUrl + "?TodoItemId=" + todoItemId));
testAgentCommand = new DelegateCommand(
obj => ScheduledActionService.LaunchForTest(
agentName, TimeSpan.Zero));
backupDatabaseCommand = new DelegateCommand(obj => BackupDatabase());
restoreDatabaseCommand = new DelegateCommand(obj => RestoreDatabase());
Load();
}
BackupDatabaseCommand and RestoreDatabaseCommand are discussed later in this chapter.
Debugging Scheduled Tasks
Debugging a task agent is done by calling the ScheduledActionService.LaunchForTest method. Calling LaunchForTest is a way of forcing the OS to run your task agent. LaunchForTest accepts two parameters: the name of the scheduled task and a TimeSpan that indicates the delay before the task agent is invoked. By specifying TimeSpan.Zero, the task agent is invoked immediately.
With the TestAgentCommand wired up to the UI you can instruct the OS to launch the task agent, allowing you to step into the task agent’s OnInvoke method. The task agent for the sample is discussed later in this section.
The viewmodel relies on a custom IDeviceProperties interface, which allows the viewmodel to retrieve the Windows Live anonymous ID. Windows Live anonymous IDs are discussed further in Chapter 28, “Background File Transfers.”
TodoListView XAML
The TodoListView XAML contains a LongListSelector that is bound to the GroupedTodoItems property of the viewmodel (see Listing 27.6). The LongListSelector’s ItemTemplate uses a TextBlock to display the Description property of each TodoItem. When the user taps the description, the EditItemCommand is executed, and the Id of the TodoItem is passed as a command parameter. This is done using the custom commanding infrastructure, introduced in Chapter 8, “Taming the Application Bar.”
The LongListSelector’s GroupHeaderTemplate contains a Border whose background is determined by the Overdue property of the group key, which is a DateGroupingKey instance.
Listing 27.6. TodoListView.xaml (excerpt)
<StackPanel x:Name="ContentPanel" Grid.Row="1" Margin="12,0,12,0">
<toolkit:LongListSelector
ItemsSource="{Binding GroupedTodoItems}"
Background="Transparent"
Height="600">
<toolkit:LongListSelector.ItemTemplate>
<DataTemplate>
<StackPanel Orientation="Horizontal">
<TextBlock Text="{Binding Description}"
Margin="12,10,0,10"
Style="{StaticResource PhoneTextLargeStyle}"
c:Commanding.Event="Tap"
c:Commanding.Command="{Binding DataContext.EditItemCommand,
ElementName=page}"
c:Commanding.CommandParameter="{Binding Id}" />
</StackPanel>
</DataTemplate>
</toolkit:LongListSelector.ItemTemplate>
<toolkit:LongListSelector.GroupHeaderTemplate>
<DataTemplate>
<Border Background="Transparent">
<Border Background="{Binding Key.Overdue,
Converter={StaticResource BooleanToBrushConverter}}"
Padding="5"
HorizontalAlignment="Left"
Margin="0,10,0,0">
<TextBlock
Text="{Binding Key.DateTime, StringFormat={0:d}}"
Foreground="{StaticResource PhoneForegroundBrush}"
Style="{StaticResource PhoneTextLargeStyle}"
VerticalAlignment="Bottom" />
</Border>
</Border>
</DataTemplate>
</toolkit:LongListSelector.GroupHeaderTemplate>
</toolkit:LongListSelector>
</StackPanel>
The custom BooleanToBrushConverter is used to transform the Overdue property of type bool to a brush. For more information about the BooleanToBrushConverter, see Chapter 9, “Silverlight Toolkit Controls.”
The BooleanToBrushConverter is defined as a page resource as shown:
<phone:PhoneApplicationPage.Resources>
<ValueConverters:BooleanToBrushConverter
x:Name="BooleanToBrushConverter"
BrushIfTrue="Red"
BrushIfFalse="Blue" />
</phone:PhoneApplicationPage.Resources>
Overdue groups are shown with a red header, while regular groups have a blue header (see Figure 27.11).

Figure 27.11. Todo items are grouped according to when they are due to expire.
The custom AppBar for the page includes an AppBarHyperlinkButton, which takes the user to the TodoItemView page and allows the user to create a new todo item. The other viewmodel commands are bound to AppBarMenuItems, as shown:
<u:AppBar>
<u:AppBarHyperlinkButton
NavigateUri="/TodoList/TodoItemView.xaml"
Text="New"
IconUri="/Images/ApplicationBarIcons/Add.png" />
<u:AppBar.MenuItems>
<u:AppBarMenuItem
Command="{Binding BackupDatabaseCommand}"
Text="Backup" />
<u:AppBarMenuItem
Command="{Binding RestoreDatabaseCommand}"
Text="Restore" />
<u:AppBarMenuItem
Command="{Binding TestAgentCommand}"
Text="test agent" />
</u:AppBar.MenuItems>
</u:AppBar>
You have seen how the list of todo items is displayed, the next section examines how new todo items are created.
TodoItemView and ViewModel
The TodoItemView allows the user to perform the following three tasks:
• Create a new todo item.
• Update an existing todo item.
• Delete a todo item.
The TodoItemViewModel constructor receives the ITodoService, initializes commands, and registers persistent state, as shown:
public TodoItemViewModel(ITodoService todoService)
{
this.todoService = ArgumentValidator.AssertNotNull(
todoService, "todoService");
saveCommand = new DelegateCommand<bool>(SaveItem);
loadItemCommand = new DelegateCommand<int>(LoadItem);
deleteCommand = new DelegateCommand(obj => DeleteItem());
RegisterStatefulProperty(ApplicationStateType.Transient,
() => TodoDescription);
RegisterStatefulProperty(ApplicationStateType.Transient,
() => TodoDueDate);
}
The viewmodel contains a Description property and a DueDate property, which coincide with the properties of the TodoItem class. When the SaveCommand is executed, the SaveItem method is called. SaveItem uses the ITodoService to persist the TodoItem to the database and to optionally create a live tile representing the todo item.
Creating the Todo Item Shell Tile
To create a shell tile, you must pass a StandardTileData instance to the static ShellTile.Create method. Because this is performed in several places in the sample, the code for creating the StandardTileData has been placed into a class called TodoTileDataCreator (see Listing 27.7). This class uses the todo item’s due date to determine the numeric icon shown on the tile. If it exceeds 99 days, it is not shown. The tile has a foreground and a background image and shows the description and due date of the todo item.
Listing 27.7. TodoTileDataCreator Class
public static class TodoTileDataCreator
{
public static StandardTileData CreateTile(
string todoItemDescription, DateTime dueDate)
{
/* The Count property of the tile data is set
* to the number of days remaining.
* It must be between 0 and 99 inclusively. */
int daysUntilDue = 0;
bool overdue = DateTime.Now > dueDate;
if (!overdue)
{
int temp = (int)(DateTime.Now - dueDate).TotalDays;
if (temp < 100)
{
daysUntilDue = temp;
}
}
const string tilesDirectory = "/TodoList/Images/Tiles/";
string backgroundUrl = overdue
? tilesDirectory + "Overdue.jpg"
: tilesDirectory + "Ok.jpg";
StandardTileData tileData = new StandardTileData
{
Title = todoItemDescription,
BackgroundImage = new Uri(backgroundUrl, UriKind.Relative),
Count = overdue ? 0 : daysUntilDue,
BackTitle = dueDate.ToShortDateString(),
BackContent = todoItemDescription,
BackBackgroundImage = new Uri(
tilesDirectory + "Background.jpg", UriKind.Relative)
};
return tileData;
}
}
Saving a Todo Item
Saving an item involves instantiating a new item and sending it to the ITodoService to be stored in the database (see Listing 27.8).
If a shell tile is created for the todo item, the NavigationUri of the tile is set to the TodoItemView page, and the Id of the TodoItem is placed in the query string of the URI, so that by tapping the tile, the user is brought back to the TodoItemView page, which allows editing or deletion of the todo item.
The final task of the SaveItem method is to navigate the user back to the TodoItemList page.
Listing 27.8. TodoItemViewModel SaveItem Method
void SaveItem(bool createTile)
{
if (string.IsNullOrWhiteSpace(todoDescription))
{
MessageService.ShowError("Please enter a description.",
"Required Field Missing");
return;
}
if (todoItem == null)
{
todoItem = new TodoItem();
}
todoItem.Description = todoDescription;
todoItem.DueDate = todoDueDate;
todoService.AddOrUpdateItem(todoItem);
StandardTileData tileData = TodoTileDataCreator.CreateTile(
todoItem.Description, todoItem.DueDate);
string url = string.Format("/TodoList/TodoItemView.xaml?{0}={1}",
TaskScheduler.TodoItemIdQueryKey,
todoItem.Id);
if (createTile)
{
/* Creating a shell tile takes the user to the start experience. */
ShellTile.Create(new Uri(url, UriKind.Relative), tileData);
}
else
{
ShellTile shellTile = ShellTile.ActiveTiles.Where(
tile => tile.NavigationUri.ToString()
.Contains(url)).FirstOrDefault();
if (shellTile != null)
{
shellTile.Update(tileData);
}
Navigate(todoListUrl);
}
}
Editing an Existing Todo Item
The TodoItemViewModel can be in one of two modes: creation mode or edit mode. Either a new item is to be created, or an existing todo item is being edited. This is indicated to the view using a VisualState property, which is of type string. By default, the viewmodel is in creation mode. When the user taps a todo shell tile or a todo item on the TodoListView page, the view is placed in edit mode.
If in edit mode, the viewmodel’s LoadItem method is used to retrieve the TodoItem with the specified Id from the ITodoService. The viewmodel’s TodoDescription and TodoDueDate are populated using the retrieved item’s values, as shown in the following excerpt:
TodoItem todoItem;
void LoadItem(int itemId)
{
try
{
todoItem = todoService.GetTodoItem(itemId);
}
catch (KeyNotFoundException)
{
MessageService.ShowError("Item not found.");
}
TodoDescription = todoItem.Description;
TodoDueDate = todoItem.DueDate;
VisualState = "Update";
}
As you see later in this section, the VisualState property is used by the TodoItemView page to hide or reveal elements on the page.
When in edit mode, the user also has the ability to delete the todo item. The DeleteItem method uses the ITodoService to perform the data operation. Any shell tiles whose NavigationUri contains the query string corresponding to the todo item are also removed. See the following excerpt:
void DeleteItem()
{
if (todoItem == null)
{
throw new InvalidOperationException("Not in edit mode.");
}
todoService.RemoveTodoItem(todoItem);
string tileQueryString = string.Format("{0}={1}",
TaskScheduler.TodoItemIdQueryKey,
todoItem.Id);
ShellTile tile = ShellTile.ActiveTiles.FirstOrDefault(
x => x.NavigationUri.ToString().Contains(tileQueryString));
if (tile != null)
{
tile.Delete();
}
Navigate(todoListUrl);
}
The TodoItemView page uses the IoC container to resolve the ITodoService instance. If it has not been defined in the container, a TodoService is instantiated.
For more information on IoC and IoC containers, see Chapter 22, “Unit Testing.”
The following excerpt shows the TodoItemView constructor and fields:
readonly TodoItemViewModel viewModel;
bool initialized;
public TodoItemView()
{
InitializeComponent();
var todoService = Dependency.Resolve<ITodoService, TodoService>();
DataContext = viewModel = new TodoItemViewModel(todoService);
}
The Id of the TodoItem is passed as a query string parameter, which causes the view to be placed in edit mode. This is determined in the OnNavigatedTo method of the view. If the TodoItem Id has been supplied, then the viewmodel’s LoadItemCommand is executed.
When the LoadItemCommand completes, the visual state of the view is updated according to the VisualState property of the viewmodel, as shown in the following excerpt:
protected override void OnNavigatedTo(NavigationEventArgs e)
{
base.OnNavigatedTo(e);
if (initialized)
{
return;
}
initialized = true;
string itemId;
if (NavigationContext.QueryString.TryGetValue("TodoItemId", out itemId))
{
/* Custom commanding infrastructure performs automatic conversion
* from a string to an int. */
viewModel.LoadItemCommand.Execute(itemId);
}
VisualStateManager.GoToState(this, viewModel.VisualState, true);
}
The TodoItemView page contains a TextBox to edit the viewmodel’s TodoDescription property and a Silverlight Toolkit DatePicker to edit the TodoDueDate property.
To force the TextBox to update the viewmodel when the text changes, the custom UpdateSourceTriggerExtender is used. This prevents changes to the description from being missed if the user taps an application bar item without first tapping elsewhere on the page to lose focus. See the following excerpt:
<StackPanel x:Name="ContentPanel" Grid.Row="1" Margin="12,0,12,0">
<TextBlock Text="description"
Style="{StaticResource PhoneTextNormalStyle}" />
<!-- UpdateSourceTriggerExtended causes the value
to be updated in the viewmodel as soon as the text changes. -->
<TextBox Text="{Binding TodoDescription, Mode=TwoWay}"
u:UpdateSourceTriggerExtender.UpdateSourceOnTextChanged="True" />
<TextBlock Text="due"
Style="{StaticResource PhoneTextNormalStyle}" />
<toolkit:DatePicker Value="{Binding TodoDueDate, Mode=TwoWay}" />
</StackPanel>
For more information on the UpdateSourceTriggerExtender, see Chapter 23, “Input Validation.”
The view contains an AppBar with an AppBarHyperlinkButton that links back to the TodoListView page and AppBarIconButtons that are bound to the various viewmodel commands, as shown:
<u:AppBar>
<u:AppBarHyperlinkButton
NavigateUri="/TodoList/TodoListView.xaml"
Text="Items"
IconUri="/Images/ApplicationBarIcons/List.png" />
<u:AppBarIconButton
x:Name="Button_Delete"
Command="{Binding DeleteCommand}"
Text="Delete"
IconUri="/Images/ApplicationBarIcons/Delete.png" />
<u:AppBarIconButton
Command="{Binding SaveCommand}"
CommandParameter="False"
Text="Save"
IconUri="/Images/ApplicationBarIcons/Save.png" />
<u:AppBarIconButton
Command="{Binding SaveCommand}"
CommandParameter="True"
Text="Save & Pin"
IconUri="/Images/ApplicationBarIcons/AddTile.png" />
</u:AppBar>
The visibility of the Delete button is determined by the VisualState property of the viewmodel. When the VisualState property is equal to Update, the Delete button is shown; if equal to Create, it is collapsed (see Figure 27.12). See the sample code if you are interested in the visual state group XAML.
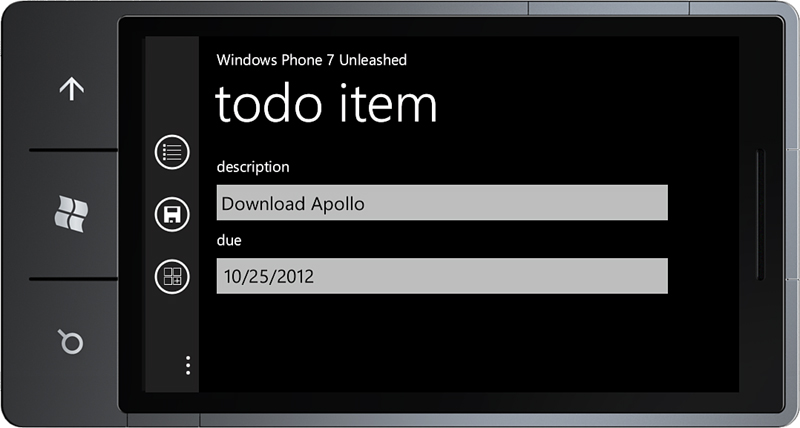
Figure 27.12. Creating a new todo item
When tapping the Save & Pin button, the app is deactivated and the tile is displayed on the Start Experience (see Figure 27.13).

Figure 27.13. Todo item shell tile is displayed on the Start Experience.
Tapping the tile returns the user to the TodoItemView, where the item can be edited or deleted.
When the tile is overdue, a different image is displayed. Changing the properties of the tile can be done from your foreground app or from a background agent, which is demonstrated in the following section.
Updating Tiles Using a Scheduled Task Agent
The background agent for the sample is the TaskScheduler class, which is a subclass of the ScheduledTaskAgent class. TaskScheduler is registered using the WMAppManifest.xml file.
As you saw earlier, a periodic task is registered in the TodoItemViewModel class. This causes the TaskScheduler.OnInvoke method to be called periodically. The OnInvoke method determines what kind of task is being launched by the OS, either periodic or resource intensive. For the todo sample, it is always a periodic task (see Listing 27.9).
Listing 27.9. TaskScheduler OnInvoke Method (excerpt)
protected override void OnInvoke(ScheduledTask task)
{
/* Detect if the task is periodic or resource intensive. */
if (task is PeriodicTask)
{
ProcessPeriodicTask();
}
else
{
ProcessResourceIntensiveTask();
}
...
NotifyComplete();
}
The main purpose of the TaskScheduler is to refresh the shell tiles on the Start Experience, updating the overdue status and changing the background image as required (see Listing 27.10).
The ProcessPeriodicTask method retrieves all tiles for the app containing the todo item query string parameter. Each tile is processed by extracting the Id of the todo item and then by retrieving the actual TodoItem object using the todo service. A new StandardTileData object is created for the TodoItem using the TodoTileDataCreator, and the tile is updated.
Listing 27.10. TaskScheduler ProcessPeriodicTask Method
void ProcessPeriodicTask()
{
TodoService todoService = new TodoService();
string queryWithEquals = TodoItemIdQueryKey + "=";
IEnumerable<ShellTile> tiles = ShellTile.ActiveTiles.Where(
tile => tile.NavigationUri.ToString().Contains(queryWithEquals));
foreach (var tile in tiles)
{
/* NavigationUri.Query raises an exception on relative URIs. */
Dictionary<string, string> queryPairs
= UrlUtility.ParseQueryString(tile.NavigationUri.ToString());
string idString = queryPairs[TodoItemIdQueryKey];
int todoItemId;
if (!int.TryParse(idString, out todoItemId))
{
Debug.Assert(false, "Invalid id " + idString);
continue;
}
TodoItem todoItem;
if (!todoService.TryGetTodoItem(todoItemId, out todoItem))
{
Debug.Assert(false, "Unknown item " + idString);
continue;
}
StandardTileData tileData = TodoTileDataCreator.CreateTile(
todoItem.Description,
todoItem.DueDate);
tile.Update(tileData);
}
}
Using a scheduled task agent to update shell tiles provides the means to engage with your users even when your app is not running. It should be remembered, however, that there is no guarantee that a scheduled task will run, and therefore it is wise not to depend solely on a background task for activities critical to the proper functioning of your app. Indeed, updating of shell tiles should also be done within your foreground app, which is not done in the sample.
Scheduled Task API Limitations
Scheduled task agents do not have access to the entire set of APIs that foreground apps do. There is a set of APIs that are off-limits, and using an API from the set either raises an UnauthorizedAccessException at runtime or causes the app to fail certification during submission to the Windows Phone Marketplace. For the list of unsupported APIs, see Table 27.3.
Table 27.3. Scheduled Task Agent Unsupported APIs

One noteworthy limitation is the inability to display visual elements from a background agent. You see a workaround in the next section.
Providing Feedback to the User from an Agent
On occasion, your background agent may want to notify the user of some event. This is, however, not possible using custom UI nor with a Silverlight MessageBox.
A solution is to use a shell toast, which can provide immediate feedback to the user. A toast notification can be presented from within your task agent like so:
protected override void OnInvoke(ScheduledTask task)
{
ShellToast toast = new ShellToast
{
Title = "Windows Phone 7 Unleashed",
Content = "Task Scheduler running..."
};
toast.Show();
/* ... */
}
If the user taps the toast notification, your app is launched in the foreground. By setting the NavigationUri property for the ShellToast, you can also provide a deep link with a query string, as was demonstrated for the todo item shell tiles.
Using a Mutex to Access Common Resources Safely
Your app’s task agent may be invoked even when your app is in the foreground. It is, therefore, important to ensure that simultaneous access to shared resources, such as files in isolated storage, is controlled and performed safely.
A System.Threading.Mutex can be employed to synchronize critical sections of code—code that accesses a common resource—within your primary app and your background agent. A Mutex is a synchronization primitive. It is similar to the Monitor class but with a scope that allows you to achieve interprocess synchronization, allowing you to synchronize across your foreground app and your background agent.
Unlike Silverlight for the browser, a Mutex instance in Windows Phone must be named, and the scope of a Mutex is limited to your primary app and its background agent.
A Mutex cannot be used to synchronize different apps, nor as a conduit for interapp communication.
Listing 27.11 shows an excerpt from the CommonResourceExample class in the downloadable sample code that demonstrates how to read and write to a file in isolated storage in a safe manner while preventing another thread, such as from your background agent, from accessing the file simultaneously.
When the ReplaceFileContents method is called, WaitOne is called on the Mutex, which blocks if the Mutex is owned by another thread in your foreground app or a background agent. If not owned, or when released by another thread, the contents of a file is read and then overwritten with a new content string. The result is returned to the caller. By using a Mutex, the result is guaranteed to be the content of the file immediately prior to writing the new content.
Listing 27.11. CommonResourceExample Class (excerpt)
public class CommonResourceExample
{
static readonly Mutex mutex = new Mutex(false, "CommonResourceExample");
static readonly string fileName = "CommonResourceExample.txt";
public string ReplaceFileContents(string fileContent)
{
try
{
mutex.WaitOne();
string result = ReadFileCore();
WriteFileCore(fileContent);
return result;
}
finally
{
mutex.ReleaseMutex();
}
}
void WriteFileCore(string fileContent)
{
using (IsolatedStorageFile isolatedStorageFile
= IsolatedStorageFile.GetUserStoreForApplication())
{
using (IsolatedStorageFileStream outStream
= isolatedStorageFile.OpenFile(
fileName, FileMode.Create))
{
using (StreamWriter writer = new StreamWriter(outStream))
{
writer.Write(fileContent);
}
}
}
}
string ReadFileCore()
{
using (IsolatedStorageFile isolatedStorageFile
= IsolatedStorageFile.GetUserStoreForApplication())
{
if (!isolatedStorageFile.FileExists(fileName))
{
return string.Empty;
}
using (IsolatedStorageFileStream inStream
= isolatedStorageFile.OpenFile(
fileName, FileMode.Open))
{
using (StreamReader reader = new StreamReader(inStream))
{
return reader.ReadToEnd();
}
}
}
}
}
It is important to ensure that your Mutex is released upon exiting from a critical section. This is done by wrapping the section in a try/finally block. If your foreground app or your background agent terminates while owning a mutex, the state of the mutex is set to signaled and the next waiting thread gets ownership.
To test whether the Mutex is owned, you can specify a timeout parameter to the WaitOne method (see Listing 27.12). This is an effective way to prevent your task agent from being terminated because it is blocked on a WaitOne call. Recall that a PeriodicTask has a maximum 15 seconds of execution time.
Listing 27.12. Using WaitOne to Determine Whether a Mutex Is Owned
bool mutexAcquired = false;
try
{
mutexAcquired = mutex.WaitOne(10000);
if (mutexAcquired)
{
/* Access common resource here. */
Debug.WriteLine("mutex entered.");
}
}
finally
{
if (mutexAcquired)
{
mutex.ReleaseMutex();
}
}
if (!mutexAcquired)
{
/* Unable to acquire ownership of mutex. */
Debug.WriteLine("mutex timed out.");
}
To test whether a Mutex is owned, without blocking the calling thread, use a timeout value of 0 when calling WaitOne.
Mutex provides an effective way to synchronize critical sections of code and can assist in avoiding race conditions and other concurrency issues when accessing shared resources.
Summary
This chapter looked at the scheduled notification system, which consists of a useful set of classes for setting reminders and alarms that can present a message to the user at a predetermined time, whether or not your app is running in the foreground.
It then examined the scheduled task system, which extends the principles underpinning the notification system and offers the capability to run your own code in the background. You saw how to create a todo list app, which leverages a local database and updates live tiles from a background agent.
Finally, the chapter explained how to use a Mutex to provide safe access to resources shared by your foreground app and your background agent.
The next chapter continues with the todo list app and demonstrates how to use a background transfer service to back up the todo database to a cloud service.