Now that you have a basic understanding of how to use Visual Studio 2019, you can learn more about some of the languages you may encounter when developing your IoT solutions. One of those languages is Visual Basic (sometimes notated as VB)—another robust and powerful object-oriented language that you can use to write managed Windows .NET and UWP applications. Mastering Visual Basic is not as difficult as C++ or C# due to its simplified syntax. However, if you have never seen or worked with any form of Basic programming languages, the code may appear quite different. Fortunately, you need only learn the syntax since Visual Basic can be used to write the same applications as C++ and C#.
This chapter presents a crash course on the basics of Visual Basic programming in Visual Studio including an explanation about some of the most commonly used language features. As such, this chapter provides you with the skills you need to understand the growing number of IoT project examples available on the Internet. The chapter concludes with a walk-through of a Visual Basic example project that shows you how to interact with hardware. Specifically, you will implement the LED project you saw in Chapter 3. Only this time, you’ll be writing it as a Visual Basic Windows 10 IoT Core application. So, let’s get started!
If you are not interested in using Visual Basic in your IoT solutions, or you already know the basics of Visual Basic programming, feel free to skim through this chapter. I recommend working through the example project at the end of the chapter, especially if you’ve not written IoT applications.
Getting Started
The Visual Basic .Net language has been around since the first introduction of the .NET Framework (pronounced “dot net”) introduced in 2002. Visual Basic .Net is derived from an earlier product of the same name that originated in 1991 that combined the Basic programming language with a visual form designer, hence the “visual” in the name. The latest version of Visual Basic is version 8.0 and is sometimes called simply Visual Basic or VB.Net or simply VB.
I use “Visual Basic” to refer to Visual Basic .Net in this chapter because the previous product it replaced is no longer supported.
You may be thinking that Visual Basic and .NET may restrict the types of applications you can write, but that also is not true. You can use Visual Basic to write a host of applications from Windows 10 IoT Core to desktop to web applications and beyond. As you will see, you can also write Visual Basic console applications like you did in Chapter 5 with C++ and Chapter 6 with C#.
If you have ever worked with the Basic programming language or the Visual Basic for Applications (VBA) that is part of the macro language in Microsoft Office, Visual Basic will seem familiar to you. You may think Visual Basic is a “toy” language or too, well, basic for anything of significant complexity, but that is not the case. Visual Basic supports object-oriented and all of the resources and classes needed to write complex Windows applications. What sets Visual Basic apart is its simplified syntax.
Beginning Visual Basic 2015 by Bryan Newsome (Wrox, 2015)
Microsoft Visual Basic 2017 for Windows, Web, and Database Applications: Comprehensive by Shelly Cashman (Microsoft Press, 2017)
Visual Basic 2015 in 24 Hours by James Foxall (Sams Teach Yourself, 2015)
Getting Started with Visual Basic .Net (https://docs.microsoft.com/en-us/dotnet/visual-basic/getting-started/)
Visual Basic .Net Programming Guide (https://docs.microsoft.com/en-us/dotnet/visual-basic/programming-guide/)
Now that you know some of the origins and references for Visual Basic, let’s learn about the syntax and basic language features for creating applications.
Visual Basic Crash Course
Now let’s learn some of the basic concepts of Visual Basic programming. Let’s begin with the building blocks of the language, such as classes, methods, variables, and basic control structures, and then move into the more complex concepts of data structures and libraries.
While the material may seem to come at you in a rush (hence the crash part), this crash course on Visual Basic covers only the most fundamental knowledge of the language and how to use it in Visual Studio. It is intended to get you started writing Visual Basic Windows 10 IoT Core applications. If you find you want to write more complex applications than the examples in this book, I encourage you to acquire one or more of the resources listed earlier to learn more about the intriguing power of Visual Basic programming.
Visual Basic Fundamentals
There are a number of basic concepts about the Visual Basic programming language that you need to know in order to get started. In this section, I describe some of the fundamental concepts used in Visual Basic, including how the code is organized, how libraries are used, namespaces, and how to document your code.
Visual Basic is a case-sensitive language, so you must take care when typing the names of methods or classes in libraries. Fortunately, Visual Studio’s IntelliSense feature recognizes mistyped case letters and autocorrects the names. For example, if you type BLINKTimer for a variable that is declared as blinkTimer, Visual Studio corrects it for you. Once you get used to this feature, it is very hard to live without it.
Classes
The first thing you may notice is that Visual Basic is an object-oriented language and that every program you write is written as a class. However, simple console applications do not have to use a class and instead use a module definition, which resembles a class (it’s very similar). Just think object-oriented when you see the Class keyword and code module when you see the Module keyword. We will see an example of both in this chapter.
UWP applications are implemented using a class definition. A class is more than a simple data structure. You use classes to model concepts that include data and operations on the data. A class can contain private and public definitions (called members) and any number of operations (called methods) that operate on the data and give the class meaning.
Source files in Visual Basic have a file extension of .vb.
You can use classes to break your programs down into more manageable chunks. That is, you can place a class you’ve implemented in its own .vb file and refer to it in any of the code provided there aren’t namespace issues, and even then you simply use the namespace you want.
Vector Class in Visual Basic
This is a basic class that is declared with the keyword Class followed by a name. The name can be any identifier you want to use, but the convention is to use an initial capital letter for the name. All classes are defined using a common indentation that defines the body or structure of the class.
By convention, you list the member variables (also called attributes) indented from the class definition. In this example, you see two member variables that are declared as private. You make them private to hide information from the caller. That is, only member methods inside the class itself can access and modify private member variables. Note that derivatives (classes built from other classes—sometimes called a child class) can also access protected member variables.
Notice we don’t have curly braces. Instead, we use the End <keyword> syntax to define a code block. For example, we use End Class to end the class, End Sub, and End Function to define code blocks for methods (Sub) and functions.
Next, you see a special method named New. This is called the constructor. The constructor is a method that is called when the class is instantiated (used). You call the code that defines the attributes and methods a class, and when executed, you call the resulting object an instance of the class.
In this case, the constructor takes a single integer parameter that is used to define the size of the private member variable that stores the array of double values. Notice how this code is used to dynamically define that array. More specifically, you use the ReDim command to reallocate memory for the array.
Next are three public methods, which users (or callers of the instance) can call. The first method, size(), looks as you would expect and in this case simply returns the value of the private member variable sz. The next methods are the get and set operations for storing a double in the array (setValue) and retrieving a specific double from the array using an index (getValue).
Notice that it is easy to read what the code is doing. Neat, eh?

Visual Basic solution with a new class
As you may have surmised, classes are the building blocks for object-oriented programming, and as you learn more about using classes, you can build complex libraries of your own.
Visual Studio provides a tool called the Class View window that you can use to explore the libraries and classes used in your application.
Comments
One of the most fundamental concepts in any programming language is the ability to annotate your source code with text that not only allows you to make notes among the lines of code but also forms a way to document your source code.1
Writing good comments and indeed documenting your code well is a bit of an art form, one that I encourage you to practice regularly. Since it is an art rather than a science, keep in mind that your comments should be written to teach others what your code does or is intended to do. As such, you should use comments to describe any preconditions (or constraints) of using the code, limitations of use, errors handled, and a description of how the parameters are used and what data is altered or returned from the code (should it be a method or class member).
How Visual Basic Programs Are Structured
Temperature Code Example Rewrite
In the example, the only methods created are convertTemp() and Main(), but this is because you are implementing a very simple solution. Here, you see the sample application named temperatureVB was implemented with a module with the name Program.
Wow, that’s quite a change from the code in the last chapter! While the functionality is exactly the same, the code looks very different from the C++ and C# versions. The following describe the Visual Basic concepts I have implemented in this example.
The Imports Keyword
This is a very common occurrence in Windows Visual Basic applications. In fact, you will use several namespaces in our example project.
The Main() Method
Next, you see the name, main, followed by a list of parameters enclosed in parentheses. For the Main() method, the parameters are fixed and are used to store any command-line arguments provided by the user. In this case, you have the arguments stored in args, which is a string.
A method in Visual Basic is used as an organizational mechanism to group functionality and make your programs easier to maintain (methods with hundreds of lines of code are very difficult to maintain), improve comprehensibility, and localize specialized operations in a single location, thereby reducing duplication.
Methods and functions therefore are used in your code to express the concepts of the functionality they provide. Notice how I used the convertTemp() method. Here, I declared it as a method that returned a double and takes a character and a double as input. As you can see, the body of the method (defined inside the Function ➤ End Function) uses the character as the scale in the same way as you do in main and uses the double parameter as the target (or base) temperature to convert. Since I made the parameters generic, I can use only one variable.
Method parameters and values passed must match on type and order when called.
Notice also that I placed it in the line of code that prints the value to the screen. This is a very common practice in Visual Basic (and other programming languages). That is, you use the method to perform some operation, and rather than store the result in a variable, you use it directly in the statements (code).
Variables and Types
No program would be very interesting if you did not use variables to store values for calculations. As you saw earlier, variables are declared with a type (the s <type> syntax) and once defined with a specific type cannot be changed. Since Visual Basic is strongly typed, the compiler ensures that anywhere you use the variable, it obeys its type, for example, that the operation on the variable is valid for the type. Thus, every variable must have a type assigned.
There are a number of simple types that the Visual Basic language supports. They are the basic building blocks for more complex types. Each type consumes a small segment of memory which defines not only how much space you have to store a value but also the range of values possible.2
For example, an integer consumes 4 bytes, and you can store values in the range –2,147,483,648 to 2,147,483,647. In this case, the integer variable is signed (the highest bit is used to indicate positive or negative values). An unsigned integer can store values in the range 0 to 4,294,967,295.
Commonly Used Types in Visual Basic
Symbol | Size in Bytes | Range |
|---|---|---|
Boolean | 1 | False or true |
Char | 1 | –128 to 127 |
String | User-defined | –128 to 127 per character |
SByte | 1 | –128 to 127 |
Byte | 1 | 0–255 |
Short | 2 | –32,768 to 32,767 |
UShort | 2 | 0 to 65,535 |
Integer | 4 | –2,147,483,648 to 2,147,483,647 |
UInteger | 4 | 0 to 4,294,967,295 |
Long | 4 | –2,147,483,648 to 2,147,483,647 |
ULong | 4 | 0 to 4,294,967,295 |
Single | 4 | 3.4E +/– 38 (7 digits) |
Decimal | 8 | (–7.9 x 1028 to 7.9 x 1028) / (100 to 28) |
Double | 8 | 1.7E +/– 308 (15 digits) |
It is always a good practice to initialize your variables when you declare them. It can save you from some nasty surprises if you use the variable before it is given a value (although the compiler will complain about this).
Arithmetic
Arithmetic, Logical, and Comparison Operators in Visual Basic
Type | Operator | Description | Example |
|---|---|---|---|
Arithmetic | + | Addition | intVar + 1 |
- | Subtraction | intVar - 1 | |
* | Multiplication | intVar * 2 | |
/ | Division | intVar / 3 | |
Mod | Modulus | intVar % 4 | |
^ | Exponent | intVar ^ 2 | |
Integer division | floatVar 3 | ||
+= | Unary addition | intVar += 1 | |
-= | Unary subtraction | intVar -= 1 | |
Logical | And | Bitwise and | var1&var2 |
Or | Bitwise or | var1|var2 | |
Xor | Bitwise exclusive | var1^var2 | |
And | Logical and | var1&&var2 | |
Or | Logical or | var1||var2 | |
Comparison | = | Equal | expr1==expr2 |
<> | Not equal | expr1!=expr2 | |
< | Less than | expr1<expr2 | |
> | Greater than | expr1>expr2 | |
<= | Less than or equal | expr1<=expr2 | |
>= | Greater than or equal | expr1>=expr2 |
Bitwise operations produce a result on the values performed on each bit. Logical operators (and, or) produce a value that is either true or false and are often used with expressions or conditions.
Now that you understand variables and types, the operations permitted on them, and expressions, let’s look at how you can use them in flow control statements.
Flow Control Statements
Flow control statements change the execution of the program. They can be conditionals that cause one section of code to execute vs. another (also called gates). These conditionals use expressions that, when evaluated, restrict execution to only those cases where the expression is true. There are special constructs that allow you to repeat a block of code (loops) as well as functions to switch context to perform some special operations. You’ve already seen how functions work, so let’s look at conditional and loop statements.
Conditionals
Conditional statements allow you to direct execution of your programs to sections (blocks) of code based on the evaluation of one or more expressions. There are two types of conditional statements in Visual Basic—the If...Then statement and the Select...Case statement.
While you can chain the statement as much as you want, use some care here because the more ElseIf sections you have, the harder it becomes to understand, maintain, and avoid logic errors in your expressions.
The case values must match the type of the thing you are evaluating. That is, case values must be the same type as scale. Notice I placed Case statements “stacked” so that multiple cases can be directed to the same code block. That is a simple way of achieving that goal. Finally, there is a Case Else section for code you want to execute should scale fail to match any of the values.
Loops
Loops are used to control the repetitive execution of a block of code. There are three forms of loops that have slightly different behavior. All loops use conditional statements to determine whether to repeat execution or not. That is, they repeat as long as the condition is true. The three types of loops are While, Do, and For. I explain each with an example.
The While loop has its condition at the “top” or start of the block of code. Thus, While loops only execute the body (between the While and End While statements) if and only if the condition evaluates to true on the first pass. This form of loop is best used when you need to execute code only if some expression(s) evaluates to true, for example, iterating through a collection of things whose number of elements is unknown (loop until you run out of things in the collection).
The While loop in Visual Basic permits two additional directives. While developers try to structure their code to avoid such constructs, you can control the flow of the While loop using the Exit While and Continue While clauses.
The Exit While does what you expect—it will immediately stop executing any more statements and return control to the next statement after the End While, which is analogous with the break statement from other languages. The Continue While is interesting because it also stops executing any more statements in the loop but instead returns to the While condition (the top of the loop). As you view more Visual Basic examples, you may encounter these clauses.
The Do loop normally places the condition at the “bottom” of the statement which permits the body of the loop to execute at least once. However, the Do loop in Visual Basic has a second form that permits you to add the condition at the “top” of the loop which performs the same as the While loop.
The Do loop in Visual Basic permits two additional directives. While developers try to structure their code to avoid such constructs, you can control the flow of the Do loop using the Exit Do and Continue Do clauses.
The Exit Do does what you expect—it will immediately stop executing any more statements and return control to the next statement after the End Do, which is analogous with the break statement from other languages. The Continue Do is interesting because it also stops executing any more statements in the loop but instead returns to the While condition (the top or bottom of the loop). As you view more Visual Basic examples, you may encounter these clauses.
This form of loop is handy for cases where you want to execute code that, depending on the results of that execution, may require repetition, for example, repeatedly asking the user for input that matches one or more known values, repeating the question if the answer doesn’t match.
The For loop has two forms and is sometimes called a counting loop because of its unique way of executing a loop for a specific number of iterations or through the members of a container.
The first form of the For loop allows you to define a counting variable, a condition to evaluate, and an operation on the counting variable. Instead of an “End” clause, the For loop is defined by Next at the end of the body of the loop. More specifically, the For loop allows you to define stepping code for a precise number of operations, a <start> TO <stop> clause and optional Step <increment> clause that you can use to count by a constant such as counting by 2s, 3s, and so on. This form of loop is best used for a number of iterations for a known number (either at runtime or as a constant) and commonly used to step through memory, count, and so forth.
The For counting loop in Visual Basic permits two additional directives. While developers try to structure their code to avoid such constructs, you can control the flow of the For loop using the Exit For and Continue For clauses.
The Exit For does what you expect—it will immediately stop executing any more statements and return control to the next statement after the Next, which is analogous with the break statement from other languages. The Continue For is interesting because it also stops executing any more statements in the loop but instead returns to the count evaluation. As you view more Visual Basic examples, you may encounter these clauses.
The second form is the For Each loop that iterates through a collection or container and has a slightly different syntax. Instead of a counting variable and optional step clause, we use a variable that contains the type of the things in the collection. For example, if we have a structure (more on those in the next section), we can use the For Each loop to iterate through a list (array) of books.
For more detailed information about the loops in Visual Basic, see https://docs.microsoft.com/en-us/dotnet/visual-basic/programming-guide/language-features/control-flow/loop-structures.
Now let’s look at some commonly used data structures.
Basic Data Structures
What you have learned so far about Visual Basic will allow you to create applications that do simple to moderately complex operations. However, when you start needing to operate on data—either from the user or from sensors and similar sources—you need a way to organize and store data and operations on the data in memory. The following introduces three data structures in order of complexity: arrays, structures, and classes.
You can also define multiple dimensional arrays (arrays of arrays). Arrays can be used with any type or data structure.
Arrays and structures can increase the power of your programs by allowing you to work with more complex data types.
Wow! That was a wild ride, wasn’t it? I hope that this short crash course in Visual Basic has explained enough about the sample programs shown so far that you now know how they work. This crash course also forms the basis for understanding the other Visual Basic examples in this book.
OK, now it’s time to see some of these fundamental elements of Visual Basic in action. Let’s look at the blink an LED application you saw in Chapter 3, only this time you’re going to write it for Windows 10 IoT Core!
For a complete, online reference guide to Visual Basic, see the Official Microsoft documentation at https://docs.microsoft.com/en-us/dotnet/visual-basic.
Blink an LED, Visual Basic Style
OK, let’s write some Visual Basic code! This project is the same concept as the project from Chapter 3 where you used Python to blink an LED on your Raspberry Pi. Rather than simply duplicate that project, you’ll mix it up a bit and make this example a headed application (recall a headed application has a user interface). The user interface presents the user with a greeting, a symbol that changes color in time with the LED, and a button to start and stop the blink timer.
Rather than build the entire application at once by presenting you a bunch of code, we walk through this example in two phases. The first phase builds the basic user interface. The code for the GPIO is added in the second phase. By using this approach, you can test the user interface on your PC, which is really convenient.
Recall that the PC does not support the GPIO libraries (there is no GPIO!), so if you built the entire application, you would have to test it on the device, which can be problematic if there are serious logic errors in your code. This way, you can ensure that the user interface is working correctly and therefore eliminate any possible issues in that code before you deploy it.
Before you get into the code for the user interface, let’s look at the components that you will use, and then set up the hardware.
Required Components
560 ohm 5% 1/4W resistor (green, blue, brown stripes3)
Diffused 10mm red LED (or similar)
Breadboard (mini, half, or full sized)
(2) male-to-female jumper wires
You may notice that this is the same set of components you used in Chapter 3.
Set Up the Hardware
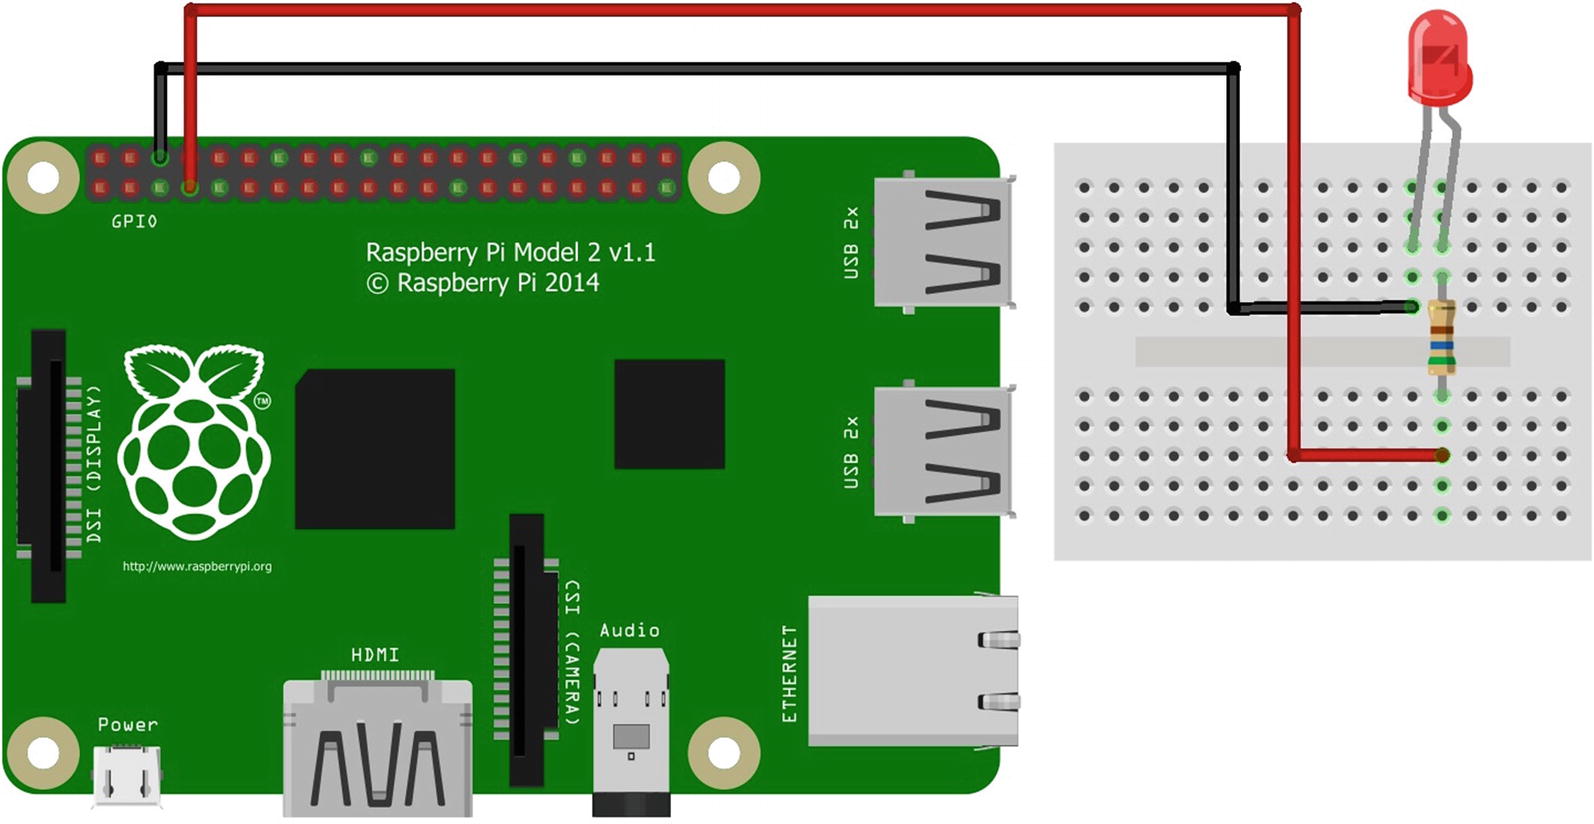
Wiring the LED to a Raspberry Pi
The only component that is polarized is the LED. This longer side is the positive side.
Next, plug the resistor into the breadboard with each pin on one side of the center groove. You can choose whichever area you want on the breadboard. Next, connect the LED so that the long leg is plugged into the same row as the resistor and the other pin on another row. Finally, connect the wire from pin 6 to the same row as the negative side of the LED and the wire from pin 7 to the row with the resistor. Once you’re satisfied everything is connected correctly, you’re ready to power on the Raspberry Pi and write the code.
Since you are building a headed application, you’ll also need a keyboard, mouse, and monitor connected to the Raspberry Pi.
OK, now that the hardware is set up, it’s time to start writing the code.
Write the Code: User Interface
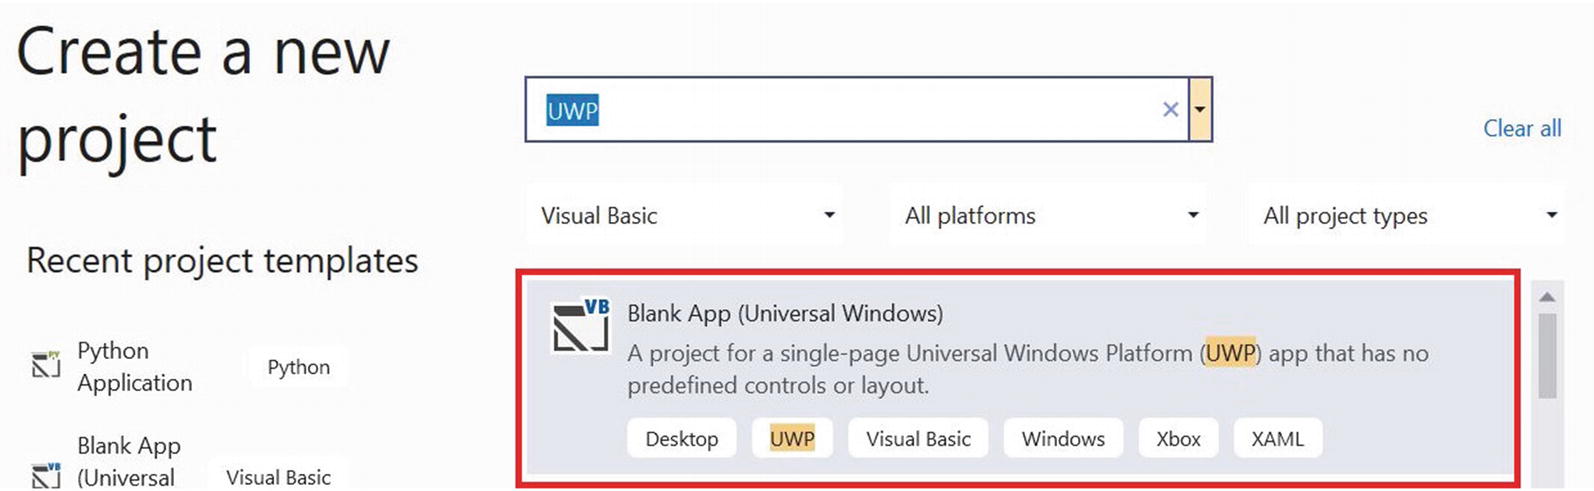
New project dialog: blank Visual Basic application
You will be asked to choose the Windows 10 IoT Core version you want to use, and then Visual Studio will open with the project configured. Notice that there are a number of files created and the layout of the project is similar to what you’ve seen in previous examples.
Bare XAML Code (MainPage.xaml)
Recall that the XAML file is used to define a user interface in a platform-independent way using an XML-like language. In this project, I demonstrate the more basic controls: a text box, a button, and an ellipse (circle) placed inside a special control called a stacked panel. The stacked panel allows you to arrange the controls in a vertical “stack,” making it easier to position them. As you can see in the listing, you want to place your XAML user interface items in the <Grid></Grid> section.
In this example, you want a text box at the top and a circle (ellipse) to represent the LED that you will use to turn on (change to green) and off (change to gray) to correspond with the hardware on/off code that you will add later. You also need a button to toggle the blink operation on and off. Finally, you’ll add another text box to allow you to communicate with the user about the state of the GPIO code (that you’ll add later).
Adding XAML Code for the User Interface: MainPage.xaml
Notice the button control. Here, you have an event that you want to associate with the button named start_stop_button_Click, which you assigned via the Click attribute. That is, when the user clicks it, a method named start_stop_button_Click() will be called.
XAML provides a great way to define a simple, easy user interface with the XML-like syntax. However, it also provides a mechanism to associate code with the controls. The code is placed in another file called a source-behind file named MainPage.xaml.vb. You will place all of the source code for the application in this file.
If you were typing this code in by hand, you will notice a nifty feature of Visual Studio—a context-sensitive help called IntelliSense that automatically completes the code you’re typing and provides drop-down lists of choices. For example, when you type in the button control and type Click=, a drop-down box will appear, allowing you to create the event handler (a part of the code that connects to the XML). In fact, it creates the code in the MainPage.xaml.vb file for you. If you copy and pasted the code, you will not get this option and would have to type in the code manually.
Adding the Base Code: MainPage.xaml.vb
Notice the New() method. This is the constructor for a Visual Basic class. In other languages, this method would have the same name as the class.
OK, there are a few extra bits here that may not be very obvious why they’re here. You want to paint the LED control green and gray for on and off. To do that, you need a reference to the green and gray brush resources. Thus, I create a new object from the Windows user interface colors namespace.
You also add the code for the button click event, start_stop_button_Click(), as well as a boolean member variable that you use to trigger the LED timer. You add code that inverts the blinking variable (toggles between false and true), and depending on the value, you turn the LED indicator control green (meaning the LED is on) or gray (meaning the LED is off). You also change the label of the button to correspond with the operation. That is, if the button is labeled Start, the LED indicator is off, and when clicked, the label changes to Stop and the LED indicator is turned on.
That’s it! You’ve finished the user interface. Go ahead and build the solution correcting any errors that may appear. Once compiled, you’re ready to test it.
Test and Execute: User Interface Only
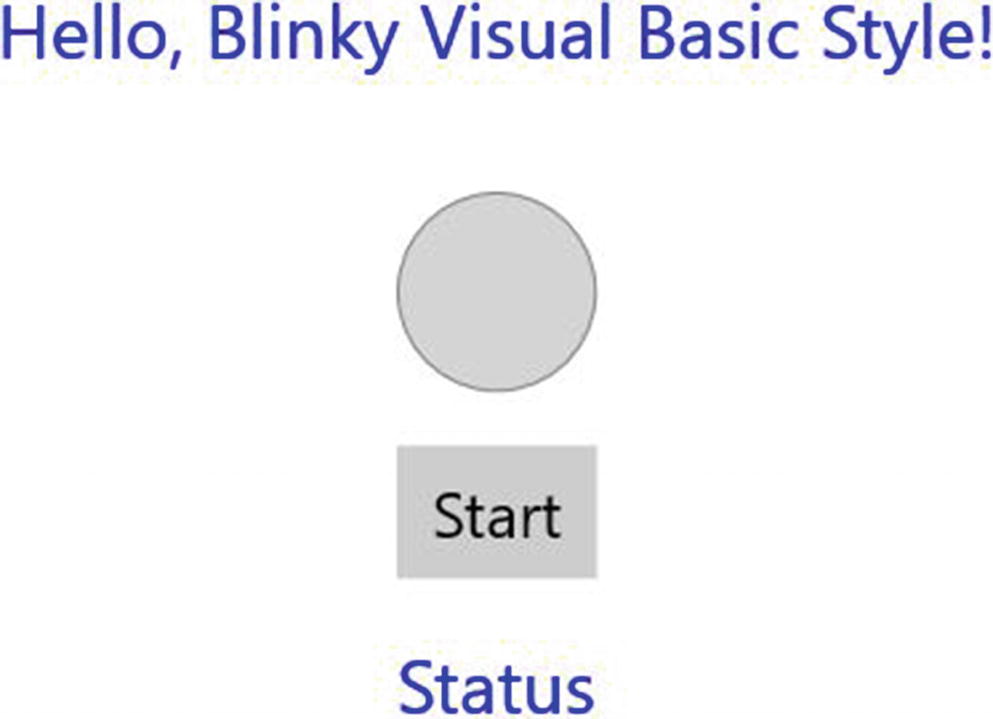
The user interface: timer off

The user interface: timer on
You may be wondering where the blink part is. Well, you haven’t implemented it yet. You will do that in the next phase.
Add the GPIO Code
Now, let’s add the code to work with the GPIO header. For this phase, you cannot run the code on your PC because the GPIO header doesn’t exist, but you can add code to check the GPIO header status—hence the extra text box in the interface.
The following is a bit more complicated and requires additional objects. Thus, I walk through the code changes one part at a time. Henceforth, for brevity, I present excerpts of the files that we will be editing.
Adding the Timer and GPIO Variables: MainPage.xaml.vb
The private variables store the pin value, a constant set to GPIO 4 (hardware pin #7), and a variable to store the pin variable result.
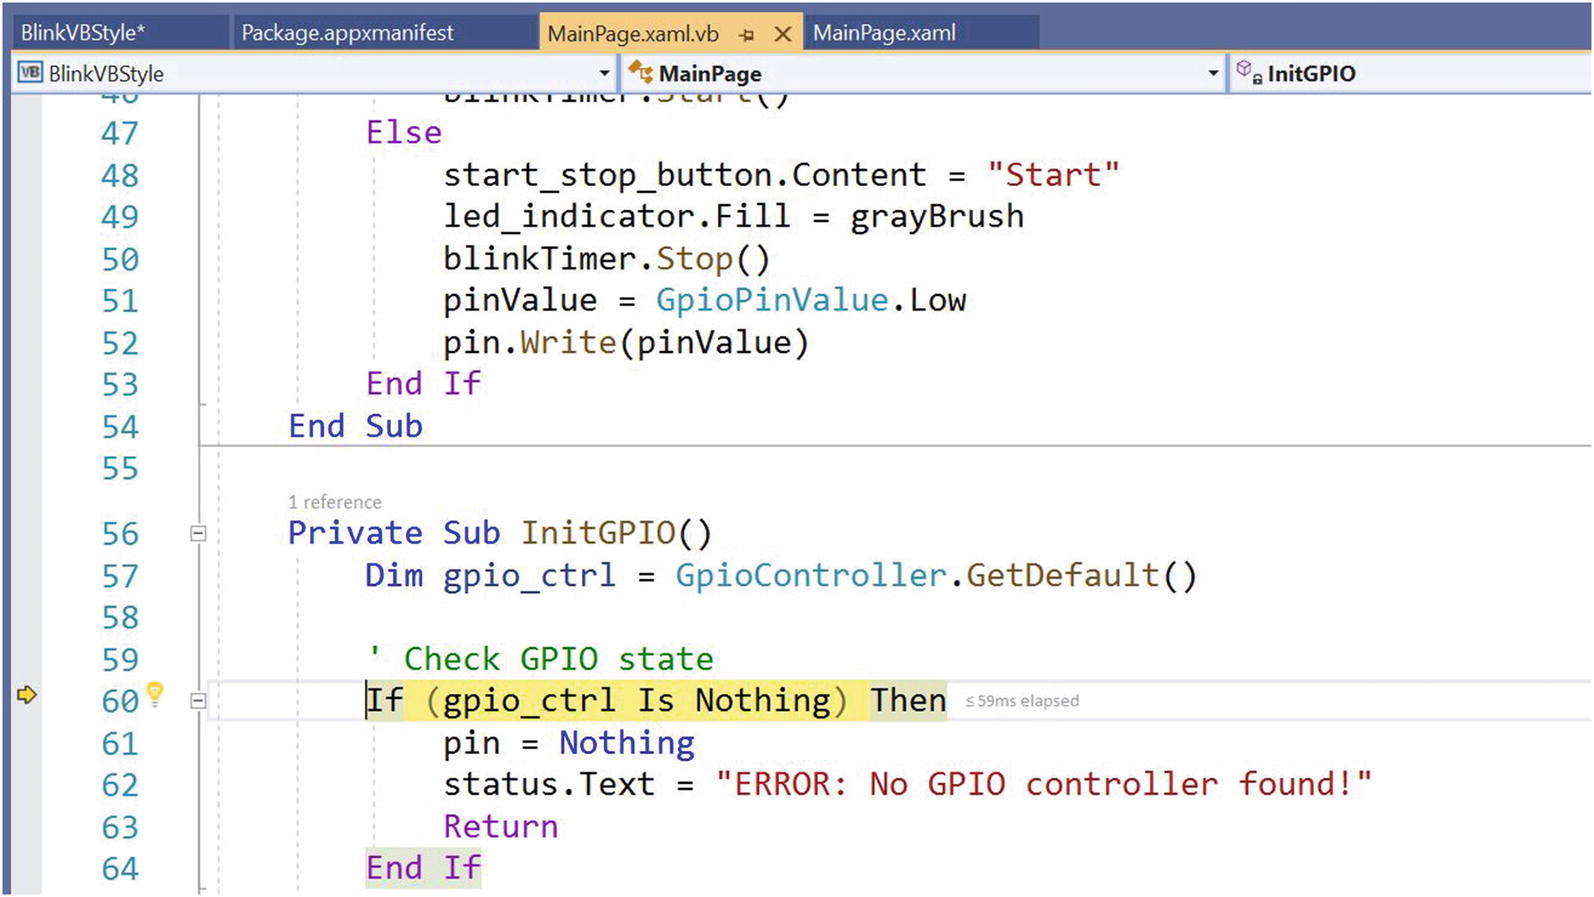
Adding the InitGPIO() Code: MainPage.xaml.vb
The code first creates an instance of the default GPIO controller class. Next, you check to see if that instance is null, which indicates the GPIO header cannot be initiated, and if so you change the label of the status text and return. Otherwise, you open the GPIO pin defined earlier. If that value is null, you print the message that you cannot get the pin. Otherwise, you set up the pin for output mode, and then turn off the bin and state all is well in the status label text.
Adding the BlinkTimer_Tick() Code: MainPage.xaml.vb
In this method, you check the value of the pin. Here is where the real operation of the code happens. In this code, if the pin is set to high (on), you set it to low (off) and paint the LED control gray. Otherwise, you set the pin to high (on) and paint the LED control green. Cool, eh?
You could change this color to match the color of your LED if you wanted. Just remember to change the brush accordingly in the source file.
Adding the Timer Control Code: MainPage.xaml.vb
You see here a few things going on. First, notice that you invert the blinking variable to toggle blinking on and off. You then add a call to the blinkTimer instance of the DispatchTimer to start the timer if the user presses the button when it is labeled Start. Notice you also set the label of the button to Stop so that, when clicked again, the code turns off the timer and sets the pin value to low (off). This is an extra measure to ensure that if the button is clicked when the timer is between tick events, the LED is turned off. Try removing it and you’ll see.
Adding the Timer and GPIO Initialization Code: MainPage.xaml.vb
Notice you add code to create a new instance of the DispatchTimer class, set the interval for the tick event to 1 second (1000 milliseconds), and add the BlinkTimer_Tick() method to the new instance (this is how you assign a method reference to an existing event handle). Next, you stop the timer and finally call the method that you wrote to initialize the GPIO.
OK, now you’re ready to deploy the application to your device. Go ahead and set up everything, make the connections on the breadboard, and power on your device.
Deploy and Execute: Completed Application
Once your code compiles, you’re ready to deploy the application to your Raspberry Pi (or another device). Recall from Chapter 4, we have a different deployment method for Visual Basic applications. If you want to install your application, you can do so from Visual Studio with only a few steps. However, if you want to debug your application, you must use a slightly different process. Let’s look at each of these options starting with a normal deployment.
Before you attempt to deploy your application, make sure the remote debugger is stopped. We do not need the remote debugger running to deploy Visual Basic applications. This is because we will be using a different authentication mode.
Make sure the remote debugger is stopped on your device before attempting to deploy a Visual Basic application.
Deploying Your Application (No Debugging)
Select the build, platform, and device (Visual Studio)
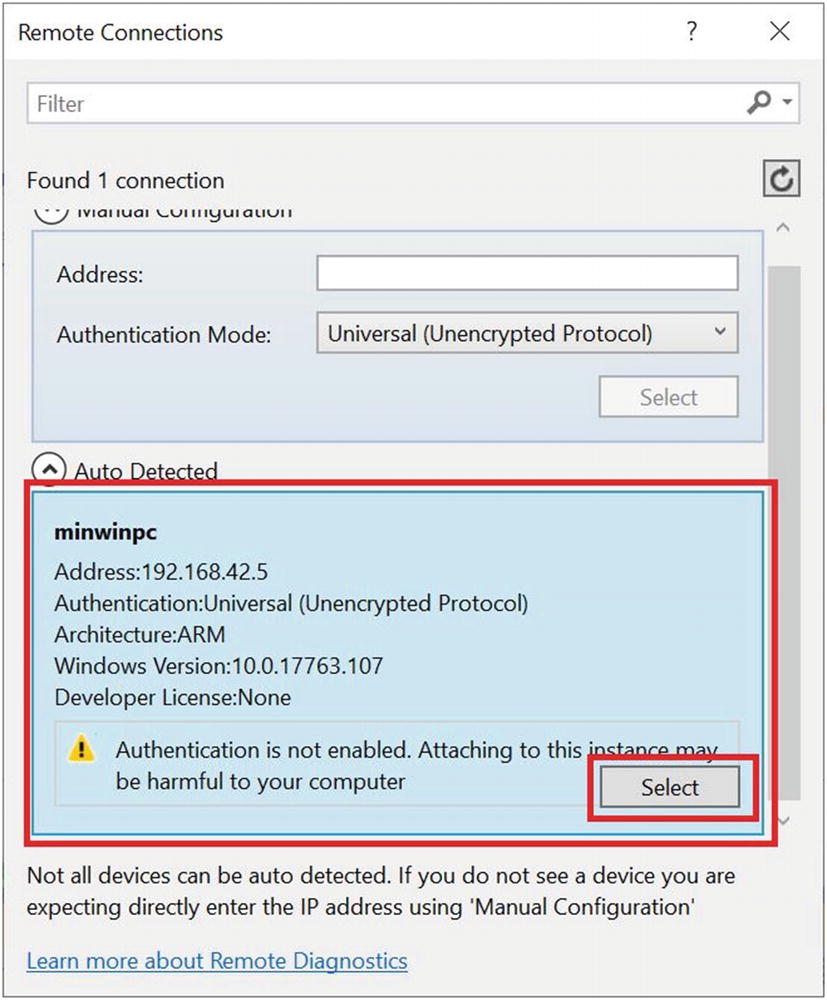
Remote Connections dialog
OK, we’re almost ready to deploy. There is just one more thing to change. I find it helpful to rename the package name using the package manifest. This is the name that will be displayed in the Device Portal. By default, it uses a generated name, but I find renaming it to the same as the project name helpful for easier tracking. Thus, this is an optional step.

Set the package name (package manifest)
Now all that is left is to deploy the application. Simply click Build ➤ Deploy Solution, and the deploy will begin. If this is the first time you’re deploying the application (or any application) to your device, the deployment could take a while.
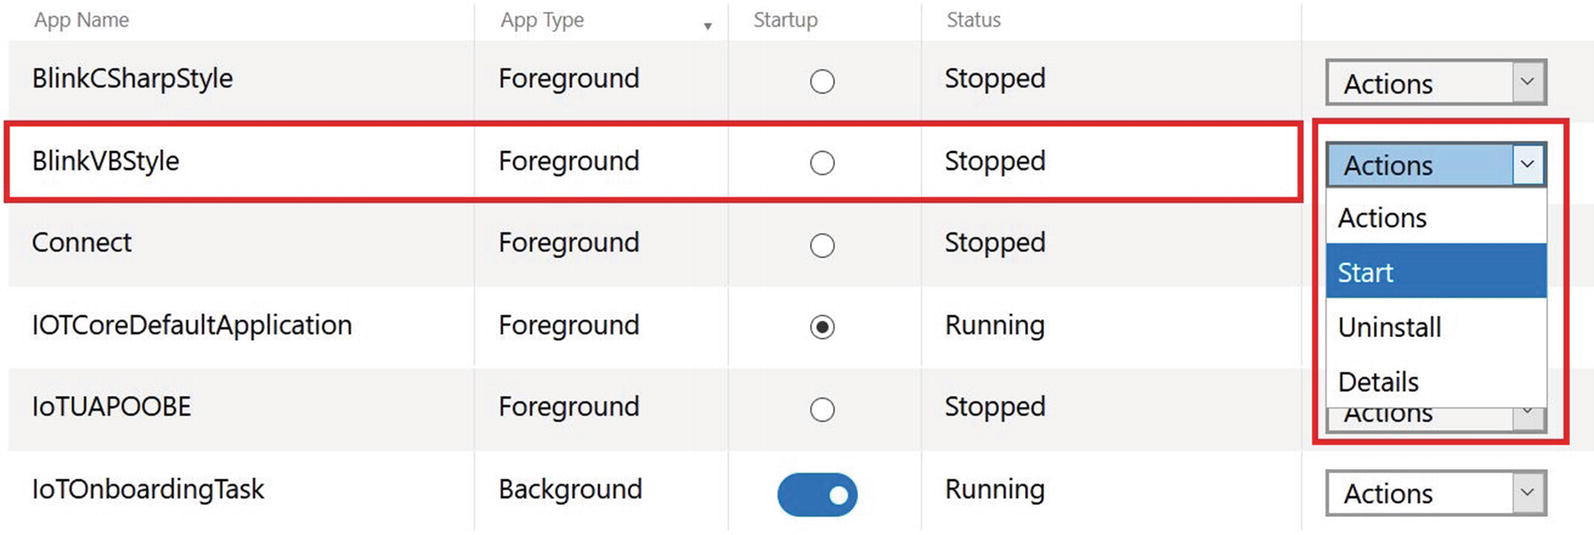
Controlling the application in the Apps manager (Device Portal)
After a few moments, you will see the application start on your device. If you have all of the wiring complete, you can click the button and observe the LED blinking until you stop it. Cool, eh?
If the LED is not blinking, double-check your wiring and ensure that you chose pin 4 in the code and pin 7 on the pin header (recall that the pin is named GPIO 4, but it is pin #7 on the header for the Raspberry Pi).
When you’re done, you can stop it from the Apps manager in the Device Portal by using the Actions drop-down box and selecting Stop. It may take a few seconds for the status to change from Running to Stopped.
If you want to start the application again, you do not need to redeploy it. The application is installed on the device. To start it, go back to the Device Portal, click Apps, then Apps manager, and then click the Actions drop-down box for the application and click Start.
Should you want to uninstall the application, go back to the Device Portal, click Apps, then Apps manager, and then click the Actions drop-down box for the application and click Uninstall.
And that’s it! Congratulations, you’ve just written your first Visual Basic application that uses the GPIO header to power some electronics!
Now, let’s see how to deploy and debug our application.
Deploy and Debug
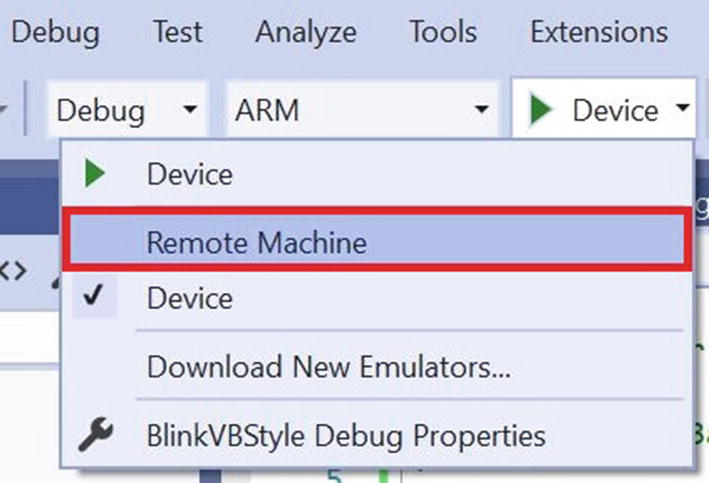
If you want to debug your application, you can, but once again it is not the same process we saw with the C++ application. Specifically, we do not need to use the remote debugger. Instead, we can make the same selections from the debug toolbar, selecting the Debug build, the ARM platform, and the Remote Machine from the device drop-down. If you have previously completed the Remote Connections dialog, you will not see that again. If you do see the dialog, make sure to select your device as described earlier and click the Select button.
Before you start the debugger, let’s check a few settings. Most of these should be set correctly, but I’ve seen a couple of situations where the debug settings have changed. If they are not set correctly, you could have difficulty starting the debug session or may receive a series of strange, cryptic messages explaining either the application is already running or the debug symbols cannot be loaded.4
Target device: Remote Machine
Remote Machine: The name of your device
(Optional) Uninstall and then re-install: Checked
(Optional) Deploy optional packages: Checked
Application process: Managed Only
Background task process: Managed Only

Project debug settings
Notice there are two optional settings. Checking these will ensure your application will always be deployed (thus overwriting previous installations) and all optional packages are included, which may avoid certain dependency issues if you have installed and uninstalled other applications on the device.
If you want to reset the Remote Connection, remove the IP or device name in the Remote Machine text box.
Once you make any changes in this dialog, be sure to save your solution. Building or deploying does not automatically save these settings.
OK, now we are ready to debug our application. I find it helpful to place a breakpoint in the code so that when the application starts, I can step through it. Later, you may want to set a breakpoint somewhere in your code to observe certain variables or check for logic errors.

Setting a breakpoint (Visual Studio)
Interactive debugger (Visual Studio)
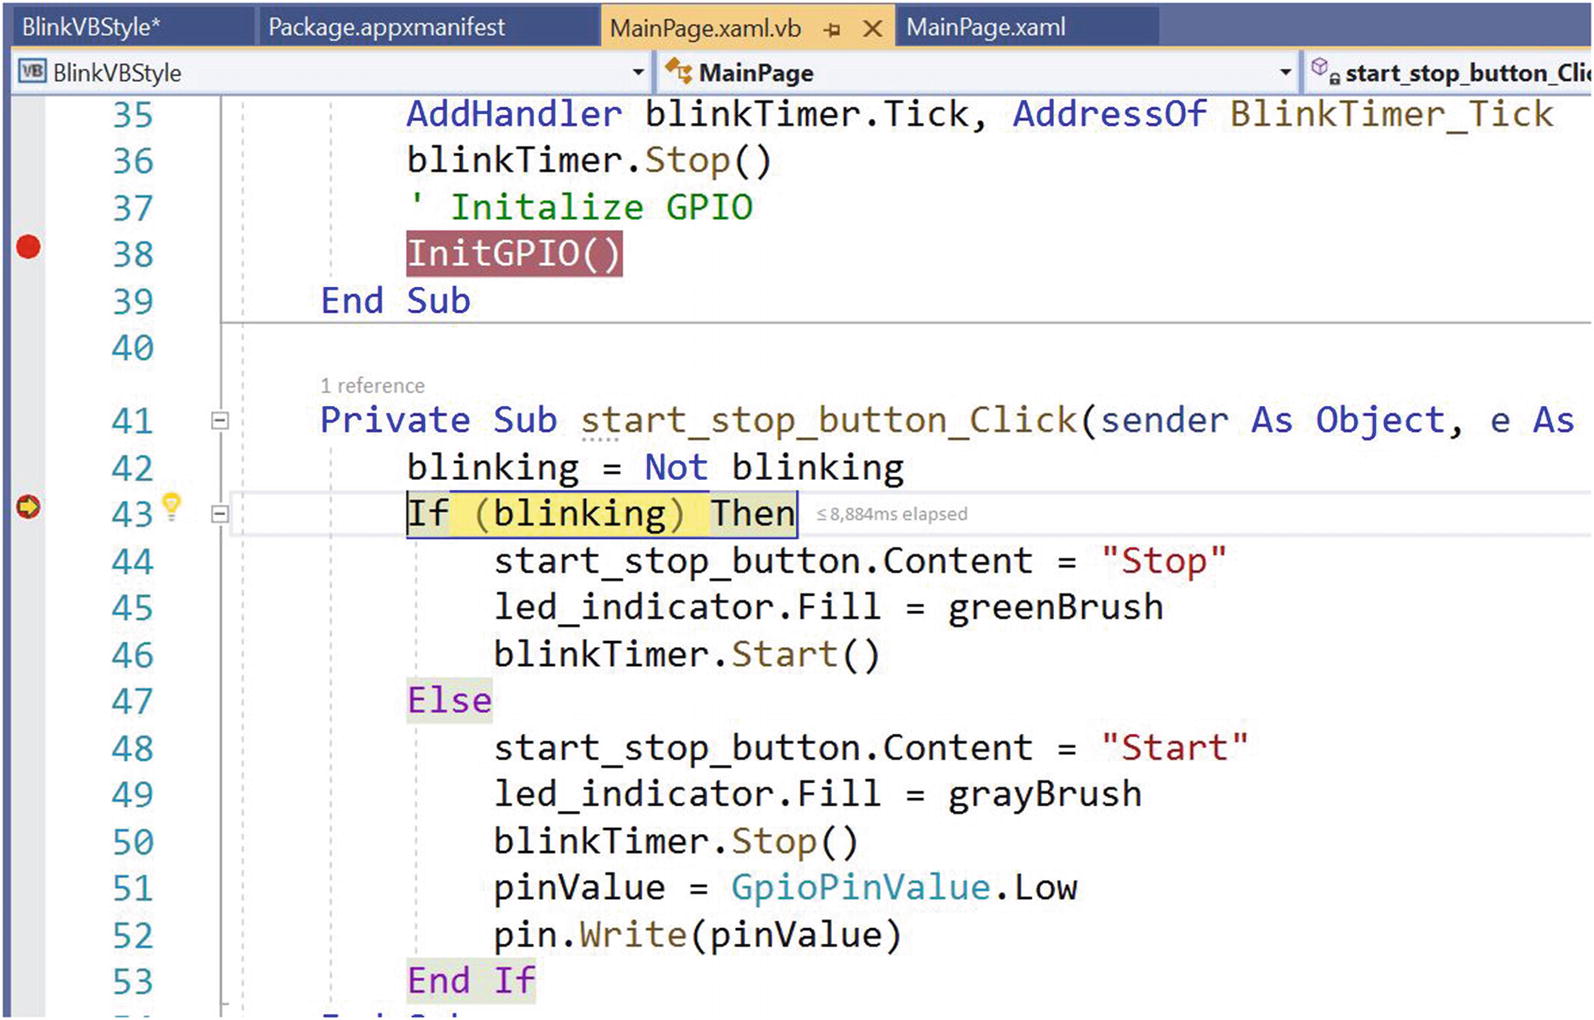
Stepping through code with interactive debugger (Visual Studio)
Go ahead and experiment with the application until you are satisfied it is working correctly. When you want to stop it, go to the Device Portal, and click Apps ➤ Apps manager and use the Actions drop-down to stop the application.
If you get errors during the deployment, go back and check all of your settings to ensure you have everything correct. See the Visual Basic Application Deployment Troubleshooting section for more details.
If the app deployed successfully but doesn’t show in the drop-down list, try disconnecting and reconnecting. If that doesn’t work, try rebooting your device.
Visual Basic Application Deployment Troubleshooting
If you’re like me, things sometimes go wonky and just don’t work, or they present you with an interesting but nearly indecipherable error message. I present a couple of these incidents you may encounter along with actions you can take to prevent or correct them.
Application Already/Not Running
If you get an error dialog saying the application is already or not running, you should double-check your debug settings for the project as described earlier. This can happen if you’ve deployed the application numerous times or have previous versions installed. Clearing the debug properties selections usually fixes the problem, but if that does not, change the package name or increment the version number, uninstall the application from the device, and restart your deployment.
Failure to Unregister Application
Once you’ve removed the folder, you can deploy your application.
Deploy Succeeds, but Nothing Happens
It is possible you can deploy your application, but it either doesn’t start or doesn’t show up in your Apps manager on the Device Portal.
If Visual Studio reports the deployment succeeded, but the application doesn’t start, that’s OK and normal if you are doing a straight deployment. If you are deploying and debugging expecting the application to start, check the project properties as described earlier and correct any settings that may have changed. You can also attempt to uninstall the application using the App manager before retrying the deployment. If that still doesn’t work, try removing all applications you’ve built previously.
If the application doesn’t show up in the Apps manager, be sure to double-check all of the project settings in Visual Studio as described earlier, and the device is connected and reachable from the Device Portal. Try using the clean and build solution menu options again before attempting to deploy the application.
As a challenge, you can modify this project to add a Close or an Exit button to stop the application.
Summary
If you are learning how to work with Windows 10 IoT Core and don’t know how to program with Visual Basic, learning Visual Basic can be fun given its easy-to-understand syntax. While there are many examples on the Internet that you can use, most are not UWP projects and thus can be a challenge to understand how they translate to UWP applications. As you have seen, the UWP application template for Visual Basic follows the same pattern and uses the same libraries as the C# example from the last chapter. Only, the syntax is less complex.
This chapter has provided a crash course in Visual Basic that covers the basics of the things you encounter when examining most of the smaller example projects. You discovered the basic syntax and constructs of a Visual Basic application, including a walk-through of building a real Visual Basic application that blinks an LED. Through that example, you learned how to work with headless applications, including how to manage a startup background application.
The next chapter takes a short detour in your exploration of Windows 10 IoT Core projects. You are introduced to the basics of working with electronics. Like the programming crash course, the chapter provides a short introduction to working with electronics. A mastery of electronics in general is not required for the projects you explore, but if you’ve never worked with electronic components before, the next chapter will prepare you for the more advanced projects in Chapters 10–14.