
In the world of LEGO robotics, pneumatics are among the great mysteries to many robot teams. Since so many people either don't understand their potential, or maybe just are not aware of their existence, these parts rarely get used on LEGO robotics projects. "Pneumatics" refers to the use of pressurized gas (in LEGO, that gas is air) to create a mechanical motion.
Pneumatics give the robot another power source of manipulation besides LEGO NXT servos. Many times, a team will find that it needs an extra powered attachment that can't be created using the robot's existing attachment servo. Maybe the servo is being used for other attachments, or its location on the robot chassis doesn't work for the attachment idea that the team has in mind for a particular mission. The LEGO pneumatics can give a team this extra source of power for that attachment. LEGO pneumatics are also very strong; tasks that may cause a mechanized attachment with gears to slip, such as heavy lifting, can be done with pneumatics much easier.
Pneumatics are not for everyone, and I advise against using them just for the sake of having them on the robot. If you do use them, be sure to understand why you chose to do so, and be ready to explain this to the technical judges. In this chapter, we will talk about the how each of the components work in the system.
LEGO pneumatics use compressed air to push pneumatic actuators either open or closed. The air is compressed by using the LEGO pneumatic pump to fill the air tank with compressed air; this air is then released via a pneumatic air switch that directs the air to the actuators. The compressed air now forces the actuator to open or closed depending on what direction the air was put into it.
Figure 10-1 shows the flow of the air to cause an actuator to open. The steps for this circuit are as follows:
The pump pushes the air into the tank.
The switch is opened and releases the air into the lines.
The air causes the actuactor to open.
For the actuator to close, the same process is followed, but instead of the switch pushing the air to the bottom of the actuator, the air is released into the top of the actuator, thus causing it to close. You determine whether the air makes an actuator open or close by connecting the air hose to either the open or close port. However, not all LEGO pneumatic actuators have a close port on them. Some can be only opened by air and have to be closed manually.

LEGO has created a variety of pneumatic parts over the years. There are air tanks, air hoses, switches, t-joints, and actuators. While the color and size of these parts has varied, the way they work has stayed consistent.
The availability of pneumatic parts fluctuates. LEGO Education is the best source for finding the current LEGO pneumatic parts, but a variety of third party vendors sell older LEGO pneumatic parts on the Internet. A quick search on any of the popular online classifies or auction sites will most likely return a good list of parts. Be careful to make sure that any parts you use are made by LEGO. Figure 10-2 shows many of the common LEGO pneumatic parts.

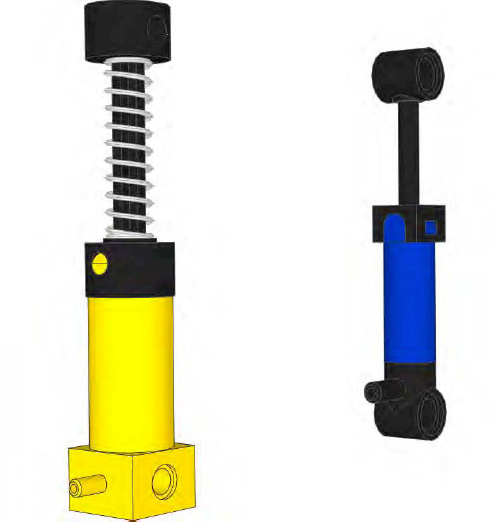
Pumps are the primary source of air in a pneumatic circuit. There are two types of LEGO pneumatic pumps: a large manual pump that has an easy-to-activate plunger and is spring loaded and a small pump that requires a bit more effort to work manually but can be connected to a power source, such as an NXT servo, for automatic pumping. For most competitive robots, having an automatic pumping system will not be necessary, because the use of the air will be isolated to just a few missions that should be doable on just one full tank. In that case, the normal procedure would be to fill the air tank while the robot is still located in base. Figure 10-3 shows a large pneumatic pump and a small pump.
To store air for later use, a pneumatic air storage tank is available. The LEGO air tank will store the air as we compress it using the LEGO pneumatic pump. LEGO air pressure gauges are available, but for the most the most part, you can tell when the tank is getting full based on the effort required to push the pump. The tank has a hose connection on both ends: one will be used to attach the air pump and the second opening will be the output line connected to the air switch. Figure 10-4 shows a standard LEGO pneumatic air tank.

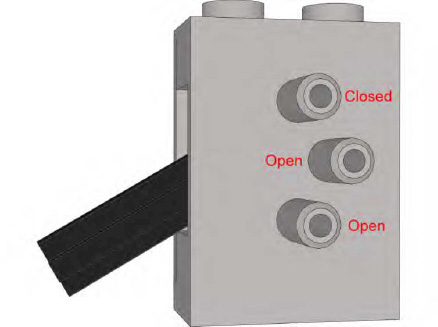
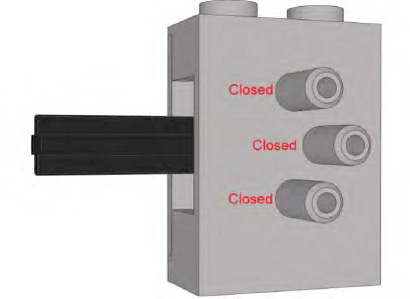
Like the LEGO pneumatic pumps, LEGO pneumatic switches come in two versions, but they both work the same way. They just have different enclosures that allow for multiple ways to connect them to your robot chassis. The switches have three air connections on them and a TECHNIC-type axle connected that controls the flow of the air between the air connections on the switch. Figures 10-5, 10-6, and 10-7 show the state of the air connections based on the position of the switch. When a connection is open, the air is free to flow in or out. When a connection is closed, the air cannot escape or enter the connection. When connections are opened together, the air can flow between the open connections.

The pneumatic actuator is the part that actually makes use of the compressed air. The air is used to either extend or retract the actuator. There are multiple versions of the pneumatic actuators; some have only one input, and others have a top and bottom input, as shown in Figure 10-8.

The single-input actuators have only one input that will extend the actuator; the cylinder has to be compressed manually either by hand or with some type of spring. The more commonly used actuator available currently is the dual-input actuator, which has inputs on the top and bottom of the actuator. The bottom input will extend the cylinder, and the top input will cause the cylinder to close.
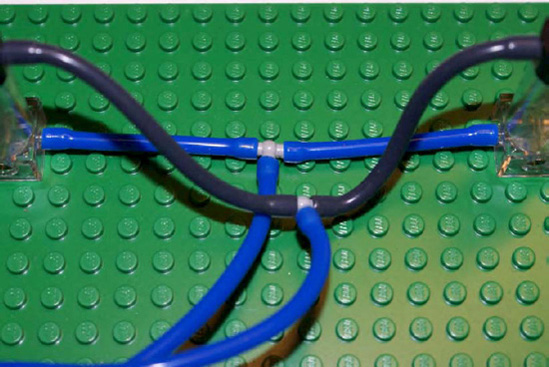
The T-joint, shown in Figure 10-9, allows you to combine airflow from two lines into one single line or to split airflow from a single line into two. If more directions are needed, multiple T-joints can be combined to create more directions for the airflow.
LEGO air hoses are one of the few LEGO pieces that you can modify in most LEGO robotics competitions; most events allow you to cut the air hoses to the desired length. It is best to not cut any hoses until you have tested out your pneumatic attachment completely, since once the hose is cut, you can't make it longer again. The hoses you use do need to be LEGO pneumatic hoses for most robotic events.
One of the newer LEGO pneumatic parts is a LEGO air gauge (see Figure 10-10). The gauge has a single input and a reading that goes between 0 psi (pounds per square inch) and 60 psi. Most LEGO air pumps can only reach 35–40 psi. The air gauge is not a requirement on a robot attachment, but it is nice to have for making sure your pneumatic attachment fully charged and ready to go.

LEGO pneumatics are a great addition to LEGO robots because of their compact size and lightweight components. Compared to an NXT servo, the pneumatic actuators are quite light and can be added to your robot without causing much gain in weight. Also, because the actuators are relatively small, they can be installed in tight locations on your robot chassis, and the flexible hoses make the air lines easy to position.
LEGO pneumatics are also very strong. The amount of pressure you apply will determine how much force is applied by the actuator when it extends or contracts. You don't have to worry about gear slippage as you do with powered attachments, but you will need to be careful to not overpressurize your pneumatic components or else you could cause failure in one of the air hose connections and thus lose all your air pressure, making the pneumatic system useless.
When building a pneumatic attachment, you need to be aware of the distance the air switch is from the actuator. When the switch is close to the actuator, the cylinder will react faster than when the switch is a greater distance away. Because the air hose before the switch is full of pressurized air, and the hose coming out of the switch is empty, when the switch is triggered to open the air valve, the air must first fill the empty air hose before it can reach the actuator, thus making the response time slower.
There are two ways to fill your air tanks at an event: with a powered pump system or a manual pump system. The manual pump will be the more common approach at most events.
Some competitive LEGO robot teams will make use an automatic pump system. To do so, they would need to use an NXT motor to run the pump, and this would defeat one of the advantages of using LEGO pneumatics on the robot. The idea is to increase the various ways to power an attachment, not really to swap one for another. This is not to say that automatic pump systems can't be done or won't be used; I'm just saying that using such a system will not be the common practice.
For a team that does not have any kind of powered pumping system, the robot's pneumatic systems will have to be filled with compressed air manually using the LEGO pump. This can be done in base or whenever the game rules allow the team to touch and handle the robot.
If your robot is going to be doing just a few minor things with the pneumatic attachment, a single full air tank should perform just fine, but if you think you're going to need a bit more air, adding multiple air tanks to your robot would be great option. Just remember that more tanks you have, the more time it's going to take to fill the tanks, and time is one of the things you won't have a lot of during most events.
Many teams will make the pneumatic attachment removable, so when its not being used, a teammate can pump up that air tank just before the attachment is installed on the robot and sent off to perform its mission. Don't try to fill the air tanks too early, because the LEGO pneumatic parts will leak a small bit of air. If you fill the tanks too soon, you might not get the full amount of pressure needed to complete your task.
You could also try to have multiple air tanks that you switch out when the robot returns to base. Doing so will require some nimble hands when attempting to connect the air hoses quickly.
Once your robot is pumped up and heading out to complete its task with the pneumatic attachment, how will you flip the switch to release the air needed to start the pneumatic action? Unfortunately, there is no easy answer to this question. In most cases, you will need to interact with an object on the field to flip the switch; very much like a touch sensor, the switch will have to be located in such a way that when the robot is in position, something on the field, or even the game table wall, will cause the air switch to flip and start the pneumatic process.
Many times, you will be able to just have the robot rub next to a field object or bump into something stationary on the game field. The amount of force needed to trigger the air switch is minimal, so you don't need to drive the robot fast or hit anything with a great deal of force; just a gentle tap is all that is needed.
When building your pneumatic attachment, treat it the same way you would any other powered attachment. Make sure it's quick to take on and off of the robot chassis. Keep the actual attachment mechanism simple, and give lots of room for error when you can. Many of the same designs you can make for powered attachments can be made for pneumatic attachments as well, such as claws, lifts, and pushers.
Figure 10-11 shows an example of a lifting attachment that will connect to the DemoBot chassis. The attachment is all inclusive, meaning that the pump, air tank, switch, and of course, actuators are all part of the single attachment. This helps with quickly adding and removing the attachment. During an event, you will most likely not have time to connect and disconnect air hoses.

Now, in Figure 10-12, the attachment is mounted on the DemoBot with a quick-release pin system, so the attachment simply drops into place. The air tank should have already been pumped up at this point, so it's just a matter of connecting the lift attachment and sending the robot out to perform its mission.

LEGO pneumatics might not be necessary for most robot designs, but it's always a good idea to be aware that they are available. One time, you might find yourself needing an extra powered attachment that is lightweight and strong and can create linear movements. If you don't currently have any LEGO pneumatic parts available, I suggest that you at least invest in a few to give your team some hands-on experience with them. You'll be amazed at some of the creative ideas that can come from just hooking parts together and getting a better understanding of how they work.