
This chapter will start by focusing on sed, one of the tools that can scare a lot of Linux users. We will look at some basic sed commands that could make hours of refractor turn into a few minutes. We will see how you can locate any file by using Linux puter. Furthermore, we will see just how remote work will get a whole lot better when Tmux enters our skill set. You can run long lasting commands, split screens, and never lose your work with the help of the best terminal multiplexor. Then, you will learn how to discover and interact with your network with the help of commands like netstat and nmap. Lastly, we will see how Autoenv helps switch environments automatically and how to use rm command to interact with trash from command line using the trash utility.
In this chapter, we will cover the following:
- Understanding the working of sed
- Working with tmux, a terminal multiplexer
- Automatically switching environments using Autoenv
- Using rm command line to remove (delete) files or directories
If a picture is worth 1000 words, then sed one liners are definitely worth a thousand lines of code! One of the most feared commands in the Linux CLI is, you guessed it, sed! It's been feared by programmers and sysadmins everywhere, because of it's cryptic usage, but it can serve as a very powerful tool for quickly editing large amounts of data.
We have created five files to help demonstrate the power of this awesome tool. The first one is a simple file containing the humble line of text: Orange is the new black. Let's start by creating a simple sed command to replace the word black with white.
The first argument of sed is the replace command. It's divided into 3 parts by 3 /. The first part is s for substitute, the second part is the word to be replaced, black, in our case, and the third part is the replacement word, white.
The second argument is the input, in our case, a file:
sed "s/black/white/" 1.txt

Now, the result will be printed on the screen, and you can see the word black has been replaced by white.
Our second example contains yet another line of text, this time with the word black in both upper and lower case. If we run the same command using this new file, we will see that it replaces only the word that matches the case. If we want to do a case insensitive replace, we will add two more characters to the end of our sed command; g and l.
g: It means global replace, used for replacing all the occurrences in the file. Without this, it will only replace the first argument.l: means case insensitive search.sed "s/black/white/gI" 2.txt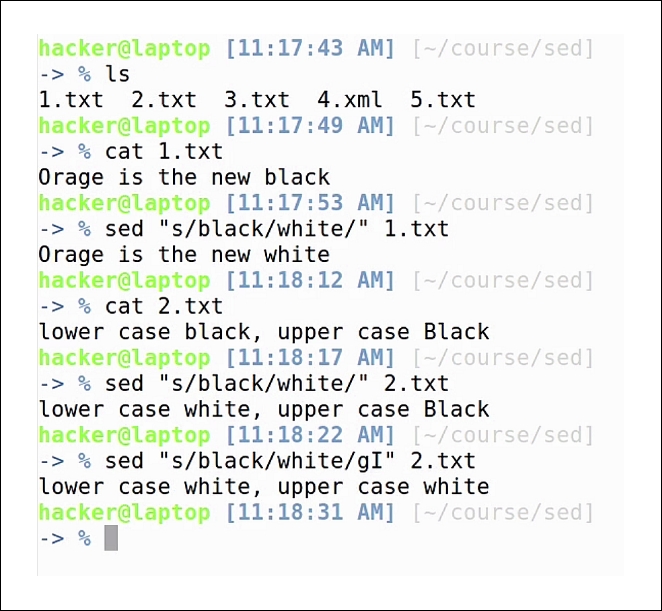
And as you can see, both words have been replaced. If we want to save the results in our file instead of printing to the screen, we use the -i argument, which stands for inline replace.
In some scenarios, we might also want to save our initial files, just in case we have an error in the sed command. To do this, we specify a suffix after -i which will create a backup file. In our case, we use the .bak suffix:
sed -i.bak "s/black/white/g" 2.txt

If we check the content of the files, we can see that the initial file contains the updated text, and the backup file contains the original text.
Now, let's look at a more practical example. Let's say we have a shell script that contains multiple variables and we want to surround our variables with curly brackets:
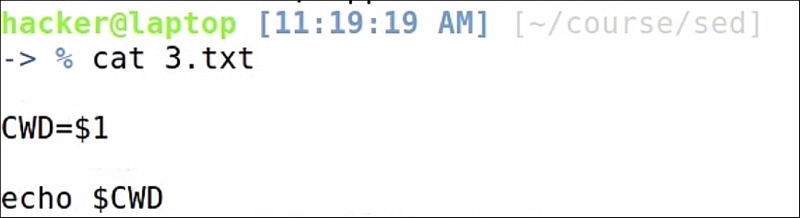
In order to do this we will write:
s: It's for substitute.g: It's for global; meaning replace all occurrences found.$: This matches all strings starting with the dollar sign. Here dollar needs to be escaped, so that it's not confused with the start of the row anchor.- We will enclose the string following
$in ( [ ]: This is for specifying a range of charactersA-Z: It matches all uppercase characters0-9: It matches all numbers_: It matches_+: Any character in the[ ]must appear one or multiple times
In the replace part, we will use:
$: The dollar sign{ }: The curly brackets we want to add.1: The string that was previously matched in the ( )sed 's/$([A-Z0-9_]+)/${1}/g' 3.txt
Other common scenarios are replacing content in xml or html files.
Here we have a basic html file with a <strong> text inside. Now, we know that the <strong> text has more semantic value for search engine optimizations, so maybe we want to make our strong tags be a simple <b> (bold), and manually decide the <strong> words in the page. For this we say:
s: This is for substitute.<strong: The actual text we are searching for.( ): This will be used again for selecting a piece of text, that will be added back..*: This means any character, found any number of times. We want to select everything between "<strong" and "strong>".</: This is the closing of the tag. This, we want to keep intact.<b1b>: Just add<b b>, and the text that you previously found in the( ).sed "s/<strong(.*</)strong>/<b1b>/g" 4.xml
As you can see, the text was updated correctly, the red class still applies to the new tag, and the old text is still contained between our tags, which is exactly what we wanted:

Besides replacing, sed can also be used for deleting lines of text. Our 5.txt file contains all the words from the lorem ipsum text. If we wanted to delete the third line of text, we would issue the command:
sed -i 3d 5.txt
Hit :e, to reload the file in vim, and we see the word dolor is no longer there. If, for example, we wanted to delete the first 10 lines of the file, we'd simply run:
sed -i 1,10d 5.txt
Hit :e, and you see the lines are no longer there. For our last example, if we scroll down, we can see multiple empty lines of text. These can be deleted with:
sed -i "/^$/d" 5.txt

Which stands for:
^: Beginning of line anchor$: End of line anchord: Delete
Reload the file, and you see that the lines are no longer there.
Now, as you can imagine, these have only been some basic examples. The power of sed is much greater than this, and there are many more possibilities of using it than what we have seen today. We recommend that you gain a good understanding of the features presented here today, as these are the features you will probably use the most. It's not as complicated as it might seem at first, and it really comes in handy in lots of scenarios.