
Git is by far the most popular version control system out there. In this chapter, we will be looking at a plugin for Git, called GitFlow, which proposes a branching model for software projects. This branching model doesn't offer much help when it comes to small projects, but it's a great benefit to medium sized and large projects. We will be looking at a variation of the git-flow plugin, called gitflow-avh, which adds extra functionality, such as Git hooks, https://github.com/petervanderdoes/gitflow-avh.
To install it, we'll follow the instructions on the GitHub page. We are on Ubuntu, so we will follow the installation instructions for Linux.
We can see that it can be directly installed with the apt command, but apt doesn't usually contain the latest version of the software, so today we will do a manual installation. We want to pick the stable version, and use the one line command.
Once this is done, let's create a dummy project. We'll create an empty directory and initialize it as a Git repository:
git init

Basic Git usage is not part of this course, and we are assuming that you understand the basics.
All right. A good way to get started with git-flow is to read the excellent cheatsheet created by Daniel Kummer:
http://danielkummer.github.io/git-flow-cheatsheet/
This provides the basic tips and tricks to get you started quickly with git-flow. So the first thing the cheatsheet suggests is to run the following:
git flow init

To configure it, we need to answer a bunch of questions about what names the branches should have in each flow and what the version tag prefix and hooks directory are. Let's just leave the defaults. Now, let's run the following:
git branch

We can see that we are now on the develop branch, so no more developing on the master branch. This helps us have a stable master, while not so stable features are kept on the develop branch.
If we go back to the cheatsheet, we can look at the first item, which is a feature branch. Feature branches are useful when developing a specific part of functionality or doing refactoring, but you don't want to break the existing functionality on the develop branch. To create a feature branch, just run the following:
git flow feature start feature1

This is not the most intuitive description of the feature, but it's good for demonstration purposes. GitFlow will also show us a summary of actions once the feature branch has finished. This has created a new branch called feature/feature1, based on the develop branch and has switched us to that branch. We can also see this from our handy zsh prompt.
Let's open up a file, edit, and save it:
git status
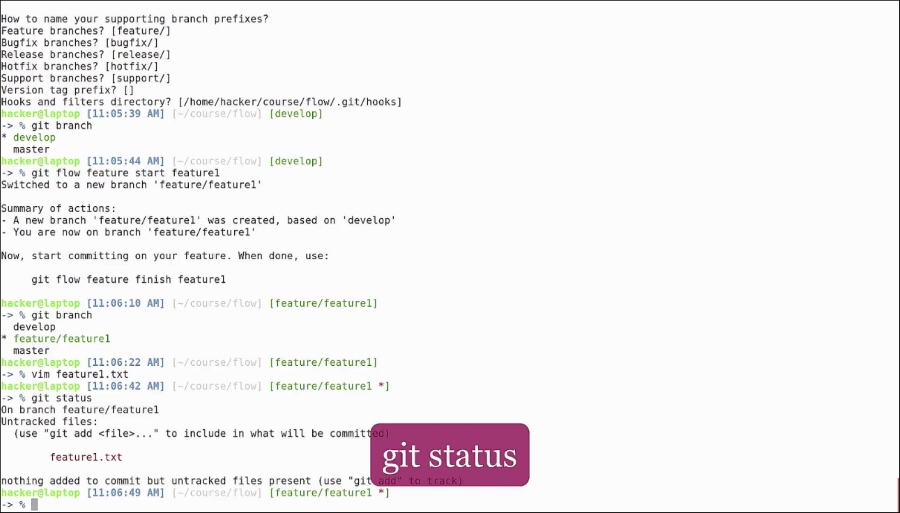
This command will tell us that we have an uncommitted file. Let's go ahead and commit it.
Now git commit is using the nano editor for editing the commit message. Since we prefer vim, let's go ahead and change the default editor to vim. All we need to do is add this line in our zshrc and reload it:
export EDITOR=vim
Now when we do a git commit Vim opens up, shows us a summary of the commit, and closes.
Now let's assume that we've finished adding a new feature. It's time to merge the feature branch back to develop with the following:
git flow feature finish feature1

Again, to get a summary of actions:
- The feature branch was merged back to develop
- The feature branch has been deleted
- The current branch was switched back to develop
If we do an ls, we see the file from our branch present on the develop branch. Looking at the cheatsheet we see a graphical representation of this process.
Next up is starting a release. Release branches are good for stopping the incoming features and bug fixes from the develop branch, testing the current version, submitting bug fixes on it, and releasing it to the general public.
As we can see, the syntax is similar, the process is similar, the develop is branched to a release branch, but when it comes to finishing the branch, the features are also merged to the master branch, and a tag is cut from this branch. Time to see it in action:
git flow release start 1.0.0
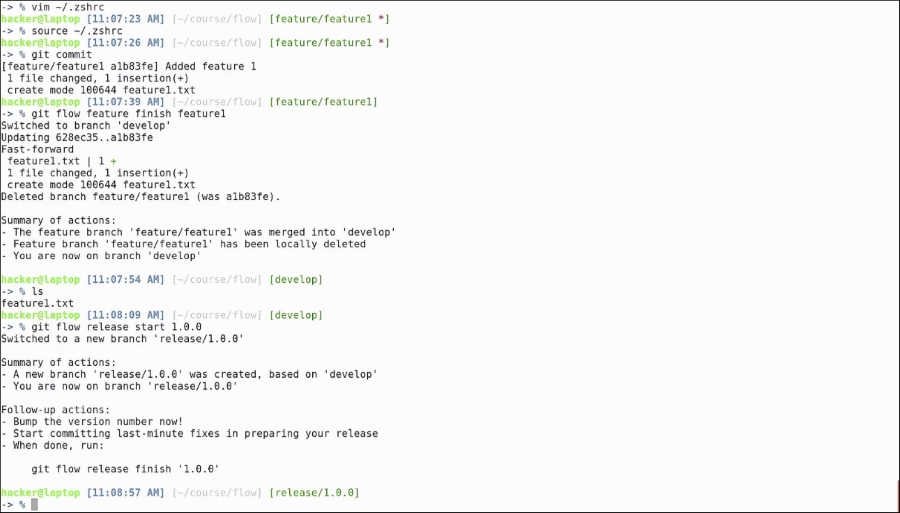
This switches us over to our release/1.0.0 branch. Let's add a releasenotes.txt file to show what has changed in this release. Added more bugs…Hopefully not!
Let's commit the file.
This is usually the case when you start to run your integration and stress testing, to see if all is well and to check that there are no bugs.
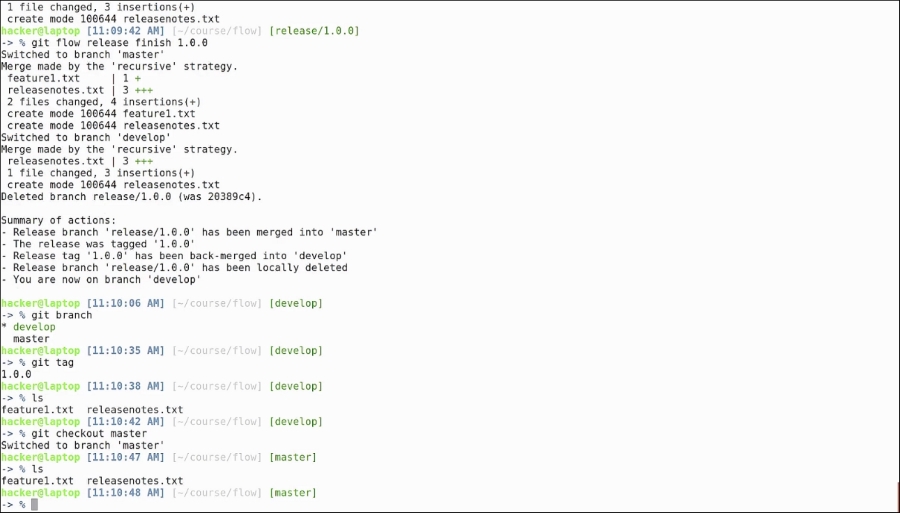
After the testing is finished, we go ahead and finish our release branch:
git flow release finish 1.0.0

It will prompt us for a series of release messages: we will leave all the defaults.
Checking out the summary, we can see that:
- The release branch was merged into master
- A tag was cut from master with the release version
- The tag has also been merged into develop
- The release branch has been deleted
- And we are back on the develop branch
Now, we run the following:
git branch

We see that the only two available branches are master and develop:
git tag

This tells us that there is a 1.0.0 tag cut. We can see that the branch now contains two files from the merge of the feature and release branch; and if we also switch to the master branch, we can see that, at this point, master is an exact replica of develop:
GitFlow also comes with an enhanced hooks functionality. If we read the documentation, we can see all the possible hooks in the hooks folder. Let's add a git hook that will be executed before every hotfix branch. For this we just open the template, copy the content, and paste it to a file with the name pre-flow-hotfix-start in our .git/hooks directory.
GitFlow has more workflows than the ones presented. We won't go through all of them, but you can find additional information by visiting the cheatsheet page or by reading the instructions on the GitHub page.
Let's just simply echo a message with the version and origin.
If we look at the hotfix flow, we can see that they are created from the master branch and merged back to master and develop, with a tag on master.
Let's see if it works:
git flow hotfix start 1.0.1

Apparently not. Something went wrong, our script was not executed and we need to delete our branch:
git flow hotfix delete 1.0.1

Analyzing the git hooks directory, we see that our hook does not have execution permissions. After adding execution permissions, and running the git hook command again, we can see our message on the top of the hotfix output. Let's finish this hotfix with the following:
git flow hotfix finish 1.0.1

As you can see, the commands are quite straightforward. There is also an oh-my-zsh plugin that you can activate to have command line completion.
As we said earlier, this is a plugin suitable for teams of developers working on multiple features, fixing bugs, and releasing hotfixes all at the same time. GitFlow is simple to learn, and helps teams have a correct workflow where they can easily prepare patches for production code, without worrying about the extra functionalities developed on the master branch.
You can tweak the config as you like: some people prefer to place the hooks folder in a different place so that it is committed on the git repo and they don't have to worry about copying the files over; others continue to develop on the master branch and use a separate branch such as customer for the production code.