
There are some differences between the iOS 7.x and 8.x SDK in the way things work. Here are some examples and resolutions to get them to work.
Let's look at a simple application that gets the location fix and displays it to the console. The steps for that are quite simple:
- In a project that you want to add location capabilities to, we need to import
CoreLocationand declare a couple of functions:import CoreLocation
- Next, we need to add the
CLLocationManagerDelegateprotocol to the class definition, which for theViewController.swiftfile would look something like this:class ViewController: UIViewController, CLLocationManagerDelegate { - Now, declare the variable to hold a reference to the location manager:
var locManager:CLLocationManager!
- Also declare the same variable in a function such as
viewDidLoador where you might want to start the updates:if locManager == nil { locManager = CLLocationManager() locManager.delegate = self locManager.desiredAccuracy = kCLLocationAccuracyBest locManager.distanceFilter = 10.0 } locManager.startUpdatingLocation()
This would be fine, however; when position updates are received, we need a function such as the following to handle them:
func locationManager(manager: CLLocationManager!, didUpdateLocations locations: [AnyObject]!) {
  let arrLocations = locations as NSArray
  let newLoc = aLocations.lastObject as CLLocation!

  let lat = (newLoc.coordinate.latitude.description)
  let lon = (newLoc.coordinate.longitude.description)

     manager.stopUpdatingLocation()
  println("We got (lat), (lon)")
}
Now run this on the iOS 7.x simulator or device; everything works fine. Run this on an iOS 8.x simulator or device and… nothing works:

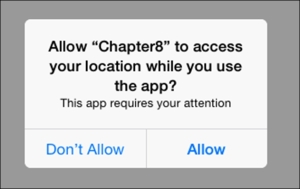
You will find that, due to the new privacy policies on iOS 8.x, you have to first obtain permission from the user to be able to access the location services. There are two functions available that allow you to do so:
requestWhenInUseAuthorization: This tries to get permission every time it has to use the application in the foreground—that is, as an active applicationrequestAlwaysAuthorization: This tries to get the permission for access even when the application is in the background—that is it is not the active application
When you request either of these, it invokes the following function:
locationManager(manager: CLLocationManager!, didChangeAuthorizationStatus status: CLAuthorizationStatus)
The status is one among: NotDetermined, Authorized, Denied, Restricted, or AuthorizedWhenInUse.
Now, you run the application with the request for authorization functions added as:
locManger.requestWhenInUseAuthorization()
Just before the locManager.startUpdatingLocation() function, it still doesn't do anything; it does not even ask for the authorization dialog. This is because there is a key that you need to set in the plist file. The authorization functions will only work as expected if this key is set. For requestWhenInUseAuthorization, the key is NSLocationWhenInUseUsageDescription and, for requestAlwaysAuthorization, the key is NSLocationAlwaysUsageDescription. The values for these keys are a message that you can set.
Whenever you have backwards compatibility in your application, you will have to check for the device iOS version to ensure that you do not call functions that do not exist; otherwise, the app will crash. The easiest way to manage this is to use a conditional if statement. First, we can determine the iOS version on which the app is running, as follows:
let device = UIDevice.currentDevice()
let iosVersion = device.systemVersion
let OS_8_OR_LATER = NSString(string: iosVersion).doubleValue >= 8.0
After this, with a simple if statement, we can check the following:
if OS_8_OR_LATER {
 println("Only when we run the app on iOS 8.x")
} else {
 println("This would be iOS 7.x")
}
If you are uncertain and do not want to have version-specific code, you can also check for the existence of a particular function with respondsToSelector. In our preceding example, you could write the code that would work on both iOS 7.x and iOS 8.x without errors:
if locManager.respondsToSelector("requestWhenInUseAuthorization") {
  locManager.requestWhenInUseAuthorization() // iOS 8.x only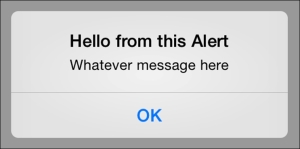
}If you have developed for iOS or searched some code samples on the Internet, you will find a solution in the form of something called UIAlertView. This is a class that allows you to quickly display an alert on the screen:
let vue = UIAlertView()
vue.title = "Hello from this Alert"
vue.message = "Whatever message here"
vue.addButtonWithTitle("OK")
vue.show()
The following is the alert screen:
However, to be able to detect and perform some action when the button is clicked, you need to also add UIAlertViewDelegate and set delegate to self, and then write the function to handle the button tap:
alertView(_ alertView: UIAlertView,
   clickedButtonAtIndex buttonIndex: Int)
With iOS 8.0, UIAlertView and UIActionSheet have been deprecated and replaced by UIAlertController. The AlertViews displays a message in the center of its view while ActionSheet is displayed anchored to the bottom of the screen. The new AlertController can display either style but note that this is available from iOS 8.x onwards only.
You can display an alert using UIAlertController and add the actions like this:
let actController = UIAlertController(title:"Hello Fom this Alert", message:"Whatever message", preferredStyle: .Alert)
let actOK = UIAlertAction(title: "OK", style: .Default) {
 (action) in
  // Code to handle the click here
}
actController.addAction(actOK)
self.presentViewController(actController, animated:true) {}You could display ActionSheet using UIAlertController by setting its preferredStyle value to .ActionSheet like this:
let actController = UIAlertController(title:"Hello from the Alert", message:"This is the ActionSheet alert", preferredStyle: .ActionSheet)
let actCancel = UIAlertAction(title: "Cancel", style: .Cancel) { (action) in }
actController.addAction(actCancel)
let actOK = UIAlertAction(title: "OK", style: .Default) { (action) in }
actController.addAction(actOK)
let actDestroy = UIAlertAction(title: "End of the World", style: .Destructive) { (action) in }
actController.addAction(actDestroy)

self.presentViewController(actController, animated:true) {}
In case you are wondering what those funny { (action) in } lines are all about, they are inline handlers or blocks, as those familiar with Objective-C will know them. There are two ways to pass handlers, either as inline code (seen in the preceding code) or as a reference to the handler, like this:
let actOKHandler = { (action:UIAlertAction!) in println("This is the OK Handler") }Then, add an OK action as follows:
actController.addAction(UIAlertAction(title:"OK", style: .Default, handler: actOKHandler))
You can see that the rest of the code is mostly the same. If you were to change preferredStyle from .ActionSheet to .Alert, the same code would work but would display the alert on the screen differently:

Action styles can be one of three button types, namely:
.Default.Cancel.Destructive
You can also add other UI elements onto ActionController; however, we are not going to cover that in this book.
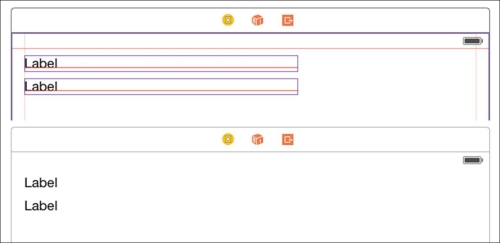
We did discuss Interface Builder in detail in Chapter 4, Interface Builder; however, there are a couple of tricks and tips that you could use. With the new UI changes since iOS7, buttons have stopped being grey rectangles with a border and some text. They are now transparent areas with just the text sitting there. It is difficult to see their size on the screen, as it would not show up other than as text. This can quickly be resolved by a simple setting, by going to Editor | Canvas | Show Layout Rectangles | Show Bounds Rectangles. When these are turned on, you will see the elements and their size.
In a previous chapter, we have not even skimmed the surface of what auto layout and size classes can do for your projects. The advantage of these classes is that your UI's adapt to devices based on characteristics as supplied by the class sizes. If you have seen the iPhone 6+, it is the first iOS phone that adapts the screen to both portrait and landscape mode. Here is a screenshot from the mail application. You can see that it has a master-detail view like we are used to on iPads:
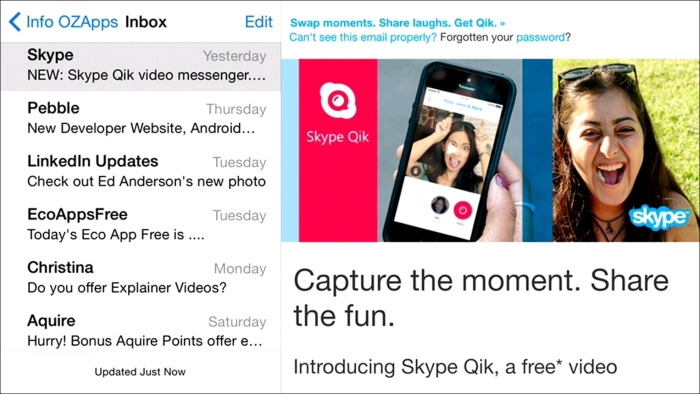
From that point on, portrait mode does not have the sidebar, just the e-mail like we are used to on iPhones:
This is because of the new class called UISplitViewController that adapts and provides this functionality.