
Chapter 4. Creating Your Very Own Channel
All About Your Channel
What most other social networking sites call your profile, YouTube calls your channel, as in “TV channel.” Picture your YouTube channel as a TV transmitter that reaches the world from your room. When I refer to your channel in this chapter, I am referring to your profile and/or your account on YouTube. Your channel is your home on YouTube; it is a page that resides at the following address:
| http://www.youtube.com/user/YOURUSERNAME |
Your channel page contains a description, which is information you enter about yourself, such as your likes and dislikes, favorite books or films, and other items. Your channel page also displays any videos you upload, along with the videos you save as your favorites. I will explain how this works in detail throughout this chapter; just know that your channel is where almost everything you do on YouTube is done.
Registering Your Account
Registering a YouTube account is simple. Although many of YouTube’s functions are available to unregistered guests, such as video searches and watching videos, registering an account offers many benefits. As mentioned, your YouTube account is your home on the site. Without an account, you are simply a spectator. This book isn’t for spectators; this book is for those who want to be seen. Don’t just watch the media. Be the media.
Registering an account allows you to leave comments and rate the videos you watch; it also allows you to subscribe to your favorite video makers and upload your own videos for others to watch and comment on. Before you register your account, however, you need to think about your username.
Choose Your Username Carefully
Your username is almost important enough to deserve its own chapter. The username you choose when you register is your permanent username. There is no way to change this later. Be very careful when selecting a username. Make sure it’s readable. Make sure that if someone were to mention it in a video, others would be able to type it into their browser window and find you. Make sure it isn’t too similar to other popular users so you can avoid confusion.
Take this from someone who regrets his username every day. fallofautumndistro is too long, it’s unpronounceable for many, and, for those who can say it, it is hard to spell correctly. When I registered my account, I never planned on using it for anything other than online video storage. I embedded the videos on my personal website (an online zine distro called Fall of Autumn, which is how I chose the name) and forgot about my account until my first video, a documentary about offset-printing techniques, was featured in the DIY and HowTo category (now called the DIY and Fashion category).
By the time I realized my username was difficult to remember, spell, and say, it was too late; I had already received a number of views and subscribers and was stuck with it. Don’t repeat my mistake; keep your username short, readable, and free of any numerical characters attached to the end.
Michael Dean’s username is kittyfeet69. He also says he wishes he’d picked a different name. (“kittyfeet” is from one of his websites, and “69” is the street address of his childhood home. He picked it because the username Michaeldean was already taken—by someone who has never uploaded a video! Michael thought he could pick a different username later, because on many social networking sites, you can change your username.)
If you later really want to change your username, you can simply create a new channel, in other words, a new account. YouTube allows you to create as many accounts as you’d like with the same email address. I advise against this if you have already built up your channel, though. It’s a lot of hard work to build your brand, and you wouldn’t want that work wasted by moving to a new, and empty, channel.
Usernames are not case-sensitive. Thus, fallofautumndistro will point to the same page as Fallfautumndistro or FallOfAutumnDistro or even FALLOFAUTUMNDISTRO. But it can be confusing to newcomers to put a lot of capital letters in the middle of your name, because they may think they have to type them.
One consideration is that it sometimes is prudent to use a capital letter at the start of the name, because it’s your name on YouTube, and there is a psychological effect to this, as in “I take myself seriously enough to put a capital letter at the start of my name because I am a proper noun.” But again, people won’t have to type that letter as a capital letter; it will work typed as a capital or lowercase letter.
Sign Up for Your Account
The sign-up process is straightforward; you’ll be asked to provide some minimum information to set up your account. Once your account is set up, you’ll be able to provide more detailed information for your profile to display. (Much of this information is optional, but providing it makes people take you more seriously, because they will feel they know more about you. Channels with just a username, no photo, and no info almost never get many subscribers.)
So, let’s get started.
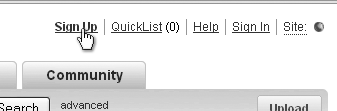
First, click the Sign Up link found at the top of any YouTube page (Figure 4-1).
After clicking the Sign Up link, you’ll be taken to the registration page (Figure 4-2).
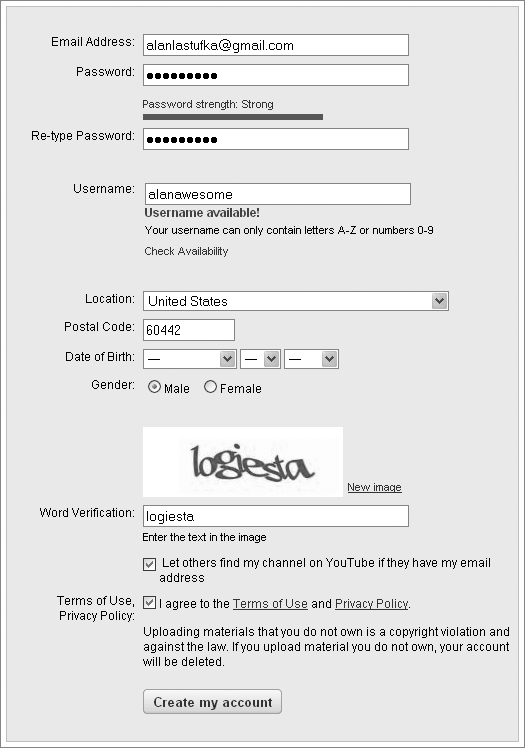
You will first be asked for your email address. YouTube uses this email address to confirm your account, so make sure you’ve entered your correct email address with no typos. YouTube will also automatically send notices of new subscribers, new video comments, and other optional alerts to this email address, so make sure it’s one you check often. (You can change your email address later if you want, for instance, if you get a new email address or if you start getting so popular on YouTube that you want to set up a dedicated Gmail address for YouTube-only communications to make it easier to manage all your incoming information. You can also later set up when you get email alerts if you feel overwhelmed.)
Next, you will be asked to create a password. Your password should be something difficult to guess, so don’t make it your first name, your hometown, or anything that could be guessed by possible hackers. It’s best to combine letters and numbers for your password. YouTube automatically rates your password’s strength as you type it and requires you to type it twice to ensure that you entered it correctly.
Example of a horrible password: password
Example of a weak password: magic
Example of an OK password: mag9ic5
Example of a very strong password: 83ka0j3Ahm29n30
Then, it’s time for the all-important username we discussed a moment ago. Again, take a moment before committing to a username. Think about it, because you’re going to have to live with it.
Once you type in the username you’ve chosen, YouTube will check its availability. If it’s already taken, you’ll have to pick another one. If you’re really set on the name, you can just add some numbers at the end of it, but check first to see whether the person who’s taken it is very popular. If they have a lot of subscribers, you might want to not use a derivative of that name; you might want to pick something completely unrelated.
(I used alanawesome in the example shown in Figure 4-2 as my username. I had to go through the account creation process and set up a new account to show you how it’s done, but I’m not going to use this account for anything.)
Next, YouTube will ask for your location, postal code, and date of birth. It does this to confirm your age. YouTube’s terms of use state you must be 13 years old or older to register an account. Those who are younger than 13 years old should have their parents set up and administer their accounts.
You will then be asked to provide your gender. Providing this information has no effect on your account; it is simply for demographic purposes. Word verification is next; this is a form of the CAPTCHA code, which will be discussed later in this book. In short, entering this code proves you’re a human registering your account, not a computer program attempting to register numerous accounts.
You then see two checkboxes; the first is optional and allows users to find your channel by searching your email address if they know it. We’re here to be seen, so I suggest making it easy for anyone to find your account. Go ahead and turn on this box if it isn’t already. And finally, you must turn on the box that says you agree to YouTube’s terms of use before you can create your account.
YouTube’s Terms of Use
I’m not a lawyer, so I will not try to explain or summarize YouTube’s terms of use in any official fashion. I will just tell you what worked for me. I strongly suggest you read YouTube’s terms of use before registering your account. The terms of use provide many of the rules you have to follow while on the site. Because you turn on this box while registering an account, you can’t claim ignorance should YouTube suspend you for violating one of its terms of use. I know it’s a lot of fine print, but at least take a look at it to make sure you know what you can and can’t do before proceeding. And please realize that these terms of use change at YouTube’s discretion, without warning. Tips I may suggest in this book may not violate YouTube’s terms while I’m writing this but may at some later date if YouTube adds terms. Books are set in stone (well, they are when still printed on paper), but the Internet is a moving target. Please keep this in mind. After turning on the “I agree…” box, you can now create your account.
Once your account is created, you will automatically be logged in and taken to the screen shown in Figure 4-3, which will instruct you to confirm your email address.
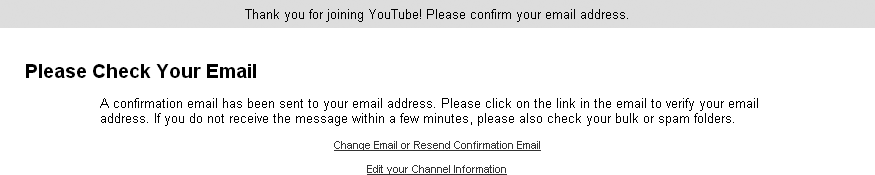
Log in to your email address and find the email YouTube sent you.
Note
If the confirmation email doesn’t arrive after a few minutes, check your spam folder, your junk folder, and your trash folder. Some overly aggressive spam blockers will send any automatically generated emails into the refuse heap—“Send them to the corner to think about what they’ve done.” If this is the case, mark it “not spam.” Let’s hope your overly vigilant spam program will learn its lesson and not send future emails from YouTube to the trash. If you have this problem over and over, add *@youtube.com to your whitelist. (The asterisk is a wildcard. It means “allow any address at this domain to get through.)
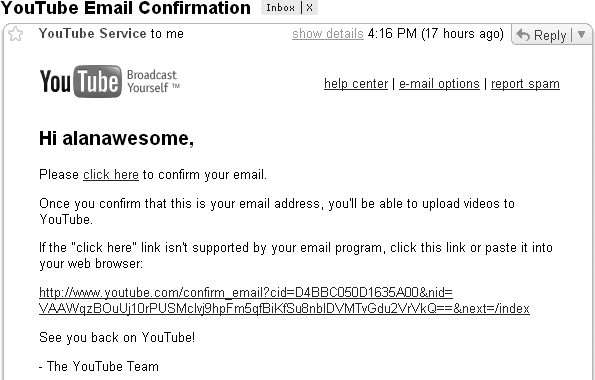
Open the confirmation email and you’ll find a clickable link to confirm your account (Figure 4-4). Clicking this link returns you to YouTube, and a “Your email has been confirmed” message appears (Figure 4-5). Now we’re ready to customize your channel. The look and feel of your channel should be unique to you, so I’ll show you how to access features, but I won’t tell you which colors, images, or fonts to choose.
Introduce Yourself
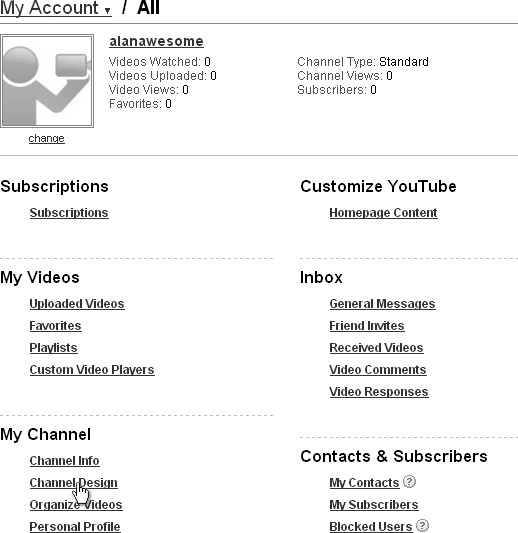
After registering your account, the first thing you should do is edit your channel info. You’ll want to provide a little basic information about yourself and about the videos you plan on uploading before anyone sees your profile. To edit your channel info, click the Account link that appears at the top of every YouTube page (Figure 4-5).

This will bring you to your account, which offers many options for customizing your YouTube experience. For now, we’re going to focus on the Channel Info link, found under the My Channel heading (Figure 4-6). Click it.

Now you can input some basic information about your channel.
You can’t change your URL; this is set because it is tied to your username. You should memorize your URL so that you can share your channel with others via email, via social networking sites like Facebook or MySpace, or via instant messages. (We’ll cover various ways to promote your channel in more detail throughout this book, but mostly in Chapters Chapter 7 and Chapter 10.)
The title refers to the text header that appears at the top of your channel. It can be your username, your real first name, or any funny phrase that represents your channel.

I chose “alanawesome” (Figure 4-7). You can change the title at any time, so don’t feel locked in to the one you choose now.
The description of your channel appears directly beside your channel’s featured video on your profile page. The text you enter here is important for new viewers visiting your channel. Most YouTubers include a bit of personal and contact information, (email addresses or instant messenger names). If you put your email address here, rather than just letting people contact you through YouTube, expect to get a lot more spam. Your description can technically be long, but try to keep it to a readable length, and include a link to your personal website if you want viewers to read your full bio.
The channel tags are keywords you can enter that others might search for when looking for your channel. You should include your username and any other nickname you go by. You should include words that describe your style, like “funny, sketch, comedy” for comedians or “folk, rock, acoustic, punk” for musicians.
A few other channel options will allow you to choose who can comment on your channel and whether bulletins will appear on your channel, but you will learn about those in other chapters; for now, you can leave them on their default settings, or you can experiment and change them if you’re feeling adventurous.
After you personalize all the settings, click Update Channel. You can now click your URL and look at your newly updated channel.
While all the text information you entered will be there, you’ll notice your channel looks really plain, simple, and, well, unattractive. Let’s sexy it up a bit by pimping your profile.
Customizing Your Channel, or “Pimping Your Profile”
You may have noticed that every channel you come across on YouTube looks different. Background images, color schemes, font choices…many decisions go into making your channel look the way you want it to look. Because everyone’s tastes are different, I won’t tell you how to customize your channel; rather, I’ll show you where your customizing options are, and I’ll leave it up to you to play with them and make your channel your own. Return to your Account page by clicking the Account link at the top of any YouTube page. In the last section, you clicked Channel Info; this time, click Channel Design, which is right below Channel Info (Figure 4-8).
You’ll be taken to a new screen that offers you every option to customize the look of your channel (Figure 4-9). Adjust colors, fonts, background image, and elements of the layout. Move elements around or turn them off completely. Create a channel design you like that reflects the videos you’ll upload. If your videos are edgy and dark, maybe a matching color scheme of dark grays or deep reds might be appropriate. If your videos are lighthearted, maybe light blues or oranges suit you better.

YouTube offers a few predesigned color themes for you to choose. If you’re not skilled at mixing and matching colors, choosing one of these default color themes may be right choice you. If you’re really into having control over every aspect of your channel, you can pick any colors you’d like using YouTube’s color picker (Figure 4-10).

As you choose your color and design options, a real-time preview will update. This will give you a pretty good idea of what your newly designed channel will look like. Again, I can show you where these tools are, but I’m going to leave the actual designing up to you. Make your channel unique, but be sure it is readable. If you choose to put orange text on a pink background, no one is going to kill their eyes to read your channel description; they’ll simply click the Back button and move on. Readability on a computer monitor is important, especially if you want people paying attention to what you’re saying.
Note
I cannot stress this enough: You want to keep your page readable, and you don’t want it to hurt people’s eyes and drive them away. One problem that most people encounter when they finally get to do a little bit of “web design” is that they do things because they can, not because they should. MySpace is an excellent example of this. Many MySpace pages are so garish that you can’t even read the text on them. YouTube fortunately doesn’t give you as many choices, so it’s hard to make an unreadable page, but try to make a page that looks good, which is not always the same as making it look really fancy.
After you design your channel and have it looking the way you want, click Update Channel, found at both the top and bottom of the Channel Design options page. Then, show it to a few friends or your brother or your mom (keep in mind, people who love you will give you an “A for effort”; strangers on the Internet are likely to be more critical). Get some feedback to make sure it’s not too hard on the eyes. You’ll also just naturally want to show off your new channel design.
Your channel design can be changed at any time. Change it with your mood if you’d like, or, if you have a special video coming up, change the colors to go along with your new video’s theme. Stagnant channels are boring. I usually redesign mine about once a month. Doing so keeps things fresh and lets people know I’m still around and still investing time in the site, even if I haven’t put up a new video that week—especially if I haven’t put up a new video that week. But you should spend more time making videos and networking than you do pimping and re-pimping your channel.
Note
YouTube Partners, users who share in ad revenue dollars, have additional channel design options and elements that will be covered, along with other information about the YouTube Partnership Program, in Chapter 11.
Subscribe to Other Channels
So, now your channel is looking foxy, you’ve written a great channel description, and you’re ready to move on. Now what? Well, if you have a video you’d like to upload, you could skip right to Chapter 5 and start broadcasting yourself, but if you’re like most new users, you don’t have a clue what your first video is going to be about. It might help, then, if you watched a few videos first.
Finding videos to watch on YouTube is easy—they’re all over the place!—and I covered searching for videos on specific subjects way back in Chapter 1. Most days you will log in and start off on the front page, www.youtube.com (URL 4.1). The YouTube editors feature 12 videos at any given time on the front page, but these are mostly hit or miss. You won’t always enjoy what the editors have chosen. Instead, it’s better to begin subscribing to the channels you come across that you enjoy.
When you first log in and visit the front page, your Subscriptions box will be empty (Figure 4-11). However, as you watch various videos (including those linked in this book), you’ll come across numerous channels to which you want to subscribe. When you subscribe to a channel, any video made by that channel will appear in your Subscriptions box. This is a great way to make sure you don’t miss any videos from your favorite users, but it’s also a sure way to have something new and entertaining to watch every day when you log in. Subscribing to others is also a way to get them to subscribe to you, and having a lot of subscribers, especially ones who actually watch your videos, is a big part of working toward becoming a “star” on YouTube.

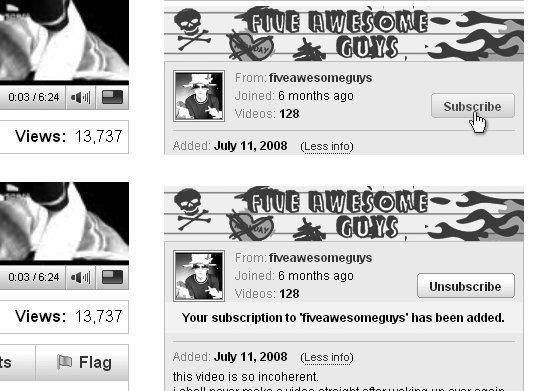
You can subscribe to a channel in two different ways; the first way is to visit a channel page and click the Subscribe button above the channel description.
Your second choice is to subscribe while watching any video without interrupting playback. If you enjoy what you see enough to want to subscribe, simply navigate to the right side of the video page, and click the Subscribe button there.
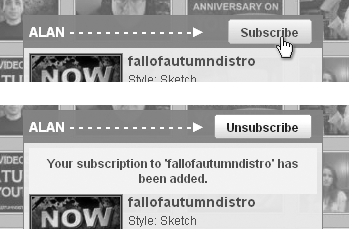
Figure 4-12 shows subcribing by visiting a channel page and Figure 4-13 shows you how to subscribe while watching a video.
You don’t have to subscribe to the users mentioned in this book, including me (fallofautumndistro) or Michael (kittyfeet69), but you could do worse. The YouTubers I interview and mention in this book make consistently solid videos, interact with the YouTube community, and occasionally produce true art. They’ve inspired countless videos from thousands of YouTubers by way of video responses (more on those in Chapter 8) or parody videos. They’re users who routinely promote or feature others in their videos and will therefore continue to expose you to new, great channels.
You’re Not Alone: Make Some Friends
In addition to, or instead of, subscribing to a channel, you can add that user as a friend. Your friends’ videos don’t show up in your Subscriptions box (unless you’re also subscribed to them). However, being friends with another user allows you to share your videos privately with them (more on private videos in Chapter 7), and it means all the bulletins you post will appear on their channel. And vice versa.
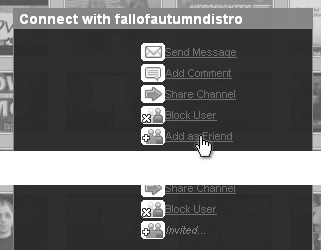
To add someone as a friend, simply visit their profile, and navigate to just below their channel description. You will find a section titled “Connect with…” containing an Add as Friend link (Figure 4-14). After you click it, that user will be notified and will have the option to accept or reject your friend request.
Other than sharing private videos or posting bulletins, the friend function on YouTube serves one other important purpose. You can choose to allow only your friends to comment on your channel page and/or on specific videos. I advise against this if you’re trying to reach the largest audience possible. But enabling this on a specific video can be a useful feature if you begin receiving a lot of spam or hate comments on that particular video. We’ll cover setting this “friends-only” option in the next chapter when we discuss uploading your video.
What’s Next?
As you watch others’ videos and start making a few friends, you’ll start itching to upload your first video. Maybe you’ve been inspired by a video you’ve just watched, or perhaps you want to vlog about your day and share some wonderful news with your new friends.
In the next chapter, we’ll show you everything you need to know about uploading your video and priming it to be seen by a decent-sized audience.