
Chapter 6
Acquiring the Tools of the Trade
IN THIS CHAPTER
![]() Choosing the right camera
Choosing the right camera
![]() Keeping your camera on the straight and narrow
Keeping your camera on the straight and narrow
![]() Seeing your way with light
Seeing your way with light
![]() Getting the sound just right
Getting the sound just right
Let’s face it: Making video is easier now than it has ever been, and that trend is growing. Cameras, editing software, and computers that can edit video are now relatively cheap and available, which means that, after following a few best practices, almost anyone can make a decent YouTube video with equipment they may already own. This chapter looks at a few of those best practices and helps you make a decision about price versus quality by examining the advantages of new camera and recording formats. To close out the chapter, we also take a look at the production tools you need in order to produce great video for YouTube.
Checking Out Your Camera Options
Let’s get the good news out of the way right off the bat: There’s a good chance that you already own a high-definition (HD) camera. Video cameras are everywhere. According to the Pew Research Center, as of June 2019, 81 percent of American adults own smartphones. Most modern smartphones have an HD camera, as do most modern laptops and all-in-one desktop computers. But just because access to cameras is easy doesn’t mean that choosing the right camera is simple. Quality varies widely, and some tools and techniques can help even a basic camera shoot good video. We talk about several types of cameras specifically, but you have to take a few (mostly universal) features into account when shopping for cameras. For the most part, we talk about these three types of cameras:
- DSLR: DSLRs have exploded in popularity in recent years. DSLRs have traditionally been used for still photography, but they now all include an array of video features and settings. You can capture great-quality video and easily stay under a $1,000 budget for your camera gear.
- Camera phone: We use the term camera phone as a catchall term for a camera built into a mobile device. (So don't write in to tell us that your tablet isn’t a phone — we’re well aware of that fact.) When we say camera phone, you should see in your mind “a camera that is built into your iPhone or Android or Kindle or whatever.” Camera phones have come pretty far, with resolutions, frame rates, and features that can rival their more dedicated counterparts. When the moment comes to capture the footage of one of your dogs sitting on your other dog and howling the tune to “Total Eclipse of the Heart,” the best camera is the one in your pocket that you can start shooting with immediately.
- Point-and-shoot: These compact, easy-to-use little cameras aren’t to be messed with. Sure, they lack the bells and whistles that come with their bigger DSLR-siblings, but they are extremely capable and affordable. Plus, they’re easy to use and quite portable, making them helpful in a pinch.
Working through the (camera) basics
Before getting into a detailed discussion of the pros and cons of the different camera types out there, we want to talk a bit about a few features and elements that all cameras share. That way, we can get some terminology out of the way that may prove helpful when you’re comparing cameras:
-
The sensor: The heart of any digital video camera is its sensor. The larger the sensor, the better the image quality. That’s because a larger sensor has larger pixels, which capture more light, resulting in higher image quality. Currently, a “big” sensor is a full-frame sensor measuring in at 36 x 24mm, the same size as a 35mm film negative.
 When people talk about megapixels, that’s something of a red herring. A 10-megapixel camera with a larger sensor can likely capture better-looking video than a 12-megapixel camera with a smaller sensor. Though this description can be confusing and technical, the important thing to note is that a larger sensor is generally better.
 -
The lens: The pros will tell you that it’s all about the glass. The lens in a camera is a huge factor in image quality, and it’s a factor that can be difficult to understand. The most important feature of any lens is its aperture capability. The aperture of a lens controls how much light enters the camera body and hits the sensor. Basically, along with shutter speed (how long the image is exposed) and ISO (the sensor’s sensitivity to light), this is the control that makes the picture brighter or darker.
The aperture is also called the f-stop (or t-stop, on cinema lenses), and aperture ranges are denoted as f1.4–f32 or similar language.The most popular look on YouTube now is an f-stop of 5.6. It draws the viewers’ attention to the foreground, keeping it in sharp focus while leaving the background soft.
 Try to use lenses that have a fixed f-stop, not a variable f-stop. Such lenses often are of a much higher quality — with a price tag that reflects that fact. A Canon 50mm 1.8 is a great starter lens and usually costs around $100.
 -
Resolution and format: The YouTube player supports 4K video, and you really should have an HD camera to take advantage of that support. Most modern cameras are capable of shooting full 1080p HD (1920 x 1080 resolution) and higher (many are capable of 4K), and that is what you should look for. Some cameras have variable frame rates, but as long as they can shoot the standard rates — such as 24p, 30p, and 60i — you should be able to find something you like. Look for all these numbers in the specs when shopping for cameras.
The numbers in front of the letters indicate how many fields per second are shown. As for the P, it stands for progressive, where the video image is drawn progressively, line after line. In 30p, to take one example, one whole frame is typically shown every  of a second. The I stands for interlaced, meaning the odd or even rows in the picture show every
  of a second; 60i is typically used for sports or fast-paced videos because it results in less of a flicker feel; 30p is often perceived as higher quality for less action-based footage because its resolution brings with it a clearer image; 24p is the frame rate of film — but getting that “film look” also depends on lighting and composition. Many of the latest-and-greatest DSLRs can shoot in the format 4K (4K is short for 4,000-pixel resolution), which is a much higher resolution than 1080p HD. Though footage shot in 4K is beautiful, many cameras that shoot 4K tend to be expensive. The reality of shooting video for YouTube is that 4K resolution is often overkill. The site can display 4K, but the vast majority of views are on computer screens or mobile devices incapable of displaying 4K or 8K content.
 - Codecs: Most cameras compress the captured video to save space on whatever recording media you're using. The compression software the camera uses is a codec. In the past, different codecs could result in wildly variable performance when the time came to edit. Often, footage would need to be transcoded to a different format in order for the editing suite to understand it. Thanks to improvements in editing software and hardware, transcoding is largely a thing of the past. All the major editing packages these days can handle just about any codec you care to throw at them. Just be sure to record in the highest-quality codec for your device — which generally means the least-compressed video.
- Monitoring: You need to be able to see your video as you shoot it. Most modern cameras have an LCD screen for monitoring video. Usually, manufacturers talk about these screens in terms of pixels. When choosing a camera, make sure you can tell whether the image is in focus from the view on the LCD. Built-in focus assist options also help when using a smaller LCD. If you cannot tell whether an image is in focus, you may need an external HD monitor, or you may want to add an electronic viewfinder (EVF) from a third party for monitoring.
- Zoom: To zoom is to change the focal length of the lens to make it seem as though the camera is closer to its subject. Though zoom is a somewhat familiar concept, one important fact to remember about it is the difference between optical and digital zoom:
- Optical zoom is the actual telephoto effect produced by the physical change in the focal length of the lens, and it’s the only zoom you would ever want to use. It allows you to zoom in on the subject with no significant degradation of picture quality.
- Digital zoom is usually a very high, seemingly impressive number, but it’s a feature to avoid. Digital zoom doesn’t actually change the optics of the camera; it simply scales the image up, which produces a lot of static in the picture. Stated simply, it does nothing but make your footage look bad.
- Memory cards: It is important that you have the right memory card for your camera. Most cameras take one of two types (or both): Secure Digital High Capacity (SDHC or SD, the more common title) and Compact Flash (CF). Both are excellent. They’re relatively cheap, reliable, and ubiquitous. You can buy them just about everywhere.
-
When it comes to memory, our recommendation is to choose your camera first — that decision often determines what kind of memory card you need to purchase. When purchasing a memory card, either SD or CF, choose one that can read and write data as quickly as your camera can. An example of write speed is 1000x: This means that the card reads and writes at approximately 150 megabytes per second.
-
- Image stabilization: Higher-quality cameras and lenses often offer image stabilization, a feature that does just what it says — it stabilizes images. One hallmark of footage from people who are new to videography is shaky footage. Image stabilization can help with this problem, and it comes in a couple of different flavors:
-
Optical image stabilization: This type of correction features gyroscopes and moving elements inside the lens itself. When the camera shakes, the lens detects the movement, and the lens elements roll with the punches, so to speak. The lens parts move to correct for the motion, and the sensor captures a stable image.
Internal gyroscopes can be noisy, so be sure to use an off-camera audio recording device when using optical image stabilization. (An internal camera mic is sure to pick up the noisy gyroscope sounds.) - Digital image stabilization: This correction uses various software algorithms to reduce the impact of shaky hands on your video. Unfortunately, some of the tricks it comes up with aren’t that aesthetically pleasing. For example, the most common way digital image stabilization corrects an issue is by removing the edges of the frame. More often than not, you end up with a degraded image that’s just not worth keeping. Yes, you may be able to correct in post-production, but your best bet is to collect the highest-quality image while recording in the field.
-
- Manual controls: An important feature to look for in a camera is easily accessible manual controls. Though at first you'll probably want the camera to manage most aspects of image capture for you, as your skills as a videographer develop, you’ll inevitably want to take control of the camera's controls. The manual controls have to be easily accessible — ideally assignable to physical buttons on the outside of the camera. These physical buttons allow you to change settings quickly, which can be important when you're trying to capture a moment. Controls that are buried deep in the camera's settings menus aren't truly useful.
Looking at DSLRs
DSLR stands for digital single-lens reflex, but its initials aren’t the key concept to understand here. The big reason that DSLRs are massively popular these days is that they can produce great image quality for a relatively low price; the many happy DSLR owners out there probably don't know — and don’t care — what the initials stand for.
As with any camera, the DSLR has both upsides and downsides. The upsides are clear:
- The big picture: By a large margin, the most important advantage that the DSLR affords a filmmaker, is its large sensor. Some DSLRs even have a sensor that’s roughly the same area as a traditional frame of 35mm film — these are full-frame sensors. Without getting too technical, the larger the sensor, the better the image quality. Also, the large sensor, when combined with the right lens settings, produces a shallow depth of field, which is desirable if you want your video to have that sheen of professionalism. This depth-of-field effect is, put simply, the phenomenon in which the subject of the video is in focus, but the background is out of focus, which makes the subject feel separate from the background. This out-of-focus background — called bokeh by all the arty film school types — is an important trick to have in your repertoire.
- The lenses: Another useful feature of the DSLR is its interchangeable lenses. A DSLR allows the operator to choose the type of lens that’s required for the shot. Some lenses are better for action shots, and some lenses are helpful in low light; macro lenses shoot subjects in extreme close-up, and zoom lenses allow you to capture distant subjects. This sort of flexibility, which is crucial in higher-end filmmaking, can greatly improve your videos’ visual quality. A nice bonus is that each manufacturer has a standard lens mount that most of its cameras use. For example, if you start with an entry-level Canon camera and obtain several lenses for it, those lenses should also fit the fancier Canon camera if and when you decide to upgrade.
- Continuous autofocus: More and more DSLRs are capable of automatically focusing while recording video. This feature is extremely helpful if your subject is moving frequently throughout the frame. Some are even equipped with face-tracking, which allows the camera to keep constant focus on your subject’s face. This feature isn’t without its problems, though: If your subject is moving too quickly or if the space is too dark, your camera may have a difficult time adjusting its focus.
- Manual settings: Most serious videographers will tell you that capturing the best image requires understanding and using the camera's manual settings and setting characteristics such as ISO, aperture, and shutter speed. We don’t get into explaining all the details of how to use a camera in this chapter. The important point here is that even entry-level DSLRs have robust manual controls that are usually easy to use and understand. Advanced videographers want to make changes to these settings quickly and easily, and most DSLRs have dedicated buttons on the camera body to change each of these settings quickly.
As proof that not everything is hunky-dory in DSLR-ville, check out these things that folks love to hate about DSLRs:
- The sound: Though this situation is slowly changing, DSLRs have traditionally been reviled for their inability to capture sound well. Audio is extremely important to making a watchable video, so this is kind of a big deal. We will say up front that no DSLR on the market today has an acceptable built-in microphone. We believe that you should not use the built-in mic on the camera when you can avoid it — we recommend that you buy more stuff to accompany your camera. You can find a couple of ways around this problem.
- An external microphone: This is the simplest solution to the DSLR audio problem. Most DSLRs have a connection that allows the user to plug in a separate microphone. Because this audio problem is widespread in the DSLR market, quite a few options are available that are designed to work specifically with DSLRs. You have many choices in this space, but we find one solution to be the Rode VideoMic Pro; it has an excellent cost-to-value ratio.
-
An external audio recorder: Even with an external microphone, many DSLRs still don't have a helpful way to monitor the audio you're recording. This is a very big deal. If you don't know what the audio sounds like as you're recording the footage, you can quickly ruin the shoot and waste a lot of time and resources. A number of digital recorders on the market are designed for this very purpose. These recorders come in a wide variety of price points, but they do confer a lot of advantages. Going down the list, they offer balanced inputs (eliminating hiss and hum noises), phantom power for professional mics (using the audio cable to power the mike instead of batteries), more control of audio levels, and compressors and limiters for keeping levels from clipping (exceeding what your device can capture). We recommend the Sennheiser MKH416.
Recording the audio externally does mean that you have to synchronize the footage and the audio recording in editing, which introduces more work and an opportunity for problems to arise. Just because you’re using an external audio recorder doesn’t mean you should turn off the in-camera audio recording. You’ll want audio from both devices captured for reference when syncing in post-production.
- Manual settings: Extensive manual controls can be both a blessing and a curse. The best part about shooting manually is the amount of control you have over the quality of light in every shot. You can choose how bright you want the shot to feel based on the emotion of the scene, whereas if you use an automatic setting, you may lose some of the mood you could have created with your lighting setup. The sheer number of settings and the fine gradations of adjustment can be overwhelming to an inexperienced user. Though DSLRs generally have a full automatic mode that allows you to point-and-shoot quickly, we recommend working in the manual controls and maintaining control over the quality of each shot, even if it takes more time.
-
Record time limitations: One long-standing complaint about DSLRs is that almost all of them have some kind of record-time limitation. Admittedly, popular cameras like the Panasonic GH4 or the Sony a7s iii have no duration limits, but in some cases, a camera can shoot only 29 minutes of continuous video.
Before planning a long video, make sure your channel is verified. (See Chapter 2 for how to verify your channel.) Unverified channels are capped at 15-minute maximum uploads. Neither does YouTube allow uploads over 12 hours long. - Manual zoom only: The only way to zoom on most DSLRs is to manually adjust the zoom ring on the lens barrel. This can cause a number of problems while shooting video. Touching the lens will more than likely produce a shaky image — it takes a steady hand to make a smooth manual zoom. If you're planning to do lots of zoom shots, a DSLR may not be the right choice for you.
- The expensive aftermarket: A lot of the issues we've described with DSLRs do have solutions, but you have to pay a pretty penny for them — or try to build them yourself.
If you’re a YouTube video creator just starting out, a DSLR may be just the ticket for you. If you have no experience with video production or photography, be patient — the DSLR has a learning curve. The inexperienced creator often can use a simple point-and-shoot or webcam to get started. If you do have experience creating video and you're making content that requires the best image quality for your buck, a DSLR is the way to go.
Several manufacturers are in the DSLR market, including Canon, Sony, Nikon, and Panasonic. Though all these companies make good DSLRs for still images, we generally recommend the Canon DSLRs for shooting video. In our estimation, they offer good features for the price. Start by looking at some entries in the Canon line:
- Canon EOS 5D Mark IV: Though this option is a bit pricey, around $3,300 for the camera without a lens, it’s a truly excellent camera choice for shooting video. The 5D Mark IV has made huge improvements to its video capture capabilities, and its full 35mm sensor gives you the ability to capture beautiful video. As with any DSLR, you need to have at least an external microphone and maybe even an external audio recorder; but as far as image quality goes, the 5D is hard to beat. The latest Canon DSLR cameras have done a lot to improve the onboard audio capture quality.
- Canon EOS 90D: Much more affordable than the 5D, the SL3 is widely available for around $1,200, and it delivers excellent image quality. It features a somewhat smaller sensor than the full-frame 5D, but it’s still extremely capable.
Settling for smartphones
We won’t argue that the camera on your phone should be your primary camera. Though they are quickly improving, smartphones aren't the best video cameras; they can be difficult to stabilize, and the footage files they produce can often be difficult to work with. Still, sometimes in the heat of an amazing moment unfolding in front of you, the best camera is the one in your pocket. It may not have much in the way of manual control, and it may not produce the most beautiful image, but in a lot of cases, being quick on the draw is more important.
The specs for smartphone cameras are a moving target. Smartphone manufacturers are constantly trying to outdo each other by packing more powerful cameras into phones. We don’t make a specific recommendation, but we know that pretty much any high-end or flagship smartphone has a camera that can shoot exceptional HD video.
In many ways, choosing the camera that works for you is a matter of personal taste. If you're just getting into videography, you should watch a lot of videos. Find the stuff you like on YouTube, and then find out how those videos were made. The beauty of YouTube and social media is that the barrier is much lower for reaching out to creators. Find creators that make stuff you think looks good, and then ask them nicely how they shot it. Though you may not get a response from a creator with millions of subscribers, smaller creators are often happy to help out. Give it a try.
Stabilizing the Shot
One of the most important things you can do to give your video an air of professionalism is to stabilize your shot. Nothing says amateur video like extremely shaky handheld video. We've all watched home videos that induce motion sickness as the camera whips around. Many tools can help you lock down your shot:
-
Tripod: The most useful stabilizing tool is the simple tripod. It has three legs; you attach your camera to the top, and your shot is as stable as stable can be. Tripods are readily available online, at camera stores, and at electronics stores, and they have a wide variety of price points. We recommend investing at least $50 here. It can be helpful to get one that has a built-in level to keep your shots from being crooked.
When you're shopping for a tripod, choose a model that has a fluid panning head, meaning you can turn it smoothly from side-to-side (known as panning) and that it’s built to resist bumps and vibrations. At some point, you'll want to add a few camera moves to your repertoire, and you'll need that fluid head when that time comes. A basic still photography tripod may be cheaper, but you'll regret it when you need to move the camera during a shot. Tripods with nonfluid heads cannot replicate the smooth motion that a fluid head can provide. - Monopod: This is the one-legged cousin of the aforementioned stabilizer. No, this one doesn’t give you a perfectly stable shot, but it’s a great tool for reducing a majority of unwanted shake and movement. It’s also much more portable and compact, because you’re working with only one leg versus three!
- Dolly: A dolly is simply a set of wheels for the camera. The simplest dollies attach to the bottom of the tripod, and — voila! — your camera is now on the move, allowing you to create interesting motion and following shots.
- Stabilizer: A number of handheld stabilizer rigs are available these days, but they can be a little expensive. They also require a great deal of skill to use effectively. That means practice. If you want to get good handheld shots using a stabilizer rig, you have to practice, practice, practice to get the hang of using the thing. If you do put in the time and get good at it, you can create some cool shots with these devices.
- Sliders/cranes/jibs: A wide variety of devices are also on the market to create moving shots. Sliders allow the camera to move on rails, providing a sense of smooth motion in the shot. Cranes/jibs allow the camera to move from side to side and up and down in space, creating a smooth sensation of flight. Many of these are available as add-ons to tripods. Though they aren't absolutely necessary, a few nice moving shots do provide a feeling of high production value to almost any project. Sliders start at around $200; if you’re ready to build something in order to save money, search YouTube for some DIY slider videos.
Seeing Your Way with Light
Another important aspect of creating a video with some level of professionalism is lighting. You don't need to win any lighting awards, but decent lighting goes a long way toward making a watchable video. You can approach lighting in a couple of ways: You can buy specialized lights, which will probably produce the best results, or work with the lights you already have. Just using lamps from around the house isn't ideal, but it can get you started, and there are ways to improve your video's look just by putting some thought into light placement.
Setting up 3-point lighting
The simplest, and generally most useful, lighting setup for shooting a person inside is 3-point lighting. As its name implies, this lighting setup involves three lights, and it illuminates a subject in what is considered a traditionally pleasing way.
We describe the three lights that are involved (see Figure 6-1) in the following list:
- Key light: The key light is the main (and brightest) light in a 3-point lighting setup. It’s usually placed to the right or left of the camera, and it points directly at the subject from a 30- to 60-degree angle. The height of the light should be set, ideally, so that it points slightly downward on the subject’s face, but not so high that it creates shadows on the face. It should point down from slightly above the subject's eye level.
- Fill light: The fill light is a generally a softer light that should be pointed at the subject from the opposite side of the camera. The fill light shouldn't be as bright as the key light. It’s there mainly to create a more even light on the subject. Using only a key light would usually result in creating dramatic shadows on the subject's face, and unless you're shooting a horror movie or a serious drama, you probably should stick with somewhat even lighting.
- Back light: The back light (sometimes called a hair light) shines from behind the subject and casts a thin outline of light around the subject’s head, almost like a halo. This is intended not to give the subject an angelic look — but rather to create depth and separate the subject from the background. The back light can be directly behind the subject, but it can also be placed at an angle to the subject. Be sure not to get the light in the shot if you're going to place it directly behind the person.
- Background light: We know, it's confusing to add a fourth light to a section about 3-point lighting, but the reality is that most 3-point lighting setups also use a background light. This light does what its name implies — it lights the background. This is sometimes used to call attention to the background, but it’s most often used to light the background separately from the subject. This can help create a sense of distance between the subject and the background, and can help enhance the separation between the two.
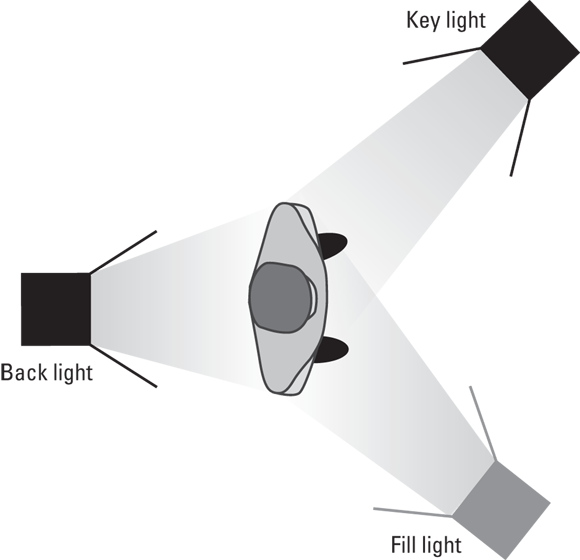
FIGURE 6-1: Three-point lighting.
Setting up high-key lighting
Another viable, if less popular, lighting scheme is high-key lighting. This involves using multiple high-powered key lights and turning them all on very brightly. This setup basically floods the subject with light. Though this setup lacks subtlety, we recommend it because it’s simple. It also allows for quick production, because pretty much all shots require the same lighting setup. No one will comment on your beautiful lighting if you use this setup, but it does make things easy.
Capturing Sound
A crucial factor in creating an air of professionalism in a video is the sound. In this sense, audio is truly king. Capturing good audio to accompany your video is essential. Good sound is, in most cases, transparent. If you're able to record your talent's voice clearly and cleanly, the audience won't notice, which is exactly the reaction you're looking for here. If you record echo-laden bad audio, the audience will notice, and not in a good way.
Looking at microphones
The single biggest thing you can do to improve the audio in your videos is to obtain a decent external microphone. Though some camcorders do have a decent built-in microphone, you’ll almost always obtain better results by using an external microphone. You can use a few different types of microphones:
-
Lavalier: The lavalier mic — or lav mic, for short — is also known as a lapel mic. A lav mic's primary advantage is that it’s small. The microphone can be attached to the speaker's clothing, and it’s small enough to be unobtrusive. Most viewers are accustomed to seeing newscasters and other video subjects with visible microphones, so it isn't generally off-putting for the audience. Lav mics are usually omnidirectional, which means that they pick up sound from every direction: You can hear not only your subject but also hear every sound in your recording environment.
Lavs work best in quiet environments or controlled studios. The nice thing about the lav mic is that it is, for the most part, a set-it-and-forget-it solution. After the lav mic is attached correctly to the talent and the levels are set, you need to check only periodically to ensure that the levels are maintained.
- Shotgun mic: A shotgun microphone (or boom mic) is a highly directional mic that is often used to record voices in videos. The shotgun mic is designed to record audio from a single direction, and it’s less sensitive to sound coming from behind the mic, to the sides, or elsewhere around the subject. This type of mic is especially useful for isolating sources in noisy situations, where background noise can overwhelm the subject's voice. Shotgun mics, which are a lot larger than lav mics, need to be pointed at the talent from just off camera, no more than a foot from the speaker’s mouth. This is usually accomplished by a boom operator, a human who holds the shotgun mic attached to the end of a pole and points it at the talent. (One other option is to attach the boom mic to a stand with a clamp and then positon the mic over the talent.)
- Handheld: You often see onscreen talent using a handheld microphone. A handheld mic can be a practical solution for capturing audio, but it’s clear that the talent is using a microphone. This is completely acceptable in newsgathering situations, and it can be a great solution for videos of that type.
Capturing good audio
Capturing good audio is important, so it's worthwhile to look at a few factors that go into capturing it. You may already know that you need a decent mic, but here are a couple of other considerations:
- The recording environment: Modern audio-editing software allows you to make quite a few changes and fixes to your audio after the fact, but the best way to end up with good audio is to capture good audio. A huge part of capturing good audio is controlling the environment in which you shoot. If you shoot your video in a busy coffee shop, it's difficult to keep the sounds of the coffee shop out of your video. Make sure you've chosen a quiet place for your video recording, away from traffic, refrigerators, air conditioners, pets, crying children, televisions, and so on.
- Monitoring your audio: Another key aspect to capturing good audio is to listen to what you're recording while you're recording it. Though a good camera will have an onscreen monitor visually representing the sound levels of audio you're capturing, it’s essential to listen to the audio in headphones as you're recording. Ensuring that everything sounds good, and retaking shots marred by audio glitches or other noises, is much more time-effective than trying to fix all that stuff in post-production.