3. Working with Email and Surfing the Web
In This Chapter
• Setting up an iPad to work with your existing email accounts
• Using the Mail app to compose, send, and manage emails
• Using the Safari app to surf the Web
• Accessing Twitter, Facebook, and other online social networking services from your iPad
As long as your iPad has access to the Internet via a Wi-Fi, 3G, or 4G connection, it has the capability to securely access virtually any type of email account. In fact, using the tablet’s preinstalled Mail app, you can manage multiple email accounts simultaneously without having to open and close accounts to switch between them.
If you want to surf the Web, the Safari web browser that comes preinstalled on your iPad enables you to access the Internet from virtually anywhere. As a result, your tablet can place a vast amount of information at your fingertips exactly when you need it. Like never before, the iPad is a tool that can keep you in the know and provide the knowledge you need to be a powerful force in the business world.
In addition to offering a brief introduction to the Mail and Safari apps, this chapter focuses on some of the most useful new features iOS 6 adds to them.
Any model of iPad can access an optional 4G personal hotspot device via Wi-Fi, or any other wireless device that offers a 4G tethering feature.
Using the Mail App to Manage Your Email Accounts on Your iPad
The newly revamped Mail app offers a more streamlined interface for reading, composing, sending, and managing one or more email accounts from your iPad. It’s now possible to add photos or video clips to email messages from within the Mail app, plus you can create and maintain a VIP List, and then view emails received from people on that list in a separate inbox.
Setting Up Your iPad to Work with Existing Email Accounts
The email account setup process described here works with virtually all email accounts. If you have an email account through your employer that doesn’t initially work using the setup procedure outlined in this chapter, contact your company’s IT department or Apple’s technical support for assistance.
The process for setting up an existing email account to use with your iPad and the Mail app must be done only once per account.
Follow these steps to set up your iPad to work with your existing email account:
1. From the Home screen, tap on the Settings app icon.
2. On the left side of the main Settings app screen, tap on the Mail, Contacts, Calendars option.
3. When the Mail, Contacts, Calendars options display on the right side of the screen (see Figure 3.1), tap the Add Account option that’s displayed near the top of the screen, below the Accounts heading. If you’ve already set up iCloud on your iPad when you initially set up the tablet, your iCloud-related email account is already listed under the Accounts heading, just above the Add Account option.

Figure 3.1. Tap on the Mail, Contacts, Calendars option in Settings, and then tap on the Add Account option.
4. From the Add Account screen, select the type of email account you have: iCloud, Microsoft Exchange, Gmail, Yahoo! Mail, AOL Mail, Microsoft Hotmail, or Other. Tap on the appropriate option (see Figure 3.2). If you have a POP3- or IMAP-compatible email account, tap the Other option and follow the on-screen prompts.

Figure 3.2. Select the type of email account you are setting up by tapping the appropriate icon.
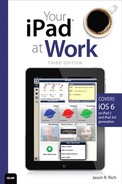
If you have an existing Yahoo! Mail account, for example, tap the Yahoo! icon. When the Yahoo! screen appears (shown in Figure 3.3), use the iPad’s virtual keyboard to enter your full name, Yahoo! email address, account password, and a description for the account (such as My Yahoo! Account).
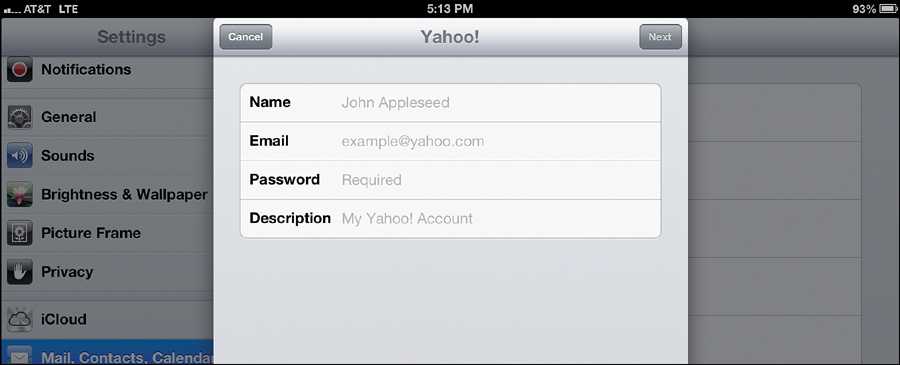
Figure 3.3. Using the iPad’s virtual keyboard, enter the details pertaining to your existing email account.
5. Tap the Next button that’s located in the upper-right corner of the window.
6. Your iPad connects to the email account’s server and confirms the account details you entered.
7. After the account has been verified, a new window with multiple options, such as Mail, Contacts, Calendars, and Notes, is displayed. (The options listed vary based on the type of email account you’re setting up.) Each option has a virtual On/Off switch associated with it. These options relate to what account-related data will sync with your iPad.
8. Tap the Save button that’s located in the upper-right corner of this window.
9. Details about the email account you just set up are added to your iPad and accessible from the Mail app.
10. If you have another existing email account to set up, from the Mail, Contacts, Calendars screen in the Settings app, again tap the Add Account option, and repeat the preceding steps.
As you’re setting up your email account and responding to on-screen prompts in the Settings app, the Name field should include your full name. This is what is later displayed in the From field of all email messages you send. The Address is your email address, and you should enter it in the yourname@mailservice.com format.
The Password is the password you currently use to access your existing email account. For the Description, you can enter any text that helps you differentiate the email account from others, such as “AOL Mail Account,” “Yahoo! Email,” or “Work Email.”
If you’re trying to set up a POP3, IMAP, or Microsoft Exchange account, for example, and you’re prompted for information you don’t have, such as your incoming mail server host name, incoming mail server port number, outgoing mail server, or outgoing server authentication type, contact your Internet service provider or the company that provides your email account.
Depending on the type of email account you’re setting up for use with your iPad, the information you are prompted for varies slightly.
When you purchase an iPad, it comes with free technical support from AppleCare for 90 days. This includes the ability to make an in-person appointment with an Apple Genius at any Apple Store to get help setting up your email accounts on your tablet. To schedule a free appointment, visit www.apple.com/retail/geniusbar. Or call Apple’s toll-free technical support phone number and have someone talk you through the email setup process. Call (800) APL-CARE.
Customizing Your Email Account Settings
From the Settings app, as you look at the Mail, Contacts, Calendars screen, you see a variety of customizable options that pertain to your email accounts. Tap each of these customizable options, one at a time, to personalize the settings based on your preferences and needs.
Fetching New Data
Set up your iPad to automatically access the Internet and retrieve new email messages by tapping the Fetch New Data option and adjusting its settings. You also can make sure the Push option, listed at the top of the Fetch New Data screen (see Figure 3.4), is turned on. This enables the iPad to automatically retrieve new emails from the server on an ongoing basis.

Figure 3.4. Turn on the Push option to enable your iPad to automatically check for new emails and retrieve them from the server.
If you turn off the Push option, set the Fetch option to check for new emails every 15 minutes, every 30 minutes, hourly, or manually. Two reasons why you might consider turning off the Push feature and use Fetch to periodically check for emails (or do this manually) is to reduce your 3G or 4G wireless data use and extend your tablet’s battery life between charges. (Constantly checking for new emails and downloading those emails depletes the iPad’s battery life faster.)
When you signed up for a 3G or 4G wireless data plan, you were probably given a predetermined wireless data allocation per month. Having your iPad constantly check for new incoming emails (using the Push feature) quickly uses this allocation. This is not a concern, however, if you’re using a Wi-Fi Internet connection.
Keep in mind that downloading and reading emails with large attachments, such as photos, Microsoft Office, or PDF files, depletes your monthly wireless data allocation much faster, as does having your iPad check for new emails often.
Customizing Mail Options
Under the Mail heading of the Mail, Contacts, Calendars screen are a handful of additional customizable features pertaining to how your iPad handles your email accounts. These options include the following:
• Show: This feature determines how many messages within a particular email account the Mail app downloads from the server and displays at once. Your options include 50, 100, 200, 500, or 1,000 Recent Messages.
• Preview: As you look at your Inbox using the Mail app, you can determine how much of each email message’s body text is visible from the Inbox summary screen, in addition to the From, Date/Time, and Subject lines.
• Show To/Cc Label: To save space on your screen as you’re reading emails, you can turn off the To and CC label within each email message by tapping the virtual switch associated with this option.
• Ask Before Deleting: This option serves as a safety net to ensure you don’t accidently delete an important email message. When this feature is turned on, you are asked to confirm your message deletion request before an email message is actually deleted. Keep in mind that, by default, you cannot delete email messages stored on your email account’s server. When you delete a message, it is only deleted from your iPad.
• Load Remote Images: When an email message has a photo or graphic embedded with it, this option determines whether that photo or graphic is automatically downloaded and displayed with the email message. You can opt to have your iPad refrain from automatically loading graphics with email messages. This reduces the amount of data transferred to your tablet, and it can help to protect against spammers who use image tracking to verify valid email addresses. You always have the option to tap an icon in the email message to download the graphic content of that message, including photos.
• Organize By Thread: This feature enables you to review messages in reverse chronological order if a single message turns into a back-and-forth email conversation, where multiple parties keep hitting Reply to respond to messages with the same topic. When turned on, this makes keeping track of email conversations much easier, especially if you’re managing several email accounts on your iPad. If turned off, messages in your Inbox are displayed in reverse chronological order, as they’re received, and are not grouped together by subject or sender.
• Always Bcc Myself: To ensure you keep a copy of every outgoing email you send, turn on this feature. A copy of every outgoing email is sent to your Inbox if this feature is turned on.
• Increase Quote Level: This feature can be turned On (the default selection) or Off. When turned On, any time you forward or reply to an email message, the original message will be displayed but be indented, which makes it easier to visually separate the original message content from your reply.
• Signature: For every outgoing email that you compose, you can automatically add an email signature. The default signature is “Sent from my iPad.” By tapping this option, you can compose one or more customized signatures. A signature might include your name, mailing address, email address, phone number(s), and so on.
• Default Account: If you’re managing multiple email accounts, when you reply to an email message, by default it will be sent from the email account to which the original email was sent. However, if you’re writing an email from scratch, this feature enables you to choose a default email account from which the new email will be sent. As you’re composing the email, you can always change the From account by tapping on the From field, and then select one of your other email accounts.
After you make whatever adjustments you want to the Mail app-related options from within the Settings app, exit the Settings app by pressing the Home button on your iPad to return to the Home screen. You’re now ready to begin using the Mail app to access and manage your email account(s).
Managing Your Email Accounts with the Mail App
The Mail app that is preinstalled on your iPad is loaded with features to make managing multiple email accounts a straightforward process.
If you need to manage multiple email accounts with your iPad, it’s important to understand that although the Mail app enables you to view email messages in all of your accounts simultaneously (when the All Inboxes option is selected), the app actually keeps messages from your different accounts separate.
As you view your incoming email messages, by default, the app groups emails together by message thread, enabling you to follow an email-based conversation that extends through multiple messages and replies. When turned on, this feature displays emails within the same thread in reverse chronological order, with the newest message first.
After you’ve initially set up your existing email accounts to work with the Mail app, you can use this app to manage your email accounts from anywhere. Launch the Mail app from the Home screen.
To alert you of incoming messages, without having the Mail app running, access the Settings app to have the iPad display a badge on the Mail app icon that’s displayed on the Home screen as new emails arrive.
A badge is a small number that appears in the upper-right corner of the Mail app’s icon on the Home screen. In this case, it indicates how many new emails your iPad has received.
Plus, you can set the Notification Center to list incoming emails. If the Notification Center window displays an incoming message alert (shown in Figure 3.5), tap it to automatically open the Mail app and display that new message. You learn more about the Notification Center in Chapter 4, “Using the Calendar, Reminders, Notification Center, and Clock Apps.”
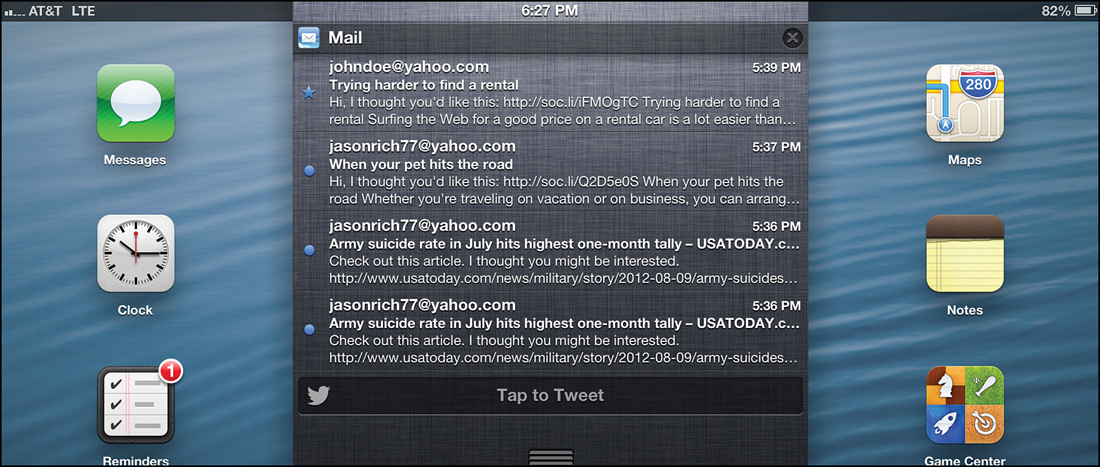
Figure 3.5. This is what the Notification Center window looks like when incoming email message alerts are displayed.
After you launch the Mail app, you can access the Inbox for one or more of your existing email accounts, compose new emails, or manage your email accounts. Just like the Inbox on your main computer’s email software, the Inbox of the Mail app (see Figure 3.6) displays your incoming emails.

Figure 3.6. The Mail app’s inbox screen. In this example, just one email account is set up to work with the app.
Working with the Inbox
On the left side of the Mail app’s Inbox screen is a list of the individual emails in your Inbox. A blue dot to the left of a message indicates the message has not yet been read.
As shown in Figure 3.7, a blue dot displayed in your Inbox, next to a message on the left side of the screen, indicates that a message is new and unread. An orange flag icon indicates the message is urgent. A curved, left-pointing arrow icon indicates you have already sent a reply to that message. A straight, right-pointing arrow indicates you have forwarded the message to one or more recipients. A blue star means the sender of the incoming email message is on your VIP List (a new Mail app feature that is described in greater detail shortly).
Figure 3.7. Small graphic icons displayed to the left of each email message listing in your Inbox indicate different things.
Based on the customizations that you made from within the Settings app that pertain to the Mail app, the Sender, Subject, Date/Time, and up to five lines of the message’s body text are displayed for each incoming message.
The email message that’s highlighted in blue on the left side of the screen is the one that’s currently being displayed, in its entirety, on the right side of the screen. Tap any email item on the left side of the screen to view the entire message on the right side of the screen.
To refresh your Inbox and manually check for new incoming emails, swipe your finger downward in the Inbox listing on the left side of the Mail app’s screen. The Updated message displayed at the bottom of the Inbox listing, accompanied by the date and time, indicates the last time your Inbox was refreshed.
If you’re managing multiple email accounts from your iPad, you can view the Inbox for any single email account, or choose to view a comprehensive listing of all inboxes. You also can view just your VIP inbox or your flagged messages inbox separately.
At the top of the Inbox message listing are two buttons labeled Mailboxes (or the name of the email account whose Inbox you’re viewing) and Edit. Between these two icons is the Inbox heading, along with a number displayed in parentheses. This number indicates how many new, unread messages are currently stored in your inbox.
Just below the Inbox heading is a Search field. Tap this Search field to enter a search phrase and quickly find a particular email message. You can search the content of the Mail app using any keyword, a sender’s name, or email subject, for example.
Organizing Mailbox Actions with the Mailboxes Button
When looking at your Inbox, the Mailboxes button is displayed in the upper-left corner of the screen. If you’re managing just one email account with the Mail app, when you tap on this icon, you can immediately access your Drafts folder, Sent Message folder, Trash folder, Bulk Mail folder, or other folders associated with your email account.
However, if you’re managing multiple email accounts using the Mail app, when you tap the Mailboxes button, you see a listing of each mail account’s Inbox, as well as each email account, displayed on the left side of the screen. You also see a listing for your VIP inbox and flagged messages inbox.
Tabs for each email account’s Inbox are displayed to the upper left. At the top of this listing is an All Inboxes tab. Tap this icon to view a listing of all your incoming emails, from all your accounts, on a single screen. (These messages are displayed together but are actually kept separate by the Mail app.)
When you’re managing multiple accounts, you can tap the Mailboxes tab to switch between individual email account inboxes. Under the Accounts heading, you can also access the Inbox, Drafts, Sent, Trash, Bulk Mail, or other folders for each account separately.
Depending on the email account, you might be able to add new folders for storing email messages on your iPad. As you’re looking at the current list of folders associated with one email account, tap the Edit button that’s displayed at the top of the screen next to the Mailboxes heading. Now, at the bottom of the screen, in the lower-right corner of the left mailbox folder column, you see a new button labeled New Mailbox (shown in Figure 3.8).

Figure 3.8. For most types of email accounts, you can create an unlimited number of mailbox folders (each with a custom name) for organizing email messages.
Tap the New Mailbox button to manually enter the name of a new folder, and decide under which email account (Mailbox Location) the folder will be displayed.
Selecting Messages for Managing with the Edit Button
Located on top of the Inbox message listing (to the right of the Inbox heading) is an Edit button. When you tap this button, you can quickly select multiple messages from your Inbox to delete or move to another folder (see Figure 3.9).

Figure 3.9. After tapping the Edit button, you can quickly delete or move multiple email messages currently stored in your Inbox.
After you tap the Edit button, an empty circle displays to the left of each email message summary. To move or delete one or more messages from this Inbox listing, tap the empty circle for that message. A red-and-white check mark fills the empty circle when you do this, and the Delete and Move buttons are displayed at the bottom of the screen.
After you’ve selected one or more messages, tap the Delete button to quickly delete the messages from your Inbox (which sends them to the Trash folder), or tap the blue-and-white Move button, and then select the folder to which you want to move those email messages.
Deleting Individual Incoming Messages
As you’re looking at the listing of messages in your Inbox, you can delete individual messages, one at a time, in several ways. Swipe your finger from left to right over a message listing on the left side of the screen. A red-and-white Delete button displays on the right side of that email message listing. Tap this Delete button to delete the message.
Another way to delete a single message from your Inbox (or any folder) is to tap the message listing that’s displayed on the left side of the screen, which highlights the message in blue. At the same time, the entire message is displayed on the right side of the screen. To then delete the message, tap the Trash Can icon displayed near the upper-right corner of the screen.
Viewing Your Email
When a single email message is highlighted on the left side of the Inbox screen, that message is displayed, in its entirety, on the right side of the screen. At the top of the message, you see the From, To, Cc, Bcc, Subject, and Date/Time lines.
In the upper-right corner of the email message is a blue Hide command. If you tap this, some of the message header information is no longer displayed. This enables you to display more of that email’s message on the tablet’s screen. To make this information reappear, tap the Details command that appears in the upper-right corner of the message.
If you flag a message, a small orange flag appears next to its listing on the left side of the screen, which indicates the message is urgent. If you tap the Mark As Unread option, that message remains in your Inbox with a blue dot next to it, indicating that it’s a new message that has not yet been read.
To flag a message as you’re reading it on the right side of the Mail app’s screen, tap on the Flag icon that’s displayed near the upper-right corner of the screen. A pop-up menu with two options, labeled Flag and Mark As Unread, is displayed. Tap on the Flag option.
As you then look at your Inbox listing, messages that have been flagged are accompanied by an orange flag icon. From the Mailboxes listing on the left side of the screen, if you tap on the Flagged Inbox, only flagged messages from your various email accounts are displayed.
Accessing Incoming Email Attachments
The Mail app enables you to access certain types of attachment files that accompany an incoming email message. You can view and access the following files: photos (in the .JPEG, .GIF, .PNG, and .TIFF format), audio files (in the .MP3, .AAC, .WAV, and .AIFF format), PDF files, and Pages, Keynote, Numbers, Microsoft Word, Microsoft Excel, and Microsoft PowerPoint files.
If an incoming email message contains an attachment that is not compatible or accessible from your iPad, you see that an attachment is present but you aren’t able to open or access it. In this case, you must access this content from your primary computer.
To open a compatible attached file within an incoming email message, tap and hold down the attachment icon for one to three seconds. If the attachment is compatible with an app that’s installed on your iPad, you are given the option to transfer the file to that app and directly open or access the file using that app. Or, you can open a compatible attachment in the Mail app’s own viewer.
Transferring Messages to Other Folders
As you’re viewing an email message on the right side of the screen, you can move it from your Inbox to another folder in one of two ways. First, you can tap the Edit button, or you can tap the file folder–shaped icon that’s displayed in the upper-right corner of the screen. When you tap this icon, the various folders available for that email account are displayed on the left side of the screen. Tap the folder to which you want to move the message. The folders available vary for different types of email accounts.
Forwarding, Replying, and Printing Emails
From within the Mail app, you can reply to the message, forward any incoming message to someone else, or print the email by tapping the left-pointing arrow icon that’s displayed in the upper-right corner of the main Inbox screen (next to the Trash Can icon). A menu is then displayed in the upper-right corner of the screen (see Figure 3.10).

Figure 3.10. As you’re reading any email message, tap the left-pointing arrow icon to Reply To, Forward, Save Attachments (in this case Images), or Print that message.
To reply to the message you’re reading, tap the Reply button. A blank email message template appears on the screen. See the “Composing Messages” section later in this chapter for details on how to write and send an email message from the Mail app.
To forward the email you’re reading to another recipient, tap the Forward button. If an attachment is associated with this email, you are asked whether you want to include the attachments from the original email. You see two icons, labeled Include and Don’t Include. Choose the appropriate response.
When you opt to forward an email, a new message template displays; however, within the body of the email message are the contents of the message you’re forwarding.
Start the message forwarding process by filling in the To field. You can also modify the Subject field (or leave the message’s original Subject) and then add to the body of the email message with your own text. The newly added text displays above the forwarded message’s content.
To forward an email to multiple recipients, enter each person’s email address in the To field of the outgoing message, but separate each address with a comma. You also can tap the plus icon (+) that appears to the right of the To field to add more recipients.
If you’re sending an email to a contact that’s stored in your Contact app’s database, instead of manually typing the personal’s email address, you can begin typing the person’s name. The Mail app offers suggestions based on the information stored in the Contacts app.
When you’re ready to forward the message to one or more recipients, tap the blue-and-white Send button that appears in the upper-right corner of the email message window. Or tap the Cancel button (located in the upper-left corner of the message window) to abort the message forwarding process.
If you have a wireless printer set up to work with your iPad, you can print incoming or outgoing emails directly from your tablet using the Print command. To learn more about wireless printing from your iPad, see Chapter 9, “Wireless Printing and Scanning via Your iPad.”
Creating a VIP List in the Mail App
Although you can flag individual emails as being important, if you often receive emails from specific senders, such as relatives, important clients, or your boss, that are extremely important to you, you can designate those people as VIPs in the Mail app. Then, any messages you receive from those senders are displayed with a blue star in your Inbox, plus you can view the separate VIP Inbox to quickly view only incoming emails from people on your VIP lists that have been received in all of your email accounts.
Adding someone to your VIP list must be done only once. To do this, as you’re reading an incoming email from someone you want to add to your VIP list, tap on the From field of the message. Details about the sender are displayed in a pop-up window (shown in Figure 3.11). Tap on the Add To VIP button that’s displayed in this window to add this person to your VIP list. A blue star appears next to their name in the From field.
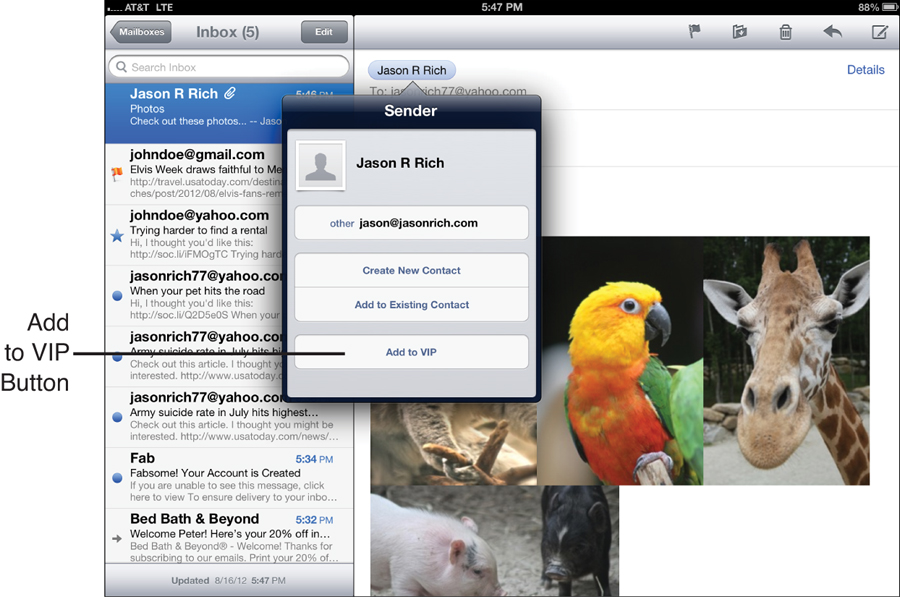
Figure 3.11. Add people who are important to you to your VIP list so you can easily identify incoming emails from them.
To remove someone from your VIP list, view an incoming email from that individual and tap on the From field. When the Sender pop-up window is displayed, tap on the Remove From VIP button.
As you’re viewing the main Mailboxes listing on the left side of the Mail app’s screen, under the Inbox heading (shown in Figure 3.12), you’ll see a listing for VIP. When you tap on this listing, all the incoming emails from people on your VIP list are displayed in a centralized listing for easy reference. However, as you’re looking at your All Inboxes listing or the Inbox for an individual email account, messages received from people on your VIP list will have a blue star displayed to the left of them rather than a blue dot.

Figure 3.12. Tap on the VIP listing under Inbox to display only incoming emails from people on your VIP list. This is a comprehensive listing from all your email accounts that the Mail app is managing.
Composing Messages
From within the Mail app, you can easily compose an email from scratch and send it to one or more recipients. To compose a new email, tap the Compose icon that’s displayed near the upper-right corner of the main Inbox screen. The Compose icon looks like a square with a pencil on it.
When you tap the Compose icon, a blank email message template (shown in Figure 3.13) displays. Using the virtual keyboard, fill in the To, Cc, Bcc, and Subject fields. At the very least, you must fill in the To field with a valid email address for at least one recipient. The other fields are optional.
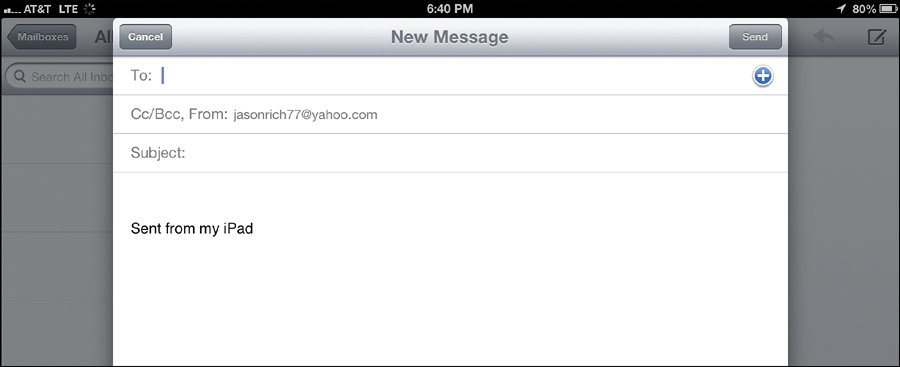
Figure 3.13. After tapping the Compose icon, you can create an email from scratch and send it from your iPad.
You can send the same email to multiple recipients by either adding multiple email addresses to the To field or adding additional email addresses to the Cc or Bcc fields.
If you’re managing just one email address from your iPad, the From field automatically fills with your email address and is not displayed. However, if you’re managing multiple email addresses from the tablet, tap the From field to select the email address from which you want to send the message.
Tap the Subject field and use the virtual keyboard to enter the subject for your message. As you do this, the Subject displays in the title bar of the Compose window.
To begin creating the main body of the outgoing email message, tap in the main body area of the message template and use the virtual keyboard (or the external keyboard you’re using with your iPad) to compose your message.
Instead of manually typing an email message, you can use the Dictate feature. To do this, tap the microphone key on the virtual keyboard. When the icon enlarges and you hear a tone, begin speaking (dictating) the body of your email message. You can speak for up to 30 seconds at a time, but repeat the process as often as you’d like. When you’re finished, tap the Dictate button again.
Whatever you said is translated by your iPad from speech to text and promptly inserted into the body of your outgoing email message.
If you have the Auto-Correction or Spell Check feature turned on (both of which are adjustable from the Settings app) as you type, the iPad automatically corrects anything that it perceives as a typo or misspelled word.
Be very careful when using these features because they are notorious for plugging the wrong word into a sentence. Especially if you’re creating important business documents and emails, make sure you proofread whatever you type on your iPad carefully before sending it. Typically, these features are helpful, but they do have quirks that can lead to embarrassing and unprofessional mistakes.
The signature you set up in the Settings app is displayed automatically at the bottom of the newly composed message. You can return to the Settings app to turn off the Signature feature, or you can change the signature that appears.
When your email is fully written and ready to be sent, tap the blue-and-white Send button in the upper-right corner of the Compose window. In a few seconds, the message is sent from your iPad, assuming the tablet is connected to the Internet. A copy of the message goes to your Sent or Outbox folder.
Saving Unsent Drafts of an Email Message
If you want to save a draft of an email (in your Draft folder, for example) without sending it, as you’re composing the email message tap the Cancel button that appears in the upper-left corner of the Compose message window. The Delete Draft and Save Draft buttons display. To save the unsent draft, tap Save Draft. This draft is then saved in your Drafts folder until you either send it or delete it.
Sending an Email with an Attachment
To send an email message that contains an attachment, such as a Pages document, those attachments must be sent from within a specific app, not from the Mail app. However, from within the Mail app, thanks to iOS 6, you can now attach to the outgoing message photos or video clips that are stored in your iPad.
To add a photo or video clip attachment, in the body of the email message you’re composing, press and hold your finger on the screen (where you want the image to be inserted) for about two seconds. A command bar appears. Tap on the Insert Photo or Video option that’s displayed (shown in Figure 3.14).

Figure 3.14. Tap on the Insert Photo or Video tab to select and insert an image or video clip into your outgoing email.
When the Photos window appears, tap on the album that contains the image or video clip you want to include in the email, and then tap on the thumbnail for the actual image. From the Choose Photo window, tap on the Use button to select the image and embed it into the outgoing email. The image is now displayed in the outgoing email message you’re composing (shown in Figure 3.15).

Figure 3.15. You can embed one or more images (or video clips) into an outgoing email message from within the Mail app. However, pay attention to the file size to ensure the message is not larger than 5MB. If it is, you’ll need to decrease the photo’s image size.
Anytime you add a photo as an attachment to an outgoing email in the Mail app, the app keeps the photo at its current file size. To change the image file size, look to the right of the From field for a message that says Images, and tap on it.
An Image Size tab bar (shown in Figure 3.16) is displayed that includes four buttons, Small, Medium, Large, and Actual Size. Tap on the image file size you want, based on how the recipient will be using the images and the overall size of the outgoing email. Remember that most email accounts do not allow messages larger than 5MB to be sent or received, so if you’re sending multiple high-resolution images in a single email, you will need to decrease the image size.

Figure 3.16. You can change the file size of images being embedded into your outgoing emails when using the Mail app.
Keep in mind that you can send a Pages, Word, or PDF document from the Pages app, or a Numbers or Excel (spreadsheet) file from the Numbers app. It’s also possible to send photos or video clips from the Photos app.
Other apps also enable you to attach app-specific files to outgoing emails that are composed and sent from within that app. To do this, tap the Share icon that’s displayed within the app, and choose the Email option.
Additional Mail App Features
As you begin using the Mail app to manage one or more email accounts on your iPad, you’ll probably discover that this app offers much of the same functionality as the email program you use on your primary computer or on the Web. In addition to utilizing a built-in spell checker, for example, Mail is compatible with the Select, Copy, Cut, and Paste features built in to the iOS operating system. This enables you to move text and email message content between messages or into other apps with ease.
Plus, the Mail app automatically links with the Contacts app to pull email addresses from your Contacts database. So instead of entering someone’s email address into the To field of a message you’re composing, you can begin typing the recipient’s name, and the app automatically pulls email addresses from your Contacts database and gives you a list of potential recipients.
Using the Web or Other Apps to Access Email
In addition to using the Mail app to access your email, for some types of email accounts, you can also use the Safari web browser to access your email account directly from the server.
When you visit the App Store, you will also find third-party iPad apps that can replace the Mail app and help you better manage one or more email accounts. To find these apps, launch the App Store app, and enter the keyword “email” in the Search field.
If you’re a Microsoft Outlook user, for example, you’ll discover the Outlook Web Email app ($4.99) or Outlook Mail Pro app ($9.99). To send emails to groups of people, you can use the MailShot Pro app ($3.99). For people who use Google Gmail, the free Gmail app enables you to better manage this type of email account from your iPad.
Surfing the Web Using Safari
The Safari web browser that comes preinstalled on your iPad offers the ability to access the Internet from virtually anywhere there’s a Wi-Fi, 3G, or 4G signal.
Your iPad enables you to visit virtually any website and navigate around the World Wide Web with ease using now-familiar finger motions on the tablet’s touch screen.
As you visit web pages using Safari, you can utilize hyperlinks or activate command icons with the tap of the finger, scroll up or down on a web page with a finger swipe, perform a reverse pinch or double-tap to zoom in on specific areas of a web page, or flick your finger to scroll left or right.
If you’re already familiar with how to surf the Web on your primary computer using a web browser, such as Microsoft Internet Explorer, Firefox, Google Chrome, or the Mac version of Safari, you should have little trouble surfing the Web on your iPad. The iPad’s version of Safari was custom-designed specifically for your tablet to give you the most authentic and robust web surfing experience possible from a mobile device.
The iOS 6 version of Safari also includes some handy new features, such as iCloud Tabs and an Offline Reading List option that you’ll learn more about shortly.
Customizing Safari Settings
The Safari app offers a handful of user-customizable settings adjustable from the Settings app on your iPad. Several of these settings relate to security and privacy.
To access and personalize the settings for Safari, tap the Settings app icon that’s displayed on your tablet’s Home screen, and then tap the Safari option listed on the left side of the screen under the Settings heading. A handful of Safari-specific options are displayed on the right side of the screen.
At the top of the Settings screen (on the right), when the Safari option is selected (on the left), you see a General heading with four options below it: Search Engine, AutoFill, Open New Tabs in Background, and Always Show Bookmarks Bar.
As you’re actually surfing the Web and looking at the main Safari screen (see Figure 3.17), note the Search field in the upper-right corner of the screen, just below the battery icon. From the Settings app, you can determine whether your default search engine should be Google, Yahoo!, or Bing. This determines which search engine Safari utilizes when you perform a keyword search as you surf the Web.

Figure 3.17. The main Safari browser screen looks similar to the web browser screen of a computer.
The AutoFill option has two main uses when it’s activated. First, as you’re surfing the Web, whenever you’re asked to enter your personal information—such as your name, address, phone number, or email address—Safari automatically inserts the information into the appropriate fields on the website.
To use AutoFill, make sure the virtual switch that’s associated with the Use Contact Info option is turned on. You also need to tap the My Info option and select your own contact entry from your Contacts database.
Farther down on the AutoFill screen is the Names and Passwords option. This is the second main use for AutoFill. When it’s turned on, this feature remembers your usernames and passwords for the websites you visit and automatically enters them whenever you revisit websites that require you to otherwise manually enter a username or password.
If you’re concerned about security and other people accessing personal information about you from the Web when they use your iPad, make sure you keep the Names and Passwords option turned OFF. This prevents other users from accessing your account(s) or signing in to websites as you.
The Clear All option at the bottom of the AutoFill screen resets all the names and passwords data from websites you’ve visited and deletes this information from your tablet.
The next option found under the General heading is the Open New Tabs in Background feature. Safari enables you to open multiple web pages at once using tabs and then instantly switch between them with a tap of the finger.
With the Open New Tabs feature turned on, when a new web page is opened automatically (and a new tab is created), that page does not take precedence over the web page you’re currently viewing. You must tap on the new page’s tab to access it.
Also under the General heading is the Always Show Bookmarks Bar option. This option is accompanied by a virtual On/Off switch on the right. As you’re surfing the Web using Safari, under the Title Bar command icons at the top of the screen, you can opt to display your personalized Bookmarks bar.
When the Always Show Bookmarks Bar option is turned on, the Bookmarks bar is displayed at all times, giving you one-tap access to your favorite websites. You can assign which websites appear along your Bookmarks bar, or you can sync this information with the browser you use on your primary computer.
When the Always Show Bookmarks Bar option is turned off, one line of on-screen real estate is conserved. The Bookmarks bar, however, is displayed automatically whenever you use the Search field in Safari to perform a search, or when you tap on the address bar.
Under the Privacy heading of the Safari screen in Settings, you can customize a handful of security-related options. For example, you can turn on or off the Private Browsing option, which keeps Safari from storing cookies or other data pertaining to the websites you visit. By default, this option is turned off.
You can also opt to keep Safari from saving cookies related to the websites you visit, or delete cookies that have already been stored by Safari by tapping on the Remove Website Data option that’s found under the Privacy heading.
The Accept Cookies option enables Safari to store certain information relating to specific websites you visit so that those sites remember you on subsequent visits. By selecting the From Visited option, only information that relates to websites you have chosen to visit is saved.
Safari automatically keeps a detailed listing of every website you visit. When you tap the Clear History button, this listing is reset and deleted.
Under the Security heading of the Safari screen with Settings, you can turn on or off the Fraud Warning option. By default, this option is turned on and should remain on for your protection. This option helps prevent you from accidentally surfing to imposter or fraudulent websites, for example.
Don’t mess with the default settings for the next two options, JavaScript and Block Pop-ups, unless you know what you’re doing or are instructed by a specialist to change these settings. The JavaScript option enables you to visit and access websites that utilize JavaScript programming. The Block Pop-ups option prevents those annoying pop-up windows (which are usually ads) from cluttering your screen as you’re surfing the Web.
Unless you have a programming background or you’re told to do so by an AppleCare technical support specialist, refrain from changing any settings found under the Developer or Databases submenus, if and when these options are displayed on the Safari screen within Settings. Simply leave the default settings as is.
To exit the Settings app and automatically save your changes, press the Home button on your iPad. This returns you to the Home screen. From here, you can launch Safari and begin surfing the Web.
Where’s the Flash?
The one main drawback to surfing the Web using Safari on your iPad is the web browser’s inability to display Adobe Flash–based graphics and animations. This limitation is not due to lack of technological capability of your tablet, however. It’s the result of ongoing disagreements between Apple and Adobe with regard to offering Flash compatibility through the iOS operating system.
Back in April 2010, Steve Jobs, Apple’s late founder and CEO, publically announced that Safari for Apple’s iOS mobile devices would not support Flash technology. To learn more about Apple’s position on this matter, visit www.apple.com/hotnews/thoughts-on-flash.
Unfortunately, websites that rely heavily on Flash are not accessible using Safari. However, the optional Photon Flash Web Browser app does support Flash as you surf the Web from your iPad. You can also use a remote desktop app, such as Splashtop, to control your primary computer from your iPad’s screen, which enables you to run your computer’s web browser to surf the Web to access Flash-based websites.
You learn more about the Photon Flash Web Browser and Splashtop apps in Chapter 13, “Discovering ‘Must Have’ Business Apps.”
You’re Ready to Begin Surfing
To access the Web using your iPad, make sure it’s connected to the Internet, and then tap the Safari app icon that’s displayed on the tablet’s Home screen. The main Safari web browser screen appears.
Using Safari’s Title Bar Features
Located along the top of the Safari screen is the title bar, which includes a handful of command icons that you use to navigate around the Web. Although the icons might look different than what you’re used to when surfing the Web using the browser installed on your primary computer, their features and functions are similar.
As you surf the Web using Safari, you can hold your tablet in portrait or landscape mode. Landscape mode makes the portion of the websites you’re viewing appear larger on the screen, but portrait mode enables you to see more of the web page vertically.
The Back and Forward Icons
Displayed near the upper-left corner of the Safari screen are the Back and Forward arrow-shaped icons used for jumping to a previous web page you’ve visited.
The Bookmarks/History/Reading List Viewing Icon
The Bookmarks icon that resembles an open book (shown in Figure 3.18) enables you to access your Reading List, History, Bookmarks bar, and the bookmarks you’ve added to your bookmarks list. Later in this chapter, you learn how to sync your bookmarks between Safari on your iPad with the bookmarks stored on your primary computer’s web browser software.

Figure 3.18. Tap the Bookmarks icon (it resembles an the open book) to access your Reading List (which is explained shortly), as well as your History, Bookmarks Bar listing, and saved bookmarks.
The iCloud Tabs Icon
The cloud-shaped icon is for a new feature added to the iOS 6 edition of Safari called iCloud tabs. If you have multiple computers or iOS mobile devices linked to the same iCloud account, and you use Safari to surf the Web on any or all of them, anytime you use tabbed browsing on any computer or device, the tabs that represent websites you have open on your various computers and/or iOS mobile devices will automatically be synced with your iCloud account and then shared with your other devices.
As a result, when you tap on the iCloud Tabs icon on your iPad, for example, you’ll be able to see the open Safari tabs on your iMac, MacBook, and/or iPhone, for example. Figure 3.19 shows Safari running on the iPad. When the iCloud tabs icon is tapped, the listing shows open tabs on the MacBook Air and iMac that are linked to the same iCloud account. Tap on any of these listings to open a new browser window on your iPad and display the website it represents.

Figure 3.19. The iCloud Tab icon enables you to view open tabbed browser windows on your other computers or iOS mobile devices that are linked to the same iCloud account.
The Share Icon
When you’re visiting any website, you can tap the Share icon that’s located to the immediate left of the address field to access a submenu with the following nine options (see Figure 3.20):
• Mail: Send details about the website you’re viewing in Safari to one or more other people via an email message that can be sent from the Safari app. There’s no need to launch the Mail app.
• Message: Send details about the website you’re viewing to someone via instant message using iMessage or one of the services with which the Messages app is compatible.
• Twitter: Compose and send a tweet with details about the website you’re currently viewing to your Twitter followers from within the Safari app.
• Facebook: Post a status update on your Facebook page with information about the website you’re currently viewing in Safari.
• Add to Home Screen: Create a shortcut icon on your iPad’s Home screen that will enable you to launch Safari and automatically open the website you’re currently viewing with a single tap. After you add a Home screen bookmark icon, you can treat it like any Home screen app icon, which means you can tap it to launch the website, move it around on the Home screen, or place it into a folder.

Figure 3.20. The Share button offers a handful of different options for sharing web page information with other people.
• Print: If you have a compatible printer wirelessly connected to your iPad, tap the Print icon to print the web page you’re currently viewing. See Chapter 9 for more information about using your tablet with a printer.
• Copy: Copy the link for the website you’re currently viewing into the tablet’s virtual clipboard, and then use the Paste commend to insert that link into a document, email, Tweet, or another app using the Paste command that’s built in to iOS 6.
• Bookmark: Create a bookmark for the website you’re viewing and add it to your saved Bookmarks list or Bookmark Bar. If the feature is set up, this information is uploaded automatically to your iCloud account and then synced with the other computers linked to your iCloud account, so your saved Bookmarks list and Bookmark Bar remain consistent, regardless of which computer or iOS mobile device you’re using.
• Add to Reading List: Store the contents of the web page you’re currently reading in Safari’s Reading List. You can then go back and read that web page anytime later, even if your tablet is not connected to the Internet. The Reading List feature built in to the iOS 6 edition of Safari offers offline reading and stores the contents of the entire web page you’re viewing—not just its URL. This feature is particularly useful if you find an interesting article or blog entry that you don’t have time to read at the moment but you know you want to read later.
Keep in mind that multimedia content (such as audio or video) that’s associated with the web page(s) you add to your Reading List will not always be downloaded and saved.
When you tap on the Bookmark command, the Add Bookmark window displays. Using the virtual keyboard, enter the title for this web page, or use the default title, and then choose whether you want to store the bookmark in your Bookmarks menu or display it on your Bookmarks bar.
The Bookmarks menu is a pull-down menu that lists your favorite bookmarks. It is a listing you can create and maintain as you’re surfing the Web. You can access it by tapping on the open-book icon at the top of the Safari screen.
Editing Your Bookmarks
As you’re viewing your Bookmarks menu, tap the Edit button displayed in the upper-right corner of the window to edit your bookmarks listing.
After you tap on the Edit command, the Bookmarks menu displays additional icons to the right and left of each bookmark title (see Figure 3.21). On the left side of each user-added bookmark listing is a red-and-white circular icon with a minus sign in it. Tap this icon to delete the bookmark from your Bookmarks menu.

Figure 3.21. You can edit the bookmarks listed in your Bookmark menu or Bookmarks bar by tapping the Edit button in the upper-right corner of the Bookmark menu window. Tap Done when you’re finished editing your Bookmarks menu.
Use the open-book icon or the > symbol (displayed to the right of each bookmark title) to edit the bookmark’s title, URL, or where the bookmark is listed.
Located to the extreme right of each user-added bookmark title is an icon with three horizontal lines. Place your finger on one of these icons to drag a bookmark listing up or down on the Bookmarks list and change the order of the list.
In addition to having all of your bookmarks displayed in one long list in the Bookmarks menu, you can tap the New Folder button in the upper-left corner of this Bookmarks menu window to create separate folders that you can use to better organize your bookmarks by sorting them into custom categories. When you create a new bookmark folder, you must also assign a custom name to it.
When you’re finished editing the Bookmark menu, be sure to tap the blue-and-white Done button in the upper-right corner of the window to save your changes and return to the regular Bookmark menu.
Accessing and Managing Your Reading List
To access and manage your reading list, tap the open-book shaped icon, and then tap on the Reading List option (which looks like eyeglasses). A new Reading List window appears. Under the Reading List heading are two tabs: All and Unread.
To open a reading list entry, tap its listing, or swipe your finger from left to right across the entry to delete an entry from your reading list. When the red-and-white Delete icon appears, tap it.
To exit out of the Reading List window, either tap on the Bookmarks icon that’s displayed in the upper-left corner, or tap anywhere on the tablet’s screen that’s outside the window.
Your Reading List can be comprised of specific web pages you want to refer to later, to read a specific article or blog entry, for example. At any time, if you’re reading an article on a website, another way to add it to your Reading List is to tap the open-book icon, select the Reading List option, and then tap the plus (+) icon in the upper-right corner of the Reading List window.
Safari’s Address Field
Located at the top of the main Safari screen is the address bar. When you tap it, the iPad’s virtual keyboard appears and you can manually enter the website address (URL) for any website you want to access, as shown in Figure 3.22. As you begin typing, a list of suggestions, based on past websites you’ve visited, is displayed.

Figure 3.22. Enter the URL for any website into the address bar, and then tap the Go key on the virtual keyboard to visit any website.
If a website is already displayed in the address bar, tap the X icon displayed at the right end of the address bar to delete the address bar’s contents.
In Safari, the virtual keyboard includes several specialized keys associated with entering URL addresses, including a colon (:), backslash (/), underscore (_), dash (-), and .com. These keys are located along the bottom row of the virtual keyboard. These keys enable you to more quickly enter the URL for the website you want to visit. When you’re finished entering the URL, tap the Go key on the virtual keyboard to surf to that site.
Also, if you hold down the .com key on the virtual keyboard, a pop-up menu enables you to choose .net, .org, .com, .us, or .edu, which are common website extensions.
Using the Search Field
Located in the upper-right corner of the screen is Safari’s Search field. Here, you can enter any keyword or search phrase to perform a web search using Google, Yahoo!, or Bing, depending on which default search engine you previously selected from the Settings app.
Using Tabs
Tabs enable you to load multiple web pages within Safari simultaneously and then instantly switch between them. The tab bar is displayed below the Bookmarks bar, near the top of the Safari screen.
If you have iCloud activated on your tablet, your open tabs are uploaded to iCloud and synced with your other computers and iOS mobile devices that are linked to the same iCloud account. Thus, when you tap on the iCloud Tabs icon on your iPad, you can view and access open tabs on your other computers or iPhone, for example.
When you first load Safari, only one tab is open. However, at any time, you can tap the plus (+) icon that’s displayed to the extreme right of the tab bar to open a new browser window and create a new tab.
You can have multiple tabs displayed at the top of the Safari screen. When multiple tabs are open, tap any of them to switch to the website to which the tab corresponds.
The website that’s actually displayed on the iPad’s screen is the active tab. To the left of the active tab’s title is an X icon. Tap this X to delete the tab and close the web page associated with it. To keep the web page open but view a different web page, tap on another displayed tab or open a new tab and manually surf to another website.
The ability to quickly switch between web pages that are open (which is referred to as tabbed browsing) makes surfing the Web on the iPad fast and convenient.
Using Safari’s Reader Feature
Sometimes, web pages are cluttered with ads, graphics, menus, and other content that makes reading a text-based article confusing. The Reader option that’s built in to Safari enables the web browser to automatically strip away this clutter, allowing you to read the text-based article more easily and with no on-screen distractions.
When this option is available, a small Reader icon appears to the right of the website’s URL in the Address field of Safari (as shown in Figure 3.23). Tap this icon, and the text-based article displays in a new, clutter-free window.

Figure 3.23. When the Reader icon appears in the Address Bar of Safari, you can tap it to read the text-based content on that site on a clutter-free screen.
As you’re reading a text-based article in Reader, in the upper-left corner of the screen is an aA icon. Tap it to increase or decrease the size of the on-screen text.
Understanding the Web Page Viewing Area
Getting back to surfing the Web, displayed below the title bar and the Bookmarks bar (if you have this option turned on) is the main website viewing area of Safari. As you view website content, you can scroll around on the page using upward, downward, left, or right finger swipes.
To instantly jump back to the top of a web page, tap anywhere on the status bar at the top of the iPad’s screen (above the title bar). The status bar displays the Internet connection’s signal bars, the current time, and the battery life indicator.
To zoom in or out of a particular area of a web page, either double tap on the area that you want to zoom in on or perform a reverse-pinch finger motion. To zoom out, double-tap on the screen again or perform a pinch finger motion.
If you see a hyperlink or a command button displayed on a web page, tap it to follow the link or activate the button. To see where the link takes you before actually surfing there, hold your finger on the link or button for two to three seconds. The link’s URL address is displayed along with a menu containing three commands:
• Open: This opens the web page that the link directs you to.
• Open in New Page: This opens the web page that the link directs you to but does so in a new Safari browser window.
• Copy: This copies the website URL to your iPad’s virtual clipboard so you can paste this information elsewhere.
As you’re viewing almost any graphic or photo that’s displayed in a website, you can hold your finger on the image to save it on your iPad, where it becomes accessible from the Photos app.
If for some reason a web page doesn’t fully load or you want to refresh the information displayed on a web page you’re currently viewing, tap the circular arrow icon that’s displayed to the extreme right of the address bar. However, if you want to stop a web page as it is loading, tap the X icon to the extreme right of the address bar during the web page loading process.
Any time you need to enter text or numerical data in a field on a website you’re viewing, tap the empty field, which displays the iPad’s virtual keyboard. To move to another field that requires data entry, either tap your finger on the next field or tap the Next or Previous icon that appears on the screen above the virtual keyboard.
Syncing Bookmarks with Your Primary Computer
To ensure your web surfing experience is similar to when you’re exploring the Web using the web browser on your primary computer, you have the option to sync your bookmarks between your computer and your iPad.
There are two methods for syncing your Safari bookmarks. One happens automatically using the iCloud service, and the other is done through an iTunes sync procedure when your tablet is connected to your primary computer via a USB cable. This sync process works with Safari for the Mac, Microsoft Internet Explorer on a PC, as well as a variety of other popular web browser applications.
If you use the iCloud online service, you can automatically sync your bookmarks wirelessly between your tablet and primary computer (as well as your iPhone). To set this up, after you have an iCloud account, access the Settings app from your tablet’s Home screen, and tap the iCloud option that’s displayed on the left column. When the iCloud screen appears on the right side of the Settings screen, turn on the Bookmarks option.
Accessing Social Networks on Your iPad
Whether you use Facebook, Twitter, Google+, LinkedIn, Tumblr, or Instagram to promote your business, a product, or service, to help position yourself as an expert in your field, to meet new people, or simply to stay in touch with your friends and family, you can fully utilize these online social networking sites using specialized apps available from the App Store.
The capability to share information on social networks from virtually anywhere using your iPad brings a new level of interactivity to these services.
Working with Facebook
In addition to offering Facebook integration in iOS 6 and some of the core apps, the official Facebook for iPad app (free) is available from the App Store. It offers almost all the functionality of Facebook on your tablet’s screen, including the capability to access your Wall, update your Status, send/receive messages, manage your photo albums, upload and share photos shot using your iPad, and chat in real time with your Friends.
To download the Facebook app and configure Facebook integration with your iPad, launch Settings, and then select the Facebook option from the left side of the screen. Then, on the right side of the screen, tap on the Install Now icon to install the official Facebook app on your iPad. Then, add your existing Facebook account information in Settings, and then again when you launch the actual Facebook app for the first time.
When you tap on the Update All Contacts button on the Facebook screen in Settings, your iPad syncs your Contacts database with your active friends list on Facebook automatically.
Tweeting from Your iPad
There is an official Twitter app, designed specifically for the iPad (free), as well as dozens of third-party apps that work with Twitter. Twitter functionality has also been fully integrated into iOS 6, so you can tweet from a variety of different apps. However, to be able to manage your existing Twitter accounts, you’ll want to install the official Twitter app onto your tablet.
To initially set up Twitter on your iPad, access the Settings app and tap the Twitter option displayed on the left side of the screen. On the right side of the screen, you have the option to install the official Twitter app by tapping the Install Now icon.
After installation, launch the Twitter app on your iPad. You can then sign in using one or multiple Twitter accounts, or create a new account (which is also something you can do from the Twitter screen in Settings, by tapping the Create New Account option).
You can use the official Twitter app to create and send tweets, access your Twitter timeline, and see what the people you’re following are tweeting about. In addition, various other core apps—including Photos, Safari, Camera, Contacts, and Maps—are fully integrated with Twitter and allow you to send tweets with an app-related attachment.
For Twitter integration to work with the core apps built in to your iPad (as opposed to just the official Twitter app), you must sign in to your Twitter account from within Settings just once.
Figure 3.24 shows the Twitter option in Photos, which is displayed when you view a photo and tap the Share icon. When the Share menu appears, one available option is to tweet the photo from directly within the Photos app.

Figure 3.24. You can send tweets from within the Photos app as you’re viewing a photo. Tap the Share icon, and then choose the Tweet option.
Tap the Tweet option, and a Tweet window appears in Photos (shown in Figure 3.25), enabling you to compose an outgoing tweet that automatically attaches the photo. If you tap the Add Location option in the lower-left corner of this window, your exact location is automatically added to the outgoing tweet as well.
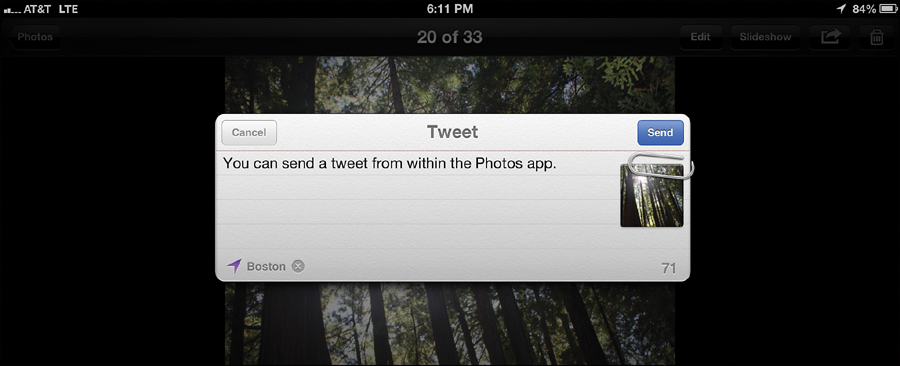
Figure 3.25. When you choose to send a tweet from within an app, a special tweet window appears enabling you to compose and send the 140-character message and (if applicable) automatically attach a photo, URL, or your exact location.
Tapping into LinkedIn to Network with Business Professionals
More than 175 million business professionals, working in thousands of different fields and industries, are active participants on the LinkedIn online social networking service (www.linkedin.com).
To access LinkedIn from your iPad, download the free LinkedIn for iPad app available from the App Store.
Managing Your Google+ Account from Your iPad
Also available from the App Store is the free Google+ app, which enables you to manage most aspects of your Google+ account directly from your tablet. From this app, you can join a Hangout, post a photo, see what your online friends are up to, see the What’s Hot stream, and view the Nearby stream, for example.
Share Your Photos with Instagram
Whereas Twitter enables you to send text-based messages to your followers (that can include an attached website link or photo), Instagram is designed specifically for sharing digital photos shot using your mobile device. Using this app, you can take pictures on your iPad, edit and crop them, add special effects, and then publish them on the Instagram service. Photos can be accompanied by a text-based caption or hash tags. The free Instagram app also enables you to view the public photo feed from the Instagram service, plus view the photo feeds of the people you’re following.
The official Instagram app is currently an iPhone-specific app that works flawlessly on the iPad, but it does not use the iPad’s larger screen size unless you use the 2x feature.
If you want to publish customized photo collages, instead of single photos, on Instagram, download the free InstaCollage app or InstaCollage Pro ($0.99) app. Both enable you to use templates to create eye-catching photo collages using multiple photos, and then publish those collages online in your Instagram account.
To have 2" × 2" refrigerator magnets created from your Instagram images and sent to you for $14.99 (includes nine images), visit http://stickygram.com.