
7. Digital Photography on Your iPad
In This Chapter
• Discovering how to shoot, view, organize, edit, enhance, share, and print digital photos
• Learning about iCloud’s Photo Stream and new Shared Photo Stream features
• Tips for taking better quality pictures using your iPhone
The latest iPad models have two powerful, high-resolution cameras built in that, when used with the Camera app, make snapping detailed, clear, and vibrant photos as easy as tapping on the device’s screen.
When it comes to viewing, organizing, enhancing, printing, and sharing digital photos on your iOS device, you have a multitude of options. The Photos app that comes preinstalled on the iPad offers decent photo-organizing and basic photo-editing features. However, available from the App Store is Apple’s iPhoto app ($4.99). It dramatically enhances your ability to view, organize, edit, enhance, share, and print images.
When using your iPad as a business tool, there are many situations in which being able to snap photos of people, places, or things can be beneficial. The photos you take, edit, or store on your iPad can then be imported into various apps, such as Contacts, Pages, Numbers, or Keynote, as well as database apps, such as FileMaker Go or Bento.
Many other apps also enable you to import or somehow utilize digital photos. For example, the Square app that’s used for credit card processing allows photos to be imported as part of its virtual cash register functionality, so you can tap an item’s photo that someone is about to purchase to create a detailed receipt.
Of course, if you’re active on Facebook, Twitter, or Instagram, for example, and use your iPad for online social networking to promote yourself, your product(s), services, or a business, you can easily share photos taken with or stored on your tablet with others via these and other online services.
Loading Digital Images onto Your iPad
Before you can view, edit, print, and share your favorite digital images, you first must shoot them using the Camera or Photo Booth app that comes preinstalled on your iPad, or transfer images into your tablet.
Aside from shooting images using one of your iPad’s built-in cameras, there are several ways to import photos into your iOS device and then store them in the Photos app:
• Use the iTunes sync process to transfer photos to your device. Set up iTunes to sync the image folders or albums you want, and then initiate an iTunes sync or wireless iTunes sync from your primary computer.
• Load photos from a Photo Stream (via iCloud).
• Receive and save photos sent via email. When a photo is embedded in an email, as shown in Figure 7.1, hold your finger on it for a second or two until a menu appears giving you the option to Save Image. This menu can also offer other options, based on how your tablet is configured. For example, you can print, copy, mail, tweet, or publish the incoming image directly to Facebook. If you copy the image to your device’s virtual clipboard, you can then paste it into another app.

Figure 7.1. If you receive a digital photo attached to an incoming email, you can save that image in the Photos app by holding your finger on the image thumbnail (within the email), and then tapping the Save Image option when it appears.
If an incoming email has several images attached to or embedded in it, you’ll be given the option to save just the selected image or save all the images in the email at once. Whether you tap on the Save Image or Save [#] Images icon, the incoming images are saved in the Camera Roll album in the Photos app.
• Receive and save photos sent via text message. Tap the image you receive using the Messages app, and then tap the Copy command to copy the image to your device’s virtual clipboard (after which you can paste it into another app).
• Save images directly from a website as you’re surfing the Web. Hold your finger on the image you’re viewing in a website. If it’s not copy-protected, after a second or two, a menu appears enabling you to Save Image or Copy it to your device’s virtual clipboard (after which you can paste it into another app).
• Use the optional Camera Connection Kit ($29.00, available from Apple Stores or Apple.com) to load images from your digital camera’s memory card directly into your iPad.
When you use the Save Image command, the image is stored in the Camera Roll album of Photos. You can then view, edit, enhance, print, or share it using the Photos app or another app, such as iPhoto or PSTouch.
Taking Pictures with the Camera App
The Camera app that comes preinstalled with iOS 6 is easy to use for shooting digital images or video clips. To begin using the Camera app, launch it from your iPad’s Home Screen.
The main camera viewfinder screen (shown in Figure 7.2) appears as soon as you launch the Camera app. The main area of the screen serves as your camera’s viewfinder. In other words, what you see on the iPad’s screen is what you’ll photograph or capture on video.

Figure 7.2. From the Camera app’s main screen, you can snap digital photos or shoot video.
Along the bottom of the screen are several icons. In the lower-left corner, you’ll see a thumbnail image of the last photo or video clip you’ve shot. Tap it to view that image or video clip by automatically launching the Photos app.
Next to the thumbnail image is the Options icon. Tap it to turn on or off the virtual Rule of Thirds grid that can be superimposed on the screen to help you frame or compose your images. The grid, however, does not appear in your actual photos.
As you know, the iPad has two built-in cameras—one on the front of the device and one on the back. Tap the icon located near the lower-right corner of the screen to switch between cameras.
Also near the lower-right corner of the Camera screen is the Camera/Video virtual switch. Tap it to move the switch to the left and place the Camera app into Camera Mode for shooting digital photos, or move the virtual switch to the right to shoot video.
Located on the right side of the screen is the camera’s shutter button. Tap it to snap a photo or start and stop the video camera. In Camera Mode, tap this camera-shaped shutter button to snap a photo. You hear a sound effect, and a single photo is saved in your iPad. In Video Mode, the camera-shaped icon transforms into a circle with a dim red dot inside it. The dot gets brighter when you tap it to begin shooting a video clip.
How to Snap a Photo
Snapping a single digital photo using the Camera app is simple. Follow these steps:
1. Launch the Camera app from the Home Screen.
2. Make sure the Camera app is set to Camera mode.
3. Tap Options to turn on or off the grid feature as you see fit.
4. Choose which of your device’s two built-in cameras you want to use by tapping the camera selection icon.
5. Compose or frame your image by holding up your iPad and pointing it at your subjects.
6. Select what the main subject of your photo will be, such as a person or object. Tap your finger on the screen where your subject appears in the viewfinder, and an autofocus sensor box appears on the screen at that location. The camera focuses in on where this box is positioned (as opposed to focusing on something in the foreground, background, or next to your intended subject). If you’re photographing multiple people, the Camera app displays several autofocus sensor boxes, one over each subject’s face.
7. If you want to use the Camera app’s zoom feature, use a pinch motion on the screen. A zoom slider (shown in Figure 7.3) appears near the bottom of the screen. Use your finger to move the dot in the slider to the right to zoom in or to the left to zoom out on your subject.

Figure 7.3. As you’re framing an image, you can zoom in (or out) on your subject using the on-screen zoom slider. Use a pinch finger gesture on the screen to make this slider appear.
8. When you have your image framed in the viewfinder, tap the shutter button (the camera-shaped icon) to snap a photo. You see an animation of a virtual shutter closing and then reopening on the screen, indicating the photo is being taken. At the same time, you hear an audio effect.
9. In a few seconds, the photo is saved on your device in the Camera Roll album of Photos. You can now shoot another photo or view the photo using the Photos app (or another photography-related app).
How to Shoot Video
You also can easily shoot video from the Camera app. Follow these steps to shoot video on your iPad:
1. Launch the Camera app from the Home Screen.
2. Make sure the Camera app is set to Video Mode. (Check the virtual switch displayed in the lower-right corner of the screen, and make sure the shutter button icon is circular and the screen shows a dim red dot.)
3. Choose which camera you want to use by tapping the camera selection icon. You can switch between the front- or rear-facing camera at any time.
4. Hold your iPad up to the subjects you want to capture on video. You can set up your shot by looking at what’s displayed on the tablet’s screen.
5. When you’re ready to start shooting video, tap the shutter button icon (the red dot–shaped icon). The red dot gets brighter, which indicates you’re now filming. Your iPad will capture whatever images you see on the screen as well as any sound in the area.
6. As you’re filming video, you’ll notice a timer displayed in the upper-right corner of the screen. Your only limit to how much video you can shoot is based on the amount of available memory in your iPad and how long the battery lasts. However, this app is designed more for shooting short video clips, not full-length home movies.
7. Also as you’re filming, tap anywhere on the screen to focus in on your subject using the app’s built-in autofocus sensor.
8. To stop filming, tap again on the red dot shutter icon. Your video footage will be saved. You can now view, edit, and share it from within the Photos app.
The Photos app enables you to trim your video clips, as well as view and share the videos. If you want to edit your videos, plus add titles and special effects, you’ll definitely want to purchase and use Apple’s feature-packed iMovie app, which is available from the App Store ($4.99). For more information about iMovie, visit www.apple.com/ipad/from-the-app-store/imovie.html.
Tips for Shooting Eye-Catching Photos Using Your iPad
Even though you’re using a tablet to shoot photos, as opposed to a full-featured digital SLR or point-and-shoot digital camera from a company like Nikon or Canon, you can still use basic photo composition and framing techniques to snap professional-quality images.
To generate the best possible, in-focus, well-lit, and nicely framed images when shooting with your iPad, follow these basic shooting strategies (many of which also apply when shooting video):
• Pay attention to your light source. As a general rule, the light source (such as the sun) should be behind you (the photographer) and shining onto your subject. When light from your primary light source shines directly into your camera’s lens (in this case your iPad), you’ll wind up with unwanted glare or an overexposed image.
• As you look at the viewfinder screen, pay attention to shadows. Unwanted shadows can be caused by the sun or by an artificial light source. When shadows show up in your images, they can be distracting, so make sure they aren’t covering your subjects.
• Candid photos of people are great for showing emotion, spontaneity, or true life. The key to taking great candid photos is to have your camera ready to shoot and be unobtrusive, so your subjects don’t become self-conscious when they have a camera (your iPad) pointed at them. Try to anticipate when something interesting, surprising, funny or that will generate a strong emotion will happen, and be ready to snap a photo. Also, don’t get too close to your subject. You’re better off being several yards away and using the zoom, so you as the photographer don’t become a distraction.
• As you get ready to tap the shutter icon and snap a photo, hold your iPad perfectly still. Even the slightest movement could result in a blurry image, especially in low-light situations.
• When shooting portraits of people or specific objects, make sure you use the Camera app’s autofocus sensor box to focus in on your subject. As you look through the viewfinder, tap the main subject’s face, for example. This will ensure that the Camera app focuses in on the person and not something in the foreground, background, or to the side of your subject.
• Your subject does not have to be looking directly into the camera to capture an interesting shot. Sometimes, a more thought-provoking image is created when your subject is looking slightly away from the camera. When shooting animals, however, you’ll typically get the best shots by specifically focusing in on their eyes.
• As you’re framing your subjects in the viewfinder, pay attention to what’s in the foreground, background, and to the sides of the subject. These objects can often be used to frame your subject and add a sense of multidimensionality to a photo. Just make sure the autofocus sensor of the Camera app focuses in on your intended subject, and not on something else in the photo, to ensure clarity.
When shooting a digital photo, hold the iPad as still as possible. This is also important when shooting video. However, when shooting video, if you choose to pan up, down, left or right, for example, use slow, fluid motions.
How to Use the Rule of Thirds When Shooting
It’s a common mistake for amateur photographers to hold their camera directly up to their subject, point it at the subject head-on, center the subject in the frame, and snap a photo. The result is always a generic-looking image, even if it’s well lit and in perfect focus. Instead, as you look at the viewfinder screen to compose or frame your image, utilize the Rule of Thirds. This is a shooting strategy used by professional photographers, but it’s very easy to take advantage of, and the results are impressive.
Imagine a tic-tac-toe grid being superimposed on your camera’s viewfinder. Or, tap the Options icon when shooting with the Camera app and turn on the Grid feature. The center box in the tic-tac-toe grid corresponds to the center of the image you’re about to shoot as you look at the viewfinder screen. Instead of framing your subject in this center box, reframe the image so your subject is positioned along one of the horizontal or vertical lines of the grid, or so the main focal point of the image is positioned at one of the grid’s four intersection points.
As you’re shooting, instead of holding the camera head-on, directly facing your subject, try shooting from a different perspective, such as from slightly above, below, or to the side of your subject. This enables you to create more visually interesting images.
Using the Rule of Thirds when framing your images takes a bit of practice, but if you use this shooting technique consistently and correctly, you’ll discover the quality of your images will vastly improve. Of course, you also want to take into account lighting, as well as what’s in the foreground, background, and to the sides of your main subject. And be sure to tap your creativity when choosing your shooting angle or perspective for each shot.
When you’re shooting a subject in motion, capture the subject moving into the frame, as opposed to moving out of it, while also taking into account the Rule of Thirds.
Using the Photos App to View, Edit, Enhance, Print, and Share Your Photos and Videos
After you shoot photos or import them into your iPad, to view, edit, enhance, print, or share those images, launch the Photos app from your iPad’s Home Screen. Alternatively, from the Camera app, tap the image thumbnail icon displayed in the lower-left corner of the main Camera app’s screen.
Viewing Photos and Videos
The View Images screen on the iPad (shown in Figure 7.4) displays several viewing tabs at the top center of the screen labeled Photos, Photo Stream (if applicable), Albums, and Places.
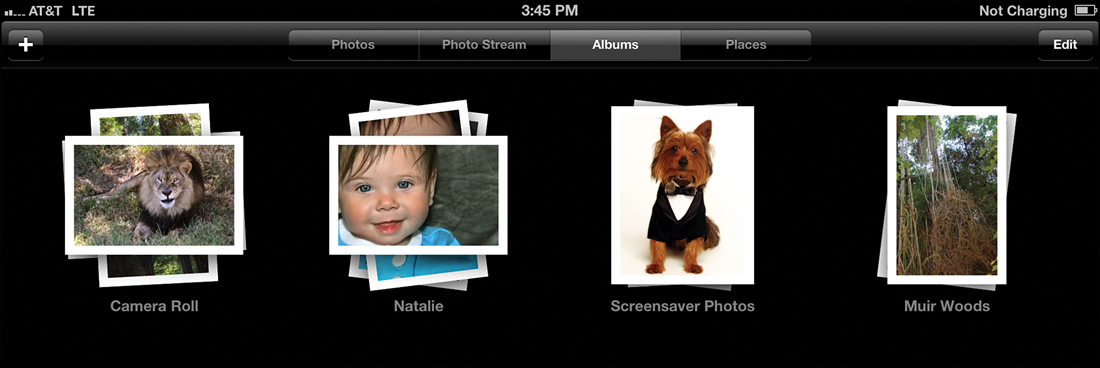
Figure 7.4. When the Albums tab is selected, this screen of the Photos app displays thumbnails that represent each album that’s stored on your tablet.
Tap the Photos tab to see thumbnails of all images currently stored on your tablet (shown in Figure 7.5), regardless of which album they’re stored in. Use your finger to move up or down and scroll through your images.

Figure 7.5. From the View Images screen, tap the Photos tab to view thumbnails of all images stored on your tablet in the Photos app.
When the Photos tab is active, the Slideshow and Edit buttons appear in the upper-right corner of the screen. Tap Slideshow to create a slideshow of your images and adjust specific settings, such as transition effects and what music will be played.
When viewing your image thumbnails by tapping the Photos tab, tap the Edit button in the upper-right corner of the screen to share, copy, move, or delete any of the images being displayed.
When you tap the Edit button, the Select Items screen displays, again showing thumbnails of all images stored on your tablet. At this point, tap one or more image thumbnails to select them. Once selected, a thumbnail displays a check mark icon near its lower-right corner.
In the upper-left corner of this screen, the other Share button becomes visible. Depending on the type of album, you might also see a red Delete button here. In the upper-right corner of the screen, an Add To and Cancel button appear.
Tap the Share icon to email or print the selected photos. Tap the Copy icon to move the selected images to another album, or tap one of the other sharing options displayed in the pop-up window that appears. Your other options are described shortly.
Tap the Add To icon to copy the selected images into a new album that you can create when prompted. Tapping the Cancel icon exits you out of this screen.
From the main View Images screen, tap the Albums tab (displayed at the top center of the screen) to view thumbnails representing the individual albums that contain your photos. By default, all photos and videos shot using the Camera app are saved in the Camera Roll album. From this screen, tap any album thumbnail to reveal individual thumbnails of all images stored in that album.
To create a new album, from the main Album screen, tap the Edit icon that’s displayed near the upper-right corner of the screen. Then, tap the plus sign (+) icon that appears near the top-left corner of the screen. When prompted, enter the album name when the New Album pop-up window appears. You can then copy or move photos into that new album using the Copy or Add To commands.
From the main View Images screen, tap the Places icon to see a map showcasing where images were shot. This geo-tagging feature works with all photos taken using your iPad (or another iOS device), or with images shot with a digital camera that has a geo-tagging feature. If none of the images stored on your iPad have geo-tagging associated with them, this Places feature is not displayed.
In the Photos app, the thumbnails for video clips shot using the Camera app are also displayed. However, in the lower-left corner of a video clip’s thumbnail is a movie camera icon, and the length of the video is displayed in the lower-right corner of the thumbnail, as shown in Figure 7.6.

Figure 7.6. The thumbnails for video clips stored in the Photos app look a bit different than those for photos. Video clips have a video camera icon in the lower-left corner and the length of the video displayed in the lower-right corner of its thumbnail.
Viewing an Image in Full-Screen Mode
When viewing thumbnails of your images from the main View Images screen, tap any single image thumbnail to view a full-screen version of that image. As you’re then viewing an image, tap it to make the various command icons for editing and sharing the image also appear on the screen (as shown in Figure 7.7).

Figure 7.7. When viewing an image in full-screen mode, tap anywhere on that image to reveal the command icons you’ll use to edit, enhance, and share that image.
To exit out of the single-image view and return to the multi-image thumbnail view offered by the main View Images screen, tap the left-pointing arrow-shaped icon displayed in the upper-left corner of the screen. The word displayed in this icon is the album name in which the photo is stored, such as Camera Roll. If you were previously looking at the main View Images’ Albums screen with the Albums tab selected, this icon will have the word Albums displayed in it.
As you’re viewing a single image in full-screen mode, along the bottom of the screen will be a filmstrip depiction of all images stored in the current album, or all images stored on your iPad if you were previously using the Photos viewing mode. In the upper-right corner are command icons used for editing photos, viewing slideshows, sharing images, or deleting the image you’re looking at in full-screen mode.
Editing Photos and Videos
After selecting a single image to view in full-screen mode, tap the Edit icon (displayed in the upper-right corner of the screen) to access the editing commands for photos.
When you tap the thumbnail for a video clip, you’ll have the option to play that clip in the Photos app. You also can tap anywhere on the screen (except for the Play icon) to access the video trimming (editing) feature, as well as the Share icon and the trash can icon (used to delete the video clip from your iPad).
To trim a video clip, look at the filmstrip display of the clip located at the top of the screen, and move the left or right editing tabs accordingly to define the portion of the clip you want to edit. The box around the filmstrip display turns yellow, and the Trim command icon appears on the right side of the screen. Before tapping on Trim, tap the Play icon to preview your newly edited video clip. If it’s okay, tap the Trim icon to save your changes. Two additional command icons appear: Trim Original and Save as New Clip. Trim Original alters the original video clip and replaces the file, and Save as New Clip creates a separate file and keeps a copy of the original clip.
The Edit Commands for Photos
When you tap the Edit command icon when viewing a single image in full-screen mode, the following command icons appear near the bottom center of the screen. These icons provide the tools for quickly editing and enhancing your image.
• Rotate: Tap this icon once to rotate the image counterclockwise by 90 degrees. You can tap the Rotate icon up to three times before the image returns to its original orientation.
• Enhance: Tap the Enhance feature to instantly sharpen the photo and make the colors in it more vibrant. You should notice a dramatic improvement to the visual quality, lighting, detail, and sharpness of your image. This command impacts your entire photo. Using the Photos app, it is not possible to enhance just part of an image.
• Red-Eye: If the human subjects in your photo are exhibiting signs of red-eye as a result of using a flash, tap the Red-Eye icon to digitally remove this unwanted discoloration in your subjects’ pupils.
• Crop: Tap this icon to crop the image and reposition your subject in the frame. If you forgot to incorporate the Rule of Thirds while shooting a photo, you can sometimes compensate by cropping a photo. You also can cut away unwanted background or zoom in on your subject based on how you crop it. When the crop grid appears, position your finger in any corner or side of the grid to determine how you’ll crop the image. When you’re finished, tap the Crop icon to confirm your changes.
As you’re cropping an image and moving around the cropping grid using your finger, first tap the Constrain tab to force you to keep the basic dimensions of your image intact but still use the crop feature. This enables you to make perfectly sized prints later, without throwing off the image dimensions.
• Revert To Original: Tapping this icon displayed near the top-left corner of the screen instantly removes your edits and returns the photo to its original appearance.
• Undo: The last edit you made to the image is undone, but any other edits remain intact.
• Save: After you’ve used the various editing commands to edit or enhance your image, tap the Save command to save your changes. It’s located near the upper-right corner of the screen.
• Cancel: Exit out of the photo editing mode of the Photos app without making any changes to the photo you’re viewing. You can find this icon near the top-left corner of the screen.
Printing Photos
iOS 6 is fully compatible with Apple’s AirPrint feature. So, if you have a photo printer set up to work wirelessly with your iPad, you can create photo prints from your digital images using the Print command in the Photos app. Follow these steps to print an image:
1. Launch the Photos app from the Home Screen or by tapping the photo thumbnail in the Camera app.
2. From the main View Images screen, tap any thumbnail to view an image in full-screen mode. (You might need to open an album first by tapping the album’s thumbnail if you have the Albums viewing option selected.)
3. Tap the full-screen version of the image to make the various command icons appear.
4. Tap the Share icon that’s displayed in the upper-right corner of the screen.
5. From the Share menu, select the Print option.
6. When the Printer Options submenu appears, select your printer, determine how many copies of the print you’d like to create, and then tap the Print icon.
To print wirelessly from your iPad using the AirPrint feature, you must have a compatible printer. To learn more about AirPrint, and to configure your printer for wireless printing from your iPad, refer to Chapter 9, “Wireless Printing and Scanning via Your iPad,” or visit http://support.apple.com/kb/HT4356.
One simple and inexpensive way to create professional-quality prints from the photos stored on your iPad, without using a wireless photo printer, is to download and install the FreePrints app from the App Store (free). This third-party app enables you to create up to 1,000 4" × 6" prints per year from images stored on your iOS mobile device for free. You only need to pay shipping charges. For a low per-print fee, you can also order 5" × 7" or other size prints and have them shipped to your door within a few days. This app is operated by an independent photo-processing lab.
Another alternative for creating prints is to email your image files to a one-hour photo processing lab, and then pick up the prints when they’re completed. This option is available from most pharmacy-based photo labs (CVS, Walgreen’s, Rite-Aid, and so on), as well as from the photo departments at Target and Wal-Mart and most professional photo labs located throughout the world.
Sharing Photos and Videos
The Photos app offers several ways to show off and share your favorite digital images. As you’re looking at a photo in full-screen mode on the iPad, tap the Slideshow icon to create a slideshow of your images and view it on your iPad screen. Using optional cables, you also can connect your tablet to an HD television set or monitor to display your slideshow, or connect it to your home theatre system wirelessly via Apple TV.
To share your digital images with other people, tap on the Share icon displayed in the upper-right corner of the screen. A pop-up window containing your available Share options is displayed (shown in Figure 7.8). Depending on how you have your tablet set up, these Share options include the following:

Figure 7.8. The iOS 6 version of the Photos app offers several ways to share your digital images with other people.
• Mail: Send the selected image(s) to other people via email.
• Message: Send the selected image to other people via instant message using the Messages app.
• Photo Stream: Create a Shared Photo Stream or add the photo to an existing Shared Photo Stream, which enables you to post images online via your iCloud account and share them with other people online.
• Twitter: Publish a tweet for your Twitter followers that includes the selected photo.
• Facebook: Publish the selected photos to your Wall on Facebook.
• Assign To Contact: Use the selected photo as the image associated with someone’s entry in your Contacts database.
• Print: Send the selected image(s) wirelessly to an AirPrint-compatible printer that’s linked to your iPad.
• Copy: Temporarily store the selected image in your iPad’s virtual clipboard so that you can then paste it into another app.
• Use As Wallpaper: Use the selected image as your wallpaper on your iPad’s Home Screen and/or Lock Screen.
Emailing Photos
After tapping on the Share icon, tap the Mail option to send between one and five images to one or more recipients via email from within the Photos app. When viewing a single image, tap the Share icon, followed by the Mail option. A compose email screen appears with that photo already attached to the body of the email. Use the virtual keyboard to fill in the To and Subject fields, as shown in Figure 7.9, and then tap the Send icon.

Figure 7.9. You can send an email with one to five photos attached to it from within the Photos app.
To send one to five photos in a single email message, follow these steps:
1. Launch the Photos app.
2. From the main View Images screen, tap the Photos tab.
3. Tap the Edit icon that’s displayed in the upper-right corner of the screen.
4. Using your finger, tap one to five image thumbnails to select the images you want to include in an email. As you select each image from the Select Photos screen, a check mark icon appears in the lower-right corner of each thumbnail.
5. After you’ve selected the images, tap the other Share button. It displays the word “Share” in it and can be found near the upper-left corner of the screen. If the Share icon is not active, you might have inadvertently selected more than five images to include in the email.
6. Tap the Mail option that appears.
7. When the compose email screen is displayed, your selected photos are already attached (embedded within) the outgoing email message. Simply fill in the To field with the email addresses for your intended recipients, and then fill in the Subject field using the virtual keyboard.
8. To change the file size of the images you’re sending, tap on the From field and the Image Size option tabs are displayed. Tap on the Small, Medium, Large, or Actual Size tab. Keep in mind that, when using most email accounts, your outgoing email cannot be larger than 5MB.
9. Tap the Send icon to send the email containing your images.
Assigning a Photo to a Contact
Follow these steps to link an image stored in the Photos app to a specific contact in the Contacts app:
1. From within the Photos app, select a single photo and view it in full-screen mode.
2. Tap the image to make the various command icons appear.
3. Tap the Share icon.
4. Tap on the Assign to Contact icon.
5. An All Contacts window, displaying the names associated with all of your contacts, appears. Scroll through the listing, or use the Search field to find the specific entry with which you want to associate the photo.
6. Tap on that person or company’s name from the All Contacts listing.
7. When the Choose Photo window opens, use your finger to move or scale the image. What you see in the box is what will be saved.
8. Tap the Use icon in the upper-right corner of the Choose Photo window to save the photo and link it to the selected contact.
9. When you launch Contacts and access that person’s entry (shown in Figure 7.10), you will see the photo you selected appear in that entry.
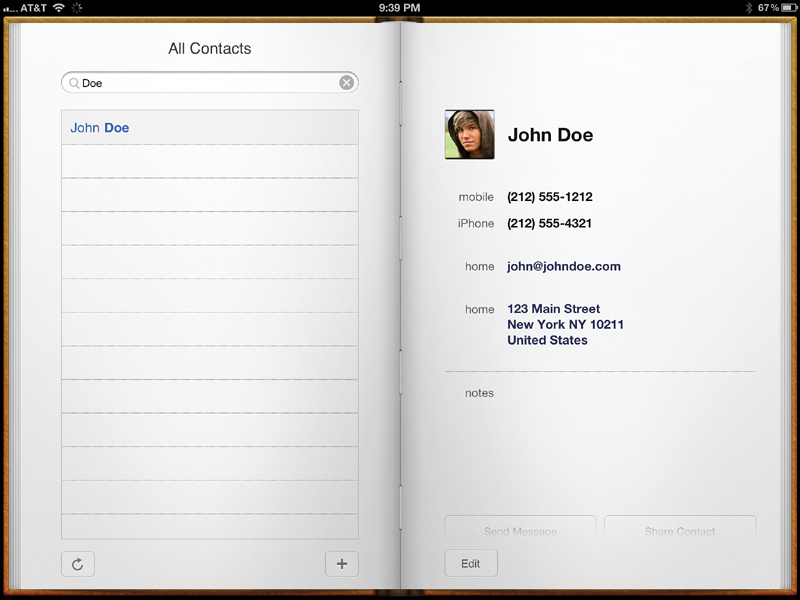
Figure 7.10. If you use the Contacts app to manage your contacts database, you can attach a photo to each contact entry.
Tweeting a Photo or Publishing It On Facebook
As you know, Twitter functionality has been integrated into several popular iPad apps, enabling you to compose and send tweets from within those apps. Photos is one of the apps that integrates with Twitter, enabling you to select a photo and tweet it to your followers, along with an accompanying text-based message.
After tapping the Share icon while viewing a single photo in full-screen mode, select the Tweet option. Compose your tweet message (which will already have the selected image attached), and then tap the Send icon.
If you want to publish one or more of your photos on Facebook, select one or more images from within the Photos app and tap on the Share icon. Next, tap on the Facebook icon (assuming you have Facebook integration set up to work on your iPad). A pop-up Facebook window appears with the selected photos already attached to the outgoing message. Using the virtual keyboard, type a text-based message to accompany the photo. You can also tap on the Add Location option to display where the photo was taken once it’s published on Facebook. Tap on the Post button when you’re ready to publish the photo on your Facebook Wall.
In the lower-right corner of the Facebook window, tap on the Friends option to manually select who will be able to view your photos when they are published on Facebook.
Copying a Photo
From within the Photos app, you can store a photo in your iPad’s virtual clipboard, and then paste that photo into another compatible app, such as Pages, Numbers, or Keynote. Follow these steps to copy a photo into your device’s virtual clipboard:
1. From within the Photos app, select a single photo and view it in full-screen mode.
2. Tap the image while in full-screen mode to make the various command icons appear.
3. Tap the Share icon.
4. Tap the Copy option. The photo is now stored in the virtual clipboard.
5. Launch a compatible app, such as Pages, and hold your finger down on the screen to use the Paste option and paste your photo from the clipboard into the active app.
Deleting Photos Stored on Your iPad
To delete photos stored in the Photos app on the iPad, access the main View Images screen, and tap the Photos tab. Next, tap the Edit button. When the Select Photos screen appears (shown in Figure 7.11), tap your finger to select one or more images. After the images are selected, tap the red-and-white Delete button that’s displayed in the upper-left corner of the Select Items screen.

Figure 7.11. From the Select Items screen, you can select image thumbnails and then tap the Remove button to erase those images from your iOS device. Here, three images near the center of the screen have been selected. Look for the blue and white check mark icons.
Although you can delete entire albums from your iPad, you cannot delete individual photos from the Photos app unless they were actually taken using the tablet. If you transferred (synced) images from your computer, for example, those images must be deselected during the syncing process.
Working with iCloud’s Photo Stream in the Photos App
If you have your iPad set up to work with iCloud, the Photo Stream feature is turned on, and your tablet is connected to a Wi-Fi Internet connection, you’ll discover the Photo Stream tab displayed along the top center of the main Photos screen. The iCloud Photo Stream feature automatically stores, syncs, and displays up to 1,000 of the most recently shot or imported digital photos from iPhoto ‘11 on your primary computer, your iPhone, and your iPad.
A Photo Stream can include up to 1,000 images and store them for up to 30 days online. By default, this is the most recent 1,000 you shoot or transfer to your Photo Stream. However, you can manually edit the collection of images that are part of your Photo Stream. Beyond the 1,000 images stored on iCloud (or after the 30 days), all your digital images are automatically backed up and stored on your primary computer’s hard drive (or on a hard drive connected to your primary computer).
When viewing the Photo Stream on your iPad from within the Photos app, thumbnails representing the images are displayed. To view these images as a slideshow, tap the Slideshow icon.
To share, copy, or delete any of the Photo Stream images, tap the Edit button. A new Share button, along with a Delete button, appears near the upper-left corner of the screen. Tap one or more image thumbnails to select them, tap on the Share button, and then choose which Share command you’d like to utilize from the pop-up menu that appears. Depending on how your iPad is set up, your options will include Mail, Message, Facebook, Print, Copy, and Save to Camera Roll.
When you delete photos from your Photo Stream, not only are the images deleted from your iPad, they also are erased from the Photo Stream stored on iCloud and on the Photo Stream you can view from your primary computer and/or iPhone that’s linked to the same iCloud account.
Unlike other images stored in albums, photos viewable from your Photo Stream are not permanently stored on your iPad. To move one or more images from the Photo Stream to an album, tap the Edit button, tap the thumbnails for the images you want to store on your tablet, and then tap the Save icon displayed near the upper-right corner of the screen.
To create and use the Photo Stream feature of iCloud, you must set up a free iCloud account, have the latest version of OS X Lion or OS X Mountain Lion installed on your Mac, and have the most current version of iTunes. In addition, you must update your iPhoto ‘11 software on your Mac with the latest version (iPhoto ’11 version 9.3.2 or later).
To utilize iCloud’s Photo Stream feature, from the Settings app on your iPad, tap the Photos & Camera option listed under the main Settings menu. Then, turn on the Photo Stream option from the Photos & Camera menu screen. To utilize this feature and be able to upload and download photos to and from your iOS devices, a Wi-Fi Internet connection is required.
If you’re a Windows PC user, you can install the iCloud Control Panel on your computer and use it to transfer photos to and from your Photo Stream. To download this free Windows software from Apple’s website, visit http://support.apple.com/kb/DL1455.
Sharing Your Images Using a Shared Photo Stream
The iCloud Shared Photo Stream feature is new to iOS 6. From the Photos or optional iPhoto app, it enables you to create an online image gallery featuring as many images as you like. You can then choose to share the Shared Photo Stream gallery with whomever you want.
To create a Shared Photo Stream with multiple images from the same Album in the Photos app, for example, launch the Photos app and tap on the Album thumbnail that contains the images you want to share. (Open the Camera Roll Album to share recently shot photos.) When you’re viewing the thumbnail images for the photos stored in an album, tap on the Edit button displayed in the upper-right corner of the screen. Tap on each photo you want to add to a Shared Photo Stream. As you select each thumbnail, a small check mark icon appears in the lower-right corner of the thumbnail.
After you’ve selected each image to be shared, tap on the Share button displayed in the upper-left corner of the screen. From the pop-up menu that appears, tap on the Photo Stream button. When you see the Add To a Photo Stream window, tap on the existing Shared Photo Stream listing to which you want to add the selected images, or tap on the New Photo Stream option to create a new Shared Photo Stream.
Next, from the Photo Stream menu, fill in the To field with the names or email address of the people with whom you want to share the images. You can enter multiple recipients by placing a comma between names or email addresses, or click on the “+” icon that’s displayed to the right of the To field. In the Name field, enter a custom title for the Shared Photo Stream, such as “Vacation Photos” or “Photos of Natalie.” Finally, turn off the Public Website option if you want your Shared Photo Stream to be private and viewable only by people you invite to see it. Or, turn on the Public Website option if you want to share the newly created Shared Photo Stream with anyone who accesses it via www.iCloud.com. Tap on the Next button to continue.
In the next Photo Stream pop-up window that appears, you can add a text-based comment about the images you’re uploading to the Shared Photo Stream gallery. Tap the Post icon to upload the images and share the Shared Photo Stream with others. While using the Photos or iPhotos app, you can access, view, or alter a Shared Photo Stream by tapping on the Photo Stream tab. After you create a Shared Photo Stream, you can add additional images to it, delete images from it, or delete the entire Shared Photo Stream altogether.
The recipients you listed in the To field earlier will receive an email that includes a special URL (website address) where your Shared Photo Stream gallery has been published and is now viewable. Using the new Shared Photo Stream feature makes it easy to share many digital photos at the same time with select people.
Upgrading to Apple’s iPhoto App
If you want photo organization, editing, viewing, and sharing options that are beyond what the free Photos app is capable of, visit the App Store and purchase a copy of Apple’s iPhoto app ($4.99). Not only does the iOS version of iPhoto offer similar functionality to iPhoto ’11 for the Mac, it includes a handful of new features, such as Journals and Smart Browsing, plus it makes syncing or transferring images between iOS devices, Macs, and iCloud’s Photo Stream a straightforward process.
Organizing Your Images from the iPhoto Albums Screen
When you launch iPhoto, the first thing you see is the Albums screen. Displayed at the top center of this screen (shown in Figure 7.12) are multiple command tabs that enable you to decide how you want to view your images. Tap Albums to view thumbnails for each album stored within iPhoto, and then tap on any album thumbnail to view the images within that album and start working with them.
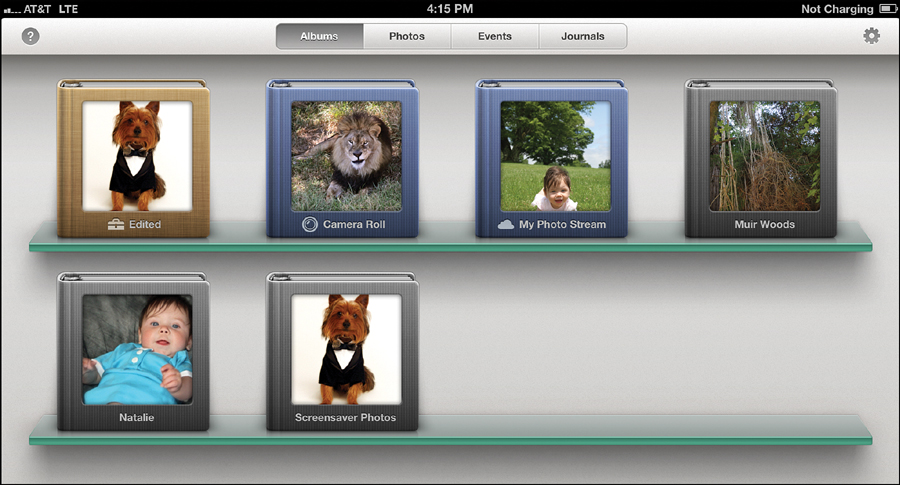
Figure 7.12. The Albums screen of iPhoto automatically sorts your images into albums.
Tapping the Photos option from the Album screen displays a complete collection of thumbnails representing all images stored on your tablet on a single (scrollable) screen. From this screen, tap any thumbnail to begin working with an image.
Any time you import new photos from your PC or Mac using iTunes, or use the iPad Camera Connection Kit, new events are created and viewable by tapping the Events tab. Or, you can organize your edited photos into visually stunning journals, and then view and share those journals by tapping the Journals command tab.
Viewing Individual Photos Using iPhoto
From the Albums, Photos, or Events screens, tap any image thumbnail to view that image and start working with it using the photo editing and enhancement tools built in to iPhoto, as shown in Figure 7.13.

Figure 7.13. View an image, and then use iPhoto’s editing tools to edit and enhance it.
Along the top of iPhoto’s Editing screen are a series of command icons and menu options. The main area of the Editing screen is where you’ll view one image at a time. At any time, press the question mark icon to get on-screen help using the applicable features or functions within iPhoto.
As you’re editing a photo, you can zoom in on a specific area of the image using a reverse-pinch motion with your thumb and index finger, or double-tap the area of the photo that you want to zoom in on.
Whenever you’re viewing a selected image, by tapping the Edit icon that’s displayed in the upper-right corner of the screen you can access an extensive collection of photo editing and enhancement tools, each of which is represented by an icon that’s displayed along the bottom of the screen.
The Effects icon (displayed to the right of the paintbrush icon), for example, gives you instant access to a handful of special effects sorted by categories, such as Artistic, Vintage, Aura, Black & White, Duotone, and Warm & Cool. Tap any of the effects bars to reveal a collection of special effects that you can add to an entire photo with a single tap on the screen. You can easily mix and match special effects to create a truly artistic or visually stunning image.
Located near the bottom center of the Editing screen are five additional command icons that give you easy access to a handful of other photo enhancement and editing tools. Tap the magic wand icon to auto-enhance an entire image with a single tap, or tap the Rotate icon to rotate an image clockwise by 90 degrees. You can tap this icon multiple times, as needed.
Another way to rotate an image is to use your thumb and index finger on the touch screen to perform a circular gesture.
One other way you can gather your favorite images for easy viewing, sharing, and editing, for example, is to separate them by tapping the Favorites icon (which looks like an award ribbon) for each of them. This stores those images in a separate Event.
When you’re finished editing a single image, tap the Edit icon again to automatically save your changes and view the image in its newly edited form. While in single image viewing mode, swipe your finger from right to left or left to right to scroll through the images stored in the same album or event folder.
Printing and Sharing Images Using iPhoto
From the photo viewing screen, tap the Share icon (displayed near the upper-right corner of the screen) to reveal the app’s extensive Share menu. From here, you can transfer an image to a journal, the Camera Roll, or iTunes, or you can post the photo online via Twitter, Facebook, or Flickr. If your iPad is connected to the same wireless network as another Mac or iOS device, you can wirelessly beam the image to that computer or device, or email photos from within the app.
Creating and Showing Off Journals
Think of a journal as a digital collage feature with a personalized theme. After selecting a collection of photos to be included in a journal, select the Journal option. Start by adding an original title to your journal, and then choose a theme.
iPhoto offers six different journal themes: Cotton, Border, Denim, Light, Dark, and Mosaic. After choosing your theme, tap the Create Journal command icon. The app automatically creates the journal, which takes anywhere from a few seconds to several minutes, depending on how many photos are being included.
When the basic journal has been formatted (see Figure 7.14), you can personalize it by moving around photos, resizing images, adding captions, including maps, displaying dates, or even showing the current weather when the image was taken (if it was shot using an iPhone or iPad).

Figure 7.14. The Journals feature of iPhoto offers a new and fun way to showcase and share a handful of images.
Just like individual photos, journals can be viewed on the iPad’s screen, published online, or shared via email. As you’re viewing a journal, tap a single image to view it in full-screen mode, and then you can switch back to the Journal view.
iPhoto Offers Many Photo-Related Tools in a Single App
The iPhoto app is truly a one-stop shop for handling all your digital photography needs from virtually anywhere. The app works flawlessly with images shot on your iPhone or iPad using the Camera app (or a compatible app), as well as with images imported into your iPad from other sources, including your digital camera. What’s great about iPhoto is that it offers an extremely powerful collection of tools, yet the app itself is very intuitive. (However, on-screen help is always just a screen tap away.) Even if you don’t think of yourself as a skilled photographer, using this app, you can easily enhance all your digital images to dramatically improve their visual appeal.
Utilize Powerful Photo Editing Capabilities with Third-Party Photography Apps
If you want even more powerful photo editing tools available to you from your iPad, check out one or more of the third-party photography apps available from the App Store. When you launch the App Store from your iPad, tap on the More command tab located along the top of the screen, and then choose the Photo & Video category. You’ll discover hundreds of third-party photography apps that add or supplement functionality that’s built in to the Camera, Photos, and iPhoto app.
A few of these third-party photography apps include CameraBag ($1.99), Photogene ($2.99), Snapseed ($4.99), and Photoshop Touch (a.k.a. PSTouch, $9.99).
Instagram is an online social networking service, now owned by Facebook, that enables you to share digital images in much the same way Twitter enables you to share text-based tweets. Using the free Instagram app, you can take photos (or use the Camera app for this purpose), and then edit the pictures by adding a special effect. When you’re ready, your photo can be uploaded and published as part of your Instagram photo feed, which is then shared with your followers and the general public.
Each photo you upload can be accompanied by a text-based caption and/or hash tags that enable people to easily search for photos based on their content. For example, if you uploaded a photo of a rose, you could add the following hash tags to the image using the Instagram app: #rose #flower #garden.
Using the same Instagram app, you can follow other peoples’ photo feeds. A sample photo feed can be seen in Figure 7.15. Tap on an image thumbnail to view a larger version of it, along with its caption and related user commands and “likes.”

Figure 7.15. Instagram has become a very popular way for people to share digital photos shot using their tablet or mobile device via the Web.
Instead of using words, like Twitter, Instagram enables people to share their life and adventures with photos. The Instagram app is currently an iPhone-specific app, but it works flawlessly on the iPad. It’s available from the App Store.
A separate and free app called Pinterest (http://pinterest.com/) is available from the App Store. It can be used to access the photo-oriented Pinterest online social networking service, which is quickly growing in popularity.