4
Access to Tools
My preconceived notion of makers wasn’t limited to the people I had imagined: the mad-scientist, MacGyver-types. I also had preconceptions about the places where making happened. I envisioned elaborate workshops and laboratories; private places such as garages and basements, filled with tools, contraptions, and works-in-progress. All of the profiles I read and makers I had met reinforced that mental image. They all had incredible workshops, each customized to their specific flavor of creation.
I didn’t have that type of workshop. In fact, having taken residence on a sailboat in San Francisco Bay, I didn’t have much of anything. No workspace or tools, except for a few wrenches and screwdrivers for basic boat maintenance. It didn’t take long for me to realize that having access to tools was going to be a critical issue, no matter what maker route I decided to take.
“I Think I’m Going to Need a Bigger Boat!”
In the first conversation about Zero to Maker, during which I explained my blurry vision of overcoming my fear of jumping into the DIY culture and chronicling the journey, Gareth (my soon-to-be editor at Make: magazine) mentioned Make: Electronics by Charles Platt. It was a book Make: had published on basic electronics, and Gareth was particularly proud of how it was structured; it catered directly to the complete beginner. It assumed nothing. Someone could start with no background in electronics or grasp of the terminology and end up with enough information and skill to tinker with electronics projects. I decided to order it because electronics was something I wanted to learn, and I was eager to see what Make: had to offer people like me, who are approaching the subject with a blank slate.
The Amazon package with the Make: Electronics book arrived a few days later. I was excited and full of determination. Gareth had given my column idea the go-ahead, and one of my first assignments was to write about how a beginner learns electronics. I blocked off a full day to read the book and begin experimenting. I was about five pages in when I discovered a major obstacle: I didn’t have any of the required tools. Gareth was right when he said that I didn’t need any prior experience, but in order to complete the exercises and hands-on projects, I would need a whole series of items, such as a soldering iron, batteries, and a multimeter. I realized that despite my commitment to learning and my eagerness to get started, my goal of going from Zero to Maker would be impossible if I didn’t have the right tools.
This hurdle also cast a spotlight on my next challenge: cost. Tools are expensive! Unless you’re using them regularly or working on a big project, it’s difficult to get enough use out of a specific tool to justify owning it. For a beginner who only wants to experiment, it’s just not reasonable.
I looked over the Make: Electronics required tool list, mentally adding up the costs of acquiring them. And these were just the tools I needed to finish the first book on the only subject I had attempted. There was so much more to learn. Of course, I knew that the tools would be useful for future electronics projects, so I could look at them as an investment, but who knows what other tools I would need. Not to mention, the materials costs were already sunk. I wouldn’t be able to get multiple uses out of a dead battery, used solder, or anything I was likely to break in the process. My wandering mind quickly saw the expenses spiraling out of control.
In an effort to keep the Zero to Maker journey as frugal as possible, I committed myself to finding creative ways to avoid spending money at every step of the process. As it turns out, there are a number of new and evolving solutions for people in my shoes. Most of them involve some form of collaborative consumption, or services that provide all the benefits of access, without the hassles of ownership, such as initial purchase costs, taxes, and maintenance. In other words, sharing.
As I would come to learn, sharing tools does more than just defray costs. It has a fortunate by-product of creating community, connection, and a wealth of collective knowledge about the different tools.
The trick with all these new services and communities is knowing how they work and what you can expect. Just as you might imagine, the best solution for tool access depends on what you plan to make. Each service has its limitations, but knowing the capabilities of each is a great way to effectively find what you need, when you need it.
The Ultimate Maker Tool
Before we go any further with the maker tools, I want to share a piece of advice I got from Andrew Sliwinski about the ultimate maker tool: Google.
Andrew is a jack-of-all-trades type of maker. It’s tough to pin down exactly what he specializes in, but he can prototype just about anything. I first learned about him in a New York Times Magazine profile (nyti.ms/17H2yFe), which also discussed the hackerspace he started in Detroit (he’s currently building a web app for kid makers called DIY—more on this in Chapter 9, “Making More Makers”). I was so intrigued and inspired to hear what these “Kitchen Table Industrialists” were creating, I sought him out to see what advice he had for new makers.
By the time we met at a Mini Maker Faire in Oakland, I was deep into the Zero to Maker process. I described to him the maker mentality and how I wish I had heard it articulated prior to getting started. It would have saved me so much time and eliminated so much unnecessary fear.
He laughed and nodded his head. Based on his experience teaching maker workshops to beginners like me in Detroit, he knew it all too well. It was important, he thought, to develop a specific curriculum to help address that exact need. So before he started his maker workshops—full of welding, electronics, and 3D printing—he would give a short lecture on the importance of utilizing Google in the making process.
He would pull open a browser in front of his students and explain that although it might seem daunting, there is likely an answer or explanation only a web search away. He encouraged the students to utilize that tool, not to get stuck, and, most important, not to try to learn everything. Over the course of the workshop, he was going to give them some basic ideas on getting started, but the full curriculum involved their own imaginations and curiosity and the world’s best search algorithm.
And wherever Google leaves off, YouTube (usually) picks right up. They’re the yin and yang of maker knowledge on the Internet. Google provides all the explicit knowledge you could want: measurements, material properties, parts lists, and the like. And YouTube provides just about any form of assimilated knowledge you could ever hope to find: the instructionals, the video tutorials, or what Alexis Madrigal described as a momentary apprenticeship (http://bit.ly/18HBarP). The what and the how. The explicit knowledge consists of the hard facts and details. The assimilated knowledge is the subtle way of doing things, like the grip and swing of a hammer.
The transfer of maker skills involves both types of learning, with each perspective giving the other more context. Used together, Google and YouTube hold the answer to many of your burning questions. Take full advantage.
Hackerspaces, Makerspaces, Fab Labs: What’s the Difference?
My initial despondency regarding the lack of tools and the high costs didn’t last long. After my Make:SF experience at Noisebridge and the first few classes at TechShop, it quickly became apparent that I do have access to most of the tools I need—I just have to know where to look and what to ask for. The hackerspaces, makerspaces, and fab labs that are emerging are, so far, the best solution for accessing tools.
To be perfectly honest, I still have a hard time with the hackerspace/makerspace/fab lab terminology. Which is which, what location has what tools, how to join and participate—the lines are blurry.
The most important thing to know about these spaces is that, regardless of whether they share the same self-appointed definition, like hackerspace or makerspace, each and every place is unique and different. Even among the chain of corporate-run TechShops across the country, some locations have tools that others don’t, some emphasize motorcycle repair, and others have more maker business incubation. Each space reflects the community that emerges. Also, the spaces aren’t mutually exclusive. For example, as a maker in San Francisco, just because you’re a member of TechShop doesn’t mean you can’t frequent Noisebridge, and vice versa. Each of the spaces and communities offers a different flavor of maker know-how. It’s the fluid overlap between all spaces and groups that makes the local and global maker community so valuable.
Here are some brief overviews and histories of each of the space types and how each of them is best utilized:
Hackerspaces
- It’s humbling to remember how new this modern maker movement really is. In 2005, there were only a dozen or so of these types of spaces around the world. Their rarity was matched by their novelty. They represented an anarchic model of decentralized creation. John Baichtal recounts a brief history of hackerspaces in his book Hack This,1 from an underground collective in Europe, to scattered clandestine groups across the United States, to their current incarnation of co-op-style creativity hubs.
- Now, as I write this in 2017, there are more hackerspaces than I could possibly count—thousands, definitely, with probably double that number in some level of the planning stages. An awe-inspiring map of all the hackerspaces in the world can be found at http://hackerspaces.org. You’ll be surprised how close you are to the action.
- “Hackerspace” seems to be the original term for this type of community space. And, the spaces that consider themselves “hackerspaces” mostly maintain that grassroots, co-op style of organization. As such, many of the tools and machines in hackerspaces are maker products (like a MakerBot Thing-O-Matic or a derivative of the RepRap 3D Printer), donated, or secondhand gear. In my experience, hackerspaces also tend to be a place where works-in-progress collect, including experiments that are ongoing, repairs that are being undertaken, and project builds that are coming together. If I wanted to debug an Arduino microcontroller, take apart a Microsoft Kinect, or work on a CNC machine that has fallen into disrepair, I would head straight for Noisebridge (or whatever the nearest hackerspace happened to be).
- It’s worth noting that there are now subcategories of hackerspaces, like those for kids (more in Chapter 9), those for Burning Man projects, and those for biology. It’s all available; your curiosity is (usually) the only price of admission.
- Makerspaces In some respects, makerspaces are one of the emerging subcategories of hackerspaces. Most of them carry the same hackerspace ethos of community-centered creation and collaboration. However, the makerspace term has evolved to mean something different: a little more professional, more mainstream type of hackerspace. That’s just my opinion, and someone could (quite fairly) argue that I’m oversimplifying things, but I believe the distinction can be helpful for new makers.
- TechShop is probably the first true makerspace. It’s a for-profit business; its model consists of members who pay to take classes and attend events, and it supports a wide array of well-kept tools and equipment. TechShop in San Francisco has over $750,000 in tooling, including numerous Epilog laser cutters, CNC vinyl cutters, ShopBot CNC machines, and a Waterjet CNC machine. It’s all there. It’s going to cost a little more than a co-op-based hackerspace, but you can also expect more consistency with the tooling, instruction, and availability. The makerspace is a place to go if you want to prototype an idea, receive professional instruction, or use the shared tooling to run a small business.
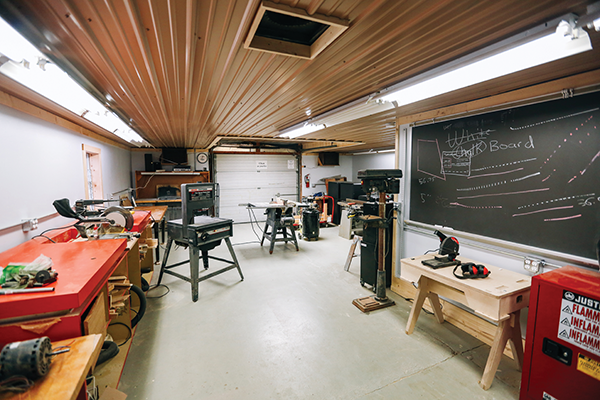
Figure 4-1: The Triple Cities Makerspace, Inc., in Binghamton, New York. (Photo courtesy of Triple Cities Makerspace; used by permission.)
- Following the TechShop model, a number of other makerspaces have sprung up around the country and the world. These include places like Makerhaus in Seattle, 3rd Ward in Brooklyn, and the aptly titled Makerspace in San Diego. I expect to see continued excitement and evolution in these types of spaces in the next few years, with newer hybrid models like Artisan’s Asylum, in Somerville, Massachusetts, finding unique ways to blend makerspace-quality tooling, hackerspace-quality community, and the very real need of actual square-footage space for makers to work on projects.
- Fab Labs Just as the hackerspace is the grassroots, co-op take on a maker community and the makerspace is the business-oriented approach, the fab lab can be seen as the academic take on making powerful production tools more accessible. Here’s the fab lab concept, originally defined and described by Neil Gershenfeld in Fab (Basic Books, 2007):
As you wish, “fab lab” can mean a lab for fabrication, or simply a fabulous laboratory. Just as a minicomputer combined components—the processor, the tape drive, the keypunch, and so forth—that were originally housed in separate cabinets, a fab lab is a collection of commercially available machines and parts linked by software and processes we developed for making things.
- The first fab labs consisted of laser cutters, CNC vinyl cutters, CNC mill machines, and tools for programming microcontrollers. The goal was to create machines that could replicate themselves, “until eventually the labs themselves are self-reproducing.”
- A grant from the National Science Foundation (NSF) helped get the first fab labs going in a few different locations around the globe, and the project has continued to evolve. In addition to fab labs, the derivative FabLab@School program is aimed at getting digital fabrication tools and curricula into secondary education.
- Biohacking Makerspaces Recent years have seen a growing number of makerspaces, or DIY biolabs, dedicated to the principle that a better understanding of biotechnology benefits everyone and encourages more DIY biologists. You can find a list of biohacking makerspaces at makezine.com/2017/04/05/biohacking-spaces.

Figure 4-2: The Fab Lab at Northampton Community College in Bethlehem, Pennsylvania. (Photo by Phil Stein; used by permission)
Here a Space, There a Space, Everywhere a Makerspace
To understand these new creation spaces, you have to get to know the people who inhabit them. Better yet, meet the people who are creating them. Jeff Sturges is one of those people.
From a young age, Jeff seemed to be destined for makerspaces. For most of his life, he wandered through different worlds, following his curiosity into educational and vocational opportunities that could feed his hunger for cross-disciplinary knowledge.
As a kid, Jeff was a good student, but his real love was for tinkering; he was the type to pull things apart and learn how they worked. When other kids were playing with RC cars, he was the RC car mechanic. As he grew older, the tinkering turned to real cars, dirt bikes, and four-wheelers.
He decided to attend Middlebury College, a small liberal arts school in Vermont that both of his parents had attended. When he showed up, he was shocked to learn that the college didn’t have an auto shop. He thought to himself, “Wait, what am I going to do here?”
He quickly found a maker respite in computer tinkering and AV club, absorbing any technical education he could find. Not surprisingly, he ended up becoming an IT technician and network administrator after school. But he couldn’t quell his curiosity, and eventually decided to go to Cranbrook Academy of Art to study architecture. After that, he worked for a real estate developer, an architecture firm, and a design firm, all while confidently (and unknowingly) chasing his dream of cross-disciplinary creativity.
It wasn’t until he stumbled across the hackerspace concept that he realized what he was meant to do. As one of the early members of NYC Resistor, Jeff helped work through the challenges and opportunities of one of the original community-centered hackerspaces. He saw what worked and what didn’t. At the same time, he was volunteering at the South Bronx Fab Lab, which gave him an even broader perspective on the creative potential of these spaces. Jeff was the earliest of early adopters.
Taking what he learned from NYC Resistor, Jeff decided to move to Detroit because it was an area in deep need of creative reinvention. He thought it could use a mixing and amplification of existing resources. The city also had an ample supply of affordable and flexible space. It was a perfect storm of opportunity to apply the makerspace model in his own way. And Jeff was the man for the job; he even did it twice.
His first attempt was very similar to the NYC Resistor model—the classic hackerspace model. He sent out an email blast to his friends and fellow makers in the Detroit area and outlined his intentions. His friends responded right away, and planning commenced. Pretty soon, they had scoped out a space and were moving in. OmniCorp, one of Detroit’s first hackerspaces, was born.
Jeff wasn’t satisfied, though. Setting up OmniCorp was fairly straightforward given his circle of friends, but it wasn’t achieving the truly democratizing social impact that Jeff believed was possible with makerspaces. Just as Gershenfeld was bringing fab labs into underserved areas and developing countries, Jeff wanted to bring these tools into the neighborhoods and communities in Detroit that could really use them—which, for a white kid from New York, wasn’t exactly an easy sell.
Jeff knew he needed engagement from the community, and he found a great partnership with the Church of the Messiah. Pastor Barry Randolph became a great advocate of the project, even offering space in the church basement to make it a reality. Jeff has continued to work directly with the leadership there, and the Mt. Vernon Makerspace has blossomed.
Jeff’s experience is proof that the democratizing of tools and technology is possible if we all work together. He demonstrated that makerspaces can succeed anywhere there is a committed community, even in a church basement.
Creating a Makerspace
Over the past few years, I’ve seen and visited dozens of these spaces. I’ve seen some of them fail, but most of them flourish. In every instance, I always make a point to ask organizers and community leaders what makes a successful makerspace. What goes into it? What are the ingredients? What is the special sauce?
I’ve received a number of insightful responses, but Jeff’s description seemed particularly useful. He told me it’s a combination of people, space, and tools. Of those three, the people are the most important. Once you have the people, the other two become straightforward.
Fortunately, it’s easier than ever to get your own makerspace off the ground. A quick Google search of “how to make a makerspace” yields dozens of results. There are guides and examples, spanning everything from school-based makerspaces to business models for makerspaces. Whatever direction you want to go, there are blueprints to building it out.
- Step 1: People In each case, Jeff organized the people long before they ever had a space to inhabit or tools to use. Sometimes it only takes sending an email out to a group of friends; other times it means building relationships with community leaders such as church organizers or school officials. If you’re starting from scratch in your area, you can employ a lot of the same techniques we mentioned in Chapter 2, “DIT (Do-It-Together),” like using Meetup (meetup.com) or finding similar interest groups to help build your local maker posse.
- Step 2: Space After you have a foundation of community support, the next decision is to start scouting out a potential location. If we’ve learned anything in the past few years, it’s that just about any place can be used as a makerspace. There’s been a surge in libraries evolving into makerspaces and in makerspaces finding their way into schools, or just neighborhood garages. The space should reflect the needs of the people who will be using it.
- Depending on your goals and community, it doesn’t have to be a standalone space. As with Jeff’s experience with the Church of the Messiah, you might be better off tapping into an existing resource like a museum or library.2
- Step 3: Tools The truth is, for many spaces, the right tools are the ones that you can get your hands on. Many makerspaces have found success advertising themselves as places to which people in the community can donate their old tools to give them a second life. Others, like Artisan’s Asylum, have created a model that allows for members to donate tools and machines in return for a discounted membership fee. Jeff recalled that in the early days of NYC Resistor, the community decided that they really needed a laser cutter, so a number of them chipped in to buy one. Jeff told me that it was one of the best investments of his life, and one of the driving forces for early MakerBots.
- As the tools continue to become more affordable, the upfront financial investment will continue to decline. Especially when you’re spreading the cost over a community of excited users, they will more than pay for themselves in enjoyment and learning.
- Step 4: Administrative Stuff Not far down the path of starting your own makerspace, you run into the big administrative issues: insurance, liability, membership dues, etc. Luckily, you’re not reinventing the wheel. Groups like Artisan’s Asylum have already done a lot of the heavy lifting in that department, and many of those spaces are eager to share what they’ve learned. Ask a nearby makerspace, or makerspace model you admire, if they have any tips or resources before you go about the process of creating a space yourself.
Tool-Lending Libraries
All these new models of maker- and hackerspaces are great, but they do fail to address the obvious question that arises when you talk about access to tools: what if you need the tools at home?
After all, the romantic idea of the maker culture is garage creation. Some projects, like home remodeling or modification, are inextricably linked to a specific place. Other projects are just too big to get out from your backyard, like Doug and Kay Jackson’s re-creation of an 1894 wooden submarine called the Argonaut Jr.3 They had built the entire plywood and epoxy contraption—14 feet long, big enough for two people and multiple scuba tanks—in their front yard in Tulsa, Oklahoma. It didn’t move from there until they were ready for a test run in a nearby lake. It’s hard to imagine dragging something that large into a community space every day. And there are probably a million other projects and reasons that you need to use a specific tool at your house or somewhere outside of a makerspace.
One emerging option for home-based projects is tool-lending libraries, which operate just like public book-lending libraries. Still an infant idea and concept, there are fewer than fifty of these tool-lending libraries scattered around the country. They differ somewhat in size and structure—some are public whereas some are privately owned. But they’re all aiming at a similar target, and each is creating a vital resource in their respective maker communities.
Luckily, one of the oldest, the Berkeley Tool Lending Library, was right in my neighborhood. It was created in 1979 and, despite my ignorance, has been a useful and beloved asset to the community ever since. Peter McElligott, the primary staff member of the library from 1979 through 1999, recounted some of his experiences of the tool library in an interview with Jonathan Gray (http://bit.ly/1anSiXz). Here is how McElligott described the diverse uses the patrons have found for the tools and library:
People are always doing stuff in their homes. A lot of people have ongoing projects and you see them every few days for a month or two, and they’re gone and you don’t see them for six months or a year and then they’re back doing something else…. There are a certain number of street sellers and people who make craft items that they sell. There was one guy who made African instruments—kalimbas, shakers, and stuff out of gourds. He sells them at local craft fairs. He’s been using the tools for years. There are various artists that use the tools for their work. There are a lot of people who I have no idea what they are doing.
I had to check it out for myself. I casually mentioned my plans to visit the tool-lending library to a friend of mine, Stacy, who also lives in Berkeley. Unfortunately, she was busy at work so she couldn’t join me, but she did ask me what I was building.
“Oh, nothing in particular,” I responded. “I’m just really interested in the concept and wanted to check it out. Why? Have you heard of it?”
“Of course,” she said, matter-of-factly. “I use it all the time.”
“Really?” I was curious. I knew Stacy was a handy person and was always working on something, but I was still surprised to hear that she used the tool library. As it turned out, she actually was a tool library regular. She finds herself there every few weeks, everyone knows her name, and her picture is even on the website! She’s used the tools to make shelves, build bookcases, and fell trees in her backyard. Her latest project is a canoe paddle she’s crafting in her backyard.
I was amazed. Even though I had read that the library was used heavily, for some reason hearing it from Stacy made it seem more accessible.
When I finally made my trip to the library, I ended up arriving early, about ten minutes before their opening time of noon. I wasn’t the only one there, as two other cars had pulled up to the library door. A man got out of his truck and started unloading a number of different tools. One by one, he set a saw, a hoe, a gardening rake, and numerous other tools next to the door of the still closed library. I asked him what he was building, and he excitedly explained how he had turned most of his backyard into a raised-bed garden. He called me over to the truck, pulled out his phone, and showed me pictures of his new home agriculture operation. He couldn’t hide his excitement and sense of accomplishment. It was infectious.
By the time the library opened, a few more people had shown up and it was abuzz with activity. It wasn’t what I had imagined. I think I had pictured more of a traditional library, with tools on the shelves instead of books. With the doors now wide open, it revealed the library to be just a desk with a long storage shed behind it. The shed was filled with tools: overflowing shelves, packed drawers, and something hanging on every square inch of the wall. The one staff member began rolling out wheelbarrows and opening other doors to sheds behind me that I hadn’t noticed. The person from the other car set a large table saw down on the checkout desk. Another patron waited at the desk for someone from the staff to help him. As I looked around the library and snapped photos of the sight, the man in line noticed my curiosity and commented, “You’d be amazed how much they have tucked into the nooks and crannies back there. They’ve got everything.”
More important, it has a staff that can help you find exactly the tool you need. The Berkeley Tool Lending Library is a vibrant community resource. For a new maker—someone who needs access but isn’t ready for ownership—this is an incredible gift.
Start Your Own Tool-Lending Library
My experience in Berkeley reminded me how lucky I was to be living in the Bay Area, where I have easy access to places like TechShop, Noisebridge, and the Berkeley Tool Lending Library. I had been living in a bubble. This was the easiest place in the world for someone like me, with no experience, to get started making. With a little initiative, the infrastructure was already in place for me to learn. But what about cities that didn’t have a TechShop or Noisebridge or a city-funded tool-lending library?
I started doing research into other tool-lending libraries around the country and how maker communities were self-organizing outside of the Bay Area. One of the first people I spoke with was Gene Homicki, one of the organizers of the West Seattle Tool Library. Gene’s background is in technology. He owns and runs his own technology consulting business, which offers services ranging from custom software development to general technology strategy. Gene’s other passion, as he explained to me, is sustainability, which spurred his interest in the tool-lending library. Inspired by what was happening in other cities around the concept of collaborative consumption, Gene and a few others decided to take things into their own hands. After putting the idea for a tool-lending library out to local sustainability blogs, they got an incredibly positive response. Before they knew it, the idea had a lot of momentum and a number of excited volunteers. Even though they had a lot of enthusiasm, there were still a number of hurdles that they needed to clear: insurance and liability issues, figuring out an inventory management system, building a bigger community around the library, and finding a physical space for it.
Pretty soon, the pieces began to fall into place. Gene—seeing an opportunity to combine his tech skills and passion for sharing and making—began working on a software system to manage the tool inventory. By the time the West Seattle Tool Library opened to the public, Gene had created an incredibly robust system to manage and automate not only the tool inventory, but also the membership, tool maintenance, and check-out times. By Gene’s own admission, the West Seattle Tool Library boasts the most sophisticated system in the country, which supports their 1,500 tools and 400 members.
This turns out to be great news for all of us because Gene decided to offer the software to other tool-lending libraries to use. The service is currently in place at the Vancouver Tool Library, with others planning to adopt it soon. You can learn more about the specifics on their website, localtools.org.
Starting a tool library is more than just creating a collection of tools—it’s organizing a maker community. It’s a perfect stepping-stone to creating a full-on makerspace. You can get started with just the tools sitting around in your garage, and collect more as funds allow or others donate to your cause. Combined with organizing a maker meetup, setting up a basic tool-lending library is a great first step to catalyzing the maker community in your area.
Sharing as a Resource vs. Sharing as a Strategy
Of course, starting a makerspace or a tool-lending library is great for the broader maker community, but how does it help you? How does it get you any closer to your own maker goals?
If you’re still figuring out what your big project will be, spending time building the maker infrastructure in your community is a great way to build a strong foundation for future projects. As we’ll explore more in Chapter 7, “One to One Thousand,” these spaces and communities are the fertile ground from which ideas can sprout.
It’s also important to think about these sharing models as a strategy to help defray costs for the tools you need. Like the early NYC Resistor members who shared space and all chipped in for a laser cutter, the communal use allowed MakerBot and dozens of other projects to get off the ground. Artisan’s Asylum allows members to donate tools to the space in return for reduced membership costs. Using the different sharing methods might just be the best way to afford that tool you’ve always wanted or needed.
But What Tools? Finding a Maker Personal Trainer
I would have been completely lost inside TechShop (and probably wouldn’t have come back out of sheer intimidation) if it weren’t for a conversation with Zack Johnson, my designated Dream Coach at TechShop. As a new member, I was encouraged to set up a meeting with a Dream Coach to better understand and define my goals. With the preface that I was a complete beginner, I explained the OpenROV project to him, along with the bombshell news that we hoped to have it all working and ready to go before World Maker Faire in New York City (only a few months away).
“So do you think it’s possible?” I asked with a slightly concerned, yet curiously hopeful, look on my face.
“Honestly, not really,” replied Zack. “But I do think we’re going to give it a good shot and we’re definitely going to learn a lot. Here’s how we can think about it…”
Zack’s background was in electrical engineering, and like all the Dream Coaches at TechShop, he was handy with just about every tool there. If he didn’t know how to do something, he knew exactly who would. Until that point, OpenROV had been mostly the brainchild of Eric, but his mechanical engineering wizardry could only get us so far. In addition, my lack of technical-anything was not contributing at all. To cross the gap to a working prototype, we needed an outside perspective and I needed some basic education. Zack understood both of those challenges, and together we mapped out a plan.
During that first meeting, in addition to the background of the project goals and technical issues (as best as I could understand them at the time), I also asked him what skills and tools I needed to learn. His guidance was exactly what I needed. Zack didn’t just tell me what needed to be done in terms of tool training and classes, he told me why. He reinforced the importance of the process and assured me that it would be just as rewarding as the end product. We broke the action items into two categories: classes I should take, and workflow for having a working OpenROV prototype for Maker Faire. The class schedule included Intro to the Laser Cutter, Basic Electronics, CNC (at the time, I had no idea what that stood for), CAD Software, Arduino, Silicone Moldmaking, and a few others. As excited as I was about the classes, the workflow plan really helped to instill some much needed confidence. Even though Zack hadn’t had the chance to talk to Eric, his methodical thought process of how to tackle the challenge was helpful for me to hear. It got me thinking about how the different aspects of the robot could be separated into understandable and manageable pieces.
A lawyer once told me that the main purpose of law school was to get you to think like a lawyer. I suspect a similar truism exists for engineers based on the way Zack explained the process of trying to solve the ROV issues with limited information. For a new maker, it’s intimidating to walk into a shop and survey all the equipment. It becomes a lot more digestible with a short list of specific tools to focus on first. Zack’s list took the weight of uncertainty off my shoulders and pointed me in a direction to go.
Even if there isn’t someone with a formal title of “Dream Coach,” it doesn’t mean that there aren’t experienced makers who are willing to give some guidance. Often due to their grassroots organizational structure, many hackerspaces don’t have a program or system to help and welcome new makers—it’s almost always an issue of resource constraints, never malevolence. However, it’s easy to take your education into your own hands.
Asking for guidance or project advice is a great way to get to know the people and the tools at your local maker community. Once you locate a nearby makerspace or maker meetup, finding the right experienced maker isn’t too challenging. Ask around for a veteran member, and hint that you’re looking to get some advice about a project you’re working on.
I suggest asking for a list of five classes, skills, or tools that you should focus on. I’ve found that five seems to be pretty close to the right number; it’s at least enough to give you a broad swath of experiences and certainly enough to keep you busy for a few months of part-time work. Also, ask for introductions around the space to experts (or “know-enoughs”) in the areas you’re hoping to learn. After all, the knowledge and know-how resides with the people, not in the tools themselves.
It’s worth restating: the goal is not to master any of these tools. The aim is to expose you to the potential possibilities by understanding the different resources—and most of all, to begin to build your own network and your own unique maker community.
Let Your Workshop Build Itself
Despite how wonderful and effective the new shared maker resources are, there is still something magical about your own personal workshop. I didn’t realize it until I had a space of my own.
It was one of those moments that catches you off guard. My workshop, the OpenROV HQ, had evolved into a wonderful little makerspace of its own. It’s located in a small R&D laboratory in Berkeley, California, within walking distance of where my boat is docked in the San Francisco Bay. It’s full of tools now: a full electronics bench, screwdrivers, wrenches, saws, epoxies, glues, and acrylic. It has everything we need to build underwater robots (except an expensive laser cutter, which we still use at TechShop, but we’ll even have one of those soon).
I was there one evening by myself, staying late at the workshop to get some writing done, when the reality of having my very own workspace actually set in. In the process of writing about the different collaborative models, I realized that despite never intending to maintain my own space, I had created a workshop that was uniquely suited to my particular flavor of making, and I absolutely loved it.
Utilizing the various sharing models—makerspaces, borrowing from friends, lending libraries—is the right way to get started. There’s little in the way of capital investment, maintenance can be shared, and most important, it’s a way to meet and get to know the maker community in your area (and around the world). However, the rise of these new collaborative spaces and options isn’t eliminating the elaborate and celebrated workshops. In fact, as more people discover the joy of making, makerspaces become more crowded, and tools like 3D printers become even more affordable and easy to use. It seems that the personal workshop will see a renaissance of its own.
A year prior, the space that OpenROV HQ occupies would have been no use to me. Quite literally, it was a waste of space. But now, having spent time learning and tinkering, my workshop seemed like an extension of my maker self—a place where I could make progress on and complete projects as well as push the OpenROV prototypes forward at the fastest pace possible. The space adapted to me as much as I adapted to it.
It wasn’t always one location, either. It started at a table at TechShop in San Francisco when I realized I would need acrylic glue for the OpenROV and I didn’t have any. It became a bag of materials and tools I knew I would need (and that I could carry). This bag became the solution to inevitable future problems. My experiences, the struggles and the mistakes, were the guide on what to include. Pretty soon, this “space” spilled over into Eric’s garage in Cupertino. The space became our own, filled with everything we would need or might need on our mission to make a better underwater robot. After our Kickstarter campaign, the garage began to fill with boxes of robot parts for kits we were sending all over the world. A section of the garage became the shipping department, with all of our boxes, a scale, and shipping materials. It wasn’t long before Eric’s roommates had had enough, and we went in search of a bigger home. We found an ideal location in Berkeley. It was the right amount of space and conveniently located right on the water in an area called Aquatic Park, where we could test our robots right outside the building. We organized the space to suit our needs, accumulating more tools and each time building a better system for keeping track of what we had. Our space, shown in Figure 4-3, is as much a work in progress as the robot itself. They are a reflection of each other as well as an indicator of our growth as makers.

Figure 4-3: Our space
Before you go out and build an addition to your home or clear out the garage to accommodate a workshop, here are a few things to consider:
- Take the low road. In his book How Buildings Learn: What Happens After They’re Built (Penguin Books, 1995), Stewart Brand identifies a particular type of building that he calls “low road.” He describes the cheap and flexible spaces that are often overlooked, such as shipping containers, garages, and old warehouses. These are the types of buildings and structures where no one cares about punching a hole in the wall. The result of this “low road” mentality creates a space of maximum adaptability. As you grow as a maker, this flexibility to change is all important.
- Create a Makerhood. Our OpenROV space is great. It’s perfect for us. However, we still rely on the laser cutters and CNC machines at TechShop. The reason we’re able to survive in our own space is not because we have everything we need, but because we’re part of a growing network of nearby makers and maker businesses. It’s the larger tools at TechShop, the advice and support of friends we’ve made through the Hardware Startup meetup, and the screw-sorting volunteers (basically a group of our friends). It’s our Makerhood.
- It goes beyond neighborhoods, too. Entire cities are getting on-board with this idea of making things again. Here in the Bay Area, a nonprofit organization called SF:Made is organizing and lobbying to make the city a more desirable and effective place to manufacture. After successfully supporting and elevating the local community, the group is now shifting its focus to helping other cities and organizations pursue similar initiatives.
- Making doesn’t happen in a vacuum; it’s the product of a supportive community. Another benefit of slowly growing your own workshop is that you’ll spend more time integrating and using the community resources.
- Take your time, maintain the tools, and stay organized. Especially if you’re brand new to making, don’t rush the creation of your own space. You don’t need to go out and buy a new 3D printer right away. Play the long game. The workshops with the most character are those that have evolved over the years. Acquire the tools when you need them, but approach each need as a problem you want to permanently solve. Look at each tool, even the screwdrivers and wrenches, as an investment in your evolving workshop.
- Build a system that helps you organize your materials. As a maker, you’re only as effective as the tools you can use (and, more important, find). You’d be surprised how easy it is to avoid sorting resistors because you’re not sure when you’re going to need them, only to kick yourself later when you have to dig through a pile of parts to find the one you need. Any time you put into organizing will save you later on.
Different Tools for Different Types of Makers
“Would you tell me, please, which way I ought to go from here?”
“That depends a good deal on where you want to get to,” said the Cat.
“I don’t much care where…” said Alice.
“Then it doesn’t matter which way you go,” said the Cat.
“…so long as I get somewhere,” Alice added as an explanation.
— Lewis Carroll, Alice’s Adventures in Wonderland
Knowing what tools to learn and use is a big question. Bigger than just the few pages I’ve written and certainly more complicated than having someone suggest five tools to learn (although that’s a good place to start). It always depends on what you want to make. In broad terms, it depends on what type of maker you want to become, which can bring you back to the same intimidating starting line.
I get that. I understand the need for direction, but I don’t think there’s a map. In fact, the closest thing I’ve found is more of a compass, something to hold onto when the surroundings are uncertain. It’s the idea that somewhere along this path—if only I walk far enough—I’ll find my own craft.